Posts Tagged ‘var’

Install and use personal Own Cloud on Debian Linux for better shared data security – OwnCloud a Free Software replacement for Google Drive

Thursday, August 23rd, 2018

owncloud-self-hosted-cloud-file-sharing-and-storage-service-for-gnu-linux-howto-install-on-debian

Basicly I am against the use of any Cloud type of service but as nowadays Cloud usage is almost inevitable and most of the times you need some kind of service to store and access remotely your Data from multiple devices such as DropBox, Google Drive, iCloud etc. and using some kind of infrastructure to execute high-performance computing is invitable just like the Private Cloud paid services online are booming nowdays, I decided to give a to research and test what is available as a free software in the field of Clouding (your data) 🙂

Undoubfully, it is really nice fact that there are Free Software / Open Source alternatives to run your Own personal Cloud to store your data from multiple locations on a single point.

The most popular and leading Cloud Collaboration service (which is OpenSource but unfortunately not under GPLv2 / GPV3 – e.g. not fully free software) is OwnCloud.

ownCloud is a flexible self-hosted PHP and Javascript based web application used for data synchronization and file sharing (where its remote file access capabilites are realized by Sabre/Dav an open source WebDav server.
OwnCloud allows end user to easily Store / Manage files, Calendars, Contacts, To-Do lists (user and group administration via OpenID and LDAP), public URLs can be easily, created, the users can interact with browser-based ODF (Open Document Format) word processor , there is a Bookmarking, URL Shortening service integrated, Gallery RSS Feed and Document Viewer tools such as PDF viewer etc. which makes it a great alternative to the popular Google Drive, iCloud, DropBox etc.

The main advantage of using a self-hosted Cloud is that Your data is hosted and managed by you (on your server and your hard drives) and not by some God knows who third party provider such as the upmentioned.
In other words by using OwnCloud you manage your own data and you don't share it ot on demand with the Security Agencies with CIA, MI6, Mussad … (as it is very likely most of publicly offered Cloud storage services keeps track on the data stored on them).

The other disadvantage of Cloud Computing is that the stored data on such is usually stored on multiple servers and you can never know for sure where your data is physically located, which in my opinion is way worse than the option with Self Hosted Cloud where you know where your data belongs and you can do whatever you want with your data keep it secret / delete it or share it on your demand.

OwnCloud has its clients for most popular Mobile (Smart Phone) platforms – an Android client is available in Google Play Store as well as in Apple iTunes besides the clients available for FreeBSD OS, the GNOME desktop integration package and Raspberry Pi.

For those who are looking for additional advanced features an Enterprise version of OwnCloud is also available aiming business use and included software support.

Assuming you have a homebrew server or have hired a dedidacted or VPS server (such as the Ones we provide) ,Installing OwnCloud on GNU / Linux is a relatively easy
task and it will take no more than 15 minutes to 2 hours of your life.
In that article I am going to give you a specific instructions on how to install on Debian GNU / Linux 9 but installing on RPM based distros is similar and straightfoward process.
 

1. Install MySQL / MariaDB database server backend
 

By default OwnCloud does use SQLite as a backend data storage but as SQLite stores its data in a file and is becoming quickly slow, is generally speaking slowre than relational databases such as MariaDB server (or the now almost becoming obsolete MySQL Community server).
Hence in this article I will explain how to install OwnCloud with MariaDB as a backend.

If you don't have it installed already, e.g. it is a new dedicated server install MariaDB with:
 

server:~# apt-get install –yes mariadb-server


Assuming you're install on a (brand new fresh Linux install – you might want to install also the following set of tools / services).


server:~# systemctl start mariadb
server:~# systemctl enable mariadb
server:~# mysql_secure_installation


mysql_secure_installation – is to finalize and secure MariaDB installation and set the root password.
 

2. Create necessery database and users for OwnCloud to the database server
 

linux:~# mysql -u root -p
MariaDB [(none)]> CREATE DATABASE owncloud CHARACTER SET utf8;
MariaDB [(none)]> GRANT ALL PRIVILEGES ON owncloud.* TO 'owncloud'@'localhost' IDENTIFIED BY 'owncloud_passwd';
MariaDB [(none)]> FLUSH PRIVILEGES;
MariaDB [(none)]> \q


3. Install Apache + PHP necessery deb packages
 

As of time of writting the article on Debian 9.0 the required packages for a working Apache + PHP install for OwnCloud are as follows.


server:~# apt-get install –yes apache2 mariadb-server libapache2-mod-php7.0 \
openssl php-imagick php7.0-common php7.0-curl php7.0-gd \
php7.0-imap php7.0-intl php7.0-json php7.0-ldap php7.0-mbstring \
php7.0-mcrypt php7.0-mysql php7.0-pgsql php-smbclient php-ssh2 \
php7.0-sqlite3 php7.0-xml php7.0-zip php-redis php-apcu


4. Install Redis to use as a Memory Cache for accelerated / better performance ownCloud service


Redis is an in-memory kept key-value database that is similar to Memcached so OwnCloud could use it to cache stored data files. To install latest redis-server on Debian 9:
 

server:~# apt-get install –yes redis-server

5. Install ownCloud software packages on the server

Unfortunately, default package repositories on Debian 9 does not provide owncloud server packages but only some owncloud-client packages are provided, that's perhaps the packages issued by owncloud does not match debian packages.

As of time of writting this article, the latest available OwnCloud server  version package for Debian is OC 10.

a) Add necessery GPG keys

The repositories to use are provided by owncloud.org, to use them we need to first add the necessery gpg key to verify the binaries have a legit checksum.
 

server:~# wget -qO- https://download.owncloud.org/download/repositories/stable/Debian_9.0/Release.key | sudo apt-key add –


b) Add owncloud.org repositories in separete sources.list file


server:~# echo 'deb https://download.owncloud.org/download/repositories/stable/Debian_9.0/ /' | sudo tee /etc/apt/sources.list.d/owncloud.list


c) Enable https transports for the apt install tool


server:~# apt-get –yes install apt-transport-https


d) Update Debian apt cache list files and install the pack


server:~# apt-get update


server:~# apt-get install –yes owncloud-files


By default owncloud store file location is /var/www/owncloud but on many servers that location is not really appropriate because /var/www might be situated on a hard drive partition whose size is not big enough, if that's the case just move the folder to another partition and create a symbolic link in /var/www/owncloud pointing to it …


6. Create necessery Apache configurations to make your new self-hosted cloud accessible
 

a) Create Apache config file


server:~# vim /etc/apache2/sites-available/owncloud.conf


Alias /owncloud "/var/www/owncloud/"

<Directory /var/www/owncloud/>
Options +FollowSymlinks
AllowOverride All

<IfModule mod_dav.c>
Dav off
</IfModule>

SetEnv HOME /var/www/owncloud
SetEnv HTTP_HOME /var/www/owncloud

</Directory>

b) Enable Mod_Dav (WebDAV) if it is not enabled yet


server:~# ln -sf ../mods-available/dav_fs.conf
server:~# ln -sf ../mods-available/dav_fs.load
server:~# ln -sf ../mods-available/dav.load
server:~# ln -sf ../mods-available/dav_lock.load

c) Set proper permissions for /var/www/owncloud to make upload work properly


chown -R www-data: /var/www/owncloud/


d) Restart Apache WebServer (to make new configuration affective)


server:~# /etc/init.d/apache2 restart


7. Finalize  OwnCloud Install
 

Access OwnCloud Web Interface to finish the database creation and set the administrator password for the New Self-Hosted cloud
 

http://Your_server_ip_address/owncloud/

By default the Web interface is accessible in unencrypted (insecure) http:// it is a recommended practice (if you already don't have an HTTPS SSL certificate install for the IP or the domain to install one either a self-signed certificate or even better to use LetsEncrypt CertBot to easily create a valid SSL for free for your domain


installing-OwnCloud-Web-Config-User-Pass-interface-Owncloud-10-on-Debian-9-Linux-howto

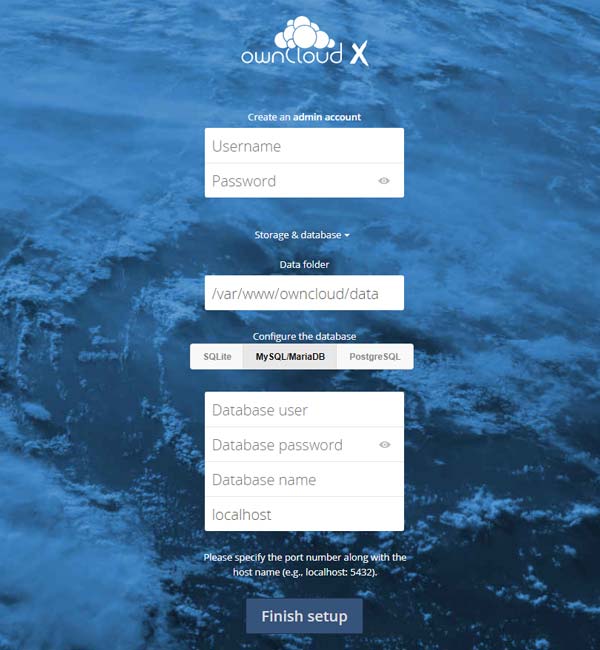
Just fill in in your desired user / pass and pass on the database user / password / db name (if required you can set also a different location for the data directory from the default one /var/www/owncloud/data.

Click Finish Setup and That's all folks!

owncloud-server-web-ui-interface

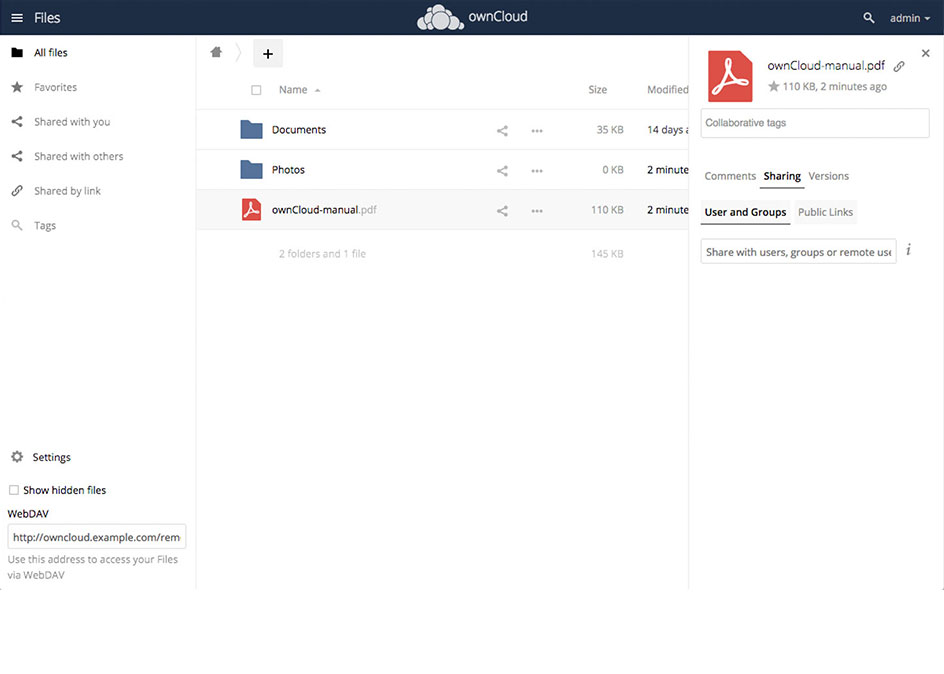
OwnCloud is successfully installed on the server, you can now go and download a Mobile App or Desktop application for whatever OS you're using and start using it as a Dropbox replacement. In a certain moment you might want to consult also the official UserManual documentation as you would probably need further information on how to manage your owncloud.

Enjoy !

Qmail redirect mail to another one and keep local Mailbox copy with .qmail file – Easy Set up email forwarding Qmail

Saturday, August 11th, 2018

Qmail redirect mail box to another one with .Qmail file dolphin artistic logo

QMail (Considered to be the most secure Mail server out there whose modified version is running on Google – Gmail.com and Mail Yahoo! and Yandex EMail (SMTP) servers, nowadays has been highly neglected and considered obsolete thus most people prefer to use postfix SMTP or EXIM but still if you happen to be running a number of qmail old rack Mail servers (running a bunch of Email addresses and Virtual Domains straight on the filesystem – very handy by the way for administration much better than when you have a Qmail Mail server configured to store its Mailboxes within MySQL / PostgreSQL or other Database server – because simple vpopmail configured to play nice with Qmail and store all user emails directly on Filesystem (though considered more insecure the email correspondence can be easily red, if the server is hacked it is much better managable for a small and mid-sized mailserver) or have inherited them from another sys admin and you wonder how to redirect a single Mailbox:

(under domain lets say domain's email  my-server1.com should forward to to SMTP domain my-server-whatever2.com (e.g. your-email-username@server-whatever1.com is supposed to forward to your-email-username2@server-whatever2.com).
To achieve it create new file called .qmail

Under the Qmail or VirtualDomain location for example:

/var/qmail/mailnames/myserver1.com/username/.qmail


e.g
 

root@qmail-server:~# vim /var/qmail/mailnames/myserver1.com/your-email-username/.qmail
&your-email-username@server-whatever1.com

your-email-username@example1.com
/home/vpopmail/domains/server-whatever2.com/your-email-username/Maildir/


!!! NOTE N.B. !!! the last slash / after Maildir (…Maildir/) is important to be there otherwise mail will not get delivered
That's all now send a test email, just to make sure redirection works properly, assuming the .qmail file is created by root, by default the file permissions will be with privileges root:root.

Note
 

That shouldn't be a problem at all. That's all now enjoy emails being dropped out to the second mail 🙂


OSCommerce how to change / reset lost admin password

Monday, October 16th, 2017

reset-forgotten-lost-oscommerce-password-howto-Os_commerce-logo.svg

How to change / reset OSCommerce lost / forgotten admin password?

The password in OSCommerce is kept in table "admin", so to reset password connect to MySQL with mysql cli client.

First thing to do is to generate the new hash string, you can do that with a simple php script using the md5(); function


root@pcfreak:/var/www/files# cat 1.php
<?
$pass=md5('password');
echo $pass;
?>


root@pcfreak:/var/www/files# php 1.php
5f4dcc3b5aa765d61d8327deb882cf99
root@pcfreak:/var/www/files#


Our just generated string (for text password password) is hash: 5f4dcc3b5aa765d61d8327deb882cf99

Next to update the new hash string into SQL, we connect to MySQL:


$ mysql -u root -p


And issue following command to modify the encrypted hash string:


UPDATE `DB`.`admin` SET `admin_password` = '5f4dcc3b5aa765d61d8327deb882cf99' WHERE `admin`.`admin_id` = 6;

Fix qmail-scanner-queue.pl: X-Qmail-Scanner-2.08st:[] cannot create /var/spool/qscan/tmp – Permission denied – Finally a working solution and what causes the error

Wednesday, July 22nd, 2015


qmail-fixing-clamdscan-errors-and-qq-errors-qmail-binary-migration-few-things-to-check-out
I've lost a whole day and was angry and irritated after moving (migrating) a Working Qmail installation in a binary form from a Debian Lenny 5.0 to a Debian 7.0 Wheezy Linux. The whole migration exercise was quite of a crazy move and I can tell you it didn't worth the effort as I lost much more time than even if I went on installing the server following Thibs Great Qmail Tutorial.

Yes I know many would say why do you still bother with an old and unsupported Qmail Mail server and not go with Postfix, the logic is correct however the whole issue is the previous installation has a number of domains already running VirtualMail hosting using VPopMail, so migrating all the old mailboxes from Qmail to Postfix are not worthy IMHO. Plus I honestly love qmail for being so stable even today (even without support). After all most of Qmail is secure enough already 🙂
And to be honest I don't so much care about security as in the old days as I know NSA, does already have access to any server on planet 🙂

Almost always when a Qmail migration happens I end up swearing and sweating and generally getting crazy, but anyways …

The overall migration of binaries went quite OK I just copied every binary and all the related libraries from the old Debian 5.0 to Debian 7.0 and installed the following long list of perl deb binaries using apt-get:
 

dh-make-perl
libalgorithm-c3-perl
libalgorithm-diff-perl
libalgorithm-diff-xs-perl
libalgorithm-merge-perl
libapparmor-perl
libapt-pkg-perl
libarray-unique-perl
libclass-accessor-chained-perl
libclass-accessor-perl
libclass-c3-perl
libclass-c3-xs-perl
libclass-factory-util-perl
libclass-inspector-perl
libclass-isa-perl
libclass-load-perl
libclass-singleton-perl
libconfig-file-perl
libconvert-binhex-perl
libcrypt-openssl-bignum-perl
libcrypt-openssl-random-perl
libcrypt-openssl-rsa-perl
libcrypt-passwdmd5-perl
libcrypt-ssleay-perl
libdata-optlist-perl
libdata-section-perl
libdate-manip-perl
libdatetime-format-builder-perl
libdatetime-format-iso8601-perl
libdatetime-format-strptime-perl
libdatetime-locale-perl
libdatetime-perl
libdatetime-timezone-perl
libdbd-mysql-perl
libdbi-perl
libdevel-symdump-perl
libdigest-hmac-perl
libdigest-sha-perl
libdpkg-perl
libemail-address-perl
libemail-date-format-perl
libencode-detect-perl
libencode-locale-perl
libenv-sanctify-perl
liberror-perl
libexporter-lite-perl
libfcgi-perl
libfile-chdir-perl
libfile-fcntllock-perl
libfile-find-rule-perl
libfile-listing-perl
libfile-which-perl
libfont-afm-perl
libhtml-form-perl
libhtml-format-perl
libhtml-parser-perl
libhtml-tagset-perl
libhtml-template-perl
libhtml-tree-perl
libhttp-cookies-perl
libhttp-daemon-perl
libhttp-date-perl
libhttp-message-perl
libhttp-negotiate-perl
libhttp-server-simple-perl
libio-multiplex-perl
libio-socket-inet6-perl
libio-socket-ip-perl
libio-socket-ssl-perl
libio-string-perl
libio-stringy-perl
libip-country-perl
liblist-moreutils-perl
liblocale-gettext-perl
liblwp-mediatypes-perl
liblwp-protocol-https-perl
libmail-dkim-perl
libmail-sendmail-perl
libmail-spf-perl
libmailtools-perl
libmath-round-perl
libmime-tools-perl
libmodule-depends-perl
libmodule-implementation-perl
libmodule-runtime-perl
libmro-compat-perl
libnet-cidr-lite-perl
libnet-cidr-perl
libnet-daemon-perl
libnet-dns-perl
libnet-http-perl
libnet-ident-perl
libnet-ip-perl
libnet-server-perl
libnet-snmp-perl
libnet-ssleay-perl
libnetaddr-ip-perl
libnumber-compare-perl
libossp-uuid-perl
libpackage-deprecationmanager-perl
libpackage-stash-perl
libpackage-stash-xs-perl
libparams-classify-perl
libparams-util-perl
libparams-validate-perl
libparse-debcontrol-perl
libparse-debianchangelog-perl
libparse-syslog-perl
libpcre-ocaml-dev
libpcre3:amd64
libpcre3-dev
libpcrecpp0:amd64
libperl-dev
libperl5.14
libpod-coverage-perl
libregexp-assemble-perl
librpc-xml-perl
librrds-perl
libsoap-lite-perl
libsocket-perl
libsocket6-perl
libsoftware-license-perl
libsub-exporter-perl
libsub-install-perl
libsub-name-perl
libswitch-perl
libsys-hostname-long-perl
libsys-syslog-perl
libtask-weaken-perl
libterm-readkey-perl
libtest-distribution-perl
libtest-pod-coverage-perl
libtest-pod-perl
libtext-charwidth-perl
libtext-glob-perl
libtext-iconv-perl
libtext-template-perl
libtext-wrapi18n-perl
libtie-ixhash-perl
libtimedate-perl
libtry-tiny-perl
liburi-perl
libwww-mechanize-perl
libwww-perl
libwww-robotrules-perl
libxml-namespacesupport-perl
libxml-parser-perl
libxml-sax-base-perl
libxml-sax-expat-perl
libxml-sax-perl
libxml-simple-perl
libyaml-perl
libyaml-syck-perl
perl
perl-base
perl-doc
perl-modules
spamassassin
spf-tools-perl


I've also installed with apt-get daemontools and daemontools-run ucspi and some others to get all the necessery binaries qmail needs the whole list of apt installed packages is here

I've also copied all the old binaries from /usr/local/lib from server1 to server2, some others from /usr/local/share and /usr/share as well as /usr/lib/courier /usr/lib/courier-authlib /usr/local/libexec /usr/local/sbin also had to link a couple of libraries such as /usr/lib/libcrypto* , link  /usr/lib/libperl.so.5.10 to /usr/lib/libperl.so.5.14 and copy /usr/lib/libltdl.so.3 and few others which i don't exactly remember.

Well anyways once I've copied everything Qmail looked fined except I had a couple of permission issues and had to clean up and fix the queue with qfixq, I've also used qmail-scanner*/contrib/test_installation.sh script to test whether qmail-scanner was running fine, e.g.:
 

./test_installation.sh -doit


As well as


qmr_inst_check


script, thanks to which I've captured and resolved few of permission problems 

Finally I've stuck upon this shitty errors (appearing) in /var/log/syslog and /var/log/messages


Jul 21 22:04:19 vps186637 qmail-scanner-queue.pl: X-Qmail-Scanner-2.08st:[] cannot create /var/spool/qscan/tmp – Permission denied
Jul 21 22:08:27 vps186637 qmail-scanner-queue.pl: X-Qmail-Scanner-2.08st:[] cannot create /var/spool/qscan/tmp – Permission denied
Jul 21 22:08:38 vps186637 qmail-scanner-queue.pl: X-Qmail-Scanner-2.08st:[] cannot create /var/spool/qscan/tmp – Permission denied
Jul 21 22:11:17 vps186637 qmail-scanner-queue.pl: X-Qmail-Scanner-2.08st:[] cannot create /var/spool/qscan/tmp – Permission denied
Jul 21 22:16:09 vps186637 qmail-scanner-queue.pl: X-Qmail-Scanner-2.08st:[] cannot create /var/spool/qscan/tmp – Permission denied
Jul 21 22:19:15 vps186637 qmail-scanner-queue.pl: X-Qmail-Scanner-2.08st:[] cannot create /var/spool/qscan/tmp – Permission denied
Jul 21 22:38:59 ns2 qmail-scanner-queue.pl: X-Qmail-Scanner-2.08st:[] cannot create /var/spool/qscan/tmp – Permission denied
Jul 21 22:42:33 ns2 qmail-scanner-queue.pl: X-Qmail-Scanner-2.08st:[] cannot create /var/spool/qscan/tmp – Permission denied
Jul 21 22:43:49 ns2 qmail-scanner-queue.pl: X-Qmail-Scanner-2.08st:[] cannot create /var/spool/qscan/tmp – Permission denied
Jul 21 22:46:05 ns2 qmail-scanner-queue.pl: X-Qmail-Scanner-2.08st:[] cannot create /var/spool/qscan/tmp – Permission denied
Jul 21 22:50:40 ns2 qmail-scanner-queue.pl: X-Qmail-Scanner-2.08st:[] cannot create /var/spool/qscan/tmp – Permission denied
Jul 21 22:53:08 ns2 qmail-scanner-queue.pl: X-Qmail-Scanner-2.08st:[] cannot create /var/spool/qscan/tmp – Permission denied


There is plenty of things written about this:
 

qmail-scanner-queue.pl: X-Qmail-Scanner-2.08st:[] cannot create /var/spool/qscan/tmp – Permission denied


But all written is too obscure and too old already somewhere between 2004 and 2010, I've been digging through Gentoo Forums, Fedora Debian and other Linux installs and everyone used to be pointing a permission issue with /var/spool/qscan/ said theoretically to be causing the error, however all looked perfectly fine with my /var/spool/qscan , e.g.:


roo@ns2:/usr/local/src# ls -ld /var/spool/qscan/
drwxr-s— 6 qscand qscand 4096 Jul 21 23:07 /var/spool/qscan/


ls -al /var/spool/qscan/
total 244904
drwxr-s— 6 qscand qscand      4096 Jul 21 23:07 .
drwxr-xr-x 4 root   root        4096 Jul 20 21:17 ..
drwxrwx— 5 qscand qscand      4096 Oct 12  2011 archives
-rwxr-x— 1 qscand qscand      1434 Oct 12  2011 log-report.sh
-rw——- 1 qscand qscand 249731919 Jul 21 23:11 qmail-queue.log
-rw——- 1 qscand qscand    398225 Oct 28  2011 qmail-queue.log.1
-rw-rw—- 1 root   qscand        74 Jul 21 23:07 qmail-scanner-queue-version.txt
lrwxrwxrwx 1 root   qscand        16 Jul 21 23:07 qscan -> /var/spool/qscan
drwxrwx— 5 qscand qscand      4096 Oct 12  2011 quarantine
-rw-r—– 1 root   qscand     12288 Jul 21 23:07 quarantine-events.db
-rw-r—– 1 qscand qscand     10443 Oct 12  2011 quarantine-events.txt
-rw-rw—- 1 qscand qscand    580033 Jul 21 23:07 quarantine.log
-rw-r—– 1 qscand qscand      2739 Oct 12  2011 settings_per_domain.txt
drwxr-x— 3 qscand qscand      4096 Jul 21 23:11 tmp
drwxrwx— 5 qscand qscand      4096 Oct 12  2011 working


Some suggested that /var/spool/qscan should be owned by qscand:clamav instead so I tried this but it didn't help,
others recommended adding clamav groupid into qscand's but this didn't help either:
 

root@ns2:/usr/local/src# grep -i clamav /etc/group
qscand:x:163:clamav,vpopmail
clamav:x:105:


Besides that I was getting also this shitty error:


Jul 21 20:05:42 vps186637 qmail-scanner-queue.pl: X-Qmail-Scanner-2.08st:[ns2143750194279012466] clamdscan: corrupt or unknown clamd scanner error or memory/resource/perms problem – exit status -1/72057594037927935
Jul 21 20:06:51 vps186637 qmail-scanner-queue.pl: X-Qmail-Scanner-2.08st:[ns2143750201179013125] clamdscan: corrupt or unknown clamd scanner error or memory/resource/perms problem – exit status -1/72057594037927935
Jul 21 20:15:42 vps186637 qmail-scanner-queue.pl: X-Qmail-Scanner-2.08st:[ns214375025407906015] clamdscan: corrupt or unknown clamd scanner error or memory/resource/perms problem – exit status -1/72057594037927935
Jul 21 20:16:06 vps186637 qmail-scanner-queue.pl: X-Qmail-Scanner-2.08st:[ns2143750256579011980] clamdscan: corrupt or unknown clamd scanner error or memory/resource/perms problem – exit status -1/72057594037927935
Jul 21 20:18:54 vps186637 qmail-scanner-queue.pl: X-Qmail-Scanner-2.08st:[ns2143750273479014847] clamdscan: corrupt or unknown clamd scanner error or memory/resource/perms problem – exit status -1/72057594037927935
Jul 21 20:21:03 vps186637 qmail-scanner-queue.pl: X-Qmail-Scanner-2.08st:[ns2143750286379028491] clamdscan: corrupt or unknown clamd scanner error or memory/resource/perms problem – exit status -1/72057594037927935
Jul 21 22:07:47 vps186637 qmail-scanner-queue.pl: X-Qmail-Scanner-2.08st:[ns2143750926779010097] clamdscan: corrupt or unknown clamd scanner error or memory/resource/perms problem – exit status 512/2


All the time in logs, so I thought something might be wrong with clamdscan and followed and tried some suggestions from qms1.net as described here, however none of the fixes described there worked for me …

I also tried to reinstall clamav from source using a bit of modified version of this tutorial

This didn't help either … I saw some suggestions online that the permission issues are caused by some wrong clamd.conf and freshclamd.conf configuration options – failing clamdscan, but this didn't work either. I also tried to remove clamdscan and substitute it with clamscan  as a suggested workaround but this didn't work either …

I spend about 6 hours trying to catch what is causing this issues so finally I went on and re-installed bigger part of Qmail using Thibs tutorial over the old installation.

I've also tried in mean time multiple time to rebuild qmail scanner database with:
 

setuidgid qscand /var/qmail/bin/qmail-scanner-queue.pl -g


Played around with permissions in /etc/clamav e.g.


chown -R qscand:clamav /var/log/clamav /var/lib/clamav /var/run/clamav
chown qscand:qscand /etc/clamav/freshclam.conf


Created:

/etc/cron.daily/qmail-scanner with following content


cat /etc/cron.daily/qmail-scanner
setuidgid qscand /var/qmail/bin/qmail-scanner-queue.pl -z


However in /var/log/qmail/qmail-smtpd/current and /var/log/qmail-send/current I continously got:

Qmail 451 qq temporary problem (#4.3.0) error

Interestingly during looking for a solution to the 451 qq temporary problem and:

status: qmail-todo stop processing asap / status: exiting – I've stumbled to my own blog post here 🙂


Finally, I tried to reinstall qmail-scanner and in mean time update it to  Version: 2.11 – st – patch – 20130319
Just to realized something was wrong with suidperl, e.g. in Debian 7.0.* Wheezy perl-suid binary is no longer in repositories so only way to have suidperl there is either to re-compile perl from source manually which is too much work and I think in most cases not worthy the effort or to use a small suid-wrapper:
 

#include <unistd.h>
#include <errno.h>
 

main( int argc, char ** argv, char ** envp )
{
              if( setgid(getegid()) ) perror( "setgid" );
              if( setuid(geteuid()) ) perror( "setuid" );
              envp = 0; /* blocks IFS attack on non-bash shells */
              system( "/usr/bin/perl", argv, envp );
              perror( argv[0] );
              return errno;
}


Create it into a file lets say suid-wrapperc and compile the file with GNU C Compiler:
 

$ gcc -o suid-wrapper suid-wrapper.c


Then move the suid-wrapper produced binary into /usr/bin/suidperl e.g.


$ mv suid-wrapper /usr/bin/suidperl


Last you will need to edit /var/qmail/bin/qmail-scanner-queue.pl


# vim /var/qmail/bin/qmail-scaner-queue.pl


And substitute


#!/usr/bin/perl -T


with:


#!/usr/bin/suidperl


Note!!! that qmail-scanner-queue.pl permissions should be suid and owned by qscand:qscand as follows:


ls -al /var/qmail/bin/qmail-scanner-queue.pl
-rwsr-sr-x 1 qscand qscand 159727 Jul 21 23:11 /var/qmail/bin/qmail-scanner-queue.pl


Finally to resolve the error I had to restart qmail via qmailctl start / stop script:


root@ns2:/var/qmail/bin# qmailctl restart
Restarting qmail:
* Stopping qmail-smtpdssl.
* Stopping qmail-smtpd.
* Sending qmail-send SIGTERM and restarting.
* Restarting qmail-smtpd.
* Restarting qmail-smtpdssl.


Finally to test emails are sent and receiver properly I used good old mail command part of bsd-mailx deb package


# mail -s "testing 12345678" testemail1234@gmail.com
asdfadf
.
Cc:


I've also tested with plain telnet to verify no errors because often the mail command doesn't return (show) errors on email sent and errors are written only in /var/log/mail.log or /var/log/qmail/* logs


# telnet localhost 25
Trying 127.0.0.1…
Connected to localhost.
Escape character is '^]'.
220 servername.localdomain.tld ESMTP
mail from: <testmail@test.com>
250 ok
rcpt to: <nospam@test.com>
250 ok
data
354 go ahead
From: Test_sender <testmail@test.com>
To: Test_receiver <nospam@test.com>
Subject: Just a stupid SMTP test


Just a test !
.
250 ok 1279384489 qp 3711
quit
221 servername.localdomain.tld
Connection closed by foreign host.

One other thing which probably helped I did was:

# qmailctl doqueue


Thanks God this time, it worked out without any QQ errors 🙂 !


How to check who is flooding your Apache, NGinx Webserver – Real time Monitor statistics about IPs doing most URL requests and Stopping DoS attacks with Fail2Ban

Wednesday, August 20th, 2014

check-who-is-flooding-your-apache-nginx-webserver-real-time-monitoring-ips-doing-most-url-requests-to-webserver-and-protecting-your-webserver-with-fail2ban

If you're Linux ystem administrator in Webhosting company providing WordPress / Joomla / Drupal web-sites hosting and your UNIX servers suffer from periodic denial of service attacks, because some of the site customers business is a target of competitor company who is trying to ruin your client business sites through DoS or DDOS attacks, then the best thing you can do is to identify who and how is the Linux server being hammered. If you find out DoS is not on a network level but Apache gets crashing because of memory leaks and connections to Apache are so much that the CPU is being stoned, the best thing to do is to check which IP addresses are causing the excessive GET / POST / HEAD requests in logged.
 

There is the Apachetop tool that can give you the most accessed webserver URLs in a refreshed screen like UNIX top command, however Apachetop does not show which IP does most URL hits on Apache / Nginx webserver. 


1. Get basic information on which IPs accesses Apache / Nginx the most using shell cmds


Before examining the Webserver logs it is useful to get a general picture on who is flooding you on a TCP / IP network level, with netstat like so:
 

# here is howto check clients count connected to your server
netstat -ntu | awk '{print $5}' | cut -d: -f1 | sort | uniq -c | sort -n


If you get an extensive number of connected various IPs / hosts (like 10000 or something huge as a number), depending on the type of hardware the server is running and the previous scaling planned for the system you can determine whether the count as huge as this can be handled normally by server, if like in most cases the server is planned to serve a couple of hundreds or thousands of clients and you get over 10000 connections hanging, then your server is under attack or if its Internet server suddenly your website become famous like someone posted an article on some major website and you suddenly received a tons of hits.


There is a way using standard shell tools, to get some basic information on which IP accesses the webserver the most with:

tail -n 500 /var/log/apache2/access.log | cut -d' ' -f1 | sort | uniq -c | sort -gr

Or if you want to keep it refreshing periodically every few seconds run it through watch command:

watch "tail -n 500 /var/log/apache2/access.log | cut -d' ' -f1 | sort | uniq -c | sort -gr"

monioring-access-hits-to-webserver-by-ip-show-most-visiting-apache-nginx-ip-with-shell-tools-tail-cut-uniq-sort-tools-refreshed-with-watch-cmd


Another useful combination of shell commands is to Monitor POST / GET / HEAD requests number in access.log :
 

 awk '{print $6}' access.log | sort | uniq -c | sort -n

     1 "alihack<%eval
      1 "CONNECT
      1 "fhxeaxb0xeex97x0fxe2-x19Fx87xd1xa0x9axf5x^xd0x125x0fx88x19"x84xc1xb3^v2xe9xpx98`X'dxcd.7ix8fx8fxd6_xcdx834x0c"
      1 "x16x03x01"
      1 "xe2
      2 "mgmanager&file=imgmanager&version=1576&cid=20
      6 "4–"
      7 "PUT
     22 "–"
     22 "OPTIONS
     38 "PROPFIND
   1476 "HEAD
   1539 "-"
  65113 "POST
 537122 "GET


However using shell commands combination is plenty of typing and hard to remember, plus above tools does not show you, approximately how frequenty IP hits the webserver


2. Real-time monitoring IP addresses with highest URL reqests with logtop


Real-time monitoring on IP addresses with highest URL requests is possible with no need of "console ninja skills"  through – logtop.


2.1 Install logtop on Debian / Ubuntu and deb derivatives Linux


a) Installing Logtop the debian way

LogTop is easily installable on Debian and Ubuntu in newer releases of Debian – Debian 7.0 and Ubuntu 13/14 Linux it is part of default package repositories and can be straightly apt-get-ed with:

apt-get install –yes logtop

b) Installing Logtop from source code (install on older deb based Linuxes)

On older Debian – Debian 6 and Ubuntu 7-12 servers to install logtop compile from source code – read the README installation instructions or if lazy copy / paste below:

cd /usr/local/src
wget https://github.com/JulienPalard/logtop/tarball/master
mv master JulienPalard-logtop.tar.gz
tar -zxf JulienPalard-logtop.tar.gz

cd JulienPalard-logtop-*/
aptitude install libncurses5-dev uthash-dev

aptitude install python-dev swig

make python-module

python setup.py install

make

make install


mkdir -p /usr/bin/
cp logtop /usr/bin/


2.2 Install Logtop on CentOS 6.5 / 7.0 / Fedora / RHEL and rest of RPM based Linux-es

b) Install logtop on CentOS 6.5 and CentOS 7 Linux

– For CentOS 6.5 you need to rpm install epel-release-6-8.noarch.rpm
 

wget http://dl.fedoraproject.org/pub/epel/6/x86_64/epel-release-6-8.noarch.rpm
rpm -ivh epel-release-6-8.noarch.rpm
links http://dl.fedoraproject.org/pub/epel/6/SRPMS/uthash-1.9.9-6.el6.src.rpm
rpmbuild –rebuild
uthash-1.9.9-6.el6.src.rpm
cd /root/rpmbuild/RPMS/noarch
rpm -ivh uthash-devel-1.9.9-6.el6.noarch.rpm


– For CentOS 7 you need to rpm install epel-release-7-0.2.noarch.rpm


links http://download.fedoraproject.org/pub/epel/beta/7/x86_64/repoview/epel-release.html
 

Click on and download epel-release-7-0.2.noarch.rpm

rpm -ivh epel-release-7-0.2.noarch
rpm –import /etc/pki/rpm-gpg/RPM-GPG-KEY-EPEL-7
yum -y install git ncurses-devel uthash-devel
git clone https://github.com/JulienPalard/logtop.git
cd logtop
make
make install


2.3 Some Logtop use examples and short explanation


logtop shows 4 columns as follows – Line number, Count, Frequency, and Actual line


The quickest way to visualize which IP is stoning your Apache / Nginx webserver on Debian?


tail -f access.log | awk {'print $1; fflush();'} | logtop


logtop-check-which-ip-is-making-most-requests-to-your-apache-nginx-webserver-linux-screenshot

On CentOS / RHEL

tail -f /var/log/httpd/access_log | awk {'print $1; fflush();'} | logtop


Using LogTop even Squid Proxy caching server access.log can be monitored.
To get squid Top users by IP listed:


tail -f /var/log/squid/access.log | awk {'print $1; fflush();'} | logtop


logtop-visualizing-top-users-using-squid-proxy-cache
 

Or you might visualize in real-time squid cache top requested URLs
 

tail -f /var/log/squid/access.log | awk {'print $7; fflush();'} | logtop


visualizing-top-requested-urls-in-squid-proxy-cache-howto-screenshot


3. Automatically Filter IP addresses causing Apache / Nginx Webservices Denial of Service with fail2ban
 

Once you identify the problem if the sites hosted on server are target of Distributed DoS, probably your best thing to do is to use fail2ban to automatically filter (ban) IP addresses doing excessive queries to system services. Assuming that you have already installed fail2ban as explained in above link (On Debian / Ubuntu Linux) with:
 

apt-get install –yes fail2ban


To make fail2ban start filtering DoS attack IP addresses, you will have to set the following configurations:
 

vim /etc/fail2ban/jail.conf


Paste in file:
 

[http-get-dos]
 
enabled = true
port = http,https
filter = http-get-dos
logpath = /var/log/apache2/WEB_SERVER-access.log
# maxretry is how many GETs we can have in the findtime period before getting narky
maxretry = 300
# findtime is the time period in seconds in which we're counting "retries" (300 seconds = 5 mins)
findtime = 300
# bantime is how long we should drop incoming GET requests for a given IP for, in this case it's 5 minutes
bantime = 300
action = iptables[name=HTTP, port=http, protocol=tcp]


Before you paste make sure you put the proper logpath = location of webserver (default one is /var/log/apache2/access.log), if you're using multiple logs for each and every of hosted websites, you will probably want to write a script to automatically loop through all logs directory get log file names and automatically add auto-modified version of above [http-get-dos] configuration. Also configure maxtretry per IP, findtime and bantime, in above example values are a bit low and for heavy loaded websites which has to serve thousands of simultaneous connections originating from office networks using Network address translation (NAT), this might be low and tuned to prevent situations, where even the customer of yours can't access there websites 🙂

To finalize fail2ban configuration, you have to create fail2ban filter file:

vim /etc/fail2ban/filters.d/http-get-dos.conf


Paste:
 

# Fail2Ban configuration file
#
# Author: http://www.go2linux.org
#
[Definition]
 
# Option: failregex
# Note: This regex will match any GET entry in your logs, so basically all valid and not valid entries are a match.
# You should set up in the jail.conf file, the maxretry and findtime carefully in order to avoid false positives.
 
failregex = ^<HOST> -.*"(GET|POST).*
 
# Option: ignoreregex
# Notes.: regex to ignore. If this regex matches, the line is ignored.
# Values: TEXT
#
ignoreregex =


To make fail2ban load new created configs restart it:
 

/etc/init.d/fail2ban restart


If you want to test whether it is working you can use Apache webserver Benchmark tools such as ab or siege.
The quickest way to test, whether excessive IP requests get filtered – and make your IP banned temporary:
 

ab -n 1000 -c 20 http://your-web-site-dot-com/

This will make 1000 page loads in 20 concurrent connections and will add your IP to temporary be banned for (300 seconds) = 5 minutes. The ban will be logged in /var/log/fail2ban.log, there you will get smth like:

2014-08-20 10:40:11,943 fail2ban.actions: WARNING [http-get-dos] Ban 192.168.100.5
2013-08-20 10:44:12,341 fail2ban.actions: WARNING [http-get-dos] Unban 192.168.100.5

Linux: /var/log/wtmp – No such file or directory quick fix and why it might be missing on a server

Thursday, May 4th, 2017

fix-var-log-wtmp-btmp-no-such-file-or-directory-linux_last_command-howto-quick-fix

If you have to occasionally log  into some client old inherited (not installed by you) Linux servers on and just out of curiosity and for security sake dediced do a quick security (last user login) evaluation, e.g. issued the
last command just to find out you get the error:

last: /var/log/wtmp: No such file or directory

Perhaps this file was removed by the operator to prevent logging last info.

Then this might be a sure indicator that some malicious script kiddie (hax0r) activity has been run over the server or the ex-system administrator if fired recently decided to wipe out all his login tracks among with installing some other nasty rootkit or backdoor.

Under some circumstances the error might be caused also by badly written end user rotate script bugs (like shell or perl script) bugs or by a buggy deployment of Linux OS virtual machine.
The last: /var/log/wtmp: No such file or directory error is likely to happen on Ubuntu / Debian / Redhat / CentOS Linux distributions running on a Cloud PaaS service such as Amazon EC2, some of the Cloud services vendors do choose to explicitly remove /var/log/wtmp for the reason that many of end customers are using their Linux VM servers (Xen Virtualization / OpenVZ / LXC – Linux Containers) etc. irresponsibly and hence become a victim of script kiddie attacks and the failed logins attempts logged in /var/log/wtmp grow to many gigabytes.

Even some Linux distributions or system administrators of Linux server login hosts that has to keep tens of thousands of  login records monthly or are concentrating on simplicity and on an attempt to reduce size has purposefully deleted the last login entry file /var/log/wtmp file to save space.

But anyways if you happen to be missing this file always bear in mind that you might have been a victim of intrusion and you better run chkrootkit and rkhunter

Run below commands to fix the missing /var/log/wtmp

touch /var/log/wtmp
chmod 0664 /var/log/wtmp
chown root:utmp /var/log/wtmp

On some Linux distributions such as Ubuntu and Fedora you might also want to create /var/log/btmp (which is used to log failed login attempts to server)

touch /var/log/btmp
chmod 0664 /var/log/btmp
chown root:utmp /var/log/btmp

Once the files are created the last command will start logging server in logins and logouts as it is supposed to be again, e.g.:
 

linux:~# last -15
root pts/0 192.168.0.15 Fri May 5 16:41 still logged in


This article was inspired by a prior article found on root.bg the site is in Bulgarian so unfortunately you might not be able to read it, but as a content and concept it is pretty similar to www.pc-freak.net, actually the site author Nikolay Nikolov (known in Internet Relay Chat IRC under the pseudonym Joni-B, happened to be an old friend from youth geek IT years 🙂

Enjoy

Briefly unavailable for scheduled maintenance. Fix WordPress after interrupted upgrade

Thursday, March 2nd, 2017

briefly-unavaiable-for-a-scheduled-maintenance-wordpress-website-fix-howto_1

I've recenty tried Update my WordPress blog sites and being unattentive I've selected all the plugins possitble for Upgrade by checking the "Select All" check box on the Update dialogs and almost automatically int he hurry pressing Update button however out of a sudden I've realized I could screw up my websites brutally as some of the plugins to upgraded might be lacking 100% compitability with their prior versions.

I've made a messes out of my blog many times during upgrades because of choosing to upgrade the wrong not 100% compatible plugins and I know well how painful and hard to track it could be a misbehaving incompatible plugin or how ot could cause a severe sluggishness to blog which automatically reflects on how well the website search engine ranked in Google / Yahoo / Bing indexed etc.

Thus as an almost unconcsious reaction to prevent myself the future troubles I've tried to cancel the update request in Firefox browser and trying to reload the Update page with a hope that I might be quick enough for the Apache / WP / MySQLbackend Update Update queries request to be delaying for processing but I was too slow and bang! I ended up with the following unpleasent message in my browser:

briefly-unavaiable-for-a-scheduled-maintenance-wordpress-website-fix-howto
Briefly unavailable for scheduled maintenance.
 

As you could guess that message caused me quite a lot of worries at hand especially since I've already break up my sites many times by doing quick unmindful reactions and the fact that there is Google Adsense ads appearing which does give me some Return on Investment cents every now and then …

It took me few minutes of research online to find what really happened and how to fix / resolve the WebSites normal operations.


So what causes the Briefly unavailable for scheduled maintenance. appears ?

When WordPress does some of its integrated maintenance jobs a plugin enable / disable or any task that has to modify crucial configurations inside the database WordPress does disable access to all end clients to itself in order to protect its sensitive data to appear to browser requestors as showing some unexpected information to end client browser could be later used by crackers / hackers or a possibly open a security hole for an attacker.

The message is wordpress generated notice and it is pretty normal for the end user to see it during the WP site installation update depending on how many plugins are installed and loaded to the site and how long it will take for the backend Linux / Windows server to fetch the archived .zips of plugins and substitute with the new ones and update the files extracting them to wp-content/plugins and updating the respective required SQL database / tables it could be showing for end users from few secs to few minutes.

However under some circumstances on Browser request timeout to remote wordpress site due to a network connectivity issue or just a bad configuration of Apache for requests timeout (or a slow remote server Apache responce time due to server Hardware / Mem overload) or a stupid browser "Stop" / cancel request like in my case you end up with the Briefly unavailable for scheduled maintenance and you can can longer access the your https://siteurl.com/wp-admin Admin Panel.

The message is triggered by a WP craeted file .maintenance inside /var/www/blog-site/ e.g. WordPress PHP scripts does check for /var/www/blog-site/.maintenance
existence and if it is matched the WP scripts does generate the Briefly unavailble … message.


How to resolve the "Briefly unavailable for scheduled maintenance. Check back in a minute" WordPress error ?

As you might guess removing the maintenance "coming soon" like message in most of the cases comes to just deleting the .maintenance file, to do so:

1. Login to remote server via FTP or SFTP
2. Locate your WP website root folder that should be something like /var/www/blog-site/.maintenance and issue:
issue something like:
 

$ rm -rf /var/www/bog-site/.maintenance


Assuming that some plugin Update .zip extraction or SQL update query did not ended being half installed / executed that should solve the error.
To check whether all is back to normal just refresh your browser pointing to the "broken" site. If it appears well you can thank God for that 🙂
If not check the apache error logs and php error logs and see which of the php scripts is failing and then try to manually fetch and unzip the WP .zip package to wp-content/plugins folder and give it another try and if God bless so it will work as before 🙂

How to prevent your WP based business in future from such nasty errors using A Staging site (test) version of your blog ?

Just run a duplicate of your website under a separate folder on your hosting and do enable the same plugins as on the primary website and copy over the MySQL / PostgreSQL Database from your Live site to the Staging, then once it is enabled before doing any crucial WordPress version updates or Plugins Update always do try the Upgrade first on your Test Staging site. If it does execute fine there in most of the cases the result should be the same on the Production host and that could solve you effors and nerves of debugging a hard to get failure errors or faulty plugins without affecting what your End users see.

If you're not hosting the WordPress install under your own hosting like me you can always use some of the public available hostings like  BlueHost or WPEngine


How to force logrorate process logs / Make logrotate changes take effect immediately

Sunday, April 10th, 2016

how-to-force-logrorate-to-process-logs-make-logrorate-changes-take-effect-immediately-log-rotate-300x299

Dealing with logrorate as admins we need to change or add new log-rorate configurations (on most Linux distributions configs are living uder
/etc/logrotate.d/
 

logrotate uses crontab to work. It's scheduled work, not as daemon, so usually no need to reload its configuration.
When the crontab executes logrotate, it will use your new config file automatically.

Most of the logrotate setups I've seen on various distros runs out of the /etc/cron.daily

$ ls -l /etc/cron.daily/logrotate 
-rwxr-xr-x 1 root root 180 May 18  2014 /etc/cron.daily/logrotate

Here is content of cron job scheduled script:

$ cat /etc/cron.daily/logrorate

#!/bin/sh /usr/sbin/logrotate /etc/logrotate.conf EXITVALUE=$? if [ $EXITVALUE != 0 ]; then /usr/bin/logger -t logrotate "ALERT exited abnormally with [$EXITVALUE]" fi exit 0

Configurations change to lograte configs takes effect on next crontab run,
but what If you need to test your config you can also execute logrotate
on your own with below ommand:


logrotate -vf /etc/logrotate.conf 

If you encounter some issues with just modified or newly added logrorate script to check out the status of last logrorate executing bunch of log-rotate scripts run on Debian  / Ubuntu etc. deb based Linux:

cat /var/lib/logrotate/status

Or on RHEL, Fedora, CentOS Linux


cat /var/lib/logrotate.status

logrotate state -- version 2


"/var/log/syslog" 2016-4-9
"/var/log/dpkg.log" 2016-4-1
"/var/log/unattended-upgrades/unattended-upgrades.log" 2012-9-20
"/var/log/unattended-upgrades/unattended-upgrades-shutdown.log" 2013-5-17
"/var/log/apache2/mailadmin.www.pc-freak.net-access.log" 2012-9-19
"/var/log/snort/portscan.log" 2012-9-12
"/var/log/apt/term.log" 2016-4-1
"/var/log/squid/access.log" 2015-3-21
"/var/log/mysql/mysql-slow.log" 2016-4-9
"/var/log/debug" 2016-4-3
"/var/log/mysql.log" 2016-4-9
"/var/log/squid/store.log" 2015-3-21
"/var/log/apache2/mailadmin.www.pc-freak.net-error.log" 2012-9-19
"/var/log/daemon.log" 2016-4-3
"/var/log/munin/munin-update.log" 2016-4-9
"/var/log/unattended-upgrades/unattended-upgrades*.log" 2013-5-16
"/var/log/razor-agent.log" 2015-2-19
"/var/log/btmp" 2016-4-1
"/var/log/squid/*.log" 2014-11-24
"/var/log/munin/munin-graph.log" 2016-4-9
"/var/log/mysql/mysql.log" 2012-9-12
"/var/log/munin/munin-html.log" 2016-4-9
"/var/log/clamav/freshclam.log" 2016-4-3
"/var/log/munin/munin-node.log" 2016-1-23
"/var/log/mail.info" 2016-4-3
"/var/log/apache2/other_vhosts_access.log" 2016-4-3
"/var/log/exim4/rejectlog" 2012-9-12
"/var/log/squid/cache.log" 2015-3-21
"/var/log/messages" 2016-4-3
"/var/log/stunnel4/stunnel.log" 2012-9-19
"/var/log/apache2/php_error.log" 2012-10-21
"/var/log/ConsoleKit/history" 2016-4-1
"/var/log/rsnapshot.log" 2013-4-15
"/var/log/iptraf/*.log" 2012-9-12
"/var/log/snort/alert" 2012-10-17
"/var/log/privoxy/logfile" 2016-4-3
"/var/log/auth.log" 2016-4-3
"/var/log/postgresql/postgresql-8.4-main.log" 2012-10-21
"/var/log/apt/history.log" 2016-4-1
"/var/log/pm-powersave.log" 2012-11-1
"/var/log/proftpd/proftpd.log" 2016-4-3
"/var/log/proftpd/xferlog" 2016-4-1
"/var/log/zabbix-agent/zabbix_agentd.log" 2016-3-25
"/var/log/alternatives.log" 2016-4-7
"/var/log/mail.log" 2016-4-3
"/var/log/kern.log" 2016-4-3
"/var/log/privoxy/errorfile" 2013-5-28
"/var/log/aptitude" 2015-5-6
"/var/log/apache2/access.log" 2016-4-3
"/var/log/wtmp" 2016-4-1
"/var/log/pm-suspend.log" 2012-9-20
"/var/log/snort/portscan2.log" 2012-9-12
"/var/log/mail.warn" 2016-4-3
"/var/log/bacula/log" 2013-5-1
"/var/log/lpr.log" 2012-12-12
"/var/log/mail.err" 2016-4-3
"/var/log/tor/log" 2016-4-9
"/var/log/fail2ban.log" 2016-4-3
"/var/log/exim4/paniclog" 2012-9-12
"/var/log/tinyproxy/tinyproxy.log" 2015-3-25
"/var/log/munin/munin-limits.log" 2016-4-9
"/var/log/proftpd/controls.log" 2012-9-19
"/var/log/proftpd/xferreport" 2012-9-19
"/var/spool/qscan/qmail-queue.log" 2013-5-15
"/var/log/user.log" 2016-4-3
"/var/log/apache2/error.log" 2016-4-3
"/var/log/exim4/mainlog" 2012-10-16
"/var/log/privoxy/jarfile" 2013-5-28
"/var/log/cron.log" 2016-4-3
"/var/log/clamav/clamav.log" 2016-4-3


The timestamp date next to each of the rotated service log is when the respective log was last rorated

It is also a handy thing to rorate only a certain service log, lets say clamav-server, mysql-server, apache2 and nginx


logrorate /etc/logrorate.d/clamav-server
logrorate /etc/logrorate.d/mysql-server
logrotate /etc/logrotate.d/nginx

Migrate Webserver and SQL data from old SATA Hard drive to SSD to boost websites performance / Installing new SSD KINGSTON 120GB hard disk on Linux

Monday, March 28th, 2016

ssd-linux-migrate-webserver-and-mysql-from-old-SATA-to-SSD-Kingston-Hard-drive-to-boost-performance-installing-new-SSD-on-Debian-linux
Blog and websites hosted on a server were giving bad performance lately and the old SATA Hard Disk on the Lenovo Edge server seemed to be overloaded from In/Out operations and thus slowing down the websites opeining time as well as SQL queries (especially the ones from Related Posts WordPress plugin was quite slow. Sometimes my blog site opening times were up to 8-10 seconds.

To deal with the issue I obviously needed a better speed of I/O of hard drive thus as I've never used SSD hard drives so far,  I decided to buy a new SSD (Solid State Drive) KINGSTON SV300S37A120G, 605ABBF2, max UDMA/133  hard disk.
Mounting the hard disk physically on the computer tower case wasn't a big deal as there are no rotating elements of the SSD it doesn't really matter how it is mounted main thing is that it is being hooked up somewhere to the case.

I was not sure whether the SSD HDD is supported by my Debian GNU / Linux so I had see whether Linux Operating System has properly detected your hard disk use dmesg

1. Check if SSD Hard drive is supported in Linux


linux:~# dmesg|grep -i kingston
[    1.182734] ata5.00: ATA-8: KINGSTON SV300S37A120G, 605ABBF2, max UDMA/133
[    1.203825] scsi 4:0:0:0: Direct-Access     ATA      KINGSTON SV300S3 605A PQ: 0 ANSI: 5


linux:~# dmesg|grep -i sdb
[    1.207819] sd 4:0:0:0: [sdb] 234441648 512-byte logical blocks: (120 GB/111 GiB)
[    1.207847] sd 4:0:0:0: [sdb] Write Protect is off
[    1.207848] sd 4:0:0:0: [sdb] Mode Sense: 00 3a 00 00
[    1.207860] sd 4:0:0:0: [sdb] Write cache: enabled, read cache: enabled, doesn't support DPO or FUA
[    1.207928]  sdb: unknown partition table
[    1.208319] sd 4:0:0:0: [sdb] Attached SCSI disk


Well great news as you see from above output obviously the Kingston SSD HDD was detected by the kernel.
I've also inspected whether the proper dimensions of hard drive (all 120 Gigabytes are being detected by the OS):


linux:~# fdisk -l /dev/sdb
Disk /dev/sdb: 120.0 GB, 120034123776 bytes
255 heads, 63 sectors/track, 14593 cylinders, total 234441648 sectors
Units = sectors of 1 * 512 = 512 bytes
Sector size (logical/physical): 512 bytes / 512 bytes
I/O size (minimum/optimal): 512 bytes / 512 bytes
Disk identifier: 0x00000000

Even better as the proper HDD sizing was detected by Linux kernel.
Next thing to do was of course to create ext4 filesystem on the SSD HDD.
I wanted to give 2 separate partitions for my Webserver Websites DocumentRoot directories which all lay under the standard Apache location inside /var/www as well as MySQL data folder which is also under the standard Debian based Linuces – /var/lib/mysql as the SQL data directory was just 3.3 GB size, I've decided to reserve 20GB gigabytes for the MySQL and another 100 GB for my PHP / CSS / JS / HTML and other data files /var/www.
 

2. Create SSD partitions with cfdisk

Hence I needed to create:

1. SSD partition of 100GB
2. SSD partition of 20GB

I have cfdisk installed and I believe, the easiest way to create the partitions is using interactive partitioner as CFDISK instead of fdisk: so in order to make the proper partitions I've ran


linux:~# cfdisk /dev/sdb


I' will skip explainig details on how to use CFDISK as it is pretty standard – display or manipulate disk partition table tool.
Just press on NEW button (moving with arrow keys buttons) and choose the 2 partitions size 100000 and 20000 MB (one thing to note here is that you have to choose between Primary and  Logical creation of partitions, as my SSD is a secondary drive and I already have a ) and then press the
WRITE button to save all the partition changes.

!!! Be very careful here as you might break up your other disks data make sure you're really modifying the SSD Hard Drive and not your other /dev/sda or other attached external Hard drive or ATA / SATA disk.
Press the WRITE button only once you're absolutely sure, you do it at your own (always create backup of your other data and don't blame me if something goes wrong) …

Once created the two partitions will look like in the screenshot below:
creating-linux-partitions-with-cfdisk-linux-partitioning-tool.png


3. Create ext4 filesystem 100 and 20 GB partitions

Next thing to do before the two partitions are ready to mount under Webserver's files documentroot /var/www and /var/lib/mysql is to create ext4 filesystem, though some might prefer to stick to ext3 or reiserfs partition, I would recommend you use ext4 for the reason ext4 according to my quick research is said to perform much better with SSD Hard Drives.

The tool to create the ext4 filesystems is mkfs4.ext4 it is provided by debian package e2fsprogs I have it already installed on my server, if you don't have it just go on and install it with:
 

linux:~# apt-get install –yes e2fsprogs


To create the two ext4 partitions run:
 

linux:~# mkfs4.ext4 /dev/sdb5


linux:~# mfs4.ext4 /dev/sdb6


Here the EXT4 filesystem on partition that is supposed to be 100 Gigabytes will take 2, 3 minutes as the dimensions of partition are a bit bigger, so if you don't want to get boring go grab a coffee, once the partitions are ready you can evaluate whether everyhing is properly created with fdisk you should get output like the one below


linux:~# fdisk -l /dev/sdb
Disk /dev/sdb: 120.0 GB, 120034123776 bytes
255 heads, 63 sectors/track, 14593 cylinders, total 234441648 sectors
Units = sectors of 1 * 512 = 512 bytes
Sector size (logical/physical): 512 bytes / 512 bytes
I/O size (minimum/optimal): 512 bytes / 512 bytes
Disk identifier: 0x00000000

   Device Boot      Start         End      Blocks   Id  System
/dev/sdb1              63   234441647   117220792+   5  Extended
/dev/sdb5             126    39070079    19534977   83  Linux
/dev/sdb6        39070143   234441647    97685752+  83  Linux


4. Mount newly created SSD partitions under /var/www and /var/lib/mysql

Before I mounted /var/www and /var/lib/mysql in order to be able to mount under the already existing directories I had to:

1. Stop Apache and MySQL server
2. Move Mysql and Apache Documentroot and Data directories to -bak
3. Create new empty /var/www and /var/lib/mysql direcotries
4. Copy backpups ( /var/www-bak and /var/lib/mysql-bak ) to the newly mounted ext4 SSD partitions

To achieve that I had to issue following commands:
 

linux:~# /etc/init.d/apache2 stop
linux:~# /etc/init.d/mysql stop

linux:~# mv /var/www /var/www-bak
linux:~# mv /var/lib/mysql /var/lib/mysql-bak

linux:~# mkdir /var/www
linux:~# mkdir /var/lib/mysql
linux:~# chown -R mysql:mysql /var/lib/mysql


Then to manually mount the SSD partitions:
 

linux:~# mount  /dev/sdb5 /var/lib/mysql
linux:~# mount /dev/sdb6 /var/www


To check that the folders are mount into the SSD drive, ran mount cmd:


linux:~# mount
/dev/sda1 on / type ext3 (rw,errors=remount-ro)
tmpfs on /lib/init/rw type tmpfs (rw,nosuid,mode=0755)
proc on /proc type proc (rw,noexec,nosuid,nodev)
sysfs on /sys type sysfs (rw,noexec,nosuid,nodev)
udev on /dev type tmpfs (rw,mode=0755)
tmpfs on /dev/shm type tmpfs (rw,nosuid,nodev)
devpts on /dev/pts type devpts (rw,noexec,nosuid,gid=5,mode=620)
fusectl on /sys/fs/fuse/connections type fusectl (rw)
/dev/sdc1 on /backups type ext4 (rw)
/dev/sdb5 on /var/lib/mysql type ext4 (rw,relatime,discard,data=ordered))
/dev/sdb6 on /var/www type ext4 (rw,relatime,discard,data=ordered))


That's great now the filesystem mounts fine, however as it an SSD drive and SSD drives are being famous for having a number of limited writes on disk before the drive lifetime is over it is a good idea to increase a bit the lifetime of the SSD by mounting the SSD partitions with noatime and errors=remount-ro (in order to not log file access times to filesystem table and to remount the FS read only in case of some physical errors of the drive).

5. Configure SSD partitions to boot every time Linux reboots

Now great, the filesystems gets mounted fine so next thing to do is to make it automatically mount every time the Linux OS boots up, this on GNU / Linux is done through /etc/fstab, for my 2 ext4 partitions this is the content to add at the end of /etc/fstab:


/dev/sdb5               /var/lib/mysql      ext4        noatime,errors=remount-ro       0       1
/dev/sdb6               /var/www        ext4    noatime,errors=remount-ro       0       1


quickest way to add it without a text editor is to echo to the end of file:
 

linux:~# cp -rpf /etc/fstab /etc/fstab.bak_25_03_2016
linux:~# echo ' /dev/sdb5               /var/lib/mysql      ext4        noatime,errors=remount-ro,discard       0       1' >> /etc/fstab
linux:~# echo ' /dev/sdb6               /var/www        ext4    noatime,errors=remount-ro,discard       0       1 ' >> /etc/fstab


Then mount again all the filesystems including the 2 new created SSD (100 and 20 GB) partitions:
 

linux:~# umount /var/www
linux:~# umount /var/lib/mysql
linux:~# mount -a


To assure properly mounted with noatime and remount-ro on errors options:


linux:~# mount | grep -i sdb
/dev/sdb5 on /var/lib/mysql type ext4 (rw,noatime,errors=remount-ro)
/dev/sdb6 on /var/www type ext4 (rw,noatime,errors=remount-ro)


It is also a good idea to check a statistics of disk free command:
 

linux:~# df -h|grep -i sdb
/dev/sdb5         19G  0G    19G  0% /var/lib/mysql
/dev/sdb6         92G   0G    92G  0% /var/www


6. Copy all Webserver and SQL data from backupped directories to new SSD mounted

Last but not least is to copy all original content files from /var/www-bak and /var/lib/mysql-bak to the new freshly  created SSD partitions, though copying the files can be made with normal linux copy command (cp),
I personally prefer rsync because rsync is much quicker and more efficient in copying large amount of files in my case this were 48 Gigabytes.

To copy files from with rsync:


linux:~# rsync -av –log-file /var/log/backup.log  /var/www-bak /var/www
linux:~# rsync -av –log-file /var/log/backup.log  /var/lib/mysql-bak /var/lib/mysql


Then ofcourse, finally to restore my websites normal operation I had to bring up the Apache Webservers and MySQL service


linux:~# /etc/init.d/apache2 start
linux:~# /etc/init.d/mysql start


7. Optimizing SSD performance with periodic trim (discard of unused blocks on a mounted filesystem)

As I digged deeper into how to even further optimize SSD drive performance I learned about the cleaning action TRIM of the partitions for a long term performance proper operation, to understand it better think about trimming like Windows degrament operatin.
 

NAME
fstrim – discard unused blocks on a mounted filesystem

SYNOPSIS
fstrim [-o offset] [-l length] [-m minimum-free-extent] [-v] mountpoint

DESCRIPTION
fstrim is used on a mounted filesystem to discard (or "trim") blocks which are not in use by the filesystem. This is useful for
solid-state drives (SSDs) and thinly-provisioned storage.

By default, fstrim will discard all unused blocks in the filesystem. Options may be used to modify this behavior based on range or
size, as explained below.


Trimming is really necessery, otherwise SSD become very slow after some time. All modern SSD's support TRIM, but older SSD's from before 2010 usually don't.
Thus for an older SSD you'll want to check this on the website of the manufacturer.

As I mentioned earlier TRIM is not supported by all SSD drives, to check whether TRIM is supported by SSD:

linux:~# hdparm -I /dev/sdb|grep -i -E 'trim|discard'
                  *          Data set Management TRIM supported (limit 1 block)

It's easiest to let the system perform an automatic TRIM. That can be done in several ways.

The quickest way for trimming is to place into /etc/rc.local trim  commands, in my case it was the following commands:


fstrim -v /var/lib/mysql
fstrim -v /var/www

To add it I've used my favourite vim text editor.
Adding commands to rc.local will make SSD trimming be executed at boot time so this will reduce a bit the downtime during the trim with some time so perhaps for those like me which are running a crually important websites a better

An alternative way is to schedule a daily cron job to do just place a new job in /etc/cron.daily/trim e.g.:
 

linux:~# vim /etc/cron.daily/trim


#!/bin/sh
fstrim -v /var/lib/mysql
fstrim -v /var/www

linux:~# chmod +x /etc/cron.daily/trim

However the best way to enable automatic trimming to SSD  is to just add the discard parameter to /etc/fstab I've already done that earlier in this article.

Not really surprising the increase of websites opening (page load times) were decreased dramatically web page loading waiting time fall down 2 to 2.5 times, so the moral of story for me is always when possible from now on to use SSD in order to have superb websites opening times.

To sum it up what was achieved with moving my data into SSD Drive, before moving websites and SQL data to SSD drive the websites were opening for 6 to 10 seconds now sites open in 2 to 4.5 seconds which is below 5 seconds (the normal waiting time for a user to see your website).
By the way it should be not a news forfor people that are into Search Engine Optimization but might be for some of unexperienced new Admins and Webmasters that, all that all page opening times that  exceeds 5 secs is considered to be a slow website (and therefore perhaps not worthy to read).
The high load page times >5 secs makes the website also less interesting not only for end users but also for search engines (Google / Yahoo / Bing / Baidoo etc.) will is said to crawl it less if website is slow.
Search Engines are said to Index much better and crawl more frequently into more responsive websites.
Hence implementing SSD to a server and decreasing the page load time should bring up my visitors stats a bit too.

Well that's all for today, hope you enjoyed 🙂

wordpress & awstats

Wednesday, July 29th, 2009

awstats-logo and wordpress awstats

I'm planning to bring up a website for remote system administration for quite some time 'till now.A couple of days before I've installed wordpress and used the monochrome theme in combination with a couple of plugins.I've used the WordPress, "Contact Form 7" plugin. I struggled around for a day before I realize the way it's beeingembeded into the Page post. Amri (Marto) a friend of mine helped me up with the whole deal, it came to be as simple assimply adding [contact-form 1 "My feedback" to one of the pages I've created in wordpress. There were a bunch of things on my newlycreated wordpress blog that looked more like a blog than a page which was not my initial goal and therefore I had to remove some chunksof code from some of the php files that came with the monochrome theme. I've partially used a guide called
"How to create Websites using WordPress" which probably would be of an interest to you if you're trying to make wordpress look more like a website than a blog, check it out here . Amri suggested few plugins that would add up to my current wordpress installation.
This are:
Cyr2Lat Slugs
Google XML Sitemaps Generates sitemap.xml. Gives an option to setup Google WebMaster Tools and in that manner of thoughts ads up for faster indexing of the blog
All In One SEO pack – SEO instrument that optimizes your wordpress
Belavir – Tracks the changes in files in wordpress.
In my case I couldn't make the Google XML Sitemap work correctly. Probably because I've removed bits of php code from some main php pages.Anyways I was able to make my wordpress look like a normal website and in general it might be said that it looks quite decent now if I have to compare it with my previous websites I've built like let's say my home page www.pc-freak.net . I've plans to deliver remote system administration services to the masses via my Yet Another Cheap System Administration Services.
I've also installed awstats on the pcfreak box currently running on
a nice foxy IBM machine. To properly install and run the Awstats I've used fractions from the article Install Awstats on FreeBSD . What was different in my case was:
1. I had to cd /usr/ports/www/awstats/work/awstats-6.9/tools/; run ./awstats_configure.pl. Answer a couple of questions. I've initially installed awstats configurations to /etc/awstats after which I've moved it to /usr/local/etc/awstats .
2. I had to create /var/lib/awstats where awstats stores it's database files: mkdir /var/lib/awstats
3. I had to link awstats to the location where my cgi-bin dir was set up by httpd.conf: ln -sf /usr/local/www/awstats/cgi-bin/ /usr/local/www/cgi-bin/awstats
4. I had to create a link to make the awstats icons visualize: ln -sf /usr/local/www/awstats/icons /usr/local/www/data/awstatsicons
5. I had to edit my conf file and align it with my desires, most important to note is the requirement to change the location to my Apache log file in my case that was /var/log/httpd-access.log: Change LogFile value in /usr/local/etc/awstats/awstats.www.pc-freak.net.conf I've changed it to LogFile="/var/log/httpd-access.log"
6. Next I had to execute the following to generate statistics for my domain www.pc-freak.net: /usr/local/www/awstats/cgi-bin/awstats.pl -update -config=www.pc-freak.net
7. Edit the root user crontab (crontab -u root -e) and paste the following : 01 0 * * * /usr/local/www/awstats/cgi-bin/awstats.pl -update -config=www.pc-freak.net 2>&1 >/dev/null8. Change the default Directory settings for /usr/local/www/cgi-bin. Had to changed them to the following AllowOverride FileInfo AuthConfig Limit Indexes Options FollowSymLinks ExecCGI Order allow,deny Allow from all
9. After that I've protected my awstats with a pass putting /usr/local/awstats/cgi-bin/.htaccess file containing the followingAuthType BasicAuthName "Restricted Access"AuthUserFile /usr/local/etc/apache2/myawstats.passwdRequire user admin
10. And last but not least, had to create the myawstats.passwd with the following command: htpasswd -c /usr/local/etc/apache2/myawstats.passwd admin

Right after I happily accessed my newly installed awstats via my domain https://www.pc-freak.net//cgi-bin/awstats/awstats.pl END—–