Posts Tagged ‘var’

wordpress & awstats

Wednesday, July 29th, 2009

awstats-logo and wordpress awstats

I'm planning to bring up a website for remote system administration for quite some time 'till now.A couple of days before I've installed wordpress and used the monochrome theme in combination with a couple of plugins.I've used the WordPress, "Contact Form 7" plugin. I struggled around for a day before I realize the way it's beeingembeded into the Page post. Amri (Marto) a friend of mine helped me up with the whole deal, it came to be as simple assimply adding [contact-form 1 "My feedback" to one of the pages I've created in wordpress. There were a bunch of things on my newlycreated wordpress blog that looked more like a blog than a page which was not my initial goal and therefore I had to remove some chunksof code from some of the php files that came with the monochrome theme. I've partially used a guide called
"How to create Websites using WordPress" which probably would be of an interest to you if you're trying to make wordpress look more like a website than a blog, check it out here . Amri suggested few plugins that would add up to my current wordpress installation.
This are:
Cyr2Lat Slugs
Google XML Sitemaps Generates sitemap.xml. Gives an option to setup Google WebMaster Tools and in that manner of thoughts ads up for faster indexing of the blog
All In One SEO pack – SEO instrument that optimizes your wordpress
Belavir – Tracks the changes in files in wordpress.
In my case I couldn't make the Google XML Sitemap work correctly. Probably because I've removed bits of php code from some main php pages.Anyways I was able to make my wordpress look like a normal website and in general it might be said that it looks quite decent now if I have to compare it with my previous websites I've built like let's say my home page www.pc-freak.net . I've plans to deliver remote system administration services to the masses via my Yet Another Cheap System Administration Services.
I've also installed awstats on the pcfreak box currently running on
a nice foxy IBM machine. To properly install and run the Awstats I've used fractions from the article Install Awstats on FreeBSD . What was different in my case was:
1. I had to cd /usr/ports/www/awstats/work/awstats-6.9/tools/; run ./awstats_configure.pl. Answer a couple of questions. I've initially installed awstats configurations to /etc/awstats after which I've moved it to /usr/local/etc/awstats .
2. I had to create /var/lib/awstats where awstats stores it's database files: mkdir /var/lib/awstats
3. I had to link awstats to the location where my cgi-bin dir was set up by httpd.conf: ln -sf /usr/local/www/awstats/cgi-bin/ /usr/local/www/cgi-bin/awstats
4. I had to create a link to make the awstats icons visualize: ln -sf /usr/local/www/awstats/icons /usr/local/www/data/awstatsicons
5. I had to edit my conf file and align it with my desires, most important to note is the requirement to change the location to my Apache log file in my case that was /var/log/httpd-access.log: Change LogFile value in /usr/local/etc/awstats/awstats.www.pc-freak.net.conf I've changed it to LogFile="/var/log/httpd-access.log"
6. Next I had to execute the following to generate statistics for my domain www.pc-freak.net: /usr/local/www/awstats/cgi-bin/awstats.pl -update -config=www.pc-freak.net
7. Edit the root user crontab (crontab -u root -e) and paste the following : 01 0 * * * /usr/local/www/awstats/cgi-bin/awstats.pl -update -config=www.pc-freak.net 2>&1 >/dev/null8. Change the default Directory settings for /usr/local/www/cgi-bin. Had to changed them to the following AllowOverride FileInfo AuthConfig Limit Indexes Options FollowSymLinks ExecCGI Order allow,deny Allow from all
9. After that I've protected my awstats with a pass putting /usr/local/awstats/cgi-bin/.htaccess file containing the followingAuthType BasicAuthName "Restricted Access"AuthUserFile /usr/local/etc/apache2/myawstats.passwdRequire user admin
10. And last but not least, had to create the myawstats.passwd with the following command: htpasswd -c /usr/local/etc/apache2/myawstats.passwd admin

Right after I happily accessed my newly installed awstats via my domain https://www.pc-freak.net//cgi-bin/awstats/awstats.pl END—–

Howto Fix “sysstat Cannot open /var/log/sysstat/sa no such file or directory” on Debian / Ubuntu Linux

Monday, February 15th, 2016

sysstast-no-such-file-or-directory-fix-Debian-Ubuntu-Linux-howto
I really love sysstat and as a console maniac I tend to install it on every server however by default there is some <b>sysstat</b> tuning once installed to make it work, for those unfamiliar with <i>sysstat</i> I warmly recommend to check, it here is in short the package description:<br /><br />
 

server:~# apt-cache show sysstat|grep -i desc -A 15
Description: system performance tools for Linux
 The sysstat package contains the following system performance tools:
  – sar: collects and reports system activity information;
  – iostat: reports CPU utilization and disk I/O statistics;
  – mpstat: reports global and per-processor statistics;
  – pidstat: reports statistics for Linux tasks (processes);
  – sadf: displays data collected by sar in various formats;
  – nfsiostat: reports I/O statistics for network filesystems;
  – cifsiostat: reports I/O statistics for CIFS filesystems.
 .
 The statistics reported by sar deal with I/O transfer rates,
 paging activity, process-related activities, interrupts,
 network activity, memory and swap space utilization, CPU
 utilization, kernel activities and TTY statistics, among
 others. Both UP and SMP machines are fully supported.
Homepage: http://pagesperso-orange.fr/sebastien.godard/


If you happen to install sysstat on a Debian / Ubuntu server with:

server:~# apt-get install –yes sysstat


, and you try to get some statistics with sar command but you get some ugly error output from:


server:~# sar Cannot open /var/log/sysstat/sa20: No such file or directory


And you wonder how to resolve it and to be able to have the server log in text databases periodically the nice sar stats load avarages – %idle, %iowait, %system, %nice, %user, then to FIX that Cannot open /var/log/sysstat/sa20: No such file or directory

You need to:

server:~# vim /etc/default/sysstat


By Default value you will find out sysstat stats it is disabled, e.g.:

ENABLED="false"

Switch the value to "true"

ENABLED="true"


Then restart sysstat init script with:

server:~# /etc/init.d/sysstat restart

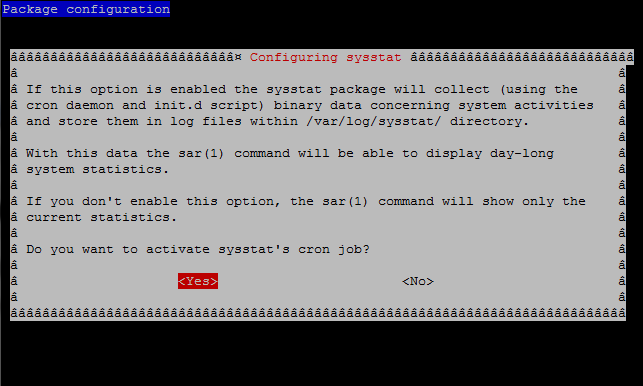
However for those who prefer to do things from menu Ncurses interfaces and are not familiar with Vi Improved, the easiest way is to run dpkg reconfigure of the sysstat:

server:~# dpkg –reconfigure


sysstat-reconfigure-on-gnu-linux


root@server:/# sar
Linux 2.6.32-5-amd64 (pcfreak) 15.02.2016 _x86_64_ (2 CPU)

0,00,01 CPU %user %nice %system %iowait %steal %idle
0,15,01 all 24,32 0,54 3,10 0,62 0,00 71,42
1,15,01 all 18,69 0,53 2,10 0,48 0,00 78,20
10,05,01 all 22,13 0,54 2,81 0,51 0,00 74,01
10,15,01 all 17,14 0,53 2,44 0,40 0,00 79,49
10,25,01 all 24,03 0,63 2,93 0,45 0,00 71,97
10,35,01 all 18,88 0,54 2,44 1,08 0,00 77,07
10,45,01 all 25,60 0,54 3,33 0,74 0,00 69,79
10,55,01 all 36,78 0,78 4,44 0,89 0,00 57,10
16,05,01 all 27,10 0,54 3,43 1,14 0,00 67,79


Well that's it now sysstat error resolved, text reporting stats data works again, Hooray! 🙂

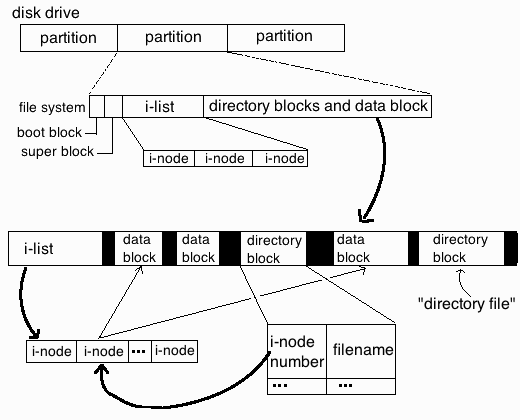
No space left on device with free disk space / Why no space left on device while there is plenty of disk space on drive – Running out of Inodes

Tuesday, November 17th, 2015

no_space_left-on-device-while-there-is-disk-space-running-out-of-file-inodes-unix_linux_file_system_diagram.gif


On one of the servers, I'm administrating the websites started showing some Mysql database table corrup errors like:


Table './database_name/site_news_list_com' is marked as crashed and last (automatic?) repair failed

The server is using Oracle MySQL server community stable edition on Debian GNU / Linux 6.0, so I first thought during work the server crashed either due to some bug issue in MySQL or it crashed due to some PHP cron job that did something messy. Thus to solve the crashed tables, tried using mysqlcheck tool which helped pretty fine, at many times whether there were database / table corruptions. I've run the following set of mysqlcheck commands with root (superuser) in a bash shell after logging in through SSH:

:

server:~# /usr/bin/mysqlcheck –defaults-extra-file=/etc/mysql/debian.cnf \–check –all-databases -u root -p`grep -i password /root/.my.cnf |sed -e 's#password=##g'`>> /var/log/cronwork.log
server:~# /usr/bin/mysqlcheck –defaults-extra-file=/etc/mysql/debian.cnf –analyze –all-databases -u root -p`grep -i password /root/.my.cnf |sed -e 's#password=##g'`>> /var/log/cronwork.log
server:~# /usr/bin/mysqlcheck –defaults-extra-file=/etc/mysql/debian.cnf \–auto-repair –optimize –all-databases -u root -p`grep -i password /root/.my.cnf |sed -e 's#password=##g'`>> /var/log/cronwork.log
server:~# /usr/bin/mysqlcheck –defaults-extra-file=/etc/mysql/debian.cnf \–optimize –all-databases -u root -p`grep -i password /root/.my.cnf |sed -e 's#password=##g'`>> /var/log/cronwork.log


In order for above commands to work, I've created the /root/.my.cnf containing my root (mysql CLI) mysql username and password, e.g. file has content like below:


[client]
user=root
password=MySecretPassword8821238


Btw a good note here is its generally a good idea (if you want to have consistent mysql databases) to automatically execute via a cron job 2 times a month, I've in root cronjob the following:


crontab -u root -l |grep -i mysqlcheck
04 06 5,10,15,20,25,1 * * /usr/bin/mysqlcheck –defaults-extra-file=/etc/mysql/debian.cnf \–check –all-databases –silent -u root -p`grep -i password /root/.my.cnf |sed -e 's#password=##g'`>> /var/log/cronwork.log 07 06 5,10,15,20,25,1 * * /usr/bin/mysqlcheck –defaults-extra-file=/etc/mysql/debian.cnf –analyze –all-databases –silent -u root -p`grep -i password /root/.my.cnf |sed -e 's#password=##g'`>> /var/log/cronwork.log 12 06 5,10,15,20,25,1 * * /usr/bin/mysqlcheck –defaults-extra-file=/etc/mysql/debian.cnf \–auto-repair –optimize –all-databases –silent -u root -p`grep -i password /root/.my.cnf |sed -e 's#password=##g'`>> /var/log/cronwork.log 17 06 5,10,15,20,25,1 * * /usr/bin/mysqlcheck –defaults-extra-file=/etc/mysql/debian.cnf \–optimize –all-databases –silent -u root -p`grep -i password /root/.my.cnf |sed -e 's#password=##g'`>> /var/log/cronwork.log


Strangely I got a lot of errors that some .MYI / .MYD .frm temp files, necessery for the mysql tables recovery can't be written inside /home/mysql/database_name

That was pretty weird and I thought there might be some issues with permissions, causing the inability to write, due to some bug or something so I went straight and checked /home/mysql/database_name permissions, e.g.::


server:/home/mysql/database_name# ls -ld soccerfame
drwx—— 2 mysql mysql 36864 Nov 17 12:00 soccerfame
server:/home/mysql/database_name# ls -al1|head -n 10
total 1979012
drwx—— 2 mysql mysql 36864 Nov 17 12:00 .
drwx—— 36 mysql mysql 4096 Nov 17 11:12 ..
-rw-rw—- 1 mysql mysql 8712 Nov 17 10:26 1_campaigns_diez.frm
-rw-rw—- 1 mysql mysql 14672 Jul 8 18:57 1_campaigns_diez.MYD
-rw-rw—- 1 mysql mysql 1024 Nov 17 11:38 1_campaigns_diez.MYI
-rw-rw—- 1 mysql mysql 8938 Nov 17 10:26 1_campaigns.frm
-rw-rw—- 1 mysql mysql 8738 Nov 17 10:26 1_campaigns_logs.frm
-rw-rw—- 1 mysql mysql 883404 Nov 16 22:01 1_campaigns_logs.MYD
-rw-rw—- 1 mysql mysql 330752 Nov 17 11:38 1_campaigns_logs.MYI


As seen from above output, all was perfect with permissions, so it should have been something else, so I decided to try to create a random file with touch command inside /home/mysql/database_name directory:


touch /home/mysql/database_name/somefile-to-test-writtability.txt touch: cannot touch ‘/scr1/data/somefile-to-test-writtability.txt‘: No space left on device


Then logically I thought the /home/mysql/ mounted ext4 partition got filled, because of crashed SQL database or a bug thus, checked with disk free command df whether there is enough space on server:

server:~# df -h
Filesystem Size Used Avail Use% Mounted on
/dev/md1 20G 7.6G 11G 42% /
udev 10M 0 10M 0% /dev
tmpfs 13G 1.3G 12G 10% /run
tmpfs 32G 0 32G 0% /dev/shm
tmpfs 5.0M 0 5.0M 0% /run/lock
tmpfs 32G 0 32G 0% /sys/fs/cgroup
/dev/md2 256G 134G 110G 55% /home

Well that's weird? Obviously only 55% of available disk space is used and available 134G which was more than enough so I got totally puzzled why, files can't be written.

Then very logically, I thought it might be that /home directory has remounted as read only, because the SSD memory disk on server is failing and checked for errors in dmesg, i.e.:


server:~# dmesg|grep -i error


Also checked how exactly was partition mounted, to check whether it is (RO) read-only:


server:~# mount -l|grep -i /home
/dev/md2 on /home type ext4 (rw,relatime,discard,data=ordered)


Now everything become even more weirder, as obviously the disk continued to be claiming no space left on device, while in reality there was plenty of disk space.

Then after running a quick research on the internet for the no space left on device with free disk space, I've come across this great superuser.com thread which let me realize the partition run out of inodes and that's why no new file inodes could be assigned and therefore, the linux kernel is refusing to write the file on ext4 partition.

For those who haven't heard of Linux Partition Inodes here is link to Wikipedia and a quick quote:


In a Unix-style file system, the inode is a data structure used to represent a filesystem object, which can be one of various things including a file or a directory. Each inode stores the attributes and disk block location(s) of the filesystem object's data.[1] Filesystem object attributes may include manipulation metadata (e.g. change,[2] access, modify time), as well as owner and permission data (e.g. group-id, user-id, permissions).[3]
Directories are lists of names assigned to inodes. The directory contains an entry for itself, its parent, and each of its children.


Once I understood it is the inodes, I checked how many of them are occupied with cmd:


server:~# df -i /home
Filesystem Inodes IUsed IFree IUse% Mounted on
/dev/md2 17006592 17006592 0 100% /home


You see, there were 0 (zero) free file inodes on server and that was the reason for no space left on device while there was actually free disk space

To clean up (free) some inodes on partition, first thing I did is to delete all old logs which were inside /home and files I positively know not to be necessery, then to find which directories allocating most innodes used:


server:~# find . -xdev -type f | cut -d "/" -f 2 | sort | uniq -c | sort -n


If you're on a regular old fashined IDE Hard Drive and not SSD or you have too much files inside this command will take really long …:

Therefore a better solution might be to frist:

a) Try to find root folders with large inodes count:

for i in /home/*; do echo $i; find $i |wc -l; done
Try to find specific folders:


You should get output like:


/home/new_website
606692
/home/common
73
/home/pcfreak
5661
/home/hipo
33
/home/blog
13570
/home/log
123
/home/lost+found
1

b) Then once you know the directory allocating most inodes, run the command again to see the sub-directories with most files (eating) partition innodes:


for i in /home/webservice/*; do echo $i; find $i |wc -l; done


One usual large folder which could free you some nodes is the linux source headers, but in my case it was simply a lot of tiny old logs being logged on the system for few years in the past without cleaning:

After deleting the log dirs and cache folder in my case /home/new_website/{log,cache}:

server:~# rm -rf /home/new_website/log/*
server:~# rm -rf /home/new_website/cache/*


a) Then, stopping Apache webserver to check prevent Apache to use MySQl databases while running database repair and restaring MySQL:
 

server:~# /etc/init.d/apache2 stop Restarting MySQL server
..
server:~# /etc/init.d/mysql restart
..


b) And re-issuing MySQL Check / Repair / Optimize database commands:


mysqlcheck –defaults-extra-file=/etc/mysql/debian.cnf \–check –all-databases -u root -p`grep -i password /root/.my.cnf |sed -e 's#password=##g'`>> /var/log/cronwork.log

mysqlcheck –defaults-extra-file=/etc/mysql/debian.cnf –analyze –all-databases -u root -p`grep -i password /root/.my.cnf |sed -e 's#password=##g'`>> /var/log/cronwork.log

mysqlcheck –defaults-extra-file=/etc/mysql/debian.cnf \–auto-repair –optimize –all-databases -u root -p`grep -i password /root/.my.cnf |sed -e 's#password=##g'`>> /var/log/cronwork.log

mysqlcheck –defaults-extra-file=/etc/mysql/debian.cnf \–optimize –all-databases -u root -p`grep -i password /root/.my.cnf |sed -e 's#password=##g'`>> /var/log/cronwork.log

c) And finally starting the Apache Webserver again:
 

server:~# /etc/init.d/apache2 start


Some innodse got freed up:
 

server:~# df -i /home Filesystem Inodes IUsed IFree IUse% Mounted on
/dev/md2 17006592 16797196 209396 99% /home


And hooray by God's Grace and with help of prayers of The most Holy Theotokos (Virgin) Mary, websites started again !

Install simscan on Qmail for better Mail server performance and get around unexisting suid perl in newer Linux Debian / Ubuntu servers

Tuesday, August 18th, 2015

qmail-fixing-clamdscan-errors-and-qq-errors-qmail-binary-migration-few-things-to-check-outclamav_logo-installing-clamav-antivirus-to-scan-periodically-debian-server-websites-for-viruses

I've been stuck with qmail-scanner-queue for a while on each and every new Qmail Mail server installation, I've done, this time it was not different but as time evolves and Qmail and Qmail Scanner Wrapper are not regularly updated it is getting, harder and harder to make a fully functional Qmail on newer Linux server distribution releases.

I know many would argue QMAIL is already obsolete but still I have plenty of old servers running QMAIL whose migration might cause more troubles than just continuing to use QMAIL. Moreover QMAIL once set-upped works like a charm.

I've been recently experiencing severe issues with clamdscan errors and I tried to work around this with compiling and using a suid wrapper, however still the clamdscan errors continued and as qmail-scanner is not actively developed and it is much slower than simscan, I've finally decided to give simscan as a mean to fix the clamdscan errors and thanksfully this worked as a solution.

Here is what I did "rawly" to make simscan work on this install:
 

Make sure simscan is properly installed on Debian Linux 7 or Ubuntu servers and probably (should work) on other Deb based Linuxes by following below steps:
 

a) Configure simscan with following compile time options as root (superuser)

./configure \
–enable-user=qscand \
–enable-clamav \
–enable-clamdscan=/usr/local/bin/clamdscan \
–enable-custom-smtp-reject=y \
–enable-per-domain=y \
–enable-attach=y \
–enable-dropmsg=n \
–enable-spam=y \
–enable-spam-hits=5 \
–enable-spam-passthru=y \
–enable-qmail-queue=/var/qmail/bin/qmail-queue \
–enable-ripmime=/usr/local/bin/ripmime \
–enable-sigtool-path=/usr/local/bin/sigtool \
–enable-received=y


b) Compile it


 make && make install-strip

c) Fix any wrong permissions of simscan queue directory


chmod g+s /var/qmail/simscan/

chown -R qscand:qscand /var/qmail/simscan/
chmod -R 777 simscan/chown -R qscand:qscand simscan/
chown -R qscand:qscand simscan/

d) Add some additional simscan options (how simscan is how to perform scans)

The restart qmail to make mailserver start using simscan instead of qmail-scanner, run below command (again as root):

echo ":clam=yes,spam=yes,spam_hits=8.5,attach=.vbs:.lnk:.scr:.wsh:.hta:.pif" > /var/qmail/control/simcontrol


e) Run /var/qmail/bin/simscanmk in order to convert /var/qmail/control/simcontrol into the /var/qmail/control/simcontrol.cdb database

/var/qmail/bin/simscanmk
/var/qmail/bin/simscanmk -g

f) Modify /service/qmail-smtpd/run to set simscan to be default Antivirus Wrapper Scanner

vim /service/qmail-smtpd/run

I'm using thibs's run script so I've uncommented the line there:

QMAILQUEUE="$VQ/bin/simscan"

Below two lines should stay commented as qmail-scanner is no longer used:

##QMAILQUEUE="$VQ/bin/qmail-scanner-queue"
##QMAILQUEUE="$VQ/bin/qmail-scanner-queue.pl"
export QMAILQUEUE

qmailctl restart
* Stopping qmail-smtpdssl.
* Stopping qmail-smtpd.
* Sending qmail-send SIGTERM and restarting.
* Restarting qmail-smtpd.
* Restarting qmail-smtpdssl.

g) Test whether simscan is properly sending / receiving emails:

echo "Testing Email" >> /tmp/mailtest.txt
env QMAILQUEUE=/var/qmail/bin/simscan SIMSCAN_DEBUG=3 /var/qmail/bin/qmail-inject hipo@my-mailserver.com < /tmp/mailtest.txt

Besides that as I'm using qscand:qscand as a user for my overall Qmail Thibs install I had to also do:

chown -R qscand:qscand /var/qmail/simscan/
chmod -R 777 simscan/
chown -R qscand:qscand simscan/


It might be a good idea to also place that lines in /etc/rc.local to auto change permissions on Linux boot, just in case something wents wrong with permissions.

Yeah, I know 777 is unsecure but without this permissions, I was still getting errors, plus the server doesn't have any accounts except the administrator, so I do not worry other system users might sniff on email 🙂

h) Test whether Qmail mail server send / receives fine with simscan

After that I've used another mail server with mail command to test whether mail is received:
 

mail -s "testing email1234" hipo@new-configured-qmail-server.com
asdfadsf
.
Cc:

Then it is necessery to also install latest clamav daemon from source in my case that's on Debian GNU / Linux 7, because somehow the Debian shipped binary version of clamav 0.98.5+dfsg-0+deb7u2 does fail to scan any incoming or outgoing email with error:
 

clamdscan: corrupt or unknown clamd scanner error or memory/resource/perms problem – exit status -1/72057594037927935

So to fix it you will have to install clamav on Debian Linux from source.


Voilla, that's all finally it worked !

Apache Webserver: No space left on device: Couldn’t create accept lock /var/lock/apache2/accept.lock – Fix

Wednesday, April 8th, 2015

Apache-http-server-no-space-left-on-device-semaphores-quotes-hard-disk-space-resolve-fix-howto
If out of a sudden your Apache webserver crashes and is refusing to start up by manually trying to restart it through its init script on Debian Linux servers – /etc/init.d/apache2 and RPM based ones: /etc/init.d/httpd

Checking in php_error.log there was no shown errors related to loading PHP modules, however apache's error.log show following errors:

[Wed Apr 08 14:20:14 2015] [error] [client 180.76.5.149] client denied by server configuration: /var/www/sploits/info/trojans_info/tr_data/y3190.html
[Wed Apr 08 14:20:39 2015] [warn] pid file /var/run/apache2.pid overwritten — Unclean shutdown of previous Apache run?
[Wed Apr 08 14:20:39 2015] [emerg] (28)No space left on device: Couldn't create accept lock (/var/lock/apache2/accept.lock.15974) (5)
[Wed Apr 08 14:25:39 2015] [warn] pid file /var/run/apache2.pid overwritten — Unclean shutdown of previous Apache run?
[Wed Apr 08 14:25:39 2015] [emerg] (28)No space left on device: Couldn't create accept lock (/var/lock/apache2/accept.lock.16790) (5)
[Wed Apr 08 14:27:03 2015] [warn] pid file /var/run/apache2.pid overwritten — Unclean shutdown of previous Apache run?
[Wed Apr 08 14:27:03 2015] [emerg] (28)No space left on device: Couldn't create accept lock (/var/lock/apache2/accept.lock.16826) (5)
[Wed Apr 08 14:27:53 2015] [warn] pid file /var/run/apache2.pid overwritten — Unclean shutdown of previous Apache run?
[Wed Apr 08 14:27:53 2015] [emerg] (28)No space left on device: Couldn't create accept lock (/var/lock/apache2/accept.lock.16852) (5)
[Wed Apr 08 14:30:48 2015] [warn] pid file /var/run/apache2.pid overwritten — Unclean shutdown of previous Apache run?
[Wed Apr 08 14:30:48 2015] [emerg] (28)No space left on device: Couldn't create accept lock (/var/lock/apache2/accept.lock.17710) (5)
[Wed Apr 08 14:31:21 2015] [warn] pid file /var/run/apache2.pid overwritten — Unclean shutdown of previous Apache run?
[Wed Apr 08 14:31:21 2015] [emerg] (28)No space left on device: Couldn't create accept lock (/var/lock/apache2/accept.lock.17727) (5)
[Wed Apr 08 14:32:40 2015] [warn] pid file /var/run/apache2.pid overwritten — Unclean shutdown of previous Apache run?
[Wed Apr 08 14:32:40 2015] [emerg] (28)No space left on device: Couldn't create accept lock (/var/lock/apache2/accept.lock.17780) (5)
[Wed Apr 08 14:38:32 2015] [warn] pid file /var/run/apache2.pid overwritten — Unclean shutdown of previous Apache run?

As you can read the most likely reason behind above errors preventing for apache to start is /var/run/apache2.pid  unable to be properly written due to lack of disk space or due to disk quota set for users including for userID with which Apache is running.

First thing I did is of course to see how much free space is on the server:

df -h
Filesystem                     Size  Used Avail Use% Mounted on
/dev/mapper/vg00-rootvol       4.0G  1.7G  2.2G  44% /
udev                           7.8G  204K  7.8G   1% /dev
tmpfs                           24G     0   24G   0% /dev/shm
/dev/sda1                      486M   40M  422M   9% /boot
/dev/mapper/vg00-lv_crashdump 1008M   34M  924M   4% /crashdump
/dev/mapper/vg00-homevol       496M   26M  445M   6% /home
/dev/mapper/vg00-lv_opt         12G  1.4G  9.9G  13% /opt
/dev/mapper/vg00-tmpvol        2.0G   68M  1.9G   4% /tmp
/dev/mapper/vg00-varvol        7.9G  609M  6.9G   8% /var
/dev/mapper/vg00-crashvol      1.9G   35M  1.8G   2% /var/crash
/dev/mapper/vg00-auditvol      124M  5.6M  113M   5% /var/log/audit
/dev/mapper/vg00-webdienste     60G   12G   48G  19% /webservice


As visible from above df command output , there is enough disk on HDD, so this is definitely not the issue:

Then I Checked whether there is Quota enabled on the Linux server with repquota command shows there are no quotas enabled:

# repquota / var/
repquota: Mountpoint (or device) / not found or has no quota enabled.
repquota: Mountpoint (or device) /var not found or has no quota enabled.
repquota: Not all specified mountpoints are using quota.


So obviously the only few left possible reason for Apache failing to start after invoked via init script is  either due to left tainted semaphores or due to some server hardware  RAM problem / or a dying  hard disk with bad blocks.

So what are Semaphores? Generally speaking Semaphores are apparatus for conveying information by means of visual signals between applications (something like sockets).They're used for communicating between the active processes of a certain application. In the case of Apache, they’re used to communicate between the parent and child processes, hence if Apache can’t properly write and coordinate these things down, then it can’t communicate properly with all of the processes it starts and hence the Main HTTPD process can't spawn probably its childs preventing Webserver to enter "started mode" and write its PID file.

To check general information about system semaphore arrays there is the ipcs -s command, however my experience is that ipcs -a is more useful (because it lists generally all kind of semaphores) including Semaphore Shared Memory Signals which are the most likely to cause you the problem.

ipcs -a

—— Shared Memory Segments ——–
key        shmid      owner      perms      bytes      nattch     status

—— Semaphore Arrays ——–
key        semid      owner      perms      nsems
0x00000000 22970368   www-data   600        1

—— Message Queues ——–
key        msqid      owner      perms      used-bytes   messages

As you see in my case there is a Semaphore Arrays which had to be cleaned to make Apache2 be able to start again.
 

To clean all left semaphores (arrays) preventing Apache from start properly, use below for one liner bash loop:
 

for i in `ipcs -s | awk '/www-data/ {print $2}'`; do (ipcrm -s $i); done
ipcrm -m 0x63637069


Note that above for loop is specific to Debian on CentOS / Fedora / RHEL and other Linuxes the username with which stucked semaphores might stay will be apache or httpd

Depending on the user with which the Apache Webserver is running, run above loop like so:

For RPM based distros (CentOS / RHEL):


for i in `ipcs -s | awk '/apache/ {print $2}'`; do (ipcrm -s $i); done
ipcrm -m 0x63637069


For other distros such as Slackware or FreeBSD or any custom compiled Apache webserver:

for i in `ipcs -s | awk '/httpd/ {print $2}'`; do (ipcrm -s $i); done
ipcrm -m 0x63637069


If there is also Shared Memory Segments you can remove them with ipcrm i.e.:

ipcrm -m 0x63637069


An alternative way to get rid of left uncleaned semaphores is with xargs:
 

ipcs -s | grep nobody | awk ‘ { print $2 } ‘ | xargs ipcrm


Even though this fixes the issue I understood my problems were due to exceeding semaphores, to check default number of set semaphores on Linux Kernel level as well as few Semaphore related values run below sysctl:

sysctl -a | egrep kernel.sem\|kernel.msgmni
kernel.msgmni = 15904

kernel.sem = 250        32000   32      128


As you can see the number of maximum semaphores is quite large so in my case the failure because of left semaphores was most likely due to some kind of Cracker / Automated bot scanner attack or someone trying malicious against the webserver or simply because of some kind of Apache bug or enormous high load the server faced.

Fix MySQL ibdata file size – ibdata1 file growing too large, preventing ibdata1 from eating all your server disk space

Thursday, April 2nd, 2015

fix-solve-mysql-ibdata-file-size-ibdata1-file-growing-too-large-and-preventing-ibdata1-from-eating-all-your-disk-space-innodb-vs-myisam

If you're a webhosting company hosting dozens of various websites that use MySQL with InnoDB  engine as a backend you've probably already experienced the annoying problem of MySQL's ibdata1 growing too large / eating all server's disk space and triggering disk space low alerts. The ibdata1 file, taking up hundreds of gigabytes is likely to be encountered on virtually all Linux distributions which run default MySQL server <= MySQL 5.6 (with default distro shipped my.cnf). The excremental ibdata1 raise appears usually due to a application software bug on how it queries the database. In theory there are no limitation for ibdata1 except maximum file size limitation set for the filesystem (and there is no limitation option set in my.cnf) meaning it is quite possible that under certain conditions ibdata1 grow over time can happily fill up your server LVM (Storage) drive partitions.

Unfortunately there is no way to shrink the ibdata1 file and only known work around (I found) is to set innodb_file_per_table option in my.cnf to force the MySQL server create separate *.ibd files under datadir (my.cnf variable) for each freshly created InnoDB table.
 

1. Checking size of ibdata1 file

On Debian / Ubuntu and other deb based Linux servers datadir is /var/lib/mysql/ibdata1

server:~# du -hsc /var/lib/mysql/ibdata1
45G     /var/lib/mysql/ibdata1
45G     total


2. Checking info about Databases and Innodb storage Engine

server:~# mysql -u root -p
password:

mysql> SHOW DATABASES;
+——————–+
| Database           |
+——————–+
| information_schema |
| bible              |
| blog               |
| blog-sezoni        |
| blogmonastery      |
| daniel             |
| ezmlm              |
| flash-games        |


Next step is to get some understanding about how many existing InnoDB tables are present within Database server:


mysql> SELECT COUNT(1) EngineCount,engine FROM information_schema.tables WHERE table_schema NOT IN ('information_schema','performance_schema','mysql') GROUP BY engine;
+————-+——–+
| EngineCount | engine |
+————-+——–+
|         131 | InnoDB |
|           5 | MEMORY |
|         584 | MyISAM |
+————-+——–+
3 rows in set (0.02 sec)

To get some more statistics related to InnoDb variables set on the SQL server:
 

mysqladmin -u root -p'Your-Server-Password' var | grep innodb


Here is also how to find which tables use InnoDb Engine

mysql> SELECT table_schema, table_name
    -> FROM INFORMATION_SCHEMA.TABLES
    -> WHERE engine = 'innodb';

+————–+————————–+
| table_schema | table_name               |
+————–+————————–+
| blog         | wp_blc_filters           |
| blog         | wp_blc_instances         |
| blog         | wp_blc_links             |
| blog         | wp_blc_synch             |
| blog         | wp_likes                 |
| blog         | wp_wpx_logs              |
| blog-sezoni  | wp_likes                 |
| icanga_web   | cronk                    |
| icanga_web   | cronk_category           |
| icanga_web   | cronk_category_cronk     |
| icanga_web   | cronk_principal_category |
| icanga_web   | cronk_principal_cronk    |


3. Check and Stop any Web / Mail / DNS service using MySQL

server:~# ps -efl |grep -E 'apache|nginx|dovecot|bind|radius|postfix'

Below cmd should return empty output, (e.g. Apache / Nginx / Postfix / Radius / Dovecot / DNS etc. services are properly stopped on server).

4. Create Backup dump all MySQL tables with mysqldump

Next step is to create full backup dump of all current MySQL databases (with mysqladmin):

server:~# mysqldump –opt –allow-keywords –add-drop-table –all-databases –events -u root -p > dump.sql
server:~# du -hsc /root/dump.sql
940M    dump.sql
940M    total


If you have free space on an external backup server or remotely mounted attached (NFS or SAN Storage) it is a good idea to make a full binary copy of MySQL data (just in case something wents wrong with above binary dump), copy respective directory depending on the Linux distro and install location of SQL binary files set (in my.cnf).
To check where are MySQL binary stored database data (check in my.cnf):

server:~# grep -i datadir /etc/mysql/my.cnf
datadir         = /var/lib/mysql

If server is CentOS / RHEL Fedora RPM based substitute in above grep cmd line /etc/mysql/my.cnf with /etc/my.cnf

if you're on Debian / Ubuntu:

server:~# /etc/init.d/mysql stop
server:~# cp -rpfv /var/lib/mysql /root/mysql-data-backup

Once above copy completes, DROP all all databases except, mysql, information_schema (which store MySQL existing user / passwords and Access Grants and Host Permissions)

5. Drop All databases except mysql and information_schema

server:~# mysql -u root -p
password:


mysql> SHOW DATABASES;

DROP DATABASE blog;
DROP DATABASE sessions;
DROP DATABASE wordpress;
DROP DATABASE micropcfreak;
DROP DATABASE statusnet;

          etc. etc.

ACHTUNG !!! DON'T execute!DROP database mysql; DROP database information_schema; !!! – cause this might damage your User permissions to databases

6. Stop MySQL server and add innodb_file_per_table and few more settings to prevent ibdata1 to grow infinitely in future

server:~# /etc/init.d/mysql stop

server:~# vim /etc/mysql/my.cnf
[mysqld]
innodb_file_per_table
innodb_flush_method=O_DIRECT
innodb_log_file_size=1G
innodb_buffer_pool_size=4G

Delete files taking up too much space – ibdata1 ib_logfile0 and ib_logfile1

server:~# cd /var/lib/mysql/
server:~#  rm -f ibdata1 ib_logfile0 ib_logfile1
server:~# /etc/init.d/mysql start
server:~# /etc/init.d/mysql stop
server:~# /etc/init.d/mysql start
server:~# ps ax |grep -i mysql


You should get no running MySQL instance (processes), so above ps command should return blank.
 

7. Re-Import previously dumped SQL databases with mysql cli client

server:~# cd /root/
server:~# mysql -u root -p < dump.sql

Hopefully import should went fine, and if no errors experienced new data should be in.

Altearnatively if your database is too big and you want to import it in less time to mitigate SQL downtime, instead import the database with:

server:~# mysql -u root -p
password:
mysql>  SET FOREIGN_KEY_CHECKS=0;
mysql> SOURCE /root/dump.sql;
mysql> SET FOREIGN_KEY_CHECKS=1;


If something goes wrong with the import for some reason, you can always copy over sql binary files from /root/mysql-data-backup/ to /var/lib/mysql/
 

8. Connect to mysql and check whether databases are listable and re-check ibdata file size

Once imported login with mysql cli and check whther databases are there with:

server:~# mysql -u root -p
SHOW DATABASES;

Next lets see what is currently the size of ibdata1, ib_logfile0 and ib_logfile1
 

server:~# du -hsc /var/lib/mysql/{ibdata1,ib_logfile0,ib_logfile1}
19M     /var/lib/mysql/ibdata1
1,1G    /var/lib/mysql/ib_logfile0
1,1G    /var/lib/mysql/ib_logfile1
2,1G    total

Now ibdata1 will grow, but only contain table metadata. Each InnoDB table will exist outside of ibdata1.
To better understand what I mean, lets say you have InnoDB table named blogdb.mytable.
If you go into /var/lib/mysql/blogdb, you will see two files
representing the table:

  •     mytable.frm (Storage Engine Header)
  •     mytable.ibd (Home of Table Data and Table Indexes for blogdb.mytable)

Now construction will be like that for each of MySQL stored databases instead of everything to go to ibdata1.
MySQL 5.6+ admins could relax as innodb_file_per_table is enabled by default in newer SQL releases.


Now to make sure your websites are working take few of the hosted websites URLs that use any of the imported databases and just browse.
In my case ibdata1 was 45GB after clearing it up I managed to save 43 GB of disk space!!!

Enjoy the disk saving! 🙂

How to renew self signed QMAIL toaster and QMAIL rocks expired SSL pem certificate

Friday, September 2nd, 2011

qmail_toaster_logo-fix-qmail-rocks-expired-ssl-pem-certificate

One of the QMAIL server installs, I have installed very long time ago. I've been notified by clients, that the certificate of the mail server has expired and therefore I had to quickly renew the certificate.

This qmail installation, SSL certificates were located in /var/qmail/control under the names servercert.key and cervercert.pem

Renewing the certificates with a new self signed ones is pretty straight forward, to renew them I had to issue the following commands:

1. Generate servercert encoded key with 1024 bit encoding

debian:~# cd /var/qmail/control
debian:/var/qmail/control# openssl genrsa -des3 -out servercert.key.enc 1024
Generating RSA private key, 1024 bit long modulus
...........++++++
.........++++++
e is 65537 (0x10001)
Enter pass phrase for servercert.key.enc:
Verifying - Enter pass phrase for servercert.key.enc:

In the Enter pass phrase for servercert.key.enc I typed twice my encoded key password, any password is good, here though using a stronger one is better.

2. Generate the servercert.key file

debian:/var/qmail/control# openssl rsa -in servercert.key.enc -out servercert.key
Enter pass phrase for servercert.key.enc:
writing RSA key

3. Generate the certificate request

debian:/var/qmail/control# openssl req -new -key servercert.key -out servercert.csr
debian:/var/qmail/control# openssl rsa -in servercert.key.enc -out servercert.key
Enter pass phrase for servercert.key.enc:writing RSA key
root@soccerfame:/var/qmail/control# openssl req -new -key servercert.key -out servercert.csr
You are about to be asked to enter information that will be incorporated
into your certificate request.
What you are about to enter is what is called a Distinguished Name or a DN.
There are quite a few fields but you can leave some blank
For some fields there will be a default value,
If you enter '.', the field will be left blank.
-----
Country Name (2 letter code) [AU]:UK
State or Province Name (full name) [Some-State]:London
Locality Name (eg, city) []:London
Organization Name (eg, company) [Internet Widgits Pty Ltd]:My Company
Organizational Unit Name (eg, section) []:My Org
Common Name (eg, YOUR name) []:
Email Address []:admin@adminmail.com

Please enter the following 'extra' attributes
to be sent with your certificate request
A challenge password []:
An optional company name []:

In the above prompts its necessery to fill in the company name and location, as each of the prompts clearly states.

4. Sign the just generated certificate request

debian:/var/qmail/control# openssl x509 -req -days 9999 -in servercert.csr -signkey servercert.key -out servercert.crt

Notice the option -days 9999 this option instructs the newly generated self signed certificate to be valid for 9999 days which is quite a long time, the reason why the previous generated self signed certificate expired was that it was built for only 365 days

5. Fix the newly generated servercert.pem permissions debian:~# cd /var/qmail/control
debian:/var/qmail/control# chmod 640 servercert.pem
debian:/var/qmail/control# chown vpopmail:vchkpw servercert.pem
debian:/var/qmail/control# cp -f servercert.pem clientcert.pem
debian:/var/qmail/control# chown root:qmail clientcert.pem
debian:/var/qmail/control# chmod 640 clientcert.pem

Finally to load the new certificate, restart of qmail is required:

6. Restart qmail server

debian:/var/qmail/control# qmailctl restart
Restarting qmail:
* Stopping qmail-smtpd.
* Sending qmail-send SIGTERM and restarting.
* Restarting qmail-smtpd.

Test the newly installed certificate

To test the newly installed SSL certificate use the following commands:

debian:~# openssl s_client -crlf -connect localhost:465 -quiet
depth=0 /C=UK/ST=London/L=London/O=My Org/OU=My Company/emailAddress=admin@adminmail.com
verify error:num=18:self signed certificate
verify return:1
...
debian:~# openssl s_client -starttls smtp -crlf -connect localhost:25 -quiet
depth=0 /C=UK/ST=London/L=London/O=My Org/OU=My Company/emailAddress=admin@adminmail.com
verify error:num=18:self signed certificate
verify return:1
250 AUTH LOGIN PLAIN CRAM-MD5
...

If an error is returned like 32943:error:140770FC:SSL routines:SSL23_GET_SERVER_HELLO:unknown protocol:s23_clnt.c:607: this means that SSL variable in the qmail-smtpdssl/run script is set to 0.

To solve this error, change SSL=0 to SSL=1 in /var/qmail/supervise/qmail-smtpdssl/run and do qmailctl restart

The error verify return:1 displayed is perfectly fine and it's more of a warning than an error as it just reports the certificate is self signed.

Resolving “nf_conntrack: table full, dropping packet.” flood message in dmesg Linux kernel log

Wednesday, March 28th, 2012

nf_conntrack_table_full_dropping_packet
On many busy servers, you might encounter in /var/log/syslog or dmesg kernel log messages like

nf_conntrack: table full, dropping packet

to appear repeatingly:

[1737157.057528] nf_conntrack: table full, dropping packet.
[1737157.160357] nf_conntrack: table full, dropping packet.
[1737157.260534] nf_conntrack: table full, dropping packet.
[1737157.361837] nf_conntrack: table full, dropping packet.
[1737157.462305] nf_conntrack: table full, dropping packet.
[1737157.564270] nf_conntrack: table full, dropping packet.
[1737157.666836] nf_conntrack: table full, dropping packet.
[1737157.767348] nf_conntrack: table full, dropping packet.
[1737157.868338] nf_conntrack: table full, dropping packet.
[1737157.969828] nf_conntrack: table full, dropping packet.
[1737157.969928] nf_conntrack: table full, dropping packet
[1737157.989828] nf_conntrack: table full, dropping packet
[1737162.214084] __ratelimit: 83 callbacks suppressed

There are two type of servers, I've encountered this message on:

1. Xen OpenVZ / VPS (Virtual Private Servers)
2. ISPs – Internet Providers with heavy traffic NAT network routers
 

I. What is the meaning of nf_conntrack: table full dropping packet error message

In short, this message is received because the nf_conntrack kernel maximum number assigned value gets reached.
The common reason for that is a heavy traffic passing by the server or very often a DoS or DDoS (Distributed Denial of Service) attack. Sometimes encountering the err is a result of a bad server planning (incorrect data about expected traffic load by a company/companeis) or simply a sys admin error…

– Checking the current maximum nf_conntrack value assigned on host:

linux:~# cat /proc/sys/net/ipv4/netfilter/ip_conntrack_max
65536

– Alternative way to check the current kernel values for nf_conntrack is through:

linux:~# /sbin/sysctl -a|grep -i nf_conntrack_max
error: permission denied on key 'net.ipv4.route.flush'
net.netfilter.nf_conntrack_max = 65536
error: permission denied on key 'net.ipv6.route.flush'
net.nf_conntrack_max = 65536

– Check the current sysctl nf_conntrack active connections

To check present connection tracking opened on a system:

:

linux:~# /sbin/sysctl net.netfilter.nf_conntrack_count
net.netfilter.nf_conntrack_count = 12742

The shown connections are assigned dynamicly on each new succesful TCP / IP NAT-ted connection. Btw, on a systems that work normally without the dmesg log being flooded with the message, the output of lsmod is:

linux:~# /sbin/lsmod | egrep 'ip_tables|conntrack'
ip_tables 9899 1 iptable_filter
x_tables 14175 1 ip_tables

On servers which are encountering nf_conntrack: table full, dropping packet error, you can see, when issuing lsmod, extra modules related to nf_conntrack are shown as loaded:

linux:~# /sbin/lsmod | egrep 'ip_tables|conntrack'
nf_conntrack_ipv4 10346 3 iptable_nat,nf_nat
nf_conntrack 60975 4 ipt_MASQUERADE,iptable_nat,nf_nat,nf_conntrack_ipv4
nf_defrag_ipv4 1073 1 nf_conntrack_ipv4
ip_tables 9899 2 iptable_nat,iptable_filter
x_tables 14175 3 ipt_MASQUERADE,iptable_nat,ip_tables


II. Remove completely nf_conntrack support if it is not really necessery

It is a good practice to limit or try to omit completely use of any iptables NAT rules to prevent yourself from ending with flooding your kernel log with the messages and respectively stop your system from dropping connections.

Another option is to completely remove any modules related to nf_conntrack, iptables_nat and nf_nat.
To remove nf_conntrack support from the Linux kernel, if for instance the system is not used for Network Address Translation use:

/sbin/rmmod iptable_nat
/sbin/rmmod ipt_MASQUERADE
/sbin/rmmod rmmod nf_nat
/sbin/rmmod rmmod nf_conntrack_ipv4
/sbin/rmmod nf_conntrack
/sbin/rmmod nf_defrag_ipv4

Once the modules are removed, be sure to not use iptables -t nat .. rules. Even attempt to list, if there are any NAT related rules with iptables -t nat -L -n will force the kernel to load the nf_conntrack modules again.

Btw nf_conntrack: table full, dropping packet. message is observable across all GNU / Linux distributions, so this is not some kind of local distribution bug or Linux kernel (distro) customization.
 

III. Fixing the nf_conntrack … dropping packets error

– One temporary, fix if you need to keep your iptables NAT rules is:

linux:~# sysctl -w net.netfilter.nf_conntrack_max=131072

I say temporary, because raising the nf_conntrack_max doesn't guarantee, things will get smoothly from now on.
However on many not so heavily traffic loaded servers just raising the net.netfilter.nf_conntrack_max=131072 to a high enough value will be enough to resolve the hassle.

– Increasing the size of nf_conntrack hash-table

The Hash table hashsize value, which stores lists of conntrack-entries should be increased propertionally, whenever net.netfilter.nf_conntrack_max is raised.

linux:~# echo 32768 > /sys/module/nf_conntrack/parameters/hashsize
The rule to calculate the right value to set is:
hashsize = nf_conntrack_max / 4

– To permanently store the made changes ;a) put into /etc/sysctl.conf:

linux:~# echo 'net.netfilter.nf_conntrack_count = 131072' >> /etc/sysctl.conf
linux:~# /sbin/sysct -p

b) put in /etc/rc.local (before the exit 0 line):

echo 32768 > /sys/module/nf_conntrack/parameters/hashsize

Note: Be careful with this variable, according to my experience raising it to too high value (especially on XEN patched kernels) could freeze the system.
Also raising the value to a too high number can freeze a regular Linux server running on old hardware.

– For the diagnosis of nf_conntrack stuff there is ;

/proc/sys/net/netfilter kernel memory stored directory. There you can find some values dynamically stored which gives info concerning nf_conntrack operations in "real time":

linux:~# cd /proc/sys/net/netfilter
linux:/proc/sys/net/netfilter# ls -al nf_log/

total 0
dr-xr-xr-x 0 root root 0 Mar 23 23:02 ./
dr-xr-xr-x 0 root root 0 Mar 23 23:02 ../
-rw-r--r-- 1 root root 0 Mar 23 23:02 0
-rw-r--r-- 1 root root 0 Mar 23 23:02 1
-rw-r--r-- 1 root root 0 Mar 23 23:02 10
-rw-r--r-- 1 root root 0 Mar 23 23:02 11
-rw-r--r-- 1 root root 0 Mar 23 23:02 12
-rw-r--r-- 1 root root 0 Mar 23 23:02 2
-rw-r--r-- 1 root root 0 Mar 23 23:02 3
-rw-r--r-- 1 root root 0 Mar 23 23:02 4
-rw-r--r-- 1 root root 0 Mar 23 23:02 5
-rw-r--r-- 1 root root 0 Mar 23 23:02 6
-rw-r--r-- 1 root root 0 Mar 23 23:02 7
-rw-r--r-- 1 root root 0 Mar 23 23:02 8
-rw-r--r-- 1 root root 0 Mar 23 23:02 9


IV. Decreasing other nf_conntrack NAT time-out values to prevent server against DoS attacks

Generally, the default value for nf_conntrack_* time-outs are (unnecessery) large.
Therefore, for large flows of traffic even if you increase nf_conntrack_max, still shorty you can get a nf_conntrack overflow table resulting in dropping server connections. To make this not happen, check and decrease the other nf_conntrack timeout connection tracking values:

linux:~# sysctl -a | grep conntrack | grep timeout
net.netfilter.nf_conntrack_generic_timeout = 600
net.netfilter.nf_conntrack_tcp_timeout_syn_sent = 120
net.netfilter.nf_conntrack_tcp_timeout_syn_recv = 60
net.netfilter.nf_conntrack_tcp_timeout_established = 432000
net.netfilter.nf_conntrack_tcp_timeout_fin_wait = 120
net.netfilter.nf_conntrack_tcp_timeout_close_wait = 60
net.netfilter.nf_conntrack_tcp_timeout_last_ack = 30
net.netfilter.nf_conntrack_tcp_timeout_time_wait = 120
net.netfilter.nf_conntrack_tcp_timeout_close = 10
net.netfilter.nf_conntrack_tcp_timeout_max_retrans = 300
net.netfilter.nf_conntrack_tcp_timeout_unacknowledged = 300
net.netfilter.nf_conntrack_udp_timeout = 30
net.netfilter.nf_conntrack_udp_timeout_stream = 180
net.netfilter.nf_conntrack_icmp_timeout = 30
net.netfilter.nf_conntrack_events_retry_timeout = 15
net.ipv4.netfilter.ip_conntrack_generic_timeout = 600
net.ipv4.netfilter.ip_conntrack_tcp_timeout_syn_sent = 120
net.ipv4.netfilter.ip_conntrack_tcp_timeout_syn_sent2 = 120
net.ipv4.netfilter.ip_conntrack_tcp_timeout_syn_recv = 60
net.ipv4.netfilter.ip_conntrack_tcp_timeout_established = 432000
net.ipv4.netfilter.ip_conntrack_tcp_timeout_fin_wait = 120
net.ipv4.netfilter.ip_conntrack_tcp_timeout_close_wait = 60
net.ipv4.netfilter.ip_conntrack_tcp_timeout_last_ack = 30
net.ipv4.netfilter.ip_conntrack_tcp_timeout_time_wait = 120
net.ipv4.netfilter.ip_conntrack_tcp_timeout_close = 10
net.ipv4.netfilter.ip_conntrack_tcp_timeout_max_retrans = 300
net.ipv4.netfilter.ip_conntrack_udp_timeout = 30
net.ipv4.netfilter.ip_conntrack_udp_timeout_stream = 180
net.ipv4.netfilter.ip_conntrack_icmp_timeout = 30

All the timeouts are in seconds. net.netfilter.nf_conntrack_generic_timeout as you see is quite high – 600 secs = (10 minutes).
This kind of value means any NAT-ted connection not responding can stay hanging for 10 minutes!

The value net.netfilter.nf_conntrack_tcp_timeout_established = 432000 is quite high too (5 days!)
If this values, are not lowered the server will be an easy target for anyone who would like to flood it with excessive connections, once this happens the server will quick reach even the raised up value for net.nf_conntrack_max and the initial connection dropping will re-occur again …

With all said, to prevent the server from malicious users, situated behind the NAT plaguing you with Denial of Service attacks:

Lower net.ipv4.netfilter.ip_conntrack_generic_timeout to 60 – 120 seconds and net.ipv4.netfilter.ip_conntrack_tcp_timeout_established to stmh. like 54000

linux:~# sysctl -w net.ipv4.netfilter.ip_conntrack_generic_timeout = 120
linux:~# sysctl -w net.ipv4.netfilter.ip_conntrack_tcp_timeout_established = 54000

This timeout should work fine on the router without creating interruptions for regular NAT users. After changing the values and monitoring for at least few days make the changes permanent by adding them to /etc/sysctl.conf

linux:~# echo 'net.ipv4.netfilter.ip_conntrack_generic_timeout = 120' >> /etc/sysctl.conf
linux:~# echo 'net.ipv4.netfilter.ip_conntrack_tcp_timeout_established = 54000' >> /etc/sysctl.conf

Speed up WordPress / Joomla CMS and MySQL server on Linux with tmpfs ram file system / Decrease Website pageload times with RAM caching

Wednesday, March 4th, 2015

speed-up-accelerate-wordpress-joomla-drupal-cms-and-mysql-server-with-tmpfs_ramfs_decrease-pageload-times-with-ram-caching
As a WordPress blog owner and an sys admin that has to deal with servers running a lot of WordPress / Joomla / Droopal and other custom CMS installed on servers, performoing slow or big enough to put a significant load on servers
and I love efficiency and hardware cost saving is essential for my daily job, I'm constantly trying to find new ways to optimize Customer Website (WordPress) and rest of sites in order to utilize better our servers and improve our clients sites speed (and hence satisfaction). 

There is plenty of little things to do on servers but probably among the most crucial ones which we use nowadays that save us a lot of money is tmpfs, and earlier (ramfs) – previously known as shmfs).
TMPFS is a (Temporary File Storage Facility) Linux kernel technology based on ramfs (used by Linux kernel initrd / initramfs on boot time in order to load and store the Linux kernel in memory, before system hard disk partition file systems are mounted) which is heavily used by virtually all modern popular Linux distributions. 

Using ramfs (cramfs variation – Compressed ROM filesystem) has been used to store different system environment kernel and Desktop components of many Linux environment / applications and used by a lot of the Linux BootCD such as the most famous (Klaus Knopper's) KNOPPIX LiveCD and Trinity Rescue Kit Linux (TRK uses /dev/shm which btw can be seen on most modern Linux distros and is actually just another mounted tmpfs).
If you haven't tried Live Linux yet try it out as me and a lot of sysadmins out there use some kind of LiveLinux at least few times on yearly basis  to Recover Unbootable Linux servers after some applied remote Updates as well as for Rescuing (Save) Data from Linux server failing to properly boot because of hard disk (bad blocks) failures. As I said earlier TMPFS is also used on almost any distribution for the /dev/ filesystem which is kept in memory.

You can see which tmpfs partitions is used on your Linux server with:


debian-server:~# mount |grep -i tmpfs
tmpfs on /lib/init/rw type tmpfs (rw,nosuid,mode=0755)
udev on /dev type tmpfs (rw,mode=0755)
tmpfs on /dev/shm type tmpfs (rw,nosuid,nodev)


Above is an output from a standard Debian Linux server. On CentOS 7 standard mounted tmpfs are as follows:


[root@centos ~]# mount |grep -i tmpfs
devtmpfs on /dev type devtmpfs (rw,nosuid,seclabel,size=1016332k,nr_inodes=254083,mode=755)
tmpfs on /dev/shm type tmpfs (rw,nosuid,nodev,seclabel)
tmpfs on /run type tmpfs (rw,nosuid,nodev,seclabel,mode=755)
tmpfs on /sys/fs/cgroup type tmpfs (rw,nosuid,nodev,noexec,seclabel,mode=755)


[root@centos ~]# df -h|grep -i tmpfs
devtmpfs                 993M     0  993M   0% /dev
tmpfs                   1002M   92K 1002M   1% /dev/shm
tmpfs                   1002M  8.8M  993M   1% /run
tmpfs                   1002M     0 1002M   0% /sys/fs/cgroup

The /run tmpfs mounted directory is also to be seen also on latest Ubuntus and Fedoras and is actually the good old /var/run ( where applications keep there pids and some small app related files) stored in tmpfs filesystem stored in memory.

If you're wondering what is /dev/shm and why it appears mounted on every single Linux Server / Desktop you've ever used this is a special filesystem shared memory which various running programs (processes) can use to transfer data quick and efficient between each other to preven the slow disk swapping. People using Linux for the rest 15 years should remember /dev/shm has been a target of a lot of kernel exploits as historically it had a lot of security issues.

While writting this article I've just checked about KNOPPIX developed amd just for info as of time of writting this distro has already 1000+ programs on CD version and 2600+ packages / application on DVD version.
Nowadays Knoppix is mostly used mostly as USB Live Flash drive as a lot of people are dropping CD / DVD use (many servers doesn't have a CD / DVD Drive) and for USB Live Flash Linux distros tmpfs is also key technology used as this gives the end user an amazing fast experience (Desktop applications run much fasten on Live USBs when tmpfs is used than when the slow 7200 RPM HDDs are used).

Loading big parts of the distribution within RAM (with tmpfs from Linux Kernel 2.4+ onwards) is also heavily used by a lot of Cluster vendors in most of Clustered (Cloud) Linux based environemnts, cause TMPFS gives often speeds up improvements to x30 times and decreases greatly I/O HDD. FreeBSD users will be happy to know that TMPFS is already ported and could be used on from FreeBSD 7.0+ onward.

In this small article I will give you example use on how I use tmpfs to speed up our WordPress Websites which use WP Caching plugins such as W3 Total Cache and WP Super Cache
and Hyper Cache / WP Super Cache disk caching and MySQL server as a Database backend.
Below example is wordpress specific but since it can be easily applied to JoomlaDrupal or any other CMS out there that uses mySQL server to make a lot of CPU expensive memory hungry (LEFT JOIN) queries which end up using a slow 7200 RPM hard disk.


1. Preparing tmpfs partitions for WordPress File Cache directory
 

If you want to give tmpfs a test drive, I recommend you try to create / mount a 20 Megabyte partition. To create a tmpfs partition you don't need to use a tool like mkfs.ext3 / mkfs.ext4 as TMPFS is in reality a virtual filesystem that is mapped in the server system physical RAM (volatile memory). TMPFS is very nice because if you run out of free RAM system starts a combination of RAM use + some Hard disk SWAP 
The great thing about TMPFS is it never uses all of the available RAM and SWAP, which would not halt your server if TMPFS partition gets filled, but instead you will start getting the usual "Insufficient Disk Space", just like with a physical HDD parititon. RAMFS cares much less about server compared to TMPFS, because if RAMFS is historically older.

ramfs file systems cannot be limited in size like a disk base file system which is limited by it’s capacity, thus ramfs will continue using memory storage until the system runs out of RAM and likely crashes or becomes unresponsive. This is a problem if the application writing to the file system cannot be limited in total size, so in my opinion you better stay away from RAMFS except you have a good idea what you're doing. Another disadvantage of RAMFS compared to TMPFS is you cannot see the size of the file system in df and it can only be estimated by looking at the cached entry in free.

Note that before proceeding to use TMPFS or RAMFS you should know besides having advantages, there are certain serious disadvantage that if the server using tmpfs (in RAM) to store files crashes the customer might loose his data, therefore using RAM filesystems on Production servers is best to be used just for caching folders which are regularly synchronized with (rsync) to some folder to assure no data will be lost on server reboot or crash.

Memory of fast storage areas are ideally suited for applications which need repetitively small data areas for caching or using as temporary space such as Jira (Issue and Proejct Tracking Software) Indexing  As the data is lost when the machine reboots the tmpfs stored data must not be data of high importance as even scheduling backups cannot guarantee that all the data will be replicated in the even of a system crash.

To test mounting a tmpfs virtual (memory stored) filesystem issue:
 

mount -t tmpfs tmpfs -o size=256m /mnt/tmpfs


If you want to test mount a ramfs instead:


 mount -t ramfs -o size=256m ramfs /mnt/ramfs


debian-server:~#  mount |grep -i -E "ramfs|tmpfs"
tmpfs on /lib/init/rw type tmpfs (rw,nosuid,mode=0755)
udev on /dev type tmpfs (rw,mode=0755)
tmpfs on /dev/shm type tmpfs (rw,nosuid,nodev)
tmpfs on /mnt/tmpfs type tmpfs (rw,size=256m)
ramfs on /mnt/ramfs type tmpfs (rw,size=256m)


Once mounted tmpfs can be used in the same way as any ext4 / reiserfs filesystem. In the same way to make mounts permanent, its necessery to add a line to /etc/fstab

To illustrate better a tmpfs use case on my blog running WordPress with W3TotalCache (W3TC) plugin cache folder in /var/www/blog/wp-content/w3tc to get advantage of tmpfs to store w3tc files.

a) Stop Apache

On Debian
 

debian-server:~# /etc/init.d/apache stop


On CentOS 
 

[root@centos ~]# /etc/init.d/httpd stop


b) Move w3tc dir to w3tc-bak


debian-server:~# cd /var/www/blog/wp-content/
debian-server:~# mv w3tc w3tc-bak


c) Create w3tc directory
 

debian-server:/var/www/blog/wp-content# mkdir w3tc
debian-server:/var/www/blog/wp-content# chown -R www-data:www-data w3tc


d) Add tmpfs record to /etc/fstab

My W3TC Cache didn't grow bigger than 2Gigabytes so I create a 2Giga directory for it by adding following in /etc/fstab 
 

debian-server:~# vim /etc/fstab


tmpfs /var/www/blog/wp-content/w3tc tmpfs defaults,size=2g,noexec,nosuid,uid=33,gid=33,mode=1755 0 0


You might also want to add the nr_inodes (option) to tmpfs while mounting. nr_inodes is the maximum inode for instance. Default is half the number of your physical RAM pages, (on a machine with highmem) the number of lowmem RAM page, some common option that should work is nr_inodes=5k, if you're unsure what this option does you can safely skip it 🙂

e) Mount new added tmpfs folder

Then to mount the newly added filesystem issue:
 

mount -a


Or if you're on a CentOS / RHEL server use httpd Apache user instead and whenever you have docroot and wordpress installed.


[root@centos ~]# chown -R apache:apache: w3tc


If you're using Apache SuPHP use whatever the UID / GID is proper.

On CentOS you will need to set proper UID and GID (UserID / GroupID), to find out which ones to to use check in /etc/passwd:
 

[root@centos ~]# grep -i apache /etc/passwd
apache:x:48:48:Apache:/var/www:/sbin/nologin


f) Move old w3tc cache from w3tc-bak to w3tc


debian-server:/var/www/blog/wp-content# mv w3tc-bak/* w3tc/


g) Start again Apache

On Debian:


debian-server:~# /etc/init.d/apache2 start


On CentOS:
 

[root@centos~]# /etc/init.d/httpd start

h) Keeping w3tc cache site folder synced

As I said earlier the biggest problem with caching (the reason why many hosting providers) and site admins refuse to use it is they might loose some data, to prevent data loss or at least mitigate the data loss to few minutes intervals it is a good idea to synchronize tmpfs kept folders somewhere to disk with rsync.

To achieve that use a cronjob like this:
 

debian-server:~# crontab -u root -e
*/5 * * * * /usr/bin/ionice -c3 -n7 /usr/bin/nice -n 19 /usr/bin/rsync -ah –stats –delete /var/www/blog/wp-content/w3tc/ /backups/tmpfs/cache/ 1>/dev/null


Note that you will need to have the /backups/tmpfs/cache folder existing, create it with:


debian-server:~# mkdir -p /backups/tmpfs/cache


You will also need to add a rsync synchronization from backupped folder to tmpfs (in case if the server gets accidently rebooted because it hanged or power outage), place in

/etc/rc.local


ionice -c3 -n7 nice -n 19 rsync -ahv –stats –delete /backups/tmpfs/cache/ /var/www/blog/wp-content/w3tc/ 1>/dev/null


(somewhere before exit 0) line
 

0 05 * * * /usr/bin/ionice -c3 -n7 /bin/nice -n 19 /usr/bin/rsync -ah –stats –delete /var/www/blog/wp-content/w3tc/ /backups/tmpfs/cache/ 1>/dev/null


2. Preparing tmpfs partitions for MySQL server temp File Cache directory


Its common that MySQL servers had to serve a lot of long and heavy SQL JOIN Queries mostly by related posts WP plugins such as (Zemanta Related Posts) and Contextual Related posts though MySQLs are well optimized  to work as much as efficient using mysql tuner (tuning primer) still often SQL servers get a lot of temp tables created to disk (about 25% to 30%) of all SQL queries use somehow HDD to serve queries and as this is very slow and there is file lock created the overall MySQL performance becomes sluggish at times to fix (resolve) that without playing with SQL code to optimize the slow queries the best way I found is by using TMPFS as MySQL temp folder.

To do so I create a TMPFS usually the size of 256 MB because this is usually enough for us, but other hosting companies might want to add bigger virtual temp disk:

a) Add tmpfs new dir to /etc/fstab

In /etc/fstab add below record with vim editor:
 

debian-server:~# vim /etc/fstab


tmpfs /var/mysqltmp tmpfs rw,gid=111,uid=108,size=256M,nr_inodes=10k,mode=0700 0 0


Note that the uid / and gid 105 and 114 are taken again from /etc/passwd

On Debian

debian-server:~# grep -i mysql /etc/passwd
mysql:x:108:111:MySQL Server,,,:/var/lib/mysql:/bin/false


On CentOS
 

[root@centos ~]# grep -i mysql /etc/passwd
mysql:x:27:27:MySQL Server:/var/lib/mysql:/bin/bash


b) Create folder /var/mysqltmp or whenever you want to place the tmpfs memory kept SQL folder


debian-server:~# mkdir /var/mysqltmp
debian-server:~# chown mysql:mysql /var/mysqltmp


debian-server:~# mount|grep -i tmpfs
tmpfs on /lib/init/rw type tmpfs (rw,nosuid,mode=0755)
udev on /dev type tmpfs (rw,mode=0755)
tmpfs on /dev/shm type tmpfs (rw,nosuid,nodev)
tmpfs on /var/www/blog/wp-content/w3tc type tmpfs (rw,noexec,nosuid,size=2g,uid=33,gid=33,mode=1755)
tmpfs on /var/mysqltmp type tmpfs (rw,gid=108,uid=111,size=256M,nr_inodes=10k,mode=0700)


c) Add new path to tmpfs created folder in my.cnf 

Then  edit /etc/mysql/my.cnf


debian-server:~# vim /etc/mysql/my.cnf

[mysqld]
#
# * Basic Settings
#
user        = mysql
pid-file    = /var/run/mysqld/mysqld.pid
socket      = /var/run/mysqld/mysqld.sock
port        = 3306
basedir     = /usr
datadir     = /var/lib/mysql
tmpdir      = /var/mysqltmp


On CentOS edit and change tmpdir in same way within /etc/my.cnf


d) Finally Restart Apache and MySQL to make mysql start using new set tmpfs memory kept folder

On Debian:
 

debian-server:~# /etc/init.d/apache2 stop; /etc/init.d/mysql restart; /etc/init.d/apache2 start

On CentOS:
 

[root@centos ~]# /etc/init.d/httpd stop; /etc/init.d/mysqld restart; /etc/initd/httpd start


Now monitor your server and check your pagespeed increase for me such an optimization usually improves site performance so site becomes +50% faster, to see the difference you can test your website before applying tmpfs caching for site and after that by using Google PageInsight (PageSpeed) Online Test. Though this example is for MySQL and WordPress you can easily adopt the same for Joomla if you have Joomla Caching enabled to some folder, same goes for any other CMS such as Drupal that can take use of Disk Caching. Actually its a small secret of many Hosting providers that allow clients to create sites via CPanel and Kloxo this tmpfs optimizations are already used for sites and by this the provider is able to offer better website service on lower prices. VPS hosting providers also use heavy caching. A lot of people are using TMPFS also to accelerate Sites that have enabled Google Pagespeed as Cacher and accelerator, as PageSpeed module puts a heavy HDD I/O load that can easily stone the server. Many admins also choose to use TMPFS for  /tmp, /var/run, and /var/lock directories as this leads often to significant overall server services operations improvement.
Once you have tmpfs enabled, It is a good idea to periodically monitor your SWAP used space with (df -h), because if you allocate bigger tmpfs partitions than your physical memory and tmpfs's full size starts to be used your machine will start swapping heavily and this could have a very negative performance affect.
 

debian-server:~# df -h|grep -i tmpfs
tmpfs            3,9G     0   3,9G   0% /lib/init/rw
tmpfs            3,9G     0   3,9G   0% /dev/shm
tmpfs            2,0G  1,4G   712M  66% /var/www/blog/wp-content/w3tc
tmpfs            256M     0   256M   0% /mnt/tmpfs
tmpfs            256M  236K   256M   1% /var/mysqltmp

The applications of tmpfs to accelerate services is up to your imagination, so I will be glad to hear from other admins on any interesting other application or problems faced while using TMPFS.

 Enjoy! 🙂
Howto install XCache Debian on GNU / Linux to accelerate Apache Webserver – XCache Best alternative to outdated PHP cacher EAccelerator

Thursday, February 26th, 2015

xcache_install-and-enable-best-alternative-php-cacher-to-eaccelerator-logo
I was using Eaccelerator until recently on all Apache / PHP / MySQL  (LAMP) web-servers as a caching engine (Webserver accelerator) across all Debian GNU / Linux Lenny / Squeeze / Etch servers.
However recently, I've noticed in phpinfo output on some of the Debian hosts, that eaccelerator was loaded but showed:

 Caching Enabled false

eaccelerator_caching_enabled_false-phpinfo-screenshot-apache-debian-linux.


Our servers are quite busy serving about 50 000 to 100 000 requests and thus not having enabled caching puts a lot of extra load on the CPU and eats a lot of memory which were usually saved by eAccelerator.
Logically I tried fixing the issues following some Stackoverflow threads recommendations such as this one but didn't work I tried playing manually spending hours trying to make eaccelerator run again and as a final mean, I even tried to upgrade eaccelerator to newer version but noticed the latest available eaccelerator version 0.9.6 was 2.5 years old (from 03.09.2012). Thus while there is no new release, just make s so just to make sure I didn't break the module with (default Debian bundled distribution package which is also installed on the servers)  re-installed eAccelerator from source 

This didn't worked either and since I was totally pissed off by the worsened systems performance (CPU load increased with to 10-30%) per server, I looked for some alternatives I can use and in the mean time I learned a bit more about history of PHP Accelerators, I learned some interesting things such as that  ionCube (PHPA) was the  first PHP Accelerator Apache like module (encoding PHP code),  created in 2001, later it become inspirational for  birth to PHP-APC (Alternative PHP Cache) Apache module. 
There is also Zend Opcache PHP accelerator (available since PHP 5.5 onwards)  but since Zend OpCache caches well PHP Zend written PHP code and servers run PHP 5.4 + sites are not using Zend PHP Framewosk  this was an option.
Further investigation lead me to MMCache which is already too obsolete (latest release is from 2013), PHPExpress – PHP Encoder which  was said to run on Windows, Linux, FreeBSD, NetBSD, Mac OS X, and Solaris) but already looks dead as there were no new releases since January 2012) and finally Lighttpd's XCache.

To give you an idea on what exactly is the difference between Apache Webserver with PHP-APC Caching or other PHP Cacher enabled and the Standard way PHP Interprets PHP scripts below is a diagram:

php-apc-cache-how-php-caching-works-with-and-without-encoding-php-code-diagram

Obviously my short research shows that from all the available PHP Cache Encoder / Accelerators only ones that seemed to be recently updated (under active development) are APC and XCache.
I've already used PHP-APC earlier on some servers and was having having some random Apache Webservers crashes and weird empty pages with some PHP pages and besides that APC is known to give lower speed in PHP caching than Eaccelerator and XCache, leaving me with the only and logical choise to use XCACHE.

Here is how Xcache developers describe their opcacher:
 

XCache is a free, open source operation code cacher, it is designed to enhance the performance of PHP scripts execution on servers. It optimizes the performance by eliminating the compilation time of PHP code by caching the compiled version of code into the memory and this way the compiled version loads the PHP script directly from the memory. This will surety accelerate the page generation time by up to 5 times faster and also optimizes and increases many other aspects of php scripts and reduce website/server load.


Thanksfully XCache is shipped by default with all Debians (Etch /Lenny / Squeeze / Wheezy)  Linuces so to install it just run the standard apt cmd:
 

apt-get install –yes php5-xcache


Then to enable XCache all I had to do is edit /etc/php5/apache2/php.ini and place below code
 

debian-server:~# vim /etc/php5/apache2/php.ini


[xcache-common]
;; install as zend extension (recommended), normally "$extension_dir/xcache.so"
;;zend_extension = /usr/lib/php5/20100525/xcache.so


[xcache.admin]
xcache.admin.enable_auth = On
; Configure this to use admin pages
; xcache.admin.user = "mOo"
; xcache.admin.pass = md5($your_password)
; xcache.admin.pass = ""

[xcache]
; ini only settings, all the values here is default unless explained

; select low level shm/allocator scheme implemenation
xcache.shm_scheme =        "mmap"
; to disable: xcache.size=0
; to enable : xcache.size=64M etc (any size > 0) and your system mmap allows
xcache.size  =                16M
; set to cpu count (cat /proc/cpuinfo |grep -c processor)
xcache.count =                 1
; just a hash hints, you can always store count(items) > slots
xcache.slots =                8K
; ttl of the cache item, 0=forever
xcache.ttl   =                 0
; interval of gc scanning expired items, 0=no scan, other values is in seconds
xcache.gc_interval =           0
; same as aboves but for variable cache

Note that Debian location which instructs xcache to load in Apache as a module is xcache.ini – e.g. /usr/share/php5/xcache/xcache.ini, so instead of placing above configuration right into php.ini you might prefer to place it in xcache.ini (though I personally prefer php.ini) because it is easier for me to later control how PHP behaves from single location.

To test whether XCache is enabled for Apache Webserver:

Create phpinfo.php somewhere in DocumentRoot (in my case this was /var/www/php_info.php)

debian-server:~# vim /var/www/php_info.php


<php?
phpinfo()
?>


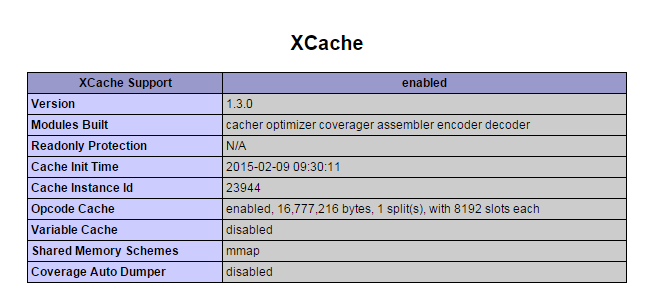
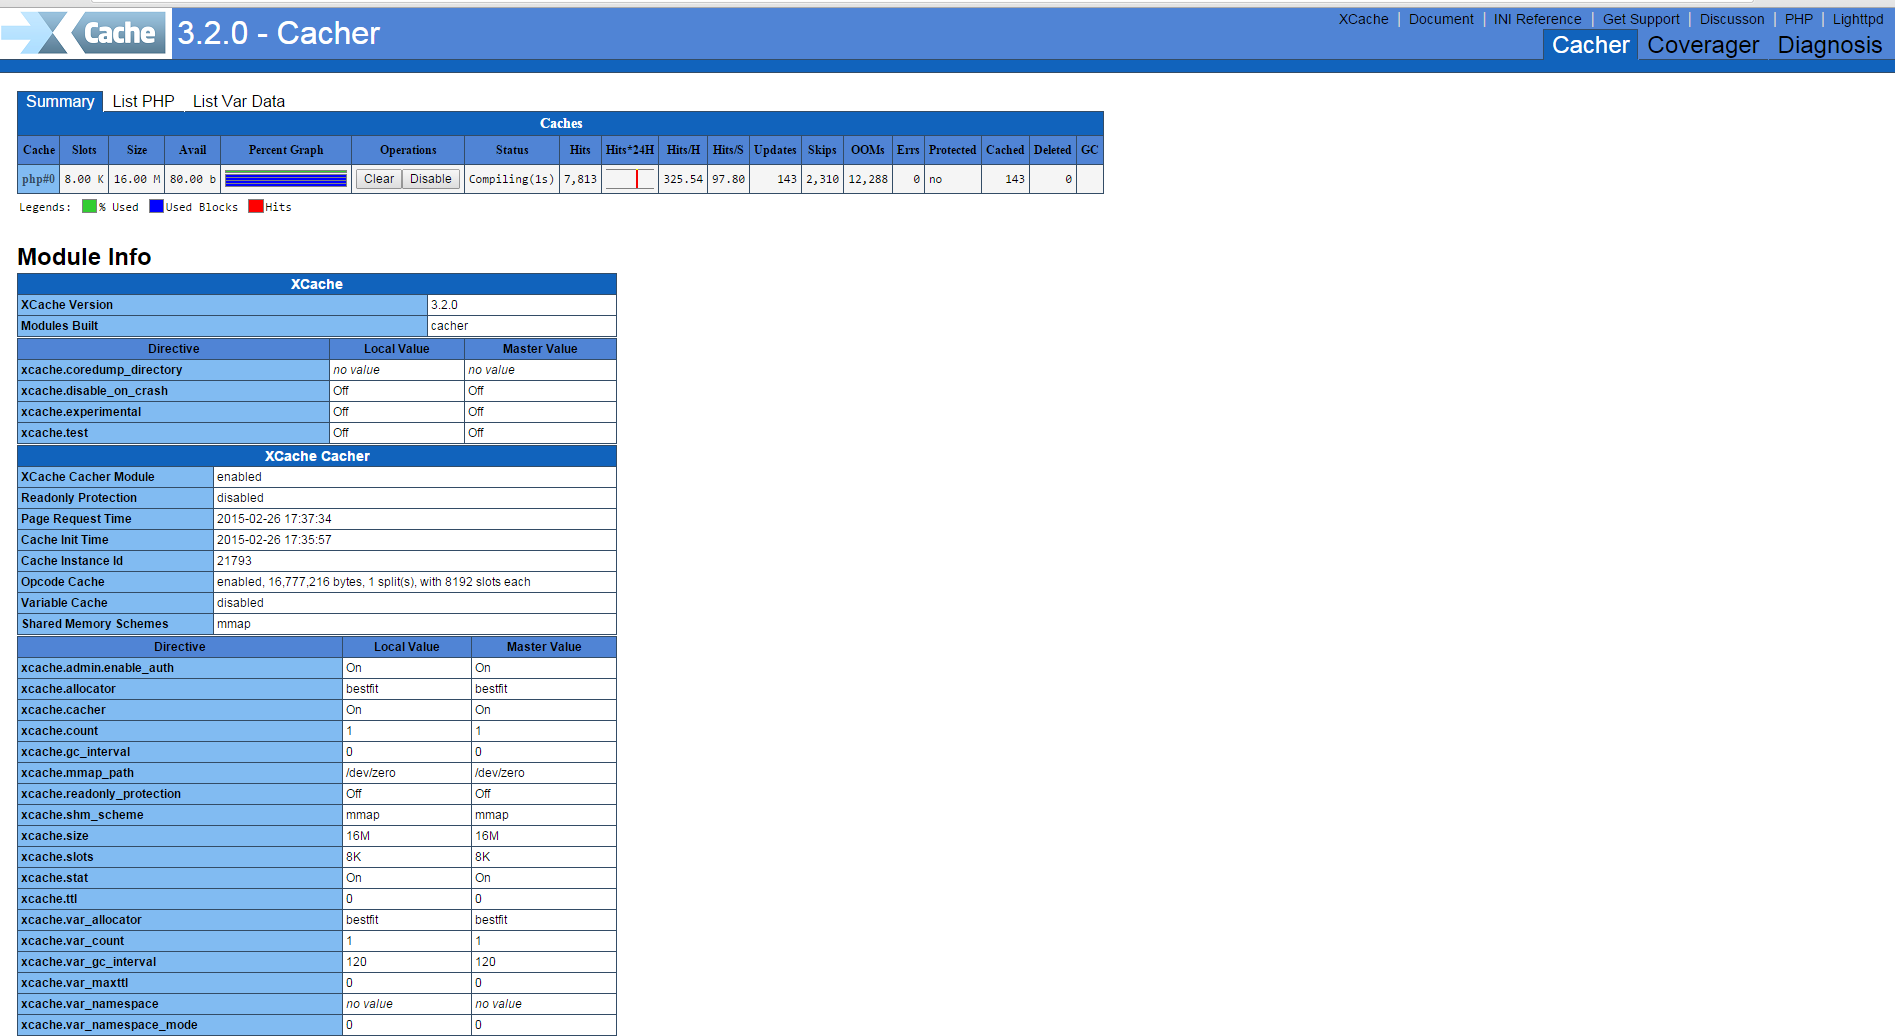
When you access the php_info.php in browser you will get XCache loaded as in below screenshot:


xcache_loaded-in-php-apache-phpinfo-output-debian-gnu-linux-server

To Test whether Xcache is enabled also for PHP CLI (applications set to run as a crontab – cronjob) :
 

debian-server:~# php -v
PHP 5.4.37-1~dotdeb.0 (cli) (built: Feb  2 2015 05:03:00)
Copyright (c) 1997-2014 The PHP Group
Zend Engine v2.4.0, Copyright (c) 1998-2014 Zend Technologies
    with XCache v3.2.0, Copyright (c) 2005-2014, by mOo
    with XCache Cacher v3.2.0, Copyright (c) 2005-2014, by mOo


Once it is tested as successful install you might want to enable the XCache admin (which is disabled by default), to enable XCache Admin on Debian you need to generate new password for it first like so:


echo -n "xcache_rulez" | md5sum
acbf5ba4a44f03058aa0ad11e0a6b645


Then you need to add in /etc/php5/mods-available/xcache.ini

debian-server:~# vim /etc/php5/mods-available/xcache.ini
[xcache.admin]
xcache.admin.enable_auth = On
; Configure this to use admin pages
 xcache.admin.user = "admin"
; xcache.admin.pass = md5($your_password)
 xcache.admin.pass = "change_with_above_generated_password_here"


To enable admin and be able to access it in a browser (if you're using as a documentroot /var/www/ and docroot supports interpretting php scripts and (has AllowOverride All) enabled to also support htaccess authentication do:
 

debian-server:~# cd /var/www/
debian-server:~# ln -sf /usr/share/xcache/htdocs/ xcache

When you access http://your-url-address.com/xcache/ you should see in browser some statistics along with all configured xcache options:

xcacher-admin-on-debian-gnu-linux-in-chrome-browser-screenshot-enable-xcacher-admin-howto

If you have time you can play with the options and get some speed minor speed improvements. The overall increase in page opening XCache should give you is between 100% – 190% !

Enjoy 🙂