Posts Tagged ‘filesystems’

Linux extending life time for a damaged hard drive server tricks on a live server. Force fcsk on next reboot.Read-only file system error solutions

Friday, February 17th, 2023

linux-extending-life-time-for-a-damaged-hard-drive-server-tricks-can-not-read-superblock-linux-force-fsck-on-next-reboot

In our daily work as system administrators we have some very old Legacy systems running Clustered High Availability proxies using CRM (Cluster Resource Manager) and some legacy systems still using Heartbeat to manage the cluster instead of the newer and modern Corosync variant.

The HA cluster is only 2 nodes Linux machine and running the obscure already long time unsupported version of Redhat 5.11 (Ootpa) who was officially became stable distant year 1998 (yeath the years were good) and whose EOL (End of Life) has been reached long time ago and the OS is no longer supported, however for about 14 years the machines has been running perfectly fine until one of the Cluster nodes managed by ocf::heartbeat:IPAddr2 , that is  /etc/ha.d/resource.d/IPAddr2 shell script. Yeah for the newbies Heartbeat Application Cluster in Linux does work like that it uses a number of extendable pair of shell scripts written for different kind of Network / Web / Mail / SQL or whatever services HA management.

The first node configured however, started failing due to some errors like:
 

EXT3-fs error (device dm-1): ext3_journal_start_sb: Detected aborted journal
sd 0:2:0:0: rejecting I/O to offline device
Aborting journal on device sda1.
sd 0:2:0:0: rejecting I/O to offline device
printk: 159 messages suppressed.
Buffer I/O error on device sda1, logical block 526
lost page write due to I/O error on sda1
sd 0:2:0:0: rejecting I/O to offline device
ext3_abort called.
EXT3-fs error (device sda1): ext3_journal_start_sb: Detected aborted journal
Remounting filesystem read-only
sd 0:2:0:0: rejecting I/O to offline device
megaraid_sas: FW was restarted successfully, initiating next stage…
megaraid_sas: HBA recovery state machine, state 2 starting…
megasas: Waiting for FW to come to ready state
megasas: FW in FAULT state!!
FW state [-268435456] hasn't changed in 180 secs
megaraid_sas: out: controller is not in ready state
megasas: waiting_for_outstanding: after issue OCR. 
megasas: waiting_for_outstanding: before issue OCR. FW state = f0000000
megaraid_sas: pending commands remain even after reset handling. megasas[0]: Dumping Frame Phys Address of all pending cmds in FW
megasas[0]: Total OS Pending cmds : 0 megasas[0]: 64 bit SGLs were sent to FW
megasas[0]: Pending OS cmds in FW :

The result out of that was a frequently the filesystem of the machine got re-mounted as Read Only and of course that is
quite bad if you have a running processess of haproxy that should be able to be living their and take up some Web traffic
for high availability and you run all the traffic only on the 2nd pair of machine.

This of course was a clear sign for a failing disks or some hit bad blocks regions or as the messages indicates, some
problem with system hardware or Raid SAS Array.

The physical raid on the system, just like rest of the hardware is very old stuff as well.

[root@haproxy_lb_node1 ~]# lspci |grep -i RAI
01:00.0 RAID bus controller: LSI Logic / Symbios Logic MegaRAID SAS 2108 [Liberator] (rev 05)

The produced errors not only made the machine to auto-mount its root / filesystem in Read-Only mode but besides has most
likely made the machine to automatically reboot every few days or few times every day in a raw.

The second Load Balancer node2 did operated perfectly, and we thought that we might just keep the broken machine in that half running
and inconsistent state for few weeks until we have built the new machines with Pre-Installed new haproxy cluster with modern
RedHat Linux 8.6 distribution, but since we have to follow SLAs (Service Line Agreements) with Customers and the end services behind the
High Availability (HA) Haproxy cluster were at danger … 

We as sysadmins had the task to make our best to try to stabilize the unstable node with disk errors for the system to servive
and be able to normally serve traffic (if node2 that is in a separate Data center fails due to a hardware or electricity issues etc.)
.

Here is few steps we took, that has hopefully improved the situation.

1. Make backups of most important files of high importance

Always before doing anything with a broken system, prepare backup of the most important files, if that is a cluster that should be a backup of the cluster configurations (if you don't have already ones) backup of /etc/hosts / backup of any important services configs /etc/haproxy/haproxy.cfg /etc/postfix/postfix.cfg (like it was my case), preferrably backup of whole /etc/  any important files from /root/ or /home/users* directories backup of at leasts latest logs from /var/log etc.
 

2. Clear up all unnecessery services scripts from the server

Any additional Softwares / Services and integrity checking tools (daemons) / scripts and cron jobs, were immediately stopped and wheter unused removed.

E.g. we had moved through /etc/cron* to check what's there,

# ls -ld /etc/cron.*
drwx—— 2 root root 4096 Feb  7 18:13 /etc/cron.d
drwxr-xr-x 2 root root 4096 Feb  7 17:59 /etc/cron.daily
-rw-r–r– 1 root root    0 Jul 20  2010 /etc/cron.deny
drwxr-xr-x 2 root root 4096 Jan  9  2013 /etc/cron.hourly
drwxr-xr-x 2 root root 4096 Jan  9  2013 /etc/cron.monthly
drwxr-xr-x 2 root root 4096 Aug 26  2015 /etc/cron.weekly


And like well professional butchers removed everything unnecessery that could trigger any extra unnecessery disk read / writes to HDD.

E.g. just create

# mkdir -p /root/etc_old/{/etc/cron.d,\
/etc/cron.daily,/etc/cron.hourly,/etc/cron.monthly\
,/etc/cron.weekly}


And moved all unnecessery cron job scripts like:

1. nmon (old school network / memory / hard disk console tool for monitoring and tuning server parameters)
2. clamscan / freshclam crons
3. mlocate (the script that is taking care for periodic run of updatedb command to keep the locate command to easily search
for files inside the DB to put less read operations on disk in case if you need to find file (e.g. prevent yourself to everytime
run cmd like: find / . -iname '*whatever_you_look_for*'
4. cups cron jobs
5. logwatch cron
6. rkhunter stuff
7. logrotate (yes we stopped even logrotation trigger job as we found the server was crashing sometimes at the same time when
the lograte job to rotate logs inside /var/log/* was running perhaps leading to a hit of the I/O read error (bad blocks).


Also inspected the Administrator user root cron job for any unwated scripts and stopped two report bash scripts that were part of the PCI tightened Security procedures.
Therein found script responsible to periodically report the list of installed packages and if they have not changed, as well a script to periodically report via email the list of
/etc/{passwd,/etc/shadow} created users, used to historically keep an eye on the list of users and easily see if someone
has created new users on the machine. Those were enabled via /var/spool/cron/root cron jobs, in other cases, on other machines if it happens for you
it is a good idea to check out all the existing user cron jobs and stop anything that might be putting Read / Write extra heat pressure on machine attached the Hard drives.

# ls -al /var/spool/cron/
total 20
drwx——  2 root root 4096 Nov 13  2015 .
drwxr-xr-x 12 root root 4096 May 11  2011 ..
-rw——-  1 root root  133 Nov 13  2015 root


3. Clear up old log files and any files unnecessery

Under /var/log and /home /var/tmp /var/spool/tmp immediately try to clear up the old log files.
From my past experience this has many times made the FS file inodes that are storing on a unbroken part (good blocks) of the hard drive and
ready to be reused by newly written rsyslog / syslogd services spitted files.

!!! Note that during the removal of some files you might hit a files stored on a bad blocks that might lead to a unexpected system reboot.

But that's okay, don't worry most likely after a hard reset by a technician in the Datacenter the machine will boot again and you can enjoy
removing remaining still files to send them to the heaven for old files.


4. Trigger an automatic system file system check with fsck on next boot

The standard way to force a Linux to aumatically recheck its Root filesystem is to simply create the /forcefsck to root partition or any other secondary disk partition you would like to check.

# touch /forcefsck

# reboot


However at some occasions you might be unable to do it because, the / (root fs) has been remounted in ReadOnly mode, yackes …

Luckily old Linux distibutions like this RHEL 5.1, has a way to force a filesystem check after reboot fsck and identify any
unknown bad-blocks and hopefully succceed in isolating them, so you don't hit into the same auto-reboots if the hard drive or Software / Hardware RAID
is not in terrible state
, you can use an option built in in /sbin/shutdown command the '-F'

   -F     Force fsck on reboot.


Hence to make the machine reboot and trigger immediately fsck:

# shutdown -rF now


Just In case you wonder why to reboot before check the Filesystem. Well simply because you need to have them unmounted before you check.

In that specific case this produced so far a good result and the machine booted just fine and we crossed the fingers and prayed that the machine would work flawlessly in the coming few weeks, before we finalize the configuration of the substitute machines, where this old infrastructure will be migrated to a new built cluster with new Haproxy and Corosync / Pacemaker Cluster on a brand new RHEL.

NB! On newer machines this won't work however as shutdown command has been stripped off this option because no SystemV (SystemInit) or Upstart and not on SystemD newer services architecture.
 

5. Hints on checking the hard drives with fsck

If you happen to be able to have physical access to the remote Hardare machine via a TTY[1-9] Console, that's even better and is the standard way to do it but with this specific case we had no easy way to get access to the Physical server console.

It is even better to go there and via either via connected Monitor (Display) or KVM Switch (Those who hear KVM switch first time this is a great device in server rooms to connect multiple monitors to same Monitor Display), it is better to use a some of the multitude of options to choose from for USB Distro Linux recovery OS versions or a CDROM / DVD on older machines like this with the Redhat's recovery mode rolled on.
After mounting the partition simply check each of the disks
e.g. :

# fsck -y /dev/sdb
# fsck -y /dev/sdc

Or if you want to not waste time and look for each hard drive but directly check all the ones that are attached and known by Linux distro via /etc/fstab definition run:

# fsck -AR

If necessery and you have a mixture of filesystems for example EXT3 , EXT4 , REISERFS you can tell it to omit some filesystem, for example ext3, like that:

# fsck -AR -t noext3 -y


To skip fsck on mounted partitions with fsck:

# fsck -M /dev/sdb


One remark to make here on fsck is usually fsck to complete its job on various filesystem it uses other external component binaries usually stored in /sbin/fsck*

ls -al /sbin/fsck*
-rwxr-xr-x 1 root root  55576 20 яну 2022 /sbin/fsck*
-rwxr-xr-x 1 root root  43272 20 яну 2022 /sbin/fsck.cramfs*
lrwxrwxrwx 1 root root      9  4 юли 2020 /sbin/fsck.exfat -> exfatfsck*
lrwxrwxrwx 1 root root      6  7 юни 2021 /sbin/fsck.ext2 -> e2fsck*
lrwxrwxrwx 1 root root      6  7 юни 2021 /sbin/fsck.ext3 -> e2fsck*
lrwxrwxrwx 1 root root      6  7 юни 2021 /sbin/fsck.ext4 -> e2fsck*
-rwxr-xr-x 1 root root  84208  8 фев 2021 /sbin/fsck.fat*
-rwxr-xr-x 2 root root 393040 30 ное 2009 /sbin/fsck.jfs*
-rwxr-xr-x 1 root root 125184 20 яну 2022 /sbin/fsck.minix*
lrwxrwxrwx 1 root root      8  8 фев 2021 /sbin/fsck.msdos -> fsck.fat*
-rwxr-xr-x 1 root root    333 16 дек 2021 /sbin/fsck.nfs*
lrwxrwxrwx 1 root root      8  8 фев 2021 /sbin/fsck.vfat -> fsck.fat*


6. Using tune2fs to  adjust tunable filesystem parameters on ext2/ext3/ext4 filesystems (few examples)

a) To check whether really the filesystem was checked on boot time or check a random filesystem on the server for its last check up date with fsck:

#  tune2fs -l /dev/sda1 | grep checked
Last checked:             Wed Apr 17 11:04:44 2019

On some distributions like old Debian and Ubuntu, it is even possible to enable fsck to log its operations during check on reboot via changing the verbosity from NO to YES:

# sed -i "s/#VERBOSE=no/VERBOSE=yes/" /etc/default/rcS


If you're having the issues on old Debian Linuxes  and not on RHEL  it is possible to;

b) Enable all fsck repairs automatic on boot

by running via:
 

# sed -i "s/FSCKFIX=no/FSCKFIX=yes/" /etc/default/rcS


c) Forcing fcsk check on for server attached Hard Drive Partitions with tune2fs

# tune2fs -c 1 /dev/sdXY

Note that:
tune2fs can force a fsck on each reboot for EXT4, EXT3 and EXT2 filesystems only.

tune2fs can trigger a forced fsck on every reboot using the -c (max-mount-counts) option.
This option sets the number of mounts after which the filesystem will be checked, so setting it to 1 will run fsck each time the computer boots.
Setting it to -1 or 0 resets this (the number of times the filesystem is mounted will be disregarded by e2fsck and the kernel).


 For example you could:

d) Set fsck to run a filesystem check every 30 boots, by using -c 30 
 

# tune2fs -c 30 /dev/sdXY


e) Checking whether a Hard Drive has been really checked on the boot


#  tune2fs -l /dev/sda1 | grep checked
Last checked:             Wed Apr 17 11:04:44 2019


e) Check when was the last time the file system /dev/sdX was checked:
 

# tune2fs -l /dev/sdX | grep Last\ c
Last checked:             Thu Jan 12 20:28:34 2017


f) Check how many times our /dev/sdX filesystem was mounted

# tune2fs -l /dev/sdX | grep Mount
Mount count:              157

g) Check how many mounts are allowed to pass before filesystem check is forced
 

# tune2fs -l /dev/sdX | grep Max
Maximum mount count:      -1


7. Repairing disk / partitions via GRUB fsck.mode and fsck.repair kernel module options

It is also possible to force a fsck.repair on boot via GRUB, but that usually is not an option someone would like as the machine might fail too boot if it hards to repair hardly, however in difficult situations with failing disks temporary enabling it is good idea.

This can be done by including for grub initial config

GRUB_CMDLINE_LINUX_DEFAULT="quiet splash fsck.mode=force fsck.repair=yes"

fsck.mode=force – will force a fsck each time a system boot and keeping that value enabled for a long time inside GRUB is stupid for servers as

sometimes booting could be severely prolonged because of the checks especially with servers with many or slow old hard drives.

fsck.repair=yes – will make the fsck try to repair if it finds bad blocks when checking (be absolutely sure you know, what you're doing if passing this options)

The options can be also set via editing the GRUB boot screen, if you have physical access to the server and don't want to reload the grub loader and possibly make the machine unbootable on next boot.
 

8. Few more details on how /etc/fstab disk fsck check parameters values for Systemd Linux machines works

The "proper" way on systemd (if we can talk about proper way on Linux) to runs fsck for each filesystem that has a fsck is to pass number greater than 0 set in
/etc/fstab (last column in /etc/fstab), so make sure you edit your /etc/fstab if that's not the case.

The root partition should be set to 1 (first to be checked), while other partitions you want to be checked should be set to 2.

Example /etc/fstab:
 

# /etc/fstab: static file system information.

/dev/sda1  /      ext4  errors=remount-ro  0  1
/dev/sda5  /home  ext4  defaults           0  2

The values you can put here as a second number meaning is as follows:
0 – disabled, that is do not check filesystem
1 – partition with this PASS value has a higher priority and is checked first. This value is usually set to the root / partition
2 – partitions with this PASS value will be checked last

a) Check the produced log out of fsck

Unfortunately on the older versions of Linux distros with SystemV fsck log output might be not generated except on the physical console so if you have a kind of duplicator device physical tty on the display port of the server, you might capture some bad block reports or fixed errors messages, but if you don't you might just cross the fingers and hope that anything found FS irregularities was recovered.

On systemd Linux machines the fsck log should be produced either in /run/initramfs/fsck.log or some other location depending on the Linux distro and you should be able to see something from fsck inside /var/log/* logs:

# grep -rli fsck /var/log/*


Close it up

Having a system with failing disk is a really one of the worst sysadmin nightmares to get. The good news is that most of the cases we're prepared with some working backup or some work around stuff like the few steps explained to mitigate the amount of Read / Writes to hard disks on the failing machine HDDs. If the failing disk is a primary Linux filesystem all becomes even worse as every next reboot, you have no guarantee, whether the kernel / initrd or some of the other system components required to run the Core Linux system won't break up the normal boot. Thus one side changes on the hard drives is a risky business on ther other side, if you're in a situation where you have a mirror system or the failing system is just a Linux server installed without a Cluster pair, then this is not a big deal as you can guarantee at least one of the nodes still up, unning and serving. Still doing too much of operations with HDD is always a danger so the steps described, though in most cases leading to improvement on how the system behaves, the system should be considered totally unreliable and closely monitored not only by some monitoring stuff like Zabbix / Prometheus whatever but regularly check the systems state via normal SSH logins. It is important if you have some important datas or logs on the system that are not synchronized to a system node to copy them before doing any of the described operations. After all minimal is backuped, proceed to clear up everything that might be cleared up and still the machine to continue providing most of its functionalities, trigger fsck automatic HDD check on next reboot, reboot, check what is going on and monitor the machine from there on.

Hopefully the few described steps, has helped some sysadmin. There is plenty of things which I've described that might go wrong, even following the described steps, might not help if the machines Storage Drives / SAS / SSD has too much of a damage. But as said in most cases following this few steps would improve the machine state.

Wish you the best of luck!


Find largest files on AIX system root / show biggest files and directories in AIX folder howto

Friday, November 6th, 2020

ibm-aix-logo-find-largest-files-and-directories-on-system-to-free-space-if-disk-is-full

On an AIX server if you get a root directory ( / ) to be completely full problem and the AIX running services are unable to write their pid files and logs for example in /tmp /admin /home /var/tmp /var/log/ and rest of directory structure or the system is almost full with mounted filesystems which shows it is 90% or 95%+ full on main partition,  the system is either already stuck or it is on the way to stop functiononing normally. Hence the only way to recover IBM AIX machine to a normal behavior is to clean up some files (if you can't extend the partition) or add more physical Hard drive, just as we usually do on Linux.

So How can we clean up largest files on AIX?


Lets say we want to find all files on AIX larger than 1 MB.

aix-system:/ $ find / -xdev -size 2048 -ls | sort -r +6
12579 1400 -rw-r—–  1 root      security   1433534 Jun 26  2019 /etc/security/tsd/tsd.dat
 9325 20361 -rw-r—–  1 root      system    20848752 Nov  6 16:02 /etc/security/failedlogin
21862 7105 -rwxr-xr-x  1 root      system     7274915 Aug 24  2017 /sbin/zabbix_agentd
   72 7005 -rw-rw—-  1 root      system     7172962 Nov  6 16:19 /audit/stream.out
24726 2810 -rw——-  1 root      system     2876944 Feb 29  2012 /etc/syslog-ng/core
29314 2391 -r-xr-xr-x  1 root      system     2447454 Jun 25  2019 /lpp/bos/bos.rte.filesystem/7.1.5.32.save/update.16
21844 2391 -r-xr-xr-x  1 root      system     2447414 Jun 25  2019 /sbin/helpers/jfs2/logredo64
21843 2219 -r-xr-xr-x  1 root      system     2271971 Jun 25  2019 /sbin/helpers/jfs2/logredo
29313 2218 -r-xr-xr-x  1 root      system     2270835 Jun 25  2019 /lpp/bos/bos.rte.filesystem/7.1.5.32.save/update.15
22279 1800 -rw-r–r–  1 root      system     1843200 Nov  4 08:03 /root/smit.log
12577 1399 -rw-r–r–  1 root      system     1431685 Jun 26  2019 /etc/security/tsd/.tsd.bk
21837 1325 -r-xr-xr-x  1 root      system     1356340 Jun 25  2019 /sbin/helpers/jfs2/fsck64
29307 1325 -r-xr-xr-x  1 root      system     1356196 Jun 25  2019 /lpp/bos/bos.rte.filesystem/7.1.5.32.save/update.9
   12 1262 -rw——-  1 root      system     1291365 Aug  8  2011 /core


Above finds all files greater than 1 MB and sort them in reverse
order with the largest files first.

To search all files larger than 64 Megabytes under root ( / )

aix-system:/ $ find / -xdev -size +131072 -ls | sort -r +6
65139 97019 -rw-r–r–  1 root      system    99347181 Mar 31  2017 /admin/archive.zip


Display 10 largest directories on system

aix-system:/ $ du -a /dir | sort -n -r | head -10


Show biggest files and directories in a directory


aix-system:/ $ du -sk * | sort -n
4       Mail
4       liste
4       my_user
4       syslog-ng.conf
140     smit.script
180     smit.transaction
1804    smit.log

Below du display the size of all files and directories in the current directory with the biggest being at the bottom.


List all largest files in dir decrasingly. If a directory is matches show all sub-dirs largest files.

aix-system:/ $ ls -A . | while read name; do du -sk $name; done | sort -nr

Below ls + while loop command sorts disk usage for all files in the current directory by size, in decreasing order. If the file we suspect happens to be a directory, we can then change into that directory, and re-run the preceding command to determine what is taking up space within that directory.

Continue these steps until you find the desired file or files, at which point you can take appropriate actions.

If the bottom-most item is a directory, then cd into that directory and run the du command again. Keep drilling down until you find the biggest files on your system and get rid of them to save some space.

What is inode and how to find out which directory is eating up all your filesystem inodes on Linux, Increase inode count on a ext3 ext4 and ufs filesystems

Tuesday, August 20th, 2019

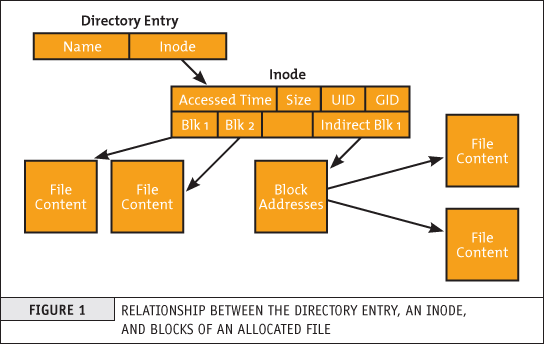
what-is-inode-find-out-which-filesystem-or-directory-eating-up-all-your-system-inodes-linux_inode_diagram

If you're a system administrator of multiple Linux servers used for Web serving delivery / Mail server sysadmin, Database admin or any High amount of Drives Data Storage used for backup servers infra, Data Repository administrator such as Linux hosted Samba / CIFS shares, etc. or using some Linux Hosting Provider to host your website or any other UNIX like Infrastructure servers that demands a storage of high number of files under a Directory  you might end up with the common filesystem inode depletion issues ( Maximum Inode number for a filesystem is predefined, limited and depending on the filesystem configured size).

In case a directory stored files end up exceding the amount of possible addressable inodes could prevent any data to be further assiged and stored on the Filesystem.

When a device runs out of inodes, new files cannot be created on the device, even though there may be plenty free space available and the first time it happened to me very long time ago I was completely puzzled how this is possible as I was not aware of Inodes existence  …

Reaching maximum inodes number (e.g. inode depletion), often happens on Busy Mail servers (receivng tons of SPAM email messages) or Content Delivery Network (CDN – Website Image caching servers) which contain many small files on EXT3 or EXT4 Journalled filesystems. File systems (such as Btrfs, JFS or XFS) escape this limitation with extents or dynamic inode allocation, which can 'grow' the file system or increase the number of inodes.


Hence ending being out of inodes could cause various oddities on how stored data behaves or communicated to other connected microservices and could lead to random application disruptions and odd results costing you many hours of various debugging to find the root cause of inodes (index nodes) being out of order.

In below article, I will try to give an overall explanation on what is an I-Node on a filesystem, how inodes of FS unit could be seen, how to diagnose a possible inode poblem – e.g.  see the maximum amount of inodes available per filesystem and how to prepare (format) a new filesystem with incrsed set of maximum inodes.


What are filesystem i-nodes?


This is a data structure in a Unix-style file system that describes a file-system object such as a file or a directory.
The data structure described in the inodes might vary slightly depending on the filesystem but usually on EXT3 / EXT4 Linux filesystems each inode stores the index to block that contains attributes and disk block location(s) of the object's data.
– Yes for those who are not aware on how a filesystem is structured on *nix it does allocate all stored data in logical separeted structures called data blocks. Each file stored on a local filesystem has a file descriptor, there are virtual unit structures file tables and each of the inodes that are a reference number has a own data structure (inode table).

Inodes / "Index" are slightly unusual on file system structure that stored the access information of files as a flat array on the disk, with all the hierarchical directory information living aside from this as explained by Unix creator and pioneer- Dennis Ritchie (passed away few years ago).

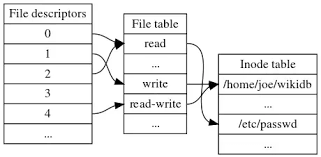
what-is-inode-very-simplified-explanation-diagram-data

Simplified explanation on file descriptors, file table and inode, table on a common Linux filesystem

Here is another description on what is I-node, given by Ken Thompson (another Unix pioneer and father of Unix) and Denis Ritchie, described in their paper published in 1978:

"    As mentioned in Section 3.2 above, a directory entry contains only a name for the associated file and a pointer to the file itself. This pointer is an integer called the i-number (for index number) of the file. When the file is accessed, its i-number is used as an index into a system table (the i-list) stored in a known part of the device on which the directory resides. The entry found thereby (the file's i-node) contains the description of the file:…
    — The UNIX Time-Sharing System, The Bell System Technical Journal, 1978  "


What is typical content of inode and how I-nodes play with rest of Filesystem units?


The inode is just a reference index to a data block (unit) that contains File-system object attributes. It may include metadata information such as (times of last change, access, modification), as well as owner and permission data.


On a Linux / Unix filesystem, directories are lists of names assigned to inodes. A directory contains an entry for itself, its parent, and each of its children.

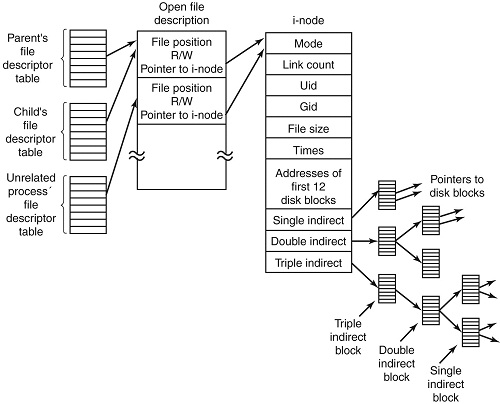
Structure-of-inode-table-on-Linux-Filesystem-diagram


Structure of inode table-on Linux Filesystem diagram (picture source GeeksForGeeks.org)

  • Information about files(data) are sometimes called metadata. So you can even say it in another way, "An inode is metadata of the data."
  •  Inode : Its a complex data-structure that contains all the necessary information to specify a file. It includes the memory layout of the file on disk, file permissions, access time, number of different links to the file etc.
  •  Global File table : It contains information that is global to the kernel e.g. the byte offset in the file where the user's next read/write will start and the access rights allowed to the opening process.
  • Process file descriptor table : maintained by the kernel, that in turn indexes into a system-wide table of files opened by all processes, called the file table .

The inode number indexes a table of inodes in a known location on the device. From the inode number, the kernel's file system driver can access the inode contents, including the location of the file – thus allowing access to the file.

  •     Inodes do not contain its hardlink names, only other file metadata.
  •     Unix directories are lists of association structures, each of which contains one filename and one inode number.
  •     The file system driver must search a directory looking for a particular filename and then convert the filename to the correct corresponding inode number.

The operating system kernel's in-memory representation of this data is called struct inode in Linux. Systems derived from BSD use the term vnode, with the v of vnode referring to the kernel's virtual file system layer.


But enough technical specifics, lets get into some practical experience on managing Filesystem inodes.
 

Listing inodes on a Fileystem


Lets say we wan to to list an inode number reference ID for the Linux kernel (files):


root@linux: # ls -i /boot/vmlinuz-*
 3055760 /boot/vmlinuz-3.2.0-4-amd64   26091901 /boot/vmlinuz-4.9.0-7-amd64
 3055719 /boot/vmlinuz-4.19.0-5-amd64  26095807 /boot/vmlinuz-4.9.0-8-amd64


To list an inode of all files in the kernel specific boot directory /boot:


root@linux: # ls -id /boot/
26091521 /boot/


Listing inodes for all files stored in a directory is also done by adding the -i ls command flag:

Note the the '-1' flag was added to to show files in 1 column without info for ownership permissions


root@linux:/# ls -1i /boot/
26091782 config-3.2.0-4-amd64
 3055716 config-4.19.0-5-amd64
26091900 config-4.9.0-7-amd64
26095806 config-4.9.0-8-amd64
26091525 grub/
 3055848 initrd.img-3.2.0-4-amd64
 3055644 initrd.img-4.19.0-5-amd64
26091902 initrd.img-4.9.0-7-amd64
 3055657 initrd.img-4.9.0-8-amd64
26091756 System.map-3.2.0-4-amd64
 3055703 System.map-4.19.0-5-amd64
26091899 System.map-4.9.0-7-amd64
26095805 System.map-4.9.0-8-amd64
 3055760 vmlinuz-3.2.0-4-amd64
 3055719 vmlinuz-4.19.0-5-amd64
26091901 vmlinuz-4.9.0-7-amd64
26095807 vmlinuz-4.9.0-8-amd64


To get more information about Linux directory, file, such as blocks used by file-unit, Last Access, Modify and Change times, current External Symbolic or Static links for filesystem object:
 

root@linux:/ # stat /etc/
  File: /etc/
  Size: 16384         Blocks: 32         IO Block: 4096   catalog
Device: 801h/2049d    Inode: 6365185     Links: 231
Access: (0755/drwxr-xr-x)  Uid: (    0/    root)   Gid: (    0/    root)
Access: 2019-08-20 06:29:39.946498435 +0300
Modify: 2019-08-14 13:53:51.382564330 +0300
Change: 2019-08-14 13:53:51.382564330 +0300
 Birth: –


Within a POSIX system (Linux-es) and *BSD are more or less such, a file has the following attributes[9] which may be retrieved by the stat system call:

   – Device ID (this identifies the device containing the file; that is, the scope of uniqueness of the serial number).
    File serial numbers.
    – The file mode which determines the file type and how the file's owner, its group, and others can access the file.
    – A link count telling how many hard links point to the inode.
    – The User ID of the file's owner.
    – The Group ID of the file.
    – The device ID of the file if it is a device file.
    – The size of the file in bytes.
    – Timestamps telling when the inode itself was last modified (ctime, inode change time), the file content last modified (mtime, modification time), and last accessed (atime, access time).
    – The preferred I/O block size.
    – The number of blocks allocated to this file.


Getting more extensive information on a mounted filesystem


Most Linuxes have the tune2fs installed by default (in debian Linux this is through e2fsprogs) package, with it one can get a very good indepth information on a mounted filesystem, lets say about the ( / ) root FS.
 

root@linux:~# tune2fs -l /dev/sda1
tune2fs 1.44.5 (15-Dec-2018)
Filesystem volume name:   <none>
Last mounted on:          /
Filesystem UUID:          abe6f5b9-42cb-48b6-ae0a-5dda350bc322
Filesystem magic number:  0xEF53
Filesystem revision #:    1 (dynamic)
Filesystem features:      has_journal ext_attr resize_inode dir_index filetype needs_recovery sparse_super large_file
Filesystem flags:         signed_directory_hash
Default mount options:    (none)
Filesystem state:         clean
Errors behavior:          Continue
Filesystem OS type:       Linux
Inode count:              30162944
Block count:              120648960
Reserved block count:     6032448
Free blocks:              13830683
Free inodes:              26575654
First block:              0
Block size:               4096
Fragment size:            4096
Reserved GDT blocks:      995
Blocks per group:         32768
Fragments per group:      32768
Inodes per group:         8192
Inode blocks per group:   512
Filesystem created:       Thu Sep  6 21:44:22 2012
Last mount time:          Sat Jul 20 11:33:38 2019
Last write time:          Sat Jul 20 11:33:28 2019
Mount count:              6
Maximum mount count:      22
Last checked:             Fri May 10 18:32:27 2019
Check interval:           15552000 (6 months)
Next check after:         Wed Nov  6 17:32:27 2019
Lifetime writes:          338 GB
Reserved blocks uid:      0 (user root)
Reserved blocks gid:      0 (group root)
First inode:              11
Inode size:              256
Required extra isize:     28
Desired extra isize:      28
Journal inode:            8
First orphan inode:       21554129
Default directory hash:   half_md4
Directory Hash Seed:      d54c5a90-bc2d-4e22-8889-568d3fd8d54f
Journal backup:           inode blocks


Important note to make here is file's inode number stays the same when it is moved to another directory on the same device, or when the disk is defragmented which may change its physical location. This also implies that completely conforming inode behavior is impossible to implement with many non-Unix file systems, such as FAT and its descendants, which don't have a way of storing this invariance when both a file's directory entry and its data are moved around. Also one inode could point to a file and a copy of the file or even a file and a symlink could point to the same inode, below is example:

$ ls -l -i /usr/bin/perl*
266327 -rwxr-xr-x 2 root root 10376 Mar 18  2013 /usr/bin/perl
266327 -rwxr-xr-x 2 root root 10376 Mar 18  2013 /usr/bin/perl5.14.2

A good to know is inodes are always unique values, so you can't have the same inode number duplicated. If a directory is damaged, only the names of the things are lost and the inodes become the so called “orphan”, e.g.  inodes without names but luckily this is recoverable. As the theory behind inodes is quite complicated and is complicated to explain here, I warmly recommend you read Ian Dallen's Unix / Linux / Filesystems – directories inodes hardlinks tutorial – which is among the best academic Tutorials explaining various specifics about inodes online.


How to Get inodes per mounted filesystem


root@linux:/home/hipo# df -i
Filesystem       Inodes  IUsed   IFree IUse% Mounted on


dev             2041439     481   2040958   1% /dev
tmpfs            2046359     976   2045383   1% /run
tmpfs            2046359       4   2046355   1% /dev/shm
tmpfs            2046359       6   2046353   1% /run/lock
tmpfs            2046359      17   2046342   1% /sys/fs/cgroup
/dev/sdb5        1221600    2562   1219038   1% /usr/var/lib/mysql
/dev/sdb6        6111232  747460   5363772  13% /var/www/htdocs
/dev/sdc1      122093568 3083005 119010563   3% /mnt/backups
tmpfs            2046359      13   2046346   1% /run/user/1000


As you see in above output Inodes reported for each of mounted filesystems has a specific number. In above output IFree on every mounted FS locally on Physical installed OS Linux is good.


Here is an example on how to recognize a depleted Inodes on a OpenXen Virtual Machine with attached Virtual Hard disks.

linux:~# df -i
Filesystem         Inodes     IUsed      IFree     IUse%   Mounted on
/dev/xvda         2080768    2080768     0      100%    /
tmpfs             92187      3          92184   1%     /lib/init/rw
varrun            92187      38          92149   1%    /var/run
varlock            92187      4          92183   1%    /var/lock
udev              92187     4404        87783   5%    /dev
tmpfs             92187       1         92186   1%    /dev/shm


Finding files with a certain inode


At some cases if you want to check all the copy files of a certain file that have the same i-node pointer it is useful to find them all by their shared inode this is possible with simple find (below example is for /usr/bin/perl binary sharing same inode as perl5.28.1:


ls -i /usr/bin/perl
23798851 /usr/bin/perl*


 find /usr/bin -inum 435308 -print
/usr/bin/perl5.28.1
/usr/bin/perl


Find directory that has a large number of files in it?

To get an overall number of inodes allocated by a certain directory, lets say /usr /var


root@linux:/var# du -s –inodes /usr /var
566931    /usr
56020    /var/

To get a list of directories use by inode for a directory with its main contained sub-directories sorted from 1 till highest number use:
 

du -s –inodes * 2>/dev/null |sort -g


Usually running out of inodes means there is a directory / fs mounts that has too many (small files) that are depleting the max count of possible inodes.

The most simple way to list directories and number of files in them on the server root directory is with a small bash shell loop like so:
 

for i in /*; do echo $i; find $i |wc -l; done


Another way to identify the exact directory that is most likely the bottleneck for the inode depletion in a sorted by file count, human readable form:
 

find / -xdev -printf '%h\n' | sort | uniq -c | sort -k 1 -n


This will dump a list of every directory on the root (/) filesystem prefixed with the number of files (and subdirectories) in that directory. Thus the directory with the largest number of files will be at the bottom.


The -xdev switch is used to instruct find to narrow it's search to only the device where you're initiating the search (any other sub-mounted NAS / NFS filesystems from a different device will be omited).


Print top 10 subdirectories with Highest Inode Usage


Once identifed the largest number of files directories that is perhaps the issue, to further get a list of Top subdirectories in it with highest amount of inodes used, use below cmd:


for i in `ls -1A`; do echo "`find $i | sort -u | wc -l` $i"; done | sort -rn | head -10


To list more than 10 of the top inodes used dirs change the head -10 to whatever num needed.

N.B. ! Be very cautious when running above 2 find commands on a very large filesystems as it will be I/O Excessive and in filesystems that has some failing blocks this could create further problems.

To omit putting a high I/O load on a production filesystem, it is possible to also use du + very complex regular expression:
 

cd /backup
du –inodes -S | sort -rh | sed -n         '1,50{/^.\{71\}/s/^\(.\{30\}\).*\(.\{37\}\)$/\1…\2/;p}'


Results returned are from top to bottom.


How to Increase the amount of Inodes count on a new created volume EXT4 filesystem

Some FS-es XFS, JFS do have an auto-increase inode feature in case if their is physical space, whether otheres such as reiserfs does not have inodes at all but still have a field reported when queried for errors. But the classical Linux ext3 / ext4 does not have a way to increase the inode number on a live filesystem. Instead the way to do it there is to prepare a brand new filesystem on a Disk / NAS / attached storage.

The number of inodes at format-time of the block storage can be as high as 4 billion inodes. Before you create the new FS, you have to partition the new the block storage as ext4 with lets say parted command (or nullify the content of an with dd to clean up any previous existing data on a volume if there was already existing data:
 

parted /dev/sda


dd if=/dev/zero of=/dev/path/to/volume


  then format it with this additional parameter:


mkfs.ext4 -N 3000000000 /dev/path/to/volume


Here in above example the newly created filesystem of EXT4 type will be created with 3 Billion inodes !, for setting a higher number on older ext3 filesystem max inode count mkfs.ext3 could be used instead.

Bear in mind that 3 Billion number is a too high number and if you plan to have some large number of files / directories / links structures just raise it up to your pre-planning requirements for FS. In most cases it will be rarely anyone that want to have this number higher than 1 or 2 billion of inodes.

On FreeBSD / NetBSD / OpenBSD setting inode maximum number for a UFS / UFS2 (which is current default FreeBSD FS), this could be done via newfs filesystem creation command after the disk has been labeled with disklabel:


freebsd# newfs -i 1024 /dev/ada0s1d


Increase the Max Count of Inodes for a /tmp filesystem


Sometimes on some machines it is necessery to have ability to store very high number of small files (e.g. have a very large number of inodes) on a temporary filesystem kept in memory. For example some web applications served by Web Server Apache + PHP, Nginx + Perl-FastCGI are written in a bad manner so they kept tons of temporary files in /tmp, leading to issues with exceeded amount of inodes.
If that's the case to temporary work around you can increase the count of Inodes for /tmp to a very high number like 2 billions using:


mount -o remount,nr_inodes=<bignum> /tmp

To make the change permanent on next boot if needed don't forget to put the nr_inodes=whatever_bignum as a mount option for the temporary fs to /etc/fstab

Eventually, if you face this issues it is best to immediately track which application produced the mess and ask the developer to fix his messed up programs architecture.


Conclusion


It was explained on the very common issue of having maximum amount of inodes on a filesystem depleted and the unpleasent consequences of inability to create new files on living FS.
Then a general overview was given on what is inode on a Linux / Unix filesystem, what is typical content of inode, how inode addressing is handled on a FS. Further was explained how to get basic information about available inodes on a filesystem, how to get a filename/s based on inode number (with find), the well known way to determine inode number of a directory or file (with ls) and get more extensive information on a FS on inodes with tune2fs.
Also was explained how to identify directories containing multitudes of files in order to determine a sub-directories that is consuming most of the inodes on a filesystem. Finally it was explained very raughly how to prepare an ext4 filesystem from scratch with predefined number to inodes to much higher than the usual defaults by mkfs.ext3 / mkfs.ext4 and *bsds newfs as well as how to raise the number of inodes of /tmp tmpfs temporary RAM filesystem.

Things to install on newly installed GNU / Linux (My favourite must have Linux text and GUI programs missing in fresh Linux installs)

Thursday, September 7th, 2017

must-have-packages-to-install-on-a-freshly-brand-new-linux-installed-on-desktop-computer-gnu-linux-logo

On every next computer I use as a Desktop or Laptop, I install with Debian GNU / Linux I install the following bunch of extra packages in order to turn the computer into a powerful Multimedia, User, Sys Admin army knife tools, A Programmer desktop and Hacker / Penetration Testing security auditting station.

The packages names might vary less or more across various Debian releases and should be similar or the same in Ubuntu / Linux Mint and the rest of Deb based distribtuions.

Also some of the package names might given in the article might change from time of writting this article just like some  already changed in time from a release to release, nomatter that the general list is a collection of packages I have enjoyed for the last 8 years. And I believe anyone who is new to GNU / Linux and  or even some experienced free software users in need of  full featured computer system for remote system administration purposes or general software development and even small entertainment such as Movie Watching or Playing some unsophisticated basic games to kill some time might benefit from the list of programs collected from my experience as a Free Software GNU / Linux users over the last 12 years or so.

So here we go as you might know, once you have a Debian GNU / Linux, first thing to do is to add some extra repositories in /etc/apt/sources.list

For example my debian 9 Stretch sources.list looks like this:

cp -rpf /etc/apt/sources.list /etc/apt/sources.list-bak

vim /etc/apt/sources.list

And delete / substitute everything within with something as following:

deb http://deb.debian.org/debian stretch main non-free
deb-src http://deb.debian.org/debian stretch main

deb http://deb.debian.org/debian stretch-updates main
deb-src http://deb.debian.org/debian stretch-updates main

deb http://security.debian.org/ stretch/updates main
deb-src http://security.debian.org/ stretch/updates main

deb http://security.debian.org/debian-security stretch/updates main contrib
deb-src http://security.debian.org/debian-security stretch/updates main contrib

deb http://download.virtualbox.org/virtualbox/debian stretch contrib

If you're using an older Debian release for example debian 7 or 8, the sources.list codename stretch word should be changed to wheezy for legacy debian 7 or jessie for debian 8, do it respectively for any future or older Deb releases.

Then proceed and update all current installed packages to their latest release with:

apt-get update && apt-get upgrade

If you're running on a very old Debian GNU / Linux release , you might encounter errors from above cmds, if that's your case just follow the online guides and update to a newer still supported Deb release.

Once all this is done assuming you have connected to the internet via LAN network or if on a laptop via Wireless, here are some useful stuff to install especially if you're planning to use your computer effectively in both console and graphics environment.


1. Install some basic packages necessery if you're planning to be using compilers on the freshly installed GNU / linux

apt-get install –yes gcc autoconf build-essential fakeroot devscripts equivs libncurses5-dev g++ make libc6-dev fontconfig gdc

The most notable package here is build-essential it provides the following collection of C / C++ programs on Deb package based distributions Debian / Ubuntu / Mint etc.
 

  1. libc6-dev – C standard library.
  2. gcc – C compiler.
  3. g++ – C++ compiler.
  4. make – GNU make utility to maintain groups of programs.
  5. dpkg-dev – Debian package development tools.

2. Install w3m lynx elinks text browsers

apt-get install –yes lynx elinks w3m-img w3m

3. Install wireless and networking tools
 

apt-get install  –yes tcpdump vnstat wpasupplicant wpagui dnsutils

4. Install Network sniffing, penetration testing and network evaluation tools
 

apt-get install  –yes wireshark nmap zenmap sniffit iptraf iptraf-ng tshark dsniff netsniff-ng netwox netwag sslsniff darkstat kismet netcat ngrep hashcat hydra hydra-gtk ophcrack ophcrack-cli

————–

wiresharkGUI network traffic analyzer

nmapnmap port mapper and security audit tool

zenmapGUI frontend to nmap

sniffitconsole text based basic packet sniffer and monitoring tool very used tool to sniff servers authenticatoins in the past

iptraf-ngNext Generation interactive colorful IP Lan mointor

tsharkanother network traffic analyzer console version

dsniffVarious tools to sniff network traffic for cleartext insecurities

netsniff-ngLinux network packet sniffer toolkit

netwoxProvides more than 200 tools to solve network problems with DNS, FTP, HTTP, IRC, NNTP, SMTP, SNMP, SYSLOG, TELNET, TFTP

netwaggraphical frontend to netwox

sslsniff SSL/TLS man-in-the-middle attack tool

darkstatnetwork traffic analyzer

kismetwireless sniffer and monitor (very useful in the past for sniffing passwords on a Wi-Fi network)

netcatTCP / IP swiss army knife (good tool to listen and connect to local and remote ports)

ngrepgrep like tool for network traffic

hashcatClaims to be world's fastest and most advanced password recovery utility, capable of attacking more than 160 highly optimized hashing algorithms, supports CPU and GPU (using the video card CPU to enhance password cracking speed), also could be used for distributed password cracking

hydra Very fast network logon cracker, supports webforms works with dictionary attacks etc.

hydra-gtkGTK GUI version of Hydra

ophcrackMicrosoft Windows password cracker using rainbow tables GUI

ophcrack-cli Console version of Microsoft Windows password cracker using rainbow tables for speed

————


5. Install multimedia, entertainment few useful tools and other useful stuff
 

apt-get install –yes workrave xscreensaver xscreensaver-data xulrunner xutils zenity yelp zgv   tracker-utils alltray ant apt-utils bsdutils  aumix bwidget ca-certificates pulseaudio-module-jack aumix audacious ffmpeg bluefish bluefish-plugins blender blueman bluez cabextract bluez-firmware bsdmainutils dcraw dmidecode evtest file fonts-liberation fonts-stix fonts-uralic fonts-opensymbol fonts-lyx fonts-cantarell fuse gimp gimp-data-extras gimp-plugin-registry git gnupg gnupg2 imagemagick imwheel inkscape iw less 


bsdutils – Provides some nice old school programs such as :

-=-=-=-=-=-

wall – a program to write to every logged in user console, used in old times on time sharing servers to notify all users about sys admin planning for a reboot or for some other update activity

renice – allows to renice priority over already prioritized process with (nice command)

script – Allows you to do a recorder like saves of user activity on a console / terminal

logger – send logging output from programs to syslog 

-=-=-=-=-=-

alltray – A small program that allows you to bring to dock any program useful to make Thunderbird appear in Gnome / Mate / KDE Dock in a similar manner as Outlook does in m$ Windows

zgv – SVGAlib graphical (picture viewer) useful to view pictures from tty consoles

zenity – allows to display graphical dialog boxes by using shell scripts

aumix – Simple text based mixer control, useful to tune up sound values and mic recording volume from console

WorkRave – is a useful program to periodically remind you to stand out of the computer on a specified interval and shows you graphically some exercies to do to prevent your physical health to not deteriorate by standing all day immobilized

Bluefish – Is Advanced GTK+ HTML Editor useful if you're about to edit HTML / CSS and other Web files

dcraw – Decode raw digital images

dmidecode – Text program that reports your computer hardware

blueman, bluez – Programs to enable USB support on your Linux

evtest – evtest is a utility to monitor Linux input devices

file – little tool to determine file type based on "magic numbes"

fontsliberation – Fonts with same metrics as Times, Arial and Courier


6. Install Text based console Multimedia Mp3 / Mod / S3m players

apt-get install –yes mpg321 mpg123 cmus mp3blaster mplayer sox  ogg123 mikmod cplay cdcd cdck eject

———

mpg321, mpg123 Mp3 and Ogg Vorbis console player historically one of the earliest I used to play my music

cmus Another awesome ncurses menu based small music player

mp3blaster Full Screen ncurses text console mp3 and Ogg vorbis music player

mplayer An awesome old school (the defacto standard) and still one of the best Music and Video player for GNU / Linux

sox Swiss army knife of sound processing, contains (sox, play, rec and soxi commands), which could be used to play, rec and add effects to WAV and other popular old sound formats

ogg123 Play Ogg Vorbis .OGG Free encoding file format in console

mikmodThe most famous Tracker (S3M, MOD, IT) music player for *NIX, play the old soundtracker formats on your GNU / Linux

cplay – A really nice text front end to music players, the cool thing about it it shows how much is left for the song to over using ASCII

cdcd – play Audio CDs from console

eject – eject your CD Drive from console

cdck – tool to verify the quality of written CDs/DVDs

———


7. Install Games

apt-get install –yes xpenguins frozen-bubble alex4 bsdgames bb ninvaders blobwars btanks chromium-bsu criticalmass figlet freetennis njam swell-foop dreamchess extremetuxracer gltron gnuchess wesnoth njam wing nikwi dreamchess gltron gnome-games swell-foop aisleriot prboom

———–

xpenguins – little penguins walk on your screen great to use as a screensaver

frozen-bubble – cool game with bubbles you have to pop out

blobwars – platform shooting game

njam – pacman like game with multiplayer support

extremetuxracer – 3D racing game featuring Tux the Linux penguin mascot

gltron – 3D remake of the good well known Tron Game

gnuchess – GNU remake of classic Chess game

wing – arcade Galaga like game for GNU / Linux

wesnoth – Fantasy turne based strategy game

dremachess – 3D chess game

swell-fool – Colored ball puzzle game

gnome-games – A collection of Games for the GNOME Desktop

nikwi – platform game with a goal to collect candies

aisleriot – GNOME solitaire card game 

prboom – PrBoom, a remake of the Doom 3d shooter classic game using SDL (supports OpenGL), to play it you will need WAD files if you don't have it install (doom-wad-shareware) package

figlet – Make large character ASCII banners out of ordinary provided text (just provide any text and get a nice ASCII picture out of it)

———-
 

8. Install basic archivers such as rar, zip, arj etc.

apt-get install –yes zip unrar arj cpio p7zip unzip bzip2 file-roller


———–

cpioGNU cpio, a program to manager archive files

bzip2BunZip2 block compressor decompressor utility (necessery to untar the .tar.bz2 tar balls)

unzipDe-archiver for .zip files console version

rar, unrarArchiver Unarchiver for .rar files in terminal / console (unfortunately non-free software)

file-rollerArchive manager for gnome

gpg – gnu privacy guard to be able to generate gpg keys

————-

If you're looking for an advanced file archive, dearchive software GUI that be a substitute for Windows WinRar,  WinZip there is also the proprietary software PeaZip for Linux, as I stay as much as possible away from non-free software I don't use PeaZip though. For me file-roller's default GNOME archiver / unarchiver does a pretty good job and if it fails someties I use the console versions of above programs
 

9. Install text and speech synthesizer festival freetts
 

apt-get install –yes festival festival-cmu festvox-kallpc16k festvox-ru mbrola-en1 speech-dispatcher-festival freetts flite yasr gnupg2

————-

FestivalIs the general multi-lingual speech synthesis system

yasris a basic console screen reader program

flitea small run time speech synthesis engine alternative to festival, another free software synthesis tool based built using FestVox

————–

Festival is great if you want to listen to text files and can easily be used to convert basic PDFs or DOC files to listen them if you're lazy to read I've explained on how you can use festival to read speak for you PDFs and DOCs, ODF (Open Document Format) here
 

10. Install linux-header files for latest installed Debian kernel

apt-get install –yes linux-headers-$(uname -r)

You will need that package if you need to compile external usually DRM (Digital Rights Management)  external modules that could be loaded to current Debian precompiled kernel, I recommend you abstain from it since most of the modules are DRMed and doesn't respect your freedom.
 

11. Install GUI programs and browsers

apt-get install –yes gnome-themes-standard gnome-themes-standard-data epiphany-browser dconf-tools gnome-tweak-tool

epiphany-browserIntuitive GNOME web browser (I love this browser, though sometimes Crashing I prefer to use it as it is really fast and lightweight I think Mac OS's Safari has been partially based on its programming code)

dconf-tools Dconf is a low-level key / value database designed for storing desktop environment variables (provides dconf-editor – which allows you to tune tons of gnome settings tunable only through this database it is something like Windows regedit registry editor tool but for GNOME)

gnome-themes-standard / gnome-themes-standard-data The name says it all it provides beautiful gnome standard themes

gnome-tweak-tool Graphic tool to adjust many advanced configuration settings in GNOME in GNOME 3.2, many of the old GNOME 3.0 and 2.X capabilities such as Desktop icons or Computer on the Desktop and many more useful gnome capabilities you might be used for historically can be enabled through that handy tool, it is a must for the GNOME user

12. Install text and GUI mail clients

apt-get install –yes mutt fetchmail bsd-mailx mailutils thunderbird aspell-bg aspell-en aspell-ru

I use primary 3 languages Russian, Bulgarian and English, so by installing the 3 packages aspell-bg, aspell-en, aspell-ru, that would add a possiility for Thunderbird and LibreOffice to have ability to spell check your mails and ODF documents, if your native language is different or you speak different languages do run:
 

apt-cache search aspell 


And install whatever languages spell check support you need


13. Install filesystem mount, check and repair tools
 

apt-get install –yes ntfs-3g sshfs dosfstools ext3grep  e2fsprogs e2fsck-static growisofs  e2undel extundelete recover bleachbit


———–

ntfs-3g – read / write NTFS driver support for FUSE (Filesystem in UserSpace) or in other words install these to be able to mount in read/write mode NTFS filesystems

sshfs – filesystem client based on SSH File Transfer Protocol, that little nitty tool enables you to mount remotely SSH Filesystems to your local Linux Desktop, it is also useful to install across servers if you need to remotely mount SSH Filesystems

e2fsprogs ext2 / ext3 / ext4 filesystem utilities to check, fix, tune, defragment resize and create etc. new filesystems  (provides crucial commands such as fsck.ext2, fsck.ext3, fsck.ext4, e2label, lsattr, chattr, resize2fs, mkfs.ext2, mkfs.ext3, mkfs.ext4 …)

dosfstoolstool giving you ability to check, create and diagnose DOS and Windows FAT 32 Filesystems provides commands such as dosfsck, mkdosfs, dosfslabel, fsck.msdos, fsck.vfat, mkfs.msdos

growisofs DVD+ RW / Read Only Recorder

ext3greptool to help recover deleted files on ext3 filesystems

e2undel Undelete utility for ext2 filesystems
———–

14. Install emulators for PC OS Emuation (Qemu), DOS and Wine to run native Windows programs on GNU / Linux
 

apt-get install –yes qemu qemu-utils aqemu dosbox mame mame-extra os8 simh wine nestopia dgen


—————-

QemuVirtual Machine emulator with support UEFI firmware

Aqemu – Qemu QT VM GUI Frotend

Dosbox – Dos Emulator, great to have to play the good old DOS games on your GNU / Linux

Mame – Multiple Arcade Machine Emulator, great if you want to play the old arcade games of your youth such as The Punisher, Cadillacs and Dinosaurs, Captain America, Robocop, Captain Commando, Wonderboy and so on the list goes on and on …

simh – PDP-1 PDP-4 PDP-7, PDP-9, PDP-10, PDP-11, PDP-15 HP 2100, IBM System 3, IBM 1620, Interdata, SDS, LGP-21, LGP-30, DEC VaX emulator

nestopia Nintendo Entertainment System / Famicom Emulator

dgen – Sega MegaDrive GNU / Linux Emulator

—————


15. Install Network Time protocol daemon and ntpdate (time synchronizing text client)

apt-get install –yes ntpdate ntp

16. Install Djview and CHM books reader

apt-get install –yes djview djview4 djvulibre-bin xchm kchmviewer chm2pdf

Install this packages to be able read DjView and CHM book formats

17. Install other text stuff

# Install text calculator I always prefer and use this console tool instead of the GUI gnome-calculator

apt-get install –yes bc

18. Install printing CUPs and printing utilities

apt-get install –yes cups-client cups-daemon cups-server-common hplip hplip-data printer-driver-hpcups printer-driver-hpijs ghostscript 

A bunch of packages for your Linux Deskto po properly support printing, you might need to install some extra packages depending on the type of printer you need to use, perhaps you will have to take few minutes probably to configure CUPs.

19. Install text monitoring tools

apt-get install –yes htop atop  dnstop  iftop iotop  jnettop ntopng  pktstat  powertop  sntop mariadb-client  iotop  itop jnettop kerneltop logtop
pgtop powertop


—————–

htop – More interactive colorful process viewer similar to top

atop – Monitor for system resources and process activity

dnstop – Console tool for analyze DNS traffic

iftop displays bandwidth usage information on a chosen network interface

iotopsimple top-like I/O (I / O) information output by the Linux kernel

jnettopView hosts / ports taking up the most network traffic

ntopng High-Speed Web-based Traffic analysis and Flow Collection tool

pktstat top like utility for network connections usage

powertop tool to diagnose issues with power consumption and management (useful for Linux running laptops)

sntop A ncurses-based utility that polls hosts to determine connectivity

mariadb-clientthis is the new name for the old mytop / mtop MySQL top package

kerneltop shows Linux kernel usage in a style like top

pgtop Show PostgreSQL queries in a top like style

lograte real time log line rate analyzer

—————-

20. Install text command line tools for transferring data from Web sites and FTP

apt-get install –yes curl wget lftp filezilla gftp transmission linuxdcpp

———-
curl command line tool for transferring data with URL syntax

wget tool to retrvie files and html from the web

lftp sophisticated command-line FTP/HTTP/BitTorrent client program

filezilla Full-featured graphical FTP/FTPS/SFTP client

gftp X/GTK+ and console FTP client

transmission lightweight Bittorrent client

linuxdcpp – Port of the Windows file-sharing program DC++

———–

21. Install text based communication programs

apt-get install –yes irssi freetalk centerim finch

———-

Irssi Great console IRC chat client with support for encryption

FreeTalk console based jabber client

centerim Console based ICQ client

finch – Multi protocol Text console client for AIM/ICQ, Yahoo!, MSN, IRC, Jabber / XMPP / Google Talk Sametime, MySpaceIM, Napster, Zephyr, Gadu-Gadu, Bonjour, GroupWise

———-

22. Install Apache Webserver and MySQL

This two are necessery if you're about to use your computer as a PHP / MySQL develment station

apt-get install –yes mysql-server phpmyadmin apache2 libapache2-mod-php php-pear php php-mysql  ant ant-contrib apache2-dev apache2-ssl-dev

———-

mysql-server MySQL community edition

ant Java based build tool like make (necessery for building many third party apache modules and code)

libapache2-mod-php5the php module loaded into apache

phpmyadminWebtool admin to manage your MySQL database

——–

23. Install mouse support for consoles

apt-get install –yes gpm


———–

gpm is the general purpose mouse interface, if you want to have support for your mouse in TTY consoles (the ones you go to with CTRL + ALT + F2, CTRL + ALT + F3 and so on install it).

———–

24. Install various formats converter tools

apt-get install –yes html2text pdf2djvu unoconv oggconvert webkit2pdf img2pdf gsscan2pdf netpbm dir2ogg soundconverter


————

gsscan2pdfGUI program to produce PDF or DJVU from scanned documents

img2pdfLossless conversion of raster images to PDF

webkit2pdfexport web pages to PDF files or printer

html2textAdvanced HTML to text converter

oggcconvert – convert media files to free format 

netpbmGraphics conversion tools between image formats

dir2ogg – converts MP3, M4A, WMA, FLAC, WAV files and Audio CDs to the open-source OGG format.

soundconverter – GNOME application to convert audio files into other formats

————

There are probably a lot of more handy packages that other Free Software users like to install to make the GNU / Linux desktop notebook even more entertaining and fulfillful for daily work. If you can think of other useful packages not mentioned here you tend to use on a daily basis no matter where Debian based or other distro, please share that would help me too to learn a new thing and I'll be greateful.

Enjoy !

UPDATE: If you get errors with missing packages, just delete them out of the apt-get lines. The reason is some packages are beying removed from .deb repositories or the software package name has changed due to some reason.
 

How to fully recover deleted files on ext3 Debian Linux partition – undelete files from ext3 filesystems with ext3grep

Monday, March 7th, 2011

In order to recover fully data by mistake or on purpose deleted on Debian GNU/Linux there is a tool called ext3grep which is able to completely recover data by innodes.

Recovering the deleted files data is very easy and can be done via some livecd after installing the ext3grep tool.

In my case I used the Back Track Linux distribution to recover my data. Recovery is still in process and it appears all or at least most of my data is about to be recovered.

For the recovery procedure all necessary is an external partition in ext3 or ext3 where the recovered data from the ext3 device can be stored.

My partition was about 20GB and since I had no external hard dive to store the data to I used the sshfs to mount remotely a hard drive via the networking using the sshfs program to make the ssh mount for more see my previous post Howto mount remote server ssh filesystem using sshfs

The Backtrack livecd linux security distribution is missing the ext3grep tool thus I had to first install the tool after booting the livecd on the notebook to succeed in that it was necessary to install the e2fslibs-dev package through the command:

debian:~# apt-get install e2fslibs-dev

Further on I've downloaded the latest version of the ext3grep and untarred the archive and compiled it with the commands:

debian:~# ./configure && make && make install
Then I used the simple commands:

debian:~# cd /mnt/res
debian:~# ext3grep --restore-all /dev/sda8

to launch the recovery.
Where in the above commands /mnt/res is the mountpoint location where I wanted to have all my data recovered and the /dev/sda8 is the device from which I wanted to recover my data.

It takes a bit long until the recovery is completed and with 20 gigabytes of data about 5, 6 hours might be necessary for the data to be recovered but the main point is it recovers.

Migrate Webserver and SQL data from old SATA Hard drive to SSD to boost websites performance / Installing new SSD KINGSTON 120GB hard disk on Linux

Monday, March 28th, 2016

ssd-linux-migrate-webserver-and-mysql-from-old-SATA-to-SSD-Kingston-Hard-drive-to-boost-performance-installing-new-SSD-on-Debian-linux
Blog and websites hosted on a server were giving bad performance lately and the old SATA Hard Disk on the Lenovo Edge server seemed to be overloaded from In/Out operations and thus slowing down the websites opeining time as well as SQL queries (especially the ones from Related Posts WordPress plugin was quite slow. Sometimes my blog site opening times were up to 8-10 seconds.

To deal with the issue I obviously needed a better speed of I/O of hard drive thus as I've never used SSD hard drives so far,  I decided to buy a new SSD (Solid State Drive) KINGSTON SV300S37A120G, 605ABBF2, max UDMA/133  hard disk.
Mounting the hard disk physically on the computer tower case wasn't a big deal as there are no rotating elements of the SSD it doesn't really matter how it is mounted main thing is that it is being hooked up somewhere to the case.

I was not sure whether the SSD HDD is supported by my Debian GNU / Linux so I had see whether Linux Operating System has properly detected your hard disk use dmesg

1. Check if SSD Hard drive is supported in Linux


linux:~# dmesg|grep -i kingston
[    1.182734] ata5.00: ATA-8: KINGSTON SV300S37A120G, 605ABBF2, max UDMA/133
[    1.203825] scsi 4:0:0:0: Direct-Access     ATA      KINGSTON SV300S3 605A PQ: 0 ANSI: 5


linux:~# dmesg|grep -i sdb
[    1.207819] sd 4:0:0:0: [sdb] 234441648 512-byte logical blocks: (120 GB/111 GiB)
[    1.207847] sd 4:0:0:0: [sdb] Write Protect is off
[    1.207848] sd 4:0:0:0: [sdb] Mode Sense: 00 3a 00 00
[    1.207860] sd 4:0:0:0: [sdb] Write cache: enabled, read cache: enabled, doesn't support DPO or FUA
[    1.207928]  sdb: unknown partition table
[    1.208319] sd 4:0:0:0: [sdb] Attached SCSI disk


Well great news as you see from above output obviously the Kingston SSD HDD was detected by the kernel.
I've also inspected whether the proper dimensions of hard drive (all 120 Gigabytes are being detected by the OS):


linux:~# fdisk -l /dev/sdb
Disk /dev/sdb: 120.0 GB, 120034123776 bytes
255 heads, 63 sectors/track, 14593 cylinders, total 234441648 sectors
Units = sectors of 1 * 512 = 512 bytes
Sector size (logical/physical): 512 bytes / 512 bytes
I/O size (minimum/optimal): 512 bytes / 512 bytes
Disk identifier: 0x00000000

Even better as the proper HDD sizing was detected by Linux kernel.
Next thing to do was of course to create ext4 filesystem on the SSD HDD.
I wanted to give 2 separate partitions for my Webserver Websites DocumentRoot directories which all lay under the standard Apache location inside /var/www as well as MySQL data folder which is also under the standard Debian based Linuces – /var/lib/mysql as the SQL data directory was just 3.3 GB size, I've decided to reserve 20GB gigabytes for the MySQL and another 100 GB for my PHP / CSS / JS / HTML and other data files /var/www.
 

2. Create SSD partitions with cfdisk

Hence I needed to create:

1. SSD partition of 100GB
2. SSD partition of 20GB

I have cfdisk installed and I believe, the easiest way to create the partitions is using interactive partitioner as CFDISK instead of fdisk: so in order to make the proper partitions I've ran


linux:~# cfdisk /dev/sdb


I' will skip explainig details on how to use CFDISK as it is pretty standard – display or manipulate disk partition table tool.
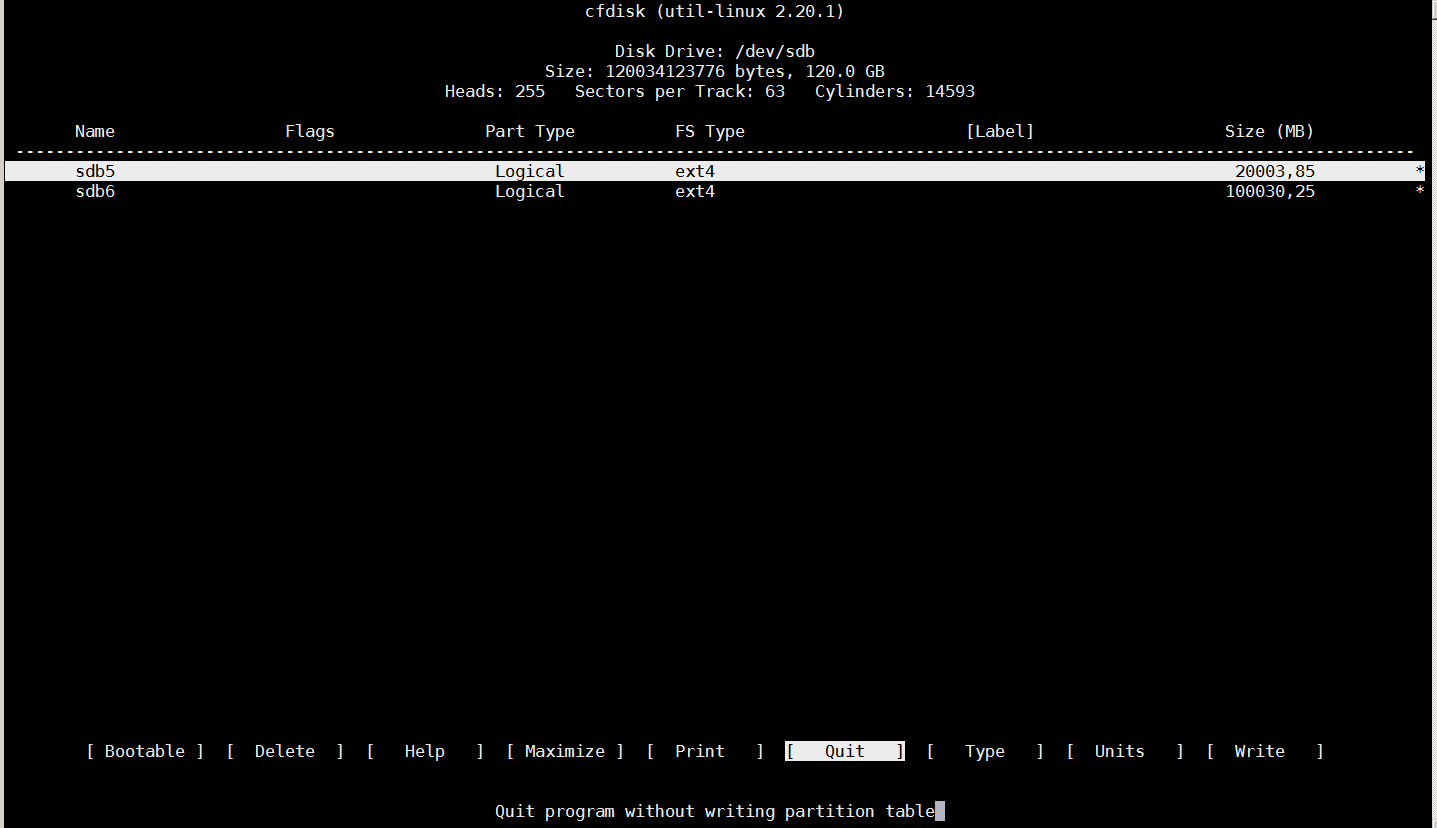
Just press on NEW button (moving with arrow keys buttons) and choose the 2 partitions size 100000 and 20000 MB (one thing to note here is that you have to choose between Primary and  Logical creation of partitions, as my SSD is a secondary drive and I already have a ) and then press the
WRITE button to save all the partition changes.

!!! Be very careful here as you might break up your other disks data make sure you're really modifying the SSD Hard Drive and not your other /dev/sda or other attached external Hard drive or ATA / SATA disk.
Press the WRITE button only once you're absolutely sure, you do it at your own (always create backup of your other data and don't blame me if something goes wrong) …

Once created the two partitions will look like in the screenshot below:
creating-linux-partitions-with-cfdisk-linux-partitioning-tool.png


3. Create ext4 filesystem 100 and 20 GB partitions

Next thing to do before the two partitions are ready to mount under Webserver's files documentroot /var/www and /var/lib/mysql is to create ext4 filesystem, though some might prefer to stick to ext3 or reiserfs partition, I would recommend you use ext4 for the reason ext4 according to my quick research is said to perform much better with SSD Hard Drives.

The tool to create the ext4 filesystems is mkfs4.ext4 it is provided by debian package e2fsprogs I have it already installed on my server, if you don't have it just go on and install it with:
 

linux:~# apt-get install –yes e2fsprogs


To create the two ext4 partitions run:
 

linux:~# mkfs4.ext4 /dev/sdb5


linux:~# mfs4.ext4 /dev/sdb6


Here the EXT4 filesystem on partition that is supposed to be 100 Gigabytes will take 2, 3 minutes as the dimensions of partition are a bit bigger, so if you don't want to get boring go grab a coffee, once the partitions are ready you can evaluate whether everyhing is properly created with fdisk you should get output like the one below


linux:~# fdisk -l /dev/sdb
Disk /dev/sdb: 120.0 GB, 120034123776 bytes
255 heads, 63 sectors/track, 14593 cylinders, total 234441648 sectors
Units = sectors of 1 * 512 = 512 bytes
Sector size (logical/physical): 512 bytes / 512 bytes
I/O size (minimum/optimal): 512 bytes / 512 bytes
Disk identifier: 0x00000000

   Device Boot      Start         End      Blocks   Id  System
/dev/sdb1              63   234441647   117220792+   5  Extended
/dev/sdb5             126    39070079    19534977   83  Linux
/dev/sdb6        39070143   234441647    97685752+  83  Linux


4. Mount newly created SSD partitions under /var/www and /var/lib/mysql

Before I mounted /var/www and /var/lib/mysql in order to be able to mount under the already existing directories I had to:

1. Stop Apache and MySQL server
2. Move Mysql and Apache Documentroot and Data directories to -bak
3. Create new empty /var/www and /var/lib/mysql direcotries
4. Copy backpups ( /var/www-bak and /var/lib/mysql-bak ) to the newly mounted ext4 SSD partitions

To achieve that I had to issue following commands:
 

linux:~# /etc/init.d/apache2 stop
linux:~# /etc/init.d/mysql stop

linux:~# mv /var/www /var/www-bak
linux:~# mv /var/lib/mysql /var/lib/mysql-bak

linux:~# mkdir /var/www
linux:~# mkdir /var/lib/mysql
linux:~# chown -R mysql:mysql /var/lib/mysql


Then to manually mount the SSD partitions:
 

linux:~# mount  /dev/sdb5 /var/lib/mysql
linux:~# mount /dev/sdb6 /var/www


To check that the folders are mount into the SSD drive, ran mount cmd:


linux:~# mount
/dev/sda1 on / type ext3 (rw,errors=remount-ro)
tmpfs on /lib/init/rw type tmpfs (rw,nosuid,mode=0755)
proc on /proc type proc (rw,noexec,nosuid,nodev)
sysfs on /sys type sysfs (rw,noexec,nosuid,nodev)
udev on /dev type tmpfs (rw,mode=0755)
tmpfs on /dev/shm type tmpfs (rw,nosuid,nodev)
devpts on /dev/pts type devpts (rw,noexec,nosuid,gid=5,mode=620)
fusectl on /sys/fs/fuse/connections type fusectl (rw)
/dev/sdc1 on /backups type ext4 (rw)
/dev/sdb5 on /var/lib/mysql type ext4 (rw,relatime,discard,data=ordered))
/dev/sdb6 on /var/www type ext4 (rw,relatime,discard,data=ordered))


That's great now the filesystem mounts fine, however as it an SSD drive and SSD drives are being famous for having a number of limited writes on disk before the drive lifetime is over it is a good idea to increase a bit the lifetime of the SSD by mounting the SSD partitions with noatime and errors=remount-ro (in order to not log file access times to filesystem table and to remount the FS read only in case of some physical errors of the drive).

5. Configure SSD partitions to boot every time Linux reboots

Now great, the filesystems gets mounted fine so next thing to do is to make it automatically mount every time the Linux OS boots up, this on GNU / Linux is done through /etc/fstab, for my 2 ext4 partitions this is the content to add at the end of /etc/fstab:


/dev/sdb5               /var/lib/mysql      ext4        noatime,errors=remount-ro       0       1
/dev/sdb6               /var/www        ext4    noatime,errors=remount-ro       0       1


quickest way to add it without a text editor is to echo to the end of file:
 

linux:~# cp -rpf /etc/fstab /etc/fstab.bak_25_03_2016
linux:~# echo ' /dev/sdb5               /var/lib/mysql      ext4        noatime,errors=remount-ro,discard       0       1' >> /etc/fstab
linux:~# echo ' /dev/sdb6               /var/www        ext4    noatime,errors=remount-ro,discard       0       1 ' >> /etc/fstab


Then mount again all the filesystems including the 2 new created SSD (100 and 20 GB) partitions:
 

linux:~# umount /var/www
linux:~# umount /var/lib/mysql
linux:~# mount -a


To assure properly mounted with noatime and remount-ro on errors options:


linux:~# mount | grep -i sdb
/dev/sdb5 on /var/lib/mysql type ext4 (rw,noatime,errors=remount-ro)
/dev/sdb6 on /var/www type ext4 (rw,noatime,errors=remount-ro)


It is also a good idea to check a statistics of disk free command:
 

linux:~# df -h|grep -i sdb
/dev/sdb5         19G  0G    19G  0% /var/lib/mysql
/dev/sdb6         92G   0G    92G  0% /var/www


6. Copy all Webserver and SQL data from backupped directories to new SSD mounted

Last but not least is to copy all original content files from /var/www-bak and /var/lib/mysql-bak to the new freshly  created SSD partitions, though copying the files can be made with normal linux copy command (cp),
I personally prefer rsync because rsync is much quicker and more efficient in copying large amount of files in my case this were 48 Gigabytes.

To copy files from with rsync:


linux:~# rsync -av –log-file /var/log/backup.log  /var/www-bak /var/www
linux:~# rsync -av –log-file /var/log/backup.log  /var/lib/mysql-bak /var/lib/mysql


Then ofcourse, finally to restore my websites normal operation I had to bring up the Apache Webservers and MySQL service


linux:~# /etc/init.d/apache2 start
linux:~# /etc/init.d/mysql start


7. Optimizing SSD performance with periodic trim (discard of unused blocks on a mounted filesystem)

As I digged deeper into how to even further optimize SSD drive performance I learned about the cleaning action TRIM of the partitions for a long term performance proper operation, to understand it better think about trimming like Windows degrament operatin.
 

NAME
fstrim – discard unused blocks on a mounted filesystem

SYNOPSIS
fstrim [-o offset] [-l length] [-m minimum-free-extent] [-v] mountpoint

DESCRIPTION
fstrim is used on a mounted filesystem to discard (or "trim") blocks which are not in use by the filesystem. This is useful for
solid-state drives (SSDs) and thinly-provisioned storage.

By default, fstrim will discard all unused blocks in the filesystem. Options may be used to modify this behavior based on range or
size, as explained below.


Trimming is really necessery, otherwise SSD become very slow after some time. All modern SSD's support TRIM, but older SSD's from before 2010 usually don't.
Thus for an older SSD you'll want to check this on the website of the manufacturer.

As I mentioned earlier TRIM is not supported by all SSD drives, to check whether TRIM is supported by SSD:

linux:~# hdparm -I /dev/sdb|grep -i -E 'trim|discard'
                  *          Data set Management TRIM supported (limit 1 block)

It's easiest to let the system perform an automatic TRIM. That can be done in several ways.

The quickest way for trimming is to place into /etc/rc.local trim  commands, in my case it was the following commands:


fstrim -v /var/lib/mysql
fstrim -v /var/www

To add it I've used my favourite vim text editor.
Adding commands to rc.local will make SSD trimming be executed at boot time so this will reduce a bit the downtime during the trim with some time so perhaps for those like me which are running a crually important websites a better

An alternative way is to schedule a daily cron job to do just place a new job in /etc/cron.daily/trim e.g.:
 

linux:~# vim /etc/cron.daily/trim


#!/bin/sh
fstrim -v /var/lib/mysql
fstrim -v /var/www

linux:~# chmod +x /etc/cron.daily/trim

However the best way to enable automatic trimming to SSD  is to just add the discard parameter to /etc/fstab I've already done that earlier in this article.

Not really surprising the increase of websites opening (page load times) were decreased dramatically web page loading waiting time fall down 2 to 2.5 times, so the moral of story for me is always when possible from now on to use SSD in order to have superb websites opening times.

To sum it up what was achieved with moving my data into SSD Drive, before moving websites and SQL data to SSD drive the websites were opening for 6 to 10 seconds now sites open in 2 to 4.5 seconds which is below 5 seconds (the normal waiting time for a user to see your website).
By the way it should be not a news forfor people that are into Search Engine Optimization but might be for some of unexperienced new Admins and Webmasters that, all that all page opening times that  exceeds 5 secs is considered to be a slow website (and therefore perhaps not worthy to read).
The high load page times >5 secs makes the website also less interesting not only for end users but also for search engines (Google / Yahoo / Bing / Baidoo etc.) will is said to crawl it less if website is slow.
Search Engines are said to Index much better and crawl more frequently into more responsive websites.
Hence implementing SSD to a server and decreasing the page load time should bring up my visitors stats a bit too.

Well that's all for today, hope you enjoyed 🙂

Recover/Restore unbootable GRUB boot loader on Debian Testing GNU/Linux using Linux LiveCD (Debian Install CD1)

Tuesday, July 6th, 2010

I’ve recently broke my grub untentianally while whiping out one of my disk partitions who was prepared to run a hackintosh.
Thus yesterday while switching on my notebook I was unpleasently surprised with an error Grub Error 17 and the boot process was hanging before it would even get to grub’s OS select menu.

That was nasty and gave me a big headache, since I wasn’t even sure if my partitions are still present.
What made things even worse that I haven’t created any backups preliminary to prepare for an emergency!
Thus restoring my system was absolutely compulsory at any cost.
In recovering the my grub boot manager I have used as a basis of my recovery an article called How to install Grub from a live Ubuntu cd
Though the article is quite comprehensive, it’s written a bit foolish, probably because it targets Ubuntu novice users 🙂
Another interesting article that gave me a hand during solving my issues was HOWTO: install grub with a chroot
Anyways, My first unsuccessful attempt was following a mix of the aforementioned articles and desperately trying to chroot to my mounted unbootable partition in order to be able to rewrite the grub loader in my MBR.
The error that slap me in my face during chroot was:

chroot: cannot execute /bin/sh : exec format error

Ghh Terrible … After reasoning on the shitty error I came to the conclusion that probably the livecd I’m trying to chroot to my debian linux partition is probably using a different incompatible version of glibc , if that kind of logic is true I concluded that it’s most likely that the glibc on my Linux system is newer (I came to that assumption because I was booting from livecds (Elive, Live CentOS as well Sabayon Linux, which were burnt about two years ago).

To proof my guesses I decided to try using Debian testing Squeeze/Sid install cd . That is the time to mention that I’m running Debian testing/unstable under the code name (Squeeze / Sid).
I downloaded the Debian testing amd64 last built image from here burnt it to a cd on another pc.
And booted it to my notebook, I wasn’t completely sure if the Install CD would have all the necessary recovery tools that I would need to rebuilt my grub but eventually it happened that the debian install cd1 has everything necessary for emergency situations like this one.

After I booted from the newly burned Debian install cd I followed the following recovery route to be able to recovery my system back to normal.It took me a while until I come with the steps described here, but I won’t get into details for brevity

1. Make new dir where you intend to mount your Linux partition and mount /proc, /dev, /dev/pts filesystems and the partition itself

noah:~# mkdir /mnt/root
noah:~# mount -t ext3 /dev/sda8 /mnt/root
noah:~# mount -o bind /dev /mnt/root/dev
noah:~# mount devpts /dev/pts -t devpts

Change /dev/sda8 in the above example commands with your partition name and number.
2. chroot to the mounted partition in order to be able to use your filesystem, exactly like you normally use it when you’re using your Linux partition

noah:~# chroot /mnt/root /bin/bash

Hopefully now you should be in locked in your filesystem and use your Linux non-bootable system as usual.

Being able to access your /boot/grub directory I suggest you first check that everything inside:

/boot/grub/menu.lst is well defined and there are no problems with the paths to the Linux partitions.

Next issue the following commands which will hopefully recover your broken grub boot loader.

noah:~# grub
noah:~# find /boot/grub/stage1

The second command find /boot/grub/stage1 should provide you with your partitions range e.g. it should return something like:

root (hd0,7)

Nevertheless in my case instead of the expected root (hd0,7) , I was returned

/boot/grub/stage1 not found

Useless to say this is uncool 🙂

As a normal reaction I tried experimenting in order to fix the mess. Logically enough I tried to reinstall grub using the

noah:~# grub-install --root-directory=/boot /dev/sda
noah:~# update-grub

To check if that would fix my grub issues I restarted my notebook. Well now grub menu appeared with some error generated by splashy
Trying to boot any of the setup Linux kernels was failing with some kind of error where the root file system was trying to be loaded from /root directory instead of the normal / because of that neither /proc /dev and /sys filesystems was unable to be mounted and the boot process was interrupting in some kind of rescue mode similar to busybox, though it was a was less flexible than a normal busybox shell.

To solve that shitty issue I once again booted with the Debian Testing (Sid / Squeeze ) Install CD1 and used the commands displayed above to mount my linux partition.

Next I reinstalled the following packages:

noah:~# apt-get update
noah:~# apt-get install --reinstall linux-image-amd64 uswsusp hibernate grub grub-common initramfs-tools

Here the grub reinstall actually required me to install the new grub generation 2 (version 2)
It was also necessary to remove the splashy

noah:~# apt-get remove splashy
As well as to grep through all my /etc/ and look for a /dev/sda6 and substitute it with my changed partition name /dev/sda8

One major thing where I substituted /dev/sda6 to my actual linux partition now with a name /dev/sda8 was in:

initramfs-tools/conf.d/resumeThe kernel reinstall and consequently (update) does offered me to substitute my normal /dev/sda* content in my /etc/fstab to some UUIDS like UUID=ba6058da-37f8-4065-854b-e3d0a874fb4e

Including this UUIDs and restarting now rendered my system completely unbootable … So I booted once again from the debian install cd .. arrgh 🙂 and removed the UUID new included lines in /etc/fstab and left the good old declarations.
After rebooting the system now my system booted once again! Hooray! All my data and everything is completely intact now Thanks God! 🙂

find text strings recursively in Linux and UNIX – find grep in sub-directories command examples

Tuesday, May 13th, 2014

unix_Linux_recursive_file_search_string_grep
GNU Grep
is equipped with a special option "-r" to grep recursively. Looking for string in a file in a sub-directories tree with the -r option is a piece of cake. You just do:

grep -r 'string' /directory/

or if you want to search recursively non-case sensitive for text

grep -ri 'string' .
 

Another classic GNU grep use (I use almost daily) is whether you want to match all files containing (case insensitive) string  among all files:

grep -rli 'string' directory-name
 

Now if you want to grep whether a string is contained in a file or group of files in directory recursively on some other UNIX like HP-UX or Sun OS / Solaris where there is no GNU grep installed by default here is how to it:

find /directory -exec grep 'searched string' {} dev/null ;

Note that this approach to look for files containing string on UNIX is very slowThus on not too archaic UNIX systems for some better search performance it is better to use xargs;

find . | xargs grep searched-string


A small note to open here is by using xargs there might be weird results when run on filesystems with filenames starting with "-".

Thus comes the classical (ultimate) way to grep for files containing string with find + grep, e.g.

find / -exec grep grepped-string {} dev/null ;

Another way to search a string recursively in files is by using UNIX OS '*' (star) expression:

grep pattern * */* */*/* 2>/dev/null

Talking about recursive directory text search in UNIX, should mention  another good GNU GREP alternative ACK – check it on betterthangrep.com 🙂 . Ack is perfect for programmers who have to dig through large directory trees of code for certain variables, functions, objects etc.


How to read ext2 / ext3 / ext4 Linux filesystem and Mac OS X HFS+ partitions from Windows

Thursday, November 27th, 2014

access-linux-drives-filesystem-disks-from-microsoft-windows-howto-picture
If you are using a Dual-boot PC with installed M$ Windows and GNU .Linux OS storing many of your Documents / Music / Movie data on Linux's ext3 / ext4 filesystem partition  but using often also Windows PC for Professional Graphic Design or Photoshop CS5 / Coreldraw Graphics Suite X7 / 3D Studio / Adobe Drewmweaver you will certainly want to be able to mount (Map drive) as a drive Linux partitions ext3 / ext4 or Mac OS's HFS+ read / use it straight from Windows.

Below are few softs that does allow mounting Mac and Linux (Debian, Ubuntu, Fedora, SuSE etc.) partitions on Windows

1. Mapping Linux ext3 and ext4 as a Windows drive

There are number of programs that can map Linux partition as a drive / directly explore Linux FS content. Most famous (free) ones are:

  • Ext2Explore (also known as Ext2Read) – Probably best historically known Windows driver that does Linux ext FS reading 


    ext2explore-access-ubuntu-debian-fedora-suse-linux-from-your-windows-screenshot
     

  • Ext2FSD – Open source file system driver for Windows (2K / XP / WIN7 / WIN8 – both x86 and 64 bit arch) supports ext2 / ext3 FSs and even CIFS protocol shares over network mounts. Ext4 filesystems are supported in read only mode only. It supports many language codepage utf8, cp936, cp950 etc..- Cyrillic file names shown correctly 🙂


    ext2fsd-mount-linux-partitions-in-microsoft-windows-screenshot
     

  • Explore2FS – GUI explorer tool for accessing ext2 and ext3 filesystems. It runs under all versions of Windows and can read almost any ext2 and ext3 filesystem.


    explore2fs-linux-partitions-from-widnows-screenshot
     

  • Disk Internals Linux reader – A freeware tool for reading and extracting files from EXT2/EXT3/EXT4, HFS, UFS2, Reiser4, and ReiserFS partitions in Windows.


    disk-internals-linux-reader-2.0-screenshot-proprietary-linux-filesystem-reader-mounter-for-windows


Other useful multiplatorm Linux FS reader unfortunately proprietary one is ParagonExtFS – proprietary software having version for both Win OS and Mac (Supports also mounting Linux partitionons Mac).

Note that if you copy some files using some of above tools to Windows permissions held in Linux could screw up, so it is not a good idea to try backup Linux configuration files to Windows's partitions 🙂

2. Read Copy files from Mac OS HFS+ filesystem to Windows

Apple has Boot Camp driver package which allows Mac OS's HFS+ to be viewable from Windows.

reading-Mac-OSX-HFS-plus-partitions-from-ms-windows-with-bootcamp-driver

For people who don't intend to continuosly read data HFS+ it might be better to not load Boot Camp but use:

hfsexplorer-explorero-allowing-read-access-to-mac-osx-from-ms-windows-os

 Only problem with Boot Camp and HFSExplorer is it allows you to read data from Mac OS filesystem only read only.If you want to write to HFS+ filesystem from Windows you will need:

  • Proprietary Paragon HFS+ (or)

Create Easy Data Backups with Rsnapshot back-up tool on GNU / Linux

Monday, April 15th, 2013


rsnapshot Linux and FreeBSD easy data backup tool logo
Backing up information on Linux servers is essential part of routine system adminsitrator job. Thus I decided to write for those interested in how one can easily create backups of important data through a tiny tool called rsnapshot which I prior used to make periodic data incremental backups on few of Debian Linux servers I manage. In case you wonder why use rsnapshot and not just rsync – the reasons are 2.
a. Rsnapshot is very easy to configure and use and you don't need to have deep understanding on  rsync numerous options to use it.
b. Rsnapshot does support incremental data backups – saving a lot of disk space on backup host.


Mentioning  incremental data backups for some those term might be a news so I will in short explain here what is Incremental Data Backups?

Incremental Data Backups are such backups which only create new backup of system scheduled files to backup only whether there are changes in files to backup or new ones are added to directory/directories set to be routinely backed up. Incremental backups are often desirable as they consume minimum storage space and are quicker to perform than normal periodic whole data archiving (differential backups). rsync has also support for incremental backups but configuring it to do so takes time and requires extra time on reading and understanding how they work, so I personally prefer simplicity rsnapshot brings.

1. Installing rsnapshot with apt-get

Here is rsnapshot debian package description;

debian:~#  apt-cache show rsnapshot|grep -i description -A 5


Description: local and remote filesystem snapshot utility
 rsnapshot is an rsync-based filesystem snapshot utility. It can take
 incremental backups of local and remote filesystems for any number of
 machines. rsnapshot makes extensive use of hard links, so disk space is
 only used when absolutely necessary.
Homepage: http://www.rsnapshot.org/

As you can read from description, rsnapshot is a frontend command using rsync to make data backups.

Install of rsnapshot is done through;

 debian:~# apt-get install --yes rsnapshot

Reading package lists… Done
Building dependency tree      
Reading state information… Done
The following NEW packages will be installed:
  rsnapshot
0 upgraded, 1 newly installed, 0 to remove and 0 not upgraded.
Need to get 0 B/140 kB of archives.
After this operation, 598 kB of additional disk space will be used.
Selecting previously deselected package rsnapshot.
(Reading database … 87026 files and directories currently installed.)
Unpacking rsnapshot (from …/rsnapshot_1.3.1-1_all.deb) … –
Processing triggers for man-db …
Setting up rsnapshot (1.3.1-1) …

2. Rsnapshot  package content and Documentation

Once installed here is file content of rsnapshot deb package;

debian:~# dpkg -L rsnapshot


/.
/usr
/usr/share
/usr/share/doc-base
/usr/share/doc-base/rsnapshot
/usr/share/doc
/usr/share/doc/rsnapshot
/usr/share/doc/rsnapshot/TODO
/usr/share/doc/rsnapshot/changelog.gz
/usr/share/doc/rsnapshot/Upgrading_from_1.1.gz
/usr/share/doc/rsnapshot/examples
/usr/share/doc/rsnapshot/examples/rsnapshot.conf.default.gz
/usr/share/doc/rsnapshot/examples/utils
/usr/share/doc/rsnapshot/examples/utils/backup_mysql.sh
/usr/share/doc/rsnapshot/examples/utils/mysqlbackup.pl
/usr/share/doc/rsnapshot/examples/utils/random_file_verify.sh
/usr/share/doc/rsnapshot/examples/utils/rsnapreport.pl.gz
/usr/share/doc/rsnapshot/examples/utils/make_cvs_snapshot.sh
/usr/share/doc/rsnapshot/examples/utils/backup_pgsql.sh
/usr/share/doc/rsnapshot/examples/utils/rsnapshotdb
/usr/share/doc/rsnapshot/examples/utils/rsnapshotdb/CHANGES.txt
/usr/share/doc/rsnapshot/examples/utils/rsnapshotdb/rsnapshotDB.pl.gz
/usr/share/doc/rsnapshot/examples/utils/rsnapshotdb/INSTALL.txt
/usr/share/doc/rsnapshot/examples/utils/rsnapshotdb/TODO.txt
/usr/share/doc/rsnapshot/examples/utils/rsnapshotdb/rsnapshotDB.xsd
/usr/share/doc/rsnapshot/examples/utils/rsnapshotdb/rsnapshotDB.conf.sample
/usr/share/doc/rsnapshot/examples/utils/rsnapshotdb/README.txt
/usr/share/doc/rsnapshot/examples/utils/rsnapshot-copy
/usr/share/doc/rsnapshot/examples/utils/backup_rsnapshot_cvsroot.sh
/usr/share/doc/rsnapshot/examples/utils/backup_dpkg.sh
/usr/share/doc/rsnapshot/examples/utils/sign_packages.sh
/usr/share/doc/rsnapshot/examples/utils/mkmakefile.sh
/usr/share/doc/rsnapshot/examples/utils/rsnaptar
/usr/share/doc/rsnapshot/examples/utils/rsnapshot_invert.sh
/usr/share/doc/rsnapshot/examples/utils/rsnapshot_if_mounted.sh
/usr/share/doc/rsnapshot/examples/utils/README
/usr/share/doc/rsnapshot/examples/utils/debug_moving_files.sh
/usr/share/doc/rsnapshot/examples/utils/backup_smb_share.sh
/usr/share/doc/rsnapshot/README.gz
/usr/share/doc/rsnapshot/changelog.Debian.gz
/usr/share/doc/rsnapshot/copyright
/usr/share/doc/rsnapshot/README.Debian
/usr/share/doc/rsnapshot/html
/usr/share/doc/rsnapshot/html/rsnapshot-HOWTO.en.html
/usr/share/doc/rsnapshot/NEWS.Debian.gz
/usr/share/lintian
/usr/share/lintian/overrides
/usr/share/lintian/overrides/rsnapshot
/usr/share/man
/usr/share/man/man1
/usr/share/man/man1/rsnapshot.1.gz
/usr/share/man/man1/rsnapshot-diff.1.gz
/usr/bin
/usr/bin/rsnapshot-diff
/usr/bin/rsnapshot
/var
/var/cache
/var/cache/rsnapshot
/etc
/etc/cron.d
/etc/cron.d/rsnapshot
/etc/rsnapshot.conf
/etc/logrotate.d
/etc/logrotate.d/rsnapshot

To get basic idea, on rsnapshot and how it can be configured and run manually as well as how it can be set-up to run periodic via a cronjob README shipped with package is a good start point.

debian:~# zless /usr/share/doc/rsnapshot/README.gz
....

It is also useful to check program documentation in HTML, whether you have some text browser installed – i.e. lynx or links:

debian:~# links /usr/share/doc/rsnapshot/html/rsnapshot-HOWTO.en.html

Note that many of information in rsnapshot-HOWTO is related to how rsnapshot is installed manually from source, so for Deb based distro users reading these sections can be safely skipped. For Debian users hence it is useful to read howto from section 4.A onwards. man rsnapshot's Examle section is very good reading too as it gives a lot of use scenarios necessary in more complicated backup situations.

3. Configuring Rsnapshot – Setting Data Directories to Backup

Configuration of Rsnapshot is done through /etc/rsnapshot.conf file. There is plenty of comments in file, so opening in text editor and taking few minutes to read commented lines is necessery. Configuration options just like with most Linux tool config files is done through config directives, not commented.

debian:~# cat /etc/rsnapshot.conf |grep -v "#"|uniq


config_version    1.2

snapshot_root    /var/cache/rsnapshot/

cmd_rm        /bin/rm

cmd_rsync    /usr/bin/rsync

cmd_logger    /usr/bin/logger

interval    hourly    6
interval    daily    7
interval    weekly    4

verbose        2

loglevel    3

lockfile    /var/run/rsnapshot.pid

backup    /home/        localhost/
backup    /etc/        localhost/
backup    /usr/local/    localhost/


Above config options are clear to understand, there is interval of backups to set (hourly, daily, weekly), verbose level of rsnapshot backup operation log file, lockfile which will be used by rsnapshot to prevent duplicate rsnapshot runs and last backup directive in which you need to specify what needs to be backed up. In config file there is also commented variable for creating rsnapshot backup once a month

#interval   monthly 3

If you need to create backups once a month uncomment it.

In backup directive add all directories from filesystem which need to have routine backup, for example I keep my Apache Web server files in /var/www/, store various install software in
/root/

and keep backup of Qmail (Vpopmail) old emails kept in
/var/vpopmail
.
To make rsnapshot backup those I add after rest of backup directives:

backup  /var/www/   localhost/
backup  /var/vpopmail/  localhost/
backup  /root/  localhost/


It is good practice to change snapshot_root directive to /root/.backups or whether you prefer to keep snapshot_root to default /var/cache/rsnapshot at least link with ln command /root/.backups to -> /root/.backups.

debian:~# ln -sf /var/cache/rsnapshot /root/.backups

If you change snapshot_root to /root/.backups, don't forget to create /root/.backups and set chmod  dir persmissions only readable to owner, i.e.:

debian:~# mkdir /root/.rsnapshot
debian:~# chmod -R 700 /root/.backups

Note that, it is important to use tab delimiters, everywhere in /etc/rsnapshot.conf, if you use space key delimiter instead of Tab you will end up with errors preventing rsnapshot to run.

4. Testing rsnapshot configuration and launching it first time

I will say it once again use Tab key for delimiters in config. It was my mistake on first time Rsnapshot launch to use spaces to delimiter my config options, thus testing my configuration, rsnapshot print an error and failed:

debian:~# rsnapshot configtest


———————————————————
rsnapshot encountered an error! The program was invoked with these options: /usr/bin/rsnapshot configtest ———————————————————
ERROR: /etc/rsnapshot.conf on line 199: ERROR: backup /var/www/ localhost/
ERROR: ———————————————————
ERROR: Errors were found in /etc/rsnapshot.conf, ERROR: rsnapshot can not continue. If you think an entry looks right, make
ERROR: sure you don't have spaces where only tabs should be.  

After changing, Space delimiters with Tabs and re-running rsnapshot configtest if all fine you get:

debian:~# rsnapshot configtest
Syntax OK

Once all good with config to launch Rsnapshot do its first complete incremental data backup, to display what rsnapshot will backup and what exact rsync invocations will it use type:


debian:~# rsnapshot -t hourly

echo 5644 > /var/run/rsnapshot.pid
mv /var/cache/rsnapshot/hourly.2/ /var/cache/rsnapshot/hourly.3/
mv /var/cache/rsnapshot/hourly.1/ /var/cache/rsnapshot/hourly.2/
native_cp_al("/var/cache/rsnapshot/hourly.0", \
    "/var/cache/rsnapshot/hourly.1")
/usr/bin/rsync -a –delete –numeric-ids –relative –delete-excluded /home \
    /var/cache/rsnapshot/hourly.0/localhost/
/usr/bin/rsync -a –delete –numeric-ids –relative –delete-excluded /etc \
    /var/cache/rsnapshot/hourly.0/localhost/
/usr/bin/rsync -a –delete –numeric-ids –relative –delete-excluded \
    /usr/local /var/cache/rsnapshot/hourly.0/localhost/
/usr/bin/rsync -a –delete –numeric-ids –relative –delete-excluded \
    /var/www /var/cache/rsnapshot/hourly.0/localhost/
/usr/bin/rsync -a –delete –numeric-ids –relative –delete-excluded \
    /var/vpopmail /var/cache/rsnapshot/hourly.0/localhost/
/usr/bin/rsync -a –delete –numeric-ids –relative –delete-excluded /root \
    /var/cache/rsnapshot/hourly.0/localhost/
touch /var/cache/rsnapshot/hourly.0/

To launch backup first time manually:

debian:~# rsnapshot hourly

Depending on backupped data (Mega/Giga/Terabytes) size and the number of files which had to be backed up, backup takes from minutes to hours.
Note that it is always good idea to create backups on separate hard disk configured in some kind of RAID array, preferrably (RAID 1 or RAID 5). Creating backups on separate hard disk has numerous advantages, the most important one is it doesn't put too much Input / Output (I/O) stress on hard disk and thus will not create server downtimes on High traffic – Busy servers slow old Hard Disks or servers with Big amount of I/O HDD read/writes .

5. Enabling Rsnapshot to create backups via scheduled cron job

On package install Rsnapshot creates a skele file for running via cronjob in /etc/cron.d/rsnapshot.

debian:~# cat /etc/cron.d/rsnapshot


# This is a sample cron file for rsnapshot.
# The values used correspond to the examples in /etc/rsnapshot.conf.
# There you can also set the backup points and many other things.
#
# To activate this cron file you have to uncomment the lines below.
# Feel free to adapt it to your needs.

# 0 */4        * * *        root    /usr/bin/rsnapshot hourly
# 30 3      * * *        root    /usr/bin/rsnapshot daily
# 0  3      * * 1        root    /usr/bin/rsnapshot weekly
# 30 2      1 * *        root    /usr/bin/rsnapshot monthly
 

To make hourly, daily, weekly, monthly backup uncomment one of above 4 lines. For paranoid admins scared to loose even a bit of data, hourly data is a good solution. For me personally I prefer configuring weekly backups for the reason I routinely monitor servers – keeping an eye regularly on dmesg and checking Linux smard / smartmontools logs to find out whether a hard disk or RAID has bad blocks

6. Checking backup size / backup difference and backup structure

Checking size of backups can be done by using standard du command on backup directory:

debian:~# du -hsc /var/cache/rsnapshot/*
4.3G /var/cache/rsnapshot/hourly.0
4.5M /var/cache/rsnapshot/hourly.1
68M /var/cache/rsnapshot/hourly.2
4.4G total

rsnapshot also has du argument via which backup size can be viewed:

debian:~# rsnapshot du 4.3G /var/cache/rsnapshot/hourly.0/
4.5M /var/cache/rsnapshot/hourly.1/
68M /var/cache/rsnapshot/hourly.2/
4.4G total

As you can see each new incremental backup is with new number after hourly{0,1,2} etc.

To check difference between two different backups:

debian:~# rsnapshot diff /var/cache/rsnapshot/hourly.0/ /var/cache/rsnapshot/hourly.1/
Comparing /var/cache/rsnapshot/hourly.1 to /var/cache/rsnapshot/hourly.0
Between /var/cache/rsnapshot/hourly.1 and /var/cache/rsnapshot/hourly.0:
660 were added, taking 3728377727 bytes;
492 were removed, saving 17623 bytes;

Structure of backed up files is identical to normal copy of files without any compression:

debian:~# cd /root/.backups/hourly.0/localhost/
debian:~/.backups/hourly.0/localhost# ls

etc/ home/ root/ usr/ var/


7. Restoing files or directory from rsnapshot backup

To restore lets say /var directory cd into it:

debian:~/.backups/hourly.0/localhost# cd var
debian:~/.backups/hourly.0/localhost/var#

Then use rsync as follows:

debian:~/.backups/hourly.0/localhost/var# rsync -avr * /


8. Creating rsnapshot backups from remote server via SSH protocol

In /etc/rsnapshot.conf you should have set SSH port on which remote server is accepting SSH connections. Standard port is 22, however it is wise to configure on backup server SSH to listen to some other non standard port.

In config variables to look on are:

ssh_args -p 22

and

Onwards to enable remote login via ssh uncomment in /etc/rsnapshot.conf :

# cmd_ssh /usr/bin/ssh

to

cmd_ssh /usr/bin/ssh

Before starting rsnapshot to create backups on remote host2 you need to Configure automatic SSH passwordless login by generating DSA or RSA key pair between host1 and host2. Where host1 is machine on which rsnapshot is run and to which backups will be copied from host2
Once passwordless ssh to remote host is active, to force rsnapshot create backups from host1 you will need to add near end of /etc/rsnapshot.conf .

backup  root@host2.com:/root/ host2.com/

The same way you can add a number of remote hosts from which periodic backups will be created to central host1. Only condition is on each node – host3, host4, host5.

backup  root@host3.com:/root/root/ host3.com
backup  root@host4.com:/home/ host4.com
backup  root@host4.com:/var/ host4.com

To create on host1 public key (id_dsa.pub) file with command:

debian:~# ssh-keygen -t dsa
...
....
debian:~# ssh-copy-id -i ~/.ssh/id_dsa.pub root@host3

Once all hosts that needs to get backed up to central backup host – host1. To test if backups gets uploaded manually issue:

debian:~# rsnapshot -v hourly
...

Rsnapshot has a number of other scripts which can be easily integrated with it in /usr/share/doc/rsnapshot/examples/utils.
Inside you can find example scripts on how to create MySQL / PostgreSQL database backup, Samba Share backups, backup CVS repositories and so on. The scripts can be easily modified and work with mostly any data or protocol with a bit of tweaking. Short description of each of example scripts can be found in /usr/share/doc/rsnapshot/examples/utils/README