Archive for October, 2017

How to use find command to find files created on a specific date , Find files with specific size on GNU / Linux

Monday, October 16th, 2017

How to use find command to find files created on a specific date on GNU / Linux?


The easiest and most readable way but not most efficient ) especially for big hard disks with a lot of files not the best way) to do it is via:


find ./ -type f -ls |grep '12 Oct'


Example: To find all files modified on the 12th of October, 2017:

find . -type f -newermt 2017-10-12 ! -newermt 2017-10-13

To find all files accessed on the 29th of september, 2008:

$ find . -type f -newerat 2015-09-29 ! -newerat 2015-09-30

Or, files which had their permission changed on the same day:

$ find . -type f -newerct 2015-09-29 ! -newerct 2015-09-30

If you don't change permissions on the file, 'c' would normally correspond to the creation date, though.


Another more cryptic way but perhaps more efficient  to find any file modified on October 12th,2017,  would be with below command:


find . -type f -mtime $(( ( $(date +%s) – $(date -d '2017-10-12' +%s) ) / 60 / 60 / 24 – 1 ))


You could also look at files between certain dates by creating two files with touch

touch -t 0810010000 /tmp/f-example1
touch -t 0810011000 /tmp/f-example2

This will find all files between the two dates & times of the 2 files /tmp


find / -newer /tmp/f-example1 -and -not -newer /tmp/f-exampl2


How to Find Files with a certain size on GNU / Linux?


Lets say you got cracked and someone uploaded a shell php file of 50296 bytes a , that's a real scenario that just happened to me:

root@pcfreak:/var/www/blog/wp-admin/js# ls -b green.php 
green.php
root@pcfreak:/var/www/blog/wp-admin/js# ls -al green.php 
-rw-r–r– 1 www-data www-data 50296 окт 12 02:27 green.php

root@pcfreak:/home/hipo# find /var/www/ -type f -size 50296c -exec ls {} \;
/var/www/blog/wp-content/themes/default/green.php
/var/www/blog/wp-content/w3tc/pgcache/blog/tag/endless-loop/_index.html
/var/www/blog/wp-content/w3tc/pgcache/blog/tag/common/_index.html
/var/www/blog/wp-content/w3tc/pgcache/blog/tag/apacheroot/_index.html
/var/www/blog/wp-content/w3tc-bak/pgcache/blog/tag/endless-loop/_index.html
/var/www/blog/wp-content/w3tc-bak/pgcache/blog/tag/common/_index.html
/var/www/blog/wp-content/w3tc-bak/pgcache/blog/tag/apacheroot/_index.html
/var/www/pcfreakbiz/wp-includes/css/media-views.css


How to solve qmail-inject: fatal: qq temporary problem (#4.3.0) Qmail and Qmail Scanner problems on Debian Linux Wheezy

Monday, October 16th, 2017

fix-qq-error-qmail-inject-qq-temporary-problem-4.3.0-PoweredBy-qmail-Logo

Below QMAIL error
 

qmail-inject: fatal: qq temporary problem (#4.3.0)


occured to me right after upgraded from Debian Linux Squeeze 6 to Debian 7 Wheezy,

qmail-inject: fatal: qq temporary problem (#4.3.0) is really terrible error and I only experienced that error in my Thunderbird during sending mails, mail receiving doesn't work either, so as normally when there are problems with Qmail its a lot of puzzling until you get it.

There is no even trace in logs on what might be causing it, strangely enough nothing in qmail-smtpd, qmail-send logs, the mail server and all components seemed to work perfectly fine I checked whether there are libraries that are missing with a small loop line as follows:


root@pcfreak:/var/log/qmail/qmail-smtpd# for i in $(ls -1 /var/qmail/bin/*); do ldd $i |grep -i "not found"; done
root@pcfreak:/var/log/qmail/qmail-smtpd# 


The absence of result indicates, all binaries are properly linked and no found mmissing libraries.

After investigating closely what might be wrong and reading comments on Thibs QmailRocks Install Qmail-Scanner page, I realied
the error might be caused, because of problems with suid perl, as I already checked my earlier post in which I seemed to have faced the same qmail-inject: fatal: qq temporary problem (#4.3.0) error on Debian Wheezy and explained the possible reasons what might be causing the qq qmail error  here as well


and a related issue I experienced earlier with qmail scanner unable to create files in previous article here Suid Perl no longer available as a package and therefore because of the inability of perl to run as root anymore in Debian Wheezy, qmail-scanner-queue.pl script did not work either.
 

root@pcfreak:/downloads/simscan-1.4.0# 320  echo "hi, testing." > /tmp/mailtest.txt
root@pcfreak:/downloads/simscan-1.4.0# env QMAILQUEUE=/var/qmail/bin/qmail-scanner-queue /var/qmail/bin/qmail-inject you@yourdomain.com < /tmp/mailtest.txt
YOU HAVEN'T DISABLED SET-ID SCRIPTS IN THE KERNEL YET!
FIX YOUR KERNEL, PUT A C WRAPPER AROUND THIS SCRIPT, OR USE -u AND UNDUMP!
qmail-inject: fatal: qq permanent problem (#5.3.0)

root@pcfreak:/downloads/simscan-1.4.0# /var/qmail/bin/qmail-scanner-queue
YOU HAVEN'T DISABLED SET-ID SCRIPTS IN THE KERNEL YET!
FIX YOUR KERNEL, PUT A C WRAPPER AROUND THIS SCRIPT, OR USE -u AND UNDUMP!


A short note to make here is qmail-scanner-queue and qmail-scanner-queue.pl are set with suid bit set as follows:
 

root@pcfreak:/home/hipo/info# ls -al /var/qmail/bin/{qmail-scanner-queue,qmail-scanner-queue.pl}
-rwsr-sr-x 1 qscand qscand   6814 окт 14 17:22 /var/qmail/bin/qmail-scanner-queue*
-rwsr-sr-x 1 qscand qscand 158880 окт 14 23:52 /var/qmail/bin/qmail-scanner-queue.pl*

Good to say here is qmail-scanner-queue is a suid wrapper binary that actually invokes qmail-scanner-queue.pl
 

root@pcfreak:/downloads/simscan-1.4.0# su hipo
hipo@pcfreak:/downloads/simscan-1.4.0$ /var/qmail/bin/qmail-scanner-queue.pl -g
perlscanner: generate new DB file from /var/spool/qscan/quarantine-events.txt
hipo@pcfreak:/downloads/simscan-1.4.0$ exit

root@pcfreak:/downloads/simscan-1.4.0# cp /downloads/qmail-scanner-2.11st/contrib/logrotate.qmail-scanner /etc/logrotate.d/qmail-scanner
root@pcfreak:/downloads/simscan-1.4.0# chmod 644 /etc/logrotate.d/qmail-scanner
root@pcfreak:/downloads/simscan-1.4.0# cd /downloads/qmail-scanner-2.11st/contrib
root@pcfreak:/downloads/qmail-scanner-2.11st/contrib# chmod 755 test_installation.sh
root@pcfreak:/downloads/qmail-scanner-2.11st/contrib# ./test_installation.sh -doit
Sending standard test message – no viruses… 1/4
qmail-inject: fatal: qq temporary problem (#4.3.0)
Bad error. qmail-inject died


This are the other things, I've done to fix possible permission issues

root@pcfreak:/downloads/qmail-scanner-2.11st/contrib#  sudo -u qscand /var/qmail/bin/qmail-scanner-queue.pl -z
root@pcfreak:/downloads/qmail-scanner-2.11st/contrib# chown qscand:qscand /var/spool/qscan/qmail-scanner-queue-version.txt

In /etc/sudoers add following lines:

root@pcfreak:~# vim /etc/sudoers

ALL ALL=(qscand) NOPASSWD: /var/qmail/bin/qmail-scanner-queue.pl
##necroleak ALL=(ALL) ALL
Defaults        env_keep +="TCPREMOTEIP TCPREMOTEHOST TCPREMOTEINFO REMOTE_OS REMOTE_COUNTRY QS_SPAMASSASSIN SA_ONLYDELETE_HOST SA_WHITELIST
"


root@pcfreak:/downloads/qmail-scanner-2.11st/contrib# cat /etc/sudoers

# /etc/sudoers
#
# This file MUST be edited with the 'visudo' command as root.
#
# See the man page for details on how to write a sudoers file.
#

Defaults    env_reset

# Host alias specification

# User alias specification

# Cmnd alias specification

# User privilege specification
root    ALL=(ALL) ALL
hipo    ALL=(ALL) ALL
ALL ALL=(qscand) NOPASSWD: /var/qmail/bin/qmail-scanner-queue.pl
##necroleak ALL=(ALL) ALL
Defaults        env_keep +="TCPREMOTEIP TCPREMOTEHOST TCPREMOTEINFO REMOTE_OS REMOTE_COUNTRY QS_SPAMASSASSIN SA_ONLYDELETE_HOST SA_WHITELIST"
# Allow members of group sudo to execute any command
# (Note that later entries override this, so you might need to move
# it further down)
%sudo ALL=(ALL) ALL
#
#includedir /etc/sudoers.d

In case you wonder why we put the line in /etc/sudoers:
 

Defaults        env_keep +="TCPREMOTEIP TCPREMOTEHOST TCPREMOTEINFO REMOTE_OS REMOTE_COUNTRY QS_SPAMASSASSIN SA_ONLYDELETE_HOST SA_WHITELIST"


The reason behind this is that by default sudo resets the environment variables when executing the command. Thus qmail-scanner cannot recognize the important info regarding the incoming mail and treats everything as coming from localhost, which leads to passing everything without scanning. The above line preserves the important ENV variables for qmail-scanner.

In /etc/sudoers add following lines:
 

root@pcfreak:/downloads/qmail-scanner-2.11st/contrib# vim /var/qmail/bin/qmail-scanner-queue.pl


Right after comments or in Line 1  ADD
 

my $real_uid="qscand";

my $effective_uid="qscand";


Also somewhere in the beginning of scripts lets say after above two variable declarations add:
 

$ENV{'PATH'}='/bin:/usr/bin';
$whoami = getpwuid($<) || "unknown";
if($whoami ne "qscand") {
    exec("/usr/bin/sudo -u qscand /var/qmail/bin/qmail-scanner-queue.pl") || die;
}


To prevent your users logged in on physical console and via SSH it is necessery to disable emergency logs for users in syslog / rsyslog, otherwise due to bug, users will logged in will get flooded with messages such as:
 

Message from syslogd@pcfreak at Oct 15 16:43:04 …
 qmail-scanner-queue.pl: qmail-scanner[6834]: Clear:RC:0(95.142.194.223):SA:0(-2.0/2.0): 2.959242 10574 admin@notify.vk.com hipo@www.pc-freak.net Светлана_Георгиева_оставила_Вам_личное_соо� <36b63ec9a0ce7ecc570de2fcbba6ed73@localhost.localdomain> 1508074981.6836-1.pcfreak:6219 1508074981.6836-0.pcfreak:545


open /etc/rsyslog.conf and find the line starting with:
 

root@pcfreak:~# vim /etc/rsyslog.conf

*.emerg

add
;user.none

right after it so it reads like:

*.emerg;user.none

OSCommerce how to change / reset lost admin password

Monday, October 16th, 2017

reset-forgotten-lost-oscommerce-password-howto-Os_commerce-logo.svg

How to change / reset OSCommerce lost / forgotten admin password?

The password in OSCommerce is kept in table "admin", so to reset password connect to MySQL with mysql cli client.

First thing to do is to generate the new hash string, you can do that with a simple php script using the md5(); function


root@pcfreak:/var/www/files# cat 1.php
<?
$pass=md5('password');
echo $pass;
?>


root@pcfreak:/var/www/files# php 1.php
5f4dcc3b5aa765d61d8327deb882cf99
root@pcfreak:/var/www/files#


Our just generated string (for text password password) is hash: 5f4dcc3b5aa765d61d8327deb882cf99

Next to update the new hash string into SQL, we connect to MySQL:


$ mysql -u root -p


And issue following command to modify the encrypted hash string:


UPDATE `DB`.`admin` SET `admin_password` = '5f4dcc3b5aa765d61d8327deb882cf99' WHERE `admin`.`admin_id` = 6;

How to synchronize with / from Remote FTP server using LFTP like with rsync

Sunday, October 15th, 2017

how-to-synchronize-from-remote-ftp-server-easily-like-rsync.jpg

Have you ever been in a need to easily synchronize with a remote host which only runs FTP server?

Or are you in a local network and you need to mirror a directory or a couple of directories in a fast and easy to remember way?

If so then you'll be happy to use below LFTP command that is doing pretty much the same as Rsync, with only difference that it can mirror files over FTP (old but gold File Transfer Protocol).
 

lftp -u FTP_USERNAME,FTP_PASSWORD -e 'mirror REMOTE_DIRECTORY LOCAL_DIRECTORY' FTP_SERVER_HOSTNAME


Enjoy and thanks to my dear friend Amridikon for the tip ! 🙂

Gnome Appearance modify command in Linux / How to change theme using command line in GNOME

Friday, October 13th, 2017

gnome-apperance-theme-modify-commands-in-linux-how-to-change-theme-using-commands-gnome-desktop-environment


1. Gnome Appearance modify command  in Linux instead – Intro

It is always handy to do stuff in console and as a GNU / Linux long time GNOME user I found it interesting to share here some nice tips on how Theme could be changed using command line.

Why would you ever want to change themes through console / Terminal? Well lets say you have to administrate remotely a bunch of GNU / Linux Desktop machines and you have to change themes simultaneously on a multiple hosts, changing theme using the command line then comes really handy.

Besides that in GNOME 3.X.X branch with Unity (yackes) if you have chosen to use GNOME (Flashback /Fallback) or Mate you might find it difficult to change some specifics of the default theme, that is especially true for GNOME (flashback) Fallback like me.

If you heard GNOME Flashback but you never used i and wonder what it is I think it is worthy to say few words about it:

GNOME Flashback is a session for GNOME 3 which was initially called "GNOME Fallback", and shipped as a stand-alone session in Debian and Ubuntu. It provides a similar user experience to the GNOME 2.x series sessions. The differences to the MATE project is that GNOME Flashback uses GTK+ 3 and tries to follow the current GNOME development by integrating recent changes of the GNOME libraries. The development currently lags behind a little but a lot of progress has been made in bug fixing lately. So in short GNOME Fallback is for anyone who wants to stick to GNOME 2.X interface but doesn't want to stick to Mate and wants still to use some more graphical goodies that comes with GNOME 3.

In MATE nowadays there is possibility to relatively Easy add / change appearance and add new themes, there is also the graphical tool called Appearance accessible via mate-control-center command or menus. Using Appearance you can modify themes and Window Decorations, however there is much more that can be done or tuned missing in the MATE GUI using a couple of GNOME desktop environment native commands.


2. List All Installed GNOME themes on Debian / Ubuntu Linux


$ ls -1 /usr/share/themes/|sed -e 's#/##g'
Adwaita
Adwaita-dark
Albatross
Arc
Arc-Dark
Arc-Darker
Blackbird
BlackMATE
Bluebird
BlueMenta
Blue-Submarine
Breeze
Breeze-Dark
Clearlooks
Clearlooks-Phenix
ClearlooksRe
ContrastHighInverse
Crux
Default
Dopple
Dopple-Left
DustBlue
Emacs
eOS
Flat-Plat
Flat-Plat-compact
Flat-Plat-dark
Flat-Plat-dark-compact
Flat-Plat-light
Flat-Plat-light-compact
GreenLaguna
Green-Submarine
Greybird
Greybird-accessibility
Greybird-bright
Greybird-compact
HighContrast
Industrial
Kiwi
Menta
Mist
MurrinaAquaIsh
MurrinaAzul
MurrinaBlau
MurrinaBleu
MurrinaBlu
MurrinaBlue
MurrinaCandido
MurrinaCandy
MurrinaCappuccino
MurrinaChrome
MurrinaCream
MurrinaCrystal
MurrinaCrystalCurve
MurrinaCrystalHuman
MurrinaCrystalLine
MurrinaDark
MurrinaEalm
MurrinaElement
MurrinaFancyCandy
MurrinaGilouche
MurrinaLoveGray
MurrinaNeoGraphite
MurrinaVerdeOlivo
Murrine-Gray
Murrine-Light
MurrineRounded
MurrineRoundedIcon
MurrineRoundedLessFramed
MurrineRoundedLessFramedIcon
Murrine-Sky
NOX
Orangine
Raleigh
Redmond
shearwater
Shiny
Spidey
Spidey-Left
Splint
Splint-Left
ThinIce
TraditionalGreen
TraditionalOk
WinMe


The All system installed theme location directory /usr/share/themes for RPM Linux-es Fedoras / CentOS etc. are identication


3. Change GTK Theme


Below commands are for GNOME 3 based desktop environments this includes also any other GNOME based Graphical Environments or components of GNOME 3 such as (Ubuntu Unity, GNOME 3 Shell/Classic, Cinnamon), and even the old GNOME 2 desktop.

In GNOME 2 it was possible to set various variables directly from gconf-editor including GTK Themes but in GNOME 3 somehow this is no more … so to do we need to use some cryptic commands or use gnome-tweak-tool or MyUnity (Ubuntu Linux users with Unity) but configuration that can be made with them is unfortunately partial so in any case knowing below commands is a necessity to be able to tune up nicely your Linux Gnome Desktop.

And yes it is crazy why on Earth gnome developers scaped out the configuration from gconf-editor and left us with this user unfriendly method. Could it be that someone (Like the big corporations) has the interest to ruin Free Software?? What do you think…
 

Unity, GNOME 3 Shell/Classic, Cinnamon

In Unity GNOME 3 Shell / Classic and Cinnamon (the default Debian graphical env).

Before we start I recommend you check out what is the current installed and enabled theme, you might want decide to keep it after checking the number of themes available. To check your current installed GNOME theme run:


gsettings get org.gnome.desktop.interface gtk-theme
'Adwaita'


You see I have 'Adwaita' theme as a default.
Next lets change the gnome GTK theme interface.
 

gsettings set org.gnome.desktop.interface gtk-theme "Menta"


MATE (In Linux Mate the current fork of GNOME 2 for hardcore GNOME 2 users)


mateconftool-2 –type=string –set /desktop/mate/interface/gtk_theme "Menta"


GNOME 2 (In native GNOME 2 if you still own some old machines with old Debian / Ubuntu / Fedoras etc.


gconftool-2 –type=string –set /desktop/gnome/interface/gtk_theme "Menta"


4. Change WINDOW THEME (Metacity)
 

Unity, GNOME 3 Classic (Metacity), GNOME 3 Shell (Metacity > Mutter)


gsettings set org.gnome.desktop.wm.preferences theme "Menta"


Cinnamon (Metacity -> Muffin)


gconftool –type=string –set /desktop/cinnamon/windows/theme "Menta"


Note: Cinnamon must be restarted for the change to take effect.


GNOME 2 (In Gnome 2 with Metacity)


gconftool-2 –type=string –set /apps/metacity/general/theme "Menta"


MATE (Metacity)


mateconftool-2 –type=string –set /apps/marco/general/theme "Menta"


Change SHELL THEME (In Gnome Shell and Cinnamon)


GNOME Shell (user-theme extension must be enabled)
 

gsettings set org.gnome.shell.extensions.user-theme name "Menta"


Cinnamon


gsettings set org.cinnamon.theme name "Menta"


5. Change GTK COLOR SCHEME

Unity, GNOME 3 Shell/Classic, Cinnamon (Change GNOME3 Color scheme)


gsettings set org.gnome.desktop.interface gtk-color-scheme "bg_color:#e9efe9;fg_color:#444444;base_color:#ffffff;text_color:#333333;selected_bg_color:#6666cc;selected_fg_color:#eeeeee;tooltip_bg_color:#222222;tooltip_fg_color:#dfcfcf;link_color:#cc0099;"

Reset color (if you don't like it):

gsettings set org.gnome.desktop.interface gtk-color-scheme ""


MATE (Mate set color scheme)


mateconftool-2 –type=string –set /desktop/mate/interface/gtk_color_scheme "bg_color:#e9efe9;fg_color:#444444;base_color:#ffffff;text_color:#333333;selected_bg_color:#6666cc;selected_fg_color:#eeeeee;tooltip_bg_color:#222222;tooltip_fg_color:#dfcfcf;link_color:#cc0099;"


Reset color :


mateconftool-2 –type=string –set /desktop/mate/interface/gtk_color_scheme ""


6. GNOME 2 (Again for the old GNome 2 machines to change the GTK Color scheme)


gconftool-2 –type=string –set /desktop/gnome/interface/gtk_color_scheme "bg_color:#e9efe9;fg_color:#444444;base_color:#ffffff;text_color:#333333;selected_bg_color:#6666cc;selected_fg_color:#eeeeee;tooltip_bg_color:#222222;tooltip_fg_color:#dfcfcf;link_color:#cc0099;"


Reset color:


gconftool-2 –type=string –set /desktop/gnome/interface/gtk_color_scheme ""


What about colors, well the #444444 and #22222 and #eeeeee, #333333 seen as color codes in above examples can easily decrypted if you don't know them using a tiny tool called gcolor2
The tool is installable on most Linux distributions with a simple apt-get install gcolor2 or yum install gcolor the tool is convenient and a must have for anyone using Linux for basic design or graphic operations with some program as GIMP / Krita / Inkscape / Vectr / Karbon etc.

All gcolor2 does is to make easy for you to get HTML color codes and convert existing ones into colors for you, here is shot:

gcolor2-show-html-color-codes-linux

gcolor2-show-html-color-codes-linux2

http://www.fandigital.com/2012/06/change-theme-command-line-gnome.html

https://ubuntuforums.org/showthread.php?t=1778355

While talking about setting color another interesting Graphical tool related to article, that gives you abilities to change colors in GNOME is gnome-color-choose, the tool is really awesome and allows you to do many of the color tunings shown in above examples

# apt-get install –yes gnome-color-chooser

And finally for the gnome theme hungry people, here is a great bonus. If you need a ton of shiny new themes as possibility to set up on your GNOME download and install The Ultimate Edition Themes deb (Debian / Ubuntu Mint) etc. collection (mirrored):

Debian and other deb based distro users can easily download and install with:
 

linux:~# dpkg -i ultimate-edition-themes-.0.0.7_all.deb


Other Linux users such as Fedora ones and Slackware users (if anyone on Slack uses Gnome since KDE is default by default there), use alien tool to install it or directly open the file with Midnight Commander (mc) and copy the files to the /usr/share/themes dir.


This article is possible thanks to Change Theme Using Command Line in GNOME (Linux) command line examples are taken from there.

How to extract a deb package on Debian, Ubuntu, Mint Linux and other non debian based distributions

Friday, October 13th, 2017

how-to-extract-deb-packages-with-dpkg-and-ar-application-x-deb

How to extract a deb package? 


Have you ever had a debian .deb package which contains image files you need, but the dependencies doesn't allow you to install it on your Debian / Ubuntu / Mint Linux release?
I had just recently downloaded the ultimate-edition-themes latest release v 0.0.7 a large pack of GNOME Themes and wanted to install it on my Debian Stretch Linux but I faced problems because of dependencies when trying to install with dpkg.

That is why I took another appoarch and decided to only extract the necessery themes from the archive only with dpkg.

Here is how I have extracted ultimate-edition-themes-.0.0.7_all.deb ;


dpkg -x ultimate-edition-themes-.0.0.7_all.deb /tmp/ultimate-edition-themes


So how dpkg extracts the .deb file?


Debian .deb packages are a regular more in Wikipedia – Unix archive files (ar) .

The structure of a deb file consists of another 3 files (2 tar.gzs and one binary) as follows:


debian-binary: regular text file, contains the version of the deb package format
control.tar.gz: compressed file, contains file md5sums and control directory for the deb package
data.tar.gz: compressed file, contains all the files which will be installed


Basicly if you're on a Linux distribution that lacks dpkg you can easily extract .deb binary using GNU AR  command (used to create, modify extract Unix ar files and is the GNU / Linux equivallent of the UNIX ar command).

To extract on Fedora or RPM based Linux distributions as well as BSDs with AR:

First print file conetnt with:

ar p  ultimate-edition-themes-.0.0.7_all.deb

Then extract it with:

ar x ultimate-edition-themes-.0.0.7_all.deb


Later just extract with tar (untar), the 2 other archived files contained in the .deb (ar) archive:


tar -zxvvf control.tar.gz; tar -zxxvf data.tar.gz


Get everything you need from there in my case that's the usr/share/themes folder, then enjoy life 🙂


Fix dosbox – setting: cycles=auto. If the game runs too fast try a fixed cycles amount in DOSBox’s options. Exit to error: DRC64:Unhandled memory reference

Thursday, October 12th, 2017

fix-dosbox-error-setting-cycles-auto-game-runs-too-fast-exit-err-drc64-unhandled-memory-reference

I've recently installed Debian GNU / Linux 9.1 Stretch and on Ubuntu 16.10 Yakkety Yak and as an old school true gamer addict decided to play some games to recall the good old memories from the past of the glorious DOS games times, when all was simple people was real and there was no terrible people dividers such as Facebook  / GooglePlus, no skype fuzzy craziness and no people watching all time at their mobile smart phones like zoombies .

Well anyways, so I wanted to play my favourite DOS games Terminal Velocity, StarGunner, Raptor, Heroes of Might and Magic 2, Doom II, Duke 3d etc. etc. the list goes on and on – BTW What's your favourite old school DOS Game??

So I issues in Terminal:

$ dosbox TV.EXE

DOSBox version 0.74
Copyright 2002-2010 DOSBox Team, published under GNU GPL.

CONFIG:Loading primary settings from config file /home/zetathon/.dosbox/dosbox-0.74.conf
MIXER:Got different values from SDL: freq 44100, blocksize 512
ALSA:Can't subscribe to MIDI port (65:0) nor (17:0)
MIDI:Opened device:none
DOSBox switched to max cycles, because of the setting: cycles=auto. If    the game runs too fast try a fixed cycles amount in DOSBox's options.
Exit to error: DRC64:Unhandled memory reference


So what is the solution to  Exit to error: DRC64:Unhandled memory reference
error and why it happens?

Well, as the error clearly states the whole problem
comes from a default dosbox dos emulator configuration, that's the
setting:
 

cycles=auto


Perhaps the CPU beat of a Core I7 CPUs is too strong for some of the old games which are expecting a slower PC with less memory that's why the exception

Exit to Error: DRC64:Unhandled memory reference
is spit out by Dosemu.

So how to solve DRC64:Unhandled memory reference dosemu error?

By default DOSBOX places its configuration at  Linux / BSD / *nix-es at home folder /dosbox – e.g. ~/.dosbox/ the naming of dosbox.conf might differ according to dosbox version and the respective Linux / BSD distro, on Debian and Ubuntu Linux usually the naming includes a version number.

On Debian 9 Strecth Linux dosbox config is at ~/.dosbox/dosbox-0.74.conf

Edit the file
 

$ vim ~/.dosbox/dosbox-0.74.conf


and change inside the value for:


core=auto

to

core=normal

Then give dosbox with the erroring game another try, it worked for me
for me and everything seemed to run fine.

I've only run a handful of games but so far it seems to be working well.

If it does work but performance is degraded and tooks a huch hit on Gameplay you better try to substitute
 

core=normal

to
 

core=simple


AND HOORAY IT WORKS AGAIN! THE GAME RUN SUCCESSFULLY JOY TO THE WORLD! 🙂

Share SCREEN terminal session in Linux / Screen share between two or more users howto

Wednesday, October 11th, 2017

share-screen-terminal-session-in-linux-share-linux-unix-shell-between-two-or-more-users


1. Short Intro to Screen command and what is Shared Screen Session

Do you have friends who want to learn some GNU / Linux or BSD basics remotely? Do you have people willing to share a terminal session together for educational purposes within a different network? Do you just want to have some fun and show off yourself between two or more users?

If the answer to the questions is yes, then continue on reading, otherwise if you're already aware how this is being done, just ignore this article and do something more joyful.

So let me start.

Some long time ago when I was starting to be a Free Software user and dedicated enthusiast, I've been given by a friend an interesting freeshell hosting access and I stumbled upon / observed an interesting phenomenon, multiple users like 5 or 10 were connected simultaneously to the same shell sharing their command line.

I can't remember what kind of shell I happen to be sharing with the other logged in users with the same account, was that bash / csh / zsh or another one but it doesn't matter, it was really cool to find out multiple users could be standing together on GNU / Linux and *BSD with the same account and use the regular shell for chatting or teaching each others  new Linux / Unix commands e.g. being able to type in shell simultaneously.

The multiple shared shell session was possible thanks to the screen command

For those who hear about screen for a first time, here is the package description:


# apt-cache show screen|grep -i desc -A 1
Description-en: terminal multiplexer with VT100/ANSI terminal emulation
 GNU Screen is a terminal multiplexer that runs several separate "screens" on

Description-md5: 2d86b86ed6058a04c540802e49312f40
Homepage: https://savannah.gnu.org/projects/screen
root@jericho:/usr/local/src/pure-python-otr# apt-cache show screen|grep -i desc -A 2
Description-en: terminal multiplexer with VT100/ANSI terminal emulation
 GNU Screen is a terminal multiplexer that runs several separate "screens" on
 a single physical character-based terminal. Each virtual terminal emulates a


Description-md5: 2d86b86ed6058a04c540802e49312f40
Homepage: https://savannah.gnu.org/projects/screen
Tag: hardware::input:keyboard, implemented-in::c, interface::text-mode,


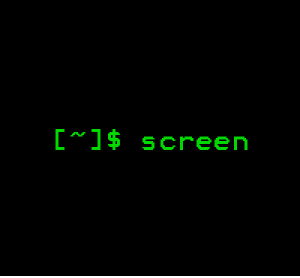
There is plenty of things to use screen for as it provides you a way to open Virtual Terminals into a single ssh or physical console TTY login session and I've been in love with screen command since day 1 I found out about it.

To start using screen just invoke it into a shell and enter a screen command combinations that make various stuff for you.


2. Some of the most useful Daily Screen Key Combinations for the Sys Admin


To do use the various screen options, use the escape sequence (CTRL + Some Word), following by the command. For a full list of all of the available commands, run man screen, however
for the sake of interest below short listing shows some of most useful screen key combination invoked commands:


Ctrl-a a Passes a Ctrl-a through to the terminal session running within screen.
Ctrl-a c Create a new Virtual shell screen session within screen
Ctrl-a d Detaches from a screen session.
Ctrl-a f Toggle flow control mode (enable/disable Ctrl-Q and Ctrl-S pass through).
Ctrl-a k Detaches from and kills (terminates) the screen session.
Ctrl-a q Passes a Ctrl-q through to the terminal session running within screen (or use Ctrl-a f to toggle whether screen captures flow control characters).
Ctrl-a s Passes a Ctrl-s through to the terminal session running within screen (or use Ctrl-a f to toggle whether screen captures flow control characters).
Ctrl-a :kill Also detaches from and kills (terminates) the screen session.
Ctrl-a :multiuser on Make the screen session a multi-user session (so other users can attach).
Ctrl-a :acladd USER Allow the user specified (USER) to connect to a multi-user screen session.
Ctrl-a p Move around multiple opened Virtual terminals in screen (Move to previous)
Ctrl-a n Move backwards in multiple opened screen sessions under single shell connection


I have to underline strongly for me personally, I'm using the most


CTRL + A + D (to detach session),

CTRL + A + C to open new session within screen (I tend to open multiple sessions for multiple ssh connections with this),

CTRL + A + P, CTRL +  A + N – I use this twoto move around all my open screen Virtual sessions.
 

3. HOW TO ACTUALLY SHARE TERMINAL SESSION BETWEEN MULTIPLE USERS?


3.1 Configuring Shared Sessions so other users can connect

You need to  have a single user account on a Linux or Unix like server lets say that might be the /etc/passwd, /etc/shadow, /etc/group account screen and you have to give the password to all users to be participating into the shared screen shell session.

E.g. create new system account screen

root@jericho:~# adduser screen
Adding user `screen' …
Adding new group `screen' (1001) …
Adding new user `screen' (1001) with group `screen' …
The home directory `/home/screen' already exists.  Not copying from `/etc/skel'.
Enter new UNIX password:
Retype new UNIX password:
passwd: password updated successfully
Changing the user information for screen
Enter the new value, or press ENTER for the default
    Full Name []: Screen user to give users shared access to /bin/bash
    Room Number []:
    Work Phone []:
    Home Phone []:
    Other []:
Is the information correct? [Y/n] Y

Now distribute the user / pass pair around all users who are to be sharing the same virtual bash session via screen and instruct each of them to run:

hipo@jericho:~$  screen -d -m -S shared-session
hipo@jericho:~$

hipo@jericho:~$ screen -list

There is a screen on:
    4095.shared-session    (10.10.2017 20:22:22)    (Detached)
1 Socket in /run/screen/S-hipo.


3.2. Attaching to just created session
 

Simply login with as many users you need with SSH to the remote server and instruct them to run the following command to re-attach to the just created new session by you:

hipo@jericho:~$ screeen -x

That's all folks now everyone can type in simultaneously and enjoy the joys of the screen shared session.

If for some reasons more than one session is created by the simultaneously logged in users either as an exercise or by mistake i.e.:

hipo@jericho:~$ screen -list

There are screens on:
    4880.screen-session    (10.10.2017 20:30:09)    (Detached)
    4865.another-session    (10.10.2017 20:29:58)    (Detached)
    4847.hey-man    (10.10.2017 20:29:49)    (Detached)
    4831.another-session1    (10.10.2017 20:29:45)    (Detached)
4 Sockets in /run/screen/S-hipo.

You have to instruct everyone to connect actually to the exact session we need, as screen -x will ask them to what session they like to connect.

In that case to connect to screen-session, each user has to run with their account:

hipo@jericho:~$ screen -x shared-session


If under some circumstances it happened that there is more than one opened shared screen virtual session, for example screen -list returns:


hipo@jericho:~$ screen -list
There are screens on:
    5065.screen-session    (10.10.2017 20:33:20)    (Detached)
    4095.screen-session    (10.10.2017 20:30:08)    (Detached)

All users have to connect to the exact screen-session created name and ID, like so:

hipo@jericho:~$ screen -x 4095.screen-session


Here is the meaning of used options


-d option instructs screen to detach,
-m makes it multiuser session so other users can attach
-S argument is just to give the screen session a name
-list Sesssion gives the screen-session ID

Once you're over with screen session (e.g. all users that are learning and you show them stuff and ask them to test by themselves and have completed, scheduled tasks), to kill it just press CTRL + A + K
 

4. Share screen /bin/bash shell session with another user

Sharing screen session between different users is even more useful to the shared session of one user as you might have a *nix server with many users who might attach to your opened session directly, instead of being beforehand instructed to connect with a single user.

That's perfect also for educational purposes if you want to learn some Linux to a class of people, as you can use their ordinary accounts and show them stuff on a Linux / BSD  machine.

Assuming that you follow and created already screen-session with screen cmd

hipo@jericho:~$ screen -list
There is a screen on:
        5560.screen-session      (10.10.2017 20:41:06)   (Multi, attached)
1 Socket in /run/screen/S-hipo.

hipo@jericho:~$

Next attach to the session

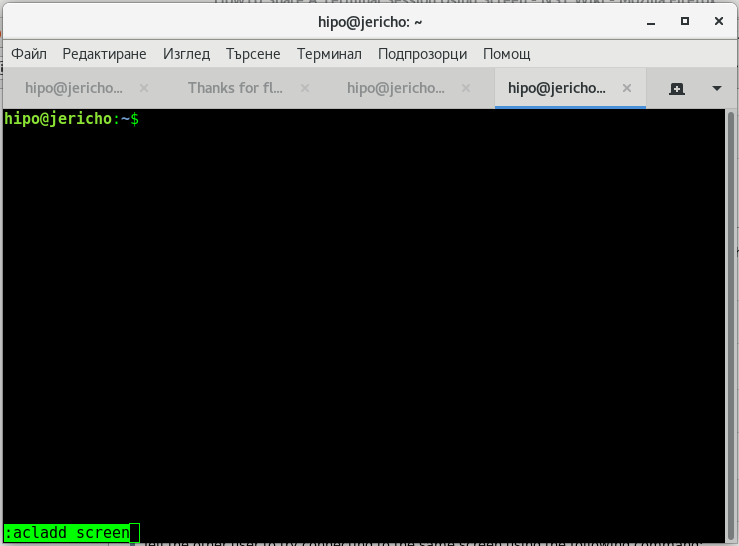
bunny@jericho:~$ screen -r shared-session
bunny@jericho:~$ Ctrl-a :multiuser on
bunny@jericho:~$ Ctrl-a :acladd user2
bunny@jericho:~$ screen -x UserNameHere/shared-session
 

Here are 2 screenshots on what should happen if you had done above command combinations correctly:

screen-share-session-to-multi-users-screenshot-multiuser-on-on-gnome-terminal2

screen-share-session-to-multi-users-screenshot-multiuser-on-on-gnome-terminal3

In order to be able to share screen Virtual terminal ( VTY ) sessions between separate (different) logged in users, you have to have screen command be suid (SUID bit for screen is disabled in most Linux distributions for security reasons).

Without making SUID the screen binary file, you are to get the error:

hipo@jericho:/home/hipo$ screen -x hipo/shared

Must run suid root for multiuser support.

If you are absolutely sure you know what you're doing here is how to make screen command sticky bit:


root@jericho:/home/hipo# which screen
root@jericho:/home/hipo# /usr/bin/screen
root@jericho:/home/hipo# root@jericho:/home/hipo# root@jericho:/home/hipo# chmod u+s $(which screen)
chmod 755 /var/run/screen
root@jericho:/home/hipo# rm -fr /var/run/screen/*
exit

How to Increase virtualbox Linux install machine VM .VDI hard disk size to free space on root partition – Move /usr to a new partition

Tuesday, October 10th, 2017

extend-vdi-virtual-machine-partition-with-virtualbox-howto-virtualbox-logo
 

How to Increse Hard Disk size of VirtualBox Virtual Machine .VDI file to Free Space on root Partition or Howto move /usr large partition to separate new partition?


I just wondered how to increase hard disk size of Virtualbox Virtual Machine image .VDI, because for some stupid reason I've created my initial hard disk size for Linux partition to be the default 10 Gigabytes.

The problem is the packages I need to have installed on the Virtual Machine which will be a testbed for future tests of a production website applications are taking up too much space, once installed so I'm left with no space
in /var/lib/mysql for the database import. So what can I do in that case is to simply free up disk space or Merge ROOT partition with another partition.

Since merging the partition is not a trivial job and would require me to have installable CD with the Linux distro (in my case that's Debian Linux) or have a bootable USB flash drive, I preferred second approach to problem e.g. to free up disk space on ROOT partition by creating a second partition and move the /usr folder to reside there.

Before that it is of course necessery to  have extended the .VDI file using VirtualBox, so more space than the default 10GB preconfigured are available, this is easily done on Windows OS as, VBox is provided with GUI clickable option to do it, but for who knows what reason that is not the case with Linux, so Linux users only option to increase VDI file is to manually run command part of the virtualbox package, that is not a hard task really but it requires some typing and basic knowledge on how to run commands in terminal.


To .VDI resize (extend), we first go to default location where VirtualBox stores its image .VDI files (by default as of moment of writting this article – this is ~/"VrtualBox VMs"  (or home directory of logged in user dir VirtualBox VMs), the command to use is VBoxManage


root@jericho:/home/hipo# cd VirtualBox VMs/
root@jericho:/home/hipo/VirtualBox VMs# ls
Debian 6  Debian 9  Windows 10
root@jericho:/home/hipo/VirtualBox VMs# cd Debian 6/
r
oot@jericho:/home/hipo/VirtualBox VMs/Debian 6# ls
Debian 6.vbox  Debian 6.vbox-prev  Debian 6.vdi  Logs  NewVirtualDisk1.vdi  Snapshots

root@jericho:/home/hipo/VirtualBox VMs/Debian 6# VBoxManage modifyhd Debian 6.vdi –resize 20000
0%…10%…20%…30%…40%…50%…60%…70%…80%…90%…100%
root@jericho:/home/hipo/VirtualBox VMs/Debian 6#


Above command does resize the 10GB default created partition for Linux, where I have installed Linux which was 99% full of data, because of the many packages I installed to 20GB size, to make it bigger just use the respective size, be it 30000 (for 30GB) or 100000 (for 100GB) etc.

Even though in this example VBoxManage virtual partition resize command was done for GNU / Linux Operating System, it can be done for any other Operating as well to resize the size of the Virtual .VDI file (Virtual Machine) partition, be it Windows 7 / 8 / 10 or the rest of Free Operating systems FreeBSD / OpenBSD / BSD that are installed in a VM etc.

Next Launch the Virtual Machine with VBox Server client Program and install there Gparted (GNU Parted), as we'll need it to create a new Hard Disk Partition:


$ VirtualBox


Inside virtualmachine's in gnome-terminal / xterm etc. depending on the graphical environment used do install with apt-get:


debian:# apt-get install –yes gparted


debian~:# gparted


Notice that gparted has to be ran as a root superuser.


Run GParted and create new EXT3 filesystem that is 10GB (the size of the new created partition).

If you have installed Debian to place all partitions under / (root directory /dev/sda1) then the fresh new partition to create should be
/dev/sda3, anyways just look closely in EXT3 and in your case if the partiition is named differently create according to proper partition /dev/ naming.

I'll not run into details on how to create the partition with GParted as the program interface is very self-explanatory, the only thing is to apply the update to create partition and the ext3 filesystem, that's being done
with a green tick:

gparted-create-ext3-partition-howto-linux

Next step is to check with fdisk whether, we have ext3 properly created  filesystem as we've done already with GPARTED:

Once we have the partition created with EXT3 filesystem, we're ready to move /usr temporary to other folder, I use usually /root for the move but you can create anywhere a new folder for that and move to there.

To move to /root directory run again in terminal:


debian:~# mv /usr /root
debian:~# mkdir /usr


howto-extend-root-filesystem-disk-space-linux-move-usr-folder-to-root-temporary-debian-gnu-linux


Note that during the move operations, your Desktop icons will become without (with broken) pictures and the default Debian background picture is to disappear, that's because the GUI environment will soon realize /usr/ libraries that're periodically reloaded in memory are missing and will be unable to reload them as it does in a cycle.

That should take a few minutes, so grab a coffee or if you're a smoker (hope not as smoking kills 🙂 ), in 5 / 10 minutes time depending on your computer / server configuration, it will be over, so we're ready to create new /usr dir and mount the  new partition:


debian:~# mount /dev/sda3 /usr


howto-extend-root-filesystem-disk-space-linux-move-usr-folder-to-root-temporary-debian-gnu-linux1


Now we check with mount command whether mount is fine:


check-if-filesystem-is-properly-mounted-linux-debian-screenshot


Now  /dev/sda3 is mounted under /usr  and we have to move back /root/usr directory content back to the newly mounted /usr so we run command:
 

debian:~#  mv /root/usr/* /usr/*


Finally we need to create proper records for the new partition inside /etc/fstab (fstab –FileSystem Tab file – the file which describes instructs the Linux OS what partition to boot where, what)

HOW TO CHECK LINUX UUID FOR A PARTITION??

Before adding anything to /etc/fstab you need to check the UUID of /dev/sda3 (or whatever the partition is called), without proper UUID, the system might fail to boot.
So here is how to check the UUID we'll need for config:


hipo@debian:~$ /sbin/blkid /dev/sda3
/dev/sda3: UUID="2273db4b-3069-4f78-90fc-e7483c0305bd" SEC_TYPE="ext2" TYPE="ext3"

hipo@debian:~$ ls -al /dev/disk/by-uuid/
total 0
drwxr-xr-x 2 root root 100 Oct  6 05:16 .
drwxr-xr-x 6 root root 120 Oct  6 05:16 ..
lrwxrwxrwx 1 root root  10 Oct  6 05:16 2273db4b-3069-4f78-90fc-e7483c0305bd -> ../../sda3
lrwxrwxrwx 1 root root  10 Oct  6 05:16 b98d92cd-41aa-4e18-a474-9b8df445dbe5 -> ../../sda1
lrwxrwxrwx 1 root root  10 Oct  6 05:16 f27f7448-f200-4983-b54f-b9e5206f77ac -> ../../sda5

As you can see our /dev/sda3 UUID is 2273db4b-3069-4f78-90fc-e7483c0305bd

Further on lets view and edit /etc/fstab you can also download a copy of my Virtual Machine fstab here


debian:~# cat /etc/fstab

# /etc/fstab: static file system information.
#
# Use 'blkid' to print the universally unique identifier for a
# device; this may be used with UUID= as a more robust way to name devices
# that works even if disks are added and removed. See fstab(5).
#
# <file system> <mount point>   <type>  <options>       <dump>  <pass>
proc            /proc           proc    defaults        0       0
# / was on /dev/sda1 during installation
UUID=b98d92cd-41aa-4e18-a474-9b8df445dbe5 /               ext3    errors=remount-ro 0       1
# swap was on /dev/sda5 during installation
UUID=f27f7448-f200-4983-b54f-b9e5206f77ac none            swap    sw              0       0
/dev/scd0       /media/cdrom0   udf,iso9660 user,noauto     0       0
/dev/scd1       /media/cdrom1   udf,iso9660 user,noauto     0       0


We need to add following line to  /etc/fstab:
 

UUID=2273db4b-3069-4f78-90fc-e7483c0305bd    /usr        ext3 error=remount-ro    0    1


Open the file with your favourite text editor (gedit / nano / pico / vim / joe) etc.

debian:~# vim /etc/fstab


# /etc/fstab: static file system information.
#
# Use 'blkid' to print the universally unique identifier for a
# device; this may be used with UUID= as a more robust way to name devices
# that works even if disks are added and removed. See fstab(5).
#
# <file system> <mount point>   <type>  <options>       <dump>  <pass>
proc            /proc           proc    defaults        0       0
# / was on /dev/sda1 during installation
UUID=b98d92cd-41aa-4e18-a474-9b8df445dbe5 /               ext3    errors=remount-ro 0       1
# swap was on /dev/sda5 during installation
UUID=f27f7448-f200-4983-b54f-b9e5206f77ac none            swap    sw              0       0
/dev/scd0       /media/cdrom0   udf,iso9660 user,noauto     0       0
/dev/scd1       /media/cdrom1   udf,iso9660 user,noauto     0       0

UUID=2273db4b-3069-4f78-90fc-e7483c0305bd     /usr        ext3 error=remount-ro    0    1    

Basicly it should be possible to add (for historic reasons) also instead of UUID=2273db4b-3069-4f78-90fc-e7483c0305bd  /dev/sda3
So it looks like so but, the better practice is to use UUID line given.

Well that's all folks now /usr directory will contain all your heavy root partition (disk filling) libraries and files, so you can happily use /var/lib/mysql or /var/lib/postgresql /var/www to store your web application files and import your databases.

Big thanks to Ubuntu Forums article – How do I increase the hard disk size of the Virtual Machine article for inspiring this post.

Hope that helps anyone and thanks and other comments are always welcome ! 🙂

How to configure Nautilus (Linux application like Windows Explorer) to work with standard Windows button + E On Linux GNOME en Mate

Monday, October 9th, 2017

how-to-configure-nautilus-linux-applicatoin-to-act-like-windows-explorer-make-windows-button-work-in-GNOME-and-Mate
As an ex-Windows user I'm still addicted to Windows User brainwashing as an ex-victim of Windows 95 / 98 and XP:), so I tend to love very much and its still hard for me to forget some major Key Binding (Windows Key Combinations).

On every new Desktop Linux I install, I have the habit to configure few great key combination shortcuts that makes my digital life much easier.
I use usually as a graphical environment GNOME and recently switched to MATE (GNOME 2 fork, cause GNOME 3 is totally messed up and unworthy to me), that's why this article is targetting this two Linux GUI envs, I'll be glad to hear in article comments for any other useful key bindings and how to configure similar key bindings for other Major Linux graphical environments (Cinnamon, KDE Plasma, XFCE, LXDE).


1. Configuring Lock Screen (Win button + L), Open Explorer(Win button + E), View Desktop (Win + D) in MATE graphic env


———  WINDOWS BUTTON, OFTEN USED KEY SHORTCUTS ———

Windows + E – Open new Windows File Explorer 

Windows + L – Lock Computer

Windows + M – To minimize All Windows

Windows + D – Show Desktop (similar to Windows +M though it doesn't switch to Desktop)

Win – + / – To Maginfy Text and Windows

Shift + Win + Left/Right Arrow – (In Windows if you have multiple monitors connected to the same computer lets say Right Monitor and Left, that combination switches between left monitor and right monitor)


——————————————————————–


The list goes on but I'm not used to all of them, I'll stop here and continue on with how to remake some of my favourite Windows keybindings in Gnu / Linux

Either run it from Menus:
 

System -> Settings -> Hardware -> Keyboard Shortcuts


Or run command


$ mate-keybinding-properties


howto-gnome-mate-remap-shortcut-keybinding-keys-mate-keybinding-properties


After rebinding the Windows: 
– Lock Screen and Open New Nautilus Explorer Window (Home folder) variable to be invoked with Windows button, the result
is as that:

howto-gnome-mate-remap-shortcut-keybinding-keys-mate-keybinding-properties


Scroll down Mate Keyboard shortcuts and you'll find

also how to configure Windows Button and D Key Combination, following 2 more screenshots showing how to do it note that MOD Key appears once you press Windows Keyboard Key + something (e.g. MATE recognizes MOD Key as Win Key):

Before the change to bind Win Key + D to work:

mate-how-to-make-desktop-view-open-with-standard-windows-button_and_d-combination-linux-debian

When configured Win Button + D looks like so:

mate-how-to-make-desktop-view-open-with-standard-windows-button_and_d-combination-linux-debian-1

2. Configuring Lock Screen (Win button + L), Open Explorer(Win button + E), View Desktop (Win + D) in GNOME

Usually in GNOME until > version 3.X.X (in older GNOME graphic environment access to KeyBinding Properties was done via:


System -> Preferences -> Keybord Shortcuts -> Add ->


In fallback gnome with Metacity (if installed along with GNOME Desktop 3.2.X environment to access Key Bindings):

d

System->Apps->Metacity->global_keybindings  


Also it is possible to remap keys via dconf-editor, I've written a small article earlier explaining how to remap Screenshotting buttons with dconf-editor but the example could be easily adapted, so you can edit almost everything.

Besides that you can use a command to run the keyboard configuration (in older GNOMEs) via:


linux:~$ gnome-keybinding-properties


Just for information for those who might know, many Key Binding interesting options are available via gnome-tweak-tool, so if you don't have it yet install it and give it a try:


linux:~# apt-get install –yes gnome-tweak-tool


As you can see, there are plenty of options to make Win (key) to act like Alt (key):

linux:~# gnome-tweak-tool
 

gnome-tweak-tool-make-win-key-to-behave-like-alt-key-howto 


After configuring the changes enjoy your WINDOWS Button + L, WINDOWS + E and WINDOWS + D WORKING AGAIN HOORAY !!! 🙂 


3. Most used shortcuts in Gnome and Nautilus 
 

Below are most used shortcuts thanks to LinuxQuestions Forum for providing them

Howdy! I thought that it would be useful to post a practical selection of shortcut keys for GNOME (the Desktop Environment) and Nautilus (the File Manager) and some information about customizing shortcut keys in Ubuntu. I wrote it especially for Ubuntu beginners, but I hope it will prove useful for all. 


2.1 GNOME/Nautilus shortcut keys – Very useful for the keyboard maniax like me :):
 

Ctrl-H: show hidden files

Ctrl-N: new window

Ctrl-Shift-N: create new folder

Alt-Home : jump to home folder

Alt-Enter : file / folder properties

F9 : toggle side-pane

Alt-F1 : launch applications menu

Alt-F2 : launch "run application" dialogue

Ctrl-Alt – Right/Left arrow : move to the next virtual desktop

Ctrl-Alt-Shift – Right/Left arrow : take current window to the next virtual desktop

Ctrl-Alt-D: minimize all windows, and gives focus to the desktop. 

Alt-Tab: switch between windows. When you use these shortcut keys, a list of windows that you can select is displayed. Release the keys to select a window. 

Ctrl-Alt-Tab: switch the focus between the panels and the desktop. When you use these shortcut keys, a list of items that you can select is displayed. Release the keys to select an item. 

Ctrl-Alt-L: lock the screen (tested only in Ubuntu) 

Ctrl-L: shortcut for opening locations-by default the path is the home folder*
/ : same as Ctrl-L but has the root (/) as default path* (shortcut found on here)
* both shortcuts can be used while you are on the desktop (no window active)

Ctrl-T : move to trash (in Nautilus)
Quite dangerous key combination because many of us are used to press these keys in order to open a new tab. Because we all delete items using the Delete key, I recommend to deactivate this shortcut key. To do that, go to System » Preferences » Appearance » Interface. Select Editable menu shortcut keys and close the dialog box. Click on the Edit menu in the File Browser. Click the Empty Trash item (it has Ctrl-T as the keyboard shortcut) Press the Delete key to get rid of the shortcut.
You can find all GNOME shortcut keys here


2.2 How to create a custom hotkey to launch whatever application you want in GNOME
 

As an example, we will set a lock-screen shortcut.


Open "gconf-editor" as the user as you're logged in in GNOME (typing gconf-editor in the terminal or "Run Application").
 

Go to apps > metacity > keybinding_commands


Here we have a list of twelve slots for commands.


Double click on e.g. "run_command_1" 

In Key Value Type in the name of the application or command you want to launch (e.g. gnome-screensaver-command –lock).


Go to apps -> Metacity -> global_keybindings 

Double click on e.g. "run_command_1" 
Change the key value to whatever key combination you like (e.g. <Ctrl><Alt>L).Press "Ok".


2.3.How to create/change GNOME shortcuts


Click on System -> Preferences -> Keyboard Shortcuts


Click the action in the list and press Enter. 
Press the new key or key combination you want to assign to the action. (To clear a shortcut, press the Backspace key)


Hope it helps, Enjoy Life .;)