1. Gnome Appearance modify command in Linux instead – Intro
It is always handy to do stuff in console and as a GNU / Linux long time GNOME user I found it interesting to share here some nice tips on how Theme could be changed using command line.
Why would you ever want to change themes through console / Terminal? Well lets say you have to administrate remotely a bunch of GNU / Linux Desktop machines and you have to change themes simultaneously on a multiple hosts, changing theme using the command line then comes really handy.
Besides that in GNOME 3.X.X branch with Unity (yackes) if you have chosen to use GNOME (Flashback /Fallback) or Mate you might find it difficult to change some specifics of the default theme, that is especially true for GNOME (flashback) Fallback like me.
If you heard GNOME Flashback but you never used i and wonder what it is I think it is worthy to say few words about it:
GNOME Flashback is a session for GNOME 3 which was initially called "GNOME Fallback", and shipped as a stand-alone session in Debian and Ubuntu. It provides a similar user experience to the GNOME 2.x series sessions. The differences to the MATE project is that GNOME Flashback uses GTK+ 3 and tries to follow the current GNOME development by integrating recent changes of the GNOME libraries. The development currently lags behind a little but a lot of progress has been made in bug fixing lately. So in short GNOME Fallback is for anyone who wants to stick to GNOME 2.X interface but doesn't want to stick to Mate and wants still to use some more graphical goodies that comes with GNOME 3.
In MATE nowadays there is possibility to relatively Easy add / change appearance and add new themes, there is also the graphical tool called Appearance accessible via mate-control-center command or menus. Using Appearance you can modify themes and Window Decorations, however there is much more that can be done or tuned missing in the MATE GUI using a couple of GNOME desktop environment native commands.
2. List All Installed GNOME themes on Debian / Ubuntu Linux
$ ls -1 /usr/share/themes/|sed -e 's#/##g'
Adwaita
Adwaita-dark
Albatross
Arc
Arc-Dark
Arc-Darker
Blackbird
BlackMATE
Bluebird
BlueMenta
Blue-Submarine
Breeze
Breeze-Dark
Clearlooks
Clearlooks-Phenix
ClearlooksRe
ContrastHighInverse
Crux
Default
Dopple
Dopple-Left
DustBlue
Emacs
eOS
Flat-Plat
Flat-Plat-compact
Flat-Plat-dark
Flat-Plat-dark-compact
Flat-Plat-light
Flat-Plat-light-compact
GreenLaguna
Green-Submarine
Greybird
Greybird-accessibility
Greybird-bright
Greybird-compact
HighContrast
Industrial
Kiwi
Menta
Mist
MurrinaAquaIsh
MurrinaAzul
MurrinaBlau
MurrinaBleu
MurrinaBlu
MurrinaBlue
MurrinaCandido
MurrinaCandy
MurrinaCappuccino
MurrinaChrome
MurrinaCream
MurrinaCrystal
MurrinaCrystalCurve
MurrinaCrystalHuman
MurrinaCrystalLine
MurrinaDark
MurrinaEalm
MurrinaElement
MurrinaFancyCandy
MurrinaGilouche
MurrinaLoveGray
MurrinaNeoGraphite
MurrinaVerdeOlivo
Murrine-Gray
Murrine-Light
MurrineRounded
MurrineRoundedIcon
MurrineRoundedLessFramed
MurrineRoundedLessFramedIcon
Murrine-Sky
NOX
Orangine
Raleigh
Redmond
shearwater
Shiny
Spidey
Spidey-Left
Splint
Splint-Left
ThinIce
TraditionalGreen
TraditionalOk
WinMe
The All system installed theme location directory /usr/share/themes for RPM Linux-es Fedoras / CentOS etc. are identication
3. Change GTK Theme
Below commands are for GNOME 3 based desktop environments this includes also any other GNOME based Graphical Environments or components of GNOME 3 such as (Ubuntu Unity, GNOME 3 Shell/Classic, Cinnamon), and even the old GNOME 2 desktop.
In GNOME 2 it was possible to set various variables directly from gconf-editor including GTK Themes but in GNOME 3 somehow this is no more … so to do we need to use some cryptic commands or use gnome-tweak-tool or MyUnity (Ubuntu Linux users with Unity) but configuration that can be made with them is unfortunately partial so in any case knowing below commands is a necessity to be able to tune up nicely your Linux Gnome Desktop.
And yes it is crazy why on Earth gnome developers scaped out the configuration from gconf-editor and left us with this user unfriendly method. Could it be that someone (Like the big corporations) has the interest to ruin Free Software?? What do you think…
Unity, GNOME 3 Shell/Classic, Cinnamon
In Unity GNOME 3 Shell / Classic and Cinnamon (the default Debian graphical env).
Before we start I recommend you check out what is the current installed and enabled theme, you might want decide to keep it after checking the number of themes available. To check your current installed GNOME theme run:
gsettings get org.gnome.desktop.interface gtk-theme
'Adwaita'
You see I have 'Adwaita' theme as a default.
Next lets change the gnome GTK theme interface.
gsettings set org.gnome.desktop.interface gtk-theme "Menta"
MATE (In Linux Mate the current fork of GNOME 2 for hardcore GNOME 2 users)
mateconftool-2 –type=string –set /desktop/mate/interface/gtk_theme "Menta"
GNOME 2 (In native GNOME 2 if you still own some old machines with old Debian / Ubuntu / Fedoras etc.
gconftool-2 –type=string –set /desktop/gnome/interface/gtk_theme "Menta"
4. Change WINDOW THEME (Metacity)
Unity, GNOME 3 Classic (Metacity), GNOME 3 Shell (Metacity > Mutter)
gsettings set org.gnome.desktop.wm.preferences theme "Menta"
Cinnamon (Metacity -> Muffin)
gconftool –type=string –set /desktop/cinnamon/windows/theme "Menta"
Note: Cinnamon must be restarted for the change to take effect.
GNOME 2 (In Gnome 2 with Metacity)
gconftool-2 –type=string –set /apps/metacity/general/theme "Menta"
MATE (Metacity)
mateconftool-2 –type=string –set /apps/marco/general/theme "Menta"
Change SHELL THEME (In Gnome Shell and Cinnamon)
GNOME Shell (user-theme extension must be enabled)
gsettings set org.gnome.shell.extensions.user-theme name "Menta"
Cinnamon
gsettings set org.cinnamon.theme name "Menta"
5. Change GTK COLOR SCHEME
Unity, GNOME 3 Shell/Classic, Cinnamon (Change GNOME3 Color scheme)
gsettings set org.gnome.desktop.interface gtk-color-scheme "bg_color:#e9efe9;fg_color:#444444;base_color:#ffffff;text_color:#333333;selected_bg_color:#6666cc;selected_fg_color:#eeeeee;tooltip_bg_color:#222222;tooltip_fg_color:#dfcfcf;link_color:#cc0099;"
Reset color (if you don't like it):
gsettings set org.gnome.desktop.interface gtk-color-scheme ""
MATE (Mate set color scheme)
mateconftool-2 –type=string –set /desktop/mate/interface/gtk_color_scheme "bg_color:#e9efe9;fg_color:#444444;base_color:#ffffff;text_color:#333333;selected_bg_color:#6666cc;selected_fg_color:#eeeeee;tooltip_bg_color:#222222;tooltip_fg_color:#dfcfcf;link_color:#cc0099;"
Reset color :
mateconftool-2 –type=string –set /desktop/mate/interface/gtk_color_scheme ""
6. GNOME 2 (Again for the old GNome 2 machines to change the GTK Color scheme)
gconftool-2 –type=string –set /desktop/gnome/interface/gtk_color_scheme "bg_color:#e9efe9;fg_color:#444444;base_color:#ffffff;text_color:#333333;selected_bg_color:#6666cc;selected_fg_color:#eeeeee;tooltip_bg_color:#222222;tooltip_fg_color:#dfcfcf;link_color:#cc0099;"
Reset color:
gconftool-2 –type=string –set /desktop/gnome/interface/gtk_color_scheme ""
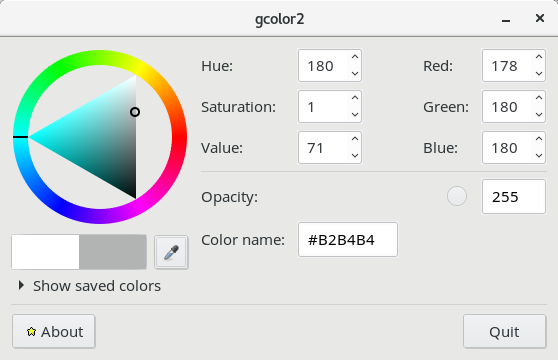
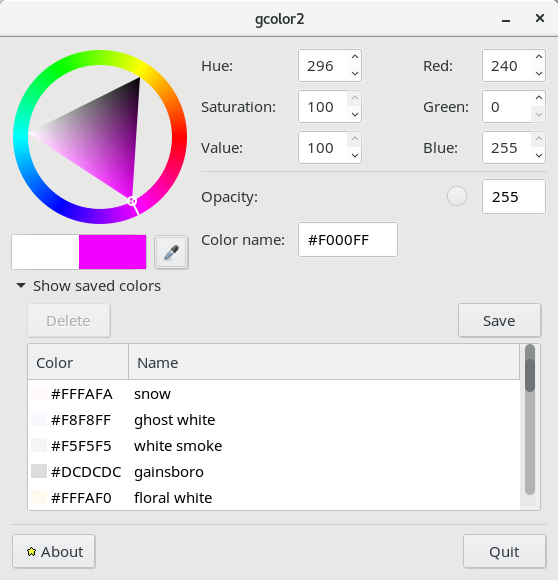
What about colors, well the #444444 and #22222 and #eeeeee, #333333 seen as color codes in above examples can easily decrypted if you don't know them using a tiny tool called gcolor2
The tool is installable on most Linux distributions with a simple apt-get install gcolor2 or yum install gcolor the tool is convenient and a must have for anyone using Linux for basic design or graphic operations with some program as GIMP / Krita / Inkscape / Vectr / Karbon etc.
All gcolor2 does is to make easy for you to get HTML color codes and convert existing ones into colors for you, here is shot:
http://www.fandigital.com/2012/06/change-theme-command-line-gnome.html
https://ubuntuforums.org/showthread.php?t=1778355
While talking about setting color another interesting Graphical tool related to article, that gives you abilities to change colors in GNOME is gnome-color-choose, the tool is really awesome and allows you to do many of the color tunings shown in above examples
# apt-get install –yes gnome-color-chooser
And finally for the gnome theme hungry people, here is a great bonus. If you need a ton of shiny new themes as possibility to set up on your GNOME download and install The Ultimate Edition Themes deb (Debian / Ubuntu Mint) etc. collection (mirrored):
Debian and other deb based distro users can easily download and install with:
linux:~# dpkg -i ultimate-edition-themes-.0.0.7_all.deb
…
Other Linux users such as Fedora ones and Slackware users (if anyone on Slack uses Gnome since KDE is default by default there), use alien tool to install it or directly open the file with Midnight Commander (mc) and copy the files to the /usr/share/themes dir.
This article is possible thanks to Change Theme Using Command Line in GNOME (Linux) command line examples are taken from there.


 My sister has forgotten the administrator account for her wordpress blog as she did not blogged for a while.