Posts Tagged ‘Hope’

Install Zabbix Proxy configure and connect to Zabbix server on CentOS Linux

Thursday, May 4th, 2023

Install Zabbix Proxy configure and connect to Zabbix server on CentOS Linux

1. Why use Zabbix-Proxy hidden advantages of using Zabbix-Proxy ?
 

Proxy can be used for many purposes and can provide many hidden benefits, just to name few of them:

  • Offload Zabbix Server when monitoring thousands of devices
  • Monitor remote locations
  • Monitor locations having unreliable communications
  • Simplify maintenance of distributed monitoring
  • Improved Security (Zabbix server can be restricted to be connectable only by the set of connected Zabbix Proxy / Proxies
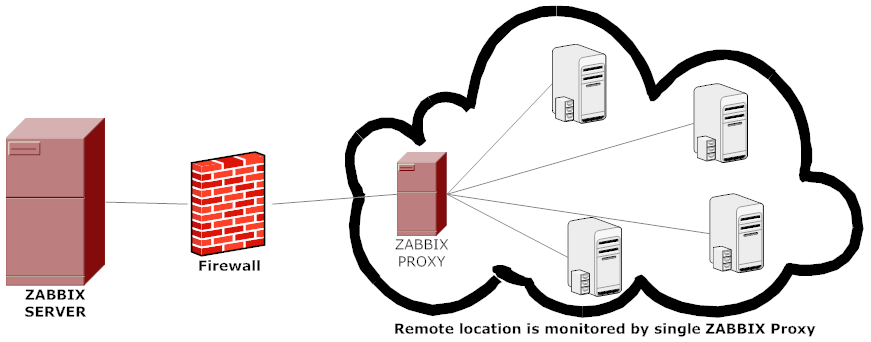

advantages-of-using-zabbix-proxy-instead-of-direct-connect-monitored-hosts-to-zabbix-server-diagram


A Zabbix proxy is the ideal solution if you have numerous hosts with multiple slow items that are affecting the performance of the server simply because processes are spending most of the time simply waiting for a response. A proxy can collect information from all hosts using its internal processes and then send raw historical data to the server. The time needed to connect and receive the host response will be on the proxy site, and the server performance will not be affected at all. A proxy just sends raw values to the server, and the server itself does not have to connect to the host to get the data.
 

2. Install zabbix-proxy-sqlite3 rpm package from Zabbix Official Repositories download page

Zabbix repository provides choice of 3 packages named as follows:

zabbix-proxy-mysql
zabbix-proxy-pgsql
zabbix-proxy-sqlite3

where the last value of the name (after zabbix-proxy) represents database type of the package — MySQL, PostgreSQL and SQLite respectively.

To not bother installing MySQL / PostgreSQL separate database servers, a lightweight choice is to use the sqlite3 db version. 
As I prefer zabbix-proxy data to be stored inside a flat database, thus I choose to use zabbix-proxy-sqlite3.

[root@sysadminshelp:/root ]# yum info zabbix-proxy-sqlite3-5.0.31-1.el7.x86_64
Заредени плъгини: fastestmirror
Loading mirror speeds from cached hostfile
 * base: mirrors.netix.net
 * epel: fedora.ipacct.com
 * extras: mirrors.netix.net
 * remi: remi.mirror.karneval.cz
 * remi-php74: remi.mirror.karneval.cz
 * remi-safe: remi.mirror.karneval.cz
 * updates: mirrors.netix.net
Инсталирани пакети
Име         : zabbix-proxy-sqlite3
Архитект.   : x86_64
Версия      : 5.0.31
Издание     : 1.el7
Обем        : 4.4 M
Хранилище   : installed
Обобщение   : Zabbix proxy for SQLite3 database
URL         : http://www.zabbix.com/
Лиценз      : GPLv2+
Описание    : Zabbix proxy with SQLite3 database support.

My experience to try to install thethe default CentOS RPM package for zabbix-proxy-sqlite3 provided by default
RPM package that came with CentOS did not work as expected and trying to install / configure and use it via

[root@sysadminshelp:/root ]# yum install zabbix-proxy-sqlite3.x86_64 -y

[root@sysadminshelp:/root ]# vi /etc/zabbix/zabbix_proxy.conf


Led me to a nasty errors seen in /var/log/zabbixsrv/zabbix_proxy.log like:

May 1st 2023, 08:42:45.020 zabbix_server cannot set list of PSK ciphersuites: file ssl_lib.c line 1314: error:1410D0B9:SSL routines:SSL_CTX_set_cipher_list:no cipher match
May 1st 2023, 08:42:45.018 zabbix_server cannot set list of PSK ciphersuites: file ssl_lib.c line 1314: error:1410D0B9:SSL routines:SSL_CTX_set_cipher_list:no cipher match
May 1st 2023, 08:42:45.013 zabbix_server cannot set list of PSK ciphersuites: file ssl_lib.c line 1314: error:1410D0B9:SSL routines:SSL_CTX_set_cipher_list:no cipher match
May 1st 2023, 08:42:45.011 zabbix_server cannot set list of PSK ciphersuites: file ssl_lib.c line 1314: error:1410D0B9:SSL routines:SSL_CTX_set_cipher_list:no cipher match


After some googling and reading some threads came upon this one https://support.zabbix.com/browse/ZBXNEXT-3604, there is exmplaed errors preventing the configured zabbix-proxy
to start are caused by the zabbix-proxy-sqlite3 package provided by Redhat (due to openssl incompitability bug or something ).

As one of people in the discussion pointed out the quickest workaround suggested is simply to use the official Zabbix Repository packages for zabbix-proxy-sqlite3, in order to not waste anymore time on this
trivial stuff to install it, simply run:

[root@sysadminshelp:/root ]# rpm -Uvh \
https://repo.zabbix.com/zabbix/5.0/rhel/7/x86_64/zabbix-proxy-sqlite3-5.0.31-1.el7.x86_64.rpm

Alternative way if you seem to not have the machine connected to the internet is simply download the package with wget / lynx / curl / w3m from another machine 
that can reach the Internet upload the package via the local LAN or VPN and install it:

# wget https://repo.zabbix.com/zabbix/5.0/rhel/7/x86_64/zabbix-proxy-sqlite3-5.0.31-1.el7.x86_64.rpm

[root@sysadminshelp:/root ]# rpm -ivh zabbix-proxy-sqlite3-5.0.31-1.el7.x86_64.rpm

NOTE ! Before you install proxy, keep in mind that your proxy version must match the Zabbix server version !

3. Generate a PSK random secret key and set proper permissions for zabbix-proxy directories


[root@sysadminshelp:/root ]# cd /etc/zabbix/
    
[root@sysadminshelp:/root ]# openssl rand -hex 32 >> /etc/zabbix/zabbix_proxy.psk     
[root@sysadminshelp:/root ]# chown root:zabbix zabbix_proxy.psk [root@sysadminshelp:/root ]# vi /etc/zabbix/zabbix_proxy.conf [root@sysadminshelp:/root ]# mkdir -p /var/lib/zabbix-proxy/sqlite3db
[root@sysadminshelp:/root ]# chown -R zabbix:zabbix /var/lib/zabbix-proxy
[root@sysadminshelp:/var/lib/zabbixsrv/sqlite3db]# sqlite3 zabbix_proxy
SQLite version 3.7.17 2013-05-20 00:56:22
Enter ".help" for instructions
Enter SQL statements terminated with a ";"
sqlite> .databases
seq  name             file
—  —————  ———————————————————-
0    main             /var/lib/zabbixsrv/sqlite3db/zabbix_proxy
sqlite>
[root@sysadminshelp:/root ]# vi /etc/zabbix_proxy.conf
#DBName=zabbix_proxy
DBName=/var/lib/zabbixsrv/sqlite3db/zabbix_proxy

4. Configure zabbix proxy to be able to connect to Zabbix Server

[root@sysadminshelp:/root ]#  vi /etc/zabbix/zabbix_proxy.conf     ############ GENERAL PARAMETERS #################
    ProxyMode=0
    Server=192.168.1.28
    ServerPort=10051
    Hostname=zabbix-proxy
    ListenPort=10051
    SourceIP=10.168.1.55
    LogFile=/var/log/zabbix/zabbix_proxy.log
    LogFileSize=1
    DebugLevel=2
    PidFile=/var/run/zabbix/zabbix_proxy.pid
    DBName=/var/lib/zabbix-proxy/sqlite3db/zabbix_proxy.db
    DBUser=zabbix
    
    ######### PROXY SPECIFIC PARAMETERS #############
    ProxyOfflineBuffer=24
    HeartbeatFrequency=60
    ConfigFrequency=120
    
    ############ ADVANCED PARAMETERS ################
    StartPollersUnreachable=3
    StartHTTPPollers=3
    JavaGateway=127.0.0.1
    JavaGatewayPort=10052
    StartJavaPollers=5
    SNMPTrapperFile=/var/log/snmptrap/snmptrap.log
    StartSNMPTrapper=1
    CacheSize=32M
    Timeout=4
    ExternalScripts=/usr/lib/zabbix/externalscripts
    LogSlowQueries=3000
    
    ####### TLS-RELATED PARAMETERS #######
    TLSConnect=psk
    TLSAccept=psk
    TLSPSKIdentity=PSK zabbix-proxy-fqdn-hostname
    TLSPSKFile=/etc/zabbix/zabbix_proxy.psk

5. Check and make sure the installed zabbix proxy as well as the zabbix_proxy server zabbix_agentd client and zabbix_server are at the same major version release

a) Check zabbix proxy version

[root@sysadminshelp:/etc/zabbix]# zabbix_proxy -V
zabbix_proxy (Zabbix) 5.0.31
Revision f64a07aefca 30 January 2023, compilation time: Jan 30 2023 09:55:10

Copyright (C) 2023 Zabbix SIA
License GPLv2+: GNU GPL version 2 or later <https://www.gnu.org/licenses/>.
This is free software: you are free to change and redistribute it according to
the license. There is NO WARRANTY, to the extent permitted by law.

This product includes software developed by the OpenSSL Project
for use in the OpenSSL Toolkit (http://www.openssl.org/).

Compiled with OpenSSL 1.0.1e-fips 11 Feb 2013
Running with OpenSSL 1.0.1e-fips 11 Feb 2013

[root@sysadminshelp:/etc/zabbix]#

b) check zabbix_agentd version

[root@sysadminshelp:/etc/zabbix]# zabbix_agentd -V
zabbix_agentd (daemon) (Zabbix) 5.0.30
Revision 2c96c38fb4b 28 November 2022, compilation time: Nov 28 2022 11:27:43

Copyright (C) 2022 Zabbix SIA
License GPLv2+: GNU GPL version 2 or later <https://www.gnu.org/licenses/>.
This is free software: you are free to change and redistribute it according to
the license. There is NO WARRANTY, to the extent permitted by law.

This product includes software developed by the OpenSSL Project
for use in the OpenSSL Toolkit (http://www.openssl.org/).

Compiled with OpenSSL 1.0.1e-fips 11 Feb 2013
Running with OpenSSL 1.0.1e-fips 11 Feb 2013

c) Check zabbix server version

[root@zabbix:~]# zabbix_server -V
zabbix_server (Zabbix) 5.0.30
Revision 2c96c38fb4b 28 November 2022, compilation time: Nov 28 2022 09:19:03

Copyright (C) 2022 Zabbix SIA
License GPLv2+: GNU GPL version 2 or later <https://www.gnu.org/licenses/>.
This is free software: you are free to change and redistribute it according to
the license. There is NO WARRANTY, to the extent permitted by law.

This product includes software developed by the OpenSSL Project
for use in the OpenSSL Toolkit (http://www.openssl.org/).

Compiled with OpenSSL 1.1.1d  10 Sep 2019
Running with OpenSSL 1.1.1n  15 Mar 2022

6. Starting the zabbix-proxy for a first time

Before beginning with installation make sure selinux is disabled, as it might cause some issues with Zabbix

[root@sysadminshelp:/etc/zabbix]# sestatus
SELinux status:                 disabled

If you need to have the selinux enabled you will have to allow the zabbix-proxy into selinux as well:

cd /tmp
# grep zabbix_proxy /var/log/audit/audit.log | grep denied | audit2allow -m zabbix_proxy > zabbix_proxy.te
grep zabbix_proxy /var/log/audit/audit.log | grep denied | audit2allow -M zabbix_proxy
semodule -i zabbix_proxy.pp


[root@sysadminshelp:/etc/zabbix]# systemctl start zabbix-proxy

Also lets enable zabbix-proxy to automatically start it on next server reboot / boot.

root@sysadminshelp:/etc/zabbix]# systemctl enable zabbix-proxy

Normally running zabbix-proxy should provide a status messages like:

[root@sysadminshelp:/etc/zabbix]# systemctl status zabbix-proxy
● zabbix-proxy.service – Zabbix Proxy
   Loaded: loaded (/usr/lib/systemd/system/zabbix-proxy.service; disabled; vendor preset: disabled)
   Active: active (running) since чт 2023-05-04 14:58:36 CEST; 2h 59min ago
  Process: 8500 ExecStop=/bin/kill -SIGTERM $MAINPID (code=exited, status=0/SUCCESS)
  Process: 8504 ExecStart=/usr/sbin/zabbix_proxy -c $CONFFILE (code=exited, status=0/SUCCESS)
 Main PID: 8506 (zabbix_proxy)
   CGroup: /system.slice/zabbix-proxy.service
           ├─8506 /usr/sbin/zabbix_proxy -c /etc/zabbix/zabbix_proxy.conf
           ├─8507 /usr/sbin/zabbix_proxy: configuration syncer [synced config 40521 bytes in 0.0…
           ├─8508 /usr/sbin/zabbix_proxy: trapper #1 [processed data in 0.000808 sec, waiting fo…
           ├─8509 /usr/sbin/zabbix_proxy: trapper #2 [processed data in 0.005028 sec, waiting fo…
           ├─8510 /usr/sbin/zabbix_proxy: trapper #3 [processed data in 0.001240 sec, waiting fo…
           ├─8511 /usr/sbin/zabbix_proxy: trapper #4 [processed data in 0.004378 sec, waiting fo…
           ├─8512 /usr/sbin/zabbix_proxy: trapper #5 [processed data in 0.004991 sec, waiting fo…
           ├─8513 /usr/sbin/zabbix_proxy: preprocessing manager #1 [queued 0, processed 3 values…
           ├─8514 /usr/sbin/zabbix_proxy: preprocessing worker #1 started
           ├─8515 /usr/sbin/zabbix_proxy: preprocessing worker #2 started
           ├─8516 /usr/sbin/zabbix_proxy: preprocessing worker #3 started
           ├─8517 /usr/sbin/zabbix_proxy: heartbeat sender [sending heartbeat message success in…
           ├─8518 /usr/sbin/zabbix_proxy: data sender [sent 0 values in 0.005241 sec, idle 1 sec…
           ├─8519 /usr/sbin/zabbix_proxy: housekeeper [deleted 4501 records in 0.011462 sec, idl…
           ├─8520 /usr/sbin/zabbix_proxy: http poller #1 [got 0 values in 0.000248 sec, idle 5 s…
           ├─8521 /usr/sbin/zabbix_proxy: http poller #2 [got 0 values in 0.000239 sec, idle 5 s…
           ├─8522 /usr/sbin/zabbix_proxy: http poller #3 [got 0 values in 0.000328 sec, idle 5 s…
           ├─8523 /usr/sbin/zabbix_proxy: discoverer #1 [processed 0 rules in 0.000261 sec, idle…
           ├─8524 /usr/sbin/zabbix_proxy: history syncer #1 [processed 0 values in 0.000009 sec,…
           ├─8525 /usr/sbin/zabbix_proxy: history syncer #2 [processed 0 values in 0.000007 sec,…
           ├─8526 /usr/sbin/zabbix_proxy: history syncer #3 [processed 0 values in 0.000014 sec,…
           ├─8527 /usr/sbin/zabbix_proxy: history syncer #4 [processed 0 values in 0.000021 sec,…
           ├─8528 /usr/sbin/zabbix_proxy: java poller #1 [got 0 values in 0.000017 sec, idle 5 s…
           ├─8529 /usr/sbin/zabbix_proxy: java poller #2 [got 0 values in 0.000019 sec, idle 5 s…
           ├─8530 /usr/sbin/zabbix_proxy: java poller #3 [got 0 values in 0.000019 sec, idle 5 s…
           ├─8531 /usr/sbin/zabbix_proxy: java poller #4 [got 0 values in 0.000018 sec, idle 5 s…
           ├─8532 /usr/sbin/zabbix_proxy: java poller #5 [got 0 values in 0.000013 sec, idle 5 s…
           ├─8533 /usr/sbin/zabbix_proxy: snmp trapper [processed data in 0.000026 sec, idle 1 s…
           ├─8534 /usr/sbin/zabbix_proxy: self-monitoring [processed data in 0.000034 sec, idle …
           ├─8535 /usr/sbin/zabbix_proxy: task manager [processed 0 task(s) in 0.000169 sec, idl…
           ├─8536 /usr/sbin/zabbix_proxy: poller #1 [got 0 values in 0.000012 sec, idle 5 sec]
           ├─8537 /usr/sbin/zabbix_proxy: poller #2 [got 0 values in 0.000021 sec, idle 5 sec]
           ├─8538 /usr/sbin/zabbix_proxy: poller #3 [got 0 values in 0.000039 sec, idle 5 sec]
           ├─8539 /usr/sbin/zabbix_proxy: poller #4 [got 0 values in 0.000024 sec, idle 5 sec]
           ├─8540 /usr/sbin/zabbix_proxy: poller #5 [got 0 values in 0.000019 sec, idle 5 sec]
           ├─8541 /usr/sbin/zabbix_proxy: unreachable poller #1 [got 0 values in 0.000011 sec, i…
           ├─8542 /usr/sbin/zabbix_proxy: unreachable poller #2 [got 0 values in 0.000018 sec, i…
           ├─8543 /usr/sbin/zabbix_proxy: unreachable poller #3 [got 0 values in 0.000041 sec, i…
           └─8544 /usr/sbin/zabbix_proxy: icmp pinger #1 [got 0 values in 0.000022 sec, idle 5 s…

май 04 14:58:36 sysadminshelp systemd[1]: Stopped Zabbix Proxy.
май 04 14:58:36 sysadminshelp systemd[1]: Starting Zabbix Proxy…
май 04 14:58:36 sysadminshelp systemd[1]: Started Zabbix Proxy.
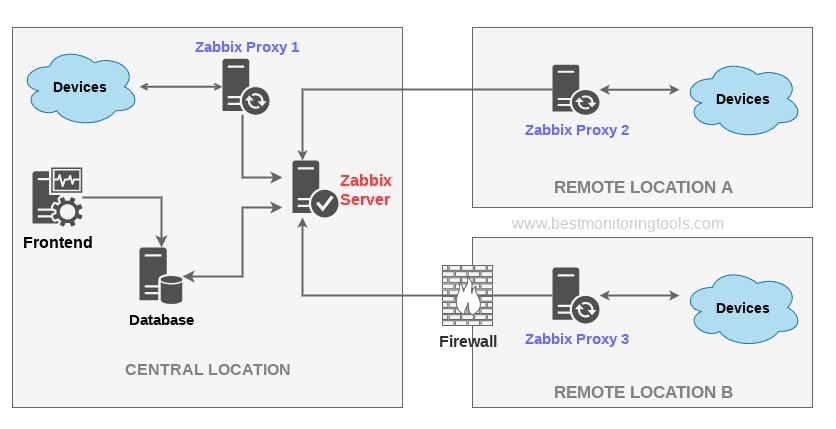
zabbix-server-zabbix-proxy-and-zabbix-clients-overview-diagram

7. Configure zabbix-agentd to use your just new brand new zabbix-proxy

Here is my sample configuration file:

[root@sysadminshelp:/etc/zabbix]# grep -v \# /etc/zabbix/zabbix_agentd.conf | sed '/^$/d'
PidFile=/var/run/zabbix/zabbix_agentd.pid
LogFile=/var/log/zabbix/zabbix_agentd.log
LogFileSize=0
Server=zabbix-proxy
ServerActive=zabbix-proxy:10051
ListenIP
Hostname=sysadminshelp
BufferSend=30
BufferSize=100
Include=/etc/zabbix/zabbix_agentd.d/*.conf


Note that the ServerActive given "zabbix-proxy" should be resolvable from the host, or even better you might want to put the IP of the Proxy if
you don't have at least a pseudo Hostname already configured inside /etc/hosts or actual DNS 'A' Active record configured inside a properly resolving
DNS server configured on the host via /etc/resolv.conf.


8. Create and Configure new proxy into the Zabbix-server host
 

Go to the zabbix server web interface URL into menus:
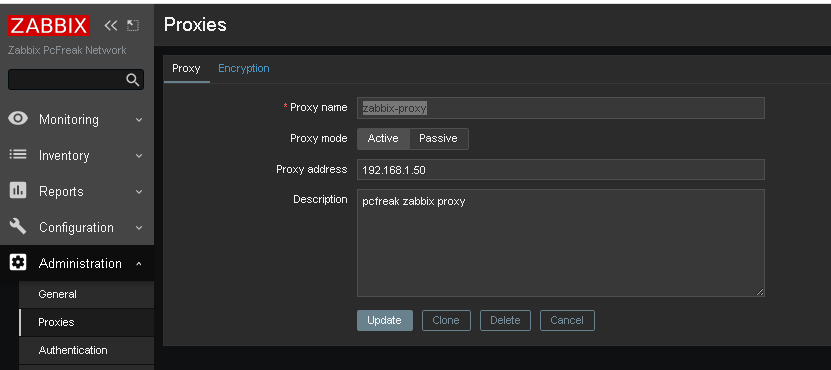
zabbix-administration-proxy-config
 

Administration -> Proxies (Proxy) 


Click on ;

Create Proxy button (uppper right corner)

*Proxy name: usually-your-host-pingable-fqdn
Proxy mode: Active
Proxy address: 192.168.1.50
Description: pcfreak zabbix proxy


Administration -> Proxies -> Encryption


From "Connection to proxy"

Untick "No encryption"

and

Tick "PSK"
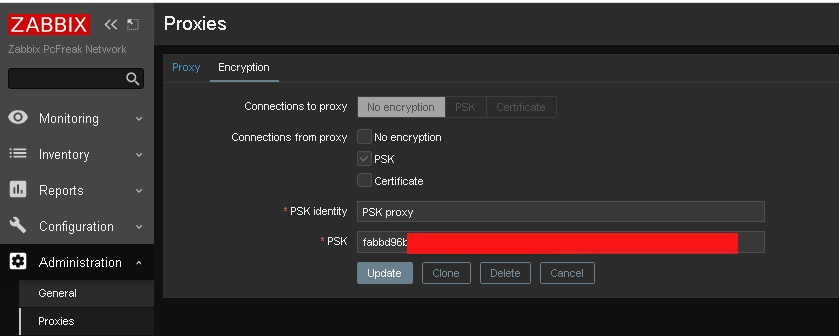

zabbix-administration-proxy-config-encryption

*PSK Identity: PSK proxy
*PSK: Put the key here (copy from /etc/zabbix/zabbix_proxy.psk generated steps earlier with openssl)

[root@sysadminshelp:/etc/zabbix]# cat zabbix_proxy.psk
faddbd96be00ac42c892fda5201634df25d51f3ndbbbf6cee9d354b2817092a28

Press the "Update" Button

zabbix-administration-proxy-config-encryption1

and go again to Proxies and check the zabbix-proxy is connected to the server and hosts configured to use the zabbix proxy reporting frequently.

To make sure that the configured new hosts to use the Zabbix Proxy instead of direct connection to Zabbix Server, go to Latest Data and check whether the configured Hostnames to connect to the Zabbix-Proxy continues to sent Data still.

9. Debugging problems with zabix-proxy and zabbix-agentd connectivity to proxy

In case of troubles check out what is going on inside the Zabbix Proxy / Agent and Server log files
 

[root@sysadminshelp:/etc/zabbix]# tail -n 50 /var/log/zabbix/zabbix_proxy.log

 6832:20230504:134032.281 Starting Zabbix Proxy (active) [zabbix-proxy]. Zabbix 5.0.31 (revision f
64a07aefca).
  6832:20230504:134032.281 **** Enabled features ****
  6832:20230504:134032.281 SNMP monitoring:       YES
  6832:20230504:134032.281 IPMI monitoring:       YES
  6832:20230504:134032.281 Web monitoring:        YES
  6832:20230504:134032.281 VMware monitoring:     YES
  6832:20230504:134032.281 ODBC:                  YES
  6832:20230504:134032.281 SSH support:           YES
  6832:20230504:134032.281 IPv6 support:          YES
  6832:20230504:134032.281 TLS support:           YES
  6832:20230504:134032.281 **************************
  6832:20230504:134032.281 using configuration file: /etc/zabbix/zabbix_proxy.conf
  6832:20230504:134032.291 current database version (mandatory/optional): 05000000/05000005
  6832:20230504:134032.291 required mandatory version: 05000000
  6832:20230504:134032.292 proxy #0 started [main process]
  6833:20230504:134032.292 proxy #1 started [configuration syncer #1]
  6833:20230504:134032.329 received configuration data from server at "192.168.1.28", datalen 40521
  6834:20230504:134032.392 proxy #2 started [trapper #1]
  6835:20230504:134032.401 proxy #3 started [trapper #2]
  6836:20230504:134032.402 proxy #4 started [trapper #3]
  6838:20230504:134032.405 proxy #6 started [trapper #5]
  6837:20230504:134032.409 proxy #5 started [trapper #4]
  6843:20230504:134032.409 proxy #11 started [heartbeat sender #1]
  6845:20230504:134032.412 proxy #13 started [housekeeper #1]
  6847:20230504:134032.412 proxy #15 started [discoverer #1]
  8526:20230504:145836.512 proxy #20 started [history syncer #3]
  8517:20230504:145836.512 proxy #11 started [heartbeat sender #1]
  8530:20230504:145836.515 proxy #24 started [java poller #3]
  8531:20230504:145836.517 proxy #25 started [java poller #4]
  8532:20230504:145836.520 proxy #26 started [java poller #5]
  8536:20230504:145836.522 proxy #30 started [poller #1]
  8527:20230504:145836.525 proxy #21 started [history syncer #4]
  8535:20230504:145836.525 proxy #29 started [task manager #1]
  8533:20230504:145836.528 proxy #27 started [snmp trapper #1]
  8539:20230504:145836.528 proxy #33 started [poller #4]
  8538:20230504:145836.529 proxy #32 started [poller #3]
  8534:20230504:145836.532 proxy #28 started [self-monitoring #1]
  8544:20230504:145836.532 proxy #38 started [icmp pinger #1]
  8543:20230504:145836.532 proxy #37 started [unreachable poller #3]
  8542:20230504:145836.535 proxy #36 started [unreachable poller #2]
  8541:20230504:145836.537 proxy #35 started [unreachable poller #1]
  8540:20230504:145836.540 proxy #34 started [poller #5]
  8507:20230504:150036.453 received configuration data from server at "192.168.1.28", datalen 40521
  8507:20230504:150236.503 received configuration data from server at "192.168.1.28", datalen 40521
  8507:20230504:150436.556 received configuration data from server at "192.168.1.28", datalen 40521
  8507:20230504:150636.608 received configuration data from server at "192.168.1.28", datalen 40521
  8507:20230504:150836.662 received configuration data from server at "192.168.1.28", datalen 40521


[root@sysadminshelp:/etc/zabbix]# tail -n 10  /var/log/zabbix-agent/zabbix_agentd.log
3096166:20230504:182840.461 agent #1 started [collector]
3096167:20230504:182840.462 agent #2 started [listener #1]
3096168:20230504:182840.463 agent #3 started [listener #2]
3096169:20230504:182840.464 agent #4 started [listener #3]
3096170:20230504:182840.464 agent #5 started [active checks #1]

If necessery to Debug further and track some strange errors, you might want to increase the DebugLevel to lets say DebugLevel=5

5 – extended debugging (produces even more information)

If checking both zabbix_agentd.log and zabbix_proxy.log cannot give you enough of a hint on what might be the issues you face with your userparameter scripts or missing Monitored data etc. and hopefully you have access to the zabbix-server machine, check out the zabbix server log as well

[root@zabbix:~]# tail -n 100 /var/log/zabbix/zabbix_server.log

3145027:20230504:182641.556 sending configuration data to proxy "zabbix-proxy" at "192.168.1.50", datalen 40521, bytes 6120 with compression ratio 6.6
3145029:20230504:182716.529 cannot send list of active checks to "192.168.1.30": host [pcfrxenweb] not found
3145028:20230504:182731.959 cannot send list of active checks to "192.168.1.30": host [pcfrxenweb] not found
3145029:20230504:182756.634 cannot send list of active checks to "192.168.1.30": host [pcfrxenweb] not found

Wrapping it up

In this article, we have learned how to install and configure a zabbix-proxy server and prepare a PSK encryption secret key for it.
We learned also  how to connect this server to the central zabbix monitoring host machine in Active mode, so both Zabbix proxy and server can communicate in a secure crypted form,
as well as how to set zabbix_agentd clients to connect to the zabbix proxy
which will from itself send its data to the Central Zabbix server host as well as how to Debug and hopefully solve issues with communication between Zabbix client -> Zabbix Proxy -> Zabbix server.

I know this article, does not say anything revolutionary and there is plenty of posts online talking about how to run yourself a zabbix proxy and make in your home or corporate network,
but I thought to write it down as by writting it and reading a bit more on the topic of Zabbix Server / Proxy / Agent, that give myself a better overview on how this technologies work and such an article will give myself an easier step by step guide to follow,
in future when I have to configure Zabbix Environments for personal hobby or professionally for customers.
Hope you enjoyed. Cheers ! 🙂

Saint Hieromartyr Therapont of Serdika ( Sofia ) martyred year † 1555 for Christ

Thursday, May 26th, 2022

Saint Therapontius of Serdika is celebrated every year on on May 27 in the Bulgarian Orthodox Church, together with St. Holy Martyrs Therapont of Sardis († 259). He is born and lived in the ancient city of Serdika (today Sofia).

He is part of the nine saints of Sofia, that are celebrated in the Church throughout the Liturgical year.

A little is known of him and just like the martyrologies of much of the ancient saints, we have only few sentences left mentioning his great martyrdom for Christ, along with other local Bulgarian saints. He has a written  celebration service in the Minelogion Church book for  27-th of May.
Minelogion for those unaware is one of the service books used in the Night and Morning services songs and containing services details about the glorified saints for each day of the year.

Saint-Therapontius-Theraponti-of-Serdika-Sofia-Sveti-Terapont-Sofiiski

Troparion of the Holy Martyr, voice 4
He became a partaker of morals and viceroy of the apostles
in the way of your contemplation, inspired by God, you have done deeds,
therefore you have faithfully taught the word of truth,
for his faith he suffered even to the point of blood,
Holy Martyr Therapont, beg the Christ God to save our souls.


Saint Hieromartyr Therapont of Roman Fortress Serdika ( Sofia )
The famous Bulgarian medieval historian Matei Gramatik, who was a contemporary of Saint Nicholas of Sofia (a 15h century famous Bulgarian martyr saint) and a witness to his martyrdom in 1555, who wrote his biography with great skill, writes about this holy martyr. There he describes the situation in which St. Nicholas of Sofia lived – both geographically and spiritually.
In his description of the spiritual situation, he gives brief information about the saints of Sofia, including St. Terapont of Serdica (Sofia). He writes:

Saint-hieromartyr-Theraponti-Therapontius-of-Serdika-Sofia-icon

"When you listen for the inhabitants of Sofia, don't think about the current contemporary ones,
but for the heavenly ones, who were once co-inhabitants of us and now live with the angels.
So forth it is beneficial, to tell about 2 , 3 of them. The holy hieromartyr Therapontius, who
being a citizen of this place and a presbyter of the holy God's Church in Serdika (Sofia), lived filled
with lot of virtues and at the end, during the persecutions of Christians, has been detained by guards
by the lawless for his Christ confession. After a lot of martyrs and being enchained with a heavy
iron chains, he has been put out of the city and on a distance of one day walking, on
this place he was beheaded and henceforth he received a martyrs death for Christ.
They say on the place where his blood was shed, in that time a large oak tree has grown  and it is seen until today and there a lot of miraculous healings occur,
whenever one comes with faith."

Today a part of this trunk of the oak is kept as a sacred relic in the ancient Sofia's capital ancient church "St. Petka", where the memory of the holy martyr is celebrated every year on May 27.

Translated from: © Lives of the Saints Book. Synodal Publishing House, Sofia, 1991, edited by Parthenius, Bishop of Lefkada and Archimandrite Dr. Athanasius (Bonchev).


Another Bulgarian saint Paisios of Hilendar / Paisij Hilendarski (1722 – 1773) also mentions in his history book History of the Slavo-Bulgarians states: "There are three holy martyrs in the city of Sofia:
1) St. George;
2) St. Nicholas;
3) St. Terapontius.

This saint was a priest in town of Tran, where many people now go for healing. Where in the Turks has slayered the saint a an oak greaw and with his prayers a lot of healing is given on the place of this oak. Same manner Saints George and Nicholas suffered from the godless Turks during Selim's reign; and their holy relics give healing in this city of Sofia. "

Icon Images of St. Therapontius are known to exist today from the XIX century. There are icons icons in the Sofia church "St. Paraskeva ”, in Pernik, in the church of " St. Petka ” in Sofia, fresco in the church“ St. Dimitar ” in the village of Yarlovtsi, Transko, wherein used to an icon also whose location now is unknown.

In Tran and Godech respectively there were folk customs associated with the saint and therein and in the region he is revered as a healer and protector of the harvests.
There is also a cave in Trun, which is indicated as a refuge for the saint.
A chapel in his name was in the city, burned by the Turks in the 30s of the XIX century.

In Glory of St. Terapontius of Sofia during the Second World War and until 1957 was dedicated the Revival church "Holy Trinity ", today – Saint Great-martyr (Mina)  Menas, in the Slatina district of Sofia. The church was built on the remains of the monastery “Holy  Trinity", according to mouth to mouth tradition kept for ages. 

According to the legend, the saint was slaughtered here and this gives some reason to presume that St. Terapontius might have been one of the spiritual fathers who were serving in the monastery at that time.

Let by the holy prayers of Saint Terapont God gives forgives to our multitude of transgressions and grants more Peace, Love, Hope, Faith and goodness to everyone !

Virtualbox Shared folder set up on Linux between Host and Guest OS – Set up Virtualbox shared folder to Copy files from PC Host to Guest

Wednesday, September 12th, 2018

mount-shares-between-host-OS-and-guest-virtual-machine-howto-virtualbox-vbox-logo

How to set-up Virtualbox shared folder to Copy files from PC Host  and Guest Virtualized OS?

Running VirtualBox Host is an easy thing to set-up across all Operating Systems.  Once you have it sooner or later you will need to copy files from the VM Host OS (that in my case is GNU / Linux) to the virtualized Guest operating system (again in my case that's again another Linux ISO running indide the Virtual Machine).

Below are steps to follow To use Virtualbox Shared Folder functionality to copy files between VBox and your Desktop / server Linux install.

1. Install Virtualbox Guest Additions CD Image ISO

I've explained how to add the Guest Additions CD image thoroughfully in my previous article Howto enable Copy / Paste Virtualbox betwen Linux guest and Host OS
Anyways I'll repeat myself below for sake of clarity:

To do so use Oracle VBox menus (on the booted virtualized OS VBox window):


Devices -> Insert Guest additions CD Image


Mount the ISO inside the Linux Virtual Machine:

root@debian:~# mount /media/cdrom1/
 

If the mount fails and there are no files inside the mount point it might be because the virtualbox-dkms and virtualbox-guest-dkms packages might be missing on the Host OS.

To install them (on Debian GNU / Linux) assuming that you're using virtualbox default distro packages /etc/apt/sources.list :
 

apt-get install –yes -qq virtualbox-dkms virtualbox-guest-dkms


and run:


root@debian:/media/cdrom1# cd /media/cdrom1; sh VBoxLinuxAdditions.run


2. Create directory for Shared Folder that will be used to access Host / OS files from the Guest Virtualized OS
 

root@debian:~# mkdir /mnt/shared_folder


3. Map from VBox program interface Shared folder settings and Mount /mnt/shared_folder location

virtualbox-virtual-machine-devices-shared-folders-shared-folder-settings-linux-screenshot


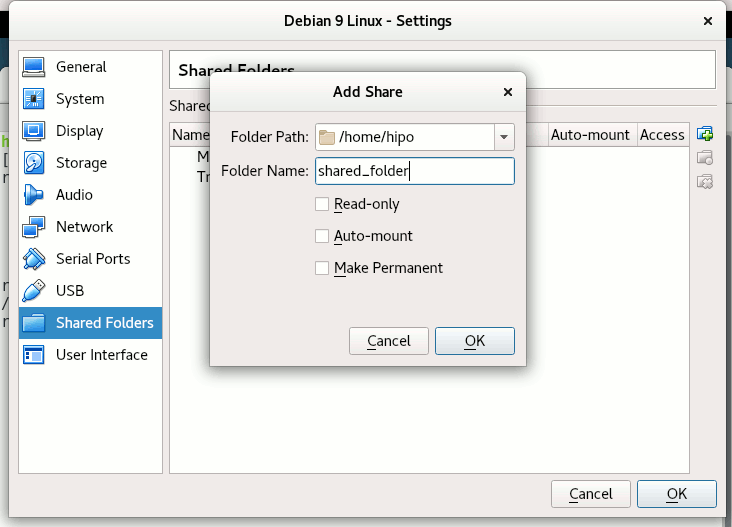
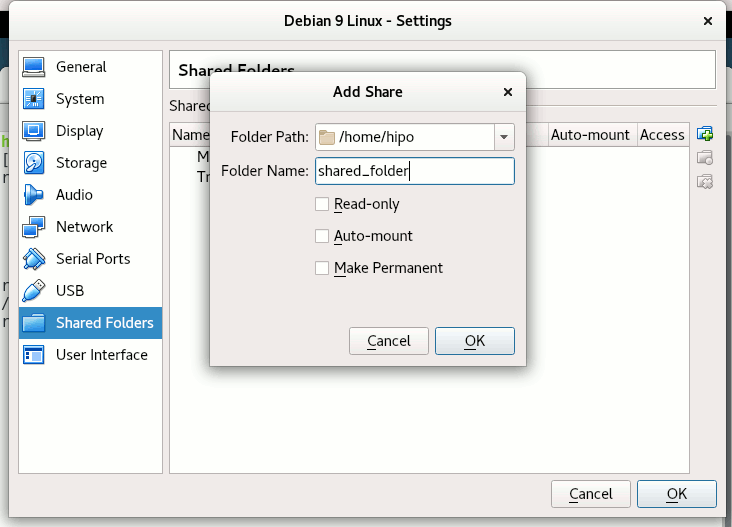
Devices -> Shared Folder -> Shared Folder settings -> Transient Folders (click blue folder add small button right)


From Transient Folders add whatever directory you want to be shared from your local notebook / PC to the VM.

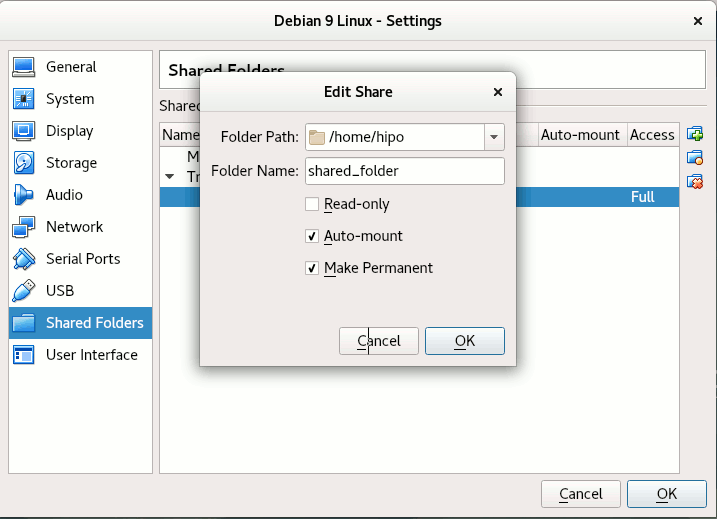
virtualbox-devices-Shared-Folder-Add-Shared-Folder-add-share-linux-screenshotDepending on whether you would like to mount the shared folder only for reading files (choose Read Only) to make it a permanent shared folder (and not just for the one session of current running Virtual Machine until its killed use Make Permanent) or check Auto-Mount tick if you want the shared_folder mapping to be mounted on every VM boot.
Once the shared_folder directory location is set-up from GUI menu click OK and in order for the settings to take effect, you'll need to restart the VM Guest with Linux (use halt command from terminal) or Power Off the Machine via the VBox menus.

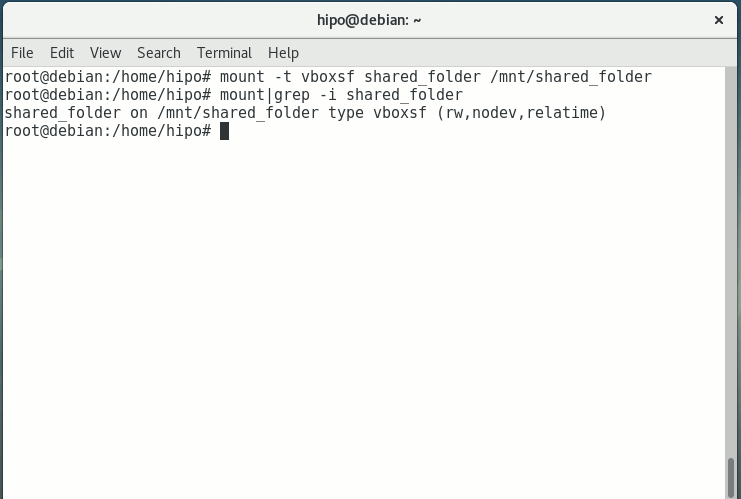
To mount use command like:

mount -t vboxsf name_of_folder_linked_from_vbox  /mnt/name_folder_guest_os/


mount-vboxsf-shared-folder-mnt-shared-linux-guest-screenshot

In my case I wanted to share home folder /home so the command I used is:

root@debian:~# mount -t vboxsf  shared_folder /mnt/shared_folder


If everything is fine your Host OS file content from /home will be visible (for read and write if you Mapped it so) 
under /mnt/shared_folder …

And as Turtles Ninja used to heavily say Cowabunga !!! 🙂
You have it mounted and ready for file share between Desktop -> Virtualized OS.


Bear in mind that above mount command has to run as root (superuser) to succeed.

You now could copy files from your Host OS (running the Virtual Machine) and the Guest OS (Virtualized OS) using /mnt/shared_folder mount point without problems.

The example is if you want to share files between VirtualBox installed Linux and the Guest (Desktop / server) OS, however at many cases mounting your Host OS directory for root users might be not very practical but, instead you might prefer to do the mount for specific non admin user, for example I prefer to do the shared folder mount with my pointed non-root username hipo.

Here is how to do above VM shared_folder mount for non-root user:

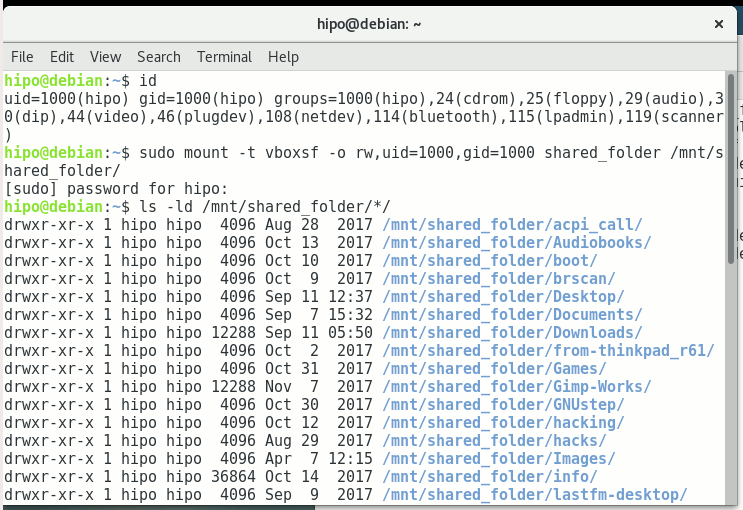
First you need to know the exact UID / GID (User ID / Group ID) of user, you can get that with id command:


hipo@linux:~$  id
uid=1000(hipo) gid=1000(hipo) groups=1000(hipo),24(cdrom),25(floppy),29(audio),30(dip),44(video),46(plugdev),108(netdev),114(bluetooth),115(lpadmin),119(scanner)


As you see UID / GID in my case are 1000 / 1000

hipo@linux:~$ sudo mount -t vboxsf -o rw,uid=1000,gid=1000 shared_folder /mnt/shared_folder


mount-virtual-box-shared_folder-with-non-administration-permissions-non-root-permissions-id-and-mount-command-screenshot-linux


4. Mounting configured shared_folder to automatically mount into the Guest OS Linux on every boot

a) Configuring shared_folder auto-mount using /etc/rc.local

If you need the shared_folder to automatically mount next-time you boot the virtual machine quickest way is to add the mount command to /etc/rc.local (on Debian 8 and Debian 9 and newer Ubuntu Linuxes rc.local is missing by default to enable it to work like it worked before read follow my previous article ).

b) Configuring auto-mount for shared_folder through /etc/fstab

The more professional way to auto-mount on emulated OS VM boot time,  you could add the vboxsf mount definitions to /etc/fstab with your favourite text-editor mcedit, nano, joe etc. … (for me that's vim).

Syntax of /etc/fstab is as follows:
 

<Device> <Mount Point> <Type> <Options> <Dump> <Pass>

root@linux:~# vim /etc/fstab


shared_folder /mnt/shared_folder                                vboxsf rw,uid=1000,gid=1000 0 0

Note that you will want to change 1000 / 1000, id / gid with the ones of the non-admin user you would like to add to mount it for.

A quick way to add it to /etc/fstab with a shell one-liner is with command
 

root@linux:~# echo 'shared_folder /mnt/shared_folder                                vboxsf rw,uid=1000,gid=1000 0  0' >> /etc/fstab

An alternative way to add a user to have permissions for vboxsf file system (without specifying the long -o uid=1000,gid=1000 options is to simply add the username in question to group vboxsf like so:

c) Adding non super user username to vboxsf group

root@linux:~# usermod -G vboxsf hipo
root@linux:~# grep -i vboxsf /etc/group
vboxsf:x:999:hipo


hipo@linux:~$ sudo mount -t vboxsf  shared_folder /mnt/shared_folder


without the extra arguments and the options to pass to /etc/fstab (for eventual requirement to auto mount the shared_folder) would be more simple e.g.:


echo 'shared_folder /mnt/shared_folder                                vboxsf ' >> /etc/fstab


One note to make here is if the uesr is added to vboxsf the line for /etc/fstab to auto mount to mount for root user and non-root will be identical.

Then you can get the /etc/fstab auto-mount configured tested by running:

c) Checking auto-mount is working

hipo@linux:~# mount -a
hipo@linux:~# mount |grep -i vboxsf
shared_folder on /mnt/shared_folder type vboxsf (rw,nodev,relatime)


5. What if you end up with mounting failed errors ? – What might be causing the mounting failed Protocol error (a few things to check to solve)


In case of troubles with the mount you might get an error like:

hipo@linux:~# mount -t vboxsf  share_folder /mnt/shared_folder

/sbin/mount.vboxsf: mounting failed with the error: Protocol error


This error might be caused because of Insert Guest Additions CD Image might be not properly enabled and installed using the ISO provided VBoxLinuxAdditions.sh shell script.
Other common reason you might get this error if you have mistyped the Folder name: given in Shared Folders -> Folder Path -> Add Share for example I have given shared_folder as a Map name but as you can see in above mount -t vboxsf, I've mistyped share_folder instead of the correct one shared_folder inserted.
In some VBox releases this error was caused by bugs in the Virtual Machine.
 

virtualbox-virtual-machine-shared-folder-transient-folder-add-folder-linux-VM-guest-linux

One useful tip is to be able to check whether a Virtualbox Virtual Machine has a configured shared_folder (if you're logging to manage the machine on remote server – nomatter whether you have logged in with VNC / Teamviewer / Citrix etc. or via SSH session.

To do so use VBoxControl as of time of writting usually located on most distributions under (/usr/bin/VBoxControl)


hipo@linux:~# VBoxControl sharedfolder list -automount
Oracle VM VirtualBox Guest Additions Command Line Management Interface Version 5.2.18
(C) 2008-2018 Oracle Corporation
All rights reserved.


Auto-mounted Shared Folder mappings (0):

No Shared Folders available.

You can use VBoxControl command to get set and list a number of settings on the VBox VM, here is an useful example with it where you get information about numerous VBox info values:


root@linux:~# VBoxControl guestproperty enumerate
Oracle VM VirtualBox Guest Additions Command Line Management Interface Version 5.2.18
(C) 2008-2018 Oracle Corporation
All rights reserved.


Name: /VirtualBox/GuestInfo/OS/Product, value: Linux, timestamp: 1536681633430852000, flags: <NULL>
Name: /VirtualBox/GuestInfo/Net/0/V4/IP, value: 10.0.2.15, timestamp: 1536681633438717000, flags: <NULL>
Name: /VirtualBox/HostInfo/GUI/LanguageID, value: en_US, timestamp: 1536697521395621000, flags: RDONLYGUEST
Name: /VirtualBox/GuestInfo/Net/0/MAC, value: 08002762FA1C, timestamp: 1536681633442120000, flags: <NULL>
Name: /VirtualBox/GuestInfo/OS/ServicePack, value: <NULL>, timestamp: 1536681633431259000, flags: <NULL>
Name: /VirtualBox/HostInfo/VBoxVerExt, value: 5.2.18, timestamp: 1536681619002646000, flags: TRANSIENT, RDONLYGUEST
Name: /VirtualBox/GuestInfo/Net/0/V4/Netmask, value: 255.255.255.0, timestamp: 1536681633440157000, flags: <NULL>
Name: /VirtualBox/GuestInfo/OS/Version, value: #1 SMP Debian 4.9.110-3+deb9u2 (2018-08-13), timestamp: 1536681633431125000, flags: <NULL>
Name: /VirtualBox/GuestAdd/VersionExt, value: 5.2.18, timestamp: 1536681633431582000, flags: <NULL>
Name: /VirtualBox/GuestAdd/Revision, value: 124319, timestamp: 1536681633432515000, flags: <NULL>
Name: /VirtualBox/HostGuest/SysprepExec, value: <NULL>, timestamp: 1536681619002355000, flags: TRANSIENT, RDONLYGUEST
Name: /VirtualBox/GuestInfo/OS/LoggedInUsers, value: 1, timestamp: 1536681673447293000, flags: TRANSIENT, TRANSRESET
Name: /VirtualBox/GuestInfo/Net/0/Status, value: Up, timestamp: 1536681633443911000, flags: <NULL>
Name: /VirtualBox/GuestInfo/Net/0/Name, value: enp0s3, timestamp: 1536681633445302000, flags: <NULL>
Name: /VirtualBox/HostGuest/SysprepArgs, value: <NULL>, timestamp: 1536681619002387000, flags: TRANSIENT, RDONLYGUEST
Name: /VirtualBox/GuestAdd/Version, value: 5.2.18, timestamp: 1536681633431419000, flags: <NULL>
Name: /VirtualBox/HostInfo/VBoxRev, value: 124319, timestamp: 1536681619002668000, flags: TRANSIENT, RDONLYGUEST
Name: /VirtualBox/GuestInfo/Net/0/V4/Broadcast, value: 10.0.2.255, timestamp: 1536681633439531000, flags: <NULL>
Name: /VirtualBox/HostInfo/VBoxVer, value: 5.2.18, timestamp: 1536681619002613000, flags: TRANSIENT, RDONLYGUEST
Name: /VirtualBox/GuestInfo/OS/LoggedInUsersList, value: hipo, timestamp: 1536681673446498000, flags: TRANSIENT, TRANSRESET
Name: /VirtualBox/GuestInfo/Net/Count, value: 1, timestamp: 1536698949773993000, flags: <NULL>
Name: /VirtualBox/GuestInfo/OS/Release, value: 4.9.0-7-amd64, timestamp: 1536681633431001000, flags: <NULL>
Name: /VirtualBox/GuestInfo/OS/NoLoggedInUsers, value: false, timestamp: 1536681673447965000, flags: TRANSIENT, TRANSRESET
Name: /VirtualBox/GuestAdd/HostVerLastChecked, value: 5.2.18, timestamp: 1536681702832389000, flags: <NULL>

Hope you enjoyed ! Have phun! 🙂

How to Increase virtualbox Linux install machine VM .VDI hard disk size to free space on root partition – Move /usr to a new partition

Tuesday, October 10th, 2017

extend-vdi-virtual-machine-partition-with-virtualbox-howto-virtualbox-logo
 

How to Increse Hard Disk size of VirtualBox Virtual Machine .VDI file to Free Space on root Partition or Howto move /usr large partition to separate new partition?


I just wondered how to increase hard disk size of Virtualbox Virtual Machine image .VDI, because for some stupid reason I've created my initial hard disk size for Linux partition to be the default 10 Gigabytes.

The problem is the packages I need to have installed on the Virtual Machine which will be a testbed for future tests of a production website applications are taking up too much space, once installed so I'm left with no space
in /var/lib/mysql for the database import. So what can I do in that case is to simply free up disk space or Merge ROOT partition with another partition.

Since merging the partition is not a trivial job and would require me to have installable CD with the Linux distro (in my case that's Debian Linux) or have a bootable USB flash drive, I preferred second approach to problem e.g. to free up disk space on ROOT partition by creating a second partition and move the /usr folder to reside there.

Before that it is of course necessery to  have extended the .VDI file using VirtualBox, so more space than the default 10GB preconfigured are available, this is easily done on Windows OS as, VBox is provided with GUI clickable option to do it, but for who knows what reason that is not the case with Linux, so Linux users only option to increase VDI file is to manually run command part of the virtualbox package, that is not a hard task really but it requires some typing and basic knowledge on how to run commands in terminal.


To .VDI resize (extend), we first go to default location where VirtualBox stores its image .VDI files (by default as of moment of writting this article – this is ~/"VrtualBox VMs"  (or home directory of logged in user dir VirtualBox VMs), the command to use is VBoxManage


root@jericho:/home/hipo# cd VirtualBox VMs/
root@jericho:/home/hipo/VirtualBox VMs# ls
Debian 6  Debian 9  Windows 10
root@jericho:/home/hipo/VirtualBox VMs# cd Debian 6/
r
oot@jericho:/home/hipo/VirtualBox VMs/Debian 6# ls
Debian 6.vbox  Debian 6.vbox-prev  Debian 6.vdi  Logs  NewVirtualDisk1.vdi  Snapshots

root@jericho:/home/hipo/VirtualBox VMs/Debian 6# VBoxManage modifyhd Debian 6.vdi –resize 20000
0%…10%…20%…30%…40%…50%…60%…70%…80%…90%…100%
root@jericho:/home/hipo/VirtualBox VMs/Debian 6#


Above command does resize the 10GB default created partition for Linux, where I have installed Linux which was 99% full of data, because of the many packages I installed to 20GB size, to make it bigger just use the respective size, be it 30000 (for 30GB) or 100000 (for 100GB) etc.

Even though in this example VBoxManage virtual partition resize command was done for GNU / Linux Operating System, it can be done for any other Operating as well to resize the size of the Virtual .VDI file (Virtual Machine) partition, be it Windows 7 / 8 / 10 or the rest of Free Operating systems FreeBSD / OpenBSD / BSD that are installed in a VM etc.

Next Launch the Virtual Machine with VBox Server client Program and install there Gparted (GNU Parted), as we'll need it to create a new Hard Disk Partition:


$ VirtualBox


Inside virtualmachine's in gnome-terminal / xterm etc. depending on the graphical environment used do install with apt-get:


debian:# apt-get install –yes gparted


debian~:# gparted


Notice that gparted has to be ran as a root superuser.


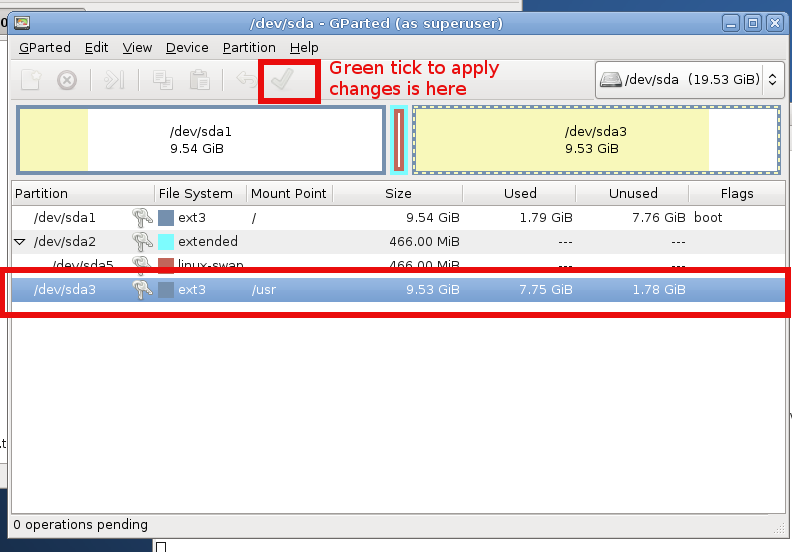
Run GParted and create new EXT3 filesystem that is 10GB (the size of the new created partition).

If you have installed Debian to place all partitions under / (root directory /dev/sda1) then the fresh new partition to create should be
/dev/sda3, anyways just look closely in EXT3 and in your case if the partiition is named differently create according to proper partition /dev/ naming.

I'll not run into details on how to create the partition with GParted as the program interface is very self-explanatory, the only thing is to apply the update to create partition and the ext3 filesystem, that's being done
with a green tick:

gparted-create-ext3-partition-howto-linux

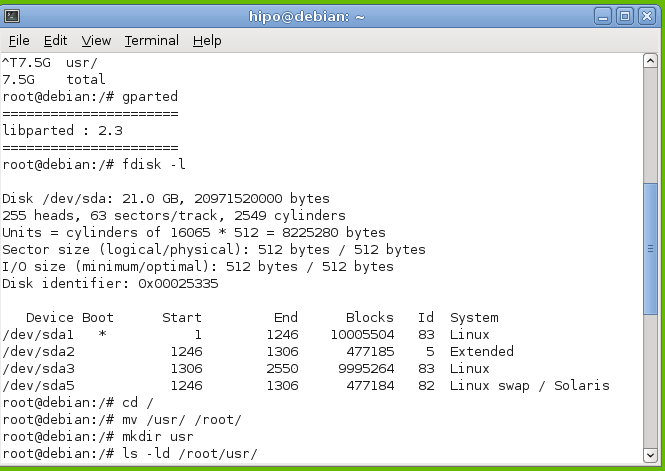
Next step is to check with fdisk whether, we have ext3 properly created  filesystem as we've done already with GPARTED:

Once we have the partition created with EXT3 filesystem, we're ready to move /usr temporary to other folder, I use usually /root for the move but you can create anywhere a new folder for that and move to there.

To move to /root directory run again in terminal:


debian:~# mv /usr /root
debian:~# mkdir /usr


howto-extend-root-filesystem-disk-space-linux-move-usr-folder-to-root-temporary-debian-gnu-linux


Note that during the move operations, your Desktop icons will become without (with broken) pictures and the default Debian background picture is to disappear, that's because the GUI environment will soon realize /usr/ libraries that're periodically reloaded in memory are missing and will be unable to reload them as it does in a cycle.

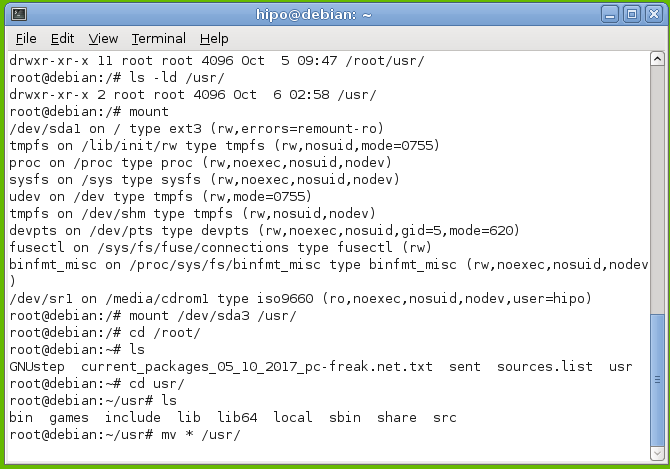
That should take a few minutes, so grab a coffee or if you're a smoker (hope not as smoking kills 🙂 ), in 5 / 10 minutes time depending on your computer / server configuration, it will be over, so we're ready to create new /usr dir and mount the  new partition:


debian:~# mount /dev/sda3 /usr


howto-extend-root-filesystem-disk-space-linux-move-usr-folder-to-root-temporary-debian-gnu-linux1


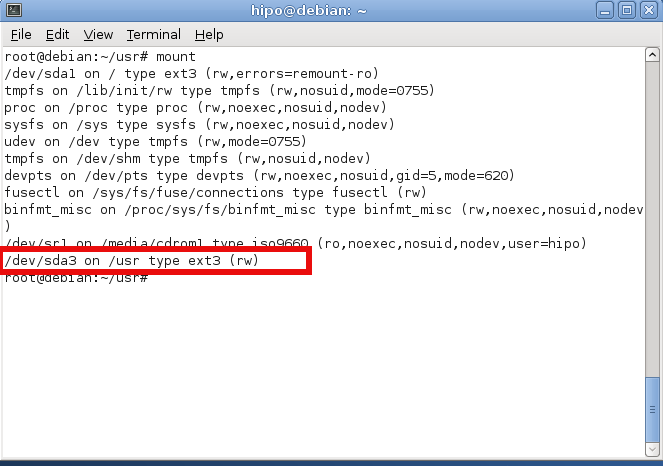
Now we check with mount command whether mount is fine:


check-if-filesystem-is-properly-mounted-linux-debian-screenshot


Now  /dev/sda3 is mounted under /usr  and we have to move back /root/usr directory content back to the newly mounted /usr so we run command:
 

debian:~#  mv /root/usr/* /usr/*


Finally we need to create proper records for the new partition inside /etc/fstab (fstab –FileSystem Tab file – the file which describes instructs the Linux OS what partition to boot where, what)

HOW TO CHECK LINUX UUID FOR A PARTITION??

Before adding anything to /etc/fstab you need to check the UUID of /dev/sda3 (or whatever the partition is called), without proper UUID, the system might fail to boot.
So here is how to check the UUID we'll need for config:


hipo@debian:~$ /sbin/blkid /dev/sda3
/dev/sda3: UUID="2273db4b-3069-4f78-90fc-e7483c0305bd" SEC_TYPE="ext2" TYPE="ext3"

hipo@debian:~$ ls -al /dev/disk/by-uuid/
total 0
drwxr-xr-x 2 root root 100 Oct  6 05:16 .
drwxr-xr-x 6 root root 120 Oct  6 05:16 ..
lrwxrwxrwx 1 root root  10 Oct  6 05:16 2273db4b-3069-4f78-90fc-e7483c0305bd -> ../../sda3
lrwxrwxrwx 1 root root  10 Oct  6 05:16 b98d92cd-41aa-4e18-a474-9b8df445dbe5 -> ../../sda1
lrwxrwxrwx 1 root root  10 Oct  6 05:16 f27f7448-f200-4983-b54f-b9e5206f77ac -> ../../sda5

As you can see our /dev/sda3 UUID is 2273db4b-3069-4f78-90fc-e7483c0305bd

Further on lets view and edit /etc/fstab you can also download a copy of my Virtual Machine fstab here


debian:~# cat /etc/fstab

# /etc/fstab: static file system information.
#
# Use 'blkid' to print the universally unique identifier for a
# device; this may be used with UUID= as a more robust way to name devices
# that works even if disks are added and removed. See fstab(5).
#
# <file system> <mount point>   <type>  <options>       <dump>  <pass>
proc            /proc           proc    defaults        0       0
# / was on /dev/sda1 during installation
UUID=b98d92cd-41aa-4e18-a474-9b8df445dbe5 /               ext3    errors=remount-ro 0       1
# swap was on /dev/sda5 during installation
UUID=f27f7448-f200-4983-b54f-b9e5206f77ac none            swap    sw              0       0
/dev/scd0       /media/cdrom0   udf,iso9660 user,noauto     0       0
/dev/scd1       /media/cdrom1   udf,iso9660 user,noauto     0       0


We need to add following line to  /etc/fstab:
 

UUID=2273db4b-3069-4f78-90fc-e7483c0305bd    /usr        ext3 error=remount-ro    0    1


Open the file with your favourite text editor (gedit / nano / pico / vim / joe) etc.

debian:~# vim /etc/fstab


# /etc/fstab: static file system information.
#
# Use 'blkid' to print the universally unique identifier for a
# device; this may be used with UUID= as a more robust way to name devices
# that works even if disks are added and removed. See fstab(5).
#
# <file system> <mount point>   <type>  <options>       <dump>  <pass>
proc            /proc           proc    defaults        0       0
# / was on /dev/sda1 during installation
UUID=b98d92cd-41aa-4e18-a474-9b8df445dbe5 /               ext3    errors=remount-ro 0       1
# swap was on /dev/sda5 during installation
UUID=f27f7448-f200-4983-b54f-b9e5206f77ac none            swap    sw              0       0
/dev/scd0       /media/cdrom0   udf,iso9660 user,noauto     0       0
/dev/scd1       /media/cdrom1   udf,iso9660 user,noauto     0       0

UUID=2273db4b-3069-4f78-90fc-e7483c0305bd     /usr        ext3 error=remount-ro    0    1    

Basicly it should be possible to add (for historic reasons) also instead of UUID=2273db4b-3069-4f78-90fc-e7483c0305bd  /dev/sda3
So it looks like so but, the better practice is to use UUID line given.

Well that's all folks now /usr directory will contain all your heavy root partition (disk filling) libraries and files, so you can happily use /var/lib/mysql or /var/lib/postgresql /var/www to store your web application files and import your databases.

Big thanks to Ubuntu Forums article – How do I increase the hard disk size of the Virtual Machine article for inspiring this post.

Hope that helps anyone and thanks and other comments are always welcome ! 🙂

Optimizing Linux TCP/IP Networking to increase Linux Servers Performance

Tuesday, April 8th, 2008

optimize-linux-servers-for-network-performance-to-increase-speed-and-decrease-hardware-costs-_tyan-exhibits-hpc-optimized-server-platforms-featuring-intel-xeon-processor-e7-4800-v3-e5-2600-supercomputing-15_full

Some time ago I thought of ways to optimize my Linux Servers network performance.

Even though there are plenty of nice articles on the topic on how to better optimize Linux server performance by tunning up the kernel sysctl (variables).

Many of the articles I found was not structed in enough understandable way so I decided togoogle around and  found few interesting websites which gives a good overview on how one can speed up a bit and decrease overall server loads by simply tuning few basic kernel sysctl variables.

Below article is a product of my research on the topic on how to increase my GNU / Linux servers performance which are mostly running LAMP (Linux / Apache / MySQL / PHP) together with Qmail mail servers.

The article is focusing on Networking as networking is usual bottleneck for performance.
Below are the variables I found useful for optimizing the Linux kernel Network stack.

Implementing the variables might reduce your server load or if not decrease server load times and CPU utilization, they would at lease increase thoroughput so more users will be able to access your servers with (hopefully) less interruptions.
That of course would save you some Hardware costs and raise up your Servers efficiency.

Here are the variables themselves and some good example:
 

# values.net.ipv4.ip_forward = 0 ( Turn off IP Forwarding )

net.ipv4.conf.default.rp_filter = 1

# ( Control Source route verification )
net.ipv4.conf.default.accept_redirects = 0

# ( Disable ICMP redirects )
net.ipv4.conf.all.accept_redirects = 0 ( same as above )
net.ipv4.conf.default.accept_source_route = 0

# ( Disable IP source routing )
net.ipv4.conf.all.accept_source_route = 0
( - || - )net.ipv4.tcp_fin_timeout = 40

# ( Decrease FIN timeout ) - Useful on busy/high load
serversnet.ipv4.tcp_keepalive_time = 4000 ( keepalive tcp timeout )
net.core.rmem_default = 786426 - Receive memory stack size ( a good idea to increase it if your server receives big files )
net.ipv4.tcp_rmem = "4096 87380 4194304"
net.core.wmem_default = 8388608 ( Reserved Memory per connection )
net.core.wmem_max = 8388608
net.core.optmem_max = 40960
( maximum amount of option memory buffers )

# like a homework investigate by yourself what the variables below stand for :)
net.ipv4.tcp_max_tw_buckets = 360000
net.ipv4.tcp_reordering = 5
net.core.hot_list_length = 256
net.core.netdev_max_backlog = 1024


# Below are newly added experimental
#net.core.rmem_max = 16777216
#net.core.wmem_max = 16777216
##kernel.msgmni = 1024
##kernel.sem = 250 256000 32 1024
##vm.swappiness=0
kernel.sched_migration_cost=5000000


Also a good sysctl.conf file which one might want to substitite or use as a skele for some productive server is ready for download here


Even if you can't reap out great CPU reduction benefits from integrating above values or similar ones, your overall LAMP performance to end customers should increase – at some occasions dramatically, at others little bit but still noticable.

If you're unsure on exact kernel variable values to use check yourself what should be the best values that fits you according to your server Hardware – usually this is done by experimenting and reading the kernel documentation as provided for each one of uplisted variables.

Above sysctl.conf is natively created to run on Debian and on other distributions like CentOS, Fedora Slackware some values might either require slight modifications.

Hope this helps and gives you some idea of how network optimization in Linux is usually done. Happy (hacking) tweakening !

Block Web server over loading Bad Crawler Bots and Search Engine Spiders with .htaccess rules

Monday, September 18th, 2017

howto-block-webserver-overloading-bad-crawler-bots-spiders-with-htaccess-modrewrite-rules-file

In last post, I've talked about the problem of Search Index Crawler Robots aggressively crawling websites and how to stop them (the article is here) explaning how to raise delays between Bot URL requests to website and how to completely probhit some bots from crawling with robots.txt.

As explained in article the consequence of too many badly written or agressive behaviour Spider is the "server stoning" and therefore degraded Web Server performance as a cause or even a short time Denial of Service Attack, depending on how well was the initial Server Scaling done.

The bots we want to filter are not to be confused with the legitimate bots, that drives real traffic to your website, just for information

 The 10 Most Popular WebCrawlers Bots as of time of writting are:
 

1. GoogleBot (The Google Crawler bots, funnily bots become less active on Saturday and Sundays :))

2. BingBot (Bing.com Crawler bots)

3. SlurpBot (also famous as Yahoo! Slurp)

4. DuckDuckBot (The dutch search engine duckduckgo.com crawler bots)

5. Baiduspider (The Chineese most famous search engine used as a substitute of Google in China)

6. YandexBot (Russian Yandex Search engine crawler bots used in Russia as a substitute for Google )

7. Sogou Spider (leading Chineese Search Engine launched in 2004)

8. Exabot (A French Search Engine, launched in 2000, crawler for ExaLead Search Engine)

9. FaceBot (Facebook External hit, this crawler is crawling a certain webpage only once the user shares or paste link with video, music, blog whatever  in chat to another user)

10. Alexa Crawler (la_archiver is a web crawler for Amazon's Alexa Internet Rankings, Alexa is a great site to evaluate the approximate page popularity on the internet, Alexa SiteInfo page has historically been the Swift Army knife for anyone wanting to quickly evaluate a webpage approx. ranking while compared to other pages)

Above legitimate bots are known to follow most if not all of W3C – World Wide Web Consorium (W3.Org) standards and therefore, they respect the content commands for allowance or restrictions on a single site as given from robots.txt but unfortunately many of the so called Bad-Bots or Mirroring scripts that are burning your Web Server CPU and Memory mentioned in previous article are either not following /robots.txt prescriptions completely or partially.

Hence with the robots.txt unrespective bots, the case the only way to get rid of most of the webspiders that are just loading your bandwidth and server hardware is to filter / block them is by using Apache's mod_rewrite through


.htaccess


file

Create if not existing in the DocumentRoot of your website .htaccess file with whatever text editor, or create it your windows / mac os desktop and transfer via FTP / SecureFTP to server.

I prefer to do it directly on server with vim (text editor)


vim /var/www/sites/your-domain.com/.htaccess


RewriteEngine On

IndexIgnore .htaccess */.??* *~ *# */HEADER* */README* */_vti*

SetEnvIfNoCase User-Agent "^Black Hole” bad_bot
SetEnvIfNoCase User-Agent "^Titan bad_bot
SetEnvIfNoCase User-Agent "^WebStripper" bad_bot
SetEnvIfNoCase User-Agent "^NetMechanic" bad_bot
SetEnvIfNoCase User-Agent "^CherryPicker" bad_bot
SetEnvIfNoCase User-Agent "^EmailCollector" bad_bot
SetEnvIfNoCase User-Agent "^EmailSiphon" bad_bot
SetEnvIfNoCase User-Agent "^WebBandit" bad_bot
SetEnvIfNoCase User-Agent "^EmailWolf" bad_bot
SetEnvIfNoCase User-Agent "^ExtractorPro" bad_bot
SetEnvIfNoCase User-Agent "^CopyRightCheck" bad_bot
SetEnvIfNoCase User-Agent "^Crescent" bad_bot
SetEnvIfNoCase User-Agent "^Wget" bad_bot
SetEnvIfNoCase User-Agent "^SiteSnagger" bad_bot
SetEnvIfNoCase User-Agent "^ProWebWalker" bad_bot
SetEnvIfNoCase User-Agent "^CheeseBot" bad_bot
SetEnvIfNoCase User-Agent "^Teleport" bad_bot
SetEnvIfNoCase User-Agent "^TeleportPro" bad_bot
SetEnvIfNoCase User-Agent "^MIIxpc" bad_bot
SetEnvIfNoCase User-Agent "^Telesoft" bad_bot
SetEnvIfNoCase User-Agent "^Website Quester" bad_bot
SetEnvIfNoCase User-Agent "^WebZip" bad_bot
SetEnvIfNoCase User-Agent "^moget/2.1" bad_bot
SetEnvIfNoCase User-Agent "^WebZip/4.0" bad_bot
SetEnvIfNoCase User-Agent "^WebSauger" bad_bot
SetEnvIfNoCase User-Agent "^WebCopier" bad_bot
SetEnvIfNoCase User-Agent "^NetAnts" bad_bot
SetEnvIfNoCase User-Agent "^Mister PiX" bad_bot
SetEnvIfNoCase User-Agent "^WebAuto" bad_bot
SetEnvIfNoCase User-Agent "^TheNomad" bad_bot
SetEnvIfNoCase User-Agent "^WWW-Collector-E" bad_bot
SetEnvIfNoCase User-Agent "^RMA" bad_bot
SetEnvIfNoCase User-Agent "^libWeb/clsHTTP" bad_bot
SetEnvIfNoCase User-Agent "^asterias" bad_bot
SetEnvIfNoCase User-Agent "^httplib" bad_bot
SetEnvIfNoCase User-Agent "^turingos" bad_bot
SetEnvIfNoCase User-Agent "^spanner" bad_bot
SetEnvIfNoCase User-Agent "^InfoNaviRobot" bad_bot
SetEnvIfNoCase User-Agent "^Harvest/1.5" bad_bot
SetEnvIfNoCase User-Agent "Bullseye/1.0" bad_bot
SetEnvIfNoCase User-Agent "^Mozilla/4.0 (compatible; BullsEye; Windows 95)" bad_bot
SetEnvIfNoCase User-Agent "^Crescent Internet ToolPak HTTP OLE Control v.1.0" bad_bot
SetEnvIfNoCase User-Agent "^CherryPickerSE/1.0" bad_bot
SetEnvIfNoCase User-Agent "^CherryPicker /1.0" bad_bot
SetEnvIfNoCase User-Agent "^WebBandit/3.50" bad_bot
SetEnvIfNoCase User-Agent "^NICErsPRO" bad_bot
SetEnvIfNoCase User-Agent "^Microsoft URL Control – 5.01.4511" bad_bot
SetEnvIfNoCase User-Agent "^DittoSpyder" bad_bot
SetEnvIfNoCase User-Agent "^Foobot" bad_bot
SetEnvIfNoCase User-Agent "^WebmasterWorldForumBot" bad_bot
SetEnvIfNoCase User-Agent "^SpankBot" bad_bot
SetEnvIfNoCase User-Agent "^BotALot" bad_bot
SetEnvIfNoCase User-Agent "^lwp-trivial/1.34" bad_bot
SetEnvIfNoCase User-Agent "^lwp-trivial" bad_bot
SetEnvIfNoCase User-Agent "^Wget/1.6" bad_bot
SetEnvIfNoCase User-Agent "^BunnySlippers" bad_bot
SetEnvIfNoCase User-Agent "^Microsoft URL Control – 6.00.8169" bad_bot
SetEnvIfNoCase User-Agent "^URLy Warning" bad_bot
SetEnvIfNoCase User-Agent "^Wget/1.5.3" bad_bot
SetEnvIfNoCase User-Agent "^LinkWalker" bad_bot
SetEnvIfNoCase User-Agent "^cosmos" bad_bot
SetEnvIfNoCase User-Agent "^moget" bad_bot
SetEnvIfNoCase User-Agent "^hloader" bad_bot
SetEnvIfNoCase User-Agent "^humanlinks" bad_bot
SetEnvIfNoCase User-Agent "^LinkextractorPro" bad_bot
SetEnvIfNoCase User-Agent "^Offline Explorer" bad_bot
SetEnvIfNoCase User-Agent "^Mata Hari" bad_bot
SetEnvIfNoCase User-Agent "^LexiBot" bad_bot
SetEnvIfNoCase User-Agent "^Web Image Collector" bad_bot
SetEnvIfNoCase User-Agent "^The Intraformant" bad_bot
SetEnvIfNoCase User-Agent "^True_Robot/1.0" bad_bot
SetEnvIfNoCase User-Agent "^True_Robot" bad_bot
SetEnvIfNoCase User-Agent "^BlowFish/1.0" bad_bot
SetEnvIfNoCase User-Agent "^JennyBot" bad_bot
SetEnvIfNoCase User-Agent "^MIIxpc/4.2" bad_bot
SetEnvIfNoCase User-Agent "^BuiltBotTough" bad_bot
SetEnvIfNoCase User-Agent "^ProPowerBot/2.14" bad_bot
SetEnvIfNoCase User-Agent "^BackDoorBot/1.0" bad_bot
SetEnvIfNoCase User-Agent "^toCrawl/UrlDispatcher" bad_bot
SetEnvIfNoCase User-Agent "^WebEnhancer" bad_bot
SetEnvIfNoCase User-Agent "^TightTwatBot" bad_bot
SetEnvIfNoCase User-Agent "^suzuran" bad_bot
SetEnvIfNoCase User-Agent "^VCI WebViewer VCI WebViewer Win32" bad_bot
SetEnvIfNoCase User-Agent "^VCI" bad_bot
SetEnvIfNoCase User-Agent "^Szukacz/1.4" bad_bot
SetEnvIfNoCase User-Agent "^QueryN Metasearch" bad_bot
SetEnvIfNoCase User-Agent "^Openfind data gathere" bad_bot
SetEnvIfNoCase User-Agent "^Openfind" bad_bot
SetEnvIfNoCase User-Agent "^Xenu’s Link Sleuth 1.1c" bad_bot
SetEnvIfNoCase User-Agent "^Xenu’s" bad_bot
SetEnvIfNoCase User-Agent "^Zeus" bad_bot
SetEnvIfNoCase User-Agent "^RepoMonkey Bait & Tackle/v1.01" bad_bot
SetEnvIfNoCase User-Agent "^RepoMonkey" bad_bot
SetEnvIfNoCase User-Agent "^Zeus 32297 Webster Pro V2.9 Win32" bad_bot
SetEnvIfNoCase User-Agent "^Webster Pro" bad_bot
SetEnvIfNoCase User-Agent "^EroCrawler" bad_bot
SetEnvIfNoCase User-Agent "^LinkScan/8.1a Unix" bad_bot
SetEnvIfNoCase User-Agent "^Keyword Density/0.9" bad_bot
SetEnvIfNoCase User-Agent "^Kenjin Spider" bad_bot
SetEnvIfNoCase User-Agent "^Cegbfeieh" bad_bot


<Limit GET POST>
order allow,deny
allow from all
Deny from env=bad_bot
</Limit>


Above rules are Bad bots prohibition rules have RewriteEngine On directive included however for many websites this directive is enabled directly into VirtualHost section for domain/s, if that is your case you might also remove RewriteEngine on from .htaccess and still the prohibition rules of bad bots should continue to work
Above rules are also perfectly suitable wordpress based websites / blogs in case you need to filter out obstructive spiders even though the rules would work on any website domain with mod_rewrite enabled.

Once you have implemented above rules, you will not need to restart Apache, as .htaccess will be read dynamically by each client request to Webserver

2. Testing .htaccess Bad Bots Filtering Works as Expected


In order to test the new Bad Bot filtering configuration is working properly, you have a manual and more complicated way with lynx (text browser), assuming you have shell access to a Linux / BSD / *Nix computer, or you have your own *NIX server / desktop computer running
 

Here is how:


lynx -useragent="Mozilla/5.0 (compatible; MegaIndex.ru/2.0; +http://megaindex.com/crawler)" -head -dump http://www.your-website-filtering-bad-bots.com/


Note that lynx will provide a warning such as:

Warning: User-Agent string does not contain "Lynx" or "L_y_n_x"!

Just ignore it and press enter to continue.

Two other use cases with lynx, that I historically used heavily is to pretent with Lynx, you're GoogleBot in order to see how does Google actually see your website?
 

  • Pretend with Lynx You're GoogleBot


lynx -useragent="Mozilla/5.0 (compatible; Googlebot/2.1; +http://www.google.com/bot.html)" -head -dump http://www.your-domain.com/


  • How to Pretend with Lynx Browser You are GoogleBot-Mobile


lynx -useragent="Mozilla/5.0 (iPhone; U; CPU iPhone OS 4_1 like Mac OS X; en-us) AppleWebKit/532.9 (KHTML, like Gecko) Version/4.0.5 Mobile/8B117 Safari/6531.22.7 (compatible; Googlebot-Mobile/2.1; +http://www.google.com/bot.html)" -head -dump http://www.your-domain.com/


Or for the lazy ones that doesn't have Linux / *Nix at disposal you can use WannaBrowser website

Wannabrowseris a web based browser emulator which gives you the ability to change the User-Agent on each website req1uest, so just set your UserAgent to any bot browser that we just filtered for example set User-Agent to CheeseBot

The .htaccess rule earier added once detecting your browser client is coming in with the prohibit browser agent will immediately filter out and you'll be unable to access the website with a message like:
 

HTTP/1.1 403 Forbidden


Just as I've talked a lot about Index Bots, I think it is worthy to also mention three great websites that can give you a lot of Up to Date information on exact Spiders returned user-agent, common known Bot traits as well as a a current updated list with the Bad Bots etc.

Bot and Browser Resources information user-agents, bad-bots and odd Crawlers and Bots specifics

1. botreports.com
2. user-agents.org
3. useragentapi.com


An updated list with robots user-agents (crawler-user-agents) is also available in github here regularly updated by Caia Almeido

There are also a third party plugin (modules) available for Website Platforms like WordPress / Joomla / Typo3 etc.

Besides the listed on these websites as well as the known Bad and Good Bots, there are perhaps a hundred of others that might end up crawling your webdsite that might or might not need  to be filtered, therefore before proceeding with any filtering steps, it is generally a good idea to monitor your  HTTPD access.log / error.log, as if you happen to somehow mistakenly filter the wrong bot this might be a reason for Website Indexing Problems.

Hope this article give you some valueable information. Enjoy ! 🙂


Apache Webserver: How to Set up multile SSL certificates on multiple domains running on one IP address with Apache SNI feature

Wednesday, September 13th, 2017

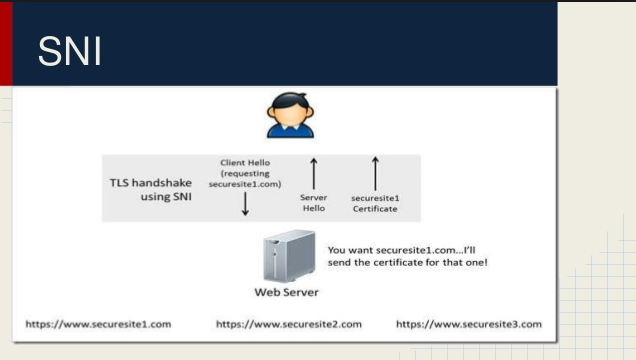
apache-ssl-handshake-how-client-talks-to-server-illustrated

In the recent past it was impossible to add multiple different SSL .crt / .pem bundle certificates on Apache Webserver but each one of it was supposed to run under a separate domain or subdomain, preconfigured with a separate IP address, this has changed with the introduction of Apache SNI (Server Name Indication). What SNI does is it sends, the site visitor initiating connections on encrypted SSL port (443) or whatever configured a certificate that matches, the client requested server name.

Note that SNI is Apache HTTPD supported only and pitily can't be used on other services such as Mail Servers (SMTPS), (POP3S), (IMAPS) etc.
Older browsers did not have support for proper communication with WebServers supporting SNI communication, so for Websites whose aim is interoperatibility and large audience of Web clients still the preferrable way is to set up each VirtualHost under a separate IP, just like the good old days.

However Small and MidSized businesses could save some cash by not having to buy separate IPs for each Virtualhost, but just use SNI.
Besides that the people are relatively rarely using old browsers without SNI, so having clients with browsers not supporting SNI would certiainly be too rare. To recognize where a browser is having support for TLS or not is to check whether the Browser has support for TLS extension.

One requirement in order for SNI to work properly is to have registered domain because SNI works based on the requested ServerName by client.

On Debian GNU / Linux based distributions, you need to have Apache Webserver installed with enabled mod_ssl module:


linux:~# apt-get install –yes apache2

linux:~# a2enmod ssl

linux:~# /etc/init.d/apache2 restart


If you're not planning to get a trusted source certificate, especially if you're just a start-up business which is in process of testing the environment (you still did not ordered certificate via some domain registrar you might want to generate self signed certificate with openssl command and use that temporary:


linux:~# openssl req -x509 -nodes -days 365 -newkey rsa:2048 -keyout /etc/apache2/ssl/your-domain.com/apache.key –out /etc/apache2/ssl/your-domain.com/apache.crt

Here among the prompted questions you need the a Distinguished Name or a DN.
There are quite a few fields but you can leave some blank.
For some fields leave the default value,
If you enter '.', or press enter the field will be left blank.

—–
 

Country Name (2 letter code) [AU]:BG
State or Province Name (full name) [Some-State]: Sofia
Locality Name (eg, city) []:SOF
Organization Name (eg, company) [Internet Widgits Pty Ltd]:Pc-Freak.NET
Organizational Unit Name (eg, section) []:
Common Name (e.g. server FQDN or YOUR name) []:your-domain.com                
Email Address []:webmaster@your-domain.com


(by the way it might be interesting to mention here the list of cheapest domain name registrars on the Internet as of January 2017 – source site here


Below order is given as estimated by price /  quality and provided service approximate


1. BlueHost.com – Domains $6.95

2. NameCheap.Com – Annual fee $10.69

3. GoDaddy.com – Annual fee $8.99 for first year, $14.99$ for each additional year

4. HostGator.com – Annual fee $15.00

5. 1and1.com – Annual fee $0.99 for first year ($14.99 for each additional year)

6. Network Solutions – This was historically one of the first domain registrar companies, but the brand is pricy $34.99

7. Register.com – Not sure

8. Hostway.com – $9.95 (first year and $9.95 renewals)

9. Moniker.com – Annual fee $11.99

10. Netfirms.ca – Annual fee $9.95 first year, Renewal fee is $11.99 per year


Note that domain pricing could value depending on the type of domain name country extension and many of the domain registrars would give you discount if you purchase domain name / SSL for 2 / 3+ years.

sni-illustrated-how-it-works-how-to-configure-multiple-domains-ssl-on-same-ip-apache-webserver

Next step in order to use SNI is to configure the WebServer Virtualhosts file:


linux:~# vim /etc/apache2/sites-available/domain-names.com


# Instruct Apache to listen for connections on port 443
Listen 443
# Listen for virtual host requests on all IP addresses
NameVirtualHost *:443

# Go ahead and accept connections for these vhosts
# from non-SNI clients
SSLStrictSNIVHostCheck off

<VirtualHost *:80>
        ServerAdmin webmaster@your-domain.com
        ServerName your-domain.com
        DocumentRoot /var/www

# More directives comes here

</VirtualHost>


<VirtualHost *:443>

        ServerAdmin webmaster@localhost
        ServerName your-domain.com
        DocumentRoot /var/www

        #   SSL Engine Switch:
        #   Enable/Disable SSL for this virtual host.
        SSLEngine on

        #   A self-signed (snakeoil) certificate can be created by installing
        #   the ssl-cert package. See
        #   /usr/share/doc/apache2.2-common/README.Debian.gz for more info.
        #   If both key and certificate are stored in the same file, only the
        #   SSLCertificateFile directive is needed.
        SSLCertificateFile /etc/apache2/ssl/your-domain.com/apache.crt
        SSLCertificateKeyFile /etc/apache2/ssl/your-domain.com/apache.key

# More Apache directives could be inserted here
</VirtualHost>


<VirtualHost *:443>
  DocumentRoot /var/www/sites/your-domain2
  ServerName www.your-domain2.com

  # Other directives here

</VirtualHost>

Add as many of the SNI enabled VirtualHosts following the example below, or if you prefer seperate the vhosts into separate domains.

I also recommend to check out Apache's official documentation on SNI for NameBasedSSLVhostsWithSNI etc.


Hope this article was not too boring 🙂
Enjoy life


Coptic Patriarch Preaching on Hope – We Christians should never loose hope! God is with us!

Sunday, March 17th, 2013

patriarch__Shenouda-of-coptic-oriental-orthodox-Church

Whoever believes in Christ he has an everlasting life, as Christ promised us. Faith, Hope and Love are the three essential things we should always keep in heart. I myself being a Christian often forget about importance of Hope. It is one of the spiritual weapons we Christians should hold firmly in our life. I've been in situation, where all around is failing and I'm miserable and powerless, in those moments I should remember more often the Holy Scripture advices that Hope should always be with us. Below preach is the words of Pope Shenouda the Coptic Oriental Church patriach, I believe we can only learn and astonish on his graceful words.


His Holiness Pope Shenouda Words on Hope – Hope Christians unfailing all time weapon

Let by this holy patriarch words, God bless Christians with a good hope. It is the beginning of the Great fasting in the Orthodox Church worldwide, so now we need hope more than ever! By the prayers of all saints oh Lord Jesus Christ, have mercy on us sinners …

Sofia Bulgaria one of the Most Ancient cities in Central Europe – the History of Europe

Friday, January 18th, 2013

Many Bulgarians might be striken to find out, today's territory of Bulgaria and on the balkans is in practice one of the ancient inhabitant territories in Europe. Sofia or Serdika, Sredets as the old name of Sofia used to be part of Roman Empire (Byzantine Empire), then of pre-Christian Bulgaria, after Christianization of Bulgaria part of the Bulgarian Empire and then after the fall of Bulgaria under turkish yoke part of Ottoman's Turkish Empire. Maybe surprisingly for many Western Europeans the city of Sofia, happened to be one of the ancient cities important for Christianity as it had a Bishop standing and a strong Christian community since 3rd century A.D. Even until today Sofia has kept its city design which is made in a Roman fashion. Hope this little video unusually made by British will shed up some light to people interested in Ancient Christian history. Enjoy 🙂


Sofia Bulgaria, one of the most ancient cities in Europe – the History of Europe

How to make GRE tunnel iptables port redirect on Linux

Saturday, August 20th, 2011

I’ve recently had to build a Linux server with some other servers behind the router with NAT.
One of the hosts behind the Linux router was running a Window GRE encrypted tunnel service. Which had to be accessed with the Internet ip address of the server.
In order < б>to make the GRE tunnel accessible, a bit more than just adding a normal POSTROUTING DNAT rule and iptables FORWARD is necessery.

As far as I’ve read online, there is quite of a confusion on the topic of how to properly configure the GRE tunnel accessibility on Linux , thus in this very quick tiny tutorial I’ll explain how I did it.

1. Load the ip_nat_pptp and ip_conntrack_pptp kernel module

linux-router:~# modprobe ip_nat_pptp
linux-router:~# modprobe ip_conntrack_pptp

These two modules are an absolutely necessery to be loaded before the remote GRE tunnel is able to be properly accessed, I’ve seen many people complaining online that they can’t make the GRE tunnel to work and I suppose in many of the cases the reason not to be succeed is omitting to load this two kernel modules.

2. Make the ip_nat_pptp and ip_nat_pptp modules to load on system boot time

linux-router:~# echo 'ip_nat_pptp' >> /etc/modules
linux-router:~# echo 'ip_conntrack_pptp' >> /etc/modules

3. Insert necessery iptables PREROUTING rules to make the GRE tunnel traffic flow

linux-router:~# /sbin/iptables -A PREROUTING -d 111.222.223.224/32 -p tcp -m tcp --dport 1723 -j DNAT --to-destination 192.168.1.3:1723
linux-router:~# /sbin/iptables -A PREROUTING -p gre -j DNAT --to-destination 192.168.1.3

In the above example rules its necessery to substitute the 111.222.223.224 ip address withe the external internet (real IP) address of the router.

Also the IP address of 192.168.1.3 is the internal IP address of the host where the GRE host tunnel is located.

Next it’s necessery to;

4. Add iptables rule to forward tcp/ip traffic to the GRE tunnel

linux-router:~# /sbin/iptables -A FORWARD -p gre -j ACCEPT

Finally it’s necessery to make the above iptable rules to be permanent by saving the current firewall with iptables-save or add them inside the script which loads the iptables firewall host rules.
Another possible way is to add them from /etc/rc.local , though this kind of way is not recommended as rules would add only after succesful bootup after all the rest of init scripts and stuff in /etc/rc.local is loaded without errors.

Afterwards access to the GRE tunnel to the local IP 192.168.1.3 using the port 1723 and host IP 111.222.223.224 is possible.
Hope this is helpful. Cheers 😉