
rkhunter or Rootkit Hunter scans systems for known and unknown rootkits. The tool is not new and most system administrators that has to mantain some good security servers perhaps already use it in their daily sysadmin tasks.
It does this by comparing SHA-1 Hashes of important files with known good ones in online databases, searching for default directories (of rootkits), wrong permissions, hidden files, suspicious strings in kernel modules, commmon backdoors, sniffers and exploits as well as other special tests mostly for Linux and FreeBSD though a ports for other UNIX operating systems like Solaris etc. are perhaps available. rkhunter is notable due to its inclusion in popular mainstream FOSS operating systems (CentOS, Fedora,Debian, Ubuntu etc.).
Even though rkhunter is not rapidly improved over the last 3 years (its last Official version release was on 20th of Febuary 2018), it is a good tool that helps to strengthen even further security and it is often a requirement for Unix servers systems that should follow the PCI DSS Standards (Payment Card Industry Data Security Standards).
Configuring rkhunter is a pretty straight forward if you don't have too much requirements but I decided to write this article for the reason there are fwe interesting options that you might want to adopt in configuration to whitelist any files that are reported as Warnings, as well as how to set a configuration that sets a stricter security checks than the installation defaults.
1. Install rkhunter .deb / .rpm package depending on the Linux distro or BSD
- If you have to place it on a Redhat based distro CentOS / Redhat / Fedora
[root@Centos ~]# yum install -y rkhunter
…
- On Debian distros the package name is equevallent to install there exec usual:
root@debian:~# apt install –yes rkhunter
…
- On FreeBSD / NetBSD or other BSD forks you can install it from the BSD "World" ports system or install it from a precompiled binary.
freebsd# pkg install rkhunter
…
One important note to make here is to have a fully functional Alarming from rkhunter, you will have to have a fully functional configured postfix / exim / qmail whatever mail server to relay via official SMTP so you the Warning Alarm emails be able to reach your preferred Alarm email address. If you haven't installed postfix for example and configure it you might do.
– On Deb based distros
[root@Centos ~]#yum install postfix
– On RPM based distros
root@debian:~# apt-get install –yes postfix
and as minimum, further on configure some functional Email Relay server within /etc/postfix/main.cf
# vi /etc/postfix/main.cf
relayhost = [relay.smtp-server.com]
2. Prepare rkhunter.conf initial configuration
Depending on what kind of files are present on the filesystem it could be for some reasons some standard package binaries has to be excluded for verification, because they possess unusual permissions because of manual sys admin monification this is done with the rkhunter variable PKGMGR_NO_VRFY.
If remote logging is configured on the system via something like rsyslog you will want to specificly tell it to rkhunter so this check as a possible security issue is skipped via ALLOW_SYSLOG_REMOTE_LOGGING=1.
In case if remote root login via SSH protocol is disabled via /etc/ssh/sshd_config
PermitRootLogin no variable, the variable to include is ALLOW_SSH_ROOT_USER=no
It is useful to also increase the hashing check algorithm for security default one SHA256 you might want to change to SHA512, this is done via rkhunter.conf var HASH_CMD=SHA512
Triggering new email Warnings has to be configured so you receive, new mails at a preconfigured mailbox of your choice via variable
MAIL-ON-WARNING=SetMailAddress
# vi /etc/rkhunter.conf
PKGMGR_NO_VRFY=/usr/bin/su
PKGMGR_NO_VRFY=/usr/bin/passwd
ALLOW_SYSLOG_REMOTE_LOGGING=1
# Needed for corosync/pacemaker since update 19.11.2020
ALLOWDEVFILE=/dev/shm/qb-*/qb-*
# enabled ssh root access skip
ALLOW_SSH_ROOT_USER=no
HASH_CMD=SHA512
# Email address to sent alert in case of Warnings
MAIL-ON-WARNING=Your-Customer@Your-Email-Server-Destination-Address.com
MAIL-ON-WARNING=Your-Second-Peronsl-Email-Address@SMTP-Server.com
DISABLE_TESTS=os_specific
Optionally if you're using something specific such as corosync / pacemaker High Availability cluster or some specific software that is creating /dev/ files identified as potential Risks you might want to add more rkhunter.conf options like:
# Allow PCS/Pacemaker/Corosync
ALLOWDEVFILE=/dev/shm/qb-attrd-*
ALLOWDEVFILE=/dev/shm/qb-cfg-*
ALLOWDEVFILE=/dev/shm/qb-cib_rw-*
ALLOWDEVFILE=/dev/shm/qb-cib_shm-*
ALLOWDEVFILE=/dev/shm/qb-corosync-*
ALLOWDEVFILE=/dev/shm/qb-cpg-*
ALLOWDEVFILE=/dev/shm/qb-lrmd-*
ALLOWDEVFILE=/dev/shm/qb-pengine-*
ALLOWDEVFILE=/dev/shm/qb-quorum-*
ALLOWDEVFILE=/dev/shm/qb-stonith-*
ALLOWDEVFILE=/dev/shm/pulse-shm-*
ALLOWDEVFILE=/dev/md/md-device-map
# Needed for corosync/pacemaker since update 19.11.2020
ALLOWDEVFILE=/dev/shm/qb-*/qb-*# tomboy creates this one
ALLOWDEVFILE="/dev/shm/mono.*"
# created by libv4l
ALLOWDEVFILE="/dev/shm/libv4l-*"
# created by spice video
ALLOWDEVFILE="/dev/shm/spice.*"
# created by mdadm
ALLOWDEVFILE="/dev/md/autorebuild.pid"
# 389 Directory Server
ALLOWDEVFILE=/dev/shm/sem.slapd-*.stats
# squid proxy
ALLOWDEVFILE=/dev/shm/squid-cf*
# squid ssl cache
ALLOWDEVFILE=/dev/shm/squid-ssl_session_cache.shm
# Allow podman
ALLOWDEVFILE=/dev/shm/libpod*lock*
3. Set the proper mirror database URL location to internal network repository
Usually file /var/lib/rkhunter/db/mirrors.dat does contain Internet server address where latest version of mirrors.dat could be fetched, below is how it looks by default on Debian 10 Linux.
root@debian:/var/lib/rkhunter/db# cat mirrors.dat
Version:2007060601
mirror=http://rkhunter.sourceforge.net
mirror=http://rkhunter.sourceforge.net
As you can guess a machine that doesn't have access to the Internet neither directly, neither via some kind of secure proxy because it is in a Paranoic Demilitarized Zone (DMZ) Network with many firewalls. What you can do then is setup another Mirror server (Apache / Nginx) within the local PCI secured LAN that gets regularly the database from official database on http://rkhunter.sourceforge.net/ (by installing and running rkhunter –update command on the Mirror WebServer and copying data under some directory structure on the remote local LAN accessible server, to keep the DB uptodate you might want to setup a cron to periodically copy latest available rkhunter database towards the http://mirror-url/path-folder/)
# vi /var/lib/rkhunter/db/mirrors.dat
local=http://rkhunter-url-mirror-server-url.com/rkhunter/1.4/
A mirror copy of entire db files from Debian 10.8 ( Buster ) ready for download are here.
Update entire file property db and check for rkhunter db updates
# rkhunter –update && rkhunter –propupdate
[ Rootkit Hunter version 1.4.6 ]
Checking rkhunter data files…
Checking file mirrors.dat [ Skipped ]
Checking file programs_bad.dat [ No update ]
Checking file backdoorports.dat [ No update ]
Checking file suspscan.dat [ No update ]
Checking file i18n/cn [ No update ]
Checking file i18n/de [ No update ]
Checking file i18n/en [ No update ]
Checking file i18n/tr [ No update ]
Checking file i18n/tr.utf8 [ No update ]
Checking file i18n/zh [ No update ]
Checking file i18n/zh.utf8 [ No update ]
Checking file i18n/ja [ No update ]

4. Initiate a first time check and see whether something is not triggering Warnings
# rkhunter –check
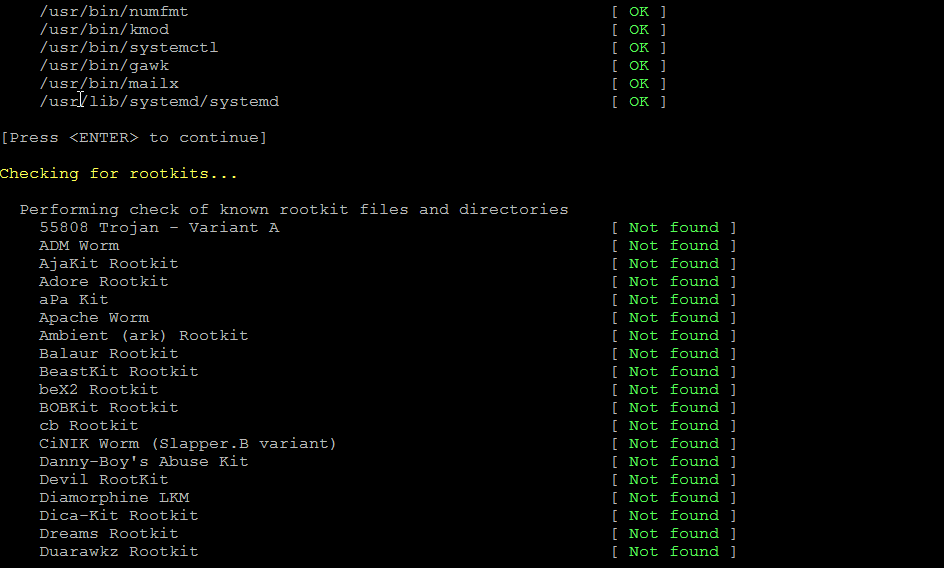
As you might have to run the rkhunter multiple times, there is annoying Press Enter prompt, between checks. The idea of it is that you're able to inspect what went on but since usually, inspecting /var/log/rkhunter/rkhunter.log is much more easier, I prefer to skip this with –skip-keypress option.
# rkhunter –check –skip-keypress
5. Whitelist additional files and dev triggering false warnings alerts
You have to keep in mind many files which are considered to not be officially PCI compatible and potentially dangerous such as lynx browser curl, telnet etc. might trigger Warning, after checking them thoroughfully with some AntiVirus software such as Clamav and checking the MD5 checksum compared to a clean installed .deb / .rpm package on another RootKit, Virus, Spyware etc. Clean system (be it virtual machine or a Testing / Staging) machine you might want to simply whitelist the files which are incorrectly detected as dangerous for the system security.
Again this can be achieved with
PKGMGR_NO_VRFY=
Some Cluster softwares that are preparing their own /dev/ temporary files such as Pacemaker / Corosync might also trigger alarms, so you might want to suppress this as well with ALLOWDEVFILE
ALLOWDEVFILE=/dev/shm/qb-*/qb-*
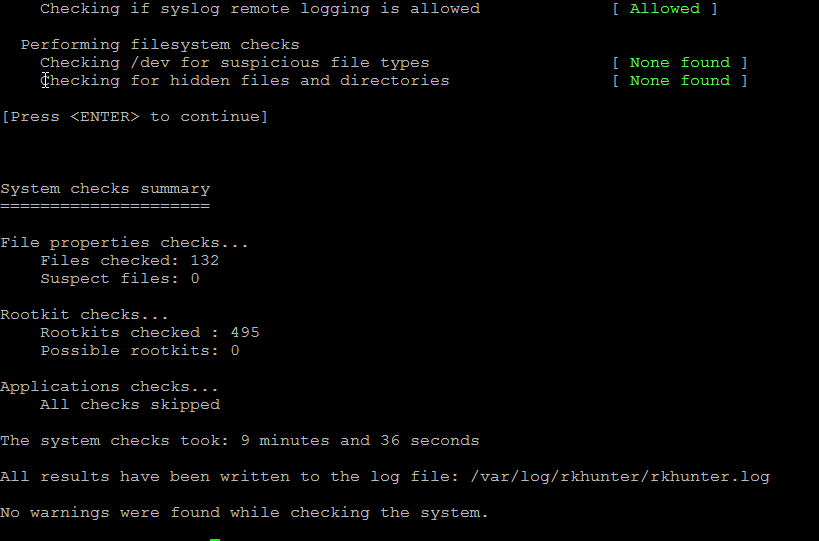
If Warnings are found check what is the issue and if necessery white list files due to incorrect permissions in /etc/rkhunter.conf .

Re-run the check until all appears clean as in below screenshot.
Fixing Checking for a system logging configuration file [ Warning ]
If you happen to get some message like, message appears when rkhunter -C is done on legacy CentOS release 6.10 (Final) servers:
[13:45:29] Checking for a system logging configuration file [ Warning ]
[13:45:29] Warning: The 'systemd-journald' daemon is running, but no configuration file can be found.
[13:45:29] Checking if syslog remote logging is allowed [ Allowed ]
To fix it, you will have to disable SYSLOG_CONFIG_FILE at all.
SYSLOG_CONFIG_FILE=NONE







How to show country flag, web browser type and Operating System in WordPress Comments
Wednesday, February 15th, 2012!!! IMPORTANT UPDATE COMMENT INFO DETECTOR IS NO LONGER SUPPORTED (IS OBSOLETE) AND THE COUNTRY FLAGS AND OPERATING SYSTEM WILL BE NOT SHOWING INSTEAD,
!!!! TO MAKE THE COUNTRY FLAGS AND OS WP FUNCTIONALITY WORK AGAIN YOU WILL NEED TO INSTALL WP-USERAGENT !!!
I've come across a nice WordPress plugin that displays country flag, operating system and web browser used in each of posted comments blog comments.
Its really nice plugin, since it adds some transperancy and colorfulness to each of blog comments 😉
here is a screenshot of my blog with Comments Info Detector "in action":
Comments Info Detector as of time of writting is at stable ver 1.0.5.
The plugin installation and configuration is very easy as with most other WP plugins. To install the plugin;
1. Download and unzip Comments Info Detector
linux:/var/www/blog:# cd wp-content/pluginslinux:/var/www/blog/wp-content/plugins:# wget http://downloads.wordpress.org/plugin/comment-info-detector.zip
...
linux:/var/www/blog/wp-content/plugins:# unzip comment-info-detector.zip
...
Just for the sake of preservation of history, I've made a mirror of comments-info-detector 1.0.5 wp plugin for download here
2. Activate Comment-Info-Detector
To enable the plugin Navigate to;
Plugins -> Inactive -> Comment Info Detector (Activate)After having enabled the plugin as a last 3rd step it has to be configured.
3. Configure comment-info-detector wp plugin
By default the plugin is disabled. To change it to enabled (configure it) by navigating to:
Settings -> Comments Info DetectorNext a a page will appear with variout fields and web forms, where stuff can be changed. Here almost all of it should be left as it is the only change should be in the drop down menus near the end of the page:
Display Country Flags Automatically (Change No to Yes)Display Web Browsers and OS Automatically (Change No to Yes
After the two menus are set to "Yes" and pressing on Save Changes the plugin is enabled it will immediately start showing information inside each comment the GeoIP country location flag of the person who commented as well as OS type and Web Browser 🙂
Tags: action, Auto, blog, Browsers, change, Comment, Comments, configured, country flag, country location, Detector, Display, downloads, Draft, drop, drop down menus, flag web, How to, Inactive, information, installation, Linux, location, mirror, operating system, os type, page, person, plugin, plugin installation, quot, sake, Save Changes, screenshot, show, Stable, time, transperancy, type, unzip, web browser type, web browsers, web forms, wget, Wordpress, Wordpress Comments, writting, www, zip linux
Posted in Web and CMS, Wordpress | 1 Comment »