Posts Tagged ‘system administrator’

Check the Type and Model of available installed Memory on Linux / Unix / BSD Server howto

Monday, October 30th, 2023

how-linux-kernel-manages-memory-picture

As a system administrator one of the common task, one has to do is Add / Remove or Replace (of Broken or failing Bank of RAM memory) a piece of additional Bank of memory Bank to a Linux / BSD / Unix server.  Lets say you need to fullfil the new RAM purchase and provide some information to the SDM (Service Delivery Manager) of the compnay you're hirder in or you need to place the purchase yourself. Then you  need to know the exact speed and type of RAM currently installed on the server installed.

In this article i'll shortly explain how do I find out ram (SDRAM) information from a via ordinary remote ssh shell session cmd prompt. In short will be shown how can one check RAM speed configured and detected by Linux / Unix kernel ? 
As well as  how to Check the type of memory (if it is DDR / DDR2 / DDR or DDR4) or ECC with no access to Hardware Console.  Please note this article will be definitely boring for the experienced sysadmins but might help to a starter sysadmins to get on board with a well know basic stuff.

There are several approaches, of course easiest one is to use remote hardware access interrace statistics web interface of ILO (on IBM machine) or the IDRAC on (Dell Server) or Fujitsu's servers iRMC. However as not always access to remote Remote hardware management interface is available to admin. Linux comes with few commands that can do the trick, that are available to most Linux distributions straight for the default package repositories.

Since mentioning about ECC a bit up, most old school admins and computer users knows pretty well about DDRs as they have been present over time but ECC is being used over actively on servers perhaps over the last 10 / 15 years and for those not dealt with it below is a short description on what is ECC RAM Memory.

ECC RAM, short for Error Correcting Code Random Access Memory, is a kind of RAM can detect most common kinds of memory errors and correct a subset of them. ECC RAM is common in enterprise deployments and most server-class hardware. Above a certain scale and memory density, single-bit errors which were up to this point are sufficiently statistically unlikely begin to occur with enough frequency that they can no longer be ignored. At certain scales and densities of memory arbitrary memory errors that are literally "one in a million chances" (or more) may in fact occur several times throughout a system's operational life.

Putting some basics, Lets proceed and Check RAM speed and type (line DDR or DDR2 or DDR3 or DDR4) without having to physically go to the the Data Center numbered rack that is containing the server.


Most famous and well known (also mentioned) on few occasions in my previous articles are: dmidecode and lshw

Quickest way to get a quick overview of installed servers memory is with:
 

root@server:~# dmidecode -t memory | grep -E "Speed:|Type:" | sort | uniq -c
      4     Configured Memory Speed: 2133 MT/s
     12     Configured Memory Speed: Unknown
      4     Error Correction Type: Multi-bit ECC
      2     Speed: 2133 MT/s
      2     Speed: 2400 MT/s
     12     Speed: Unknown
     16     Type: DDR4


To get more specifics on the exact type of memory installed on the server, the respective slots that are already taken and the free ones:

root@server:~# dmidecode –type 17 | less

Usually the typical output the command would produce regarding lets say 4 installed Banks of RAM memory on the server will be like:

Handle 0x002B, DMI type 17, 40 bytes
Memory Device
        Array Handle: 0x0029
        Error Information Handle: Not Provided
        Total Width: 72 bits
        Data Width: 64 bits
       
Size: 16 GB
        Form Factor: RIMM
        Set: None
        Locator: CPU1 DIMM A1
        Bank Locator: A1_Node0_Channel0_Dimm1
       
Type: DDR4
        Type Detail: Synchronous
       
Speed: 2400 MT/s
        Manufacturer: Micron
       
Serial Number: 15B36358
        Asset Tag: CPU1 DIMM A1_AssetTag
       
Part Number: 18ASF2G72PDZ-2G3B1 
        Rank: 2
       
Configured Memory Speed: 2133 MT/s
        Minimum Voltage: Unknown
        Maximum Voltage: Unknown
        Configured Voltage: Unknown

Handle 0x002E, DMI type 17, 40 bytes
Memory Device
        Array Handle: 0x0029
        Error Information Handle: Not Provided
        Total Width: Unknown
        Data Width: Unknown
        Size: No Module Installed
        Form Factor: RIMM
        Set: None
        Locator: CPU1 DIMM A2
        Bank Locator: A1_Node0_Channel0_Dimm2
        Type: DDR4
        Type Detail: Synchronous
        Speed: Unknown
        Manufacturer: NO DIMM
        Serial Number: NO DIMM
        Asset Tag: NO DIMM
        Part Number: NO DIMM
        Rank: Unknown
        Configured Memory Speed: Unknown
        Minimum Voltage: Unknown
        Maximum Voltage: Unknown
        Configured Voltage: Unknown


Handle 0x002D, DMI type 17, 40 bytes
Memory Device
        Array Handle: 0x0029
        Error Information Handle: Not Provided
        Total Width: 72 bits
        Data Width: 64 bits
        Size: 16 GB
        Form Factor: RIMM
        Set: None
        Locator: CPU1 DIMM B1
        Bank Locator: A1_Node0_Channel1_Dimm1
        Type: DDR4
        Type Detail: Synchronous
        Speed: 2400 MT/s
        Manufacturer: Micron
        Serial Number: 15B363AF
        Asset Tag: CPU1 DIMM B1_AssetTag
        Part Number: 18ASF2G72PDZ-2G3B1 
        Rank: 2
        Configured Memory Speed: 2133 MT/s
        Minimum Voltage: Unknown
        Maximum Voltage: Unknown
        Configured Voltage: Unknown

Handle 0x0035, DMI type 17, 40 bytes
Memory Device
        Array Handle: 0x0031
        Error Information Handle: Not Provided
        Total Width: 72 bits
        Data Width: 64 bits
        Size: 16 GB
        Form Factor: RIMM
        Set: None
        Locator: CPU1 DIMM D1
        Bank Locator: A1_Node0_Channel3_Dimm1
        Type: DDR4
        Type Detail: Synchronous
        Speed: 2133 MT/s
        Manufacturer: Micron
        Serial Number: 1064B491
        Asset Tag: CPU1 DIMM D1_AssetTag
        Part Number: 36ASF2G72PZ-2G1A2  
        Rank: 2
        Configured Memory Speed: 2133 MT/s
        Minimum Voltage: Unknown
        Maximum Voltage: Unknown
        Configured Voltage: Unknown

Handle 0x0033, DMI type 17, 40 bytes
Memory Device
        Array Handle: 0x0031
        Error Information Handle: Not Provided
        Total Width: 72 bits
        Data Width: 64 bits
        Size: 16 GB
        Form Factor: RIMM
        Set: None
        Locator: CPU1 DIMM C1
        Bank Locator: A1_Node0_Channel2_Dimm1
        Type: DDR4
        Type Detail: Synchronous
        Speed: 2133 MT/s
        Manufacturer: Micron
        Serial Number: 10643A5B
        Asset Tag: CPU1 DIMM C1_AssetTag
        Part Number: 36ASF2G72PZ-2G1A2  
        Rank: 2
        Configured Memory Speed: 2133 MT/s
        Minimum Voltage: Unknown
        Maximum Voltage: Unknown
        Configured Voltage: Unknown


The marked in green are the banks of memory that are plugged in the server. The

field Speed: and Configured Memory Speed: are fields indicating respectively the Maximum speed on which a plugged-in RAM bank can operate and the the actual Speed the Linux kernel has it configured and uses is at.

It is useful for the admin to usually check the complete number of available RAM slots on a server, this can be done with command like:

root@server:~#  dmidecode –type 17 | grep -i Handle | grep 'DMI'|wc -l
16


As you can see at this specific case 16 Memory slots are avaiable (4 are already occupied and working configured on the machine at 2133 Mhz and 12 are empty and can have installed a memory banks in).


Perhaps the most interesting information for the RAM replacement to be ordered is to know the data communication SPEED on which the Memory is working on the server and interacting with Kernel and Processor to find out.

root@server:~#  dmidecode –type 17 | grep -i "speed"|grep -vi unknown
    Speed: 2400 MT/s
    Configured Memory Speed: 2133 MT/s
    Speed: 2400 MT/s
    Configured Memory Speed: 2133 MT/s
    Speed: 2133 MT/s
    Configured Memory Speed: 2133 MT/s
    Speed: 2133 MT/s
    Configured Memory Speed: 2133 MT/s


If you're lazy to remember the exact dmidecode memory type 17 you can use also memory keyword:

root@server:~# dmidecode –type memory | more

For servers that have the lshw command installed, a quick overview of RAM installed and Full slots available for memory placement can be done with:
 

root@server:~#  lshw -short -C memory
H/W path                 Device        Class          Description
=================================================================
/0/0                                   memory         64KiB BIOS
/0/29                                  memory         64GiB System Memory
/0/29/0                                memory         16GiB RIMM DDR4 Synchronous 2400 MHz (0.4 ns)
/0/29/1                                memory         RIMM DDR4 Synchronous [empty]
/0/29/2                                memory         16GiB RIMM DDR4 Synchronous 2400 MHz (0.4 ns)
/0/29/3                                memory         RIMM DDR4 Synchronous [empty]
/0/29/4                                memory         16GiB RIMM DDR4 Synchronous 2133 MHz (0.5 ns)
/0/29/5                                memory         RIMM DDR4 Synchronous [empty]
/0/29/6                                memory         16GiB RIMM DDR4 Synchronous 2133 MHz (0.5 ns)
/0/29/7                                memory         RIMM DDR4 Synchronous [empty]
/0/29/8                                memory         RIMM DDR4 Synchronous [empty]
/0/29/9                                memory         RIMM DDR4 Synchronous [empty]
/0/29/a                                memory         RIMM DDR4 Synchronous [empty]
/0/29/b                                memory         RIMM DDR4 Synchronous [empty]
/0/29/c                                memory         RIMM DDR4 Synchronous [empty]
/0/29/d                                memory         RIMM DDR4 Synchronous [empty]
/0/29/e                                memory         RIMM DDR4 Synchronous [empty]
/0/29/f                                memory         RIMM DDR4 Synchronous [empty]
/0/43                                  memory         768KiB L1 cache
/0/44                                  memory         3MiB L2 cache
/0/45                                  memory         30MiB L3 cache

Now once we know the exact model and RAM Serial and Part number you can google it online and to purchase more of the same RAM Model and Type you need so the installed memory work on the same Megaherzes as the installed ones.
 

How to make 27 inch monitor to work on 2560×1440 with Virtualbox Linux

Wednesday, October 4th, 2023

make-virtualbox-with-linux-work-on-2k-2560x1440-howto

I've bought a new "second hand" refurbished EIZO Flexscan Monitor EV2760 S1 K1 awesome monitor re from Kvant Serviz a company reseller of Second Hand electronics that is located on the territy of Bulgarian Academy of Sciences (BAN / BAS) and was created by BAS people originally for the BAS people and am pretty happy with it for doing my daily job as system administrator, especially as the monitor has been used on very short screen time for only 256 use hours (which is less than a year of full-use time), whether EIZO does guarantee their monitors to be able to serve up to 5 Full years monitor use time.

For those who deals with Graphics such as Designers and people into art working with Computers knows EIZO brand Monitors for quite some time now and it seems as much of those people are using Windows or Macintoshes, these monitors have been mainly created to work optimally with Windows / Mac computers on a higher resolution.
My work PC that is Dell Latitude 5510 with its HDMI cable has been running perfect with The EIZO with Windows 10, however as I'm using a Virtualbox virutal machines with CentOS Linux, the VM does not automatically detected the highest resolution 2K that this monitors supports 2560×1440 at 60 Hz is the best one can use to get more things fit into the screen and hopefully also good for the Eyes, the Ecoview shoulk also be a good idea for the eyes, as the Ecoview by EIZO tries to adjust the monitor brightness to lower levels according to the light in the room to try to minimize the eye strain on the eyes. The Ecoview mode is a little bit I guess like the famous BENQ's monitors Eye care. 
I'm talking about all this Displays specifics as I spend quite a lot of time to learn the very basics about monitors as my old old 24 Inch EIZO Monitor Flexscan model 2436W started to wear off with time and doesn't support HDMI cable input, so I had to use a special. cable connector that modifies the signal from HDMI to DVI (and I'm not sure how this really effects the eyes), plus the DVI quality is said to be a little bit worse than HDMI as far as I read a bit on the topic online.

Well anyways currently I'm a happy owner of the EIZO EV2760 Monitor which has a full set of inputs of:

  • 27" In-Plane Switching (IPS) Panel
  • DisplayPort | HDMI | DVI-D | 3.5mm Audio
  • 2560 x 1440 Native Resolution
  • 1000:1 Typical Contrast Ratio
     

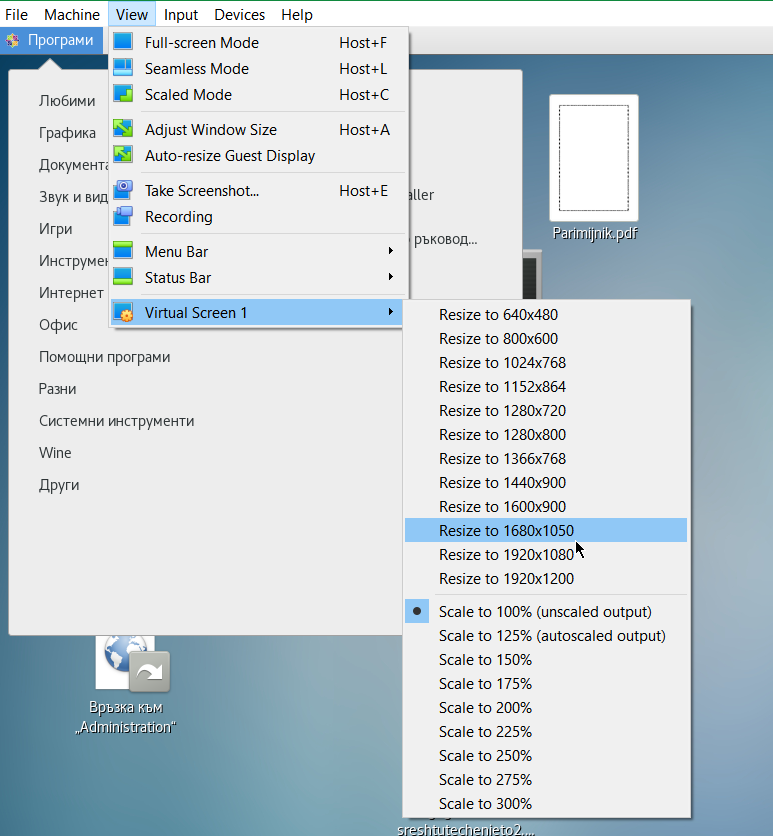
I've tried to make the monitor work with Linux and my first assumption from what I've read was that I have to reinstall the Guess Addition Tools on the Virtualbox with additing the Guest Addition Tools via the Vbox GUI interface:

Devices -> Insert Guest Additions CD Image

virtualbox-resolutions-screenshot

But got an error that the Guest additions tools iso is missing
So eventually resolved it by remounting and reinstalling the guest addition tools with the following set of commands:

[root@localhost test]# yum install perl gcc dkms kernel-devel kernel-headers make bzip2
[root@localhost test]# cd /mnt/cdrom/
[root@localhost cdrom]# ls
AUTORUN.INF  runasroot.sh                       VBoxSolarisAdditions.pkg
autorun.sh   TRANS.TBL                          VBoxWindowsAdditions-amd64.exe
cert         VBoxDarwinAdditions.pkg            VBoxWindowsAdditions.exe
NT3x         VBoxDarwinAdditionsUninstall.tool  VBoxWindowsAdditions-x86.exe
OS2          VBoxLinuxAdditions.run


[root@localhost cdrom]# ./VBoxLinuxAdditions.run 

Verifying archive integrity… All good.
Uncompressing VirtualBox 6.1.34 Guest Additions for Linux……..
VirtualBox Guest Additions installer
Removing installed version 6.1.34 of VirtualBox Guest Additions…
Copying additional installer modules …
Installing additional modules …
VirtualBox Guest Additions: Starting.
VirtualBox Guest Additions: Building the VirtualBox Guest Additions kernel
modules.  This may take a while.
VirtualBox Guest Additions: To build modules for other installed kernels, run
VirtualBox Guest Additions:   /sbin/rcvboxadd quicksetup <version>
VirtualBox Guest Additions: or
VirtualBox Guest Additions:   /sbin/rcvboxadd quicksetup all
VirtualBox Guest Additions: Building the modules for kernel
3.10.0-1160.80.1.el7.x86_64.
ERROR: Can't map '//etc/selinux/targeted/policy/policy.31':  Invalid argument

ERROR: Unable to open policy //etc/selinux/targeted/policy/policy.31.
libsemanage.semanage_read_policydb: Error while reading kernel policy from /etc/selinux/targeted/active/policy.kern. (No such file or directory).
OSError: No such file or directory
VirtualBox Guest Additions: Running kernel modules will not be replaced until
the system is restarted


The solution to that was to reinstal the security policy-target was necessery

[root@localhost test]# yum install selinux-policy-targeted –reinstall


And of course rerun the reinstall of Guest addition tools up to the latest

[root@localhost cdrom]# ./VBoxLinuxAdditions.run 

Unfortunately that doesn't make it resolve it and even shutting down the VM machine and reloading it again with Raised Video Memory for the simulated hardware from settings from 16 MB to 128MB for the VM does not give the option from the Virtualbox interface to set the resolution from
 

View -> Virtual Screen 1 (Resize to 1920×1200)

to any higher than that.

After a bit of googling I found some newer monitors doesn't seem to be seen by xrandr command and few extra commands with xrandr need to be run to make the 2K resolution 2560×1440@60 Herzes work under the Linux virtual machine.

These are the extra xranrd command that make it happen

# xrandr –newmode "2560x1440_60.00" 311.83  2560 2744 3024 3488  1440 1441 1444 1490  -HSync +Vsync
# xrandr –addmode Virtual1 2560x1440_60.00
# xrandr –output Virtual1 –mode "2560x1440_60.00"

As this kind of settings needs to be rerun on next time the Virtual Machine runs it is a good idea to place the commands in a tiny shell script:

[test@localhost ~]$ cat xrandr-set-resolution-to-2560×1440.sh 
#!/bin/bash
xrandr –newmode "2560x1440_60.00" 311.83  2560 2744 3024 3488  1440 1441 1444 1490  -HSync +Vsync
xrandr –addmode Virtual1 2560x1440_60.00
xrandr –output Virtual1 –mode "2560x1440_60.00"


You can Download  the xrandr-set-resolution-to-2560×1440.sh script from here

Once the commands are run, to make it affect the Virtualbox, you can simply put it in FullScreen mode via


View -> Full-Screen Mode (can be teriggered from keyboard by pressing Right CTRL + F) together

[test@localhost ~]$ xrandr –addmode Virtual1 2560x1440_60.00
[test@localhost ~]$ xrandr –output Virtual1 –mode "2560x1440_60.00"
[test@localhost ~]$ xrandr 
Screen 0: minimum 1 x 1, current 2560 x 1440, maximum 8192 x 8192
Virtual1 connected primary 2560×1440+0+0 (normal left inverted right x axis y axis) 0mm x 0mm
   1920×1200     60.00 +  59.88  
   2560×1600     59.99  
   1920×1440     60.00  
   1856×1392     60.00  
   1792×1344     60.00  
   1600×1200     60.00  
   1680×1050     59.95  
   1400×1050     59.98  
   1280×1024     60.02  
   1440×900      59.89  
   1280×960      60.00  
   1360×768      60.02  
   1280×800      59.81  
   1152×864      75.00  
   1280×768      59.87  
   1024×768      60.00  
   800×600       60.32  
   640×480       59.94  
   2560x1440_60.00  60.00* 
Virtual2 disconnected (normal left inverted right x axis y axis)
Virtual3 disconnected (normal left inverted right x axis y axis)
Virtual4 disconnected (normal left inverted right x axis y axis)
Virtual5 disconnected (normal left inverted right x axis y axis)
Virtual6 disconnected (normal left inverted right x axis y axis)
Virtual7 disconnected (normal left inverted right x axis y axis)
Virtual8 disconnected (normal left inverted right x axis y axis)

Tadadadam ! That's all folks, enjoy having your 27 Inch monitor running at 2560×1440 @ 60 Hz 🙂


Improve MobaXterm Best Windows terminal client with some additional settings tune ups / Install extra Linux Cygwin tools on MobaXterm and various post install configuration goodies

Friday, January 20th, 2023

mobaxterm-logo_400x400-terminal-client-tune-up-howto-for-a-new-install

Earlier I've written a an article MobaXTerm: A good gnome-terminal like tabbed SSH client for Windows / Windows Putty Tabs Alternative in which I've introduced the best in my opinion SSH / Telnet / VNC / RDP / Xserver in one Terminal client emulator for Windows operating systems.

The client has been around for quite some time and it has been improving rapidly over the last 10 years, where it now more looks like a separate Operating System than a single terminal client. It's size is quite compact as well and my opinion and every self respectiving developer, system administrator, IT geek or a hacker would definitely
use the mobaxterm at home or at work place on a daily. I guess some of my readers, who have already migrated SuperPutty / SecureCRT or Putty / XMing or whatever kind of exotic Remote SSH Console terminal is used could validate this 🙂

Therefore as I've set up Mobaxterm on a multiple computers all around, I've found it useful to write a small article with some post-install hints (tune ups) one can do immediately once he has installed the Desktop or Portable Apps version of mobaxterm on desktop PC / notebook.
 

1. Set up your bashrc server / command aliases

Lets say you need to setup some rules for connectivity via a socks proxy to dig holes over a harsh company firewalls or add
custom options to every ssh client attempt to remote server, or simply alias some of your servers with custom connectivity options
and so on simply open vi / vim text editor from mobaxterm local terminal and place inside your rules, for example that could be anything like:


alias ssh='ssh -o stricthostkeychecking=no -o passwordauthentication=yes -o PreferredAuthentications=password  -v'
alias sftp='sftp -o stricthostkeychecking=no -o passwordauthentication=yes -o PreferredAuthentications=password'

alias work-server='ssh UserName@work-server -v -o passwordauthentication=yes -o PreferredAuthentications=password'

alias proxy='ssh -D 3128 UserName@proxyIP-host1 -o ConnectTimeout=80'
alias proxy1='ssh -D 3128 UserName@proxy-host2 -p 443 -o ConnectTimeout=60'
alias proxy3='ssh -D 3128 Username@proxy-host3 -p 443 -o ConnectTimeout=60'

Simply open the terminal and setup whatever you require
export ftp_proxy="http://proxy-host:8080"
export https_proxy="https://proxy-host:8080"
export http_proxy="http://proxy-host:8080"
export HTTP_PROXY="http://proxy-host:8080"
export HTTPS_PROXY="http://proxy-host:8080"


2. Set mobaxterm presistent directory / persistent root directory and default text editor

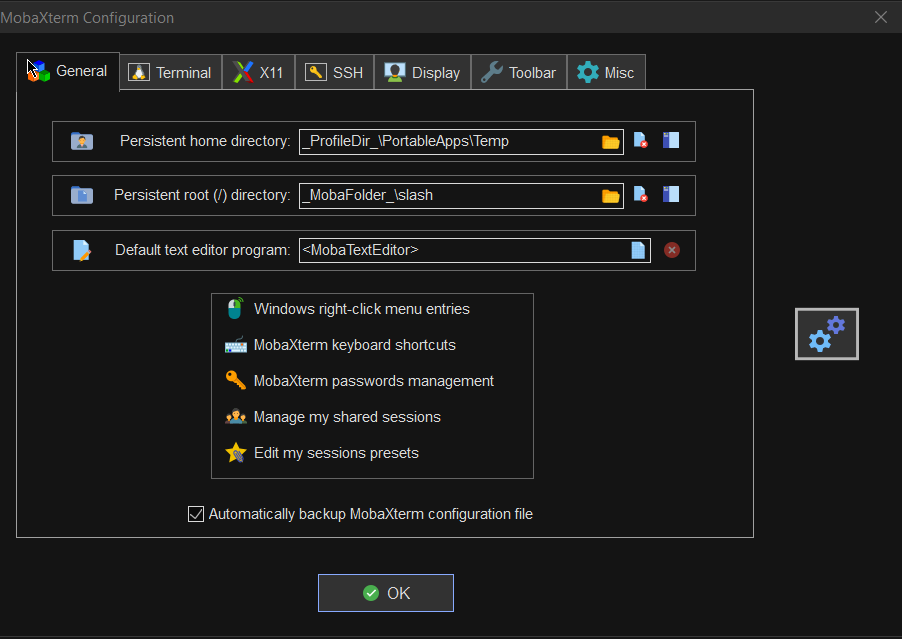
Make sure you have properly defined at least Persistent directory / Persistent directory if you want to keep the files under your /home/mobaxterm and root directory be able to save your data from local mobaxterm terminal work you have done.

To do so o to Configuration -> General

MobaXterm-persistent-home-directory
 

3. Change default settings for Opening / Closing Terminal tabs just like in gnome-terminal

MobaXterm is really awesome as the developer, followed pretty much the logic of some common GNU / Linux Terminal clients like Gnome-Terminal and KDE's default Konsole terminal.

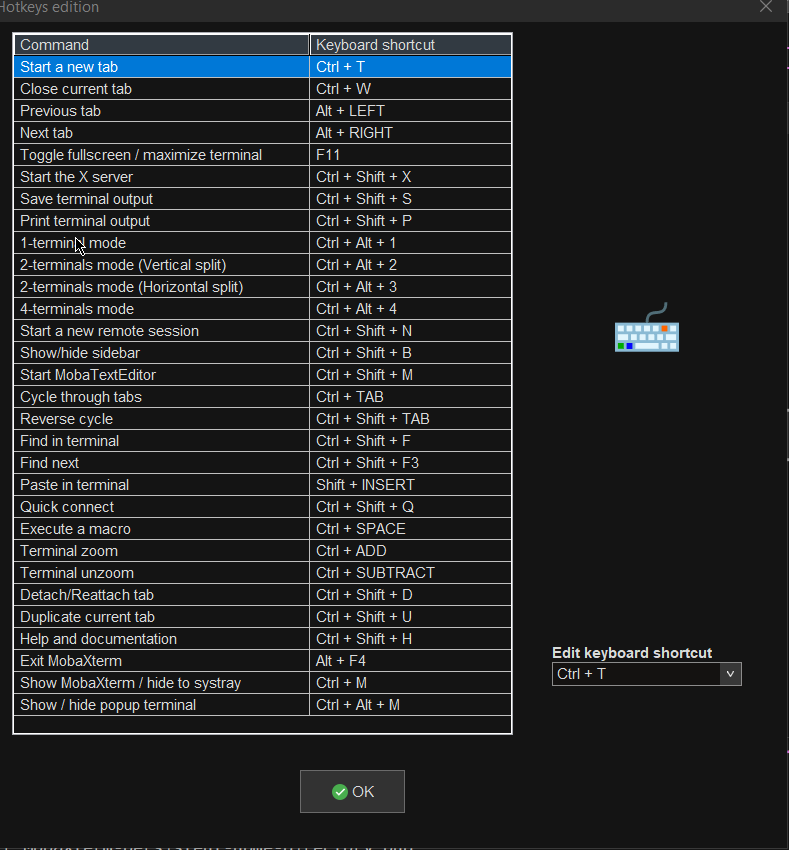
One of the first things to do once Mobaxterm is installed on the PC is to set up nice key binds as default onces might be heard to learn at the beginning or you might have already the habit to use the certain set of key combinations on your Linux desktop:

Common once are:

1. Open tab / Close tab common once I bind to are (CTRL + T / CTRL + W)
2. Previous tab move / Next tab move keys common one I use are (ALT + LEFT / ALT + RIGHT)
3. Find in terminal (CTRL + F)

rebind-mobaxterm-standard-keys
 

4. Make MobaXterm to automatically open a terminal to not Start local terminal every time

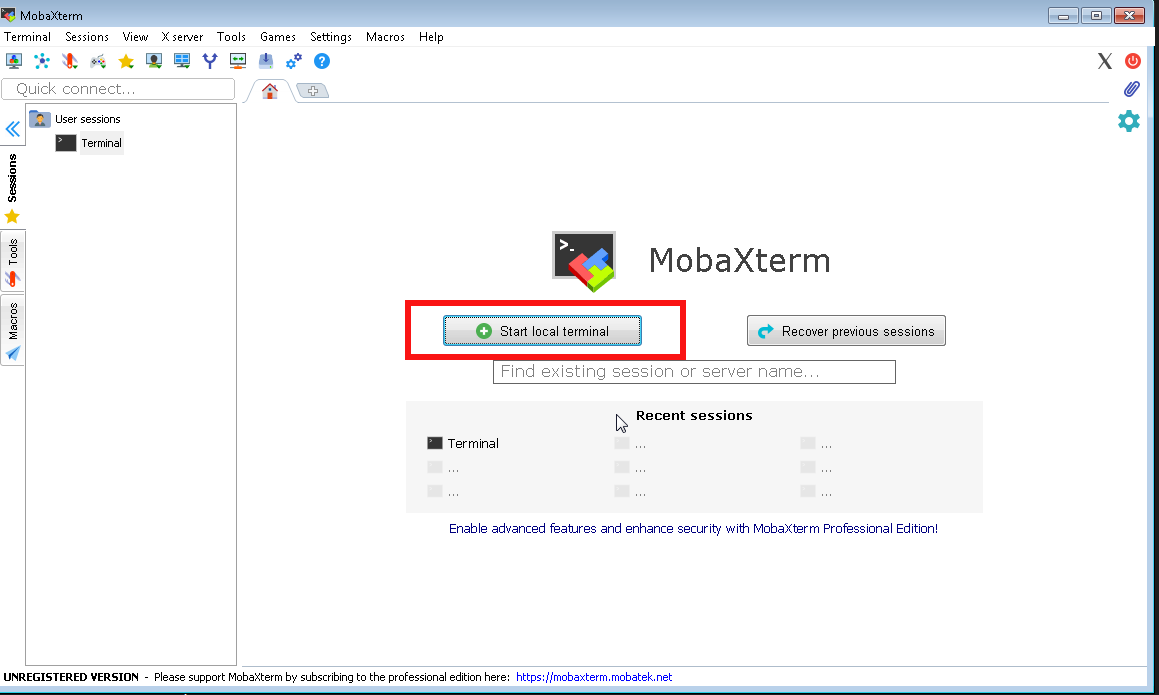
By default mobaxterm it is really annoying cause every time you run it after system reboot you have to select
Start local terminal
Once you run the terminal you get this prompt and you have to press on Start local terminal

mobaxterm-start-local-terminal


How to make Mobaxterm automatically open local Terminal Tab on every boot?
 

To fix this so every time a local terminal is spawn on MobaXterm you have get to:
 

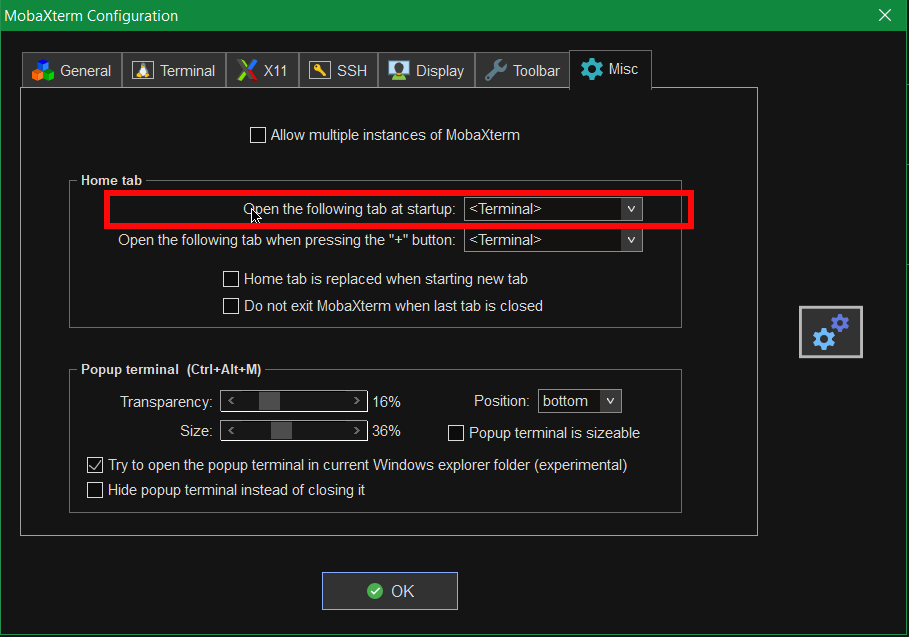
Settings -> Configuration -> Misc


Open the Following tab at startup by default it will be

<Home (Pinned)>

Change it to:

<Terminal>

mobaxterm-open-the-followintab-tab-in-startup

That's it on next login your Local Terminal with /bin/bash.exe will auto load !
 

[hipo.WINDOWS-PC] ➤ env|grep -i SHELL
SHELL=/bin/bash.exe
PATH=/bin:/drives/c/Users/hipo/DOCUME~1
/MobaXterm/slash/bin:/drives/c/Windows:/drives/c/Windows/system32:/drives/c/Windows/system32:/drives/c/Windows:/drives/c/Windows/System32/Wbem:
/drives/c/Windows/System32/WindowsPowerShell/v1.0:/drives/c/Windows/sysnative
PSModulePath=C:\Windows\system32\WindowsPowerShell\v1.0\Modules\
CMDPATH=C:\Windows\system32;C:\Windows;C:\Windows\System32\Wbem;
C:\Windows\System32\WindowsPowerShell\v1.0\;C:\Windows\sysnative\;
C:\Users\hipo\DOCUME~1\MobaXterm\slash\bin
WINPATH=C:\Windows\system32;C:\Windows;C:\Windows\System32\Wbem;C:\Windows\System32\WindowsPowerShell\v1.0\;C:\Windows\sysnative\


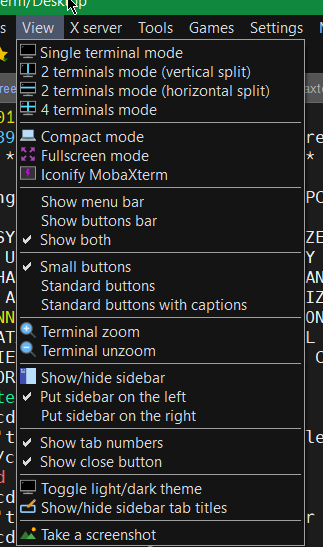
5. Make menu buttons to appear smaller


Go to menu and select
View -> (Small Buttons)

mobaxterm-select-small-buttons-screenshot

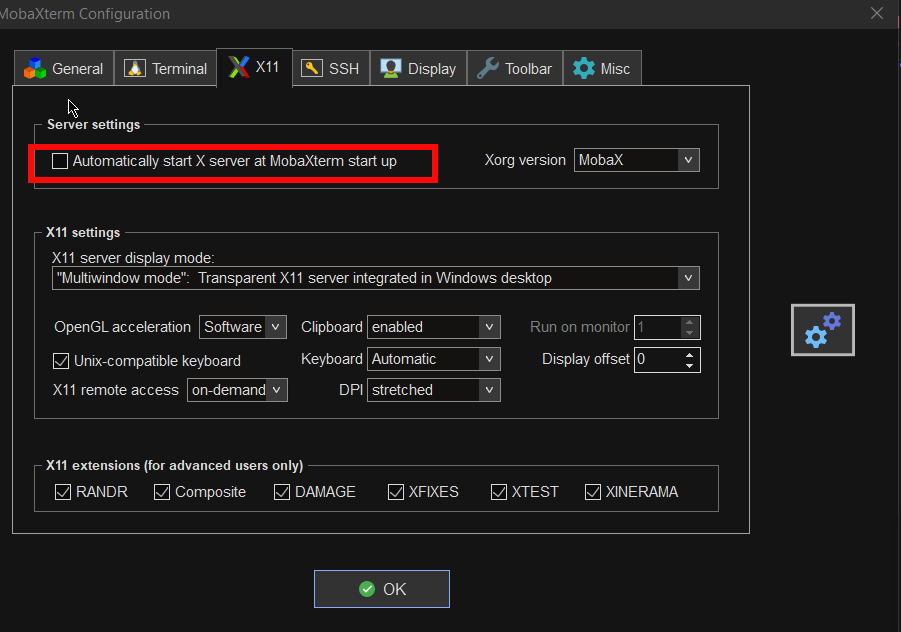
6. Disable auto start of XServer to prevent a port listener on the machine on TCP port

By default mobaxterm opens XServer listener, so you can immediately connect from a remote SSH servers missing Xserver and install software requiring an XServer, for example software such as Oracle Database or some MiddleWare WebLogig or IBM's Web Sphere. This is useful but if you want to have a good security only allow this server on a purpose. Otherwise the XServer will run in parallel with rest of your Moba and just load up your PC and eat up some RAM memory. To disable it go to:

mobaxterm-x11-automatically-start-X-server-disable-stop-at-startup

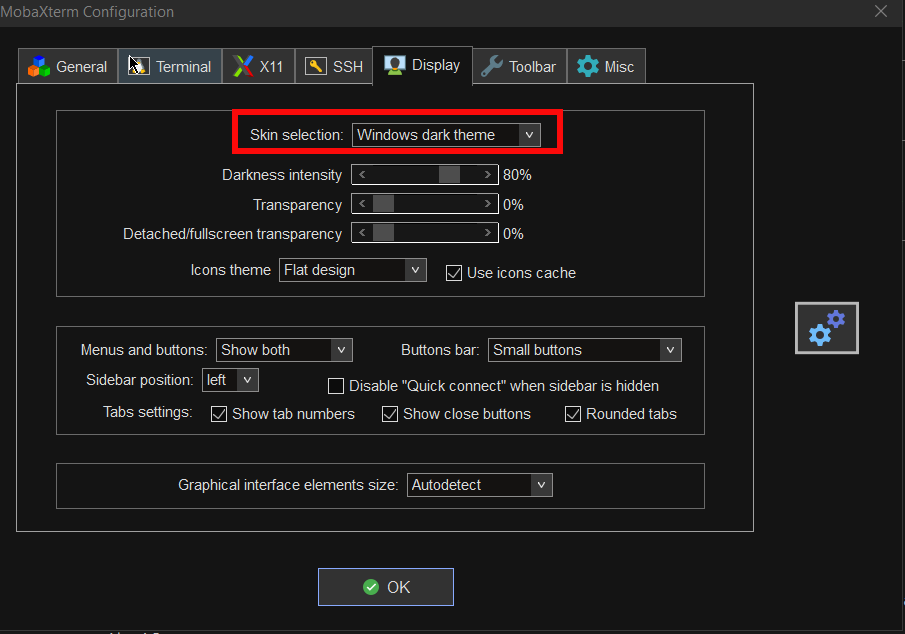
7. Change the mobaxterm Default theme to Dark

This is optional I like to set the Theme to Dark, also as a Theme for Windows as well as for MobaxTerm, the aim of that is simply to not put extra stress on my eye sight. Being on the PC around 8 to 10 hours and spending some 6 to 8 hours on console work is enough. If you want to do as well.

mobaxterm-change-default-theme-to-dark-theme

8. Install additional set of common Linux tools to mobaxterm to use on Windows
 

Tools such as:

1. Midnight Commander (mc)
2. Wget
3. Curl
4. Vim
5. Screen
6. Rsync
7. Perl
8. W3m
9. dosunix
10. unix2dos
11. gnupg
12. diffutils
13. mysql
14. mpg123
15. whois


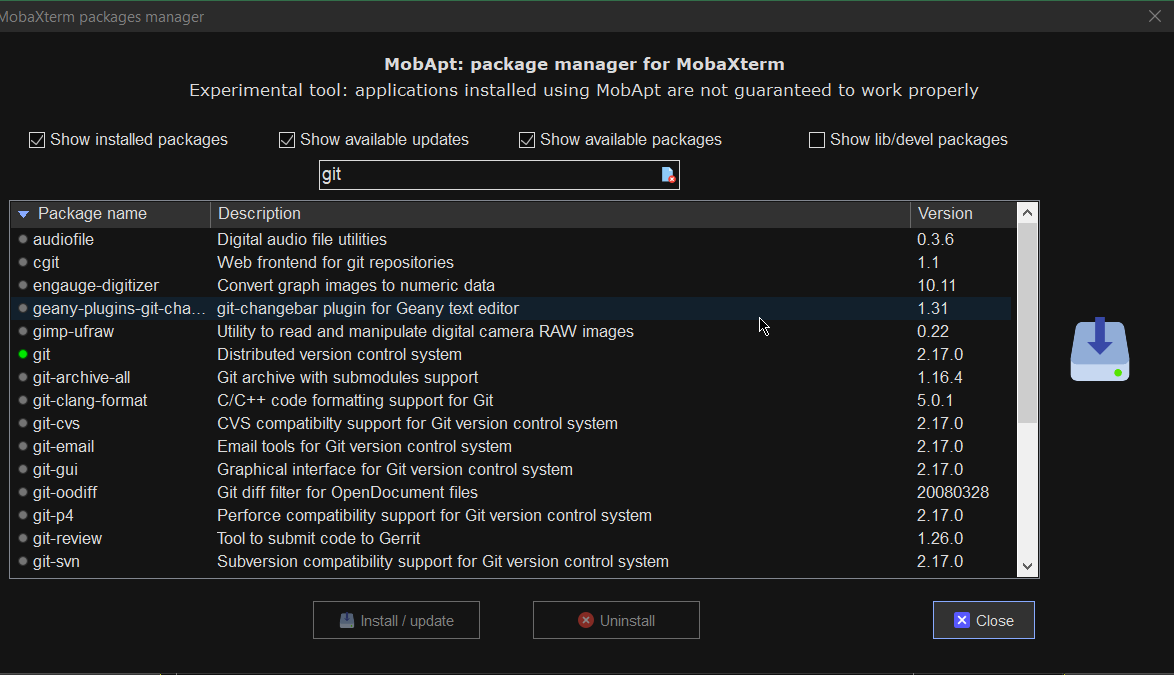
If you want to have a set of packages pre-installed that are including above as well as the rest of mine, here is a dump of my installed mobapt manager packages:

For more simply use the experimental Mobaxterm  Graphical Package installer
 

[hipo.WINDOWS-PC] ➤  for i in $(cat Downloads/installed-packages-mobaxterm.txt ); do apt-cyg install $i; done
 

Found package GeoIP-database

Installing GeoIP-database
Downloading GeoIP-database-20180505-1.tar.xz…
Unpacking GeoIP-database-20180505-1.tar.xz…


Running postinstall scripts
Package GeoIP-database installed.

Rebasing new libraries

Found package adwaita-icon-theme

Installing adwaita-icon-theme
Downloading adwaita-icon-theme-3.26.1-1.tar.xz…


You will be prompted for a single Yes for the respository

MobApt Packages Manager

mobapt-pkg-manager-install-git-from-gui-mobaxterm-package-installer

Though it is said it is experimental, I have to say the MobApt Apt Manager works quite good, I never had any issues with it so far.

9. Mobaxterm.ini the settings storage file that can help you move your configurations

If you have to prepeare new MobaXterm on multiple PCs frequently perhaps it is best to just copy the Mobaxterm.ini file. 
Here is an example of my mobaxterm.ini for download.
 

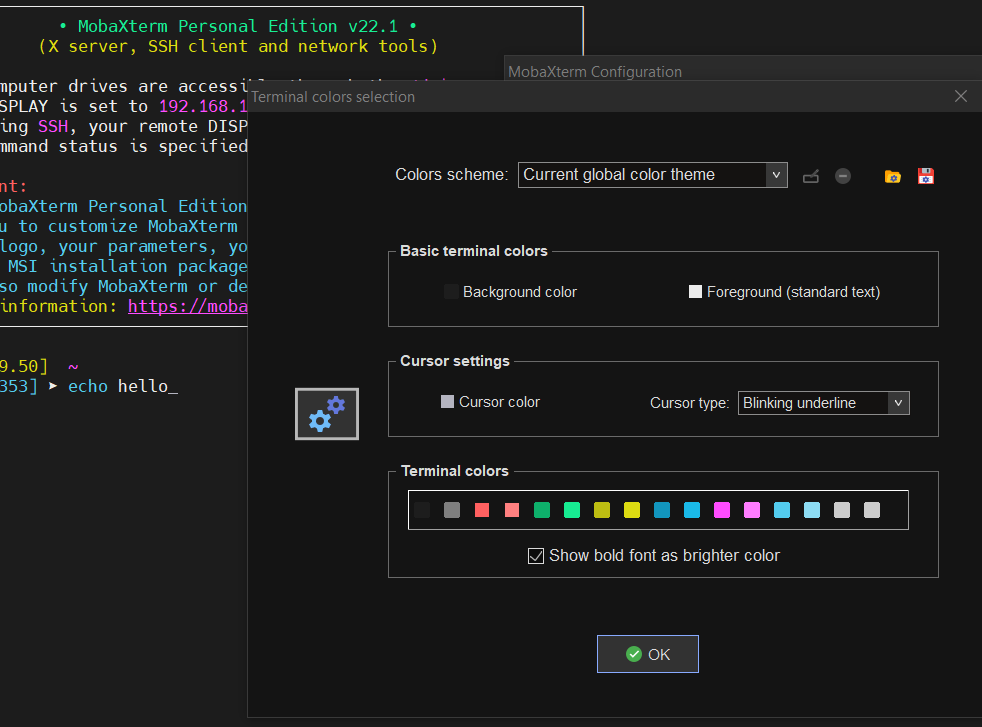
10. Change terminal colors and curor type and enable blinking (customizations)


Settings -> Configuration -> Terminal -> (Default Terminal Color Settings)


mobaxterm-change-terminal-colors-and-blinking-cursor-setting-screenshot

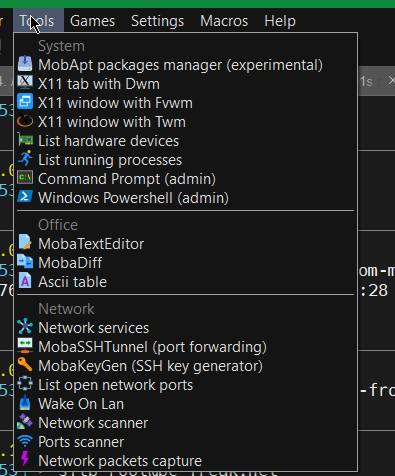
11. Use very useful moba Tools
 

mobaxterm-terminal-great-useful-tools-screenshot
For sysadmins Moba has plenty of other jems such as:

  • Network Port scanner such as Nmap with GUI

  • list open network ports (GUI interface to netmap)

  • SSH tunnel tool

  • Moba Diff

  • Wake on Lan

  • Network Packet capturer (such as tcpdump)

  • List running processes (such as taskmgr in simple form)

  • List machine hardware devices (such as Windows Device manager)

 
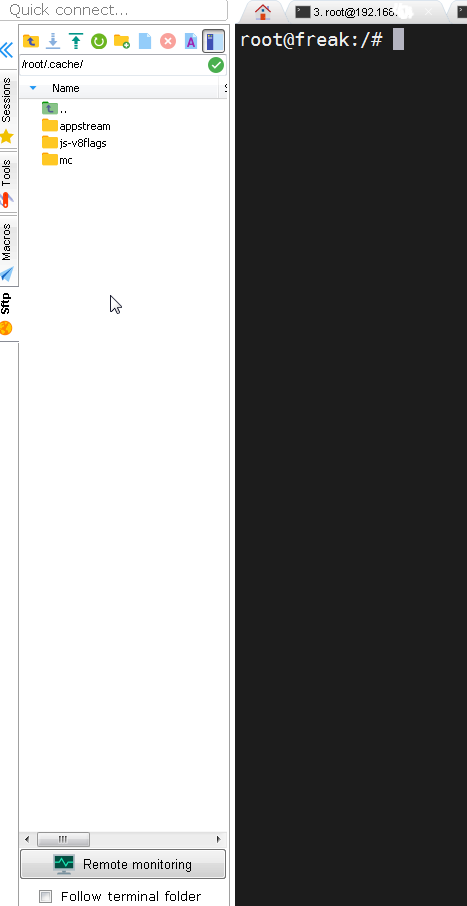
12. Remote monitoring of opened ssh session


To enable remote monitoring for a Saved session simply use the "Remote monitoring" button on the down left corner of the terminal.

mobaxterm-remote-monitoring-of-remote-ssh-server-screenshot-button

Or to enable it for a new host, open:

1. "Saved sessions"
2. Click over "User sessions"
3. New Session -> (SSH)
4. Basic SSH Settings (Remote host) -> OK
5. Click over the new created session
6. Click on Remote monitoring for the opened session

remote-monitoring-from-mobaxterm-screenshot

13. Play some mobaxterm console games

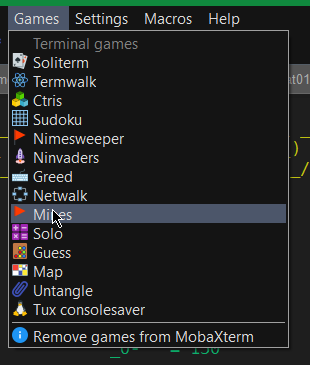
As you might have pissed off of configuring go on and enjoy some of the great console games, some of which are also present on a normal Linux new distribution installation. 🙂

mobaxterm-list-of-games-screenshot

List of Moba Games

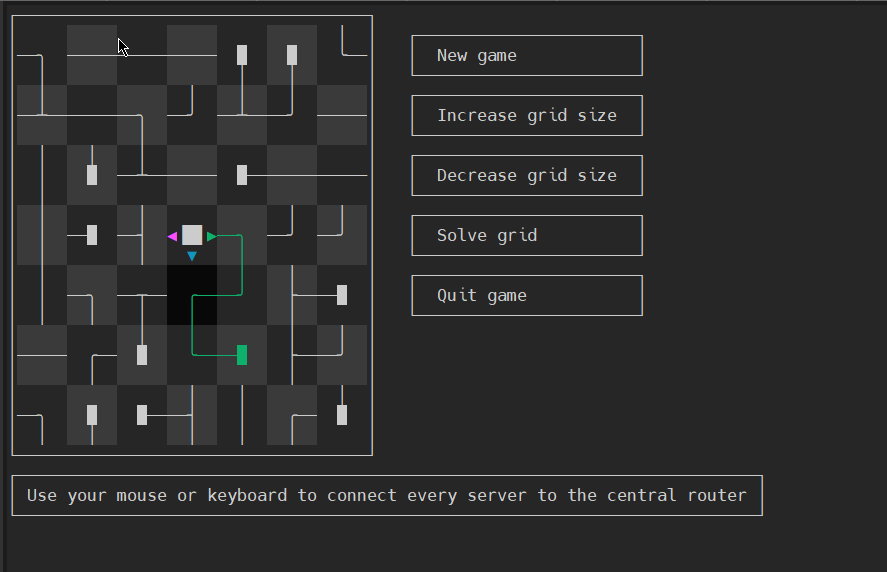
teamwalk-mobaxterm-console-connect-network-routers-game
TeamWalk (Use your mouse or keyboard to connect every server to the central router)

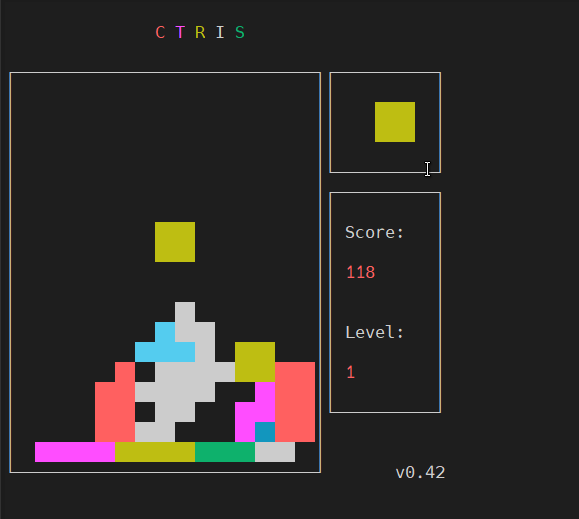
ctris-console-text-game-mobaxterm

Ctris Console tetris from Mobaxterm

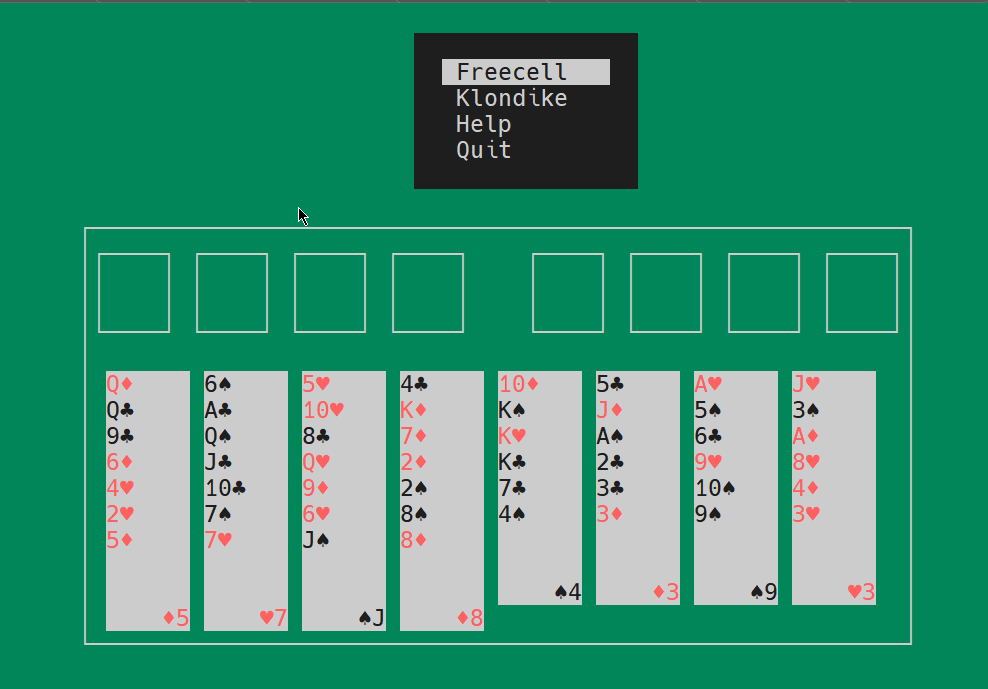
solitaire-text-console-game-played-on-mobaxterm-screenshot

Text console Solitaire from Moba
 

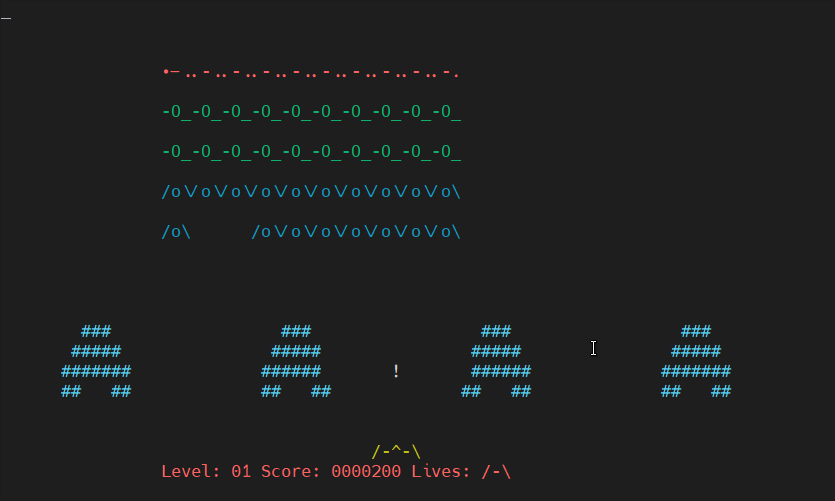
Ninvaders-console-game-mobaxterm

Here is NinVaders (Text Version of Space Invaders Arcade Classic)
 

Enjoy ! 🙂

Check if server is Physical Bare Metal or a Virtual Machine and its type

Tuesday, March 17th, 2020

check-if-linux-operating-system-is-running-on-physical-bare-metal-or-virtual-machine

In modern times the IT employee system administrator / system engineer / security engineer or a developer who has to develop and test code remotely on UNIX hosts, we have to login to multiple of different servers located in separate data centers around the world situated in Hybrid Operating system environments running multitude of different Linux OSes. Often especially for us sysadmins it is important to know whether the remote machine we have SSHed to is physical server (Bare Metal) or a virtual machines running on top of different kind of Hypervisor node OpenXen / Virtualbox / Virtuosso  / VMWare etc.
 

Then the question comes how to determine whether A remote Installed Linux is Physical or Virtual ?
 

1. Using the dmesg kernel log utility


The good old dmesg that is used to examine and control the kernel ring buffer detects plenty of useful information which gives you the info whether a server is Virtual or Bare Metal. It is present and accessible on every Linux server out there, thus using it is the best and simplest way to determine the OS system node type.

To grep whether a machine is Virtual and the Hypervisor type use:


nginx:~# dmesg | grep "Hypervisor detected"
[0.000000] Hypervisor detected: KVM


As you see above OS installed is using the KVM Virtualization technology.

An empty output of this command means the Remote OS is installed on a physical computer.


2. Detecting the OS platform the systemd way


Systemd along with the multiple over-complication of things that nearly all sysadmins (including me hate) so much introduced something useful in the fact of hostnamectl command
that could give you the info about the OS chassis platform.


root@pcfreak:~# hostnamectl status
 
 Static hostname: pcfreak
         Icon name: computer-desktop
           Chassis: desktop
        Machine ID: 02425d67037b8e67cd98bd2800002671
           Boot ID: 34a83b9a79c346168082f7605c2f557c
  Operating System: Debian GNU/Linux 10 (buster)
            Kernel: Linux 4.19.0-5-amd64
      Architecture: x86-64


Below is output of a VM running on a Oracle Virtualbox HV.


linux:~# hostnamectl status
Static hostname: ubuntuserver
 Icon name: computer-vm
 Chassis: vm
 Machine ID: 2befe86cf8887ca098f509e457554beb
 Boot ID: 8021c02d65dc46b1885afb25fddcf18c
 Virtualization: oracle
 Operating System: Ubuntu 16.04.1 LTS
 Kernel: Linux 4.4.0-78-generic
 Architecture: x86-64


3. Detect concrete container virtualization with systemd-detect-virt 


Another Bare Metal or VM identify tool that was introducted some time ago by freedesktop project is systemd-detect-virt (usually command is part of systemd package).
It is useful to detect the exact virtualization on a systemd running OS systemd-detect-virt is capable to detect many type of Virtualization type that are rare like: IBM zvm S390 Z/VM, bochs, bhyve (a FreeBSD hypervisor), Mac OS's parallels, lxc (linux containers), docker containers, podman etc.

The output from the command is either none (if no virtualization is present or the VM Hypervisor Host type):


server:~# systemd-detect-virt
none


quake:~# systemd-detect-virt
oracle


4. Install and use facter to report per node facts


debian:~# apt-cache show facter|grep -i desc -A2
Description-en: collect and display facts about the system
 Facter is Puppet’s cross-platform system profiling library. It discovers and
 reports per-node facts, which are collected by the Puppet agent and are made

Description-md5: 88cdf9a1db3df211de4539a0570abd0a
Homepage: https://github.com/puppetlabs/facter
Tag: devel::lang:ruby, devel::library, implemented-in::ruby,
root@jeremiah:/home/hipo# apt-cache show facter|grep -i desc -A1
Description-en: collect and display facts about the system
 Facter is Puppet’s cross-platform system profiling library. It discovers and

Description-md5: 88cdf9a1db3df211de4539a0570abd0a
Homepage: https://github.com/puppetlabs/facter


– Install facter on Debian / Ubuntu / deb based Linux


# apt install facter –yes


– Install facter on RedHat / CentOS RPM based distros

# yum install epel-release


# yum install facter


– Install facter on OpenSuSE / SLES

# zypper install facter


Once installed on the system to find out whether the remote Operating System is Virtual:

# facter 2> /dev/null | grep virtual
is_virtual => false
virtual => physical


If the machine is a virtual machine you will get some different output like:

# facter 2> /dev/null | grep virtual
is_virtual => true
virtual => kvm


If you're lazy to grep you can use it with argument.

# facter virtual
physical


6. Use lshw and dmidecode (list hardware configuration tool)


If you don't have the permissions to install facter on the system and you can see whether lshw (list hardware command) is not already present on remote host.

# lshw -class system  
storage-host                  
    description: Computer
    width: 64 bits
    capabilities: smbios-2.7 vsyscall32

If the system is virtual you'll get an output similar to:

# lshw -class system  
debianserver 
 description: Computer
 product: VirtualBox
 vendor: innotek GmbH
 version: 1.2
 serial: 0
 width: 64 bits
 capabilities: smbios-2.5 dmi-2.5 vsyscall32
 configuration: family=Virtual Machine uuid=78B58916-4074-42E2-860F-7CAF39F5E6F5


Of course as it provides a verbosity of info on Memory / CPU type / Caches / Cores / Motherboard etc. virtualization used or not can be determined also with dmidecode / hwinfo and other tools that detect the system hardware this is described thoroughfully in my  previous article Get hardware system info on Linux.


7. Detect virtualziation using virt-what or imvirt scripts


imvirt is a little script to determine several virtualization it is pretty similar to virt-what the RedHat own script for platform identification. Even though virt-what is developed for RHEL it is available on other distros, Fedoda, Debian, Ubuntu, Arch Linux (AUR) just like is imvirt.

installing both of them is with the usual apt-get / yum or on Arch Linux with yay package manager (yay -S virt-what) …

Once run the output it produces for physical Dell / HPE / Fujitsu-Siemens Bare Metal servers would be just empty string.

# virt-what
#

Or if the system is Virtual Machine, you'll get the type, for example KVM (Kernel-based Virtual Machine) / virtualbox / qemu etc.

#imvirt
Physical


Conclusion


It was explained how to do a simple check whether the server works on a physical hardware or on a virtual Host hypervisor. The most basic and classic way is with dmesg. If no access to dmesg is due to restrictions you can try the other methods for systemd enabled OSes with hostnamectl / systemd-detect-virt. Other means if the tools are installed or you have the permissions to install them is with facter / lshw or with virt-what / imvirt scripts.
There definitely perhaps much more other useful tools to grasp hardware and virtualization information but this basics could be useful enough for shell scripting purposes.
If you know other tools, please share.
 

Finding top access IPs in Webserver or how to delay connects from Bots (Web Spiders) to your site to prevent connect Denial of Service

Friday, September 15th, 2017

analyze-log-files-most-visited-ips-and-find-and-stopwebsite-hammering-bot-spiders-neo-tux

If you're a sysadmin who has to deal with cracker attemps for DoS (Denial of Service) on single or multiple servers (clustered CDN or standalone) Apache Webservers, nomatter whether working for some web hosting company or just running your private run home brew web server its very useful thing to inspect Web Server log file (in Apache HTTPD case that's access.log).

Sometimes Web Server overloads and the follow up Danial of Service (DoS) affect is not caused by evil crackers (mistkenly often called hackers but by some data indexing Crawler Search Engine bots who are badly configured to aggressively crawl websites and hence causing high webserver loads flooding your servers with bad 404 or 400, 500 or other requests, just to give you an example of such obstructive bots.

1. Dealing with bad Search Indexer Bots (Spiders) with robots.txt

Just as I mentioned hackers word above I feel obliged to expose the badful lies the press and media spreading for years misconcepting in people's mind the word cracker (computer intruder) with a hacker, if you're one of those who mistakenly call security intruders hackers I recommend you read Dr. Richard Stallman's article On Hacking to get the proper understanding that hacker is an cheerful attitude of mind and spirit and a hacker could be anyone who has this kind of curious and playful mind out there. Very often hackers are computer professional, though many times they're skillful programmers, a hacker is tending to do things in a very undstandard and weird ways to make fun out of life but definitelely follow the rule of do no harm to the neighbor.

Well after the short lirical distraction above, let me continue;

Here is a short list of Search Index Crawler bots with very aggressive behaviour towards websites:


# mass download bots / mirroring utilities
1. webzip
2. webmirror
3. webcopy
4. netants
5. getright
6. wget
7. webcapture
8. libwww-perl
9. megaindex.ru
10. megaindex.com
11. Teleport / TeleportPro
12. Zeus
….

Note that some of the listed crawler bots are actually a mirroring clients tools (wget) etc., they're also included in the list of server hammering bots because often  websites are attempted to be mirrored by people who want to mirror content for the sake of good but perhaps these days more often mirror (duplicate) your content for the sake of stealing, this is called in Web language Content Stealing in SEO language.


I've found a very comprehensive list of Bad Bots to block on Mike's tech blog his website provided example of bad robots.txt file is mirrored as plain text file here

Below is the list of Bad Crawler Spiders taken from his site:


# robots.txt to prohibit bad internet search engine spiders to crawl your website
# Begin block Bad-Robots from robots.txt
User-agent: asterias
Disallow:/
User-agent: BackDoorBot/1.0
Disallow:/
User-agent: Black Hole
Disallow:/
User-agent: BlowFish/1.0
Disallow:/
User-agent: BotALot
Disallow:/
User-agent: BuiltBotTough
Disallow:/
User-agent: Bullseye/1.0
Disallow:/
User-agent: BunnySlippers
Disallow:/
User-agent: Cegbfeieh
Disallow:/
User-agent: CheeseBot
Disallow:/
User-agent: CherryPicker
Disallow:/
User-agent: CherryPickerElite/1.0
Disallow:/
User-agent: CherryPickerSE/1.0
Disallow:/
User-agent: CopyRightCheck
Disallow:/
User-agent: cosmos
Disallow:/
User-agent: Crescent
Disallow:/
User-agent: Crescent Internet ToolPak HTTP OLE Control v.1.0
Disallow:/
User-agent: DittoSpyder
Disallow:/
User-agent: EmailCollector
Disallow:/
User-agent: EmailSiphon
Disallow:/
User-agent: EmailWolf
Disallow:/
User-agent: EroCrawler
Disallow:/
User-agent: ExtractorPro
Disallow:/
User-agent: Foobot
Disallow:/
User-agent: Harvest/1.5
Disallow:/
User-agent: hloader
Disallow:/
User-agent: httplib
Disallow:/
User-agent: humanlinks
Disallow:/
User-agent: InfoNaviRobot
Disallow:/
User-agent: JennyBot
Disallow:/
User-agent: Kenjin Spider
Disallow:/
User-agent: Keyword Density/0.9
Disallow:/
User-agent: LexiBot
Disallow:/
User-agent: libWeb/clsHTTP
Disallow:/
User-agent: LinkextractorPro
Disallow:/
User-agent: LinkScan/8.1a Unix
Disallow:/
User-agent: LinkWalker
Disallow:/
User-agent: LNSpiderguy
Disallow:/
User-agent: lwp-trivial
Disallow:/
User-agent: lwp-trivial/1.34
Disallow:/
User-agent: Mata Hari
Disallow:/
User-agent: Microsoft URL Control – 5.01.4511
Disallow:/
User-agent: Microsoft URL Control – 6.00.8169
Disallow:/
User-agent: MIIxpc
Disallow:/
User-agent: MIIxpc/4.2
Disallow:/
User-agent: Mister PiX
Disallow:/
User-agent: moget
Disallow:/
User-agent: moget/2.1
Disallow:/
User-agent: mozilla/4
Disallow:/
User-agent: Mozilla/4.0 (compatible; BullsEye; Windows 95)
Disallow:/
User-agent: Mozilla/4.0 (compatible; MSIE 4.0; Windows 95)
Disallow:/
User-agent: Mozilla/4.0 (compatible; MSIE 4.0; Windows 98)
Disallow:/
User-agent: Mozilla/4.0 (compatible; MSIE 4.0; Windows NT)
Disallow:/
User-agent: Mozilla/4.0 (compatible; MSIE 4.0; Windows XP)
Disallow:/
User-agent: Mozilla/4.0 (compatible; MSIE 4.0; Windows 2000)
Disallow:/
User-agent: Mozilla/4.0 (compatible; MSIE 4.0; Windows ME)
Disallow:/
User-agent: mozilla/5
Disallow:/
User-agent: NetAnts
Disallow:/
User-agent: NICErsPRO
Disallow:/
User-agent: Offline Explorer
Disallow:/
User-agent: Openfind
Disallow:/
User-agent: Openfind data gathere
Disallow:/
User-agent: ProPowerBot/2.14
Disallow:/
User-agent: ProWebWalker
Disallow:/
User-agent: QueryN Metasearch
Disallow:/
User-agent: RepoMonkey
Disallow:/
User-agent: RepoMonkey Bait & Tackle/v1.01
Disallow:/
User-agent: RMA
Disallow:/
User-agent: SiteSnagger
Disallow:/
User-agent: SpankBot
Disallow:/
User-agent: spanner
Disallow:/
User-agent: suzuran
Disallow:/
User-agent: Szukacz/1.4
Disallow:/
User-agent: Teleport
Disallow:/
User-agent: TeleportPro
Disallow:/
User-agent: Telesoft
Disallow:/
User-agent: The Intraformant
Disallow:/
User-agent: TheNomad
Disallow:/
User-agent: TightTwatBot
Disallow:/
User-agent: Titan
Disallow:/
User-agent: toCrawl/UrlDispatcher
Disallow:/
User-agent: True_Robot
Disallow:/
User-agent: True_Robot/1.0
Disallow:/
User-agent: turingos
Disallow:/
User-agent: URLy Warning
Disallow:/
User-agent: VCI
Disallow:/
User-agent: VCI WebViewer VCI WebViewer Win32
Disallow:/
User-agent: Web Image Collector
Disallow:/
User-agent: WebAuto
Disallow:/
User-agent: WebBandit
Disallow:/
User-agent: WebBandit/3.50
Disallow:/
User-agent: WebCopier
Disallow:/
User-agent: WebEnhancer
Disallow:/
User-agent: WebmasterWorldForumBot
Disallow:/
User-agent: WebSauger
Disallow:/
User-agent: Website Quester
Disallow:/
User-agent: Webster Pro
Disallow:/
User-agent: WebStripper
Disallow:/
User-agent: WebZip
Disallow:/
User-agent: WebZip/4.0
Disallow:/
User-agent: Wget
Disallow:/
User-agent: Wget/1.5.3
Disallow:/
User-agent: Wget/1.6
Disallow:/
User-agent: WWW-Collector-E
Disallow:/
User-agent: Xenu’s
Disallow:/
User-agent: Xenu’s Link Sleuth 1.1c
Disallow:/
User-agent: Zeus
Disallow:/
User-agent: Zeus 32297 Webster Pro V2.9 Win32
Disallow:/
Crawl-delay: 20
# Begin Exclusion From Directories from robots.txt
Disallow: /cgi-bin/

Veryimportant variable among the ones passed by above robots.txt is
 

Crawl-Delay: 20


You might want to tune that variable a Crawl-Delay of 20 instructs all IP connects from any Web Spiders that are respecting robots.txt variables to delay crawling with 20 seconds between each and every connect client request, that is really useful for the Webserver as less connects means less CPU and Memory usage and less degraded performance put by aggressive bots crawling your site like crazy, requesting resources 10 times per second or so …

As you can conclude by the naming of some of the bots having them disabled would prevent your domain/s clients from Email harvesting Spiders and other not desired activities.


2. Listing IP addresses Hits / How many connects per IPs used to determine problematic server overloading a huge number of IPs connects

After saying few words about SE bots and I think it it is fair to also  mention here a number of commands, that helps the sysadmin to inspect Apache's access.log files.
Inspecting the log files regularly is really useful as the number of malicious Spider Bots and the Cracker users tends to be
raising with time, so having a good way to track the IPs that are stoning at your webserver and later prohibiting them softly to crawl either via robots.txt (not all of the Bots would respect that) or .htaccess file or as a last resort directly form firewall is really useful to know.
 

– Below command Generate a list of IPs showing how many times of the IPs connected the webserver (bear in mind that commands are designed log fields order as given by most GNU / Linux distribution + Apache default logging configuration;


webhosting-server:~# cd /var/log/apache2 webhosting-server:/var/log/apache2# cat access.log| awk '{print $1}' | sort | uniq -c |sort -n


Below command provides statistics info based on whole access.log file records, sometimes you will need to have analyzed just a chunk of the webserver log, lets say last 12000 IP connects, here is how:
 

webhosting-server:~# cd /var/log/apache2 webhosting-server:/var/log/apache2# tail -n 12000 access.log| awk '{print $1}' | sort | uniq -c |sort -n


You can combine above basic bash shell parser commands with the watch command to have a top like refresh statistics every few updated refreshing IP statistics of most active customers on your websites.

Here is an example:


webhosting-server:~# watch "cat access.log| awk '{print $1}' | sort | uniq -c |sort -n";


Once you have the top connect IPs if you have a some IP connecting with lets say 8000-10000 thousand times in a really short interval of time 20-30 minues or so. Hence it is a good idea to investigate further where is this IP originating from and if it is some malicious Denial of Service, filter it out either in Firewall (with iptables rules) or ask your ISP or webhosting to do you a favour and drop all the incoming traffic from that IP.

Here is how to investigate a bit more about a server stoner IP;
Lets assume that you found IP: 176.9.50.244 to be having too many connects to your webserver:
 

webhosting-server:~# grep -i 176.9.50.244 /var/log/apache2/access.log|tail -n 1
176.9.50.244 – – [12/Sep/2017:07:42:13 +0300] "GET / HTTP/1.1" 403 371 "-" "Mozilla/5.0 (compatible; MegaIndex.ru/2.0; +http://megaindex.com/crawler)"


webhosting-server:~# host 176.9.50.244
244.50.9.176.in-addr.arpa domain name pointer static.244.50.9.176.clients.your-server.de.


webhosting-server:~# whois 176.9.50.244|less


The outout you will get would be something like:

% This is the RIPE Database query service.
% The objects are in RPSL format.
%
% The RIPE Database is subject to Terms and Conditions.
% See http://www.ripe.net/db/support/db-terms-conditions.pdf

% Note: this output has been filtered.
%       To receive output for a database update, use the "-B" flag.

% Information related to '176.9.50.224 – 176.9.50.255'

% Abuse contact for '176.9.50.224 – 176.9.50.255' is 'abuse@hetzner.de'

inetnum:        176.9.50.224 – 176.9.50.255
netname:        HETZNER-RZ15
descr:          Hetzner Online GmbH
descr:          Datacenter 15
country:        DE
admin-c:        HOAC1-RIPE
tech-c:         HOAC1-RIPE
status:         ASSIGNED PA
mnt-by:         HOS-GUN
mnt-lower:      HOS-GUN
mnt-routes:     HOS-GUN
created:        2012-03-12T09:45:54Z
last-modified:  2015-08-10T09:29:53Z
source:         RIPE

role:           Hetzner Online GmbH – Contact Role
address:        Hetzner Online GmbH
address:        Industriestrasse 25
address:        D-91710 Gunzenhausen
address:        Germany
phone:          +49 9831 505-0
fax-no:         +49 9831 505-3
abuse-mailbox:  abuse@hetzner.de
remarks:        *************************************************
remarks:        * For spam/abuse/security issues please contact *
remarks:        * abuse@hetzner.de, not this address. *
remarks:        * The contents of your abuse email will be *
remarks:        * forwarded directly on to our client for *
….


3. Generate list of directories and files that are most called by clients
 

webhosting-server:~# cd /var/log/apache2; webhosting-server:/var/log/apache2# awk '{print $7}' access.log|cut -d? -f1|sort|uniq -c|sort -nk1|tail -n10

( take in consideration that this info is provided only on current records from /var/log/apache2/ and is short term for long term statistics you have to merge all existing gzipped /var/log/apache2/access.log.*.gz )

To merge all the old gzipped files into one single file and later use above shown command to analyize run:


cd /var/log/apache2/
cp -rpf *access.log*.gz apache-gzipped/
cd apache-gzipped
for i in $(ls -1 *access*.log.*.gz); do gzip -d $i; done
rm -f *.log.gz;
for i in $(ls -1 *|grep -v access_log_complete); do cat $i >> access_log_complete; done


Though the accent of above article is Apache Webserver log analyzing, the given command examples can easily be recrafted to work properly on other Web Servers LigHTTPD, Nginx etc.

Above commands are about to put a higher load to your server during execution, so on busy servers it is a better idea, to first go and synchronize the access.log files to another less loaded servers in most small and midsized companies this is being done by a periodic synchronization of the logs to the log server used usually only to store log various files and later used to do various analysis our run analyse software such as Awstats, Webalizer, Piwik, Go Access etc.

Worthy to mention one great text console must have Apache tool that should be mentioned to analyze in real time for the lazy ones to type so much is Apache-top but those script will be not installed on most webhosting servers and VPS-es, so if you don't happen to own a self-hosted dedicated server / have webhosting company etc. – (have root admin access on server), but have an ordinary server account you can use above commands to get an overall picture of abusive webserver IPs.

logstalgia-visual-loganalyzer-in-reali-time-windows-linux-mac
 

If you have a Linux with a desktop GUI environment and have somehow mounted remotely the weblog server partition another really awesome way to visualize in real time the connect requests to  web server Apache / Nginx etc. is with Logstalgia

Well that's all folks, I hope that article learned you something new. Enjoy

Thanks for article neo-tux picture to segarkshtri.com.np)

Howto install GeoTrust RapidSSL certificate on Debian Lenny / Squeeze / Wheezy Linux

Thursday, March 25th, 2010

I faced the task of generating official Validated SSL Certificates by in mydaily duties as a System Administrator at cadiaholding.com . Though generating self-signedSSL certificate is comparatively easy task. It was a pain in the ass setting Apache version 2.2.9-10+lenny6to correctly serve pages through https:// protocol over openssl version 0.9.8g-15+lenny6.I’ll try to go through the whole process of Generating the certificate in order to help some other Debianusers out there to face less setbacks in such a simple task as installing a Trusted SSL Certificate issued(bought) by RapidSSL. Even though this article will mostly deal with SSL certificate issued by RapidSSL,it should be not a problem to apply this methodogy with Verisign or some of the other Geotrust issuedSecure Socket Layer certificates.

In generating the Validated certficate I used enom which is a domain name,ssl certificates, email and hosting company whole-saler.
Fron emon’s website after logging in and using the web interface, there are two major things required to fill inin order to issue your Trusted SSL certificate.

1. Fill in in a form a CSR file, this is usually generated on the Linux server using the openssl.
To issue the CSR file required by Enom use the following commands:

a. First we generate an DES3 RSA encrypted key which we will use next to generate the opeensl CSR file required by ENOM.
debian:~# /usr/bin/openssl genrsa -des3 -out www.domain.com.key 2048
Enter pass phrase for www.domain.com.key:

You’ll be required to fill in a pass-phrase that will be later be required to fill in before Apache servers starts or restarts,so make sure you fill something you either remember or you keep the password stored in a file.
You have to change also the www.domain.com.key in accordance with your domain name.
Now as we already have a proper generated DES3 RSA key afterwards it’s necessery to generate the CSR file with the openssl command line frontend.
So here is how:

debian:~# /usr/bin/openssl req -new -key /home/hipo/www.domain.com.key -out /home/hipo/www.domain.com.csr

Again in the above example change all the paths and file names as you wish.
It’s necessery that the end user fill in a number of questions related to the Certificate Signing Request.
Herein I’ll list what kind of prompts will emerge after executing the above command:

Enter pass phrase for /home/hipo/www.domain.com.key:
You are about to be asked to enter information that will be incorporated
into your certificate request.
What you are about to enter is what is called a Distinguished Name or a DN.
There are quite a few fields but you can leave some blank
For some fields there will be a default value,
If you enter '.', the field will be left blank.
-----
Country Name (2 letter code) [AU]:
State or Province Name (full name) [Some-State]:
Locality Name (eg, city) []:
Organization Name (eg, company) [Internet Widgits Pty Ltd]:
Organizational Unit Name (eg, section) []:
Common Name (eg, YOUR name) []:
Email Address []:
Please enter the following 'extra' attributes
to be sent with your certificate request
A challenge password []:
An optional company name []:

Note that you’ll hav eto fill in the pass phrase previously entered during the generation of the www.domain.com.key file.
In case if you’d like to read more thoroughly on the subject of howto create a Certificate Signing Request or (CSR) as we called it on multiple times, you can read About Certificate Signing Request (CSR) Generation Instructions – Apache SSL more in depth here

2. Hopefully following the above instructions you’ll now have a file named www.domain.csrJust open the www.domain.scr and copy paste it’s content to the ENOM website CSR * webform.

3. Further on select your Webserver type on Enom’s website:In our case we have to select Apache + ApacheSSL

4. What follows next is filling in your company contact information This is also required for proper certificate generation, you have to think twice before you fill in this data, take a note this can’t be changed later on without issuing a brand SSL new certificate.

Apart from the 3 major above requirements to fill in Enom there are some few more radio buttons to use to make some selections according to your personal preferences, however I won’t take time to dig in that and I’ll leave this to you.
After all the above is fulfilled you’ll have to submit your certificate details and choose an email address to which you will receive in a minute a RapidSSL Certificate Request Confirmation

Following a link from the email, will show you some basic information about the certificate about to be generated. That’s your final chance to cancel the issued Trusted Certificated.
If you’re absolutely sure the information about to enter the certificate is correct then you’ll have to follow a link and approve the certificate.

You’ll be informed that you’ll receive your certificate either through Certifier website (e.g. Enom’s website) or via another email.
I thought it’s more probable I receive it via email but anyways I was wrong. More thank 4 hours has passed since the certificate was issued and is available via Enom’s interface but I haven’t received nothing on my mail.
Therefore my friendly advice is to check about your brand new shiny Trusted Certificate on Emom’s website. I had mine ready in about 10 minutes after the CSR was issued.

Assuming that you’ve succesfully obtained the SSL Trusted certificate from RapidSSL what follows is setting up the certificate.
Initially I tried using documentation from RapidSSL website called Installing your SSL Certificate / Web Server Certificate / Secure Server Certificate from RapidSSL.com
I tried to configure one of my Virtualhost as shown in their example inserting in my /etc/apache/sites-available/www.domain.com file, few directives within the VirtualHost something like the shown below

SSLEngine on
# domain.com.crt cointains the Trusted SSL certificate generated and obtained by you from RapidSSL
SSLCertificateFile /etc/apache2/ssl/www.domain.com.crt
# www.domain.com.key contains the file used to generate the CSR file as described earlier in this post
SSLCertificateKeyFile /etc/apache2/ssl/www.domain.com.key

It is also possible insetad of using the SSLCertificateFile and SSLCertificateKeyFile directvies directives in Apache config to use:


Another alternative is to use

SSLCertificateFile /etc/ssl/certs/your-domain-name.crt
SSLCertificateKeyFile /etc/ssl/certs/your-domain-name.key
SSLCACertificateFile /etc/ssl/certs/gd_bundle.crt

The key file is the one generated earlier on the server and handed to the SSL regisrar, the files:

your-domain-name.crt and gd_bundle.crt files are provided by RapidSSL or from whatever SSL registrater the SSL was purchased.

After trying the above configuration and restarting apache with:

/etc/init.d/apache2 restart

Apache failed to start, it might be helpful to somebody out there the error I had in my apache error.log:
The error.log red the following:

[warn] RSA server certificate is a CA certificate (BasicConstraints: CA == TRUE !?)

After some 30 minutes or an hour of Googling on the error I came to the conclusion that the error is caused, becauseApache is supposed to work with .PEM files instead of the classical .CRT and .KEY files asnormally approached in most of the other Unix operating systems.

It took me a bit more of reading on the internet to find out that actually the .pem files so widely adopted in Debian simply contain both the www.domain.com.key file and the www.domain.com.crt key simply pasted one after another, this I also observed from the default Apache self-signed certificate that I believe comes with debian /etc/apache2/ssl/apache.pem .
So I copied both the content of my www.domain.com.key and www.domain.com.crt and store it in one file:
/etc/apache2/ssl/www.domain.com.pem

Also the following configuration:
SSLEngine on
SSLCertificateFile /etc/apache2/ssl/www.domain.com.pem

had to go in your
/etc/apache2/sites-enabled/www.domain.com

Last thing that’s left is to restart your Apache;

/etc/init.d/apache2 restart

Apache will prompt you for your certificate password entered by you during the www.domain.com.key generation. Type your password and with a bit of luck and hopefully with God’s help you’ll be having a Trusted Certificate on your webserver.

Last step is to check if the certificate is okay accessing your domain https://www.domain.com.

Well this is the end of the article, hope you enjoy.If you do please leave your comments, any corrections are also welcomed 🙂

Windows key Shortcuts and Commands List every Win admin / support must know

Tuesday, November 25th, 2014

windows-XP-vista-7-8-server-2003-rc2-2012--full-complete-keyboard-shortcuts-list
If you're a system administrator of Windows Servers or or just a PC support in a small company and you have to fix PCs running Microsoft Windows XP / 7 / 8  daily, sooner or later you will be interested into how to optimize your windows maintainance work to be able to do more adminsitration work for less time.

M$ Windows OS has evolved a lot over the past 10+ years and many of the features available GUI are now either possibile to be done via a standard commands and the GUI interfaces. Various adminsitration and common daily work simplification goodies are now accessible through quick access shortcuts and commands.

Virtually all Windows operating system environment could be now customized by using such shortcuts, this reduces the multitude of annoying double clicks which are truely pissing off sysadmins and tech-supports involved in  Windows Ticket solving.

Win Shortcuts and Commands helps to:

  • Quickly invoke almost all System Settings available from Windows Control Panel
  • Access all admins tools GUIs throguh command
  • Speed up Opening Video, Pictures, Documents, Downloads folders start Windows Update, Configure Printers / Fax / Add Sharings

etc..

A lot of the commands were new to me thus I decided to try out all of the commands in command prompt (cmd). Many of the tools down-mentioned were news to me and let me understand better on Windows Internals, so if you time try them out.
 

Function Comand
Open Documents Folder Start menu -> Search (Type documents)
Open Videos folder Start -> Search (Type videos)
Open Downloads Folder Start -> Search (Type downloads)
Open Favorites Folder favorites
View Recent messages of your PC Start menu -> Search (Type recent)
Open Recent Folder N/A
Open Pictures Folder Start menu -> Search (Type pictures)
Windows Sideshow control.exe /name Microsoft.WindowsSideshow
Windows CardSpace (Windows ID Manager) control.exe /name Microsoft.cardspace
Windows Anytime Upgrade Start menu -> Search dialog (Type WindowsUpdate)
Taskbar and Start Menu control.exe /name Microsoft.TaskbarandStartMenu
Troubleshooting control.exe /name Microsoft.Troubleshooting
User Accounts (Run user accounts Interface) control.exe /name Microsoft.UserAccounts
Adding a new Device devicepairingwizard
Add Hardware Wizard hdwwiz
Advanced User Accounts Management netplwiz
Advanced User Accounts (Authorization Mgr) azman.msc
Windows Backup and Restore sdclt
Bluetooth File Transfer fsquirt
Calculator calc
Certificates Manager certmgr.msc
Change Computer Performance Settings systempropertiesperformance (Remove visual effects)
Change Data Execution Prevention Settings systempropertiesdataexecutionprevention
Change Data Execution Prevention Settings printui
Character Map charmap
ClearType Tuner cttune (Make text onscreen more readable)
Color Management colorcpl
Command Prompt cmd
Component Services comexp.msc
Component Services dcomcnfg
Computer Management Interface compmgmt.msc
Computer Management Interface compmgmtlauncher
Connect to Network Project via Network netproj
Connect to a Projector displayswitch (Alias for Fn key + F4)
Run Control Panel command control
Create A Shared Folder Wizard shrpubw
Create a System Repair Disc recdisc
Credential Backup and Restore Wizard credwiz
Data Execution Prevention systempropertiesdataexecutionprevention
Date and Time timedate.cpl
Default Location locationnotifications
Device Manager devmgmt.msc
Device Manager hdwwiz.cpl
Device Pairing Wizard devicepairingwizard
Diagnostics Troubleshooting Wizard msdt
Digitizer Calibration Tool tabcal
DirectX Diagnostic Tool dxdiag
Disk Cleanup cleanmgr
Disk Defragmenter dfrgui
Disk Management diskmgmt.msc
Display (Change font size of text onscreen) dpiscaling
Display Color Calibration dccw
Display Switch displayswitch
DPAPI Key Migration Wizard dpapimig
Driver Verifier Manager verifier
Ease of Access Center utilman
EFS Wizard rekeywiz
Event Viewer eventvwr.msc
Fax Cover Page Editor fxscover
File Signature Verification sigverif
Font Viewer fontview
Game Controllers joy.cpl
Windows Getting Started Iface gettingstarted
IExpress Wizard iexpress
Another alias for Getting Started irprops.cpl
Install or Uninstall Display Languages lusrmgr
Internet Explorer iexplore
Run Internet Explorer Internet Options inetcpl.cpl
iSCSI Initiator Configuration Tool iscsicpl
Language Pack Installer lpksetup
Local Group Policy Editor gpedit.msc
Local Security Policy secpol.msc
Local Users and Groups lusrmgr.msc
Location Activity locationnotifications
Magnifier magnify
Malicious Software Removal Tool mrt (Might be not existent on some Windows versions)
Manage Your File Encryption Certificates rekeywiz
Math Input Panel mip
Microsoft Management Console mmc
Microsoft Support Diagnostic Tool msdt
Mouse main.cpl
NAP Client Configuration napclcfg.msc
Narrator narrator
Network Connections ncpa.cpl
New Scan Wizard wiaacmgr
Notepad notepad
ODBC Data Source Administrator odbcad32
ODBC Driver Configuration odbcconf
On-Screen Keyboard osk
Paint mspaint
Pen and Touch tabletpc.cpl
People Near Me collab.cpl
Performance Monitor perfmon.msc
Performance Options systempropertiesperformance
Phone and Modem telephon.cpl
Phone Dialer dialer
Power Options powercfg.cpl
Presentation Settings presentationsettings
Print Management printmanagement.msc
Printer Migration printbrmui
Printer User Interface printui
Private Character Editor eudcedit
Problem Steps Recorder psr
Programs and Features (Install / Uninstall) appwiz.cpl
Protected Content Migration dpapimig
Region and Language intl.cpl
Registry Editor regedit
Registry Editor 32 regedt32
Remote Access Phonebook rasphone
Remote Desktop Connection mstsc
Resource Monitor resmon
Resultant Set of Policy rsop.msc
SAM Lock Tool syskey
Screen Resolution desk.cpl
Securing the Windows Account Database syskey
Services services.msc
Set Program Access and Computer Defaults computerdefaults
Share Creation Wizard shrpubw
Shared Folders fsmgmt.msc
Snipping Tool snippingtool
Sound mmsys.cpl
Sound recorder soundrecorder
SQL Server Client Network Utility cliconfg
Sticky Notes stikynot
Stored User Names and Passwords credwiz
Sync Center mobsync
System Configuration msconfig
System Configuration Editor sysedit
System Information msinfo32
System Properties sysdm.cpl
System Properties (Advanced Tab) systempropertiesadvanced
System Properties (Computer Name Tab) systempropertiescomputername
System Properties (Hardware Tab) systempropertieshardware
System Properties (Remote Tab) systempropertiesremote
System Properties (System Protection Tab) systempropertiesprotection
System Restore rstrui
Task Manager taskmgr
Task Scheduler taskschd.msc
Trusted Platform Module (TPM) Management tpm.msc
User Account Control Settings useraccountcontrolsettings
Utility Manager utilman
Version Reporter Applet winver
Volume Mixer sndvol
Windows Action Center wscui.cpl
Windows Activation Client slui (Runs on Windows license activation time)
Windows Anytime Upgrade Results windowsanytimeupgraderesults
Windows CardSpace infocardcpl.cpl
Windows Disc Image Burning Tool isoburn (Command line tool to burn images)
Windows DVD Maker dvdmaker (N/A on Windows 7, 8)
Windows Easy Transfer migwiz (N/A on many Windows versions)
Run Windows Explorer explorer
Windows Fax and Scan wfs
Windows Features optionalfeatures
Windows Firewall firewall.cpl
Windows Firewall with Advanced Security wf.msc
Windows Journal journal (N/A on Windows 7)
Windows Media Player wmplayer (N/A on many Windows releases)
Windows Memory Diagnostic Scheduler mdsched (Check your PC memory on next boot)
Windows Mobility Center (Stats) mblctr
Windows Picture Acquisition Wizard wiaacmgr
Windows PowerShell powershell
Windows PowerShell ISE powershell_ise
Windows Remote Assistance msra
Windows Repair Disc recdisc
Windows Script Host wscript
Windows Update wuapp
Windows Update Standalone Installer wusa
Show Windows Version winver
WMI Management wmimgmt.msc
WordPad write
XPS Viewer xpsrchvw


Most of above commands works fine with Windows XP, Vista and Windows 7 / 8, Windows 2003 / 2012, however some cmds are missing across some win versions.

Here is list of other useful Windows shortcut keys:
 

General keyboard shortcuts

  • Ctrl+C (Copy)
  • Ctrl+X (Delete selected item and save a copy to the clipboard)
  • Ctrl+V (Paste)
  • Ctrl+Z (Undo)
  • Delete (Delete) 
  • Shift+Delete (Delete the selected item permanently without moving the item to the Recycle Bin) 
  • Ctrl while dragging an item (Copy the selected item)
  • Ctrl+Shift while dragging an item (Create a shortcut to the selected item)
  • F2 key (Rename the selected item)
  • Ctrl+Right Arrow (Move the cursor to the beginning of the next word) 
  • Ctrl+Left Arrow (Move the cursor to the beginning of the previous word) 
  • Ctrl+Down Arrow (Move the cursor to the beginning of the next paragraph) 
  • Ctrl+Up Arrow (Move the cursor to the beginning of the previous paragraph) 
  • Ctrl+Shift with any arrow key (Highlight a block of text) 
  • Shift with any arrow key (Select more than one item in a window or on the desktop, or select text in a document) 
  • Ctrl+A (Select all) 
  • F3 key (Search for a file or a folder)
  • Alt+Enter (View the properties for the selected item) 
  • Alt+F4 (Close the active item, or exit the active program) 
  • Alt+Enter (Display the properties of the selected object) 
  • Alt+Spacebar (Open the shortcut menu for the active window) 
  • Ctrl+F4 (Close the active document in programs that enable multiple documents to be open at the same time) 
  • Alt+Tab (Switch between the open items) 
  • Alt+Esc (Cycle through items in the order in which they were opened) 
  • F6 key (Cycle through the screen elements in a window or on the desktop)
  • F4 key (Display the Address bar list in My Computer or in Windows Explorer) 
  • Shift+F10 (Display the shortcut menu for the selected item)
  • Alt+Spacebar (Display the System menu for the active window) 
  • Ctrl+Esc (Display the Start menu) 
  • Alt+Underlined letter in a menu name (Display the corresponding menu)
  • Underlined letter in a command name on an open menu (Perform the corresponding command)
  • F10 key (Activate the menu bar in the active program)
  • Right Arrow  (Open the next menu to the right, or open a submenu)
  • Left Arrow  (Open the next menu to the left, or close a submenu)
  • F5 key (Update the active window)
  • Backspace (View the folder one level up in My Computer or Windows Explorer) 
  • Esc (Cancel the current task)
  • Shift when you insert a CD into the CD drive (Prevent the CD from automatically playing)
  • Ctrl+Shift+Esc (Open Task Manager) 

Dialog box keyboard shortcuts

  • Ctrl+Tab (Move forward through the tabs)
  • Ctrl+Shift+Tab (Move backward through the tabs)
  • Tab (Move forward through the options)
  • Shift+Tab (Move backward through the options)
  • Alt+Underlined letter (Perform the corresponding command, or select the corresponding option)
  • Enter (Perform the command for the active option or button)
  • Spacebar (Select or clear the check box if the active option is a check box)
  • Arrow keys (Select a button if the active option is a group of option buttons)
  • F1 key (Display Help)
  • F4 key (Display the items in the active list)
  • Backspace (Open a folder one level up if a folder is selected in the Save As or Open dialog box)

Microsoft natural keyboard shortcuts

  • Windows Logo (Display or hide the Start menu)
  • Windows Logo+Break (Display the System Properties dialog box)
  • Windows Logo+D (Display the desktop)
  • Windows Logo+M (Minimize all the windows)
  • Windows Logo+Shift+M (Restore the minimized windows)
  • Windows Logo+E (Open My Computer)
  • Windows Logo+F (Search for a file or a folder)
  • Ctrl+Windows Logo+F (Search for computers)
  • Windows Logo+F1 (Display Windows Help)
  • Windows Logo+ L (Lock the keyboard)
  • Windows Logo+R (Open the Run dialog box)
  • Windows Logo+U (Open Utility Manager)

Accessibility keyboard shortcuts

  • Right Shift for eight seconds (Switch FilterKeys on or off)
  • Left Alt+left Shift+Print Screen (Switch High Contrast on or off)
  • Left Alt+left Shift+Num Lock (Switch the MouseKeys on or off)
  • Shift five times (Switch the StickyKeys on or off)
  • Num Lock for five seconds (Switch the ToggleKeys on or off)
  • Windows Logo +U (Open Utility Manager)

Windows Explorer keyboard shortcuts


  • End (Display the bottom of the active window)
  • Home (Display the top of the active window)
  • Num Lock+Asterisk sign (*) (Display all the subfolders that are under the selected folder)
  • Num Lock+Plus sign (+) (Display the contents of the selected folder)
  • Num Lock+Minus sign (-) (Collapse the selected folder)
  • Left Arrow  (Collapse the current selection if it is expanded, or select the parent folder)
  • Right Arrow  (Display the current selection if it is collapsed, or select the first subfolder) 

Keyboard Shortcuts for Character Map


After you double-click a character on the grid of characters, you can move through the grid by using the keyboard shortcuts:

  • Right Arrow  (Move to the right or to the beginning of the next line)
  • Left Arrow  (Move to the left or to the end of the previous line) 
  • Up Arrow (Move up one row)
  • Down Arrow (Move down one row)
  • Page Up  (Move up one screen at a time)
  • Page Down (Move down one screen at a time)
  • Home (Move to the beginning of the line)
  • End (Move to the end of the line)
  • Ctrl+Home (Move to the first character)
  • Ctrl+End (Move to the last character)
  • Spacebar (Switch between Enlarged and Normal mode when a character is selected) 

Microsoft Management Console (MMC) main window keyboard shortcuts


  • Ctrl+O (Open a saved console)
  • Ctrl+N (Open a new console)
  • Ctrl+S (Save the open console)
  • Ctrl+M (Add or remove a console item)
  • Ctrl+W (Open a new window)
  • F5 key (Update the content of all console windows)
  • Alt+Spacebar (Display the MMC window menu)
  • Alt+F4 (Close the console)
  • Alt+A (Display the Action menu)
  • Alt+V (Display the View menu)
  • Alt+F (Display the File menu)
  • Alt+O (Display the Favorites menu) 

Microsoft Management Console (MMC) window keyboard shortcuts

  • Ctrl+P (Print the current page or active pane)
  • Alt+Minus sign (-) (Display the window menu for the active console window)
  • Shift+F10 (Display the Action shortcut menu for the selected item)
  • F1 key (Open the Help topic, if any, for the selected item)
  • F5 key (Update the content of all console windows)
  • Ctrl+F10 (Maximize the active console window)
  • Ctrl+F5 (Restore the active console window)
  • Alt+Enter (Display the Properties dialog box, if any, for the selected item)
  • F2 key (Rename the selected item)
  • Ctrl+F4 (Close the active console window. When a console has only one console window, this shortcut closes the console)

Remote desktop connection navigation


  • Ctrl+Alt+End (Open the Microsoft Windows NT Security dialog box)
  • Alt+Page Up (Switch between programs from left to right)
  • Alt+Page Down (Switch between programs from right to left)
  • Alt+Insert (Cycle through the programs in most recently used order)
  • Alt+Home (Display the Start menu)
  • Ctrl+Alt+Break (Switch the client computer between a window and a full-screen display)
  • Alt+Delete (Display the Windows menu)
  • Ctrl+Alt+Minus sign (-) (Put a snapshot of the complete client window area on the Terminal server clipboard and provide the same functionality as pressing Alt+Print Screen on a local computer)
  • Ctrl+Alt+Plus sign (+) (Put a snapshot of the active window in the client on the Terminal server clipboard and provide the same functionality as pressing Print Screen on a local computer.) 

Microsoft Internet Explorer navigation


  • Ctrl+B (Open the Organize Favorites dialog box)
  • Ctrl+E (Open the Search bar)
  • Ctrl+F (Start the Find utility)
  • Ctrl+H (Open the History bar)
  • Ctrl+I (Open the Favorites bar)
  • Ctrl+L (Open the Open dialog box)
  • CtrlL+N (Start another instance of the browser with the same web address)
  • Ctrl+O (Open the Open dialog box, the same as CTRL+L)
  • Ctrl+P (Open the Print dialog box)
  • Ctrl+R (Update the current webpage)
  • Ctrl+W (Close the current window) 

Complete list of Windows Keyboard Shorcuts is on Microsoft website

Quitting my job as IT Manager and moving to Further Horizons in Hewlett Packard

Friday, September 13th, 2013

International University College Logo IUC

I haven't blogged for a while for a plenty of reasons, I'm going through a change period in my life and as any change it is not easy.
This post will be not informative and will not teach any of my dear readers, anything on Computers its pretty personal but still for my friends it might cause interest.
Here is my personal life story over the last few months …

For a while I worked in a International University College situated in my hometown Dobrich. I was hired on position of IT Manager, and actually was doing a bit of E-Marketing to try to boost traffic to College's website – www.vumk.eu and mostly helping the old school hacker ad college system administrator over the last 10 yrs – Ertan to fix a bunch of Linux Mail / SQL and Webservers and some Windows machines. In college I learned from Ertan how to install and backups of restaurants software called BARBEQUE as well as how to fix problems with billing terminals situated in College Restaurant (3rd floor of building). Other of my work time I had to  fix infested Windows computers with viruses re-install Windowses and fix various printing and network problems of College's teachers, accountants, cash desk, marketing and rest of college  employees.

Talking about Ertan I should express my sincere tremendous Thanks (Thanks Ertan) to it for recommending me for this job position. Right before I started work in the college I was jobless for a while starting to get desperate that its impossible find work. Current IUC sysadmin – Mr. Ertan Geldiev is a remarkable man and one of the people that made great impression in my mind. Something I found interesting I can learn from Ertan was to get from his cheerful "admin" attitude. As a true hacker Ertan had this hacker attitude of playfulness I myself has for a while lost over the years. So seeing someone like this near my life make me a good favor and had a positive influence on myself.

I have learned a lot from Ertan during the 3 months and 3 days in International University College. Just for a bit of historic information earlier IUC was known as International College – Albena, also among Dobrich citizens known as The Dutch College – as earlier IUC had good relations with Dutch Universities and was issuing double degrees both Bulgarian and Dutch. Nowadays I'm not sure if still Double-degrees partnership between IUC and Dutch Universities exist, what I know for sure is college is issuing European Double Degrees in partnership with Cardiff Metropolitan University. I myself have earlier studied in the college and already know the place well thus will use this post to say a few words on my impressions on it …

International University College - one of top prestigious colleges in Eastern Europe

The college is a great place to be as you have chance to meet plenty of people both lecturers (professors), participate in the various events organized by College's as well as get involved in the many European Projects which are being handled by a European Projects department special department situated on the back of the College Building. Other positive about College is it is small and located on a peaceful town of Dobrich. This gives the bright people a lot of space for personal development, anyways on the other hand it can make you also a bad as Dobrich as a small city is a bit boring. The studies in College are good for students who want personal freedom as there is not too strict requirements for professors on how to teach.

Though college had help me grow, especially in my knowledge in Windows 7 and 8 (Ertan had a really good Windows background), I couldn't have the chance to develop myself too further in the long term. So my job offer to work in HP as Web and Middleware Implementation Engineer opened much broader opportunities for my long term IT career. Other reason I quit the College IT job was simply because I needed more money I had the vision to make a family with a girl from Belarus – Svetlana and in order to take care for her I need to earn good money. My official salary in the college was the funny for the position – 640 lv (though after a few months I was promised to have a raise and earn 400 EUR :)) . Such low sallary was for the reason I had the idea to continue studying in College and complete my Bachelor Business degree and we had agreed with the College CEO Mr. Todor Radev to extract part of my salary monthly and with that to pay my 1 semester tuition fee (2200 EUR) – necessary for my graduation assignment. Though completing the Bachelor is important phase to close in my life for a long time, I found for the moment more valuable to work for HP and earn normal living salary with which to possibly finance myself and create family with woman of my life (hopefully) in the short term.

In this post I want express my sincere thanks to all people in International College (Elena Urchenko, Krasimir – for helping me in my job duties), Pavel and Silvia for being a colleague for a while I worked partly in the Marketing Department.

Talking about Marketing Department what I did there is some Twitter Marketing (building some twitter followers) and wrote a tiny document with recommendation on how to optimize College website – vumk.eu (future version) – for better SEO ranking. This included complete analysis from user outlook to Indexing bots and site current code. 

Mr Docent Phd Todor Radev

I have to do a big underline on how great person the College President and UNI Rector – Docent Todor Radev is. I have already bitter experience studying for a while in a government universities when younger and I know from experience usually Rectors and Universities management of state universities is pure "Hell". Thanks to Mr. Todor Radev for he did me a big favor letting me quit  job just a week later (instead of 1 month as it is officially set by Bulgarian Dismissal Law and explicitly stated in my Work Contract. Also as a person my experience from Docent Radev is wonderful too. He is extremely intelligent, brilliant gentleman and  most importantly open minded and always open for innovation.
 

As a close up I would like to say Big Thanks to everyone which I worked with or met in International University College! Thanks guys for all your support and help, thanks for being work mates and friends for the time.

Linux: Configure Midnight Commander to use mcedit instead of nano or vi text editor

Friday, June 21st, 2013

reverting mc text editor to mcedit fix problem with mcedit not working in linux

I use Midnight Commander console file manager on any UNIX like servers, since my early days as system administrator. mc comes with its own text editor mcedit which is often very handy for reading config files or pieces of source code. Many times I had to modify files which were spitting errors which I couldn't track in VIM, jor or whatever text editor had on server at hand and after checking file with mcedit I caught my config or source code mistake. I guess many other admins has similar nice experiences with mcedit Internal file editor of GNU Midnight Commander. Nowadays, I install mostly Debian Linux on new configured servers and using mc to navigate in file system is very useful. I prefer mc to open files for edit with F4 (Edit – kbd shortcut) with its default mcedit, however for some reasons most of Debian / Ubuntu and other Linuxes, nowadays has set global environment text editor to nano. I totally dislike this text editor and like changing mc always to use mcedit. This is done straight from MC menus by:

Pressing F9 -> Going to Options -> Configuration -> (Setting mark on) -> Use Inernal Edit
/code>

unix terminal file manager midnight commander configuration menu screenshot

linux console file manager midnight commander use internal edit menu unchecked screenshot

<