Posts Tagged ‘cron job’

How to set up Notify by email expiring local UNIX user accounts on Linux / BSD with a bash script

Thursday, August 24th, 2023

password-expiry-linux-tux-logo-script-picture-how-to-notify-if-password-expires-on-unix

If you have already configured Linux Local User Accounts Password Security policies Hardening – Set Password expiry, password quality, limit repatead access attempts, add directionary check, increase logged history command size and you want your configured local user accounts on a Linux / UNIX / BSD system to not expire before the user is reminded that it will be of his benefit to change his password on time, not to completely loose account to his account, then you might use a small script that is just checking the upcoming expiry for a predefined users and emails in an array with lslogins command like you will learn in this article.

The script below is written by a colleague Lachezar Pramatarov (Credit for the script goes to him) in order to solve this annoying expire problem, that we had all the time as me and colleagues often ended up with expired accounts and had to bother to ask for the password reset and even sometimes clearance of account locks. Hopefully this little script will help some other unix legacy admin systems to get rid of the account expire problem.

For the script to work you will need to have a properly configured SMTP (Mail server) with or without a relay to be able to send to the script predefined email addresses that will get notified. 

Here is example of a user whose account is about to expire in a couple of days and who will benefit of getting the Alert that he should hurry up to change his password until it is too late 🙂

[root@linux ~]# date
Thu Aug 24 17:28:18 CEST 2023

[root@server~]# chage -l lachezar
Last password change                                    : May 30, 2023
Password expires                                        : Aug 28, 2023
Password inactive                                       : never
Account expires                                         : never
Minimum number of days between password change          : 0
Maximum number of days between password change          : 90
Number of days of warning before password expires       : 14

Here is the user_passwd_expire.sh that will report the user

# vim  /usr/local/bin/user_passwd_expire.sh

#!/bin/bash

# This script will send warning emails for password expiration 
# on the participants in the following list:
# 20, 15, 10 and 0-7 days before expiration
# ! Script sends expiry Alert only if day is Wednesday – if (( $(date +%u)==3 )); !

# email to send if expiring
alert_email='alerts@pc-freak.net';
# the users that are admins added to belong to this group
admin_group="admins";
notify_email_header_customer_name='Customer Name';

declare -A mails=(
# list below accounts which will receive account expiry emails

# syntax to define uid / email
# [“account_name_from_etc_passwd”]="real_email_addr@fqdn";

#    [“abc”]="abc@fqdn.com"
#    [“cba”]="bca@fqdn.com"
    [“lachezar”]="lachezar.user@gmail.com"
    [“georgi”]="georgi@fqdn-mail.com"
    [“acct3”]="acct3@fqdn-mail.com"
    [“acct4”]="acct4@fqdn-mail.com"
    [“acct5”]="acct5@fqdn-mail.com"
    [“acct6”]="acct6@fqdn-mail.com"
#    [“acct7”]="acct7@fqdn-mail.com"
#    [“acct8”]="acct8@fqdn-mail.com"
#    [“acct9”]="acct9@fqdn-mail.com"
)

declare -A days

while IFS="=" read -r person day ; do
  days[“$person”]="$day"
done < <(lslogins –noheadings -o USER,GROUP,PWD-CHANGE,PWD-WARN,PWD-MIN,PWD-MAX,PWD-EXPIR,LAST-LOGIN,FAILED-LOGIN  –time-format=iso | awk '{print "echo "$1" "$2" "$3" $(((($(date +%s -d \""$3"+90 days\")-$(date +%s)))/86400)) "$5}' | /bin/bash | grep -E " $admin_group " | awk '{print $1 "=" $4}')

#echo ${days[laprext]}
for person in "${!mails[@]}"; do
     echo "$person ${days[$person]}";
     tmp=${days[$person]}

#     echo $tmp
# each person will receive mails only if 20th days / 15th days / 10th days remaining till expiry or if less than 7 days receive alert mail every day

     if  (( (${tmp}==20) || (${tmp}==15) || (${tmp}==10) || ((${tmp}>=0) && (${tmp}<=7)) )); 
     then
         echo "Hello, your password for $(hostname -s) will expire after ${days[$person]} days.” | mail -s “$notify_email_header_customer_name $(hostname -s) server password expiration”  -r passwd_expire ${mails[$person]};
     elif ((${tmp}<0));
     then
#          echo "The password for $person on $(hostname -s) has EXPIRED before{days[$person]} days. Please take an action ASAP.” | mail -s “EXPIRED password of  $person on $(hostname -s)”  -r EXPIRED ${mails[$person]};

# ==3 meaning day is Wednesday the day on which OnCall Person changes

        if (( $(date +%u)==3 ));
        then
             echo "The password for $person on $(hostname -s) has EXPIRED. Please take an action." | mail -s "EXPIRED password of  $person on $(hostname -s)"  -r EXPIRED $alert_email;
        fi
     fi  
done


To make the script notify about expiring user accounts, place the script under some directory lets say /usr/local/bin/user_passwd_expire.sh and make it executable and configure a cron job that will schedule it to run every now and then.

# cat /etc/cron.d/passwd_expire_cron

# /etc/cron.d/pwd_expire
#
# Check password expiration for users
#
# 2023-01-16 LPR
#
02 06 * * * root /usr/local/bin/user_passwd_expire.sh >/dev/null

Script will execute every day morning 06:02 by the cron job and if the day is wednesday (3rd day of week) it will send warning emails for password expiration if 20, 15, 10 days are left before account expires if only 7 days are left until the password of user acct expires, the script will start sending the Alarm every single day for 7th, 6th … 0 day until pwd expires.

If you don't have an expiring accounts and you want to force a specific account to have a expire date you can do it with:

# chage -E 2023-08-30 someuser


Or set it for new created system users with:

# useradd -e 2023-08-30 username


That's it the script will notify you on User PWD expiry.

If you need to for example set a single account to expire 90 days from now (3 months) that is a kind of standard password expiry policy admins use, do it with:

# date -d "90 days" +"%Y-%m-%d"
2023-11-22


Ideas for user_passwd_expire.sh script improvement
 

The downside of the script if you have too many local user accounts is you have to hardcode into it the username and user email_address attached to and that would be tedios task if you have 100+ accounts. 

However it is pretty easy if you already have a multitude of accounts in /etc/passwd that are from UID range to loop over them in a small shell loop and build new array from it. Of course for a solution like this to work you will have to have defined as user data as GECOS with command like chfn.
 

[georgi@server ~]$ chfn
Changing finger information for test.
Name [test]: 
Office []: georgi@fqdn-mail.com
Office Phone []: 
Home Phone []: 

Password: 

[root@server test]# finger georgi
Login: georgi                       Name: georgi
Directory: /home/georgi                   Shell: /bin/bash
Office: georgi@fqdn-mail.com
On since чт авг 24 17:41 (EEST) on :0 from :0 (messages off)
On since чт авг 24 17:43 (EEST) on pts/0 from :0
   2 seconds idle
On since чт авг 24 17:44 (EEST) on pts/1 from :0
   49 minutes 30 seconds idle
On since чт авг 24 18:04 (EEST) on pts/2 from :0
   32 minutes 42 seconds idle
New mail received пт окт 30 17:24 2020 (EET)
     Unread since пт окт 30 17:13 2020 (EET)
No Plan.

Then it should be relatively easy to add the GECOS for multilpe accounts if you have them predefined in a text file for each existing local user account.

Hope this script will help some sysadmin out there, many thanks to Lachezar for allowing me to share the script here.
Enjoy ! 🙂

Linux script to periodically log enabled systemctl services, configured network IPs and routings, server established connections and iptables firewall rules

Tuesday, January 25th, 2022

bash-script-command-line-script-logo

For those who are running some kind of server be it virtual or physical, where multiple people or many systemins have access, sometimes it could be quite a mess as someone due to miscommunication or whatever could change something on the configured Network Ethernet interfaces, or configured routing tables, or simply issue an update which might change the set of automatically set to run systemctl services due to update. Such changes on a Linux server Operating system often can remain unnoticed and could cause quite a harm. Even when the change is noticed the logical question occurs what was the previous network route on the server or what kind of network was configured on Ethernet interface ethX etc. 
Problems like the described where, pretty common in many public Private Clouds or VMWare / XEN based Hypervisors that host multiple  Virtual machines, for that reason I've developed a small script which is pretty dumb on the first glimpse but mostly useful as it keeps historical records of such important information.
 

#!/bin/sh
# script to show configured services on system, configured IPs, netstat state and network routes
# Script to be used during CentOS and Redhat Enterprise Linux RPM package updates with yum

output_file=network_ip_routes_services_status;
ddate=$(date '+%Y-%m-%d_%H-%M-%S');
iptables=$(which iptables);
if [ ! -d /root/logs/ ]; then
mkdir /root/logs/;
fi

echo "STARTED: $(date '+%Y-%m-%d_%H-%M-%S'):" | tee -a /root/logs/$output_file-$(hostname)-$ddate.log
echo -e "# systemctl list-unit-files\n" | tee -a /root/logs/$output_file-$(hostname)-$ddate.log
systemctl list-unit-files –type=service | grep enabled | tee -a /root/logs/$output_file-$(hostname)-$ddate.log
echo -e '# systemctl | grep ".service" | grep "running"\n' | tee -a /root/logs/$output_file-$(hostname)-$ddate.log
systemctl | grep ".service" | grep "running" | tee -a /root/logs/$output_file-$(hostname)-$ddate.log
echo -e "# netstat -tulpn\n" | tee -a /root/logs/$output_file-$(hostname)-$ddate.log
netstat -tulpn | tee -a /root/logs/$output_file-$(hostname)-$ddate.log
echo -e "# netstat -r\n" | tee -a /root/logs/$output_file-$(hostname)-$ddate.log
netstat -r | tee -a /root/logs/$output_file-$(hostname)-$ddate.log
echo -e "# ip a s\n" | tee -a /root/logs/$output_file-$(hostname)-$ddate.log
ip a s | tee -a /root/logs/$output_file-$(hostname)-$ddate.log
echo -e "# /sbin/route -n\n" | tee -a /root/logs/$output_file-$(hostname)-$ddate.log
/sbin/route -n | tee -a /root/logs/$output_file-$(hostname)-$ddate.log
echo -e "# $iptables -L -n\n" | tee -a /root/logs/$output_file-$(hostname)-$ddate.log
echo -e "# $iptables -t nat -L" | tee -a /root/logs/$output_file-$(hostname)-$ddate.log
$iptables -L -n | tee -a /root/logs/$output_file-$(hostname)-$ddate.log
$iptables -t nat -L | tee -a /root/logs/$output_file-$(hostname)-$ddate.log
echo "ENDED $(date '+%Y-%m-%d_%H-%M-%S'):" | tee -a /root/logs/$output_file-$(hostname)-$ddate.log


Script produces its logs inside  /root/logs/network_ip_routes_services_status*hostname*currentdate*.log, put the script inside /root/ or wherever you like.

To keep an eye how network routing or ip configuration or firewall changed or there was a peak with the established connections towards daemons running on host (lets say requiring a machine upgrade), I've set the script to run as usually via cron job at the end of the predefined cron job tasks, like so:

# crontab -u root -e
# periodic dump and log network routing tables, netstat and systemctl list-unit-files
*/1 01 01,25 * * /root/show_running_services_netstat_ips_route1.sh 2>&1 >/dev/null

You can download a copy of show_running_services_netstat_ips_route1.sh script here.
The script is written without much of efficiency on mind, as you can see the with the multiple tee -a and for critical hosts it might be a good idea to rewrite it to use '>>' OPERAND instead, anyhows as most machines today are pretty powerful it doesn't really matter much.

Of course today such a script is quite archaic, as most big corporations are using much more complex monitoring software such as Zabbix, Prometheus or if some kind of Elastic Search is used Kibana etc. but for a basic needs and even for a double checking and comparing with other more advanced monitoring tools  (in case if monitoring tools  database gets damaged or temporary down until backupped), still I think such an oldschool simple monitoring script can be of use.

A good addition to that if you use a central logging server is to set another cron to periodically synchronize produced /root/logs/* to somewhere, here is how to do it with simple rsync (considering your host is configured to login with a user without password with ssh key authentication).

# HOSTNAME=$(hostname); rsync -axHv –ignore-existing -e 'ssh -p 22' /bashscripts/  -q -i –out-format="%t %f %b" –log-file=/var/log/rsync_sync_jobs.log –info=progress2 root@BACKUP_SERVER_HOST:/$(HOSTNAME)-logs/

Once something strange occurs with the machine, like the machine needs to be rebuild

I would be glad to hear if some of my readers uses some useful script which I can adopt myself. Cheers  🙂

Install certbot on Debian, Ubuntu, CentOS, Fedora Linux 10 / Generate and use Apache / Nginx SSL Letsencrypt certificates

Monday, December 21st, 2020

letsencrypt certbot install on any linux distribution with apache or nginx webserver howto</a><p> Let's Encrypt is a free, automated, and open certificate authority brought to you by the nonprofit <a data-cke-saved-href=
Internet Security Research Group (ISRG). ISRG group gave initiative with the goal to "encrypt the internet", i.e. offer free alternative to the overpriced domani registrer sold certificates with the goal to make more people offer SSL / TSL Free secured connection line on their websites. 
ISRG group supported Letsencrypt non-profit certificate authority actrively by Internet industry standard giants such as Mozilla, Cisco, EFF (Electronic Frontier Foundation),  Facebook, Google Chrome, Amazon AWS, OVH Cloud, Redhat, VMWare, Github and many many of the leading companies in IT.

Letsencrpyt is aimed at automating the process designed to overcome manual creation, validation, signing, installation, and renewal of certificates for secure websites. I.e. you don't have to manually write on console complicated openssl command lines with passing on Certificate CSR /  KEY / PEM files etc and generate Self-Signed Untrusted Authority Certificates (noted in my previous article How to generate Self-Signed SSL Certificates with openssl or use similar process to pay money generate secret key and submit the key to third party authority through a their website webadmin  interface in order to Generate SSL brought by Godaddy or Other Certificate Authority.

But of course as you can guess there are downsides as you submit your private key automatically via letsencrypt set of SSL certificate automation domain scripts to a third party Certificate Authority which is at Letsencrypt.org. A security intrusion in their private key store servers might mean a catastrophy for your data as malicious stealer might be able to decrypt your data with some additional effort and see in plain text what is talking to your Apache / Nginx or Mail Server nevertheless the cert. Hence for a high standards such as PCI environments Letsencrypt as well as for the paranoid security freak admins,  who don't trust the mainstream letsencrypt is definitely not a choice. Anyways for most small and midsized businesses who doesn't hold too much of a top secret data and want a moderate level of security Letsencrypt is a great opportunity to try. But enough talk, lets get down to business.

How to install and use certbot on Debian GNU / Linux 10 Buster?
Certbot is not available from the Debian software repositories by default, but it’s possible to configure the buster-backports repository in your /etc/apt/sources.list file to allow you to install a backport of the Certbot software with APT tool.
 

1. Install certbot on Debian / Ubuntu Linux


root@webserver:/etc/apt# tail -n 1 /etc/apt/sources.list
deb http://ftp.debian.org/debian buster-backports main


If not there append the repositories to file:


  • Install certbot-nginx certbot-apache deb packages

root@webserver:/ # echo 'deb http://ftp.debian.org/debian buster-backports main' >> /etc/apt/sources.list


  • Install certbot-nginx certbot-apache deb packages

root@webserver:/ # apt update
root@webserver:/ # apt install certbot python-certbot-nginx python3-certbot-apache python-certbot-nginx-doc


This will install the /usr/bin/certbot python executable script which is used to register / renew / revoke / delete your domains certificates.
 

2. Install letsencrypt certbot client on CentOS / RHEL / Fedora and other Linux Distributions


For RPM based distributions and other Linux distributions you will have to install snap package (if not already installed) and use snap command :


[root@centos ~ :] # yum install snapd
systemctl enable –now snapd.socket

To enable classic snap support, enter the following to create a symbolic link between

[root@centos ~ :] # ln -s /var/lib/snapd/snap /snap

snap command lets you install, configure, refresh and remove snaps.  Snaps are packages that work across many different Linux distributions, enabling secure delivery and operation of the latest apps and utilities.

[root@centos ~ :] # snap install core; sudo snap refresh core

Logout from console or Xsession to make the snap update its $PATH definitions.

Then use snap universal distro certbot classic package

 [root@centos ~ :] # snap install –classic certbot
[root@centos ~ :] # ln -s /snap/bin/certbot /usr/bin/certbot


If you're having an XOrg server access on the RHEL / CentOS via Xming or other type of Xemulator you might check out also the snap-store as it contains a multitude of packages installable which are not usually available in RPM distros.

 [root@centos ~ :] # snap install snap-store


how-to-install-snap-applications-on-centos-rhel-linux-snap-store

snap-store is a powerful and via it you can install many non easily installable stuff on Linux such as eclipse famous development IDE, notepad++ , Discord, the so favourite for the Quality Assurance guy Protocol tester Postman etc.

  • Installing certbot to any distribution via acme.sh script

Another often preferred solution to Universally deploy  and upgrade an existing LetsEncrypt program to any Linux distribution (e.g. RHEL / CentOS / Fedora etc.) is the acme.sh script. To install acme you have to clone the repository and run the script with –install

P.S. If you don't have git installed yet do

root@webserver:/ # apt-get install –yes git


and then the usual git clone to fetch it at your side

# cd /root
# git clone https://github.com/acmesh-official/acme.sh
Cloning into 'acme.sh'…
remote: Enumerating objects: 71, done.
remote: Counting objects: 100% (71/71), done.
remote: Compressing objects: 100% (53/53), done.
remote: Total 12475 (delta 39), reused 38 (delta 18), pack-reused 12404
Receiving objects: 100% (12475/12475), 4.79 MiB | 6.66 MiB/s, done.
Resolving deltas: 100% (7444/7444), done.

# sh acme.sh –install


To later upgrade acme.sh to latest you can do

# sh acme.sh –upgrade


In order to renew a concrete existing letsencrypt certificiate

# sh acme.sh –renew domainname.com


To renew all certificates using acme.sh script

# ./acme.sh –renew-all


3. Generate Apache or NGINX Free SSL / TLS Certificate with certbot tool

Now lets generate a certificate for a domain running on Apache Webserver with a Website WebRoot directory /home/phpdev/public/www


root@webserver:/ # certbot –apache –webroot -w /home/phpdev/public/www/ -d your-domain-name.com -d your-domain-name.com

root@webserver:/ # certbot certonly –webroot -w /home/phpdev/public/www/ -d your-domain-name.com -d other-domain-name.com


As you see all the domains for which you will need to generate are passed on with -d option.

Once certificates are properly generated you can test it in a browser and once you're sure they work as expected usually you can sleep safe for the next 3 months ( 90 days) which is the default for TSL / SSL Letsencrypt certificates the reason behind of course is security.


4. Enable freshly generated letsencrypt SSL certificate in Nginx VirtualHost config

Go to your nginx VirtualHost configuration (i.e. /etc/nginx/sites-enabled/phpmyadmin.adzone.pro ) and inside chunk of config add after location { … } – 443 TCP Port SSL listener (as in shown in bolded configuration)
 

server {

….
   location ~ \.php$ {
      include /etc/nginx/fastcgi_params;
##      fastcgi_pass 127.0.0.1:9000;
      fastcgi_pass unix:/run/php/php7.3-fpm.sock;
      fastcgi_index index.php;
      fastcgi_param SCRIPT_FILENAME /usr/share/phpmyadmin$fastcgi_script_name;
   }


    listen 443 ssl; # managed by Certbot
    ssl_certificate /etc/letsencrypt/live/phpmyadmin.adzone.pro/fullchain.pem; # managed by Certbot
    ssl_certificate_key /etc/letsencrypt/live/phpmyadmin.adzone.pro/privkey.pem; # managed by Certbot
    include /etc/letsencrypt/options-ssl-nginx.conf; # managed by Certbot
    ssl_dhparam /etc/letsencrypt/ssl-dhparams.pem; # managed by Certbot


5. Enable new generated letsencrypt SSL certificate in Apache VirtualHost


In /etc/apache2/{sites-available,sites-enabled}/your-domain.com-ssl.conf you should have as a minimum a configuration setup like below:


NameVirtualHost *:443 <VirtualHost 123.123.123.12:443>
    ServerAdmin hipo@domain.com
    ServerName www.pc-freak.net
    ServerAlias www.your-domain.com wwww.your-domain.com your-domain.com
 
    HostnameLookups off
    DocumentRoot /var/www
    DirectoryIndex index.html index.htm index.php index.html.var


CheckSpelling on
SSLEngine on

    <Directory />
        Options FollowSymLinks
        AllowOverride All
        ##Order allow,deny
        ##allow from all
        Require all granted
    </Directory>
    <Directory /var/www>
        Options Indexes FollowSymLinks MultiViews
        AllowOverride All
##      Order allow,deny
##      allow from all
Require all granted
    </Directory>

Include /etc/letsencrypt/options-ssl-apache.conf
SSLCertificateFile /etc/letsencrypt/live/your-domain.com/fullchain.pem
SSLCertificateKeyFile /etc/letsencrypt/live/your-domain.com/privkey.pem
</VirtualHost>


6. Simulate a certificate regenerate with –dry-run

Soon before the 90 days period expiry approaches, it is a good idea to test how all installed Nginx webserver certficiates will be renewed and whether any issues are expected this can be done with the –dry-run option.

root@webserver:/ # certbot renew –dry-run


– – – – – – – – – – – – – – – – – – – – – – – – – – – – – – – – – – – – – – – –
** DRY RUN: simulating 'certbot renew' close to cert expiry
**          (The test certificates below have not been saved.)

Congratulations, all renewals succeeded. The following certs have been renewed:
  /etc/letsencrypt/live/adzone.pro/fullchain.pem (success)
  /etc/letsencrypt/live/cdn.natsr.pro/fullchain.pem (success)
  /etc/letsencrypt/live/mail.adzone.pro/fullchain.pem (success)
  /etc/letsencrypt/live/natsr.pro-0001/fullchain.pem (success)
  /etc/letsencrypt/live/natsr.pro/fullchain.pem (success)
  /etc/letsencrypt/live/phpmyadmin.adzone.pro/fullchain.pem (success)
  /etc/letsencrypt/live/www.adzone.pro/fullchain.pem (success)
  /etc/letsencrypt/live/www.natsr.pro/fullchain.pem (success)
** DRY RUN: simulating 'certbot renew' close to cert expiry
**          (The test certificates above have not been saved.)
– – – – – – – – – – – – – – – – – – – – – – – – – – – – – – – – – – – – – – – –


7. Renew a certificate from a multiple installed certificate list

In some time when you need to renew letsencrypt domain certificates you can list them and choose manually which one you want to renew.

root@webserver:/ # certbot –force-renewal
Saving debug log to /var/log/letsencrypt/letsencrypt.log

How would you like to authenticate and install certificates?
– – – – – – – – – – – – – – – – – – – – – – – – – – – – – – – – – – – – – – – –
1: Apache Web Server plugin (apache)
2: Nginx Web Server plugin (nginx)
– – – – – – – – – – – – – – – – – – – – – – – – – – – – – – – – – – – – – – – –
Select the appropriate number [1-2] then [enter] (press 'c' to cancel): 2
Plugins selected: Authenticator nginx, Installer nginx

Which names would you like to activate HTTPS for?
– – – – – – – – – – – – – – – – – – – – – – – – – – – – – – – – – – – – – – – –
1: adzone.pro
2: mail.adzone.pro
3: phpmyadmin.adzone.pro
4: www.adzone.pro
5: natsr.pro
6: cdn.natsr.pro
7: www.natsr.pro
– – – – – – – – – – – – – – – – – – – – – – – – – – – – – – – – – – – – – – – –
Select the appropriate numbers separated by commas and/or spaces, or leave input
blank to select all options shown (Enter 'c' to cancel): 3
Renewing an existing certificate
Deploying Certificate to VirtualHost /etc/nginx/sites-enabled/phpmyadmin.adzone.pro

Please choose whether or not to redirect HTTP traffic to HTTPS, removing HTTP access.
– – – – – – – – – – – – – – – – – – – – – – – – – – – – – – – – – – – – – – – –
1: No redirect – Make no further changes to the webserver configuration.
2: Redirect – Make all requests redirect to secure HTTPS access. Choose this for
new sites, or if you're confident your site works on HTTPS. You can undo this
change by editing your web server's configuration.
– – – – – – – – – – – – – – – – – – – – – – – – – – – – – – – – – – – – – – – –
Select the appropriate number [1-2] then [enter] (press 'c' to cancel): 2
Redirecting all traffic on port 80 to ssl in /etc/nginx/sites-enabled/phpmyadmin.adzone.pro

– – – – – – – – – – – – – – – – – – – – – – – – – – – – – – – – – – – – – – – –
Your existing certificate has been successfully renewed, and the new certificate
has been installed.

The new certificate covers the following domains: https://phpmyadmin.adzone.pro

You should test your configuration at:
https://www.ssllabs.com/ssltest/analyze.html?d=phpmyadmin.adzone.pro
– – – – – – – – – – – – – – – – – – – – – – – – – – – – – – – – – – – – – – – –

IMPORTANT NOTES:
 – Congratulations! Your certificate and chain have been saved at:
   /etc/letsencrypt/live/phpmyadmin.adzone.pro/fullchain.pem

   Your key file has been saved at:
   /etc/letsencrypt/live/phpmyadmin.adzone.pro/privkey.pem
   Your cert will expire on 2021-03-21. To obtain a new or tweaked
   version of this certificate in the future, simply run certbot again
   with the "certonly" option. To non-interactively renew *all* of
   your certificates, run "certbot renew"
 – If you like Certbot, please consider supporting our work by:

   Donating to ISRG / Let's Encrypt:   https://letsencrypt.org/donate
   Donating to EFF:                    https://eff.org/donate-le


8. Renew all present SSL certificates

root@webserver:/ # certbot renew

Processing /etc/letsencrypt/renewal/www.natsr.pro.conf
– – – – – – – – – – – – – – – – – – – – – – – – – – – – – – – – – – – – – – – –
Cert not yet due for renewal


– – – – – – – – – – – – – – – – – – – – – – – – – – – – – – – – – – – – – – – –

The following certs are not due for renewal yet:
  /etc/letsencrypt/live/adzone.pro/fullchain.pem expires on 2021-03-01 (skipped)
  /etc/letsencrypt/live/cdn.natsr.pro/fullchain.pem expires on 2021-02-28 (skipped)
  /etc/letsencrypt/live/mail.adzone.pro/fullchain.pem expires on 2021-02-28 (skipped)
  /etc/letsencrypt/live/natsr.pro-0001/fullchain.pem expires on 2021-03-01 (skipped)
  /etc/letsencrypt/live/natsr.pro/fullchain.pem expires on 2021-02-25 (skipped)
  /etc/letsencrypt/live/phpmyadmin.adzone.pro/fullchain.pem expires on 2021-03-21 (skipped)
  /etc/letsencrypt/live/www.adzone.pro/fullchain.pem expires on 2021-02-28 (skipped)
  /etc/letsencrypt/live/www.natsr.pro/fullchain.pem expires on 2021-03-01 (skipped)
No renewals were attempted.
– – – – – – – – – – – – – – – – – – – – – – – – – – – – – – – – – – – – – – – –


9. Renew all existing server certificates from a cron job


The certbot package will install a script under /etc/cron.d/certbot to be run that will attempt every 12 hours however from my experience
often this script is not going to work, the script looks similar to below:

# Upgrade all existing SSL certbot machine certificates


0 */12 * * * root test -x /usr/bin/certbot -a \! -d /run/systemd/system && perl -e 'sleep int(rand(43200))' && certbot -q renew

Another approach to renew all installed certificates if you want to have a specific options and keep log of what happened is using a tiny shell script like this:


10. Auto renew installed SSL / TSL Certbot certificates with a bash loop over all present certificates

#!/bin/sh
# update SSL certificates
# prints from 1 to 104 (according to each certbot generated certificate and triggers rewew and logs what happened to log file
# an ugly hack for certbot certificate renew
for i in $(seq 1 104); do echo "Updating $i SSL Cert" | tee -a /root/certificate-update.log; yes "$i" | certbot –force-renewal | tee -a /root/certificate-update.log 2>&1; sleep 5; done

Note: The seq 1 104 is the range depends on the count of installed SSL certificates you have installed on the machine, that can be seen and set the proper value according to your case when you run one time certbot –force-renewal.
 

Tools to scan a Linux / Unix Web server for Malware and Rootkits / Lynis and ISPProtect – clean Joomla / WordPress and other CMS for malware and malicious scripts and trojan codes

Monday, March 14th, 2016

Linux-BSD-Unix-Rootkit-Malware-XSS-Injection-spammer-scripts-clean-howto-manual

If you have been hacked or have been suspicious that someone has broken up in some of the shared web hosting servers you happent o manage you already probably have tried the server with rkhuter, chroot and unhide tools which gives a general guidance where a server has been compromised

However with the evolution of hacking tools out there and the boom of Web security XSS / CSS / Database injections and PHP scripts vulnerability catching an intruder especially spammers has been becoming more and more hard to achieve.

Just lately a mail server of mine's load avarage increased about 10 times, and the CPU's and HDD I/O load jump over the sky.
I started evaluating the situation to find out what exactly went wrong with the machine, starting with a hardware analysis tools and a physical check up whether all was fine with the hardware Disks / Ram etc. just to find out the machine's hardware was working perfect.
I've also thoroughfully investigated on Logs of Apache, MySQL, TinyProxy and Tor server and bind DNS and DJBDns  which were happily living there for quite some time but didn't found anything strange.

Not on a last place I investigated TOP processes (with top command) and iostat  and realized the CPU high burst lays in exessive Input / Output of Hard Drive. Checking the Qmail Mail server logs and the queue with qmail-qstat was a real surprise for me as on the queue there were about 9800 emails hanging unsent, most of which were obviously a spam, so I realized someone was heavily spamming through the server and started more thoroughfully investigating ending up to a WordPress Blog temp folder (writtable by all system users) which was existing under a Joomla directory infrastructure, so I guess someone got hacked through the Joomla and uploaded the malicious php spammer script to the WordPress blog. I've instantly stopped and first chmod 000 to stop being execuded and after examing deleted view73.php, javascript92.php and index8239.php which were full of PHP values with binary encoded values and one was full of encoded strings which after being decoding were actually the recepient's spammed emails.
BTW, the view*.php javascript*.php and index*.php files were owned by www-data (the user with which Apache was owned), so obviously someone got hacked through some vulnerable joomla or wordpress script (as joomla there was quite obscure version 1.5 – where currently Joomla is at version branch 3.5), hence my guess is the spamming script was uploaded through Joomla XSS vulnerability).

As I was unsure wheteher the scripts were not also mirrored under other subdirectories of Joomla or WP Blog I had to scan further to check whether there are no other scripts infected with malware or trojan spammer codes, webshells, rootkits etc.
And after some investigation, I've actually caught the 3 scripts being mirrored under other webside folders with other numbering on filename view34.php javascript72.php, index8123.php  etc..

I've used 2 tools to scan and catch malware the trojan scripts and make sure no common rootkit is installed on the server.

1. Lynis (to check for rootkits)
2. ISPProtect (Proprietary but superb Website malware scanner with a free trial)

1. Lynis – Universal security auditing tool and rootkit scanner

Lynis is actually the well known rkhunter, I've used earlier to check servers BSD and Linux servers for rootkits.
To have up-to-date version of Lynis, I've installed it from source:
 

cd /tmp
wget https://cisofy.com/files/lynis-2.1.1.tar.gz
tar xvfz lynis-2.1.1.tar.gz
mv lynis /usr/local/
ln -s /usr/local/lynis/lynis /usr/local/bin/lynis


Then to scan the server for rootkits, first I had to update its malware definition database with:
 

lynis update info


Then to actually scan the system:
 

lynis audit system


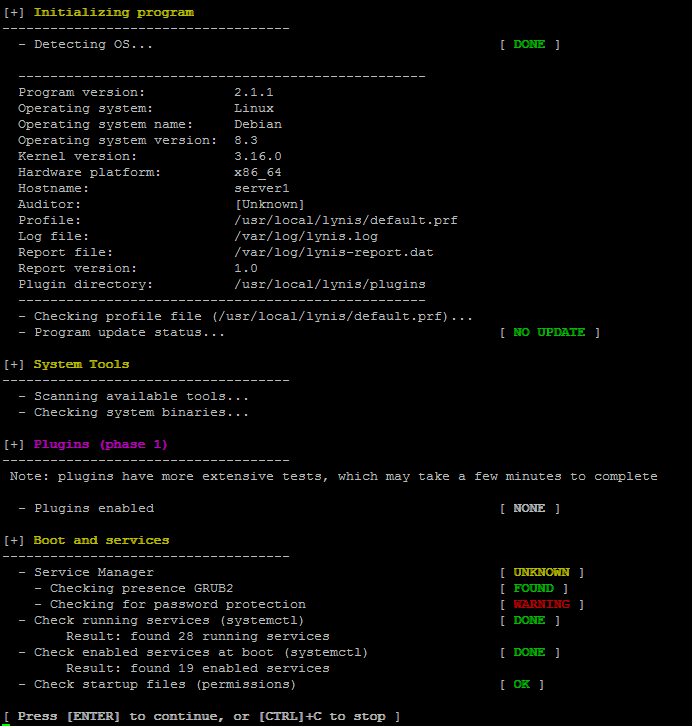
Plenty of things will be scanned but you will be asked on a multiple times whether you would like to conduct different kind fo system services and log files, loadable kernel module rootkits and  common places to check for installed rootkits or server placed backdoors. That's pretty annoying as you will have to press Enter on a multiple times.

lynis-asking-to-scan-for-rootkits-backdoors-and-malware-your-linux-freebsd-netbsd-unix-server

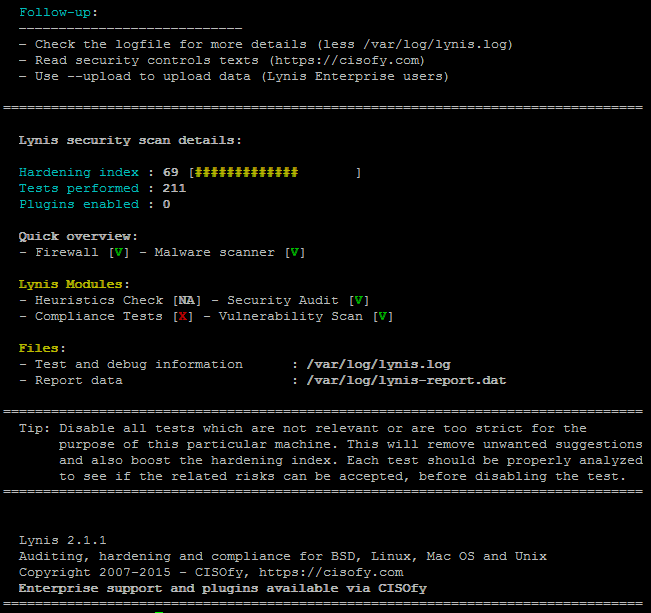
Once scan is over you will get a System Scan Summary like in below screenshot:

lynis-scanned-server-for-rootkit-summer-results-linux-check-for-backdoors-tool

Lynis suggests also a very good things that might be tampered to make the system more secure, so using some of its output when I have time I'll work out on hardening all servers.

To prevent further incidents and keep an eye on servers I've deployed Lynis scan via cron job once a month on all servers, I've placed under a root cronjob on every first dae of month in following command:


server:~# crontab -u root -e
0 3 1 * * /usr/local/bin/lynis –quick 2>&1 | mail -s "lynis output of my server" admin-mail@my-domain.com)


2. ISPProtect – Website malware scanner

ISPProtect is a malware scanner for web servers, I've used it to scan all installed  CMS systems like WordPress, Joomla, Drupal etc.
ISPProtect is great for PHP / Pyhon / Perl and other CMS based frameworks.
ISPProtect contains 3 scanning engines: a signature based malware scanner, a heuristic malware scanner, and a scanner to show the installation directories of outdated CMS systems.
Unfortunately it is not free software, but I personally used the FREE TRIAL option  which can be used without registration to test it or clean an infected system.
I first webserver first locally for the infected site and then globally for all the other shared hosting websites.

As I wanted to check also rest of hosted websites, I've run ISPProtect over the all bunch of installed websites.
Pre-requirement of ISPProtect is to have a working PHP Cli and Clamav Anti-Virus installed on the server thus on RHEL (RPM) based servers make sure you have it installed if not:
 

server:~# yum -y install php

server:~# yum -y install clamav


Debian based Linux servers web hosting  admins that doesn't have php-cli installed should run:
 

server:~# apt-get install php5-cli

server:~# apt-get install clamav


Installing ISPProtect from source is with:

mkdir -p /usr/local/ispprotect
chown -R root:root /usr/local/ispprotect
chmod -R 750 /usr/local/ispprotect
cd /usr/local/ispprotect
wget http://www.ispprotect.com/download/ispp_scan.tar.gz
tar xzf ispp_scan.tar.gz
rm -f ispp_scan.tar.gz
ln -s /usr/local/ispprotect/ispp_scan /usr/local/bin/ispp_scan


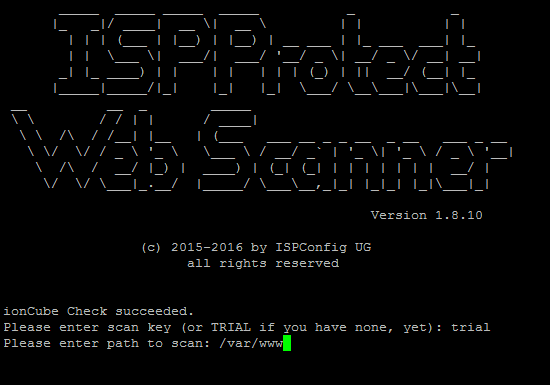
To initiate scan with ISPProtect just invoke it:
 

server:~# /usr/local/bin/ispp_scan


ispprotect-scan-websites-for-malware-and-infected-with-backdoors-or-spamming-software-source-code-files

I've used it as a trial

Please enter scan key:  trial
Please enter path to scan: /var/www

You will be shown the scan progress, be patient because on a multiple shared hosting servers with few hundred of websites.
The tool will take really, really long so you might need to leave it for 1 hr or even more depending on how many source files / CSS / Javascript etc. needs to be scanned.

Once scan is completed scan and infections found logs will be stored under /usr/local/ispprotect, under separate files for different Website Engines and CMSes:

After the scan is completed, you will find the results also in the following files:
 

Malware => /usr/local/ispprotect/found_malware_20161401174626.txt
Wordpress => /usr/local/ispprotect/software_wordpress_20161401174626.txt
Joomla => /usr/local/ispprotect/software_joomla_20161401174626.txt
Drupal => /usr/local/ispprotect/software_drupal_20161401174626.txt
Mediawiki => /usr/local/ispprotect/software_mediawiki_20161401174626.txt
Contao => /usr/local/ispprotect/software_contao_20161401174626.txt
Magentocommerce => /usr/local/ispprotect/software_magentocommerce_20161401174626.txt
Woltlab Burning Board => /usr/local/ispprotect/software_woltlab_burning_board_20161401174626.txt
Cms Made Simple => /usr/local/ispprotect/software_cms_made_simple_20161401174626.txt
Phpmyadmin => /usr/local/ispprotect/software_phpmyadmin_20161401174626.txt
Typo3 => /usr/local/ispprotect/software_typo3_20161401174626.txt
Roundcube => /usr/local/ispprotect/software_roundcube_20161401174626.txt


ISPProtect is really good in results is definitely the best malicious scripts / trojan / trojan / webshell / backdoor / spammer (hacking) scripts tool available so if your company could afford it you better buy a license and settle a periodic cron job scan of all your servers, like lets say:


server:~# crontab -u root -e
0 3  1 * *   /usr/local/ispprotect/ispp_scan –update && /usr/local/ispprotect/ispp_scan –path=/var/www –email-results=admin-email@your-domain.com –non-interactive –scan-key=AAA-BBB-CCC-DDD


Unfortunately ispprotect is quite expensive so I guess most small and middle sized shared hosting companies will be unable to afford it.
But even for a one time run this tools worths the try and will save you an hours if not days of system investigations.
I'll be glad to hear from readers if aware of any available free software alternatives to ISPProtect. The only one I am aware is Linux Malware Detect (LMD).
I've used LMD in the past but as of time of writting this article it doesn't seems working any more so I guess the tool is currently unsupported / obsolete.


No space left on device with free disk space / Why no space left on device while there is plenty of disk space on drive – Running out of Inodes

Tuesday, November 17th, 2015

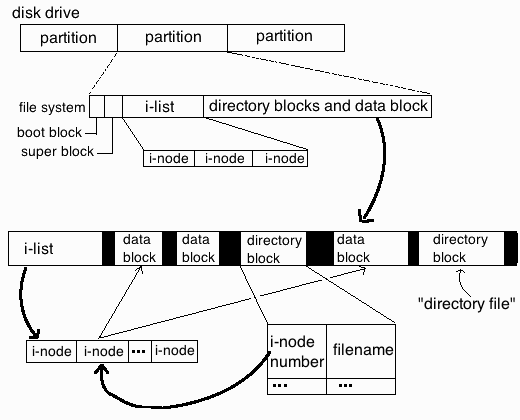
no_space_left-on-device-while-there-is-disk-space-running-out-of-file-inodes-unix_linux_file_system_diagram.gif


On one of the servers, I'm administrating the websites started showing some Mysql database table corrup errors like:


Table './database_name/site_news_list_com' is marked as crashed and last (automatic?) repair failed

The server is using Oracle MySQL server community stable edition on Debian GNU / Linux 6.0, so I first thought during work the server crashed either due to some bug issue in MySQL or it crashed due to some PHP cron job that did something messy. Thus to solve the crashed tables, tried using mysqlcheck tool which helped pretty fine, at many times whether there were database / table corruptions. I've run the following set of mysqlcheck commands with root (superuser) in a bash shell after logging in through SSH:

:

server:~# /usr/bin/mysqlcheck –defaults-extra-file=/etc/mysql/debian.cnf \–check –all-databases -u root -p`grep -i password /root/.my.cnf |sed -e 's#password=##g'`>> /var/log/cronwork.log
server:~# /usr/bin/mysqlcheck –defaults-extra-file=/etc/mysql/debian.cnf –analyze –all-databases -u root -p`grep -i password /root/.my.cnf |sed -e 's#password=##g'`>> /var/log/cronwork.log
server:~# /usr/bin/mysqlcheck –defaults-extra-file=/etc/mysql/debian.cnf \–auto-repair –optimize –all-databases -u root -p`grep -i password /root/.my.cnf |sed -e 's#password=##g'`>> /var/log/cronwork.log
server:~# /usr/bin/mysqlcheck –defaults-extra-file=/etc/mysql/debian.cnf \–optimize –all-databases -u root -p`grep -i password /root/.my.cnf |sed -e 's#password=##g'`>> /var/log/cronwork.log


In order for above commands to work, I've created the /root/.my.cnf containing my root (mysql CLI) mysql username and password, e.g. file has content like below:


[client]
user=root
password=MySecretPassword8821238


Btw a good note here is its generally a good idea (if you want to have consistent mysql databases) to automatically execute via a cron job 2 times a month, I've in root cronjob the following:


crontab -u root -l |grep -i mysqlcheck
04 06 5,10,15,20,25,1 * * /usr/bin/mysqlcheck –defaults-extra-file=/etc/mysql/debian.cnf \–check –all-databases –silent -u root -p`grep -i password /root/.my.cnf |sed -e 's#password=##g'`>> /var/log/cronwork.log 07 06 5,10,15,20,25,1 * * /usr/bin/mysqlcheck –defaults-extra-file=/etc/mysql/debian.cnf –analyze –all-databases –silent -u root -p`grep -i password /root/.my.cnf |sed -e 's#password=##g'`>> /var/log/cronwork.log 12 06 5,10,15,20,25,1 * * /usr/bin/mysqlcheck –defaults-extra-file=/etc/mysql/debian.cnf \–auto-repair –optimize –all-databases –silent -u root -p`grep -i password /root/.my.cnf |sed -e 's#password=##g'`>> /var/log/cronwork.log 17 06 5,10,15,20,25,1 * * /usr/bin/mysqlcheck –defaults-extra-file=/etc/mysql/debian.cnf \–optimize –all-databases –silent -u root -p`grep -i password /root/.my.cnf |sed -e 's#password=##g'`>> /var/log/cronwork.log


Strangely I got a lot of errors that some .MYI / .MYD .frm temp files, necessery for the mysql tables recovery can't be written inside /home/mysql/database_name

That was pretty weird and I thought there might be some issues with permissions, causing the inability to write, due to some bug or something so I went straight and checked /home/mysql/database_name permissions, e.g.::


server:/home/mysql/database_name# ls -ld soccerfame
drwx—— 2 mysql mysql 36864 Nov 17 12:00 soccerfame
server:/home/mysql/database_name# ls -al1|head -n 10
total 1979012
drwx—— 2 mysql mysql 36864 Nov 17 12:00 .
drwx—— 36 mysql mysql 4096 Nov 17 11:12 ..
-rw-rw—- 1 mysql mysql 8712 Nov 17 10:26 1_campaigns_diez.frm
-rw-rw—- 1 mysql mysql 14672 Jul 8 18:57 1_campaigns_diez.MYD
-rw-rw—- 1 mysql mysql 1024 Nov 17 11:38 1_campaigns_diez.MYI
-rw-rw—- 1 mysql mysql 8938 Nov 17 10:26 1_campaigns.frm
-rw-rw—- 1 mysql mysql 8738 Nov 17 10:26 1_campaigns_logs.frm
-rw-rw—- 1 mysql mysql 883404 Nov 16 22:01 1_campaigns_logs.MYD
-rw-rw—- 1 mysql mysql 330752 Nov 17 11:38 1_campaigns_logs.MYI


As seen from above output, all was perfect with permissions, so it should have been something else, so I decided to try to create a random file with touch command inside /home/mysql/database_name directory:


touch /home/mysql/database_name/somefile-to-test-writtability.txt touch: cannot touch ‘/scr1/data/somefile-to-test-writtability.txt‘: No space left on device


Then logically I thought the /home/mysql/ mounted ext4 partition got filled, because of crashed SQL database or a bug thus, checked with disk free command df whether there is enough space on server:

server:~# df -h
Filesystem Size Used Avail Use% Mounted on
/dev/md1 20G 7.6G 11G 42% /
udev 10M 0 10M 0% /dev
tmpfs 13G 1.3G 12G 10% /run
tmpfs 32G 0 32G 0% /dev/shm
tmpfs 5.0M 0 5.0M 0% /run/lock
tmpfs 32G 0 32G 0% /sys/fs/cgroup
/dev/md2 256G 134G 110G 55% /home

Well that's weird? Obviously only 55% of available disk space is used and available 134G which was more than enough so I got totally puzzled why, files can't be written.

Then very logically, I thought it might be that /home directory has remounted as read only, because the SSD memory disk on server is failing and checked for errors in dmesg, i.e.:


server:~# dmesg|grep -i error


Also checked how exactly was partition mounted, to check whether it is (RO) read-only:


server:~# mount -l|grep -i /home
/dev/md2 on /home type ext4 (rw,relatime,discard,data=ordered)


Now everything become even more weirder, as obviously the disk continued to be claiming no space left on device, while in reality there was plenty of disk space.

Then after running a quick research on the internet for the no space left on device with free disk space, I've come across this great superuser.com thread which let me realize the partition run out of inodes and that's why no new file inodes could be assigned and therefore, the linux kernel is refusing to write the file on ext4 partition.

For those who haven't heard of Linux Partition Inodes here is link to Wikipedia and a quick quote:


In a Unix-style file system, the inode is a data structure used to represent a filesystem object, which can be one of various things including a file or a directory. Each inode stores the attributes and disk block location(s) of the filesystem object's data.[1] Filesystem object attributes may include manipulation metadata (e.g. change,[2] access, modify time), as well as owner and permission data (e.g. group-id, user-id, permissions).[3]
Directories are lists of names assigned to inodes. The directory contains an entry for itself, its parent, and each of its children.


Once I understood it is the inodes, I checked how many of them are occupied with cmd:


server:~# df -i /home
Filesystem Inodes IUsed IFree IUse% Mounted on
/dev/md2 17006592 17006592 0 100% /home


You see, there were 0 (zero) free file inodes on server and that was the reason for no space left on device while there was actually free disk space

To clean up (free) some inodes on partition, first thing I did is to delete all old logs which were inside /home and files I positively know not to be necessery, then to find which directories allocating most innodes used:


server:~# find . -xdev -type f | cut -d "/" -f 2 | sort | uniq -c | sort -n


If you're on a regular old fashined IDE Hard Drive and not SSD or you have too much files inside this command will take really long …:

Therefore a better solution might be to frist:

a) Try to find root folders with large inodes count:

for i in /home/*; do echo $i; find $i |wc -l; done
Try to find specific folders:


You should get output like:


/home/new_website
606692
/home/common
73
/home/pcfreak
5661
/home/hipo
33
/home/blog
13570
/home/log
123
/home/lost+found
1

b) Then once you know the directory allocating most inodes, run the command again to see the sub-directories with most files (eating) partition innodes:


for i in /home/webservice/*; do echo $i; find $i |wc -l; done


One usual large folder which could free you some nodes is the linux source headers, but in my case it was simply a lot of tiny old logs being logged on the system for few years in the past without cleaning:

After deleting the log dirs and cache folder in my case /home/new_website/{log,cache}:

server:~# rm -rf /home/new_website/log/*
server:~# rm -rf /home/new_website/cache/*


a) Then, stopping Apache webserver to check prevent Apache to use MySQl databases while running database repair and restaring MySQL:
 

server:~# /etc/init.d/apache2 stop Restarting MySQL server
..
server:~# /etc/init.d/mysql restart
..


b) And re-issuing MySQL Check / Repair / Optimize database commands:


mysqlcheck –defaults-extra-file=/etc/mysql/debian.cnf \–check –all-databases -u root -p`grep -i password /root/.my.cnf |sed -e 's#password=##g'`>> /var/log/cronwork.log

mysqlcheck –defaults-extra-file=/etc/mysql/debian.cnf –analyze –all-databases -u root -p`grep -i password /root/.my.cnf |sed -e 's#password=##g'`>> /var/log/cronwork.log

mysqlcheck –defaults-extra-file=/etc/mysql/debian.cnf \–auto-repair –optimize –all-databases -u root -p`grep -i password /root/.my.cnf |sed -e 's#password=##g'`>> /var/log/cronwork.log

mysqlcheck –defaults-extra-file=/etc/mysql/debian.cnf \–optimize –all-databases -u root -p`grep -i password /root/.my.cnf |sed -e 's#password=##g'`>> /var/log/cronwork.log

c) And finally starting the Apache Webserver again:
 

server:~# /etc/init.d/apache2 start


Some innodse got freed up:
 

server:~# df -i /home Filesystem Inodes IUsed IFree IUse% Mounted on
/dev/md2 17006592 16797196 209396 99% /home


And hooray by God's Grace and with help of prayers of The most Holy Theotokos (Virgin) Mary, websites started again !

Auto restart Apache on High server load (bash shell script) – Fixing Apache server temporal overload issues

Saturday, March 24th, 2012

auto-restart-apache-on-high-load-bash-shell-script-fixing-apache-temporal-overload-issues

I've written a tiny script to check and restart, Apache if the server encounters, extremely high load avarage like for instance more than (>25). Below is an example of a server reaching a very high load avarage:;

server~:# uptime
13:46:59 up 2 days, 18:54, 1 user, load average: 58.09, 59.08, 60.05
load average: 0.09, 0.08, 0.08

Sometimes high load avarage is not a problem, as the server might have a very powerful hardware. A high load numbers is not always an indicator for a serious problems. Some 16 CPU dual core (2.18 Ghz) machine with 16GB of ram could probably work normally with a high load avarage like in the example. Anyhow as most servers are not so powerful having such a high load avarage, makes the machine hardly do its job routine.

In my specific, case one of our Debian Linux servers is periodically reaching to a very high load level numbers. When this happens the Apache webserver is often incapable to serve its incoming requests and starts lagging for clients. The only work-around is to stop the Apache server for a couple of seconds (10 or 20 seconds) and then start it again once the load avarage has dropped to less than "3".

If this temporary fix is not applied on time, the server load gets increased exponentially until all the server services (ssh, ftp … whatever) stop responding normally to requests and the server completely hangs …

Often this server overloads, are occuring at night time so I'm not logged in on the server and one such unexpected overload makes the server unreachable for hours.
To get around the sudden high periodic load avarage server increase, I've written a tiny bash script to monitor, the server load avarage and initiate an Apache server stop and start with a few seconds delay in between.

#!/bin/sh
# script to check server for extremely high load and restart Apache if the condition is matched
check=`cat /proc/loadavg | sed 's/\./ /' | awk '{print $1}'`
# define max load avarage when script is triggered
max_load='25'
# log file
high_load_log='/var/log/apache_high_load_restart.log';
# location of inidex.php to overwrite with temporary message
index_php_loc='/home/site/www/index.php';
# location to Apache init script
apache_init='/etc/init.d/apache2';
#
site_maintenance_msg="Site Maintenance in progress - We will be back online in a minute";
if [ $check -gt "$max_load" ]; then>
#25 is load average on 5 minutes
cp -rpf $index_php_loc $index_php_loc.bak_ap
echo "$site_maintenance_msg" > $index_php_loc
sleep 15;
if [ $check -gt "$max_load" ]; then
$apache_init stop
sleep 5;
$apache_init restart
echo "$(date) : Apache Restart due to excessive load | $check |" >> $high_load_log;
cp -rpf $index_php_loc.bak_ap $index_php_loc
fi
fi

The idea of the script is partially based on a forum thread – Auto Restart Apache on High Loadhttp://www.webhostingtalk.com/showthread.php?t=971304Here is a link to my restart_apache_on_high_load.sh script

The script is written in a way that it makes two "if" condition check ups, to assure 100% there is a constant high load avarage and not just a temporal 5 seconds load avarage jump. Once the first if is matched, the script first tries to reduce the server load by overwritting a the index.php, index.html script of the website with a one stating the server is ongoing a maintenance operations.
Temporary stopping the index page, often reduces the load in 10 seconds of time, so the second if case is not necessery at all. Sometimes, however this first "if" condition cannot decrease enough the load and the server load continues to stay too high, then the script second if comes to play and makes apache to be completely stopped via Apache init script do 2 secs delay and launch the apache server again.

The script also logs about, the load avarage encountered, while the server was overloaded and Apache webserver was restarted, so later I can check what time the server overload occured.
To make the script periodically run, I've scheduled the script to launch every 5 minutes as a cron job with the following cron:

# restart Apache if load is higher than 25
*/5 * * * * /usr/sbin/restart_apache_on_high_load.sh >/dev/null 2>&1

I have also another system which is running FreeBSD 7_2, which is having the same overload server problems as with the Linux host.
Copying the auto restart apache on high load script on FreeBSD didn't work out of the box. So I rewrote a little chunk of the script to make it running on the FreeBSD host. Hence, if you would like to auto restart Apache or any other service on FreeBSD server get /usr/sbin/restart_apache_on_high_load_freebsd.sh my script and set it on cron on your BSD.

This script is just a temporary work around, however as its obvious that the frequency of the high overload will be rising with time and we will need to buy new server hardware to solve permanently the issues, anyways, until this happens the script does a great job 🙂

I'm aware there is also alternative way to auto restart Apache webserver on high server loads through using monit utility for monitoring services on a Unix system. However as I didn't wanted to bother to run extra services in the background I decided to rather use the up presented script.

Interesting info to know is Apache module mod_overload exists – which can be used for checking load average. Using this module once load avarage is over a certain number apache can stop in its preforked processes current serving request, I've never tested it myself so I don't know how usable it is. As of time of writting it is in early stage version 0.2.2
If someone, have tried it and is happy with it on a busy hosting servers, please share with me if it is stable enough?

Updating Flash Player on Debian GNU / Linux / Keeping Flash player up-to-date with update-flashplugin-nonfree

Saturday, November 10th, 2012


Update flash player on Debian GNU / Linux update-flashplugin-nonfree macromedia flash logo

Assuming you have previously installed and running Adobe Flash Player – package flashplugin-nonfree i.e.:

debian:~# dpkg -l |grep -i flashplugin-nonfree
ii flashplugin-nonfree 1:2.8.3 Adobe Flash Player - browser plugin

and you want to Update flash player to the latest provided version for Linux, there is an update script part of flashplugin-nonfree, package /usr/sbin/update-flashplugin-nonfree. The script updates flash player to latest Linux version avaiable fetching the version from macromedia's website in a .tar.gz and untarring it substituting the old flash library.

To update your Debian FlashPlayer, launch as superuser:

debian:~# update-flashplugin-nonfree --install
--2012-11-10 00:51:48-- http://fpdownload.macromedia.com/get/flashplayer/pdc/11.2.202.251/install_flash_player_11_linux_x86_64.tar.gz Resolving fpdownload.macromedia.com... 92.123.98.70 Connecting to fpdownload.macromedia.com|92.123.98.70|:80... connected. HTTP request sent, awaiting response... 200 OK Length: 7228964 (6.9M) [application/x-gzip] Saving to: “./install_flash_player_11_linux_x86_64.tar.gz”

0K .......... .......... .......... ..........
.......... 0% 69.5K 1m41s 50K .......... .......... .......... ..........
.......... 1% 91.1K 88s 100K .......... .......... .......... ..........
.......... 2% 70.8K 91s ........
..........

After a while (usually up to a minute), update will be completed. Restart your browser of use IceWeasel, Epiphany, Opera, Chrome etc. and test it with About Flash Player Page and / or youtube. You should be with latest Flash Linux version now.

It might be a good idea to automate future flash player updates via a cron job, I think launching the update script every two weeks is a good timing;

To do so add to root user cron like so:

10,27 * * * * /usr/sbin/update-flashplugin-nonfree –install -q 2>&1 >/dev/null

If you still haven't configured your pulseaudio to play multiple sound streams do that too.

I've seen also on Debian's Wiki FlashPlayer page, mentioning that on some systems after update to Flash Player 11 there might be laggy performance issues, due to disabled hardware acceleration in Flash Player > v. 10. If that's the case with you you might also need to put a mss.cfg like this one to /etc/adobe/mss.cfg

# wget -q https://www.pc-freak.net/files/adobe-flash-player-config-for-hardware-acceleration-mms.cfg
# mv adobe-flash-player-config-for-hardware-acceleration-mms.cfg /etc/adobe/mms.cfg

Finally if you experience, some flash video lagging issues, you could try experimenting with OverrideGPUValidation=true flash setting which in some cases improves Linux flash video performance

Firefox users might be also interested to check out www.mozilla.org/en-US/plugincheck – the URL provides information on essential Firefox video plugins and whether plugins installed are up2date or prone to remote web exploitation vulnerability.

How to add cron jobs from command line or bash scripts / Add crontab jobs in a script

Saturday, July 9th, 2011

I’m currently writting a script which is supposed to be adding new crontab jobs and do a bunch of other mambo jambo.

By so far I’ve been aware of only one way to add a cronjob non-interactively like so:

                  linux:~# echo '*/5 * * * * /root/myscript.sh' | crontab -

Though using the | crontab – would work it has one major pitfall, I did completely forgot | crontab – OVERWRITES CURRENT CRONTAB! with the crontab passed by with the echo command.
One must be extremely careful if he decides to use the above example as you might loose your crontab definitions permanently!

Thanksfully it seems there is another way to add crontabs non interactively via a script, as I couldn’t find any good blog which explained something different from the classical example with pipe to crontab –, I dropped by in the good old irc.freenode.net to consult the bash gurus there 😉

So I entered irc and asked the question how can I add a crontab via bash shell script without overwritting my old existing crontab definitions less than a minute later one guy with a nickname geirha was kind enough to explain me how to get around the annoying overwridding.

The solution to the ovewrite was expected, first you use crontab to dump current crontab lines to a file and then you append the new cron job as a new record in the file and finally you ask the crontab program to read and insert the crontab definitions from the newly created files.
So here is the exact code one could run inside a script to include new crontab jobs, next to the already present ones:

linux:~# crontab -l > file; echo '*/5 * * * * /root/myscript.sh >/dev/null 2>&1' >> file; crontab file

The above definition as you could read would make the new record of */5 * * * * /root/myscript.sh >/dev/null be added next to the existing crontab scheduled jobs.

Now I’ll continue with my scripting, in the mean time I hope this will be of use to someone out there 😉