Posts Tagged ‘ERROR’

How to make 27 inch monitor to work on 2560×1440 with Virtualbox Linux

Wednesday, October 4th, 2023

make-virtualbox-with-linux-work-on-2k-2560x1440-howto

I've bought a new "second hand" refurbished EIZO Flexscan Monitor EV2760 S1 K1 awesome monitor re from Kvant Serviz a company reseller of Second Hand electronics that is located on the territy of Bulgarian Academy of Sciences (BAN / BAS) and was created by BAS people originally for the BAS people and am pretty happy with it for doing my daily job as system administrator, especially as the monitor has been used on very short screen time for only 256 use hours (which is less than a year of full-use time), whether EIZO does guarantee their monitors to be able to serve up to 5 Full years monitor use time.

For those who deals with Graphics such as Designers and people into art working with Computers knows EIZO brand Monitors for quite some time now and it seems as much of those people are using Windows or Macintoshes, these monitors have been mainly created to work optimally with Windows / Mac computers on a higher resolution.
My work PC that is Dell Latitude 5510 with its HDMI cable has been running perfect with The EIZO with Windows 10, however as I'm using a Virtualbox virutal machines with CentOS Linux, the VM does not automatically detected the highest resolution 2K that this monitors supports 2560×1440 at 60 Hz is the best one can use to get more things fit into the screen and hopefully also good for the Eyes, the Ecoview shoulk also be a good idea for the eyes, as the Ecoview by EIZO tries to adjust the monitor brightness to lower levels according to the light in the room to try to minimize the eye strain on the eyes. The Ecoview mode is a little bit I guess like the famous BENQ's monitors Eye care. 
I'm talking about all this Displays specifics as I spend quite a lot of time to learn the very basics about monitors as my old old 24 Inch EIZO Monitor Flexscan model 2436W started to wear off with time and doesn't support HDMI cable input, so I had to use a special. cable connector that modifies the signal from HDMI to DVI (and I'm not sure how this really effects the eyes), plus the DVI quality is said to be a little bit worse than HDMI as far as I read a bit on the topic online.

Well anyways currently I'm a happy owner of the EIZO EV2760 Monitor which has a full set of inputs of:

  • 27" In-Plane Switching (IPS) Panel
  • DisplayPort | HDMI | DVI-D | 3.5mm Audio
  • 2560 x 1440 Native Resolution
  • 1000:1 Typical Contrast Ratio
     

I've tried to make the monitor work with Linux and my first assumption from what I've read was that I have to reinstall the Guess Addition Tools on the Virtualbox with additing the Guest Addition Tools via the Vbox GUI interface:

Devices -> Insert Guest Additions CD Image
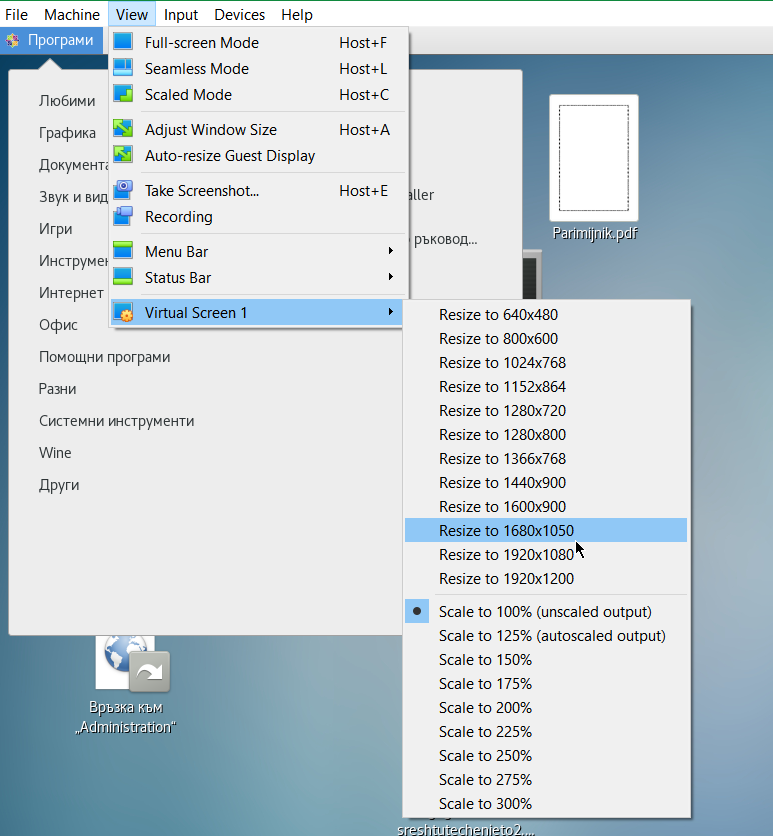
virtualbox-resolutions-screenshot

But got an error that the Guest additions tools iso is missing
So eventually resolved it by remounting and reinstalling the guest addition tools with the following set of commands:

[root@localhost test]# yum install perl gcc dkms kernel-devel kernel-headers make bzip2
[root@localhost test]# cd /mnt/cdrom/
[root@localhost cdrom]# ls
AUTORUN.INF  runasroot.sh                       VBoxSolarisAdditions.pkg
autorun.sh   TRANS.TBL                          VBoxWindowsAdditions-amd64.exe
cert         VBoxDarwinAdditions.pkg            VBoxWindowsAdditions.exe
NT3x         VBoxDarwinAdditionsUninstall.tool  VBoxWindowsAdditions-x86.exe
OS2          VBoxLinuxAdditions.run


[root@localhost cdrom]# ./VBoxLinuxAdditions.run 

Verifying archive integrity… All good.
Uncompressing VirtualBox 6.1.34 Guest Additions for Linux……..
VirtualBox Guest Additions installer
Removing installed version 6.1.34 of VirtualBox Guest Additions…
Copying additional installer modules …
Installing additional modules …
VirtualBox Guest Additions: Starting.
VirtualBox Guest Additions: Building the VirtualBox Guest Additions kernel
modules.  This may take a while.
VirtualBox Guest Additions: To build modules for other installed kernels, run
VirtualBox Guest Additions:   /sbin/rcvboxadd quicksetup <version>
VirtualBox Guest Additions: or
VirtualBox Guest Additions:   /sbin/rcvboxadd quicksetup all
VirtualBox Guest Additions: Building the modules for kernel
3.10.0-1160.80.1.el7.x86_64.
ERROR: Can't map '//etc/selinux/targeted/policy/policy.31':  Invalid argument

ERROR: Unable to open policy //etc/selinux/targeted/policy/policy.31.
libsemanage.semanage_read_policydb: Error while reading kernel policy from /etc/selinux/targeted/active/policy.kern. (No such file or directory).
OSError: No such file or directory
VirtualBox Guest Additions: Running kernel modules will not be replaced until
the system is restarted


The solution to that was to reinstal the security policy-target was necessery

[root@localhost test]# yum install selinux-policy-targeted –reinstall


And of course rerun the reinstall of Guest addition tools up to the latest

[root@localhost cdrom]# ./VBoxLinuxAdditions.run 

Unfortunately that doesn't make it resolve it and even shutting down the VM machine and reloading it again with Raised Video Memory for the simulated hardware from settings from 16 MB to 128MB for the VM does not give the option from the Virtualbox interface to set the resolution from
 

View -> Virtual Screen 1 (Resize to 1920×1200)

to any higher than that.

After a bit of googling I found some newer monitors doesn't seem to be seen by xrandr command and few extra commands with xrandr need to be run to make the 2K resolution 2560×1440@60 Herzes work under the Linux virtual machine.

These are the extra xranrd command that make it happen

# xrandr –newmode "2560x1440_60.00" 311.83  2560 2744 3024 3488  1440 1441 1444 1490  -HSync +Vsync
# xrandr –addmode Virtual1 2560x1440_60.00
# xrandr –output Virtual1 –mode "2560x1440_60.00"

As this kind of settings needs to be rerun on next time the Virtual Machine runs it is a good idea to place the commands in a tiny shell script:

[test@localhost ~]$ cat xrandr-set-resolution-to-2560×1440.sh 
#!/bin/bash
xrandr –newmode "2560x1440_60.00" 311.83  2560 2744 3024 3488  1440 1441 1444 1490  -HSync +Vsync
xrandr –addmode Virtual1 2560x1440_60.00
xrandr –output Virtual1 –mode "2560x1440_60.00"


You can Download  the xrandr-set-resolution-to-2560×1440.sh script from here

Once the commands are run, to make it affect the Virtualbox, you can simply put it in FullScreen mode via


View -> Full-Screen Mode (can be teriggered from keyboard by pressing Right CTRL + F) together

[test@localhost ~]$ xrandr –addmode Virtual1 2560x1440_60.00
[test@localhost ~]$ xrandr –output Virtual1 –mode "2560x1440_60.00"
[test@localhost ~]$ xrandr 
Screen 0: minimum 1 x 1, current 2560 x 1440, maximum 8192 x 8192
Virtual1 connected primary 2560×1440+0+0 (normal left inverted right x axis y axis) 0mm x 0mm
   1920×1200     60.00 +  59.88  
   2560×1600     59.99  
   1920×1440     60.00  
   1856×1392     60.00  
   1792×1344     60.00  
   1600×1200     60.00  
   1680×1050     59.95  
   1400×1050     59.98  
   1280×1024     60.02  
   1440×900      59.89  
   1280×960      60.00  
   1360×768      60.02  
   1280×800      59.81  
   1152×864      75.00  
   1280×768      59.87  
   1024×768      60.00  
   800×600       60.32  
   640×480       59.94  
   2560x1440_60.00  60.00* 
Virtual2 disconnected (normal left inverted right x axis y axis)
Virtual3 disconnected (normal left inverted right x axis y axis)
Virtual4 disconnected (normal left inverted right x axis y axis)
Virtual5 disconnected (normal left inverted right x axis y axis)
Virtual6 disconnected (normal left inverted right x axis y axis)
Virtual7 disconnected (normal left inverted right x axis y axis)
Virtual8 disconnected (normal left inverted right x axis y axis)

Tadadadam ! That's all folks, enjoy having your 27 Inch monitor running at 2560×1440 @ 60 Hz 🙂


Linux “bash: mail: command not found” error fix – Installing mail cli on Fedora, Debian, CentOS, Ubuntu

Friday, September 7th, 2018

bash-mail-command-not-found-error-fix-linux-installing-bsd-mailx-linux-fedora-debian-centos

If you just hired a cheap VPS with some kind of Linux OS installed or just installed a home Linux test system environment inside a Virtual Machine (such as VirtualBox) on your notebook and you want to read system email reports delivered by services (e.g. track possible errors with the OS) or simply test whether Email relaying is configured properly

and you end up with shell error:

bash: mail: command not found

because mail command is missing and you wonder what Linux package you have to install in order to have the lovely mail / mailx command back on the OS … this article will help you how you can easily solve it by installing the mailx binary file (e.g. install the package providing it depending on the Linux Distribution Operating System you face the problem on.

1.  Install mailx command on Debian / Ubuntu / Mint and other .deb based Linux
 

root@linux:~# apt-get install –yes bsd-mailx


An alternative way to install the mailx system binary is to install  mailutils package

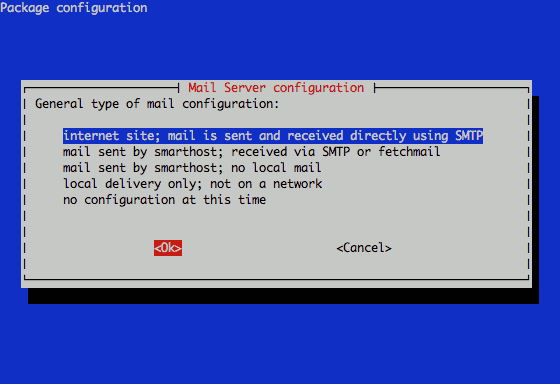
which will set up the system with essential mail related programs and set up a light Exim MTA and common server Email surrounding  so you can easily configure default installed Exim Mail Server to serve as an SMTP relay (through dpkg-reconfigure exim4-config) command


root@linux~:# apt-get install mailutils
Reading package lists… Done
Building dependency tree       
Reading state information… Done
The following additional packages will be installed:
  exim4-base exim4-config exim4-daemon-light guile-2.0-libs libgsasl7
  libkyotocabinet16v5 libmailutils5 libmariadbclient18 libntlm0
  mailutils-common mysql-common
Suggested packages:
  eximon4 exim4-doc-html | exim4-doc-info spf-tools-perl swaks mailutils-mh
  mailutils-doc
The following NEW packages will be installed:
  exim4-base exim4-config exim4-daemon-light guile-2.0-libs libgsasl7
  libkyotocabinet16v5 libmailutils5 libmariadbclient18 libntlm0 mailutils


root@linux:~# dpkg-reconfigure exim4-config


dpkg-reconfigure-exim4-config-debian-linux-exim4-email-server-screenshot

2. Install mailx Linux command on Fedora / CentOS / RHEL e.g. Redhat based distros


On RPM based distrubutions the package name is different from debians to install it there you have to fetch and install current distro mailx .rpm

To install mail command on older CentOS / Redhat 7/6/5 distributions


[root@centos:~]# yum install -y mailx


On Fedora 22+ version yum auto-dependency tool was substituted with dnf:


[root@fedora:~]# dnf install -y mailx


3. Send Test Email with mail command


root@linux:~# echo "Sample Message Body" | mail -s "Whatever … Message Subject" remote_receiver@remote-server-email-address.com


Check the mailbox, you just sent the sample email, hopefully if MTA is relaying correctly and the SMTP relay is properly delivering the email should be at the recipient address.

Allowing MySQL users access from all hosts – Fixing mysql ERROR 1045 (28000): Access denied for user ‘root’@’remote-admin.com’ (using password: YES)

Friday, June 20th, 2014

mysql_allow_access-from-remote-any-host-fix-access-error-after-sql-migration

I recently migrated MySQL database server from host A to host B (remotesystemadministration.com), because I wanted to have the mysql database server on a separate machine (have separation of server running services and have a dedicated mysql server).

MySQL server host (running on localhost previously was set from my mysql config my.cnf to listen and serve connections on localhost with

bind-address = 127.0.0.1

). MySQL is used by a Tomcat running Java application on localhost and my task was to set the Tomcat to use the MySQL database remotely to MySQL host B (new remote hostname where MySQL is moved is  remotesystemadminsitration.com and is running on IP 83.228.93.76).

Migration from MySQL Db server 1 (host A) to MySQL Db server 2 (host B) is done by binary copying the mysql database directory which in this case is (as it is a Debian server installed MySQL), the standard directory where mysql stores its database data is /var/lib/mysql ( datadir = /var/lib/mysql in /etc/mysql/my.cnf)

Binary copying of data from MySQL db (host A) to MySQL Db (host B) is done with rsync

After migrating and trying to login on migrated mysql  database on remotesystemadministration.net with mysql cli client:

remotesysadmin:~$ mysql -u root -p

I got following error:
 

ERROR 1045 (28000): Access denied for user 'root'@'remotesystemadministration.com' (using password: YES)


To fix the issue I had to login remotely from old migration server mysql (host A) cli:

mysql:~$ mysql -u root -p -h remotesystemadministration.com

and  run SQL commands:

GRANT ALL PRIVILEGES ON *.* TO 'root'@'remotesystemadministration.com' WITH GRANT OPTION;
GRANT USAGE ON *.* TO 'root'@'remotesystemadministration.com' IDENTIFIED BY 'secret-mysql-pass';
FLUSH PRIVILEGES;

Query OK, 0 rows affected (0.03 sec)
Query OK, 0 rows affected (0.00 sec)


Another way to solve the problem is to add the root user to be able to connect from any host (Enable MySQL root access from all host), to do so issue:

GRANT ALL PRIVILEGES ON *.* TO 'root'@'%' IDENTIFIED BY 'password';
FLUSH PRIVILEGES;

Note: In newer version of MySQL, flush privileges could be omitted.

Another approach if you want to substitute access from localhost for all users and enable all users to be able to authenticate to mysql remotely is to execute SQL Query:

UPDATE USER SET host='%' WHERE host='localhost';

Allowing all users to be able to connect from anywhere on the internet is a very bad security practice anyways, if you already have a tight firewall setup and you can only access the server via specific remote IP addresses allowing MySQL access from all hosts / ips should be ok.

How to check and repair broken MySQL ISAM tables

Monday, July 11th, 2011

MySQL repair artistic picture

If you are stuffed with errors in /var/log/mysqld.log similar to:

110711 11:00:48 [ERROR] /usr/libexec/mysqld: Incorrect information in file: './anyboots_moncler_spaccio/zen_seo_cache.frm'
110711 11:00:48 [ERROR] /usr/libexec/mysqld: Incorrect information in file: './anyboots_moncler_spaccio/zen_sessions.frm'

This is a sure sign something terrible has happened with your mysql database tables that lead to corruption.
Having corrupt table in mysql installation can severely lead to data loss as well as significantly reduce the speed and performance of a MySQL server in this awful times mysqlcheck is the best friend of the administrator, here is how you can check and repair broken tables in MySQL server:

mysql-server:~# mysqlcheck --all-databases -u root -p
chillor_hjbgl.vn_users OK
chillor_lul.mybb_adminlog OK
chillor_lul.mybb_adminoptions OK
chillor_lul.mybb_adminsessions OK
chillor_lul.mybb_adminviews OK
chillor_lul.mybb_announcements OK
...

You will notice the corrupt sql tables will be reported as corrupt by the tool and mysqlcheck will try it’s best to recover the corrupt tables.

In most cases this should be enough to recover corrupt tables.

w00tw00t.at.ISC.SANS.DFind in apache error.log – Filtering script kiddie port scanner on GNU / Linux

Friday, November 23rd, 2012


w00tw00t.at.ISC.SANS.Dinfd - Filtering script kiddies port scanners from Apache logs and servers with iptables firewall

If you get thousand of messages:

[Wed Nov 21 16:28:49 2012] [error] [client 89.136.100.192] client sent HTTP/1.1 request without hostname (see RFC2616 section 14.23): /w00tw00t.at.ISC.SANS.DFind:)


in /var/log/apache2/error.log It is due to a script kiddie port scanner, usually such requests originate from Turkia, Romania ,Russia.. Usually, for servers getting in Apache error.log  GET /w00tw00t.at.ISC.SANS.DFind:) once in a while, it is not an issue however if you get too many of this messages it is sometimes useful to filter them with a simple iptables rule

debian:~# /sbin/iptables -A INPUT -p tcp -m tcp --dport 80 -m string --string "GET /w00tw00t.at.ISC.SANS." --algo bm --to 70 -j DROP

What above command does is it greps the 1st 70 bytes and checks, whether it contains string '/w00tw00t.at.ISC.SANS.DFind:)' , whether string is matched it jumps to DROP rule filtering the IP. Of course on busy servers checking each incoming IP client TCP/IP request for a certain string might not be very efficient and even can be a possible bottleneck. So I don't know whether filtering /w00tw00t.at.ISC.SANS.DFind:) is good or bad practice. Anyways generally it is wise to filter IPs doing the request anyways since, they could try a various script kiddie cracking tools, port scanners and even some of them might be hosts attempting DoS or DDoS.

Also it is useful to store for later the rule with:

debian:~# /sbin/iptables-save > /root/iptables_rules.txt

Then you can load up /root/iptables_rules.txt with:

debian:~# /sbin/iptables-restore < /root/iptables_rules.txt

Some common way to keep the iptables rule loaded on system boot is by adding /iptables-restore  to /etc/rc.local
 

Some alternative methods to filter IPs issuing GET  /w00tw00t.at.ISC.SANS.DFind:) to Apache is through  fail2ban, denyhosts or blockhosts or Apache mod security filters.
You can read further Information on what DFind hacktool does here

To keep an eye on all DROPped and REJECT-ed traffic (in bytes) it is useful to use:

debian:~# /sbin/iptables -L INPUT -nvx|grep -i -E 'drop|reject'
       0        0 REJECT     tcp  --  *      *       0.0.0.0/0            0.0.0.0/0           tcp dpt:3306 reject-with icmp-port-unreachable
       0        0 DROP       icmp --  *      *       0.0.0.0/0            0.0.0.0/0           icmp type 17
       0        0 DROP       icmp --  *      *       0.0.0.0/0            0.0.0.0/0           icmp type 13
       0        0 DROP       tcp  --  *      *       0.0.0.0/0            0.0.0.0/0           tcp flags:0x03/0x03
       0        0 DROP       tcp  --  *      *       0.0.0.0/0            0.0.0.0/0           tcp flags:0x06/0x06
    1526    77004 REJECT     tcp  --  *      *       0.0.0.0/0            0.0.0.0/0           tcp reject-with icmp-host-prohibited
 
For filtering

Disable Apache access.log and error.log logging on Debian Linux and FreeBSD

Tuesday, September 25th, 2012

Disable Apache logging Debian and FreeBSD Linux logo

Many times disabling logging on a busy websites is quite beneficial, especially if more than few Gigabytes are written in Apache visitors log (access.log) every day. Too much visitors to Apache webserver could pose significantly increase disk writes and be negative for overall server performance.

Disabling the log is handy also for websites which already integrate a different type of visitors logging lets say – via MySQL, PostgreSQL (SQL) …

From security perspective disabling logging is a very stupid idea thought, however on systems which are experiencing high load and you need to sacrifice logging to reduce a bit the load (especially if you cannot afford to get a new server hardware), disabling it is an option.

1. Disabling access.log and error on Debian Linux

a) Disabling access.log logging
As most Debian users already know on Debian GNU Linux Apache logs all incoming (port 80) Apache requests to /var/log/apache2/access.log and /var/log/apache2/error.log

Disabling logging is very simple, just comment out line in /etc/apache2/sites-enabled/000-default:


CustomLog ${APACHE_LOG_DIR}/access.log combined

to


#CustomLog ${APACHE_LOG_DIR}/access.log combined

Then restart the webserver to re-read new config value:


# /etc/init.d/apache2 restart
....

Of course this is one of the ways to disable access.log logging. Other ways are to make logging gets logged in good old /dev/null. To use /dev/null forwardingp put Customlog /dev/null in /etc/apache2/sites-enabled/000-default


CustomLog /dev/null

In Debian Lenny and older Debian releases Customlog Apache directive is found in /etc/apache2/apache2.conf.

b) Disabling error.log logging

Same procedure applies for disabling error.log, comment out default ErrorLog directive, restart Apache and you’re done:


ErrorLog ${APACHE_LOG_DIR}/error.log

should become:


ErrorLog /dev/null

Usually just comming ErrorLog ${APACHE_LOG_DIR}/error.log is supposed to work, unfortunately for reason on Debian Squeeze this worked not commenting it and restarting Apache failed to restart apache with error:


# /etc/init.d/apache2 restart
Restarting web server: apache2 ... waiting (2)No such file or directory: apache2: could not open error log file /etc/apache2/logs/error_log.
Unable to open logs
Action 'start' failed.
The Apache error log may have more information.
failed!

Thus to disalbe error.log you need to add ErrorLog /dev/null in /etc/apache2/apache2.conf and once again restart Apache.


ErrorLog /dev/null


# /etc/init.d/apache2 restart

Bear in mind that if you use some custom virtualhosts which has the ErrorLog directive in (let’s say /etc/apache2/sites-enabled/{website-domain.com,website-domain1.com} etc. you need to change there too.
2. Disabling access.log and error.log logging on FreeBSD
On FreeBSD to disable access.log add CustomLog /dev/null to /usr/local/etc/httpd.conf and just like on Linux restart Apache:


freebsd# /usr/local/etc/rc.d/apache2 restart
....

Disaling error.log on BSD is done by changing:


ErrorLog /var/log/httpd-error.log

to


ErrorLog /dev/null

BTW disaling error.log is quite a stupid idea but in some situation, where you don’t update software versions and don’t change often webserver script interpreter and (processed) server side executables / PHP scripts it could be ok.
Still it is much better to change the amount of Apache logged information and keep error.log logging by changing:


LogLevel crit

Using LogLevel crit, will prevent Apache from logging numerous not so useless warnings in error.log, so if you have a very busy server with high loads you better use it.

Don’t expect that disabling logging will drastically improve performance usually even on Apache servers which serve more than 20 000 of requests daily disabling access.log / error.log could would probably reduce load with from 00.1 to maximum 2-3 percentage.

Thunderbird mail check problem fix to: “An error occurred sending mail: Unable to establish a secure link with SMTP server smtp.examplehost.com using STARTTLS since it doesn’t advertise that feature.”

Wednesday, August 22nd, 2012

Some clients of one of the qmail servers mail domain complained that there are problems sending e-mails with Thunderbird (pop / imap) client.

The exact Thunderbird sending error is:

Unable to establish a secure link with SMTP server smtp.examplehost.com using STARTTLS since it doesn't advertise that feature.
Switch off STARTTLS for that server or contact your service provider.

For for almost half an hour I pondered why the heck this odd error happens in sending mails with a fresh new Thunderbird (auto) configured mail address.
Few months back some clients were experiencing similar STARTTLS errors so I went back to check my previous post to get an idea what was wrong then in order to determine if the current reported error had to do with the previous one. My previous post is here – How to work around STARTTLS Qmail Thunderbird / Outlook mail sending (error) issues

After reading on the previous error and some assumptions I found out the whole problem lays in incorrectly set DNS records.
By default Thunderbird (and probably other mail clients) are configuring automatically as SMTP server (smtp.examplehost.com) if the DNS record for smtp.examplehost.com points to an IP address / host which belongs to another mail server, everytime thunderbird tries to send email the incorrect smtp.examplehost.com is used, hence the mail sending fails with the err:

Unable to establish a secure link with SMTP server smtp.examplehost.com using STARTTLS since it doesn't advertise that feature.
Switch off STARTTLS for that server or contact your service provider.

In my case the DNS for examplehost.com which is the mail server host was managed by Godaddy’s DNS-es:

ns49.domaincontrol.com
ns50.domaincontrol.com

The A record for our domain smtp.examplehost.com was by default set in GoDaddy to point to incorrect IP, so the fix was simply to change the Domain alias of smtp.examplehost.com to the proper mail host.

Another thing I had to do is change variables in /var/qmail/supervise/qmail-smtpd/run and /var/qmail/supervise/qmail-smtpdssl/run

In both files I changed variables:

SSL=0
ALLOW_INSECURE_AUTH=0

to

SSL=1
ALLOW_INSECURE_AUTH=1

Also variables FORCE_TLS and DENY_TLS in /var/qmail/supervise/{qmail-smtpd,qmail-smtpdssl}/runs should be:

FORCE_TLS=0
DENY_TLS=1

Though the problem was occuring in Mozilla Thunderbird, i’m sure same email sending problem will be present if Microsoft Outlook Express or any other desktop pop3 client is used.
After this changes I had to restart qmail server through qmailctl:

# qmailctl stop; sleep 5; qmailctl start

This fixed clients mail sending issues … hope this will help to others looking for way to remove STARTTLS, TLS, SSL qmail support

Solving “Cannot redeclare show_subscription_checkbox() (previously declared in .. wp-content/plugins/subscribe-to-comments/subscribe-to-comments.php”

Monday, March 21st, 2011

I’m trying to install subscribe-to-comments wordpress plugin in order to make my users to easily set a tick and receive new emails if somebody replies to their comments in my blog. Pitily downloading and trying to install the subscribe-to-comments wordpress plugin was failing after it’s activation with an error message:

PHP Fatal error: Cannot redeclare show_subscription_checkbox() (previously declared in /var/www/blog/wp-content/plugins/subscribe-to-comments/subscribe-to-comments.php:12) in /var/www/blog/wp-content/plugins/subscribe-to-comments.php on line 58"

I did my best to edit the subscribe-to-comments.php to fix up the fatal error but it was no go, so after a bunch of research I’ve found out somebody created a new version of the plugin under the name subscribe-to-comments-reloaded .

I’ve proceeded and gave a try to subscribe-to-comments-reloaded as a substitute to the old broken subscribe-to-comments .

Enabling the subscribe-to-commets-reloaded worked out of the box and the plugin now works perfectly fine and even better is enabling all the functionaity of the subscribe-to-comments
Cheers 🙂

How to solve “[crit] [client xxx.xxx.xxx.xxx] (13)Permission denied: /var/lib/ejabberd/.htaccess pcfg_openfile: unable to check htaccess file, ensure it is readable, referer: http://jabber.mydomain.com/” – Error Cause and Solution

Thursday, January 5th, 2012

While configuring JWchat domain, I've come across around an error:

pcfg_openfile: unable to check htaccess file, ensure it is readable

The exact error I got in /var/log/apache2/error.log looked like so:

[crit] [client xxx.xxx.xxx.xxx] (13)Permission denied: /var/lib/ejabberd/.htaccess pcfg_openfile: unable to check htaccess file, ensure it is readable, referer: http://jabber.mydomain.com/

The error message suggested /var/lib/ejabberd/.htaccess – is missing or not readable, however after checking i've seen .htaccess existed as well as was readable:

debian:~# ls -al /var/lib/ejabberd/.htaccess
-rw-r--r-- 1 www-data www-data 114 2012-01-05 07:44 /var/lib/ejabberd/.htaccess

At first glimpse it seems like the message is misleading and not true, however when I switched to www-data user (the user with which Apache runs on Debian), I've figured out the error meaning of unreadability is exactly correct:

www-data@debian:$ ls -al /var/lib/ejabberd/.htaccess
ls: cannot access /var/lib/ejabberd/.htaccess: Permission denied

This permission denied was quite strange, especially when considering the .htaccess is readable for all users:

debian:~# ls -al /var/lib/ejabberd/.htaccess
-rw-r--r-- 1 www-data www-data 114 2012-01-05 07:44 /var/lib/ejabberd/.htaccess

After a thorough look on what might go wrong, thanksfully I've figured it out. The all issues were caused by wrong permissions of /var/lib/ejabberd/.htaccess .You can see below the executable flag for all users (including apache's www-data) is missing :

debian:/var/lib# ls -ld /var/lib/ejabberd/drw-r--r-- 3 ejabberd ejabberd 4096 2012-01-05 07:45 /var/lib/ejabberd/

Solving the error, hence is as easy as adding +x flag to /var/lib/ejabberd :

debian:/var/lib# chmod +x /var/lib/ejabberd

Another way to fix the error is to chmod to 755 to the directory which holds .htaccess:

From now onwards pcfg_openfile: unable to check htaccess file, ensure it is readable err is no more 😉