Posts Tagged ‘unzip’
Monday, March 14th, 2011 
I'm experimenting this days with Elgg – An Open Source Free Software GPLed Social Network which enables users to quickly create Communities.
Elgg is really easy to install and all it requires is a Linux/BSD or Windows system with PHP, MySQL and Apache installed.
Elgg is provided with dozens of nice plugins which for a short time enables individual to create fully operational Social Network like facebook.
Many people nowdays use facebook without realizing how bad facebook is how it breaks their privacy.
Facebook is actually a spy network, it stores data and pictures, likings and user behaviour of million of users around the world.
This needs to be stopped somehow, maybe if people start using the free software networks like elgg to build a mini-community which has profound interests in a certain spheres of work, life and amusement.
The evil empire of facebook will slowly start to loose it's position and the small projects networks based on Elgg and the other Free Software Social Networks which are currently available will start to rise up.
I'm currently really a novice into Elgg but I'm more convinced that the guys who develop it and contribute to it in terms of handy plugins have done really a great job.
It's ultra easy even for non professional middle level user to setup himself an Elgg install.
The installation procedure is not much harder than a simple wordpress blog or joomla based website install.
The installation of elgg takes no more than 10 to 20 minutes, the plugin installation and setup time further could take few days but in the end you have a full featured Social Network! This is really amazing.
The installation of new plugins in elgg is also fool proof / easy all you have to do to equip a newly installed elgg with plugins is to go to it's root directory and look for the mod directory. The new plugins which needs to be installed, could be directly downloaded and saved via links, elinks, lynx or even wget to the elgg installation directory.
Most of the elgg plugins comes in a form of zip files so after being installed simply executing:
server:/home/elgg/mysocialnetwork/mod# unzip walltowall.zip

....
The above cmd will for example unzip the WallToWall elgg plugin and the plugin will be further ready to be enabled via the administrator user set upped during your elgg installation.
The configurations of elgg are being accomplished via:
Administration -> Tool Administration
I should I'm still experimenting with Elgg social, until this very moment I've installed the following elgg plugins:
aaudio

akismet

artfolio

blog

bookmarks

buddytalk

captcha

categories

chat

crontrigger

custom_index

custom_profile_fields

default_widgets

diagnostics

elgg-ebuddy

embed

embedvideo

emoticons

externalpages

family

fbconnect

file

file_tree

flyers

forum

friend_request

friends

garbagecollector

groups

htmlawed

invitations

invitefriends

izap_videos

kaltura_video

lastfm

likes

logbrowser

logrotate

lucygames

members

messageboard

messages

milockergames_frameme

noscript_message

notifications

pages

polls

profile

reportedcontent

resume

river_comments

riverdashboard

riverfaces

search

siteaccess

tagcloud

theme_simpleneutral

thewire

tidypics

tidypicsExt

tinymce

twitter

twitterservice

user_contact_list

uservalidationbyemail

walltowall

weather

wp1

zaudio
One very handy feature I truly enjoy about Elgg is that it gives every user an own blog which or in other words when somebody registers in Elgg, he automatically gets a personal blog! How cool this is Yeash 😉
The Elgg photo upload plugin is also another interesting story. The photo plugin is a way better from my first impressions than facebook's buggy upload client.
Elgg also uses heavily jquery for it's various operations and the user experience feels very interactive.
Of course as with all free software things are not perfect some of the elgg plugins or (mods) as they are called are not working.
For example I couldn't make by so far the weather plugin which is supposed to report the weather.
Maybe some tweakening of the not working plugins will easily make them working. What is really important is that the Elgg basis system looks and seems to work really good and enpowers the user with a social network alternatives to the ugly facebook.
In order to experiment with Elgg and I've established a small social network targetting at University College and School Students called MockATeacher – mockateacher.com>/i>. The idea behind is to help students in their report writting by providing them with a place where they can meet other students and share files.
Some other aspects I've planned for MockATeacher is to build a small community of people who would like to share about idiot teachers, teacher stupid sayings as well as to mock the idiotic type of education that we and our children are up to in this age.
Just to close up, if you're looking for some time to spend in experimenting in an enjoyable way you definitely need to install elgg and play with it 😉
Tags: BSD, bsd system, custom, dozens, elgg, evil empire, facebook, fool, fool proof, Free, free software networks, GPLed, installation, level, likings, Lynx, mod, novice, Open, php mysql, plugin, plugin installation, Privacy, root, root directory, setup time, short time, social networks, software, spheres, spy, spy network, time, unzip, weather, which enables users, windows system, wordpress blog, work, working
Posted in Entertainment, Everyday Life, Joomla, Linux, Various, Web and CMS | 2 Comments »
Monday, April 11th, 2016 
If you're a Linux user and you have to write some scripts for websites to extract all Images /Pictures from Microsoft Word .docx document then you'll probably wonder if there is a (Linux) command-line tool to extract all the images from a MS Word .docx document?
For websites or even for scripting purposes extracting .docx on Linux / UNIX OS is really a great thing to do.
The good news is MS .docx format is simply a ZIP Archive file format, so you can straight away unzip and pick up all the contained image .JPG / .PNG / .GIF whatever Graphic files bundled.
To list the content of a sample .docx on Linux you will hence need to have installed unzip command line tool, if you still haven't install it either with yum (on RHEL / CentOS / Fedora)
[root@centos ~]:# yum -y install unzip
…
Or with apt-get on (Debian / Ubuntu / Mint):
debian-linux:~# apt-get install –yes unzip
Once installed to get a list of .docx MS Word file:
debian-linux:~# unzip -l your-file-name-of-choice.docx
Archive: your-file-name-of-choice.docx
Length Date Time Name
——— ———- —– —-
4333 1980-01-01 00:00 [Content_Types].xml
737 1980-01-01 00:00 _rels/.rels
4117 1980-01-01 00:00 word/_rels/document.xml.rels
462177 1980-01-01 00:00 word/document.xml
2984 1980-01-01 00:00 word/footer1.xml
1487 1980-01-01 00:00 word/header2.xml
1351 1980-01-01 00:00 word/header3.xml
1556 1980-01-01 00:00 word/header4.xml
1756 1980-01-01 00:00 word/header1.xml
2390 1980-01-01 00:00 word/footer2.xml
1432 1980-01-01 00:00 word/footer3.xml
1629 1980-01-01 00:00 word/footnotes.xml
1623 1980-01-01 00:00 word/endnotes.xml
1449 1980-01-01 00:00 word/header5.xml
306540 1980-01-01 00:00 word/media/image5.jpeg
5564 1980-01-01 00:00 word/media/image2.png
5593 1980-01-01 00:00 word/media/image4.png
8050 1980-01-01 00:00 word/media/image3.png
6992 1980-01-01 00:00 word/theme/theme1.xml
5537 1980-01-01 00:00 word/media/image1.png
685 1980-01-01 00:00 word/glossary/_rels/document.xml.rels
10300 1980-01-01 00:00 word/glossary/document.xml
12341 1980-01-01 00:00 word/settings.xml
3390 1980-01-01 00:00 word/glossary/settings.xml
677 1980-01-01 00:00 docProps/core.xml
1380 1980-01-01 00:00 docProps/custom.xml
1000 1980-01-01 00:00 docProps/app.xml
335 1980-01-01 00:00 customXml/itemProps2.xml
296 1980-01-01 00:00 customXml/_rels/item4.xml.rels
296 1980-01-01 00:00 customXml/_rels/item3.xml.rels
….
As you can see from above output .docx files media files are always stored under "word/media/*" file structure folder.
Therefore to not extract all .xml .rels files from .docx but only pick up the picture files:
debian-linux:~# unzip your-file-name-of-choice.docx "word/media/*"
Archive: your-file-name-of-choice.docx
extracting: word/media/image5.jpeg
extracting: word/media/image2.png
extracting: word/media/image4.png
extracting: word/media/image3.png
extracting: word/media/image1.png
In case you need to gather only some specific files format from the Word .docx document, issue:
[root@centos ~:]# unzip your-file-name-of-choice.docx "*.jpeg"
…
Or if you just need the .xmls extensions
[root@centos ~:]# unzip your-file-name-of-choice.docx "*.xml"
If you need to extract pictures from older .doc (2003) MS file format you will first need to convert .doc file to .docx and then you can use unzip to extract the files you need.
Unfortunately I'm not aware how to convert .doc to docx with a tool if somebody knows share in comment.
Perhaps it is possible with unoconv or abiword.
The closest thing I know is how to convert .doc Word document to PDF:
abiword –to=pdf filename.doc
Tags: bsd extract pictures only from .docx, document, export png jpg gif from .docx on linux, extract only settings and metadata word .docx linux, extract pictures from docx, extract pictures from word docx linux, format, How to, how to extract .docx on linux, issue, Linux, linux extract images docx, need, PDF, png, unix get only pictures from word docx, unzip, xml
Posted in Curious Facts, Everyday Life, File Convert Tools, Linux | No Comments »
Wednesday, February 15th, 2012 !!! IMPORTANT UPDATE COMMENT INFO DETECTOR IS NO LONGER SUPPORTED (IS OBSOLETE) AND THE COUNTRY FLAGS AND OPERATING SYSTEM WILL BE NOT SHOWING INSTEAD,
!!!! TO MAKE THE COUNTRY FLAGS AND OS WP FUNCTIONALITY WORK AGAIN YOU WILL NEED TO INSTALL WP-USERAGENT !!!
I've come across a nice WordPress plugin that displays country flag, operating system and web browser used in each of posted comments blog comments.
Its really nice plugin, since it adds some transperancy and colorfulness to each of blog comments 😉
here is a screenshot of my blog with Comments Info Detector "in action":

Comments Info Detector as of time of writting is at stable ver 1.0.5.
The plugin installation and configuration is very easy as with most other WP plugins. To install the plugin;
1. Download and unzip Comments Info Detector
linux:/var/www/blog:# cd wp-content/plugins

linux:/var/www/blog/wp-content/plugins:# wget http://downloads.wordpress.org/plugin/comment-info-detector.zip

...

linux:/var/www/blog/wp-content/plugins:# unzip comment-info-detector.zip

...
Just for the sake of preservation of history, I've made a mirror of comments-info-detector 1.0.5 wp plugin for download here
2. Activate Comment-Info-Detector
To enable the plugin Navigate to;
Plugins -> Inactive -> Comment Info Detector (Activate)
After having enabled the plugin as a last 3rd step it has to be configured.
3. Configure comment-info-detector wp plugin
By default the plugin is disabled. To change it to enabled (configure it) by navigating to:
Settings -> Comments Info Detector
Next a a page will appear with variout fields and web forms, where stuff can be changed. Here almost all of it should be left as it is the only change should be in the drop down menus near the end of the page:
Display Country Flags Automatically (Change No to Yes)

Display Web Browsers and OS Automatically  (Change No to Yes
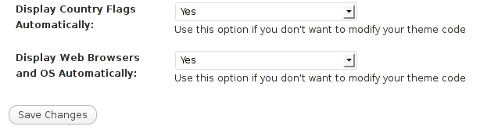
After the two menus are set to "Yes" and pressing on Save Changes the plugin is enabled it will immediately start showing information inside each comment the GeoIP country location flag of the person who commented as well as OS type and Web Browser 🙂
Tags: action, Auto, blog, Browsers, change, Comment, Comments, configured, country flag, country location, Detector, Display, downloads, Draft, drop, drop down menus, flag web, How to, Inactive, information, installation, Linux, location, mirror, operating system, os type, page, person, plugin, plugin installation, quot, sake, Save Changes, screenshot, show, Stable, time, transperancy, type, unzip, web browser type, web browsers, web forms, wget, Wordpress, Wordpress Comments, writting, www, zip linux
Posted in Web and CMS, Wordpress | 1 Comment »
Tuesday, March 31st, 2015 
If you're forced to update some Java based Web application using Java + Tomcat / WebSphere / Weblogic it is a common thing that the Java App developer handed to you will ask you which version is the Oracle JDBC / ODBC driver on current Java Virtual Machine version installed.
Actually there are few methods to check Java JDBC / ODBC version:
1. Check Java ODBC version greeping it in WEB-INF/MANIFEST.MF
Usually the .jar file comes archived in a .ZIP – i.e. application-name5 .zip
server:~# unzip application-name5.zip
Then if the .zip file contains the OJDBC as a .JAR extension – (Java Archive), inflate it with jar tool.
server:~# jar -xvf ojdbc7.jar META-INF/MANIFEST.MF
inflated: META-INF/MANIFEST.MF
server:~# grep Implementation META-INF/MANIFEST.MF
Implementation-Vendor: Oracle Corporation
Implementation-Title: JDBC
Implementation-Version: 12.1.0.1.0
Alternative way to check the info (if you don't have java or jar installed on the Linux / Unix machine) is simply with unzip + grep like so:
server:~# unzip -p ojdbc14.jar META-INF/MANIFEST.MF | grep -C 1 version
Manifest-Version: 1.0
Implementation-Version: "Oracle JDBC Driver version – 10.1.0.5.0"
Specification-Title: "Oracle JDBC driver classes for use with JDK1.4"
Specification-Version: "Oracle JDBC Driver version – 10.1.0.5.0"
Implementation-Title: "ojdbc14.jar"
If you're on a Windows (and you have Windows server grep.exe installed), use instead:
C:\jar> unzip -p ojdbc14.jar META-INF/MANIFEST.MF | grep -C version
2. Getting some info with Java JRE tool
You can check some useful Java version info also just with Java Runtime Environment (java) tool
server:~# java -jar ojdbc5.jar
Oracle 11.1.0.7.0-Production JDBC 3.0 compiled with JDK5
Tags: check, grep, How to, info, MF, server, tool, unzip, use, version, Windows
Posted in Everyday Life, Java, Linux, Windows | No Comments »
Saturday, March 1st, 2014 
Dune II: The Building of a Dynasty (known also as Dune II: Battle for Arrakis in Europe is a game that my generation will never forget. Dune 2 is the "first" computer Real Time Strategy (RTE) game of the genre of the Warcraft I and Warcraft II / III and later Command and Conquer – Red Aleart, Age of Empires I / II and Starcraft …
I've grown up with Dune2 and the little computer geek community in my school was absolutely crazy about playing it. Though not historically being the first Real Time Strategy game, this Lucas Inc.
game give standards that for the whole RTE genre for years and will stay in history of Computer Games as one of best games of all times.
I've spend big part of my teenager years with my best friends playing Dune2 and the possibility nowadays to resurrect the memories of these young careless years is a blessing. Younger computer enthusiasts and gamers probably never heard of Dune 2 and this is why I decided to place a little post here about this legendary game.

Its worthy out of curiosity or for fun to play Dune 2 on modern OS be it Windows or Linux. Since Dune is DOS game, it is necessary to play it via DOS emulator i.e. – (DosBox).
Here is how I run dune2 on my Debian Linux:
1. Install dosbox DOS emulator
apt-get install --yes dosbox
2. Download Dune2 game executable
You can download my mirror of dune2 here
Note that you will need unzip to uanrchive it, if you don't have it installed do so:
apt-get install --yes unzip
 cd ~/Downloads/

wget https://www.pc-freak.net/files/dune-2.zip
3. Unzip archive and create directory to mount it emulating 'C:\' drive
 mkdir -p ~/.dos/Dune2

cd ~/.dos/Dune2
unzip ~/Downloads/dune-2.zip
4. Start dosbox and create permanent config for C: drive auto mount
dosbox
To make C:\ virtual drive automatically mounted you have to write a dosbox config from inside dbox console
config -writeconf /home/hipo/.dosbox.conf
My home dir is in /home/hipo, change this with your username /home/username
Then exit dosbox console with 'exit' command
To make dune2 game automatically mapped on Virtual C: drive:
echo "mount c /home/hipo/.dos" >> ~/.dosbox.conf
Further to make dosbox start each time with ~/.dosbox.conf add alias to your ~/.bashrc
vim ~/.bashrc

echo "alias dosbox='dosbox -conf /home/hipo/.dosbox.conf'" >> ~/.bashrc

source ~/.bashrc
Then to run DUNE2 launch dosbox:
dosbox
and inside console type:
 c:

cd Dune2

Dune2.exe
For the lazy ones who would like to test dune you can play dune 2 online on this website
Tags: alias, bashrc, best games, Computer Games, computer geek, config, debian linux, directory, DoS, dosbox, Download Dune2, drive, echo, exit, game, games, history, home, Install, Linux, Lucas Inc, OS, Play, Real Time Strategy, RTE, Start, sudo, unzip, Windows, zip
Posted in Entertainment, Everyday Life, Games Linux, Various | No Comments »
Friday, January 17th, 2014 
I needed to import Oracle data dump on a Linux host. To do so on Linux using console its necessary to have installed sqlplus client sqlplus is part of Oracle database product. So you will need to have Oracle priorly installed on host. Latest sqlplus Client binaries from Oracle are here. As of time of writting latest client is oracle-instantclient12.1-basic-12.1.0.1.0-1.i386.rpm
Unfortunately currently from oracle's site oracle-instantclient is only available in RPM and ZIP format. So Debian and Ubuntu users will have to install it either by downloading zip and unarchiving somewhere or using alien (deb rpm install) tool.
As a pre-requirement to install on Debian or deb based Linuces its necessary to install libaio1
# aptitude install libaio1
Then unarchive .zip file into /opt/oracle
 # mkdir -p /opt/oracle

# chown simon:simon /opt/oracle

# cd /opt/oracle

# su hipo

$ unzip instantclient-basic-linux.x64-12.1.0.1.0.zip

$ unzip instantclient-basic-linux.x64-12.1.0.1.0.zip

$ export LD_LIBRARY_PATH=/opt/oracle/instantclient_12_1/

$ export ORACLE_SID=skint02
Then to connect and import a database into Oracle DB:
sqlplus / as sysdba @sql/update_patient_status.sql

Table created.
Table created.
Table created.
Commit complete.
Its worthy to mention that there is a nice open source sqplus alternative for those who prefer working with open source check out GQLPlus
Tags: aptitude, basic, client, Commit, deb, dump, How to, Linux, login, name, open source, oracle, pwd, rpm, site, structure, unzip, writting, zip
Posted in Various, Web and CMS | No Comments »
Friday, September 16th, 2011 By the default wordpress does not have support for changing the exact font, therefore copying and pasting a text made in Open Office or MS Word often places in the Post or Page wp edit fonts different from the default one set for articles.
Hence some articles after being published on a wordpress blog show up with improper font and the only way to fix that is to change the font first in Open Office and then copy back to wordpress instead of simply being able to change the font from within the wordpress article.
To get around this problem, there is a nice plugin fckeditor-for-wordpress-plugin which aids wordpress with an awesome Word like edit functionalities.
, downhload location for FCKEdit for WordPress is here
Here is a screenshot of the extra nice functionality the FCKEditor for wordpress providces.

Installing the plugin is like installing any other wordpress plugin and comes easily to:
debian:/~# cd /var/www/blog/wp-content/plugins

debian:/plugins# wget http://downloads.wordpress.org/plugin/fckeditor-for-wordpress-plugin.3.3.1.zip

...

debian:/plugins# unzip fckeditor-for-wordpress-plugin.3.3.1.zip

...

debian:/plugins# cd fckeditor-for-wordpress-plugin/
And further enabling the plugin from:
Plugins -> Inactive -> (Dean's FCKEditor For WordPress) Enable
fckeditor for wordpress will replace the default wordpress editor TinyMCE straight after being enabled.
I’ve done also a mirror of the current version as of time of writting of this article, one can download the fckeditor for wordpress mirrored here
Now really file editting inside wordpress admin panel is way easier and convenient 😉 Cheers
Tags: admin panel, aids, blog, Cheers, current version, dean, download, exact font, FCKEdit, FCKEditor, freak, functionality, hereHere, Inactive, Installing, location, lt, Microsoft, microsoft word, mirror, ms word, Open, open office, page, panel, plugin, post, quot, screenshot, show, time, unzip, var, version, way, wget, Word, Wordpress, wp, writting, www
Posted in Everyday Life, Various, Web and CMS, Wordpress | 2 Comments »
Thursday, September 22nd, 2011 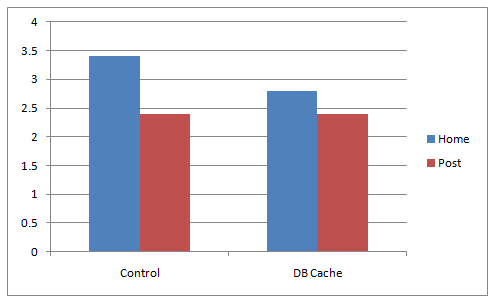
A combination of two wordpress caching plugins (Hyper Cache and Db Cachesignificantly improves the access times of a wordpress based blogs and websites.
Installing the two websites has drastically improved my blog opening times, so in my view having the two plugins on every wordpress install out there is a must! 🙂
The plugins installation is straight forward, here is how I installed them.
1. Installing Hyper Cache on WordPress
To install Hyper Cache all I had to do is download and enable the plugin, the plugin doesn’t require any configuration. I always love it when I don’t have to bother with reading configuration options and pondering for some 20 minutes on the plugin features, so in that perspective Hyper Cache in my view is a good alternative to WordPress Super Cache
Besides that WordPress Super Cache was having issues when enabled on few wordpress based websites I manage these days. For comparison Hyper Cache worked just great on all wordpress install I tried the plugin so far.
To install all I had to do is download the plugin unzip and enable it:
a. Download and unzip it
debian:/var/www/blog# wget http://downloads.wordpress.org/plugin/hyper-cache.zip

...

debian:/var/www/blog# cd wp-content/plugins

debian:/var/www/blog/wp-content/plugins# unzip hyper-cache.zip
b. Enable Hyper Cache plugin
To enable the plugin follow to standard plugin location;
Plugins -> Inactive -> Hyper Cache (Enable)
To enable the plugin follow to standard plugin location;
Plugins -> Inactive -> Hyper Cache (Enable)
A mirror of current version of hyper-cache.zip plugin is here
2. Installing Wodpress Db Cache
What Db Cache, does it does caching of last queries made to MySQL for specified time, so if the query has to be refetched again from wordpress’s php frontend the queries results are fetched straight for the memory. This decreases the load towards the MySQL server and increases the webpages loading time.
As the plugin page suggests it’s way faster than other html caching-plugins like WP-Cache or WP Super Cache
However, I think its still slower than using a combination of WP Super Cache’s alternative Hyper Cache and Db Cache . Combining this two could rise the webpage opening times according to some statisticonline at best cases up to 830% !! 😉 Let me proceed with how I did the install of Db Cache .
a. Download and Install Db Cache
debian:/var/www/blog/wp-content/plugins# wget http://downloads.wordpress.org/plugin/db-cache.0.6.zip
...
debian:/var/www/blog/wp-content/plugins# unzip db-cache.0.6.zip
b. Enable the plugin
Plugins -> Inactive -> Db Cache (Enable)
c. Make sure the permissions for Db Cache are correct
On Debian to enable Db Cache, the permissions should be changed for Apache to have a read/write permissions to plugin directory, on Debian to fix the permissions I used the commands:
debian:/var/www/blog# chown www-data:www-data wp-content
debian:/var/www/blog# chown -R www-data:www-data wp-content/plugins/db-cache
On other GNU/Linux distributions the above commands (user and group) www-data:www-data, should be set to whatever user/group Apache is running with, on Slackware this would be nobody:nobody, on CentOS and RHEL it would be apache:apache.
Finally to enable Db Cache go to
Settings -> Db Cache -> (Tick Enable) -> Save
I’ve also made a mirror of Db Cache plugin here
Enjoy the speed boost 😉
Tags: blog, blogs, CacheBesides, Cachesignificantly, CentOS, configuration options, current version, doesn, download, frontend, Inactive, Install, installation, Installing, itdebian, load time, loading, location, mirror, nbsp, nobody, page, perspective, php, plugin, pluginsdebian, queries, server load, Super, time, unzip, var, wget, Wordpress, WP-Cache, www, zipb
Posted in Linux, SEO, Various, Web and CMS, Wordpress | 2 Comments »
Monday, October 3rd, 2011 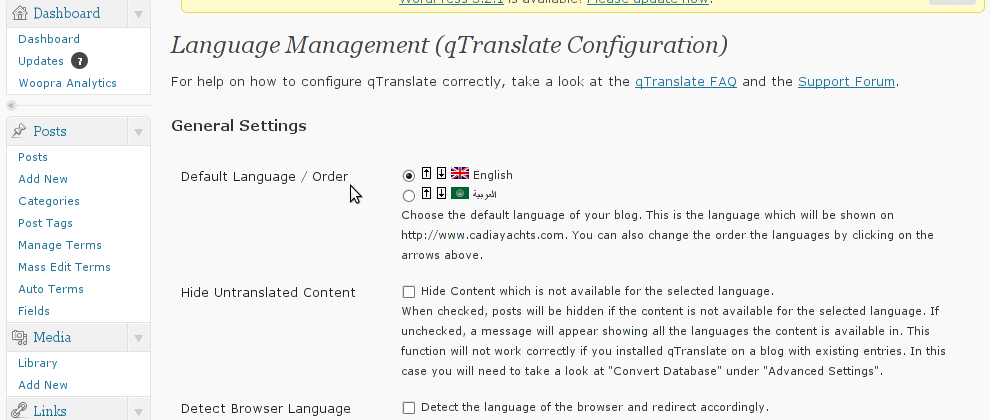
Lately, I have to deal with some wordpress based installs in big part of my working time. One of the wordpress sites needed to have added a multi language support.
My first research in Google pointed me to WPML Multilingual CMS The WordPress Multilingual Plugin
WPML Multilingual CMS looks nice and easy to use but unfortunately its paid, the company couldn’t afford to pay for the plugin so I looked forward online for a free alternative and stumbled upon QTranslate
QTranslate is free and very easy to install. Its installed the wordpress classic way and the installation went smoothly, e.g.:
1. Download and unzip QTranslate
# cd /var/www/blog/wp-content/plugins

/var/www/blog/wp-content/plugins# wget http://downloads.wordpress.org/plugin/qtranslate.2.5.24.zip

...

/var/www/blog/wp-content/plugins# unzip qtranslate.2.5.24.zip

...
Just for fun and in case the plugin disappears in future, a mirror of Qtranslate 2.5.24 is found here
2. Enable QTranslate from wordpress admin
Plugins -> Inactive -> qTranslate (Activate)
After activating the plugin, there is a Settings button from which qTranslate‘s various plugin parameteres can be tuned.
In my case my site had to support both English and Arabic, so from the settings I added support for Arabic translation to the wordpress install.
Adding Arabic is done in the following way:
a. From the Language Management (qTranslate Configuration) from the Languages menu and the Languages (Add Languages) I had to choose a language code (in my case a language code of ar – for Arabic). Next I had to choose the Arabic flag from the follow up flag list.
In next text box Name , again I had to fill Arabic, for Locale en_US.UTF-8
The following Date Format and Time Format text boxes are optional so I left them blank.
To complete the process of adding the Arabic as a new language wordpress should support I pressed the Add Language button and the Arabic got added as a second language.
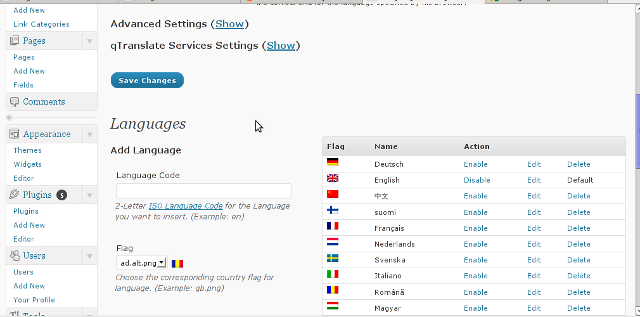
Afterwards the Arabic was added as second language, on the bottom of the left wordpress menu pane a button allowing a switch between English, Arabic appeared (see below screenshot):
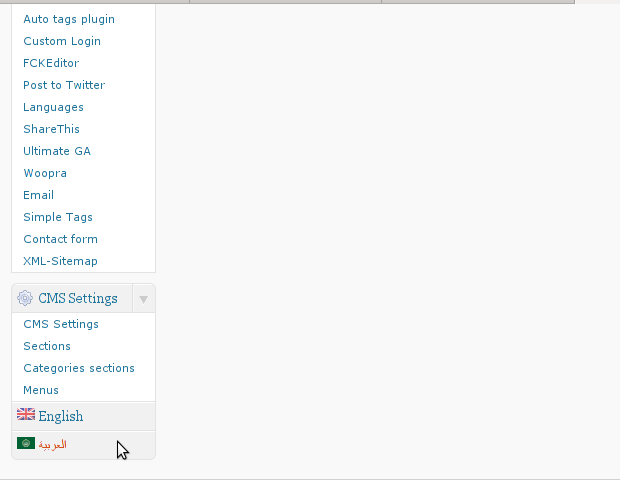
Finally to make Arabic appear as a second language of choice on the website I added it as a Widget in the Widgets menu from the AWidgets menu:
Appearance -> Widgets
In widgets I added qTranslate Language Chooser to the Sidebar without putting any kind of Title for qtranslate widget .
I found it most helpful to choose the Text and Image as an option on how to display the Language switching in the wp.
Tags: Activate, alternative, arabi, Arabic, arabic translation, Button, cms, code, company, Date, downloads, flag, flag list, format, fun, google, Inactive, installation, language button, language code, language management, language support, languages, menu, mirror, multilingual, new language, plugin, Plugins, screenshot, second language, settings button, support, text, text boxes, time, time format, time one, unzip, UTF, utf 8, wget, Wordpress, working time
Posted in Various, Web and CMS, Wordpress | 2 Comments »


How to show country flag, web browser type and Operating System in WordPress Comments
Wednesday, February 15th, 2012!!! IMPORTANT UPDATE COMMENT INFO DETECTOR IS NO LONGER SUPPORTED (IS OBSOLETE) AND THE COUNTRY FLAGS AND OPERATING SYSTEM WILL BE NOT SHOWING INSTEAD,
!!!! TO MAKE THE COUNTRY FLAGS AND OS WP FUNCTIONALITY WORK AGAIN YOU WILL NEED TO INSTALL WP-USERAGENT !!!
I've come across a nice WordPress plugin that displays country flag, operating system and web browser used in each of posted comments blog comments.
Its really nice plugin, since it adds some transperancy and colorfulness to each of blog comments 😉
here is a screenshot of my blog with Comments Info Detector "in action":
Comments Info Detector as of time of writting is at stable ver 1.0.5.
The plugin installation and configuration is very easy as with most other WP plugins. To install the plugin;
1. Download and unzip Comments Info Detector
linux:/var/www/blog:# cd wp-content/pluginslinux:/var/www/blog/wp-content/plugins:# wget http://downloads.wordpress.org/plugin/comment-info-detector.zip
...
linux:/var/www/blog/wp-content/plugins:# unzip comment-info-detector.zip
...
Just for the sake of preservation of history, I've made a mirror of comments-info-detector 1.0.5 wp plugin for download here
2. Activate Comment-Info-Detector
To enable the plugin Navigate to;
Plugins -> Inactive -> Comment Info Detector (Activate)After having enabled the plugin as a last 3rd step it has to be configured.
3. Configure comment-info-detector wp plugin
By default the plugin is disabled. To change it to enabled (configure it) by navigating to:
Settings -> Comments Info DetectorNext a a page will appear with variout fields and web forms, where stuff can be changed. Here almost all of it should be left as it is the only change should be in the drop down menus near the end of the page:
Display Country Flags Automatically (Change No to Yes)Display Web Browsers and OS Automatically (Change No to Yes
After the two menus are set to "Yes" and pressing on Save Changes the plugin is enabled it will immediately start showing information inside each comment the GeoIP country location flag of the person who commented as well as OS type and Web Browser 🙂
Tags: action, Auto, blog, Browsers, change, Comment, Comments, configured, country flag, country location, Detector, Display, downloads, Draft, drop, drop down menus, flag web, How to, Inactive, information, installation, Linux, location, mirror, operating system, os type, page, person, plugin, plugin installation, quot, sake, Save Changes, screenshot, show, Stable, time, transperancy, type, unzip, web browser type, web browsers, web forms, wget, Wordpress, Wordpress Comments, writting, www, zip linux
Posted in Web and CMS, Wordpress | 1 Comment »