A scenario where you might need to execute remote commands as a user remote located Linux / BSD UNIX server is a common task for system admins nowadays.
Passwordless OpenSSH user server login to be able to run backup / log rotation scipts or a data anlysis is handy when used together with some tiny rsync / scp data copy scripts as a way to synchronize SMTP data between Mail servers / abstract databases (such as Redis) or PostgreSQL etc.
The overall picture is like this, we have 2 servers Unix / BSD / Linux OS Server 1 and Server 2 and both has up and running recent version of OpenSSH service.
Server 1 has to login without password to Server 2 and be able to run only a specific lets say privileged command for the sake of security only this restricted command should be runnable.
Allowing a server (LDAP or Local User account) to authorize without password to a remote server (and being able to execute) multiple set of commands poses a security risk, thus it is a good idea to Restict OpenSSH connection to remote server to be able to run only one single command.
This is luckily possible by by default in any modern OpenSSH (which allows authenticated remote users to be limited to rights for running just single sys admin scripts or a just a set of defined scripts only to remote system, this has been a very good alternative to using a complicated sudo /etc/sudoers rules files which anyways could almost always be compromised relatively easy.
Here is the task lets say a username 'sync' has to be able to run commands on your Linux server Server 1 (with a hostname – remote-server.com) to execute a remote script mysqlbackupper.sh that does a daily Linux MySQL backup via a predefined cronjob scheduled task that is triggered daily.
1. DSA or RSA SSH encryption pros and cons which one to choose?
Note this few interesting tihngs on which one to choose:
- DSA (Digital Signature Algorithm) is faster to generate keys where in terms of encryption RSA is faster than
DSA - RSA is faster than DSA in verifying digital signature
- DSA is faster than
RSA generating digital signature - In Data Decryption DSA is faster than RSA
Due to fact encryption is faster in RSA and decryption faster in DSA, if performance on client side is targetted a better one to use will be RSA but if it is targetted to offload remote sshd server (lets say it is old hardware or busy machine where you don't want to put extra load on it then DSA is better choice. id_rsa and id_rsa.pub (public and private keys) are used to encrypt and decrypt the ssh (tunnel) session between the client and the server so most people would be curious which one is more secure RSA or DSA encryption.
Though there are some claims that in terms of security they're more or less the same RSA is generally preferred, because encryption can be up to 4096 bits, where DSA has to be exactly 1024 bits (in the opinion of ssh-keygen). 2048 bits is ssh-keygen's default length for RSA keys, and I don't see any particular reason to use shorter ones. (The minimum possible is 768 bits; whether that's "acceptable" is situational and not recommended).
2. Generating the SSH restricted PRIV and .PUB user key pair
The authorized_key added key string value is to be generated earlier by ssh-keygen command with which we generate a key pair files:
id_dsa and id_dsa.pub
or
id_rsa id_rsa.pub
What kind of files will be generated depends on the type of encryption strength choosen be it DSA or RSA etc. the full list of available ones you can read manual (man ssh-keygen)
$ ssh Remote-Server-1 -v
$ cd /home/postgresqlback
$ ssh-keygen -t dsa
or
$ ssh-keygen -t rsa
Provide a filename and passphrase, the output files will be id_dsa / id_dsa.or id_rsa / id_rsa.pub pub key-pair and stored in ~/.ssh of username with which the command was run.
3. Set up /home/username/authorized_keys on Server 2
$ ssh Remote-server2 -v
Next you will have to create the authorized_keys file on the remote server wherehy you will be accessing without password and copy the content of id_rsa.pub / id_dsa.pub key to /home/username/authorized_keys (in that case it will be /home/postgresqlback/.ssh/authorized_keys) the postgresqlback was previously created with adduser on Server 2
$ chmod 600 /home/postgreback/authorized_keys
There is no special need to do anything too much special to make the SSH command restriction functionality available but just, the right record in /homeusername/.ssh/authorized_keys or if supposed to be run as root user in /home/postgreback/.ssh/authorized_keys on the server where you want to place the restriction following about a file syntax like OPTIONS-1 KEY_TYPE / OPTIONS-2 KEY_TYPE / OPTIONS-3 KEY_TYPE.
To authenticate with a key from a remote PC using the sshd service on Server 1 you need to have copied the key to /home/user/.ssh/authorized_keys (with a favourite text editor lets say vim from Server 1 to Server 2 so the file should contains the ssh public keys and users (list) allowed to passwordless login to server.
authorized_keys's data ordering (as mentioned above) is in form:
OPTIONS-1 KEY_TYPE PUBLIC_KEY_STRING COMMENT-1
…
OPTIONS-2 KEY_TYPE PUBLIC_KEY_STRING COMMENT-2…
OPTIONS-3 KEY_TYPE PUBLIC_KEY_STRING COMMENT-3
…
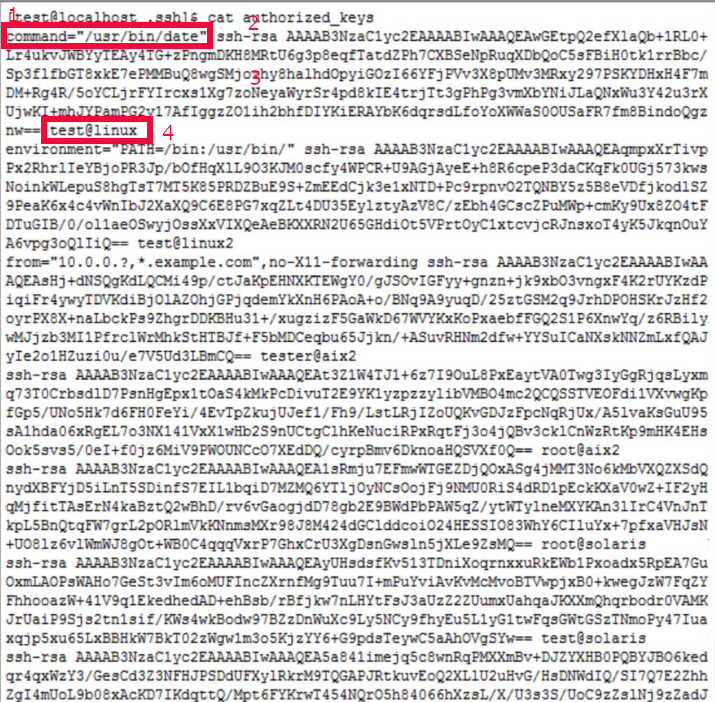
I've placed this example for more clarity the 4 fields of a public key string are marked with 1,2,3,4.
More insight on authorized_keys is on ssh.com authorized_keys documentation
Here is a real time example of a postgresqlbackup.sh that is being executed on a login with the user postgresqlback from Linux Server 1 to Linux Server 2:
command="/usr/sbin/postgresqlbackup.sh",no-port-forwarding,no-x11-forwarding,no-agent-forwarding KEY_TYPE KEY COMMENT
A shell script command to run on remote server where you want to run it and limit its execution only (below is taken from /home/postgresqlback/.ssh/authorized_keys:
$ tail -n 1 /home/postgresqlback/.ssh/authorized_keys
command="/usr/sbin/postgresqlbackup.sh",no-port-forwarding,no-x11-forwarding,no-agent-forwarding ssh-dss AAAAB3….o9M9qz4xqGCqGXoJw= postgresqlback@remote-host-name-which-accesses-without-pass
As you see there is the OPTIONS given to OPTIONS-1 command argument
no-port-forwarding,no-x11-forwarding,no-agent-forwarding
the reason for them is as we want to restrict port forwarding and agent-forwarding (No X will be used at all) and we don't want to have SSH local / remote or Dynamic SSH tunneling enabled because of obvious (improve) security reasons.
In case if no interactive terminal will be used by the script as is the case it is also a good idea to put the no-pty next to the OPTIONS string.
no-port-forwarding,no-x11-forwarding,no-agent-forwarding,no-pty
Finally the restricted ssh command to run might look something like:
command="/usr/sbin/postgresqlbackup.sh",no-port-forwarding,no-x11-forwarding,no-agent-forwarding,no-pty ssh-dss AAAAB3….o9M9qz4xqGCqGXoJw= postgreback@remote-host-name-which-accesses-without-pass
If you wonder ssh-dss is not ssh-dsa, its actually a naming convention as the Digital Signature Algorithm (DSA) is published in the Digital Signature Standard (DSS) by the NIST in FIPS 186.
3. Testing restricted SSH command user run set-up
From Server-1 (after lets say logging in via ssh to it) issue:
$ ssh -i FILENAME_with_private_auth_key username@Linux-Server2 -v
Here note that the FILENAME_with_private_auth_key (is your earlier generated id_rsa / id_dsa) as
this file will let anyone who have it at hands able to login to Linux-Server2 without any password
authentication prompt you have to make sure this file permissions are good restricted readable only
for its user owner or if run with root by root (chmod 600) might a be very good idea here.
For further executing the script via a simple user ssh to Linux-Server2 you might want to use in your trigger script or cronjob (situated on Linux Serve 1) also the -q (ssh quiet output) cmd argument:
ssh -q -i FILENAME_with_private_auth_key username@Linux-Server2
4. Configuring authorized_keys restricted given command to read / expect (fixed) arguments
Providing $SHELL command passed arguments to the script (on remote Server 2) is possible from Server 1 via given variable like $SHELLARG1,SHELLARG2,SHELLARG3 OPTIONs given below is example authorized_key file record
command="/usr/sbin/postgresqlbackup.sh $SHELLARG1 $SHELLARG2 SHELLARG3",no-port-forwarding,no-x11-forwarding,no-agent-forwarding ssh-dss AAAAB3….o9M9qz4xqGCqGXoJw= postgresqlback@remote-host-name-which-accesses-without-pass
This will make the remote script understand SHELL variables might contain anything which the remote script postgresqlbackup.sh (on Server 2) will accept as pipeline input from Server 1.
Be aware that passing string arguments with has spaces or special characters inside might be problematic so always try to use a straightforward SHELL variables such as PATH, TEMP, PWD etc.
5. Configuring authorized_keys command user to use dynamicly procuded (arbitrary) arguments
If not only predefined strings should be accepted as arguments but any arbitrary argument should be allowed to be passed to the command there is a special variable
understood by sshd daemon
$SSH_ORIGINAL_COMMAND
The $SSH_ORIGINAL_COMMAND variable used in authorized_keys is a very interesting one and it really puzzled me the first time I've seen it in a Bash Shell script as I couldn't fully grasp the meaning but it turned out to be very simple as it can be used inside /usr/sbin/postgresqlbackup.sh to return any number of passed arguments lets say backup locations directories ( /usr/local /var/log /usr/bin /bin …) to the and that would be red and processed by the script
command="/usr/sbin/postgresqlbackup.sh $SSH_ORIGINAL_COMMAND",no-port-forwarding,no-x11-forwarding,no-agent-forwarding,no-pty ssh-dss AAAAB3….o9M9qz4xqGCqGXoJw= postgreback@remote-host-name-which-accesses-without-pass
The later use of it is from Server 1 you just pass the desired arguments
$ ssh foo@bar arg1 arg2 arg3 arg4 arg5
The most basic /usr/bin/run-script.sh wrapper to place on Linux 2 would be something like:
#!/usr/bin/env bash
case "$SSH_ORIGINAL_COMMAND" in
/var/lib/authorized-scripts/*)
$SSH_ORIGINAL_COMMAND
;;
*)
exit 1
;;
esac
But this example is SECURITY UNSAFE as someone might decide to run something like:
ssh -l user your-server /var/lib/authorized-scripts/../../../bin/rm -rf /
!!! AGAIN BE CAUTIOUS AND BE WARNED that without a properly crafted script anyminor error in it might be fatal, for example if the script is running with superuser credentials (root) on remote machine, some local user or a malicious attacker that gets access to the server might decide to run something likea bove's rm -rf /* might destroy your server !!!
Instead for a /usr/sbin/run-script.sh you might Contain something like:
#!/bin/shset — $SSH_ORIGINAL_COMMAND
case "$1" in
/var/lib/authorized-scripts/*)
;;
*)
exit 1
esaccommand="${1#/var/lib/authorized-scripts/}"
shift
case "$command" in
*/*)
# Simplest is to reject anything with a slash…
exit 1
.*)
# …and anything starting with dot.
# If you need to whitelist subdirectories of /var/lib/authorized-scripts
# then you need much more sophisticated pathname parsing and care.
exit 1
*)
;;
esacexec "/var/lib/authorized-scripts/$command" "$@"
As you can read above script (wrapper) example allows multiple restricted scripts to be run and would prevent you adding multiple command lines to authorized_keys and I've given this as example taken from StackExchange (Security if only allowing a few vetted commands).
Hope this is useful to some sys admin out there, if you find some other intereteresting use of the command ssh authorized_keys functionality or a script that tightents its use please share.