Posts Tagged ‘laptop’

Make Laptop Sleep on LID (Monitor) close in Linux Debian and Ubuntu systemd Linux

Monday, June 22nd, 2020

make-laptop-auto-sleep-on-lid-close-in-Linux-Ubuntu-Debian-Linux


I need to make my laptop automatically sleep on LID Screen close but it doesn't why?

If have used your laptop for long years with Windows or any Windows user is used to the default beavrior of Windows to automatically sleep the computer on PC close. This default behavior of automatically sleep on LID Close has been Windows standard for many years
and the reason behind that usually laptop is used for mobility and working on a discharging battery so a LID screen close puts the laptop in (SLEEP) BATTERY SUSPEND MODE aiming to make the charged battery last longer. However often for Desktop use in the Office LID close 
trigger of laptop sleep mode is annoying and undesired I've blogged earlier on that issue and how to make laptop not to sleep on LID close on M$ Windows 10 here.

This bahavior was copied and was working in many of the Linux distributions for years however in Debian GNU / Linux and Ubuntu 16.X this feature is often not properly working due to a systemd bug. Of course closing the notebook LID screen without putting
the PC in sleep mode is not a bug but a very useful feature for those who use their laptop as a Desktop machine that is non-stop running, however for most ppl default behavior to auto-suspend the computer on Laptop Monitor close is desired.

Here is how to  force the close of the laptop lid to go to suspend/sleep mode and when open the lid, it wake it up.


1. First requirement is to make sure the laptop has installed the package pm-utils, if it is not there install it with:


# apt-get install –yes pm-utils


2. Next we need to edit logind.conf and append 3 variables


# vim /etc/systemd/logind.conf


Normally the file should have a bit of commented informative lines as well as a commented variables that could be enabled like so:


[Login]
#NAutoVTs=6
#ReserveVT=6
#KillUserProcesses=no
#KillOnlyUsers=
#KillExcludeUsers=root
#InhibitDelayMaxSec=5
#HandlePowerKey=poweroff
#HandleSuspendKey=suspend
#HandleHibernateKey=hibernate
#HandleLidSwitch=suspend
#HandleLidSwitchExternalPower=suspend
#HandleLidSwitchDocked=ignore
#PowerKeyIgnoreInhibited=no
#SuspendKeyIgnoreInhibited=no
#HibernateKeyIgnoreInhibited=no
#LidSwitchIgnoreInhibited=yes
#HoldoffTimeoutSec=30s
#IdleAction=ignore
#IdleActionSec=30min
#RuntimeDirectorySize=10%
#RemoveIPC=yes
#InhibitorsMax=8192
#SessionsMax=8192


These entries are usually the files that are used by default as a systemd settings.
Before starting make a copy just you happen to mess systemd.conf, e.g.:


cp -rpf /etc/systemd/logind.conf /etc/systemd/logind.conf_bak


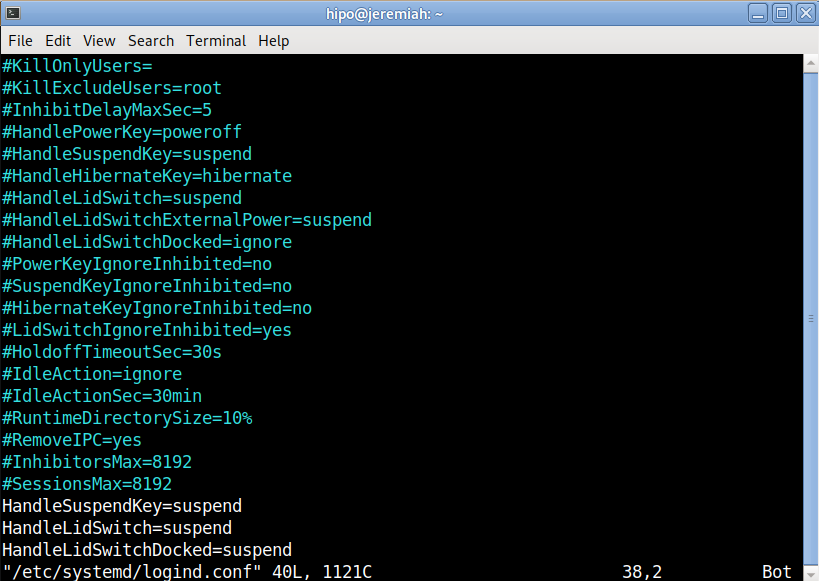
To make the PC LID close active append in the end of file below 3 lines:


HandleSuspendKey=suspend
HandleLidSwitch=suspend
HandleLidSwitchDocked=suspend


systemd-logind-conf-enable-suspend-sleep-on-laptop-lid-screen-close-linux

Save the file and to make systemd daemon reload restart the PC, even though theoretically systemd can be reloaded to digest its new /etc/systemd/logind.conf with:


# systemctl daemon-reexec


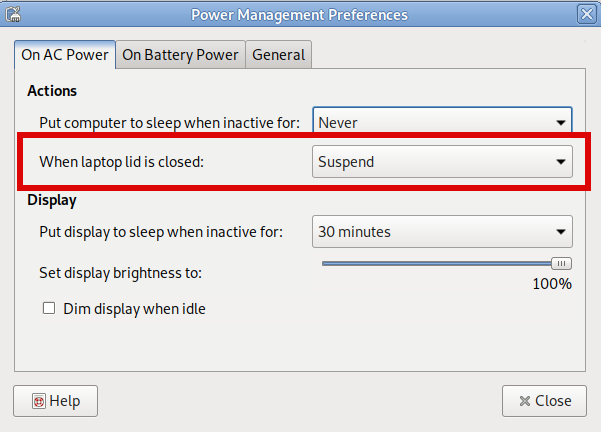
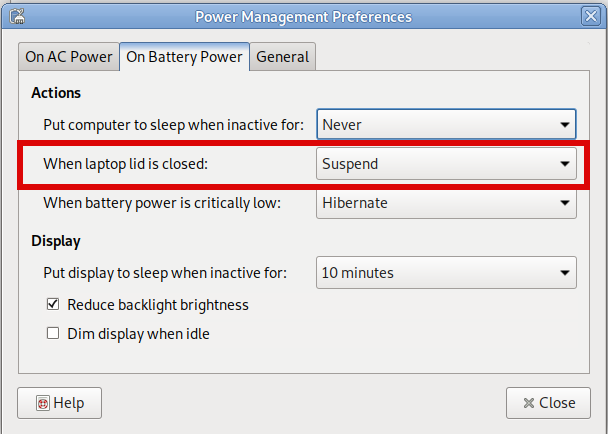
3. Assure yourself the Power Management LID setting of the Desktop Graphical User Interface are set to SUSPEND on close


I use MATE Desktop environment as it is simplistic and quite stable fork of GNOME 2.0, anyway depending on the GUI used on the Linux powered laptop e.g. GNOME / KDE Plasma / XFce etc. make sure the respective
 

Control Panel -> Power Management


settings are set to Force the Laptop Screen LID SUSPEND on Close.

Below is how this is done on MATE:

power-management-preferences-when-lid-is-closed-MATE-on-AC-power

power-management-preferences-when-lid-closed-on-battery-suspend

That's all folks, now close your Laptop and enjoy it going to sleep, open it up and get it awaked 🙂 Cheers ! 


Make laptop not to sleep on close on Microsoft Windows 10 / Disable notebook LID close sleep Windows

Thursday, November 8th, 2018

Windows10-Define-power-options-actions-settings

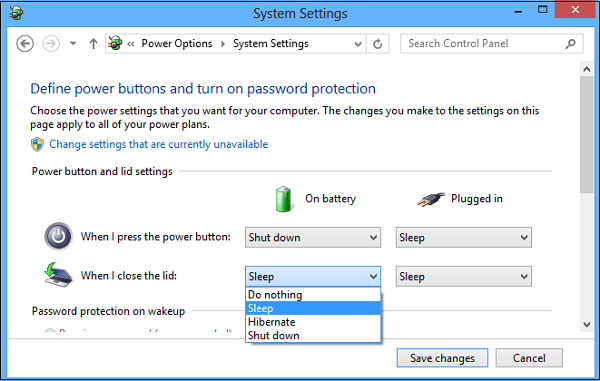
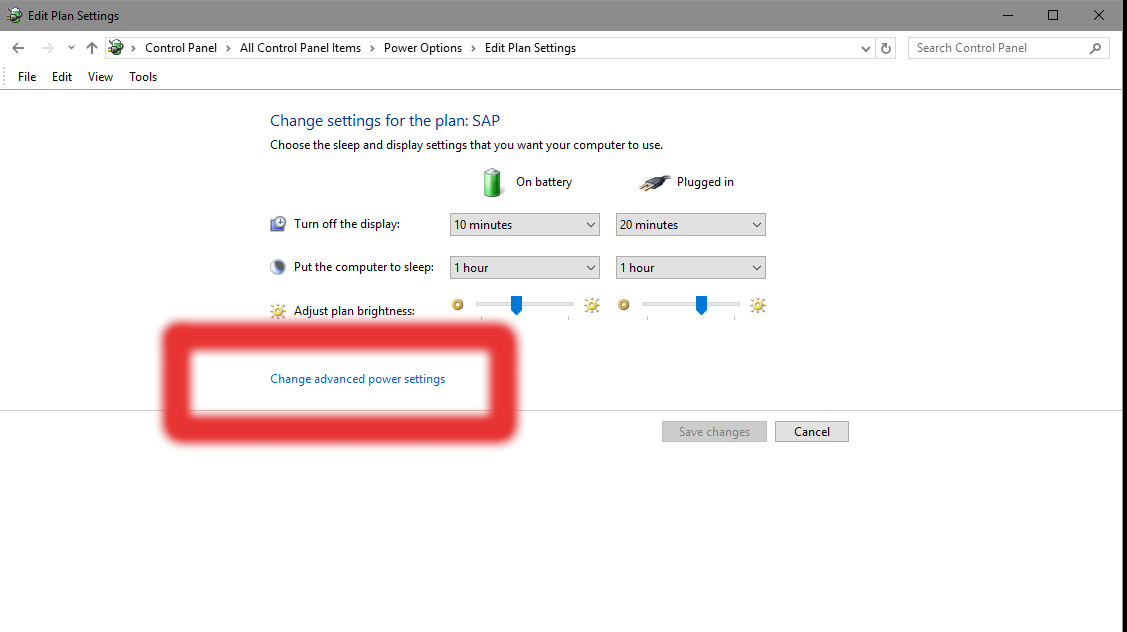
I have to use Windows 10 Enterprise on a notebook for Work purposes once again and use a Docking station connected to an external Display Monitor at the Company Office work location one of the first things to configure is to disable LID Display Sleep on laptop close because otherwise the notebook has to be left opened almost half opened in order to work with the PC to change that unwanted behavior there is an easy way via Windows Control Panel configuration, here is how:

Open

Windows Control Panel 


navigate to:

edit-plan-settings-power-settings-windows-10.png


Power Options


choose:

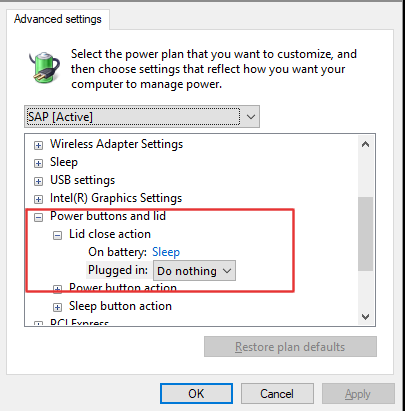
Change advanced power settings, scroll down a bit to:

power-options-power-buttons-and-lid-lid-close-action-do-nothing-windows-10-scresnshot


Power Buttons and lid (menu) 


press over it from sub-menu
 

Plugged in


Select


Do nothing


That's all from now on closing the notebook when plugged in to the Dock station or to a direct External Monitor will no longer do the sleep.

As you can see from the menus, there is a lot of triggering rules to configure further from Power Management (Advanced Settings) on how applications / USBs / Multimedia and Hard Disks should behave under different power conditions so if you have the time I recommend you go through them and check them for yourself.

Why don’t you use Window Maker GNU Step to improve your computer interaction performance

Monday, October 30th, 2017

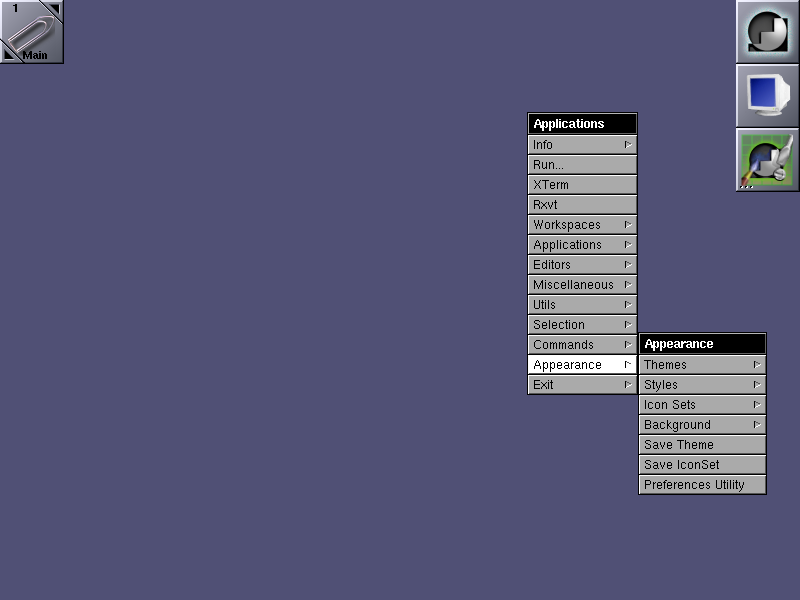
Why-dont-you-use-Window-Maker-graphical-environment-for-your-GNU_Linux-FreeBSD-desktop

If you're pissed off too already of GNOME 3 Unity / GNOME 3 Flashback and KDE Plasma  as I am you perhaps are looking for something more light weigth but you're not okay with default Debian Cinnanom GUI environment or you don't feel confortable for system administration jobs and programming with XFCE then perhaps you would like to give a try to something more old school but build with good design in Mind.

Those who are fans of the evil genius Steve Jobs (as Richard Stallman use to call him), definitely Remember NeXT company and the revolutionary Graphic Environment they tried to develop NeXT Step then you'll be happy to hear about GNUStep  which historically was called AfterStep and is a Free Software remake of NextStep graphical environment for Free and Open Source operating systems (FOSS) such as GNU / Linux and FreeBSD / OpenBSD / NetBSD etc.

Amanda_the_panda_mascot_of_window_maker-graphical-environment-system

Amanda the Panda is the mascot of Window Maker. She was designed by Agnieszka Czajkowska.

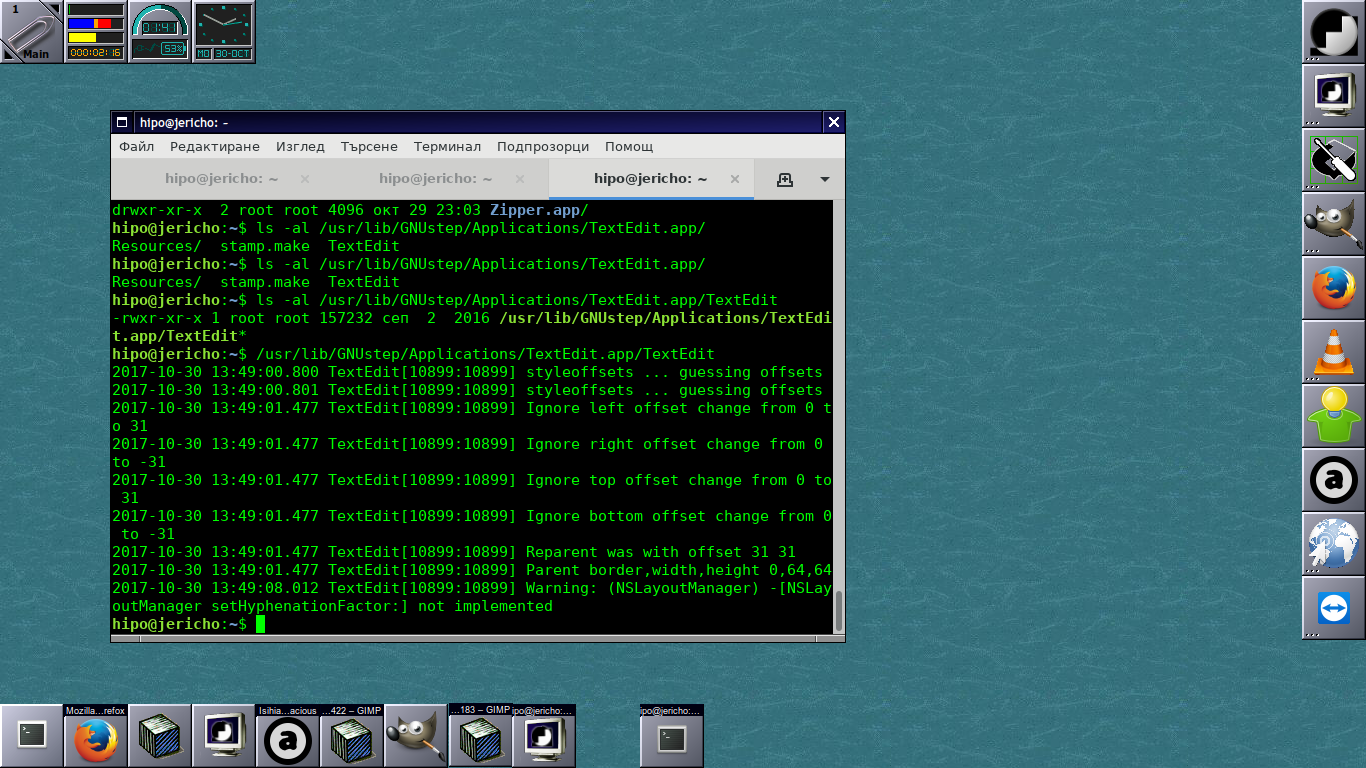
The good thing about Window Maker and the complete bunch of desktop environment GNUStep is it much lighter and less complex than the more and more becoming bloated modern Free Software graphical environments, it definitely easifies the way the user interacts with basic browsing with Firefox / Opera, terminal code writting or command system administration and basic chat functionalities such as with Gajim or Pidgin and basic email writting operatins be it with some text email client such as Mutt or with Thunderbird. Its great also to reduce the overall load the Operating System puts on your brain so you can have more time to invest in more useful stuff like programming.

windows-maker-increase-performance-of-work-with-your-computer-howto-wmaker-screenshot

After all simplicity in Operating System is a key for an increased productivity with your computer.
Besides that stability of Window Maker is much better when compared to GNOME and GNOME 2 fork MATE graphical environment which nowadays in my opinion is becoming even more buggy than it used to be some years ago.

Below is how Window Makers site describes Window Maker:

"Window Maker is an X11 window manager originally designed to provide integration support for the GNUstep Desktop Environment. In every way possible, it reproduces the elegant look and feel of the NEXTSTEP user interface. It is fast, feature rich, easy to configure, and easy to use. It is also free software, with contributions being made by programmers from around the world.

Window Maker has a stable user interface since many years and comes with a powerful GUI configuration editor called WPrefs, which removes the need to edit text-based config files by hand. It supports running dockapps which make everyday tasks such as monitoring system performance and battery usage, mounting devices or connecting to the internet very easy. Please see the features section for more specifics on what Window Maker can do, and how it compares with other popular window managers."

Window Maker is bundled with a number of useful applications which gives ability to put Dock applets easily for easily intearcive desktop update of current Weather Report, Monitoring Network Traffic, TV Player (video4linux), laptop battery info dock, CD player and Volume control management app, text editor, pdf viewer, integrated Mail application, Calculator, RSS Reader, GNUStep games and much useful things to customize from the desktop resembling many of the basic features any other graphical environment such as GNOME / KDE Provides.

The User Interface (UI) of Window Maker is highly configurable with an integrated WMaker tool called

WPrefs

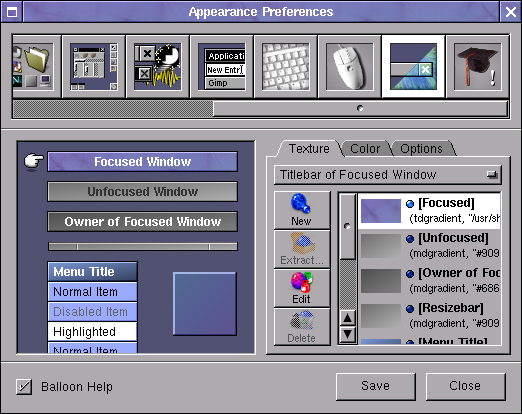
Why-dont-you-use-Wmaker-for-better-desktop-performance-Windowmaker_colour_preferences

All generated settings from WPrefs (Window Maker Prefernces) GUI tool are to be stored in a plaintext file:
 

~/GNUstep/Defaults/WMRootMenu

All Wmaker configurations are stored inside ~/GNUstep/ (Your user home GNUStep), so if you're to become its user sooner or later you will have to get acquired to it.

Wmaker is very minimalist and the performance is killing so Window Maker is perhaps the number one choice Graphical Environment to use on Old Computers with Linux and BSD.

Below is a full list of all packages installed on my Debian GNU / Linux that provides WMaker / GNUStep great functionalities:

root@jericho:/home/hipo# dpkg -l |grep -i wmaker; dpkg -l |grep -i gnustep
ii  wmaker                                        0.95.8-2                             amd64        NeXTSTEP-like window manager for X
ii  wmaker-common                                 0.95.8-2                             all          Window Maker – Architecture independent files
ii  wmbattery                                     2.50-1+b1                            amd64        display laptop battery info, dockable in WindowMaker
ii  wmcdplay                                      1.1-2+b1                             amd64        CD player based on ascd designed for WindowMaker
ii  wmifs                                         1.8-1                                amd64        WindowMaker dock app for monitoring network traffic
ii  wmnut                                         0.66-1                               amd64        WindowMaker dock app that displays UPS statistics from NUT's upsd
ii  wmpuzzle                                      0.5.2-2+b1                           amd64        WindowMaker dock app 4×4 puzzle
ii  wmrack                                        1.4-5+b1                             amd64        Combined CD Player + Mixer designed for WindowMaker
ii  wmtv                                          0.6.6-1                              amd64        Dockable video4linux TV player for WindowMaker
ii  wmweather                                     2.4.6-2+b1                           amd64        WindowMaker dockapp that shows your current weather
ii  wmweather+                                    2.15-1.1+b2                          amd64        WindowMaker dock app that shows your current weather
ii  addressmanager.app                            0.4.8-2+b2                           amd64        Personal Address Manager for GNUstep
ii  agenda.app                                    0.42.2-1+b7                          amd64        Calendar manager for GNUstep
ii  charmap.app                                   0.3~rc1-3                            amd64        Character map for GNUstep
ii  charmap.app-common                            0.3~rc1-3                            all          Character map for GNUstep (arch-independent files)
ii  cynthiune.app                                 1.0.0-1+b4                           amd64        Music player for GNUstep
ii  dictionaryreader.app                          0+20080616+dfsg-2+b6                 amd64        Dict client for GNUstep
ii  edenmath.app                                  1.1.1a-7.1+b1                        amd64        Scientific calculator for GNUstep
ii  gnumail.app                                   1.2.2-1.1                            amd64        Mail client for GNUstep
ii  gnumail.app-common                            1.2.2-1.1                            all          Mail client for GNUstep (common files)
ii  gnustep                                       7.8                                  all          User applications for the GNUstep Environment
ii  gnustep-back-common                           0.25.0-2                             amd64        GNUstep GUI Backend – common files
ii  gnustep-back0.25                              0.25.0-2                             all          GNUstep GUI Backend
ii  gnustep-back0.25-cairo                        0.25.0-2                             amd64        GNUstep GUI Backend (cairo)
ii  gnustep-base-common                           1.24.9-3.1                           all          GNUstep Base library – common files
ii  gnustep-base-doc                              1.24.9-3.1                           all          Documentation for the GNUstep Base Library
ii  gnustep-base-runtime                          1.24.9-3.1                           amd64        GNUstep Base library – daemons and tools
ii  gnustep-common                                2.7.0-1                              amd64        Common files for the core GNUstep environment
ii  gnustep-core-devel                            7.8                                  all          GNUstep Development Environment — core libraries
ii  gnustep-core-doc                              7.8                                  all          GNUstep Development Environment — core documentation
ii  gnustep-devel                                 7.8                                  all          GNUstep Development Environment — development tools
ii  gnustep-games                                 7.8                                  all          GNUstep games
ii  gnustep-gui-common                            0.25.0-4                             all          GNUstep GUI Library – common files
ii  gnustep-gui-doc                               0.25.0-4                             all          Documentation for the GNUstep GUI Library
ii  gnustep-gui-runtime                           0.25.0-4+b1                          amd64        GNUstep GUI Library – runtime files
ii  gnustep-icons                                 1.0-5                                all          Several free icons for use with GNUstep and others
ii  gnustep-make                                  2.7.0-1                              all          GNUstep build system
ii  gnustep-make-doc                              2.7.0-1                              all          Documentation for GNUstep Make
ii  gomoku.app                                    1.2.9-2+b2                           amd64        Extended TicTacToe game for GNUstep
ii  gorm.app                                      1.2.23-1                             amd64        Visual Interface Builder for GNUstep
ii  gridlock.app                                  1.10-4+b2                            amd64        Collection of grid-based board games for GNUstep
ii  grr.app                                       1.0-1+b2                             amd64        RSS reader for GNUstep
ii  gworkspace-common                             0.9.3-1                              all          GNUstep Workspace Manager – common files
ii  gworkspace.app                                0.9.3-1+b2                           amd64        GNUstep Workspace Manager
ii  helpviewer.app                                0.3-8+b3                             amd64        Online help viewer for GNUstep programs
ii  libaddresses0                                 0.4.8-2+b2                           amd64        Database API backend framework for GNUstep (library files)
ii  libaddressview0                               0.4.8-2+b2                           amd64        Address display/edit framework for GNUstep (library files)
ii  libgnustep-base-dev                           1.24.9-3.1                           amd64        GNUstep Base header files and development libraries
ii  libgnustep-base1.24                           1.24.9-3.1                           amd64        GNUstep Base library
ii  libgnustep-gui-dev                            0.25.0-4+b1                          amd64        GNUstep GUI header files and static libraries
ii  libgnustep-gui0.25                            0.25.0-4+b1                          amd64        GNUstep GUI Library
ii  libpantomime1.2                               1.2.2+dfsg1-1                        amd64        GNUstep framework for mail handling (runtime library)
ii  libpopplerkit0                                0.0.20051227svn-7.1+b9               amd64        GNUstep framework for rendering PDF content (library files)
ii  libpreferencepanes1                           1.2.0-2+b2                           amd64        GNUstep preferences library – runtime library
ii  librenaissance0                               0.9.0-4+b6                           amd64        GNUstep GUI Framework – library files
ii  librenaissance0-dev                           0.9.0-4+b6                           amd64        GNUstep GUI Framework – development files
ii  librsskit0d                                   0.4-1                                amd64        GNUstep RSS framework (runtime library)
ii  mknfonts.tool                                 0.5-11+b5                            amd64        Create nfont packages for GNUstep
ii  price.app                                     1.3.0-1                              amd64        Image filtering and manipulation using GNUstep
ii  projectcenter.app                             0.6.2-1                              amd64        IDE for GNUstep Development
ii  renaissance-doc                               0.9.0-4                              all          GNUstep GUI Framework – documentation
ii  systempreferences.app                         1.2.0-2+b2                           amd64        GNUstep preferences application
ii  terminal.app                                  0.9.8.1-1                            amd64        Terminal Emulator for GNUstep
ii  textedit.app                                  4.0+20061029-3.5+b1                  amd64        Text editor for GNUstep
ii  viewpdf.app                                   1:0.2dfsg1-5+b2                      amd64        Portable Document Format (PDF) viewer for GNUstep
ii  zipper.app                                    1.5-1+b2                             amd64        Archive manager for GNUstep

Well yes it is true Window Maker is not a spoon for every mouth, those who want to have more confortable desktop environment better look out at other options as Window Maker is Unix / Linux graphical environment that fits better hackers, computer developers and system administrators.

Anyhow if you have some old family member that has to use an old computer architecture and the person is only to use mainly just browser to check email, youtube and basic surfing then Wmaker will be a great choice as it will consume little CPU and Memory much less than the heavy and computer resources sucking GNOME and KDE.

I've historically used Wmaker also with its teminal emulator rxvt (VT102 terminal emulator for the X Windows System) which is a kinda of improved version of xterm (the default terminal program bundled with Xorg server), but for those who are already used to Gnome Terminal nice tabs perhaps that would be not the terminal of choice.

rxvt was build to match well the look and feel of AfterStep and consequently Wmaker, its scrollbar was aiming to very much resemble NeXTStep style scrollbar

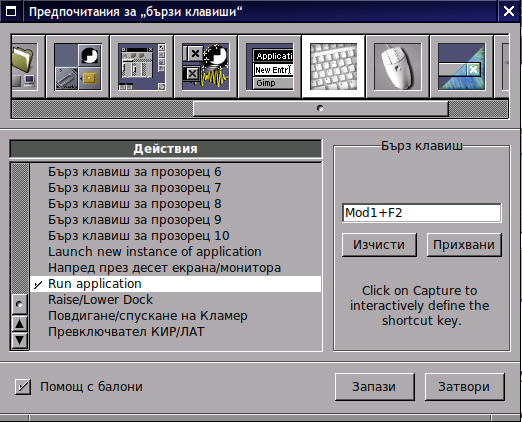
windowmaker-bind-run-application-to-make-alt-f2-work-like-in-gnome

Most "custom" shortcuts are used to launch specific applications. To add your own keyboard shortcut for an application, go to the "Applications Menu Definition" panel in the Preferences app.  Select the application item in the menu for which you want to create a shortcut, then use the "capture" button to capture the keystrokes you want to assign to that item.  In the screenshot, I've assigned Mod1 + W to open Firefox.

Above  screenshot shows how to map the Run Application keyboard bind to behave like GNOME Run application ALT + F2

window-maker-run-command-like-gnome-run-screenshot-gnu-linux-unix-freebsd

Customizing background of Window Maker

Because WMaker is so simple made and targetting more of a developer audience for use it doesn't have a special graphical interaface to set a Background if you like so, but instead you need to use a wmsetbg command to do so:
 

wmsetbg -s -u filename.jpg


WMSetBG command stands for WindowMaker Set Background


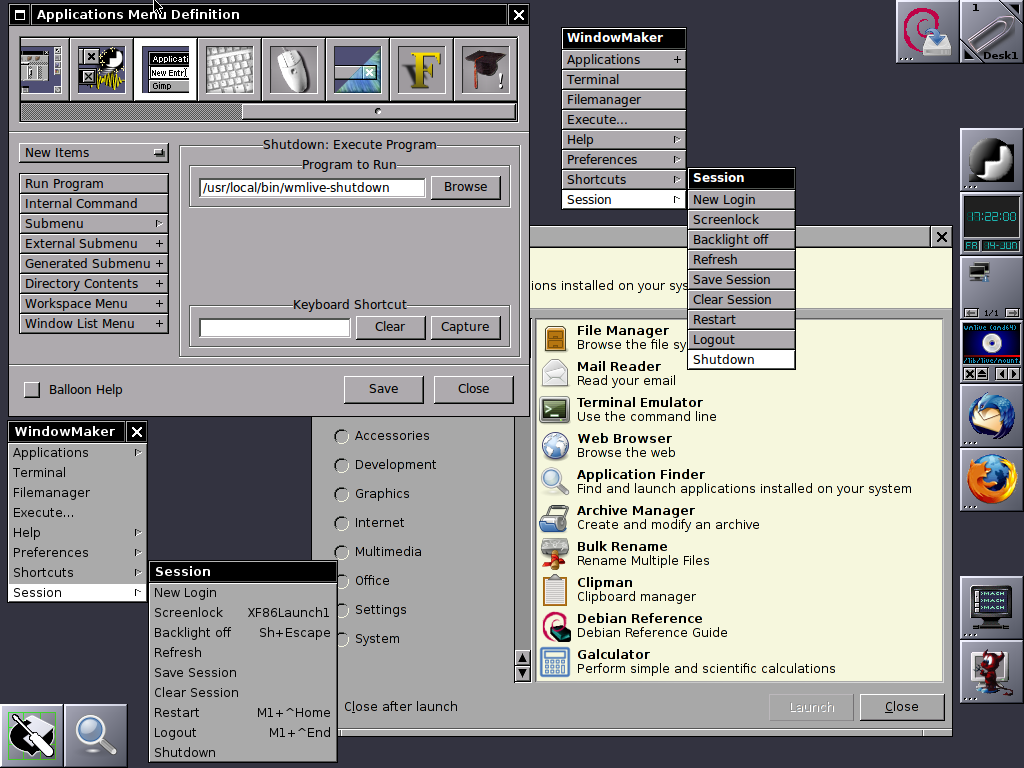
If you're too lazy to install and start configuring wmaker, there is a Window Maker LiveCD, you can run Window Maker through LiveCD in Virtual Machine such as VirtualBox to get feeling what you're about to get if you install and start using Wmaker on your Computer.

window-maker-livecd-screenshot-synaptic+wprefs
 

Well at first with Window Maker you might feel confused and quickly irritating missing the already established way to work with your computer, but that's just for a starter sooner you will realize, that for using a limited number of applications for work wmaker, makes you much more efficient. Moreover using your computer with Wmaker can rewire your brain circuits to think a little bit different.

Once you switched to Window Maker you will likely want to have a graphical option to connect to Wireless Networks especially if you're using Wmaker on a notebook it is convenient to not always manually do scan for networks with
 

Iwlscan


commad and use wpasupplicant command to connect instead you can just install wicd and stop default Gnome Network Manager (called Network Manager), you can do so by running as root:
 

service network-manager stop
apt-get install wicd wicd-gtk
service wicd start
wicd-gtk &


Improve your night sleep when using PC with Windows XP late at night with F.lux

Tuesday, February 26th, 2013

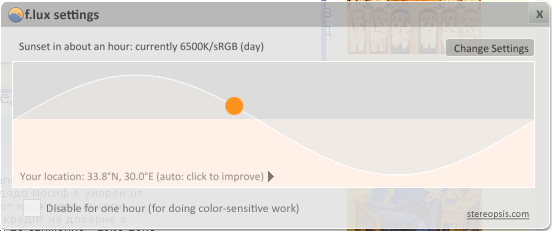
f.lux auto detect timezone geographic location after install screenshot microsoft windows XP

After testing F.lux on Mac OS X, I decided to install it and test it on a friend's Windows XP OS. Up is a screenshot from the program right after installed.

Just like on MAC OS X F.lux auto set the Geographic Location and started changing the Gamma of the screen to reddish at night. As you can see the change of Screen Color gamma can be set in various intervals with default of auto changing monitor backlid gamma every 20 secs.

On early day, when usually outside you see the day light because Sun Light shines on our planet, the color gamma is auto-configured to the normal light one.
I think in short future all computer vendors should think of embedding F.lux or some similar application to every Desktop PC, laptop, Phone and Tablet.


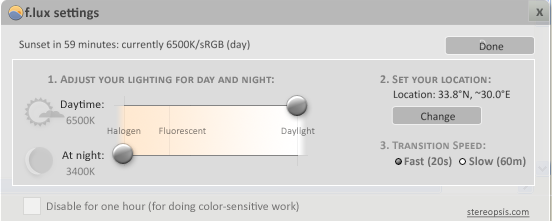
f.lux settings improve night sleep auto set monitor gamma ms windows xp

When F.lux is active a tiny icon with the F.Lux logo is visible on Taskbar like in below screenshot. From there you can view f.lux settings, see in what Color gamma mode the program works at present or to manually set custom color gamma. Enjoy

Fixing Compaq Presario CQ71-330ED can’t connect to wireless on 64-bit Windows 7

Thursday, January 10th, 2013

Fixing Windows 7 Wireless Compaq Presario CQ71 330ED notebook / What makes it not to connect to wi-fi

I had to fix one Notebook Compaq CQ71-330ED which was failing connecting to a home Wireless Router. The notebook was running 64 Bit Windows 7 installed from scratch just few weeks ago. The PC could connect normally via a LAN cable to the Internet, but can't connect to the Wireless Router. I thought the issue might be due to the Wireless Router, thus checked with my laptop if I can connect to the WPA2 network with the pass key. Being able to connect from my own PC make it clear the problem is somewhere in Windows 7 (most likely the drivers). I checked in

Control Panel -> Device Manager


to make sure the Wireless drivers were appearing as properly installed, there all seemed fine, Wireless was detected as:

Intel (R) Centrino Wireless-N 1000

I tried playing with Wireless settings from
 

Control Panel -> Network and Internet

stopped Wireless Power Saving, as I know with some wireless devices it creates problems. Also tried settings the default wireless network support from A B G N to A B G. I tried playing with changing the Workgroup name to WORKGROUP., Disabling / Enabling the Wireless Network, checking if settings for IP obtain for IPv4 are not messed up etc., but all seemed okay and still the PC weirdly was unable to connect to Wi-fi network.

I suspected, the drivers though reporting as properly installed and working with the Wi-Fi card are the point of failure. So removed driver for Wireless card and tried re-installing.

As the model of laptop was COMPAQ Presario CQ71-330ED, I looked for this model driver, but again strangely CQ71-330ED was not among the Presario models on www.hp.com drivers section.

I improvised and dfecided to download 64 bit Wi-Fi drivers for the model which seemed to be closest to CQ71-330ED – Compaq Presario CQ71-120ED.

Install the Intel 64-bit Wireless Driver for notebook CQ71-120ED solved the Wi-Fi Router connection issues. Re-connecting once again to the WPA network just worked 🙂

A mirror of Wireless driver that worked for me . After installing the driver the Wireless was detected as:
 

Intel (R) Wifi Link BGN


How to record microphone input sound (only) using good old ffmpeg

Tuesday, December 25th, 2012

The good old ffmpeg, along with being able to capture sound and video from your Linux Desktop or a certain Window and Skype whatever WebCamera input is also able to record sound from both camera or embedded laptop microphone. Here is how:

# ffmpeg -f alsa -ac 2 -i pulse   -acodec pcm_s16le -vcodec libx264 -vpre lossless_ultrafast -threads 0  -y  myVOICE.wav

This as you can see from arguments, uses GNOME's pulseaudio (audio service) and ALSA. Sound is first streamed through alsa and then the sound inflow is passed to be processed and multipled in a separate sound channel by pulseaudio. This method though said to be working fine on Ubuntu Linux is not working well on some other Linux distributions like Debian if one is using ALSA configured to use a software sound multiplexor via the so called – alsa dsnoop interface (previously I write how to use it in order to make Skype and other programs use SoundBlaster proper – article is here)

Below is the output warning I got whether trying ffmpeg with -f alsa and -i pulse arguments:

hipo@noah:~/Desktop$ ffmpeg -f alsa -ac 2 -i pulse   -acodec pcm_s16le -vcodec libx264 -vpre lossless_ultrafast -threads 0  -y  myVOICE.wav
FFmpeg version SVN-r25838, Copyright (c) 2000-2010 the FFmpeg developers
  built on Sep 20 2011 17:00:01 with gcc 4.4.5
  configuration: --enable-libdc1394 --prefix=/usr --extra-cflags='-Wall -g ' --cc='ccache cc' --enable-shared --enable-libmp3lame --enable-gpl --enable-libvorbis --enable-pthreads --enable-libfaac --enable-libxvid --enable-postproc --enable-x11grab --enable-libgsm --enable-libtheora --enable-libopencore-amrnb --enable-libopencore-amrwb --enable-libx264 --enable-libspeex --enable-nonfree --disable-stripping --enable-avfilter --enable-libdirac --disable-decoder=libdirac --enable-libschroedinger --disable-encoder=libschroedinger --enable-version3 --enable-libopenjpeg --enable-libvpx --enable-librtmp --extra-libs=-lgcrypt --disable-altivec --disable-armv5te --disable-armv6 --disable-vis
  libavutil     50.33. 0 / 50.43. 0
  libavcore      0.14. 0 /  0.14. 0
  libavcodec    52.97. 2 / 52.97. 2
  libavformat   52.87. 1 / 52.87. 1
  libavdevice   52. 2. 2 / 52. 2. 2
  libavfilter    1.65. 0 /  1.65. 0
  libswscale     0.12. 0 /  0.14. 1
  libpostproc   51. 2. 0 / 51. 2. 0
[alsa @ 0x633160] capture with some ALSA plugins, especially dsnoop, may hang.

where concrete programs, are run which take use of OSS (Open Sound System) – an already obsolete sound architecture. By the way on current Debian / Fedora etc. Linux-es OSS is managed and played only, whether few kernel modules are already  pre-loaded, below are the ones as pasted from my Debian Squeeze:

# lsmod | grep -i oss
snd_pcm_oss            32591  0
snd_mixer_oss          12606  1 snd_pcm_oss
snd_pcm                60487  3 snd_hda_intel,snd_hda_codec,snd_pcm_oss
snd                    46526  15 snd_hda_codec_analog,snd_hda_intel,snd_hda_codec,snd_hwdep,snd_pcm_oss,snd_mixer_oss,snd_pcm,snd_rawmidi,snd_seq,snd_timer,snd_seq_device

The oss processed sound recording from ffmpeg is not working, well on my Linux, cause I have my custom (non-Debian) native binary Firefox downloaded and installed from Firefox's website.The browser is compiled to open automatically /dev/dsp which in practice uses the above-mentioned OSS listed modules, which on their behalf when used break out the sound processed by alsa and respectively pulseaudio (those who use Linux for longer time should remember in the times of OSS only one certain sound stream was possible to be processed / played on Linux historically before ALSA come to scene to be "defacto" standard kernel sound processor. Well ofcourse firefox developers who compiled the Firefox for Linux probably was using Slackware or some other Linux distro which probably used to play sound still via OSS or maybe they compiled it so thinking OSS because of its historical importance is still supported by more Linux distributions than alsa is. I like the custom compiled Firefox to run on my Debian instead of default Debian Squeeze (IceWeasel) cause firefox.org ,Firefox version is much newer and supports better latest HTML5  as well as it includes ability to download and apply automatic updates to the latest version provided by Firefox team. However I fou

Thus for Linux users like me using latest firefox binary from firefox.org (in parallel) with opened Firefox browser to record sound from Webcam or Embedded notebook mic the obsolete OSS has to be used, here is how:

# ffmpeg -f oss -ac 2 -i /dev/dsp   -acodec pcm_s16le -vcodec libx264 -vpre lossless_ultrafast -threads 0  -y  my-recorder-VOICE.wav

Enjoy ;)

30 years anniversary of the first mass produced portable computer COMPAQ Grid Compass 1011

Thursday, July 19th, 2012

Grid Notebook Big screen logo

Today it is considered the modern laptop (portable computers) are turning 30 years old. The notebook grandparent is a COMPAQGRiD Compass 1011 – a “mobile computer” with a electroluminescent display (ELD) screen supporting resolution of 320×240 pixels. The screen allowed the user to use the computer console in a text resolution of 80×24 chars. This portable high-tech gadget was equipped with magnesium alloy case, an Inten 8086 CPU (XT processor) at 8Mhz (like my old desktop pravetz pc 😉 ), 340 kilobyte (internal non-removable magnetic bubble memory and even a 1,200 bit/s modem!

COMPAQ Grid Compass considered first laptop / notebook on earthy 30 anniversary of the portable computer

The machine was uniquely compatible for its time as one could easily attach devices such as floppy 5.25 inch drives and external (10 Meg) hard disk via IEEE-488 I/O compatible protocol called GPiB (General Purpose instrumental Bus).

First mass prdocued portable computer laptop grid COMPAQ 11011 back side input peripherals

The laptop had also unique small weight of only 5 kg and a rechargable batteries with a power unit (like modern laptops) connectable to a normal (110/220 V) room plug.

First notebook in World ever the COMPAQ grid Compass 1101,br />
The machine was bundled with an own specificly written OS GRiD-OS. GRID-OS could only run a specialized software so this made the application available a bit limited.
Shortly after market introduction because of the incompitablity of GRID-OS, grid was shipped with MS-DOS v. 2.0.
This primitive laptop computer was developed for serve mainly the needs of business users and military purposes (NASA, U.S. military) etc.

GRID was even used on Space Shuttles during 1980 – 1990s.
The price of the machine in April 1982 when GriD Compass was introduced was the shockingly high – $8150 dollars.

The machine hardware design is quite elegant as you can see on below pic:

 COMPAQ grid laptop 1101 bubbles internal memory

As a computer history geek, I’ve researched further on GRID Compass and found a nice 1:30 hour video telling in detailed presentation retelling the history.

Shortly after COMPAQ’s Grid Compass 1011’s introduction, many other companies started producing similar sized computers; one example for this was the Epson HX-20 notebook. 30 years later, probably around 70% of citizens on the globe owns a laptop or some kind of portable computer device (smartphone, tablet, ultra-book etc.).

Most of computer users owning a desktop nowdays, owns a laptop too for mobility reasons. Interestengly even 30 years later the laptop as we know it is still in a shape (form) very similar to its original predecessor. Today the notebook sales are starting to be overshadowed by tablets and ultra-books (for second quarter laptop sales raised 5% but if compared with 2011, the sales rise is lesser 1.8% – according to data provided by Digital Research agency). There are estimations done by (Forrester Research) pointing until the end of year 2015, sales of notebook substitute portable devices will exceed the overall sales of notebooks. It is manifested today the market dynamics are changing in favour of tabets and the so called next generation laptopsULTRA-BOOKS. It is a mass hype and a marketing lie that Ultra-Books are somehow different from laptops. The difference between a classical laptop and Ultra-Books is the thinner size, less weight and often longer battery use time. Actually Ultra-Books are copying the design concept of Mac MacBook Air trying to resell under a lound name.
Even if in future Ipads, Android tablets, Ultra-Books or whatever kind of mambo-jambo portable devices flood the market, laptops will still be heavily used in future by programmers, office workers, company employees and any person who is in need to do a lot of regular text editting, email use and work with corporative apps. Hence we will see a COMPAC Grid Compass 1011 notebook likes to be dominant until end of the decade.

Text Monitoring of connection server (traffic RX / TX) business in ASCII graphs with speedometer / Easy Monitor network traffic performance

Friday, May 4th, 2012

While reading some posts online related to MS-Windows TcpViewnetwork traffic analyzing tool. I've came across very nice tool for tracking connection speed for Linux (Speedometer). If I have to compare it, speedometer is somehow similar to nethogs and iftop bandwidth network measuring utilities .

What differentiates speedometer from iftop / nethogs / iptraf is it is more suitable for visualizing a network file or data transfers.
The graphs speedometer draws are way easier to understand, than iftop graphs.

Even complete newbies can understand it with no need for extraordinary knowledge in networking. This makes Speedometer, a top tool to visually see the amount of traffic flowing through server network interface (eth0) … (eth1) etc.

What speedometer shows is similar to the Midnight Commander's (mc) file transfer status bar, except the statistics are not only for a certain file transfer but can show overall statistics over server passing network traffic amount (though according to its manual it can be used to also track individual file transfers).

The simplicity for basic use makes speedometer nice tool to track for network congestion issues on Linux. Therefore it is a  must have outfit for every server admin. Below you see a screenshot of my terminal running speedometer on a remote server.
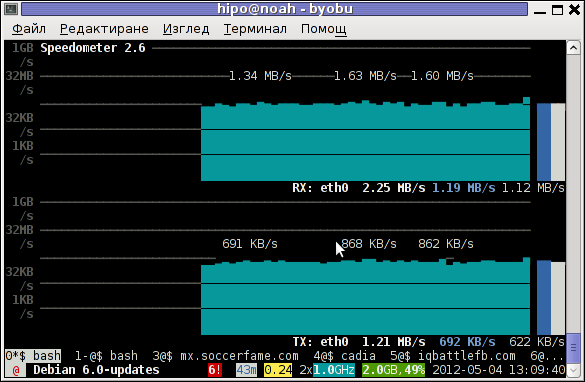
Speedometer ascii traffic track server network business screenshot in byobu screen like virtual terminal emulator

1. Installing speedometer on Debian / Ubuntu and Debian derivatives

For Debian and Ubuntu server administrators speedometer is already packaged as a deb so its installation is as simple as:

debian:~# apt-get --yes install speedometer
....

2. Installing speedometer from source for other Linux distributions CentOS, Fedora, SuSE etc.

Speedometer is written in python programming language, so in order to install and use on other OS Linux platforms, it is necessery to have installed (preferably) an up2date python programming language interpreter (python ver. 2.6 or higher)..
Besides that it is necessary to have installed the urwid -( console user interface library for Python) available for download via excess.org/urwid/


Hence to install speedometer on RedHat based Linux distributions one has to follow these steps:

a) Download & Install python urwid library

[root@centos ~]# cd /usr/local/src
[root@centos src]# wget -q http://excess.org/urwid/urwid-1.0.1.tar.gz
[root@centos src]# tar -zxvvf urwid-1.0.1.tar.gz
....
[root@centos src]# cd urwid-1.0.1
[root@centos urwid-1.0.1]# python setup.py install
running install
running build
running build_py
creating build
creating build/lib.linux-i686-2.4
creating build/lib.linux-i686-2.4/urwid
copying urwid/tests.py -> build/lib.linux-i686-2.4/urwid
copying urwid/command_map.py -> build/lib.linux-i686-2.4/urwid
copying urwid/graphics.py -> build/lib.linux-i686-2.4/urwid
copying urwid/vterm_test.py -> build/lib.linux-i686-2.4/urwid
copying urwid/curses_display.py -> build/lib.linux-i686-2.4/urwid
copying urwid/display_common.py -> build/lib.linux-i686-2.4/urwid
....

b) Download and install python-setuptools

python-setuptools is one other requirement of speedometer, happily on CentOS and Fedora the rpm package is already there and installable with yum:

[root@centos ~]# yum -y install python-setuptools
....

c) Download and install Speedometer

[root@centos urwid-1.0.1]# cd /usr/local/src/
[root@centos src]# wget -q http://excess.org/speedometer/speedometer-2.8.tar.gz
[root@centos src]# tar -zxvvf speedometer-2.8.tar.gz
.....
[root@centos src]# cd speedometer-2.8
[root@centos speedometer-2.8]# python setup.py install
Traceback (most recent call last):
File "setup.py", line 26, in ?
import speedometer
File "/usr/local/src/speedometer-2.8/speedometer.py", line 112
n = n * granularity + (granularity if r else 0)
^

While running the CentOS 5.6 installation of speedometer-2.8, I hit the
"n = n * granularity + (granularity if r else 0)
error.

After consultation with some people in #python (irc.freenode.net), I've figured out this error is caused due the outdated version of python interpreter installed by default on CentOS Linux 5.6. On CentOS 5.6 the python version is:

[root@centos ~]# python -V
Python 2.4.3

As I priorly said speedometer 2.8's minimum requirement for a python to be at v. 2.6. Happily there is quick way to update python 2.4 to python 2.6 on CentOS 5.6, as there is an RPM repository maintained by Chris Lea which contains RPM binary of python 2.6.

To update python 2.4 to python 2.6:

[root@centos speedometer-2.8]# rpm -Uvh http://yum.chrislea.com/centos/5/i386/chl-release-5-3.noarch.rpm[root@centos speedometer-2.8]# rpm --import /etc/pki/rpm-gpg/RPM-GPG-KEY-CHL[root@centos speedometer-2.8]# yum install python26

Now the newly installed python 2.6 is executable under the binary name python26, hence to install speedometer:

[root@centos speedometer-2.8]# python26 setup.py install
[root@centos speedometer-2.8]# chown root:root /usr/local/bin/speedometer
[root@centos speedometer-2.8]# chmod +x /usr/local/bin/speedometer

[root@centos speedometer-2.8]# python26 speedometer -i 1 -tx eth0

The -i will instruct speedometer to refresh the screen graphs once a second.

3. Using speedometer to keep an eye on send / received traffic network congestion

To observe, the amount of only sent traffic via a network interface eth0 with speedometer use:

debian:~# speedometer -tx eth0

To only keep an eye on received traffic through eth0 use:

debian:~# speedometer -rx eth0

To watch over both TX and RX (Transmitted and Received) network traffic:

debian:~# speedometer -tx eth0 -rx eth0

If you want to watch in separate windows TX and RX traffic while  running speedometer you can run in separate xterm windows speedometer -tx eth0 and speedometer -rx eth0, like in below screenshot:
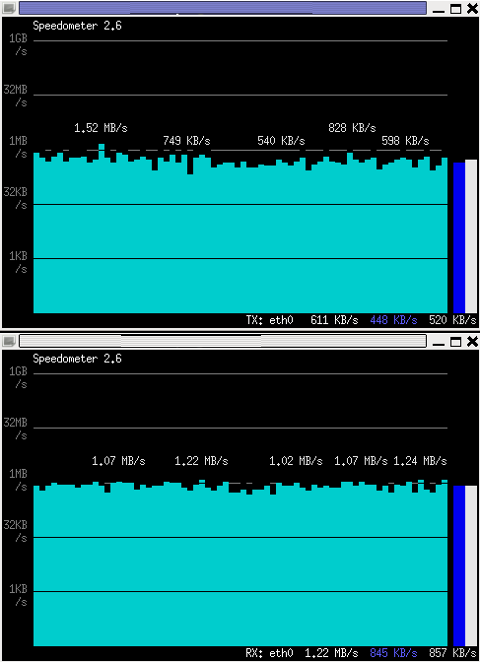
Monitor Received and Transmitted server Network traffic in two separate xterm windows with speedometer ascii graphs

4. Using speedometer to test network maximum possible transfer speed between server (host A) and server (host B)

The speedometer manual suggests few examples one of which is:

How fast is this LAN?

host-a$ cat /dev/zero | nc -l -p 12345
host-b$ nc host-a 12345 > /dev/null
host-b$ speedometer -rx eth0

When I red this example in speedometer's manual, it wasn't completely clear to me what the author really meant, but a bit after when I thought over the example I got his point.

The idea behind this example is that a constant stream of zeros taken from /dev/zero will be streamed over via a pipe (|) to nc which will bind a port number 12345, anyone connecting from another host machine, lets say a server with host host-b to port 12345 on machine host-a will start receiving the /dev/zero streamed content.

Then to finally measure the streamed traffic between host-a and host-b machines a speedometer is started to visualize the received traffic on network interface eth0, thus measuring the amount of traffic flowing from host-a to host-b

I give a try to the exmpls, using for 2 test nodes my home Desktop PC, Linux running  arcane version of Ubuntu and my Debian Linux notebook.

First on the Ubuntu PC I issued
 

hipo@hip0-desktop:~$ cat /dev/zero | nc -l -p 12345
 

Note that I have previously had installed the netcat, as nc is not installed by default on Ubuntu and Debian. If you, don't have nc installed yet, install it with:

apt-get –yes install netcat

"cat /dev/zero | nc -l -p 12345" will not produce any output, but will display just a blank line.

Then on my notebook I ran the second command example, given in the speedometer manual:
 

hipo@noah:~$ nc 192.168.0.2 12345 > /dev/null

Here the 192.168.0.2 is actually the local network IP address of my Desktop PC. My Desktop PC is connected via a normal 100Mbit switch to my routing machine and receives its internet via  NAT. The second test machine (my laptop), gets its internet through a WI-FI connection received by a Wireless Router connected via a UTP cable to the same switch to which my Desktop PC is connected.

Finally to test / get my network maximum thoroughput I had to use:

hipo@noah:~$ speedometer -rx wlan0

Here, I  monitor my wlan0 interface, as this is my (laptop) wireless card interface over which I have connectivity to my local network and via which through the the WI-FI router I get connected to the internet.

Below is a snapshot captured showing approximately what is the max network thoroughput from:

Desktop PC -> to my Thinkpad R61 laptop
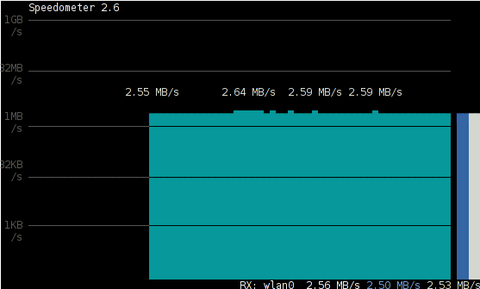
Using Speedometer to test network thorougput between two network server hosts screenshot Debian Squeeze Linux

As you can see in the shot approximately the maximum network thoroughput is in between:
2.55MB/s min and 2.59MB/S max, the speed is quite low for a 100 MBit local network, but this is normal as most laptop wireless adapters hardly transfer traffic in more than 10 to 20 MBits per sec.

If the same nework thoroughput test is conducted between two machines both connected to a same 100 M/bit switch, the traffic should be at least a 8 MB/sec.

There is something, else to take in consideration that probably makes the provided example network thoroughput measuring a bit inaccurate. The fact that the /dev/zero content is stremed over is slowing down the zeroes sent over network because of the  pipe ( | ) use slows down the stream.

5. Using speedometer to visualize maximum writting speed to a local hard drive on Linux

In the speedometer manual, I've noticed another interesting application of this nifty tool.

speedometer can be used to track and visualize the maximum writing speed a hard disk drive or hard drive partition can support on Linux OS:

A copy paster from the manual text is as follows:

How fast can I write data to my filesystem? (with at least 1GB free)
dd bs=1000000 count=1000 if=/dev/zero of=bigfile &
speedometer bigfile

However, when I tried copy/pasting the example in terminal, to test the maximum writing speed to an external USB hard drive, only dd command was started and speedometer failed to initialize and display graphs of the file creation speed.

I've found a little "hack" that makes the man example work by adding a 3 secs sleep like so:

debian:/media/Expansion Drive# dd bs=1000000 count=1000 if=/dev/zero of=bigfile & sleep 3; speedometer bigfile

Here is a screenshot of the bigfile created by dd and tracked "in real time" by speedometer:
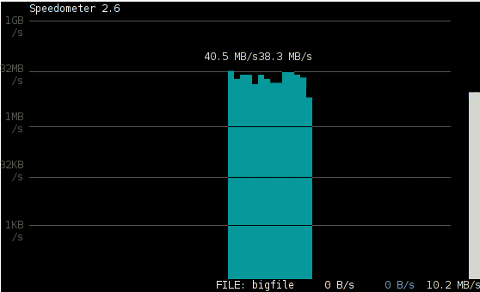
How fast is writting data to local USB expandable hard disk Debian Linux speedometer screenshot

Actually the returned results from this external USB drive are, quite high, the possible reason for that is it is connected to my laptop over an USB protocol verion 3.

6. Using Speedometer to keep an eye on file download in progress

This application of speedometer is mostly useless especially on Linux where it is used as a Desktop.

However in some occasions if files are transferred over ssh or in non interactive FTP / Samba file transfers between Linux servers it can come handy.

To visualize the download and writing speed of lets say FTP transferred .AVI movie (during the actual file transfer) on the download host issue:

# speedometer Download-Folder/What-goes-around-comes-around.avi

7. Estimating approximate time for file transfer

There is another section in the speedometer manual pointing of the program use to calculate the time remaining for a file transfer.

The (man speedometer) provided example text is:

How long it will take for my 38MB transfer to finish?
speedometer favorite_episode.rm $((38*1024*1024))

At first glimpse it hard to understand (like the other manual example). A bit of reasoning and I comprehend what the man author meant by the obscure calculation:

$((38*1024*1024))

This is a formula used in which 38 has to be substituted with the exact file size amount of the transferred file. The author manual used a 38MB file so this is why he put $((38* … in the formula.

I give it a try – (just for the sake to see how it works) with a file with a size of 2500MB, in below two screenshot pictures I show my preparation to copy the file and the actual copying / "real time" transfer tracking with speedometer's status percentage completion bar.
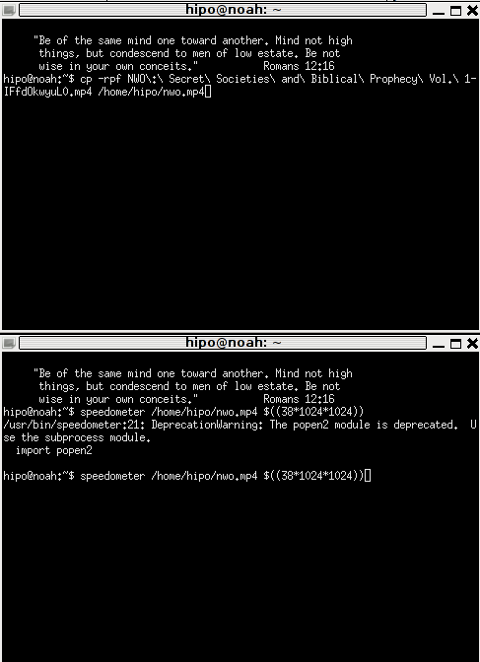
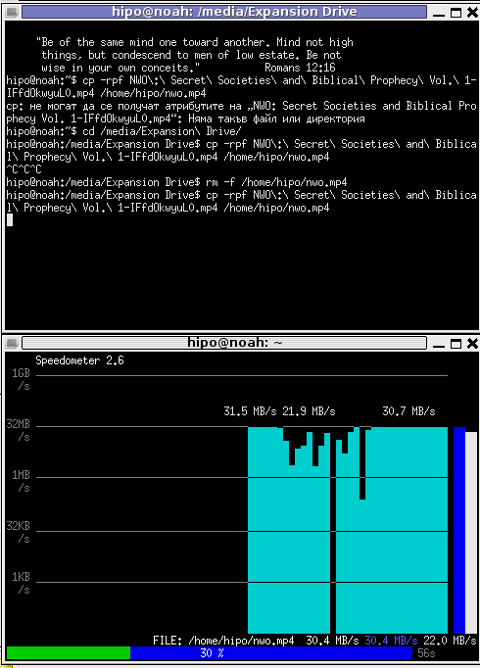
xterm terminal copy file and estimate file copying operation speed on linux with speedometer preparation

Two xterm terminals one is copying a file the other one uses speedometer to estimate the time remaining to complete the file transfer from expansion USB hard drive to my laptop harddrive


How to increase brightness on Fujitsu Siemens Amilo PI22515 notebook with Slackware Linux

Friday, March 9th, 2012

Increase LCD screen brightness on Fujitsu Siemens Amilo laptop with Linux Slackware

A friend of mine has Fujitsu Siemens Amilo laptop and is full time using his computer with Slackware Linux.

He is quite happy with Slackware Linux 13.37 on the laptop, but unfortunately sometimes his screen brightness lowers. One example when the screen gets darkened is when he switch the computer on without being plugged in the electricity grid. This lowered brightness makes the screen un-user friendly and is quite tiring for the eye …

By default the laptop has the usual function keys and in theory pressing Function (fn) + F8 / F7 – should increase / decrease the brightness with no problems, however on Slackware Linux (and probably on other Linuxes too?), the function keys are not properly recognized and not responding whilst pressed.
I used to have brigtness issues on my Lenovo notebook too and remember how irritating this was.
After a bit of recalling memories on how I solved this brightness issues I remembered the screen brigthness on Linux is tunable through /proc virtual (memory) filesystem.

The laptop (Amilo) Fujitsu Siemens video card is:

lspci |grep -i vga
00:02.0 VGA compatible controller: Intel Corporation Mobile GM965/GL960 Integrated Graphics Controller (primary) (rev 03)

I took a quick look in /proc and found few files called brightness:
 

  • /proc/acpi/video/GFX0/DD01/brightness
  • /proc/acpi/video/GFX0/DD02/brightness
  • /proc/acpi/video/GFX0/DD03/brightness
  • /proc/acpi/video/GFX0/DD04/brightness
  • /proc/acpi/video/GFX0/DD05/brightness

cat-ting /proc/acpi/video/GFX0/DD01/brightness, /proc/acpi/video/GFX0/DD03/brightness, /proc/acpi/video/GFX0/DD04/brightness all shows not supported and therefore, they cannot be used to modify brightness:

bash-4.1# for i in $(/proc/acpi/video/GFX0/DD0{1,3,4,5}/brightness); do \
cat $i;
done
<not supported>
<not supported>
<not supported>
<not supported>

After a bit of testing I finally succeeded in increasing the brightness.
Increasing the brightness on the notebook Intel GM965 video card model is done, through file:

/proc/acpi/video/GFX0/DD02/brightness

To see all the brightness levels the Fujitsu LCD display supports:

bash-4.1# cat /proc/acpi/video/GFX0/DD02/brightness
levels: 13 25 38 50 63 75 88 100
current: 25

As you can see the dark screen was caused cause the current: brightness is set to a low value of 25.
To light up the LCD screen and make the screen display fine again, I increased the brightness to the maximum level 100, e.g.:

bash-4.1# echo '100' > /proc/acpi/video/GFX0/DD02/brigthness

Just for the fun, I've written also a two lines script which gradually increases LCDs brightness 🙂

bash-4.1# echo '13' > /proc/acpi/video/GFX0/DD02/brightness;
bash-4.1# for i in \
$(cat /proc/acpi/video/GFX0/DD02/brightness|grep 'levels'|sed -e 's#levels:##g'); do \
echo $i > /proc/acpi/video/GFX0/DD02/brightness; sleep 1; \done

fujitsu_siemens_brightness_fun.sh script is fun to observe in changing the LCD screen gradually in one second intervals 🙂

Here is also a tiny program that reduces and increases the notebook laptop brightness written in C. My friend Dido, coded it in just few minutes just for the fun 🙂
To permanently solve the issues with darkened screen on boot time it is a good idea to include echo '100' > /proc/acpi/video/GFX0/DD02/brigthness in /etc/rc.local:

bash-4.1# echo '100' > /proc/acpi/video/GFX0/DD02/brigthness

I've also written another Universal Linux Increase laptop screen brightness Shell script which should be presumable also working for all Laptop models running Linux 🙂

My maximize_all_linux_laptops_brightness.sh "universal increase Linux brightness" script is here
I'll be glad to hear from people who had tested the script on other laptops and can confirm it works fine for them.
 

How to fix clock on Slackware / Slackware and this old incorrect BIOS time troubles

Friday, February 24th, 2012

There two main reasons which cause incorrect clock settings on Slackware Linux.
One common reason for incorrectly set time is improper clock and timezone settings during Slackware install.

On install, one of the ncruses install menus asks an ambigious dialog question reading

HARDWARE CLOCK SET TO UTC?
Is the hardware clock set to Coordinated Universal Time (UTC/GMT)?

Some newbie Slackware users make the mistake to choose YES here, resulting in incorrectly set clock.

Second possibility for improper time is incorrect time on BIOS level. This is not so common among laptop and modern desktop PCs. However in the past impoper system BIOS hardware clock was usual.
In any case it is a good practice to check the system PC BIOS clock settings.

To check BIOS battery hardware clock from command line use:

bash-4.1# hwclock --show
Fri 24 Feb 2012 01:24:18 AM EET -0.469279 seconds

The system clock on Slackware is set via a script called timeconfig. To fix slack's incorrect host time run:

bash-4.1# timeconfig

Slackware Linux timeconfig set to UTC ncurses dialog clock setting

Slackware Linux timeConfig Country Selection dialog

Running timeconfig once should configure a proper timezone to be set on next system reboot, however the system time will probably still be not ok.
To manually set time to right time, use date command. To set manually the system wide time to 12:00:00 with date:

bash-4.1# date -s "12:00:00"

Anyways for time accuracy the ntpdate should be used to feth time from NTP internet time server:

bash-4.1# ntpdate time.nist.gov
...

Finally to make the new set right time permanent also for the BIOS battery clock issue:

bash-4.1# hwclock --systohc

By the way its curious fact Slackware Linux is the oldest still existent GNU / Linux based distribution. Its up and running since the very day GNU and Linux came to merge at one Free OS 😉