Posts Tagged ‘Pc’

Must have software on freshly installed windows – Essential Software after fresh Windows install

Friday, March 18th, 2016

Install-update-multiple-programs-applications-at-once-using-ninite

If you're into IT industry even if you don't like installing frequently Windows or you're completely Linux / BSD user, you will certainly have a lot of friends which will want help from you to re-install or fix their Windows 7 / 8 / 10 OS. At least this is the case with me every year, I'm kinda of obliged to install fresh windowses on new bought friends or relatives notebooks / desktop PCs.

Of course according to for whom the new Windows OS installed the preferrences of necessery software varies, however more or less there is sort of standard list of Windows Software which is used daily by most of Avarage Computer user, such as:
 

Not to forget a good candidate from the list to install on new fresh windows Installation candidates are:

  • Winrar
  • PeaZIP
  • WinZip
  • GreenShot (to be able to easily screenshot stuff and save pictures locally and to the cloud)
  • AnyDesk (non free but very functional alternative to TeamViewer) to be able to remotely access remote PC
  • TightVNC
  • ITunes / Spotify (for people who have also iPhone smart phone)
  • DropBox or pCloud (to have some extra cloud free space)
  • FBReader (for those reading a lot of books in different formats)
  • Rufus – Rufus is an efficient and lightweight tool to create bootable USB drives. It helps you to create BIOS or UEFI bootable devices. It helps you to create Windows TO Go drives. It provides support for various disk, format, and partition.
  • Recuva is a data recovery software for Windows 10 (non free)
  • EaseUS (for specific backup / restore data purposes but unfortunately (non free)
  • For designers
  • Adobe Photoshop
  • Adobe Illustrator
  • f.lux –  to control brightness of screen and potentially Save your eyes
  • ImDisk virtual Disk Driver
  • KeePass / PasswordSafe – to Securely store your passwords
  • Putty / MobaXterm / SecureCRT / mPutty (for system administrators and programmers that has to deal with Linux / UNIX)

I tend to install on New Windows installs and thus I have more or less systematized the process.

I try to usually stick to free software where possible for each of the above categories as a Free Software enthusiast and luckily nowadays there is a lot of non-priprietary or at least free as in beer software available out there.

For Windows sysadmins or College and other public institutions networks including multiple of Windows Computers which are not inside a domain and also for people in computer repair shops where daily dozens of windows pre-installs or a set of software Automatic updates are  necessery make sure to take a look at Ninite
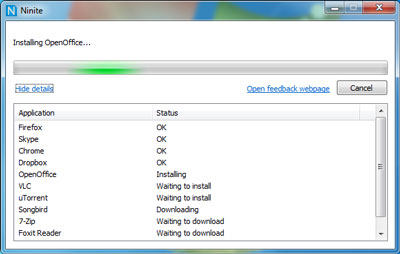
ninite-automate-windows-program-deploy-and-update-on-new-windows-os-openoffice-screenshot

As official website introduces Ninite:

Ninite – Install and Update All Your Programs at Once

Of course as Ninite is used by organizations as NASA, Harvard Medical School etc. it is likely the tool might reports your installed list of Windows software and various other Win PC statistical data to Ninite developers and most likely NSA, but this probably doesn't much matter as this is probably by the moment you choose to have installed a Windows OS on your PC.
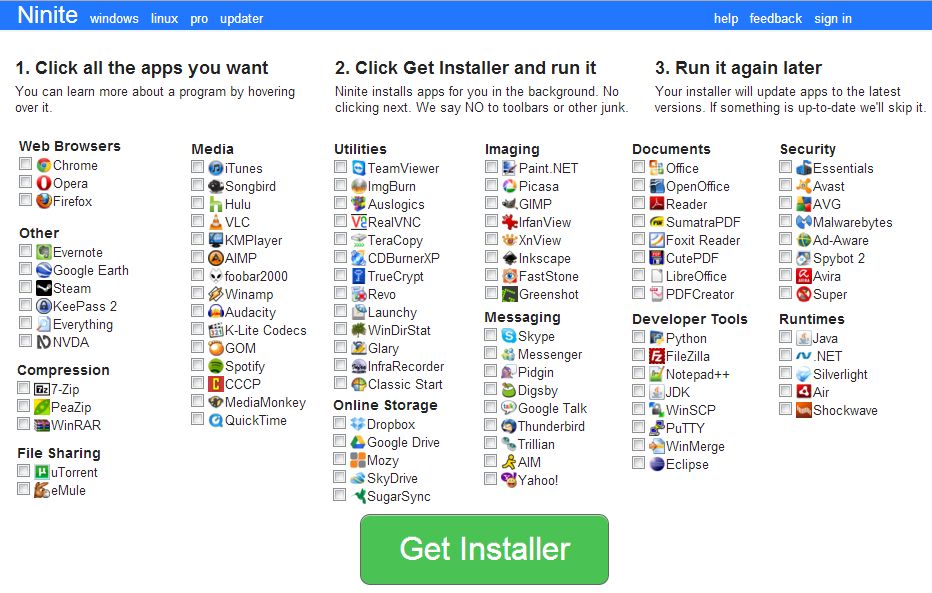
ninite-choises-to-build-an-install-package-with-useful-essential-windows-software-screenshot
 

For Windows System Administrators managing small and middle sized network PCs that are not inside a Domain Controller, Ninite could definitely save hours and at cases even days of boring install and maintainance work. HP Enterprise or HP Inc. Employees or ex-employees would definitely love Ninite, because what Ninite does is pretty much like the well known HP Internal Tool PC COE.

Ninite could also prepare an installer containing multiple applications based on the choice on Ninite's website, so that's also a great thing especially if you need to deploy a different type of Users PCs (Scientific / Gamers / Working etc.)

Perhaps there are also other useful things to install on a new fresh Windows installations, if you're using something I'm missing let me know in comments.
Create Bootable Windows installer USB from a MAC PC, MacBook host or Linux Desktop computer

Thursday, February 8th, 2024

Creating Windows bootable installer with Windows Media Creation tool is easy, but sometimes if you're a geek like me you don't have a Windows personal PC at home and your Work PC is so paranoidly restricted by its administrator through paranoid Domain Controller Policies, that you can only copy from a USB drive towards the Win PC but you cannot write to the USB. 

1. Preparing Linux installer USB via Mac's Boot Camp Assistant

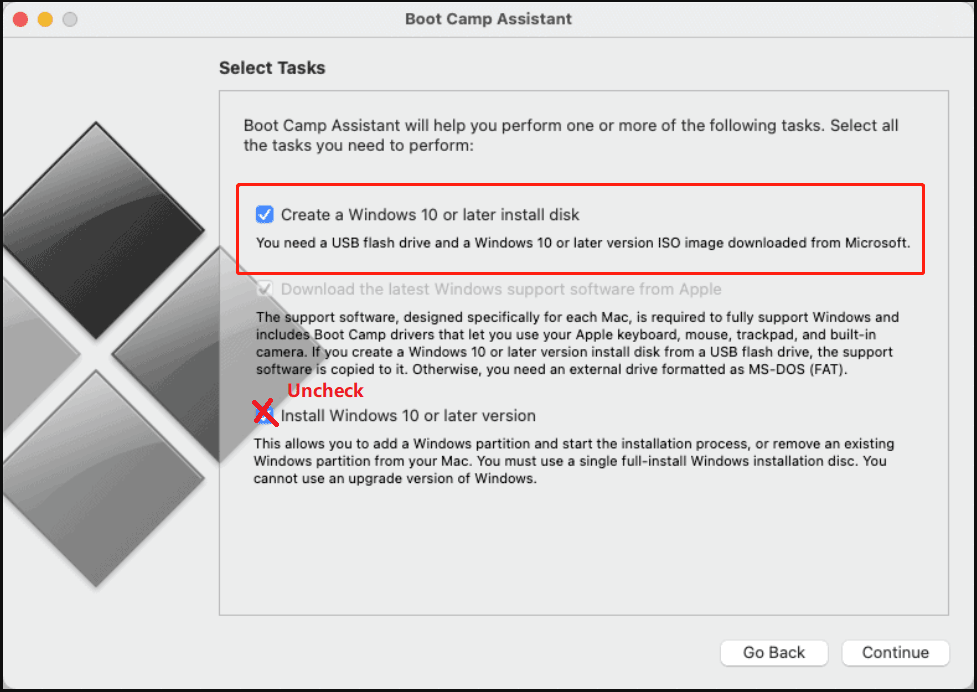
If you're lucky you might have a MAC Book Air or some kind of other mac PC, if that is the case you can burn the Windows Installer iso, with the Native Mac tool called BootCamp Assistant, by simply downloading the Win Boot ISO, launching the app and burning it:

Finder > Applications > Utilities and open Boot Camp Assistant.

create-windows-10-bootable-installer-usb-mac-screenshot.png

2. Preparing Bootable Windows installer on Linux host machine

On DEBIAN / UBUNTU and other Deb based Linuxes

# apt install gddrescue 

On CENTOS / FEDORA :

# dnf install ddrescue

To install the Windows Image to the right USB drive, first find it out with fdisk and list it:

# fdisk -l
 

Disk /dev/sdb: 14.41 GiB, 15472047104 bytes, 30218842 sectors
Disk model: DataTraveler 3.0
Units: sectors of 1 * 512 = 512 bytes
Sector size (logical/physical): 512 bytes / 512 bytes
I/O size (minimum/optimal): 512 bytes / 512 bytes
Disklabel type: dos
Disk identifier: 0xc23dc587

Device     Boot    Start      End  Sectors  Size Id Type
/dev/sdb1           8192 30216793 30208602 14.4G  7 HPFS/NTFS/exFAT
/dev/sdb2       30216794 30218841     2048    1M  e W95 FAT16 (LBA)

Then Use ddrescue to create the bootable MS windows Installer USB disk.

# ddrescue windows10.iso /dev/sd1 –force -D

3. Using GUI Linux tool WoeUSB-ng to prepare Microsoft Windows start up USB drive

If you're a lazy Linux user and you plan to prepare up to date Windows image files regularly, perhaps the WoeUSB-ng Graphical tool will suit you better, to use it you will have to install a bunch of python libraries.
 

On Ubuntu Linux:

# apt install git p7zip-full python3-pip python3-wxgtk4.0 grub2-common grub-pc-bin
# pip3 install WoeUSB-ng

On Fedora Linux:

dnf install git p7zip p7zip-plugins python3-pip python3-wxpython4
# sudo pip3 install WoeUSB-ng

Launch the WoeUSB-ng program :


$ python3 /usr/local/bin/woeusbgui


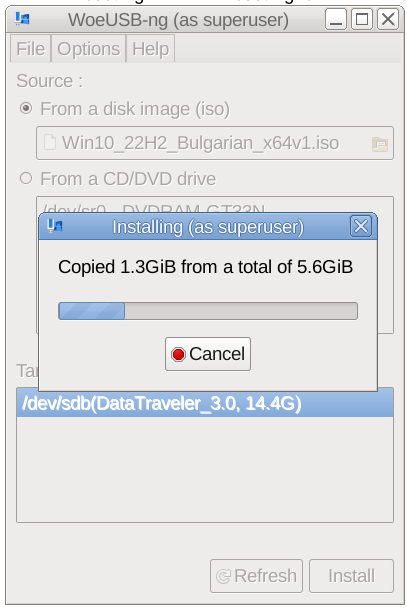
Download, the latest Version of Windows Installer .ISO IMAGE file, plug in your USB flash disk and let the program burn the ISO and create the GRUB boot loader, that will make WIndows installer bootable on your PC.
WoeUSB-ng-python-burn-windows-installer.-tool-screenshot

With WoeUSB-ng you have to be patient, it will take some time to prepare and copy the Windows installer content and will take about 15 to 20 minutes from my experience to finalize the GRUB records required, that will make the new burnt ISO bootable.


Then just plug it in to your Desktop PC or laptop, virtual machine, whatever where you would like to install the Windows from its latest installation Source image and Go on with doing the necessery evil to have Microsoft Spy on you permanently.

P.S. I just learned, from colleagues from Kvant Serviz (a famous hardware second hand, shop and repair shop here in Bulgaria, that nowadays Windows has evolved to the points, they can and they actually do overwrite the PC BIOS / UEFI as part of updates without any asking the end user !!!
At first I disbelived that, but after a short investigation online it turned out this is true, 
there are discussions online from people complaining, that WIndows updates has ovewritten their current BIOS settings and people complaining BIOS versions are ovewritten.

Enjoy your new personal Spy OS ! 🙂

How to disable Windows pagefile.sys and hiberfil.sys to temporary or permamently save disk space if space is critically low

Monday, March 28th, 2022

howto-pagefile-hiberfil.sys-remove-reduce-increase-increase-size-windows-logo

Sometimes you have to work with Windows 7 / 8 / 10 PCs  etc. that has a very small partition C:\
drive or othertimes due to whatever the disk got filled up with time and has only few megabytes left
and this totally broke up the windows performance as Windows OS becomes terribly sluggish and even
simple things as opening Internet Browser (Chrome / Firefox / Opera ) or Windows Explorer stones the PC performance.

You might of course try to use something like Spacesniffer tool (a great tool to find lost data space on PC s short description on it is found in my previous article how to
delete temporary Internet Files and Folders to to speed up and free disk space
 ) or use CCleaner to clean up a bit the pc.
Sometimes this is not enough though or it is not possible to do at all the main
partition disk C:\ is anyhow too much low (only 30-50MB are available on HDD) or the Physical or Virtual Machine containing the OS is filled with important data
and you couldn't risk to remove anything including Internet Temporary files, browsing cookies … whatever.

Lets say you are the fate chosen guy as sysadmin to face this uneasy situation and have no easy
way to add disk space from another present free space partition or could not add a new SATA hard drive
SSD drive, what should you do?
 

The solution wipe off pagefile.sys and hiberfil.sys

Usually every Windows installation has a pagefile.sys and hiberfil.sys.

  • pagefile.sys – is the default file that is used as a swap file, immediately once the machine runs out of memory. For Unix / Linux users better understanding pagefile.sys is the equivallent of Linux's swap partition. Of course as the pagefile is in a file and not in separate partition the swapping in Windows is perhaps generally worse than in Linux.
  • hiberfil.sys – is used to store data from the machine on machine Hibernation (for those who use the feature)


Pagefile.sys which depending on the configured RAM memory on the OS could takes up up to 5 – 8 GB, there hanging around doing nothing but just occupying space. Thus a temporary workaround that could free you some space even though it will degrade performance and on servers and production machines this is not a good solution on just user machines, where you temporary need to free space any other important task you can free up space
by seriously reducing the preconfigured default size of pagefile.sys (which usually is 1.5 times the active memory on the OS – hence if you have 4GB you would have a 6Gigabytes of pagefile.sys).

Other possibility especially on laptop and movable devices running Win OS is to disable hiberfil.sys, read below how this is done.


The temporary solution here is to simply free space by either reducing the pagefile.sys or completely disabling it


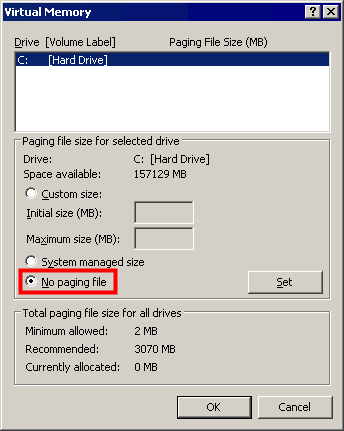
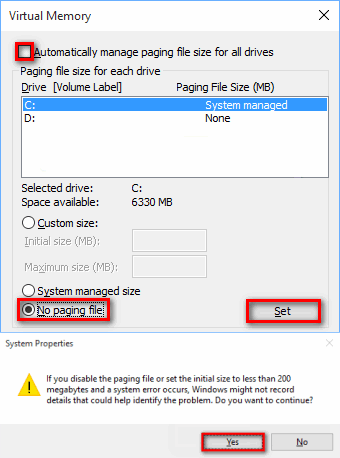
1. Disable pagefile.sys on Windows XP, Windows 7 / 8 / 10 / 11


The GUI interface to disable pagefile across all NT based Windows OS-es is quite similar, the only difference is newer versions of Windows has slightly more options.


1.1 Disable pagefile on Windows XP


Quickest way is to find pagefile.sys settings from GUI menus

1. Computer (My Computer) – right click mouse
2. Properties (System Preperties will appear)
3. Advanced (tab) 
4. Settings
5. Advanced (tab)
6. Change button

windows-xp-pagefile-disable-screenshot

1.2 Disable pagefile on Windows 7


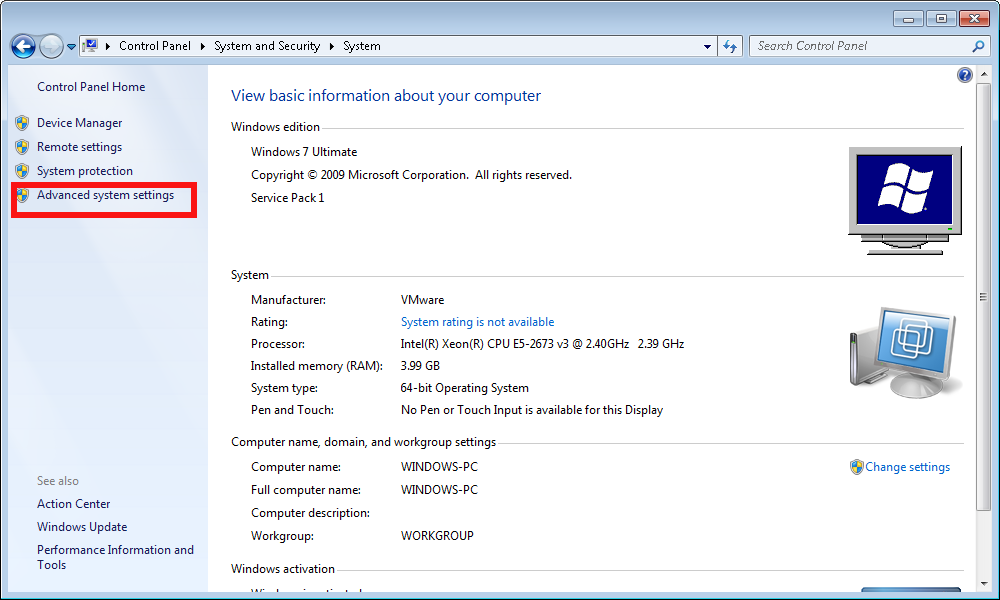
advanced-system-settings-control-panel-system-and-security-screenshot

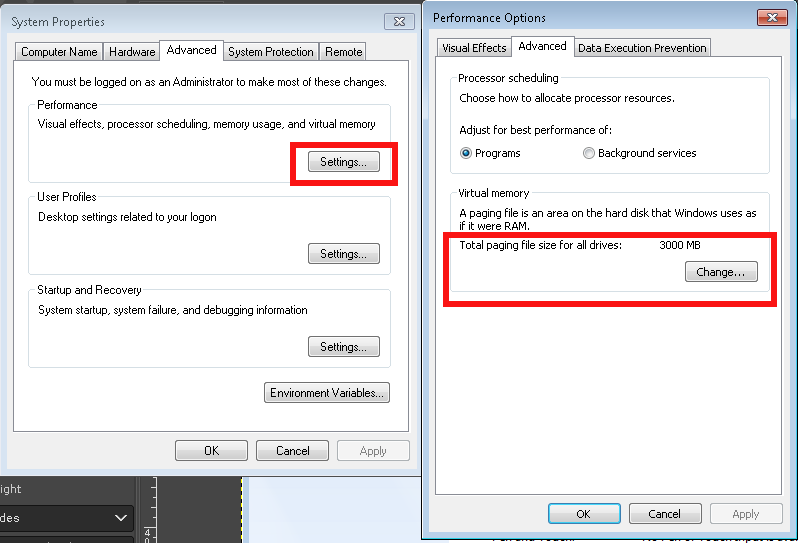
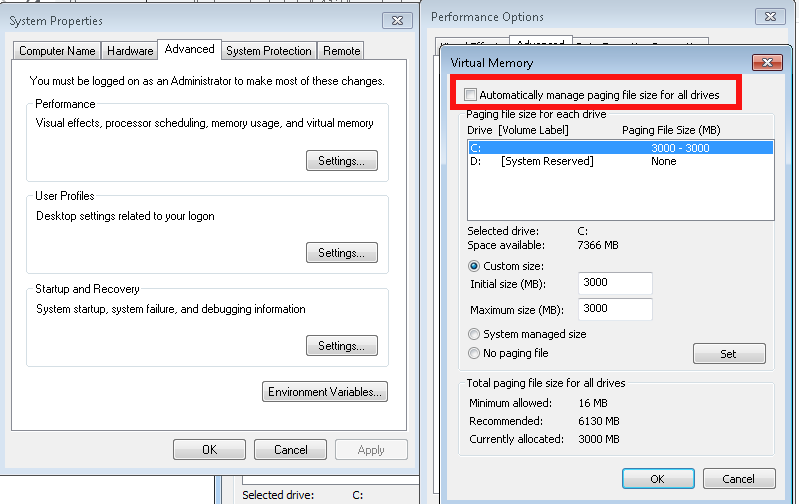
windows-system-properties-screenshot-properties-advanced-change-Virtual-memory-pagefile-screenshot

system-properties-performance-options
 

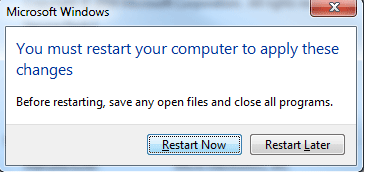
Once applied you'll be required to reboot the PC

How-to-turn-off-Virtual-Memory-Paging_File-in-Windows-7-restart


1.3 Disable Increase / Decrease pagefile.sys on Windows 10 / Win 11
 

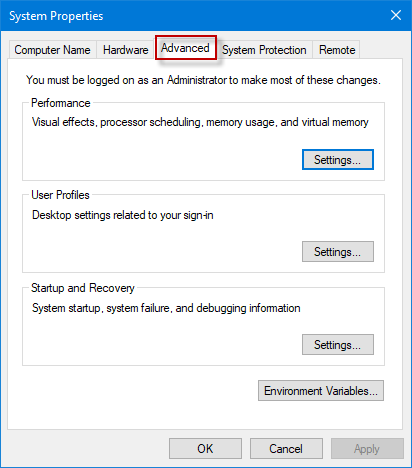
open-system-properties-advanced-win10

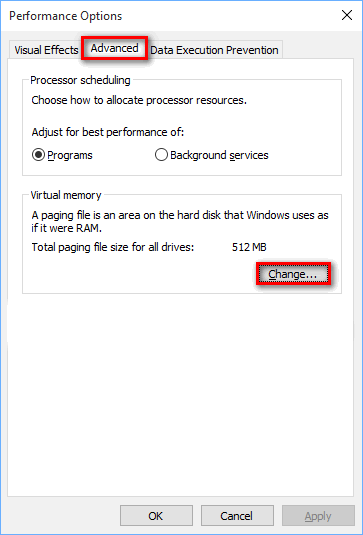
win10-performance-options-menu-screenshot

configure-virtual-memory-win-10-screenshot


1.4 Make Windows clear pagefile.sys on shutdown

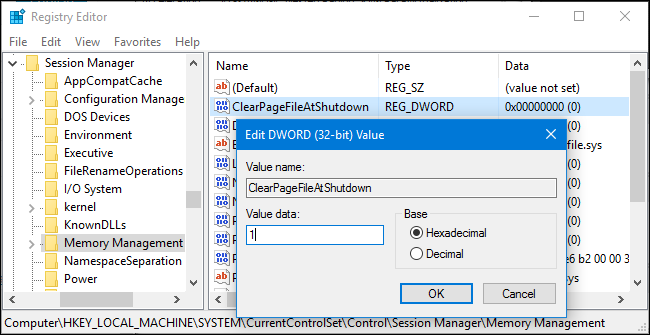
On home PCs it might be useful thing to clear up ( nullify) pagefile.sys on shutdown, that could save you some disk space on every reboot, until file continuously grows to its configured Maximum.

Run

regedit

Modify registry key at location


HKEY_LOCAL_MACHINE\SYSTEM\CurrentControlSet\Control\Session Manager\Memory Management

windows-clean-up-pagefile-sys-file-on-shutdown-or-reboot-registry-editor-value-screenshot

You can apply the value also via a registry file you can get the Enable Clearpagefile at shutdown here .reg.
 

2. Manipulating pagefile.sys size and file delete from command line with wmic tool 

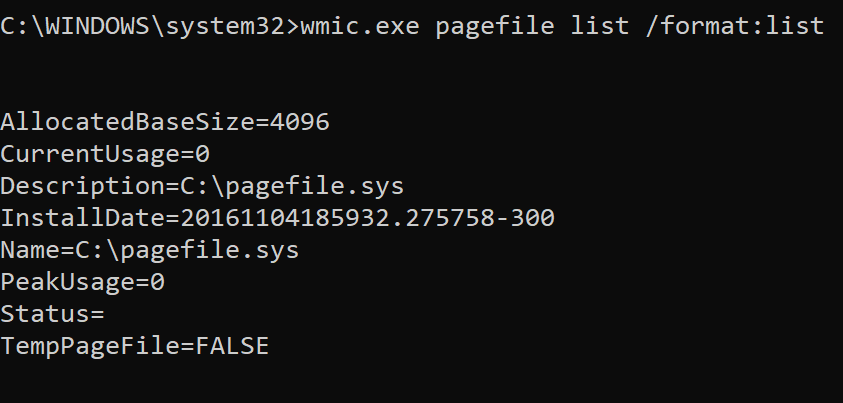
For scripting purposes you might want to use the wmic pagefile which can do increase / decrase or delete the file without GUI, that is very helpful if you have to admin a Windows Domain (Active Directory)
 

[hipo.WINDOWS-PC] ➤ wmic pagefile /?

PAGEFILE – Virtual memory file swapping management.

HINT: BNF for Alias usage.
(<alias> [WMIObject] | [] | [] ) [].

USAGE:

PAGEFILE ASSOC []
PAGEFILE CREATE <assign list>
PAGEFILE DELETE
PAGEFILE GET [] []
PAGEFILE LIST [] []


[hipo.WINDOWS-PC] ➤ wmic pagefile
AllocatedBaseSize  Caption          CurrentUsage  Description      InstallDate                Name             PeakUsage  Status  TempPageFile
4709               C:\pagefile.sys  499           C:\pagefile.sys  20200912061902.938000+180  C:\pagefile.sys  525                FALSE


[hipo.WINDOWS-PC] ➤ wmic pagefile list /format:list

AllocatedBaseSize=4709
CurrentUsage=499
Description=C:\pagefile.sys
InstallDate=20200912061902.938000+180
Name=C:\pagefile.sys
PeakUsage=525
Status=
TempPageFile=FALSE

wmic-pagefile-command-line-tool-for-windows-default-output-screenshot


  • To change the Initial Size or Maximum Size of Pagefile use:
     

➤ wmic pagefileset where name="C:\\pagefile.sys" set InitialSize=2048,MaximumSize=2048

  • To move the pagefile / change location of pagefile to less occupied disk drive partition (i.e. D:\ drive)


    Sometimes you might have multiple drives on the PC and some of them might be having multitudes of gigabytes while main drive C:\ could be fully occupied due to initial install bad drive organization, in that case a good work arount to save you space so you can work normally with the server is just to temporary or permanently move pagefile to another drive.

wmic pagefileset where name="D:\\pagefile.sys" set InitialSize=2048,MaximumSize=2048


!! CONSIDER !!! 

That if you have the option to move the pagefile.sys for best performance it is advicable to place the file inside another physical disk, preferrably a Solid State Drive one, SATA disks are too slow and reduced Input / Output disk operations will lead to degraded performance, if there is lack of memory (i.e. pagefile.sys is actively open read and wrote in).
 

  • To delete pagefile.sys 
     

➤ wmic pagefileset where name="C:\\pagefile.sys" delete


If for some reason you prefer to not use wmic but simple del command you can delete pagefile.sys also by:

Removing file default "Hidden" and "system" file attributes – set for security reasons as the file is a system file usually not touched by user. This will save you from "permission denied" errors:
 

➤ attrib -s -h %systemdrive%\pagefile.sys


Delete the file:
 

➤ del /a /q %systemdrive%\pagefile.sys


3. Disable hibernation on Windows 7 / 8 and Win 10 / 11

Disabling hibernation file hiberfil.sys can also free up some space, especially if the hibernation has been actively used before and the file is written with data. Of course, that is more common on notebooks.
Windows hibernation has significantly improved over time though i didn't have very pleasant experience in the past and I prefer to disable it just in case.
 

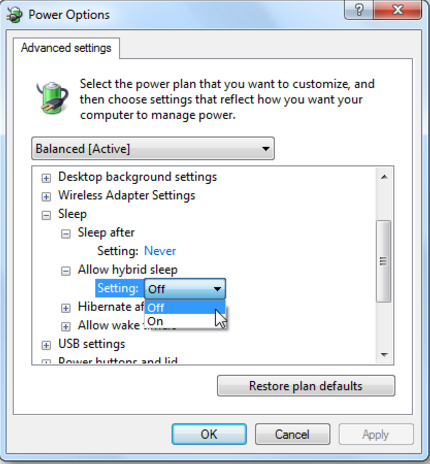
3.1 Disable Windows 7 / 8 / 10 / 11 hibernation from GUI 

Disable it through:

Control Panel -> All Control Panel Items -> Power Options -> Edit Plan Settings -> Change advanced power settings


 like shown in below screenshot:

Windqows-power-options-Advanced-settings-Allow-Hybrid-sleep-option-menu-screenshot


3.2 Disable Windows 7 / 8 / 10 / 11 hibernation from command line

Disable hibernation Is done in the same way through the powercfg.exe command, to disable it
if you're cut of disk space and you want to save space from it:

run as Administrator in Command Line Windows (cmd.exe)
 

powercfg.exe /hibernate off

If you later need to switch on hibernation
 

powercfg.exe /hibernate on


disable-hiberfile-windows-screenshot

3.3 Disable Windows hibernation on legacy Windows XP

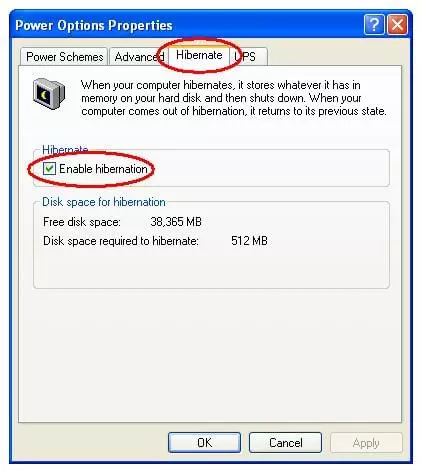
On XP to disable hibernation open

1. Power Options Properties
2. Select Hibernate
3. Select Enable Hibernation to clear the checkbox and disable Hibernation mode. 
4. Select OK to apply the change.

Close the Power Options Properties box. 

enable-disable-hibernate-windows-xp-menu-screenshot

To sum it up

We have learned some basics on Windows swapping and hibernation and i've tried to give some insight on how thiese files if misconfigured could lead to degraded Win OS performance. In any case using SSD as of 2022 to store both files is a best practice for machines that has plenty of memory always try to completely disable / remove the files. It was shown how  to manage pagefile.sys and hiberfil.sys across Windows Operating Systems different versions both from GUI and via command line as well as how you can configure pagefile.sys to be cleared up on pc reboot.
 

How to Create New Windows 10 NTFS Drive partition from new empty ( Unallocated ) space with Windows Disk Management or diskpart command

Thursday, November 18th, 2021

Windows-10-paritioning-with-disk-management-diskmgmt.msc

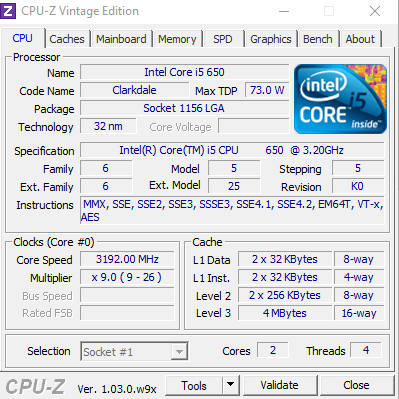
As mentioned in previous article, I've been setting up a new PC that is a bit old a 11 years old Lenovo ThinkCentre model M90P with 8 GB of Memory, Intel(R) Core(TM) i5 CPU         650  @ 3.20GHz   3.19 GHz, Intel Q57 Express Chipset.

After the installation was successful on the new Desktop PC attached SSD, I was curious to see how Windows detects the 521 GB Solid State Drive Samsung  Disk, as well as to assign all the SSD Disk space, so I don't have unused parts of the drive hanging around.

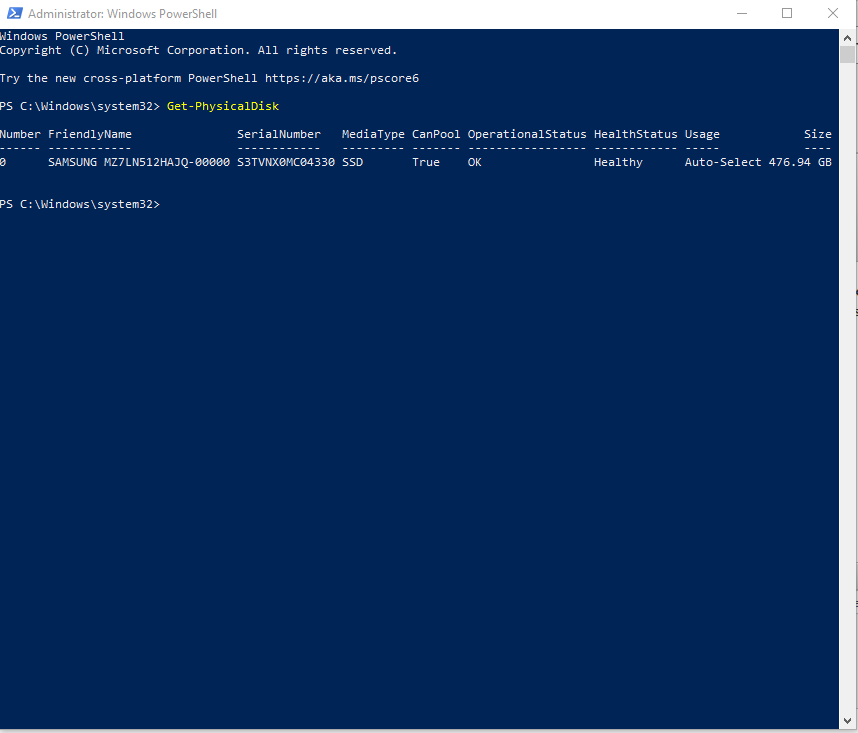
To get the exact type of SSD installed on the Lenovo ThinkCentre, it comes to a simple PowerShell command (note that the PowerShell command has to be executed as Administrator).


Windows PowerShell
Copyright (C) Microsoft Corporation. All rights reserved.

Try the new cross-platform PowerShell https://aka.ms/pscore6

PS C:\Windows\system32> Get-PhysicalDisk

Number FriendlyName               SerialNumber   MediaType CanPool OperationalStatus HealthStatus Usage            Size
—— ————               ————   ——— ——- —————– ———— —–            —-
0      SAMSUNG MZ7LN512HAJQ-00000 S3TVNX0MC04330 SSD       True    OK                Healthy      Auto-Select 476.94 GB


PS C:\Windows\system32>


PowerShell-Get-PhysicalDisk-command-print-exact-SSD-type-attached-to-a-Windows-computer 

During the Windows installation, I did installed Windows on a 110GB partition that was left behind from my attempt to copy another 120GB ssd drive as, I've described in my previous article.
Cause of that big part of the SAMSUNG MZ7LN512HAJQ-00000 SSD was left unpartitioned ( unallocated ) and respectively the space did not show in Windows, hence to work around this I was supposed to 
create new Windows Drive and format it either in VFAT (FAT32) or NTFS. Through the years when I had to do such an operations I often either booted from some bootCD and did the desired partitioning or if
partitioning had to be done on a LivePC without reboot, I've used Windows Partitioning Software, such as:

  • The Industry Standard Partition Manager ( Acronis Disk Director ) 
     
  • EaseUS Partition Manager


Using a Good partition manager is a great thing if some complicated partitioning operations needs to be done,  however for such a trivial stuff such as mine in that case – Creating a new NTFS filesystem from unallocated space is a bit of nonsense, thus this time I've decided to use the Windows Standard tool for Partitioinng
 

  • Disk Management

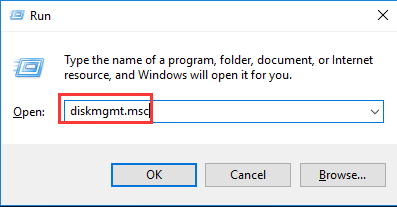
To run the tool you need to run Computer Management tool first either by just looking it up in the Search bar near Start menu (Windows 10 flag icon) or by invoking command line start window, by pressing together

Windows Button + R and runnining command:

C:\Users\Emilian> compmgmt.msc


From there on navigate to

Storage -> Disk Management

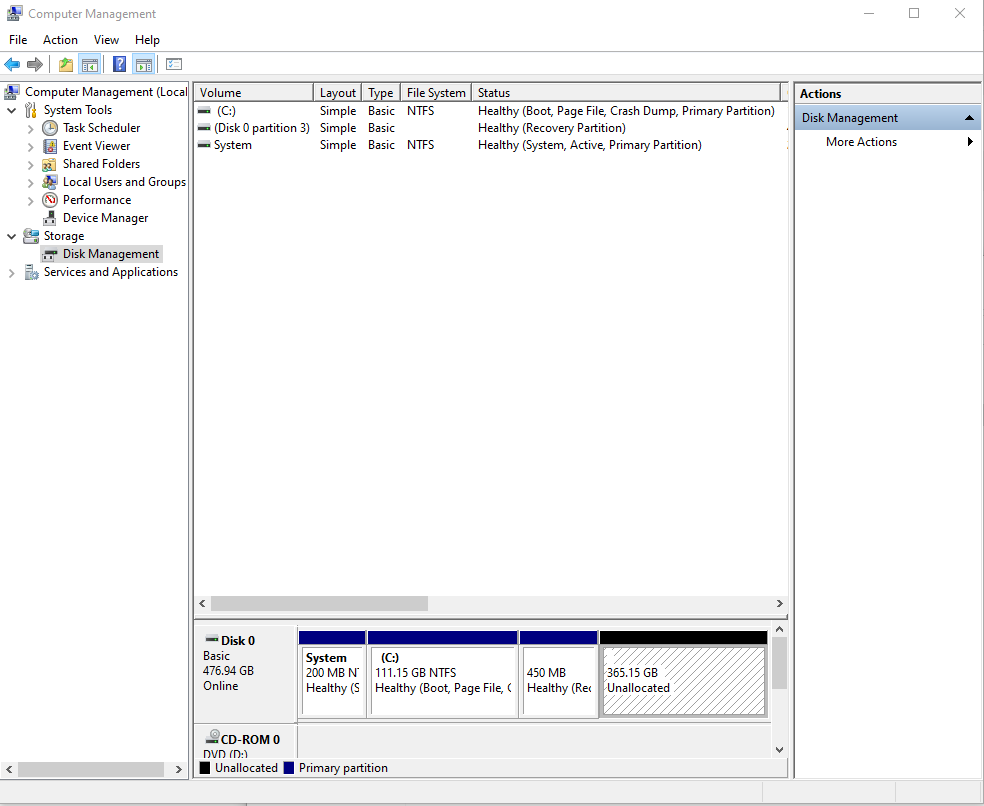
windows-computer-management-screenshot

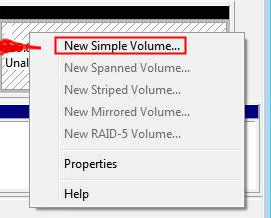
Go over box Unallocated (365.15 GB) and Press Right Mouse Button and select

-> New Simple Volume

new-simple-volume-screenshot

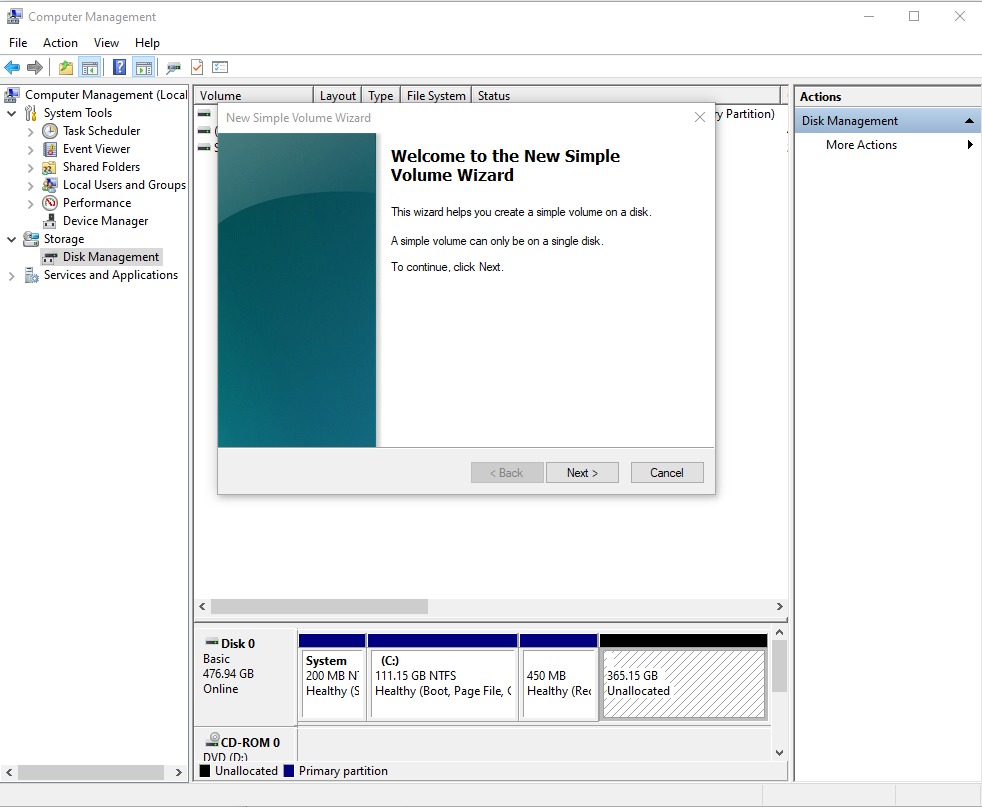
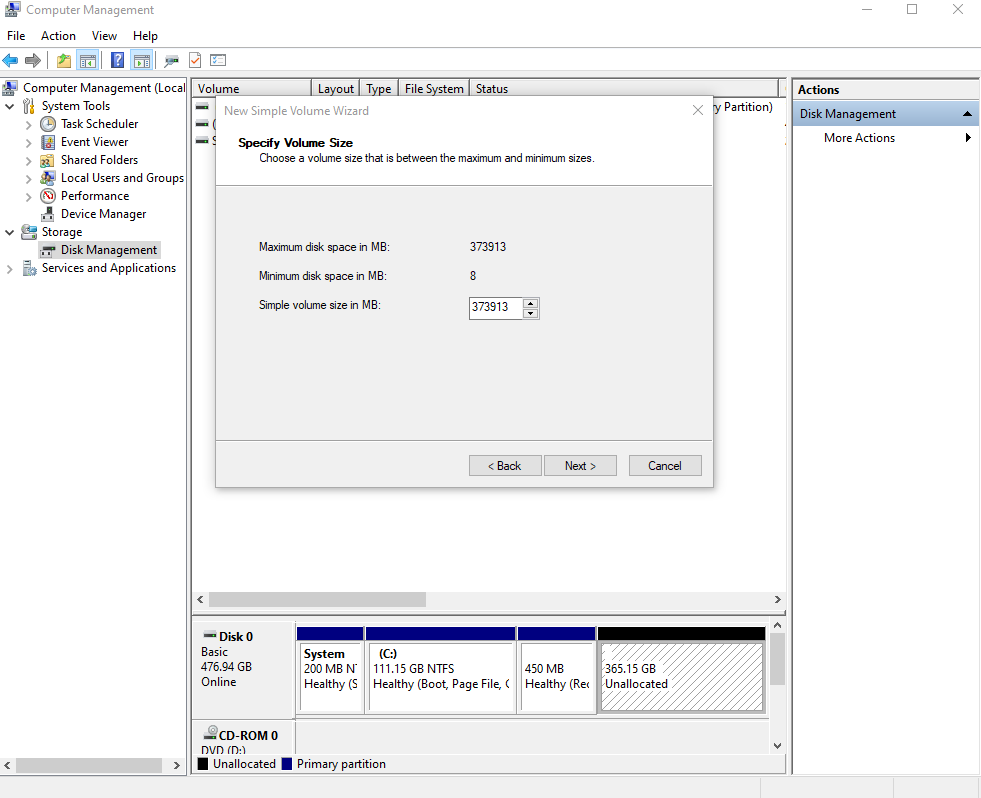
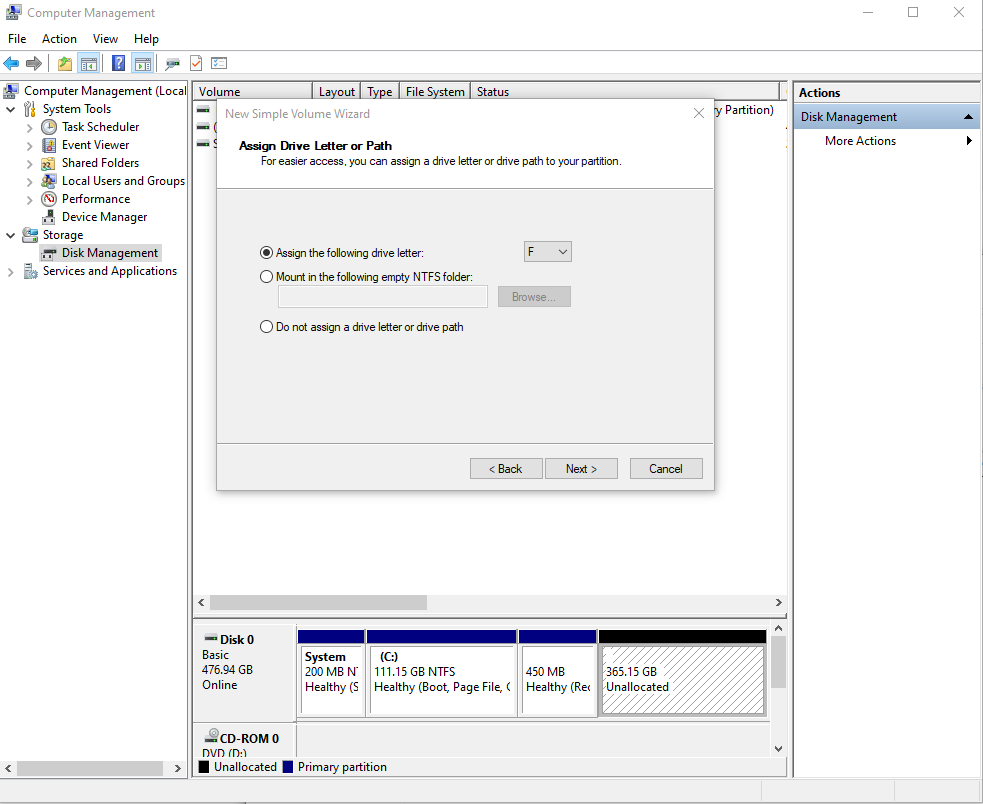
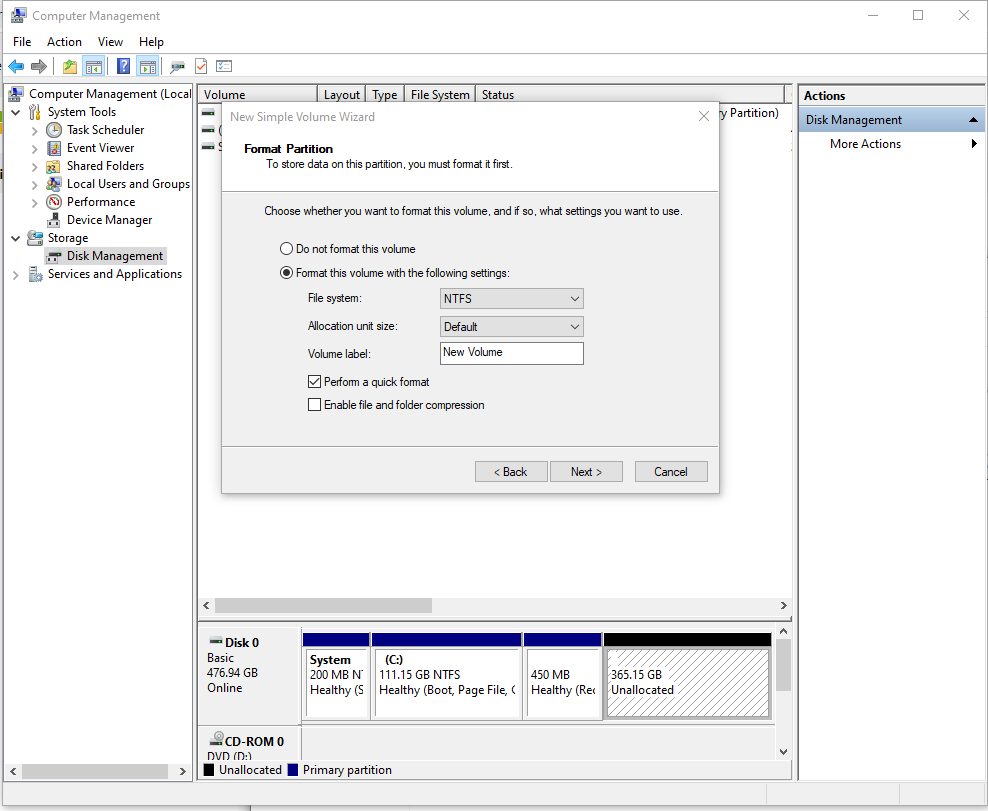
Next steps are quite self explanatory, had to just follow the New Simple Volme Wizard steps

windows-computer-management-screenshot

windows-computer-management-screenshot-3

windows-computer-management-screenshot-4

I Prefer to use NTFS because it is quicker and kinda of a standard since Windows 8+ onwards, besides that this computer will be used as a simple web browsing station and there is no plans the disk will ever have to be attached to a different OS like UNIX / LInux..However always keep in mind for compitability reasons VFAT Filesystem is usually not a bad idea. 

windows-computer-management-screenshot-5

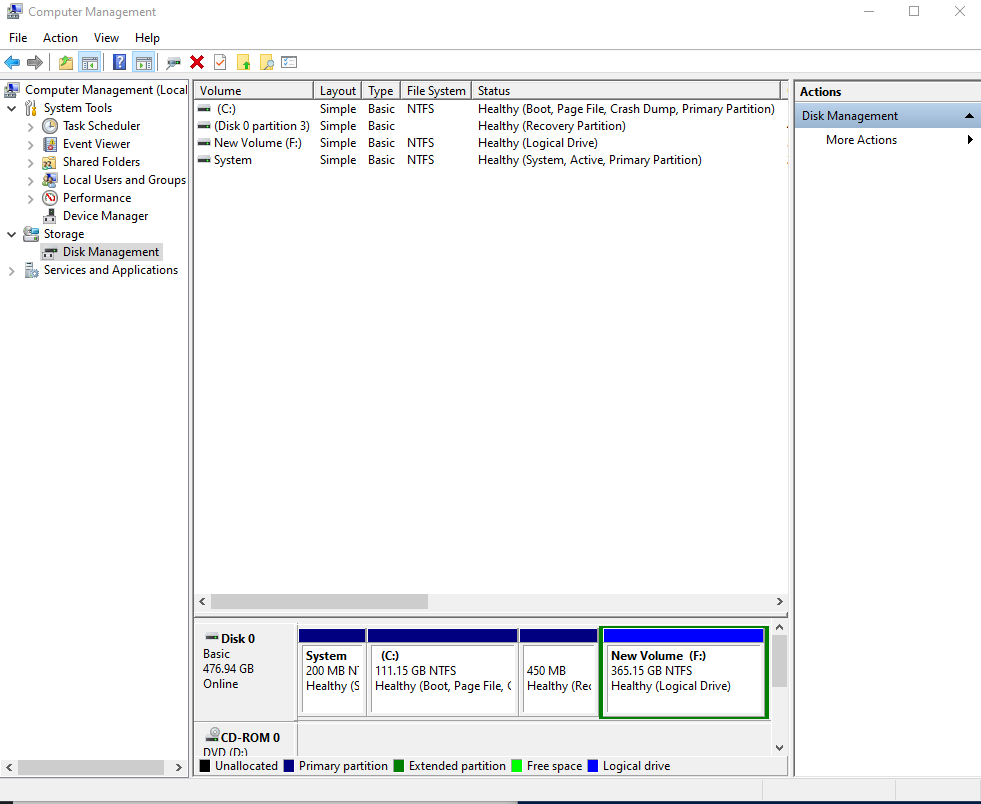
https://www.pc-freak.net/images/new-ntfs-volume-F-drive-windows-10-screenshot

As you can see the drive is prepared and now accessible from Windows Explorer under Drive F:\. If you wonder why the drive is not D:\, it seems to create the D:\ the unallocated space is supposed to be be on a separate Disk which waas not the case with this PC setup.

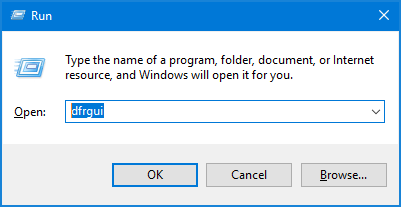
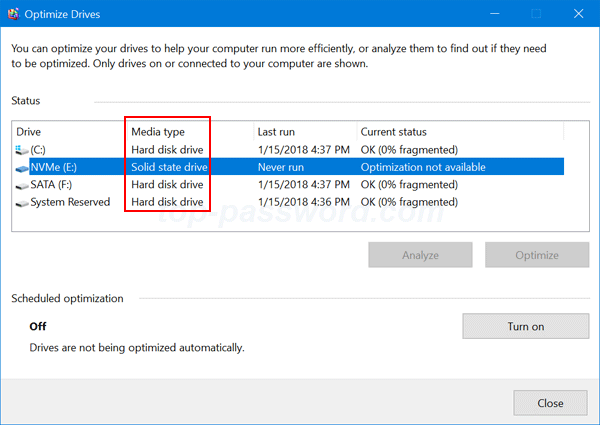
After installing the SSD drive and setting the proper partitions another good practice is to use Disk Defragmenter Win tool to optimize the Drives for speed. Another useful feature of disk degragmenter is you can use it to check what kind of hard drive you have installed e.g. SATA or SSD, as well as check if the installed SSD is NVME (Non-Volatile-Memory-Express), e.g. of a faster type.

To run Disk Degrafmenter do  Win key + R


C:\Users\Emilian> dfrgui


dfrgui-command-screenshot-windows-1

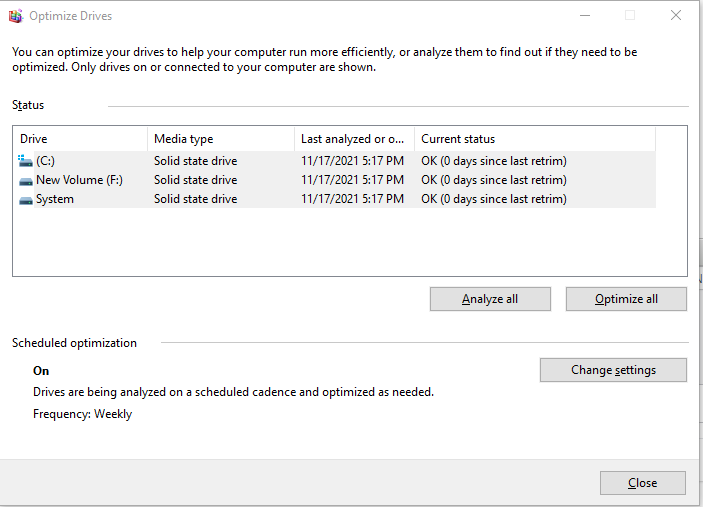
Below is what dfrgui reports on the ThinkCentre after running Disk Optimize for each Drive – (Optimize All) option.

dfrgui-partitions-on-lenovo-thinkcentre-windows-screeshot

Just to show you what you can see with dfrgui, here is the dfrgui screenshot from another PC that has attached both SATA disk and NVME SSD Drive.

dfrgui-command-screenshot-windows-2


How to do partitioning from Windows console with diskpart command (useful for scripting)


If you're coming from Linux world and you're pretty used to fdisk / cfdisk etc. to do partitioning daily, then you'll be most happy to hear about existence of the diskpart command in Windows, which is a kinda of an equivalent tool.
The tool is perfect for domain administrators which need to do some dynamic partitioning operations on multiple computers at once.

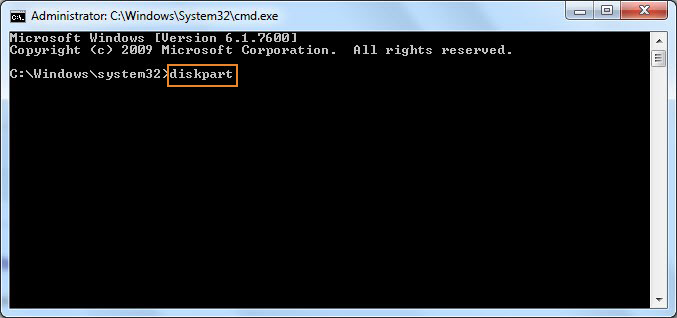
 To use diskpart you need Administrator command prompt, there is much you can do with diskpart, below is how to create another NTFS partition on a secondary

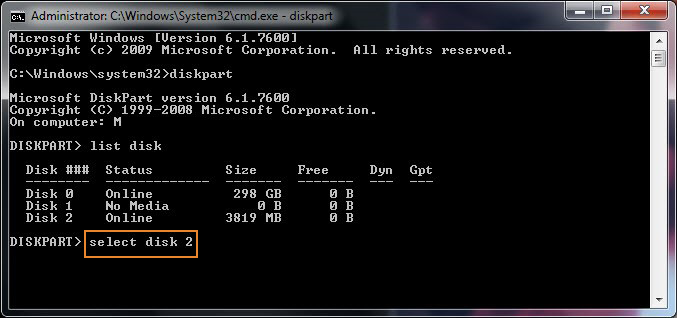
C:\Windows\System32> diskpart

diskpart-win-screenshot-1

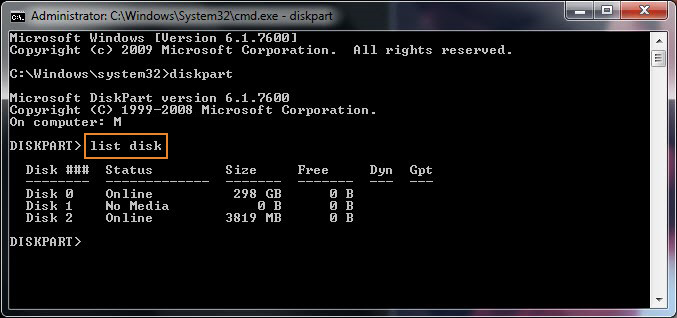
DISKPART> list disk

diskpart-win-screenshot-2

DISKPART> select disk 2

diskpart-win-screenshot-3

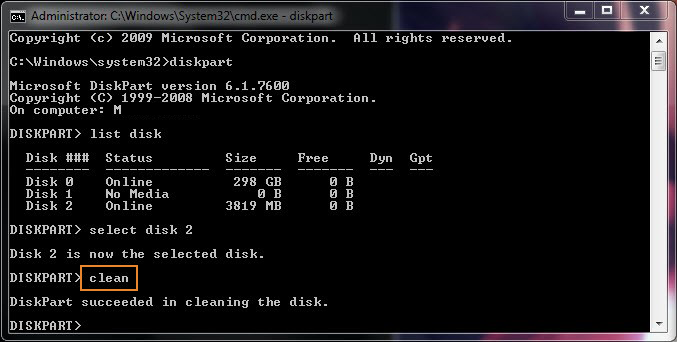
To clean all the content (e.g. delete everything on hard drive) e.g. all files and directories

!!! BEWARE NOT TO DELETE BY MISTAKE YOUR DATA DON'T BLAME ME IF YOU JUST COPY PASTE IRRESPONSIBLY WITHOUT THINKING.
AFTER ALL IT IS YOUR COMPUTER !!!

DISKPART> clean


diskpart-win-screenshot-4

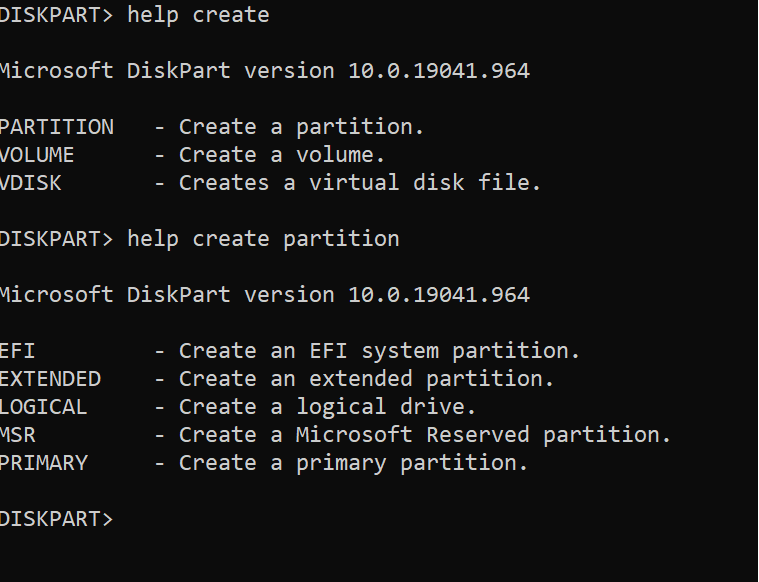
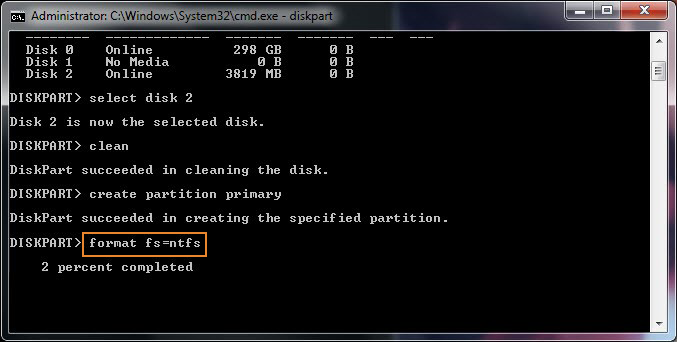
Next lets, create a partition, in below screenshot you can see how to use help and what are the supported partition types in Windows 10 as of year 2021.


/diskpart-help-create-partition-type-screenshot
 

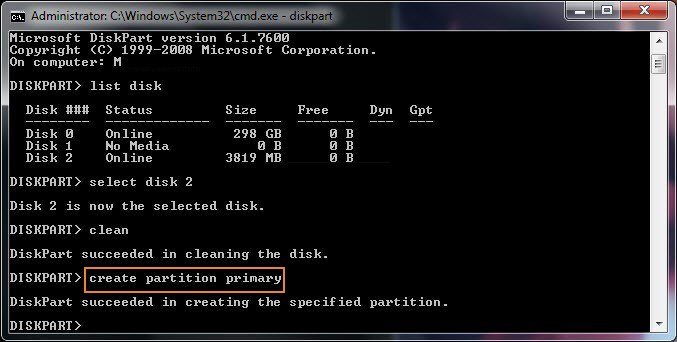
DISKPART> create partition primary

diskpart-win-screenshot-6

To format new assigned primary partition as NTFS

DISKPART> format fs=ntfs

diskpart-win-screenshot-7

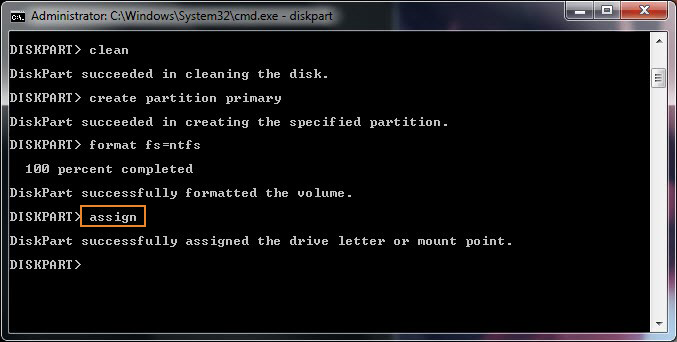
Once formatted to assign Drive letter that is the next available free one in order

DISKPART> assign


diskpart-win-screenshot-8

If instead of auto assigning a letter to new formatted partition, you would want to assign a specific Drive letter, lets say F:\> as it was in our case with the Graphical Windows Disk Management tool earlier in article.

DISKPART> assign letter=F


Using diskpart it is pretty easy to do much stuff from command line such as formatting a new attached empty unallocated drive, or formatting and setting a desired filesysteem of external attached Hard Drive. Note that the disk list arguments will list any externally attached Supported Storage and you can use disklist similarly to do quick format / repartition / wipe out data or whatever.

Further on just for fun I've run CPUID which is a great Windows freeware tool to report System Information, pretty much like the good old Everest such as exact CPU type, MainBoard, Graphics Card and Mainboard type of the certain hardware you have on running.

cpuid-screenshot-windows-10
 
That's all folks Hope this article, helped you learn something new.

Cheers 😉


Remove “Windows 7 PC is out of Support” annoying reoccuring warning popup alert

Friday, September 10th, 2021

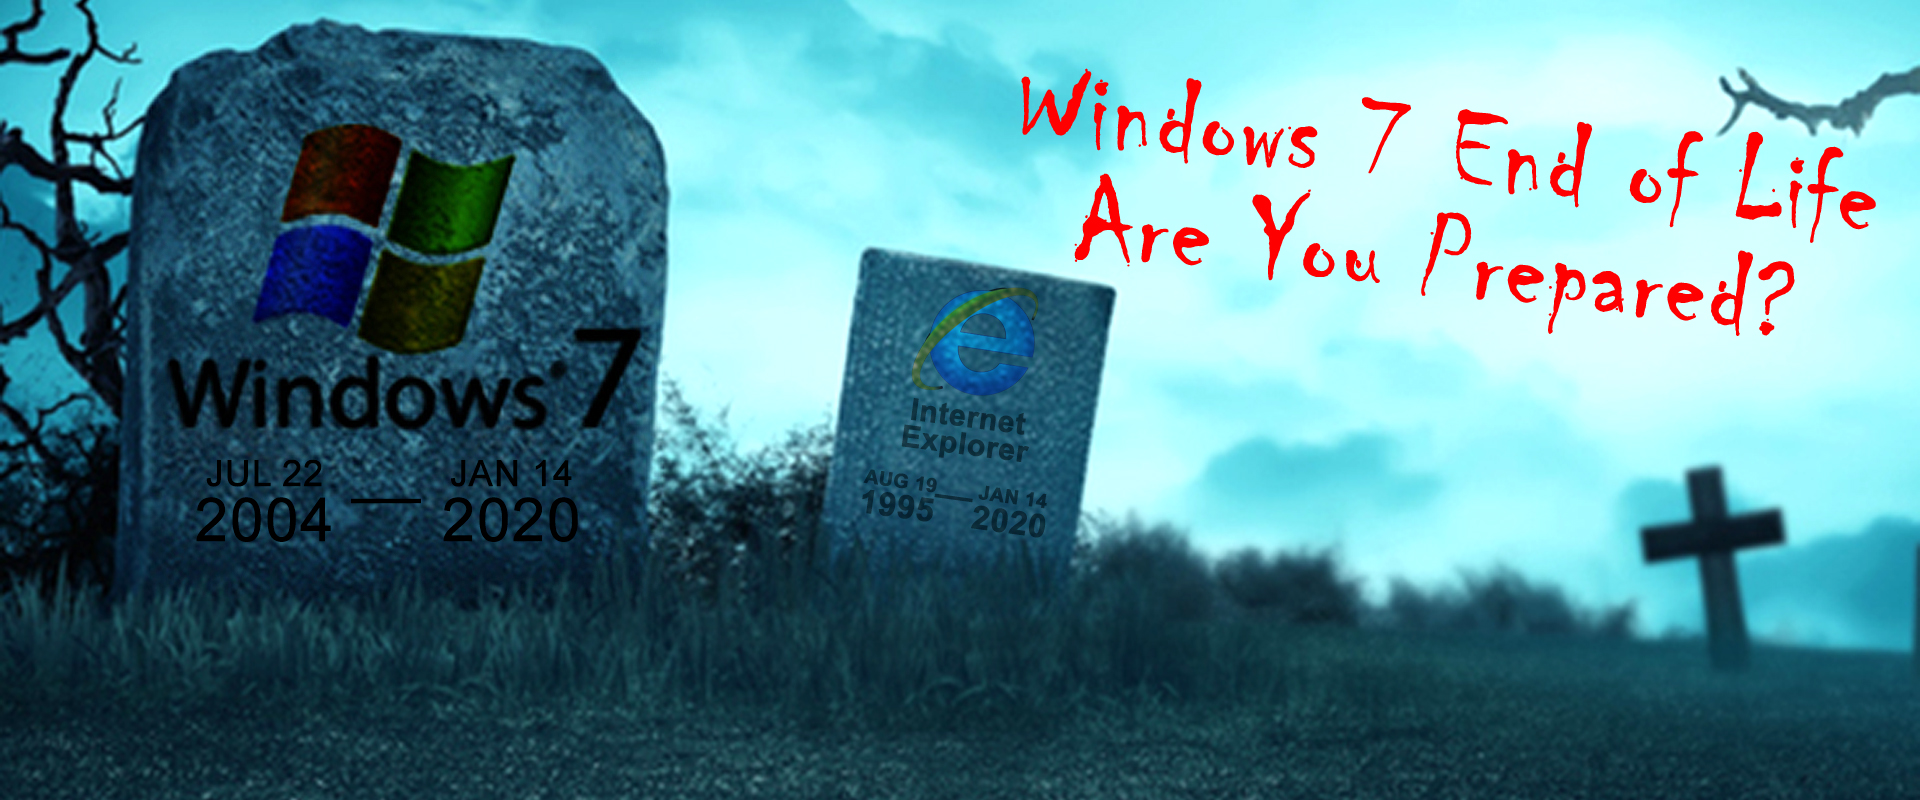
Windows-7-End-of-life-pc-is-out-of-support-removal-rip-win-7

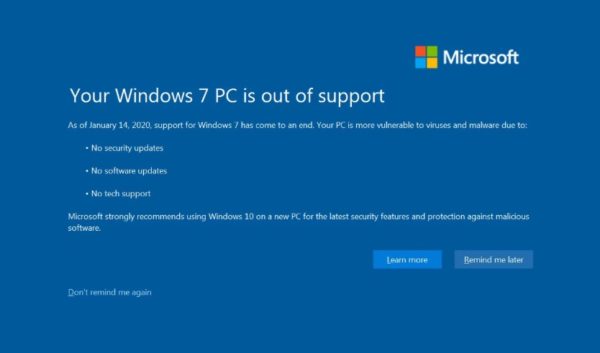
Since January 15th 2020, Windows 7 which reached its End of Life (EOL)  and is no longer Supported. Windows 7 Service Pack 1 Starter, Home Basic, Home Premium, and Professional installations will display the message


"Your Windows 7 PC is out of support".

The use of Windows 7, since 2020 is steadily declining but some hard core maniacs, who refuse to be in tune with latest fashion do still roll Windows 7 on dedicated VPS Servers (running on Xen / VMWare etc.).
With the reach of End of Support, people who still run Windows 7 have no longer the usual Operating system provided.

  • No security updates
  • No software updates
  • No tech support

Even though running End of Support system is quite dangerous and you might get hacked easily by autometed bot, still for some custom uses and if the Windows 7 Runs behind a solid firewall it could be considered relatively safe.

Microsoft hence made their Windows (remote controlled system) to have an annoying pop up window with the "YOUR WINDOWS 7 PC IS OUT OF SUPPORT" as shown in below screenshot:

windows-7-disable-pc-is-out-of-support-popup-annoying-message-screenshot.

For those who don't plan to migrate from Windows 7 to Windows 10, this message becomes quickly very annoying especially if you happen to access remotely your Windows 7 VPS and use it for simple things as browsing a few news websites or you're a marketer and you use the Windows for accessing Amazon / Ebay from a different country as many Marketers do to access General Webstores emulating access from a remote location. 


Disable "Your Windows 7 PC is out of support" popup alert
 

Luckily it is possible to disable this annoying Your Windows 7 pop-up alert by setting a value key in Windows Registry
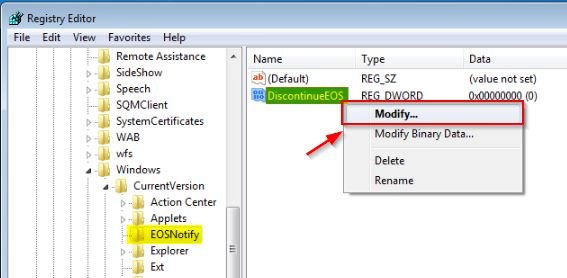
DiscontinueEOS to 1.

To do so launch from Administrator command  line cmd.exe prompt (or start it from Windows start menu):

regedit

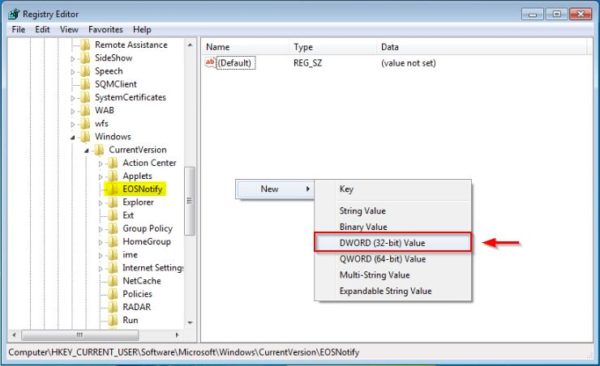
1. Open Windows Registry Editor and navigate to

HKEY_CURRENT_USER\Software\Microsoft\Windows\CurrentVersion\EOSNotify.

 You will need to set the DWORD DiscontinueEOS value to 1 in the Windows Registry
 

windows-7-disable-pc-is-out-of-support-popup-eosnotify-dword-registry-03-600x366

windows-7-disable-pc-is-out-of-support-popup-discontinueEOS-registry-modify

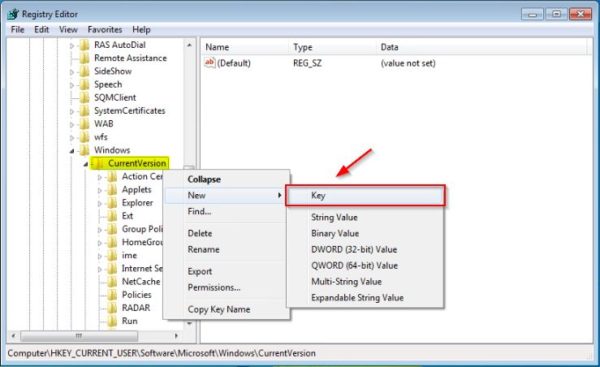
–  In case EOSNotify key is not available, right-click the CurrentVersion key and select New > Key and name it EOSNotify.

windows-7-disable-pc-is-out-of-support-popup-EOSNotify-create-new-key-600x367

2. Right click anywhere in the right pane and select New > DWORD (32-bit) Value and name it DiscontinueEOS.

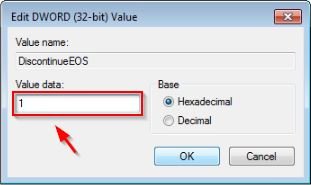
3. Set Value data to 1 and click OK.

windows-7-disable-pc-is-out-of-support-popup-edit-dword-32-bit-value-regedit-screenshot.

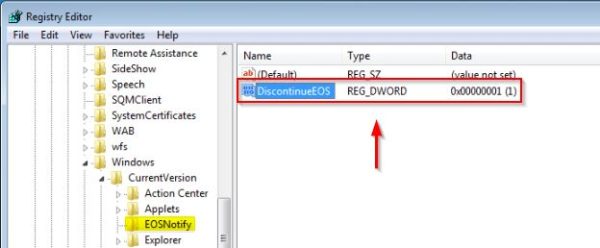
4. When the new value has been set, Restart the Windows7 computer / Virtual machine, to make sure registry setting take effect.

windows-7-disable-pc-is-out-of-support-popup-discontninueEOS-reg-dword-0x000000001-600x248


To automate the procedure in large environments, you can create a small script using the reg  command load the Registry key or use Windows GPO (Group Policy Object) to enforce the setting across all Active Directory PC members.
 

[HKEY_CURRENT_USER\Software\Microsoft\Windows\CurrentVersion\EOSNotify]
"DiscontinueEOS"=dword:00000001
custom GPO in Active Directory.

To avoid potential issues using a non supported OS, you should start planning to upgrade your Windows 7 clients to Windows 10.

That's it ! Out of support Windows 7  alert should no longer bug you 🙂

Remove pre-installed HP, Dell, Asus, Acer, Toshiba not needed default vendor software on a new bought PC notebook quickly with Decrap My Computer

Thursday, April 14th, 2016

remove-default-unneded-software-from-manufacturer-hp-asus-acer-dell-toshiba
While browsing today and looking for software to clean up all the spy software from my corporate HP laptop, I've come across an interesting tool called Decrap which aims at removing Bloatware from a Windows PC / notebook (mirrored here because original software site was down)

So what is Bloatware ?

The term Bloatware (also called jokingly crapware) is term is the one that was coined to describe, the default pre-installed software that comes to you together with Windows pre-installed OS by the hardware manufacturer.
I'm sure anyone who bought brand new branded PC or laptop over the last 10 years have already suffered the unwanted and unnecessery
bunch of software that comes pre-installed freeware programs aiming to help you in your daily work but in reality just slowing down your PC
and showing annoying popups or at best keeping useless in Windows system apptray.

Let me give you an example:

Cleanup (Remove) common ASUS, HP, Dell default  installed unneded (Bloatware) software

Many users may want to uninstall ASUS Crapware software such as ASUS Tutor, ASUS LifeFrame3, ASUS WebStorage and ASUSVibe.

Like Asus, HP computers often come preloaded with useless software from factory, example for this is HP Customer Service enhancements, HP Update, HP Total Care Setup and ProtectSmart.

If you buy Dell PC notebook soon you'll discover that there are several preloaded software (often unnecessery software) such as Dell Stage, Dell Digital Delivery and Dell DataSafe.

Toshiba computers and notebooks contain pre-loeaded "crapware" software from Toshiba.
Just to mention a few of those: Toshiba Disc Creator, Toshiba ReelTime, Service Station, Bulletin Board and Toshiba Assist.

Often there are fingerprint reader programs, Wi-Fi connection managers, Bluetooth managers, Audio Management sofware and other third party vendor software which tend to be not working as good as others softwares from third vendor, so Decrap is to help you to identify and remove these too in a easy GUI manner.

Non-experienced Computer users often leave the bloatware to hang around for even years and only if some relative that is an IT involved person / sysadmin / Even once you're aware that the Bloatware is on the system the ordinary user is hard to remove it as he is scared not to break the system.
Besides that fften this bloatware just soft comes so much integrated into Windows that removing it costs hours of tries and research online on
all the Bloatware components and even then could mislead you so you break the PC. programmer etc. comes home of such users finds out about the happily existing of the useless software on the notebook.


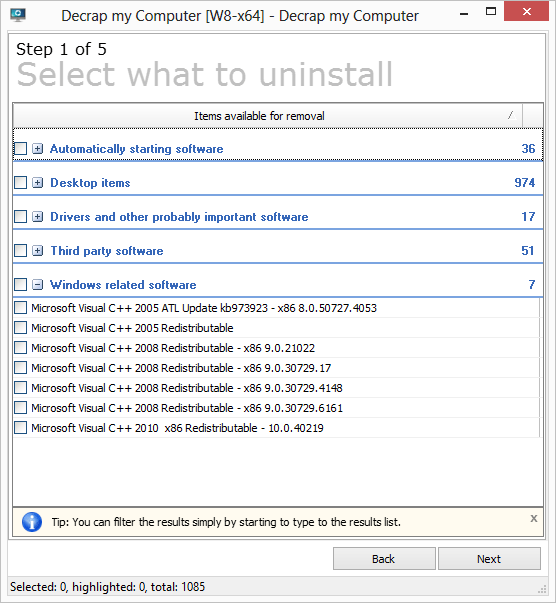
So here is Decrap My Computer coming at place aiming to help to remove the unnecessery Hardware vendor software in few easy (Click, Click, Click Next ..) steps.

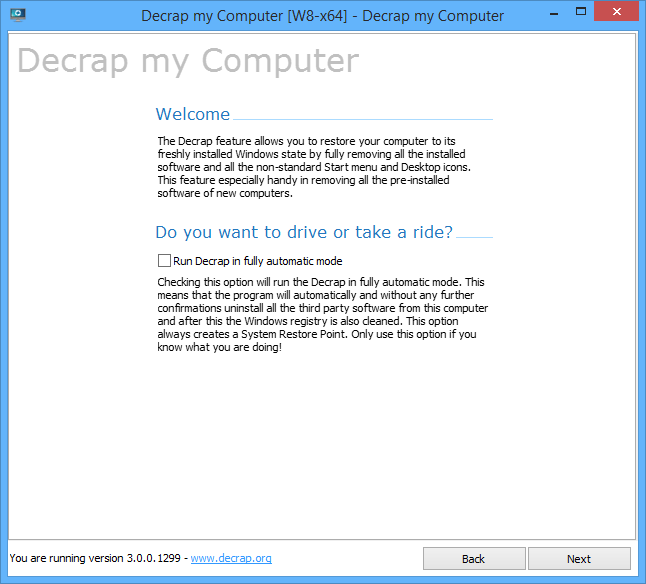
decrap-my-computer-clean-up-bloatware-crapware-on-windows-laptop-main-gui

Then decrap does silently all the complex operations and suggestions to make the HP, Dell, Asus, Toshiba manufacturer prebundled software to be stopped and uninstalled.
Decrap My Computer is a freeware, lightweight and easy to use and lets you safely remove crapware and bloatware, or any software, from any Windows PC.

Even for Old computers, Decrap comes handy for the unexperienced avarage user who used his laptop with this useless  default vendors programs silently killing the performance respectively user experience for years.

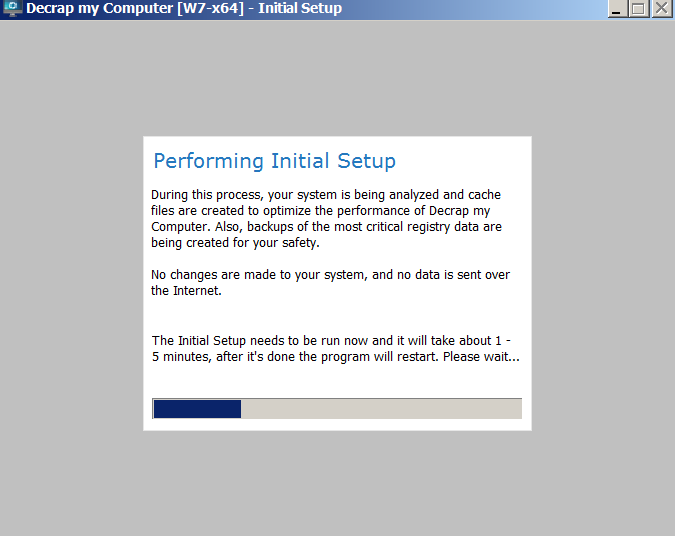
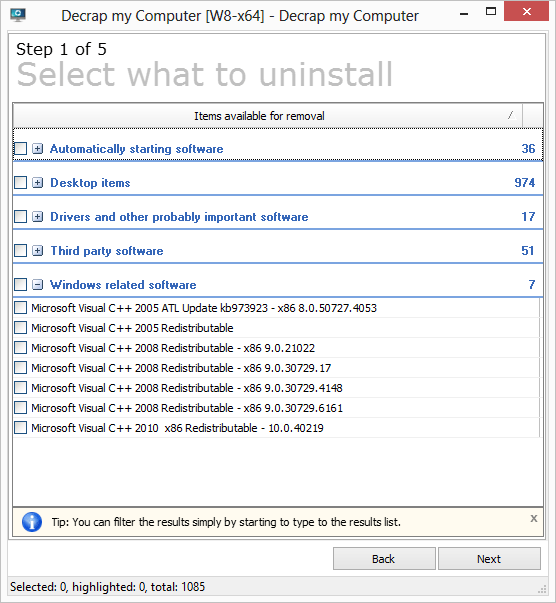
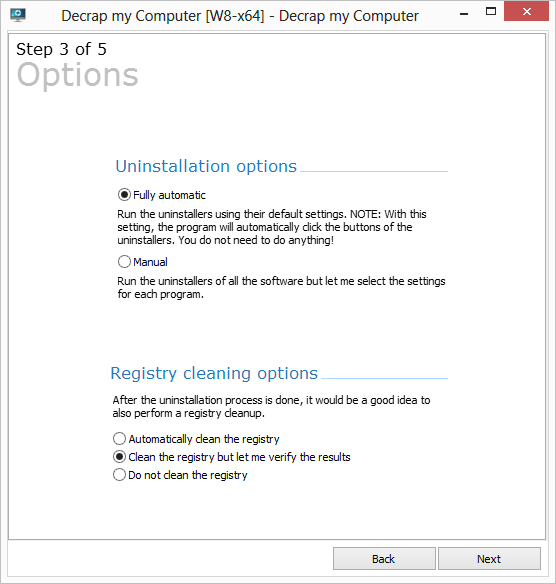
Using Decrap is quite intuitive PC is scanned for Bloatware and then after a backup Windows Restore Point is offered you're offered to review and Uninstall the unwanted softwares. There is also an automatic mode but those one still could be a bit dangerous, so use the automatic mode only on multiple machines with the same model  / brand notebooks that comes prebundled with same sofware after testing and confirming the automatic mode on 1 initial machine will not break up some needed functionality.

decrap-your-pc-clean-up-windows-from-hp-dell-toshiba-asus-bloatware-unuseful-programs

Here is few screenshots of the tool in action:
decrap-choose-what-default-laptop-manufacturer-software-you-want-to-clean-from-new-bought-pc

decrap-choose-what-default-laptop-manufacturer-software-you-want-to-clean-from-new-bought-pc-1

decrap-choose-what-default-laptop-manufacturer-software-you-want-to-clean-from-new-bought

Another good alternative (since decrap seems to be not maintained anymore) as I just leardned from Natasha Myles (thanks for pointing me about the broken link to decrap website) is SpeedUpPC more on speeding up old PC or laptop is her article 

Disable Windows hibernate on a work notebook or Desktop Gamers PC – Save a lot of Space on Windows C Drive, delete hidefil.sys howto

Thursday, May 18th, 2017

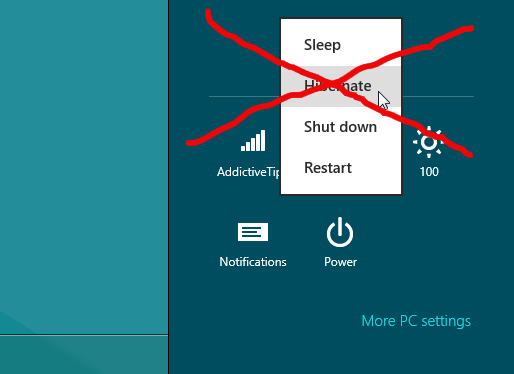
how-to-to-disable-stop-hibernate-windows-8-10-to-save-disk-space-and-get-rid-of-hbierfil.sys-misteriously-occupying-space-improve-windows-performance

Some Windows  laptop / desktop users prefer not to shutdown computers (especially those coming back from Mac OS backgound) at the end of the day but  hibernate instead.

Hibernate is a great thing but historically we know well that in Windows hibernate is working much worser than on Macs and it is common that after multiple hibernates you will face problems with missing  C: drive space is it might be "misteriously" decreasing in a way that the PC performance degrades as the C:hibfile.sys hidden file occupies few 16Gigas or so (the occupied space by hibfile.sys does resemble the installed RAM Memory on the computer, so if your PC has 16Gigas the hibfile.sys will be lets say approximately 15 Gigabytes)

However most users never use hibernate and might never use it for a life time, especially those on a Desktop Windows PCs, I use Windows as a WorkStation as an employee of DXC (the ex Hewlett Packard or Hewlett Packard Enterprise that merged with CSC) but to be honest I've used hibernate function very raraly on the notebook, thus I find the hibernate more or less useless feature, especially because at many times I try to wake-up the PC after hibernate the computer boots but the display stays dark and I have to restart the Computer before I can go back to normal work operations. Of course my Windows 7 hibernation issues might be caused do to the corporate software installed on my PC or because the fact the hard drive is encrypted but nomatter that in my case and I guess in case of many the hibernate function on Windows 7 / 8 / 10 might be totally useless.


Few works is Hiberfil.sys File and Why you might want to complete disable / delete it


On Windows 7 / 8 / 10 the hiberfil.sys file is being used to store the PC current state at time of hibernation, so if you have to move from a place to place within an organization / university / office without a charger hibernation is a really nice way to save battery power without later wasting time for additional PC boot (where a lot of power is wasted for Operationg System to load and re-opening the opened Browser etc.

So in short sleeping the PC with Hibernate function does cause the Computer to write into C:hiberfil.sys all data at the moment stored in the PC RAM (Memory), which is being cleared up at time of Computer being in Sleep mode.
Once the computer receives a Wake-up call from the hibernation in order to present with the Desktop at the same state hiberfile.sys stored information is being red and transferred to PC flushable RAM so the RAM memory is again filled with same bits it used to have right before the hibernation was made.

Because hiberfil.sys is a system file it has the hidden attribute and it can only be write / read by a Administrator Win account and usually it is not a good idea to touch it

Some people haven't shutdown Windows for 20-30 days and especially if Windows has disabled updates it happens for some users to use the hibernate function for weeks (re-hibernating and waking up thousand times) for long periods so the effect is the hiberfile.sys might become gigantic and if you take the time to check what is file or directory is wasting all your C:> drive with leys say WinDirStat or SpaceSniffer you will notice the lets say 15Gigas being eaten by Hiberfil.sys.

Disable of hibfile.sys is also a great tip for Gamers desktop PCs as most gamers won't use hibernate function at all.

I. How to Disable Hibernate Mode in Windows 10, 8, 7, or Vista


In order to get rid of the file across Windows 7 / 8 / 10

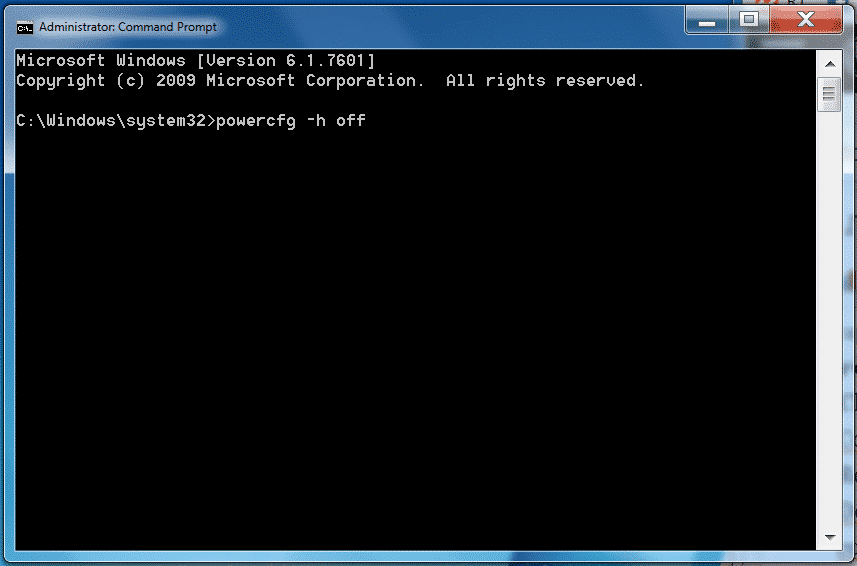
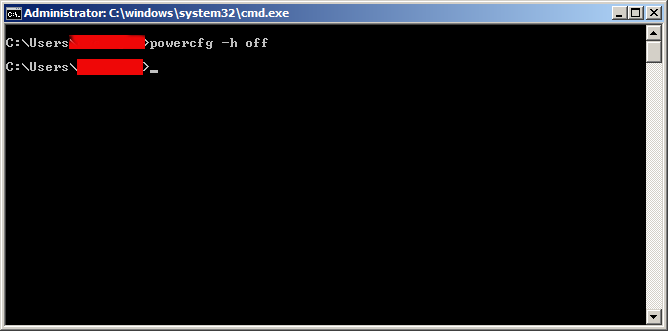
Open command prompt (as an Administartor, right click on the Command Prompt cmd.exe and choose Run as Administartor) and issue below cmd:

disable-hibernate-on-windows-7-8-10-powercfg-off-screenshot

C:> powercfg -h off

If later you decide you need the hibernate function again active on the PC or notebook do issue:

C:> powercfg -h on

You’re likely reading this because you noticed a gigantic hiberfil.sys file sitting on your system drive and you’re wondering if you can get rid of it to free up some space. Here’s what that file is and how you can delete it if you want to.


II. Disable Hibernate Mode in Windows XP

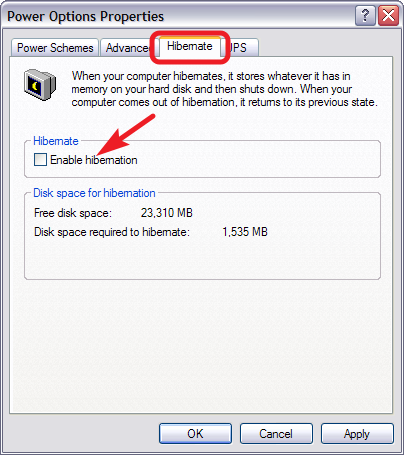
Hibernate function command is not present on Windows XP so in order to remove it on XP (hope you don't use XP any more and you're not a viction of the resent crypt catastrophic ransomware WannaCry 🙂

disable-hibernate-mode-windows-xp-screenshot

Control Panel -> Power Options

In the Power Options properties window, switch to the “Hibernate” tab and disable the “Enable hibernation” option.

After you disable hibernate mode, restart PC, and manually delete the hiberfil.sys file.

Now enjoy free-ing up few gigabytes of useless wasted C: hard drive space from your PC 🙂

Note: Removing hiberfil.sys is a precious thing to do on old Windows Computers which have been made with a little leys say 40Gigabyte partition drive C: whether with the time due to User profile use and Browsing caches the C: drive has left with leys say 1-2 Gigabyte of free space and the computers overall performance has fallen twice or so.

This post is in memoriam of Chriss Cornell (our generation used to grow with grunge and his music was one of the often listened by me and our generation)

R.I.P: Chriss Cornell (the head of SoundGarden and AudioSlave who passed away yesterday right on the day when we in Bulgarian Eastern Orthodox Church commemorate the memory of a great-martyr Nicolay Sofijski (Great Martyr Nicolas from Sofia martyred by Turkish Ottomans during year 1555).

I found surprising fact for me  that Chriss Cornell converted to Greek Eastern Orthodox faith under influence of his Greek Wife, below is paste from his Wikipedia page:

"

Chriss Cornell Personal life (Rest in Peace Chris)

Cornell was married to Susan Silver, the manager of Alice in Chains and Soundgarden.[123] They had a daughter, Lillian Jean, born in June 2000.[123] He and Silver divorced in 2004.[123] In December 2008, Cornell reported via his official website that he had finally won back his collection of 15 guitars after a four-year court battle with Silver.[124]

He was married to Vicky Karayiannis,[125] a Paris-based American publicist of Greek heritage. The union produced a daughter, Toni, born in September 2004, and a son, Christopher Nicholas, born in December 2005.[126] Cornell converted to the Greek Orthodox Church through her influence.[127]

When asked how Cornell beat all his addictions he stated, "It was a long period of coming to the realization that this way (sober) is better. Going through rehab, honestly, did help … it got me away from just the daily drudgery of depression and either trying to not drink or do drugs or doing them and you know, they give you such a simple message that any idiot can get and it's just over and over, but the bottom line is really, and this is the part that is scary for everyone, the individual kinda has to want it … not kinda, you have to want it and to not do that crap anymore or you will never stop and it will just kill you."[128]

In a 2011 interview,[129] Cornell said the major change with the reformed Soundgarden is a lack of alcohol: "The biggest difference I noticed … and we haven't even really talked about it: There are no bottles of Jack Daniel's around or beers. And we never talked about … it's just not there."


Enjoy!


Currency converter Free Desktop Software for Microsoft Windows

Saturday, December 8th, 2012

Business or not a business entity, in the mostly globalized world it is almost inevitable to go on at least monthly basis without a need for some kind of currency convertion. Of course there are plenty of websites allowing Free Money Convertion services out there. However as I'm not a big fan of the Software as a Service (SAS). I don't like other people to be able to sniff what kind of money, amounts I'm intending to convert as well as I don't like google or other search engine to profile me how frequently I'm converting or intending to convert money. Thus today I did a quick research what kind of Free and  Open Source Software FOSS is available to do the money convertion operation custom on my own webserver or my desktop PC. Though It was not exactly what I was looking for I found a Windows Desktop Software -CConverter which is capable of convertions between mostly if not all Currencies around the world. I'm not a m$ Windows user myself, but I was glad to know a Free Software exists for the task. CConverter is definitely a piece of soft useful for Businesses and People. In future if I do my own business it would be nice to know of this little handy soft existence and I will put it in action (to save costs) and add confidentiality to my business money transaction / convertions. Below is the two screenshots of CConverter I found on the project's sourceforge website:

Desktop Currency converter program cconverter windows desktop currency converter program

cconverter money desktop currency converter m$ windows software in action $$$

How to find how much power (electricity) consumption a server or PC has?

Friday, November 2nd, 2012

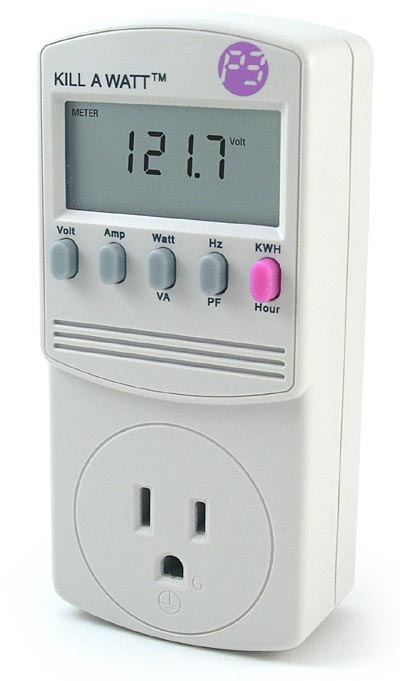
Kill-A-Watt track system power electricty consumption on GNU / Linux servers and FreeBSD
A friend of mine today ask me if I have clue if it is possible to track his home computer Consumption with some piece of Software?

The question is quite interesting, since I run a home server with Linux and it would have been nice if I can exactly track how much electricity per month it  consumes

Now knowing, the answer I first checked online for some kind of software and all I can find something that does something similar but all can find is powertop.

Though powertop is nice Linux tool to keep an eye which program on PC consumes most from overall consumed electricity and order the programs and modules based on electricity consumption it is not providing information on overall electricity consumption.

As the topic seem to be some interesting, I've decided to ask in irc.freenode.net #deiban
Here is a paste from  irssi channel log:

17:21 < hipodilski> hi any idea, how can I find how much electricity a server conmuses per month
17:21 < hipodilski> is there some some kind of software
17:21 -!- digdilem [~digdilem@plague.digdilem.org] has joined #debian
17:22 < babilen> hipodilski: I would recommend an electricity meter rather than software
17:22 -!- tommy_e [~tommy@81.27.221.202] has quit [Ping timeout: 260 seconds]
17:22 < jelly-home> watt meters ftw
17:22 -!- msx [~msx@190.194.114.10] has joined #debian
17:22 -!- blackshirt [~najwa@103.3.223.5] has left #debian []
17:23 < hipodilski> yes but i don't have electricity metter, if there is software it would be interesting to try it
17:23 -!- badiane [~gdurand@D8FF67fa.cst.lightpath.net] has quit [Remote host closed the connection]
17:23 < xand> hipodilski: no, you need a hardware device.
17:23 < jelly-home> now everything can be solved in software, hipodilski
17:23 < jelly-home> not*
17:23 < jelly-home> dammit
17:23 < xand> unless you have a very fancy PSU, software can't find that out
17:23 < babilen> jelly-home: hehe, nice typo !
17:23 < vacuous> hipodilski yes
17:24 < HelloShitty> nsadmin, are you out of ideas for me?
17:24 < vacuous> there's various devices that do it
17:24 -!- firecode [~irc@unaffiliated/firecode] has joined #debian
17:24 < vacuous> you can either get a killawat which are highly innacurate but it might give you a clue
17:24 < vacuous> and they're very cheap too
17:25 < vacuous> you can get a device which measures your entire houses electric, then you just turn off all the appliances and run the
                 server only
17:25 -!- trysten [~trysten@37-251-103-145.FTTH.ispfabriek.nl] has quit [Quit: be back]
17:25  * babilen likes that approach
17:25 < babilen> But this is getting a bit too off-topic. Maybe hipodilski wants to take it to #debian-offtopic
17:25 < vacuous> or you can keep all fridges on, check what the reading is and then negate that from the total
17:25 < hipodilski> yes thanks 🙂
 

The answer makes it clear right of time of writing this post there is no software for Linux or BSD that keeps track electricity consumption daily or monthly

I've googled to see what is Kill-A-Watt hardware? and found fuzzy named device Kill-A-Watt for sale on ThinkGeek's website for the not so expensive 24.99$

To use Kill-A-Watt device is to be connected inside the power plug and then PC or Server has to be plugged into  Kill-A-Watt dev. I've red also (while researching) many Intelligent UPS devs has support for keeping log of discharged energy, so just buying a good UPS with web administrator or even a cheap one providing statistical information of UPS use via serial port should be another alternative to track ur server consumption.

How to shutdown Windows after 1, 2, 3, 4 etc. X hours with a batch script – Shutdown / Reboot / Logoff Windows with a quick command

Wednesday, August 17th, 2016

https://www.pc-freak.net/images/windows-pc-server-shutdown-after-3-5-hours-howto-shutdown-windows-with-command-batch

I recently wondered how it is possible to shutdown Windows in some prior set time lets say in 30 minutes, 1 hour, 3 hours or 8 hours.

That's handy especially on servers that are being still in preparation install time and you have left some large files copy job (if you're migration files) from Old server environment to a new one
or if you just need to let your home WIndows PC shutdown to save electricity after some time (a very useful example is if you're downloading some 200GB of data which are being estimated to complete in 3 hours but you need to get out and be back home in 2 or 4 days and you don't want to bother connecting remotely to your PC with VNC or teamviewer then just scheduling the PC / server to shutdown in 3 hours with a simple is perfect solution to the task, here is how:

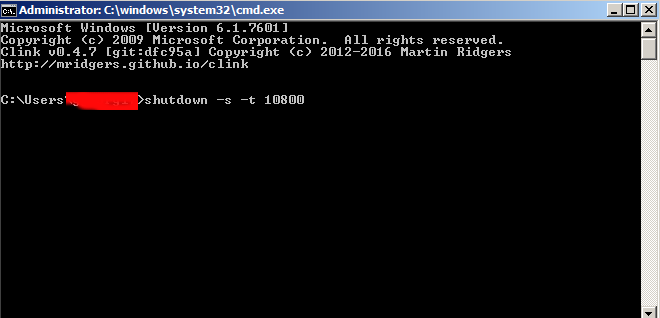
1. Open Command Prompt (E.g. Start menu -> Run and type CMD.EXE)

2. Type in command prompt


shutdown -s -t 10800


If you by mistake has typed it to shutdown earlier and suddenly you find out your PC needs to be running for a short more time in order to cancel the scheduled Shutdown type:


shutdown -a


Shutdown Windows command -s flag has also a possibiltiy to not shutdown but just logoff or if you just need to have the system rebooted a reboot option:


options    effect
-l         to log off
-r         to reboot

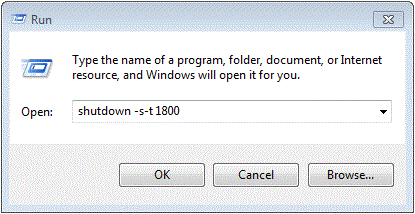
If you need to shutdown the PC after half an hour use instead the command:


shutdown -s -t 1800


shutdown-windows-pc-with-command-in-half-an-hour-screenshot.gif


Half an hour is 1800 seconds for one hour delayed shutdown use 3600 for 3 hours, that would be 3*3600 10800, for 5 hours 5*3600 = 18000 seconds and so on


An alternative way to do it with a short VBscript, here is an example:

Set objShell = CreateObject("WScript.Shell")

Dim Input
Input = "10:00"

'Input = InputBox("Enter the shutdown time here.","", "10:00")

For i = 1 to 2

CurrentTime = Time & VbCrLf

If Left(CurrentTime,5) = Input Then

objShell.Run "shutdown -s -t 00", 0
WScript.Quit 1

Else

WScript.Sleep 1000

End If

i=i-1

Next

Enjoy