Archive for the ‘Linux Audio & Video’ Category

Linux record audio from console / terminal with rec, arecord and ffmpeg

Monday, January 14th, 2013


Recording sound input from microphone linux penguin holding microphone

Recording from microphone input on Linux is possible, through multiple programs.

1. Recording microphone input using SoX's rec

 The classical old-school way is through a little proggie called sox. Back in the day I remember we recorded with sox with a friend from the school years necroleak – mirror of his website is on kenamick.www.pc-freak.net, trying to make save vox for one of his Tracked Songs. The experiments was not very succesful as both the PC microphone was low quality one, as well as the the state of recording microphone sound streams on Linux was terrible, but at least I learned about sox.

sox is not so popular and mainstream as it used to be back in the day but for anyone willing to investigate into the roots of GNU / Linux sound capturing make sure you have installed sox, alsa-utils and lame package. The package is available across virtually all main stream Linux distributions, depending on the distro to INSTALL sox do:


apt-get install --yes sox alsa-utils lame 
....

 (On Debian, Ubuntu, Arch, Xubuntu … )

yum -y install sox  alsa-utils lame
....

 (on Fedora, CentOS, RHEL …)

 slapt-get install sox ; swaret install sox alsa-utils lame
.....

(on Slackware and derivatives)

Before continuing it is a good idea to check, the microphone is not muted in alsamixer, amixer or aumix

The SoX package provides 4 binaries;

dpkg -L sox|grep -i /usr/bin/
/usr/bin/sox
/usr/bin/rec
/usr/bin/play
/usr/bin/soxi

sox -is tool to apply effects to recorded sound streams

rec – is historically among the first sound recorder tool to make records from microphone (even form the days of OSS – Open Sound System)

play – play is tiny .WAV and some other native classical sounds formats with a beautiful ASCII art (text) equalizer

soxi – gives information on recorded sound stream header (info)

rec -r 8000 -c 1 record_microphone_input.wav

rec is unfortunately made to use the old and now obsolete /dev/dsp sound interface, so on many Linux distributions, recording sound with it might pose problems.

Another problem of rec is it usually records with a lot of noise, thus reducing the noise later with sox cmd is almost necessery, to mitigate the noise you will have to experiment with its options. For some better quality of recording use arg -r 22050.

A little shell script with plenty of example use cases of rec and post sox effect applied as synchronization record_and_normalize_from_mic_with_rec_and_sox_on_linux.sh is here

Generally I mentioned rec for historical reasons, nowadays it is quite obsolete so you probably better stick to the newer alsa native arecord.

2. Recording sound from microphone using alsa-utils arecord

alsa-utils package has bunch of tools to record, play and tune sound;

dpkg -L alsa-utils |grep -i /usr/bin/
/usr/bin/aplaymidi
/usr/bin/aplay
/usr/bin/aconnect
/usr/bin/amixer
/usr/bin/alsamixer
/usr/bin/aseqdump
/usr/bin/arecordmidi
/usr/bin/speaker-test
/usr/bin/iecset
/usr/bin/amidi
/usr/bin/aseqnet
/usr/bin/arecord

One of tools included arecord is able to capture sound from microphone. arecord, can record into .WAV, but as .WAVs are not compressed and most people prefer to save the input to some more wide recognized format as .MP3 it should be invoked in conjunction with lame;

arecord -D plughw:0,0 -f S16_LE -c1 -r22050 -t raw | lame -r -s 22.05 -m m -b 64 - mic-input.mp3


Writting this long and hard to remember command line and arguments is tough, so I created a tiny shell script wrapper which accepts as 1-st argument a file name and saves .WAV and converts it to .MP3. The script linux_record_from_microphone.sh is here

3. Recording from microphone input using ffmpeg

I've earlier blogged on how to use ffmpeg to capture Microphone sound here.

For those lazy to read my previous post the skele syntax is;

ffmpeg -f alsa -ac 2 -i pulse -acodec pcm_s16le -vcodec libx264 -vpre lossless_ultrafast -threads 0 -y myVOICE.wav 

To later convert WAV to MP3 use lame;

 lame -r -s 22.05 -m m -b 64 myVOICE.wav  mic-input.mp3

How to record microphone input sound (only) using good old ffmpeg

Tuesday, December 25th, 2012

The good old ffmpeg, along with being able to capture sound and video from your Linux Desktop or a certain Window and Skype whatever WebCamera input is also able to record sound from both camera or embedded laptop microphone. Here is how:

# ffmpeg -f alsa -ac 2 -i pulse   -acodec pcm_s16le -vcodec libx264 -vpre lossless_ultrafast -threads 0  -y  myVOICE.wav

This as you can see from arguments, uses GNOME's pulseaudio (audio service) and ALSA. Sound is first streamed through alsa and then the sound inflow is passed to be processed and multipled in a separate sound channel by pulseaudio. This method though said to be working fine on Ubuntu Linux is not working well on some other Linux distributions like Debian if one is using ALSA configured to use a software sound multiplexor via the so called – alsa dsnoop interface (previously I write how to use it in order to make Skype and other programs use SoundBlaster proper – article is here)

Below is the output warning I got whether trying ffmpeg with -f alsa and -i pulse arguments:

hipo@noah:~/Desktop$ ffmpeg -f alsa -ac 2 -i pulse   -acodec pcm_s16le -vcodec libx264 -vpre lossless_ultrafast -threads 0  -y  myVOICE.wav
FFmpeg version SVN-r25838, Copyright (c) 2000-2010 the FFmpeg developers
  built on Sep 20 2011 17:00:01 with gcc 4.4.5
  configuration: --enable-libdc1394 --prefix=/usr --extra-cflags='-Wall -g ' --cc='ccache cc' --enable-shared --enable-libmp3lame --enable-gpl --enable-libvorbis --enable-pthreads --enable-libfaac --enable-libxvid --enable-postproc --enable-x11grab --enable-libgsm --enable-libtheora --enable-libopencore-amrnb --enable-libopencore-amrwb --enable-libx264 --enable-libspeex --enable-nonfree --disable-stripping --enable-avfilter --enable-libdirac --disable-decoder=libdirac --enable-libschroedinger --disable-encoder=libschroedinger --enable-version3 --enable-libopenjpeg --enable-libvpx --enable-librtmp --extra-libs=-lgcrypt --disable-altivec --disable-armv5te --disable-armv6 --disable-vis
  libavutil     50.33. 0 / 50.43. 0
  libavcore      0.14. 0 /  0.14. 0
  libavcodec    52.97. 2 / 52.97. 2
  libavformat   52.87. 1 / 52.87. 1
  libavdevice   52. 2. 2 / 52. 2. 2
  libavfilter    1.65. 0 /  1.65. 0
  libswscale     0.12. 0 /  0.14. 1
  libpostproc   51. 2. 0 / 51. 2. 0
[alsa @ 0x633160] capture with some ALSA plugins, especially dsnoop, may hang.

where concrete programs, are run which take use of OSS (Open Sound System) – an already obsolete sound architecture. By the way on current Debian / Fedora etc. Linux-es OSS is managed and played only, whether few kernel modules are already  pre-loaded, below are the ones as pasted from my Debian Squeeze:

# lsmod | grep -i oss
snd_pcm_oss            32591  0
snd_mixer_oss          12606  1 snd_pcm_oss
snd_pcm                60487  3 snd_hda_intel,snd_hda_codec,snd_pcm_oss
snd                    46526  15 snd_hda_codec_analog,snd_hda_intel,snd_hda_codec,snd_hwdep,snd_pcm_oss,snd_mixer_oss,snd_pcm,snd_rawmidi,snd_seq,snd_timer,snd_seq_device

The oss processed sound recording from ffmpeg is not working, well on my Linux, cause I have my custom (non-Debian) native binary Firefox downloaded and installed from Firefox's website.The browser is compiled to open automatically /dev/dsp which in practice uses the above-mentioned OSS listed modules, which on their behalf when used break out the sound processed by alsa and respectively pulseaudio (those who use Linux for longer time should remember in the times of OSS only one certain sound stream was possible to be processed / played on Linux historically before ALSA come to scene to be "defacto" standard kernel sound processor. Well ofcourse firefox developers who compiled the Firefox for Linux probably was using Slackware or some other Linux distro which probably used to play sound still via OSS or maybe they compiled it so thinking OSS because of its historical importance is still supported by more Linux distributions than alsa is. I like the custom compiled Firefox to run on my Debian instead of default Debian Squeeze (IceWeasel) cause firefox.org ,Firefox version is much newer and supports better latest HTML5  as well as it includes ability to download and apply automatic updates to the latest version provided by Firefox team. However I fou

Thus for Linux users like me using latest firefox binary from firefox.org (in parallel) with opened Firefox browser to record sound from Webcam or Embedded notebook mic the obsolete OSS has to be used, here is how:

# ffmpeg -f oss -ac 2 -i /dev/dsp   -acodec pcm_s16le -vcodec libx264 -vpre lossless_ultrafast -threads 0  -y  my-recorder-VOICE.wav

Enjoy ;)

Linux webcam take pictures from tty console or terminal / How to make pictures of yourself using plain console and web-camera

Saturday, December 15th, 2012

how to take webCAM console / terminal pictures on gnu linux (Debian, Ubuntu, Fedora)

I'm a great command line enthusiast, I share the believe of many other command line geeks thinking keyboard is the quickest way to access a computer. Historically keys were first and mouse second and I think there is definitely a good reason for that. Thus today I was curious if it is possible to take pictures from my external web-camera on my Debian GNU / Linux? I did a quick research and this little article springed out as result.

The answer is YES! It is possible and besides that there are many ways to take a webcamera picture using the console; Lastly it is very easy to achieve even for novice Linux buddies 😉 My little research on the topic show me there are 4 straightforward ways one can use to use his extended or embedded WebCam to take pictuers – using (vlc, mplayer, camshot, fswebcam and ffmpeg).

1. Taking a webcam picture using vlc

Invoke vlc with following arguments:

# vlc -I dummy v4l2:///dev/video0 --video-filter scene --no-audio --scene-path /home/hipo --scene-prefix webcam-taken-picture-prefix --scene-format png vlc://quit --run-time=1

I've prepared a little wrapper script, for the sake of simplifying the long and hard to remember vlc options. Below is the script;

#!/bin/sh
# This little script will take picture whilst in gnome-terminal / mlterm or any console tty
# As program uses vlc you need to have vlc properly configured and installed
# as well as the webcam video be properly working (detected by Linux kernel)
# licensed under GPLv2 script modified by hip0 14.12.2012
# Path where to store taken snapshots
STORE_PATH=/home/hipo
# Device locatation of webcam many webcams have default device in /dev/video0
WEBCAM_DEV=/dev/video0
# Stored grabbed picture filename prefix
FILE_NAME_PREF=image_prefix
# gets the current date and adds to set filename prefix
date_cur=$(date +%k_%d_%m_%Y|sed -e 's/^ *//');
vlc -I dummy v4l2://$WEBCAM_DEV --video-filter scene --no-audio --scene-path $STORE_PATH --scene-prefix $FILE_NAME_PREF.$date_cur --scene-format png vlc://quit --run-time=1
echo "WebCam picture taken and stored in $STORE_PATH/$FILE_NAME_PREF.$date_cur*.png";
echo '';
echo "To view picture in Gnome with Eye of GNOME type: eog $STORE_PATH/$FILE_NAME_PREF.$date_cur*.png";

You can also download copy of the webcam_take_picture_from_console.sh script here.

As you see the script uses, vlc's (dummy interface), and –video-filter-scene option to make the snapshot. The script can be stored in let's say /usr/local/bin/webcam_take_picture.sh and aliased through ~/.bashrc with some short alias, i.e.:

alias console-picture='/usr/local/bin/webcam_take_picture.sh'

Then at any time, when you run console-picture you will have a short way to make pictures of your room, your friends or whatever needed. One good application of script is whether you're in coffee with friends and you want to take a snapshot of them without them realizing (assuming, the webcam is embedded) 🙂

Another great application is whether you want to take a snapshot of the WebCam, from another shell script or little application using dialog ncurses interfaces etc.

Even just for the sake of fun it is so nice to take a picture from webcam, whether in plain tty console bash shell 🙂

One small note to make here is webcam_take_picture_from_console.sh should be run as non-root user (for security reasons vlc developers made smartly VLC this way), running it as root drops an err:

>VLC is not supposed to be run as root. Sorry.
If you need to use real-time priorities and/or privileged TCP ports
you can use /usr/bin/vlc-wrapper (make sure it is Set-UID root and
cannot be run by non-trusted users first).
 

By default, vlc resolution used is the automatically set to the maximum supported to the camera, with mine this is 640×480 SRGB
The quality of pictures taken is a bit low but my camera is a cheap one and even with some GUI program snapshot taking programs like GNOME's cheese, taken pictures are with low quality (though I think the brightnes of the ones taken with vlc is a bit poorer than the ones done with cheese).

Happily it is possible to correct picture brightness and lightning with v42l-ctl (v42l-ctl is not installed by default and on Debian you will have to install deb pack v4l-utils), e.g.:

apt-get install --yes v4l-utils
....

Further, check out the possible options available with:

v4l2-ctl -L - (list all possible options)

and to set a concrete option do:

v4l2-ctl -c <options>=<value> (set an option)
 

I don't have a BSD (FreeBSD, NetBSD, OpenBSD) at hand, but with a working supported Webcam, correct location to the webcam /dev/  and installed VLC from ports :

vlc -I dummy v4l2:///dev/video0--video-filter scene --no-audio --scene-path $STORE_PATH --scene-prefix $FILE_NAME_PREF.$date_cur --scene-format png vlc://quit --run-time=1

should be working fine as well.
If someone has access to a BSD with a working installed webcam, please test it and drop a comment to confirm if working …

2. Creating pictures from WebCamera using mplayer cmd

Theoretically mplayer, should be able to take snapshots from the Cam with:

mplayer -vo png -frames 1 tv://

There is possibility to pass output webcam picture (resolution) dimensions too:

mplayer tv:// -tv driver=v4l:device=/dev/video0:width=320:height=240:outfmt=rgb24 -frames 1 -vo jpeg


With my "NoName" (Eltron Technology) webcam the produced images were filled up with solid green color  (maybe due to bug of my webcam used driver). Normally it should be working; I've seen many posts around claiming using both of above cmd lines to produce pictures normally, but not for me.

3. Making pictures with WebCamera (camshot) console tool

I've seen around also another tiny tool (camshot) especially written to take pictures from webcam. The tool is available only to be compiled from source (whether source is fetched through Subversion repo (SVN)). I took a minute to test it as well, e.g.:


hipo@noah:~Desktop$ svn checkout http://camshot.googlecode.com/svn/trunk/ camshot-read-only

hipo@noah:~/Desktop/camshot-read-only$ make
....
hipo@noah:~/Desktop/camshot-read-only$ ls
arguments.c  arguments.o  camera.h  camshot  image.h  main.c  Makefile  shmem.h  shmem_test.c
arguments.h  camera.c     camera.o  image.c  image.o  main.o  shmem.c   shmem.o

hipo@noah:~Desktop/camshot-read-only$ ./camshot
Letting the camera automaticaly adjust the picture:..........Done.
Command (h for help): h

Commands:
    x    Capture a picture from camera.
    h    Prints this help.
    q    Quits the program.

Command (h for help): x
Command (h for help): q


Don't know why, but for me camshot did not produce, any output picture from webcam. Maybe my Webcam which is a cheap (all OS) compatible one is not detected fine by the tool? As you see from above help output there are not many options so it is definitely something with webcam detection or just it needs some kind of little "hack" in the source to make it working, I was lazy to further investigate so I leave it.

4. Making pictures from terminal using fswebcam

fswebcam is not so popular as vlc and mplayer, but is existent from default repostiries on both Debian and Ubuntu Linuces. Here is it how it is described when pkg info requested with apt-cache:

apt-cache show fswebcam | grep -i descrip -A 8
Description: Tiny and flexible webcam program
 Fswebcam is a tiny and flexible webcam command-line program for capturing
 images from a V4L1/V4L2 device. It accepts a number of formats, can skip
 the first (possibly bad) frames before performing the actual capture, and
 can perform simple manipulation on the captured image, such as resizing,
 averaging multiple frames or overlaying a caption or an image.
Homepage: http://www.firestorm.cx/fswebcam/
Tag: implemented-in::c, role::program

To use it first install it with apt-get or yum (yes it is available also for RedHat based Linux distros via yum).
Depending whether on Debian or Fedora etc. do:

apt-get install --yes fswebcam
.....

or

yum -y install fswebcam
....

fswebcam's syntax is much easier than all of rest cmd tools available around; to create picture from webcam;

# fswebcam -r 640x480 --jpeg 85 -D 1 web-cam-shot.jpg
--- Opening /dev/video0...
Trying source module v4l2...
/dev/video0 opened.
No input was specified, using the first.
Delaying 1 seconds.
--- Capturing frame...
Captured frame in 0.00 seconds.
--- Processing captured image...
Setting output format to JPEG, quality 85
Unable to load font 'luxisr': Could not find/open font
Disabling the the banner.
Writing JPEG image to 'web-cam-shot.jpg'.

I liked supports, saving in multiple formats, can set resolution and is probably the number 1 choice for anyone looking for high level of customization of cam taken picture.. Saying this I think fswebcam is definitely the tool of choice as it is written with the one and only aim to take webcam pictures from console.

5. Capturing picture from Webcam using ffmpeg

With ffmpeg, there are plenty of things possible;
Just to mention few interesting ones, I've written about earlier, ffmeg is capable of;

convert .OGG vorbis to MP3 
convert .FLV to .AVI and .AVI to .FLV
convert .AVI .MP4 and .FLV to OGG Vorbis (Free Format)
convert .OGG video to .FLV Video
extract sounds / music from .FLV to a MP3 / MP4
Add .SRT and .SUB files subtitles to Flash Videos

Along with all this, interestingly ffmpeg can get content using command line from WebCamera (nomatter if it's a VIDEO stream or just a Picture snapshot).

The syntax to take a picture with it is:

ffmpeg -f video4linux2 -i /dev/v4l/by-id/usb-Etron_Technology__Inc._USB2.0_Camera-video-index0 -vframes 1 output-picture.jpeg

The precise /dev/(v4l – video 4 linux) assigned to different cameras will differ so in order to find what kind of /dev, to use ls it:

# ls -al /dev/v4l/by-id/*

lrwxrwxrwx 1 root root 12 Dec 14 22:40 /dev/v4l/by-id/usb-Etron_Technology__Inc._USB2.0_Camera-video-index0 -> ../../video0

The picture resolution taken on my Eltron Technology Webcam is same like with vlc – the cam optimum 640×480, the quality and brightness gamma is also identical to pics taken using VLC.
 
Therefore if you're wondering if one tool, might make a better pictures from command line than the other the answer, according to my tests is they produce identical quality and all can be customized easily for different set of resolution. It is possible thought, this is not so with other Web Cam models, if you happen to read this post and take the time to try taking pictures with 5 methods and some of the 5 progs is making superior pictures, please drop a comment with the tool you used and the WebCam exact version as detected in dmesg or lsusb

As a sort of Outtro, from purely functional / usability point of view I think fswebcam is probably be the tool of choice for mostly all as it is most simple, easily customizable and especially crafted for creating webcam console shots. That's all Enjoy, taking pics from GUI terminal or console 🙂 

P.S. – I know there are plenty of people who have written on the topic, so this article is nothing new under the sun, but as I couldn't find a post synthesizing in one all of the 5 methods I've come up with this little article. Feedback is mostly welcome
Happy picturing 😉

Enable festival Linux (text-to-speech-system) to read/speak PDF and DOC files (Speech PDF and DOC in Festival Script)

Sunday, September 20th, 2009

Today I wondered if festival supports reading of PDF files on Linux? The answer due to my short research was NO!.

Well though I couldn’t find official program to speak PDFs for me it’s not such a big deal since it’s not so hard to convert PDF files into plain text files in Linux with pdftotext command. 

pdftotext is part of the poppler-utils which is a nice package which alsocontains pdfimages – enabling you to extract images from pdfs,
pdftohtml – pdf to html converter and
pdffonts – pdf font analyzier. The normal way to read PDF files via festival is: First use pdftotext to convert your PDF to text file

$ pdftotext filename.pdf outputfile.txt

and then to make computer speak it over festival default configured synthesizer:

$ cat outfile.txt | festival –tts
For convenience I’ve created a small shell script I calledfestival-read-pdf.sh which does this directly.

Please download the festival-read-pdf.sh shell script here Furthermore I wondered how to make the Microsoft Office .doc files to be played throughfestival. On that account It was required something to convert again the .doc file extension to plain text. I came across antiword which I’ve blogged about in my previous post. Thus to carry it via festival you need to: antiword filename.doc | festival –tts I’ve fastly scripted it for some convenience. Download the festival-doc-read.sh script here I’ve also created a third bash script which enables you to select either to play DOC or PDF file in Festival.
Here is a link to the festival’s festival-read-doc-en-pdf.sh PDF, DOC speaker script .
Talking about festival it might be interesting to mention fala – A simple text reader.If you’re a Debian user you’ll be glad to know there is already a package containg fala. Well I hope you’ll find the PDF, DOC festival speech scripts useful. Enjoy

END—–

Convert .doc to .pdf on Linux and BSD using console / Convertion of PDF to DOC inside scripts

Tuesday, November 13th, 2012

how to Convert .doc to .PDF using console / terminal on Linux and FreeBSD

On Linux, there are plenty of ways nowadays to convert Microsoft Word or OpenOffice .DOC documents to Adobe's PDF (Postscript). However most of the ways require a graphical environment. As I'm interested in how convertion is done mainly from console to suit shell scripts and php which has to routinely convert a bunch of .DOC files to .PDF. I've checked today how PDF to DOC is possible on Debian, Ubuntu, Arch Linux  and FreeBSD..

There are few tools one can use from console, that doesn't requiere you to have running Xorg on the convertion host. The quality of the produced converted document, may vary and with some Microsoft Office doc files, there might be some garbage. But generally for simplistic and well written "macros" free documents the quality of PDF is satisfactory with few of the tools.

Here I will list the few tools, one can use for convertion:

  • abiword – you probably know abiword GUI program which is a good substitute for people who doesn't want the huge openoffice on the host. interestingly abiword supports converts with no need for GUI
     
  • wvPDF (you have to have install wv package and usually this converter works well only with very old .DOC (MS Office 97) – I was not impressed with those convert results
     
  • oowriter / swriter (whether LibreOffice installed) or writer (on LibreOffice), on some Ubuntus and derivatives the equivalent cmd is lowriter
     
  • unoconv – this tool produces really good DOC to  PDF converts, it is a python script using openoffice / libreoffice as backend convertion engine so produced PDFs will be identical like the ones produced with oowriter, the pros of the tool is its syntax is very user friendly and along with PDF to DOC it supports easy syntax converting to  bunch of other file formats. Actually unoconv supports same convertions which supported by OpenOffice.org, the advantage is however you can use it within console and even schedule convertion to be processed by a remote host.


1. Convertion of DOC to PDF with abiword

abiword --to=pdf doc_file_to_convert.doc

2. Convert DOC to PDF with wvPDF

apt-get install --yes wv texlive-base texlive-latex-base ghostscript

wvPDF doc-file-to-convert-to-pdf.doc converted-to-pdf.pdf

wvPDF doc-file-to-convert-to-pdf.doc convert-to-pdf.pdf

Current directory: /home/hipo/Desktop
"doc-file-to-convert-to-pdf.eps" exists - skipping...
Some problem running latex.
Check for Errors in steinway.log
Continuing... 


The produced .pdf was not useful most of the text inside was completely missing as well as some weird probably PostScript convertion characters were in the .PDF. Seeing its output I would as of time of writing wvPDF Debian's verion 1.2.4 is crap.


3. Convert DOC to PDF with oowriter / swriter / lowrite

a) convert with oowriter and swriter

I saw posts online claiming DOC to PDF convertion is possible directly with oowriter or swriters with commands:

oowriter -convert-to pdf:writer_pdf_Export input-doc-file-to-convert.doc

or

swriter -convert-to pdf:writer_pdf_Export steinway.doc - as named on some Linux-es
 

As long as I tested it on my Debian Squeeze, neither of the two works
.I saw some suggestions that PDF can be generated by installing and using cups-pdf debian package:

apt-get install cups-pdf oowriter -pt pdf your_word_file.doc b) convert DOC to PDF with lowriter I've seen in Ubuntu documentation and in Ubuntu forums, users saying they had some good results using lowriter, which is a sort of front-end program to ImageMagick's convert. I never tested that but I doubt of any satisfactory results, as I tried converting to PDF earlier using convert and often converts failed. Anyways you try it with:

lowriter --convert-to pdf *.doc


4. Converting PDF to DOC  with unoconv

As of time of writing it seems unoconv is best Linux console tool for converting .doc to .pdf

It produces good readable text, as well as pictures and elements looks exactly as in OpenOffice.

To install it I run:

# apt-get install --yes unoconv
....

To use it:

$ unoconv -fpdf any-file-to-convert.doc

If you don't get errors or it doesn't crash a .doc file with same name any-file-to-convert.doc is created.

What unoconv, does is precisely the same as if using OpenOffice GUI's  to convert to PDF:


  • Open -> Open Office (3.2 in my case)
  • Open Document to export
  • File->Export as PDF
  • Click: Export
  • Choose file namefor output PDF


An interesting feature of unoconv is its possibility to run and convert as a port listening server. I never used this but noticed it mentioned in manual EXAMPLE section:


EXAMPLES
       You can use unoconv in standalone mode, this means that in absence of an OpenOffice listener, it will starts its own:

       unoconv -f pdf some-document.odt
       One can use unoconv as a listener (by default localhost:2002) to let other unoconv instances connect to it:

       unoconv --listener &
       unoconv -f pdf some-document.odt
       unoconv -f doc other-document.odt
       unoconv -f jpg some-image.png
       unoconv -f xsl some-spreadsheet.csv
       kill -15 %-
       This also works on a remote host:

       unoconv --listener --server 1.2.3.4 --port 4567
       and then connect another system to convert documents:

       unoconv --server 1.2.3.4 --port 4567

unoconv does not recognize wildcards like ' * ' , so in order to convert multiple DOC to PDF files one has to use the usual shell loop:

for i in *.doc; do unoconv -fpdf $i; done

From all my tests, I think unoconv is preferred tool for Linux and BSD users (good time to mention unoconv is available on FreeBSD too. BSD users can install it via port  /usr/ports/textproc/unoconv)

Disabling sound kernel modules on Debian and Ubuntu GNU / Linux servers

Friday, October 19th, 2012

First step is to list modules related to sound (snd):


root@pcfreak:/var/www# lsmod|grep -i snd
snd_hda_codec_realtek 235234 1
snd_hda_intel 20035 0
snd_hda_codec 53940 2 snd_hda_codec_realtek,snd_hda_intel
snd_hwdep 5220 1 snd_hda_codec
snd_pcm_oss 32415 0
snd_mixer_oss 12478 1 snd_pcm_oss
snd_pcm 60151 3 snd_hda_intel,snd_hda_codec,snd_pcm_oss
snd_seq_midi 4256 0
snd_rawmidi 15323 1 snd_seq_midi
snd_seq_midi_event 4628 1 snd_seq_midi
snd_seq 41281 2 snd_seq_midi,snd_seq_midi_event
snd_timer 15502 2 snd_pcm,snd_seq
snd_seq_device 4493 3 snd_seq_midi,snd_rawmidi,snd_seq
snd 45998 11
snd_hda_codec_realtek,snd_hda_intel,snd_hda_codec,snd_hwdep,snd_pcm_oss,snd_mixer_oss,snd_pcm,snd_rawmidi,snd_seq,snd_timer,snd_seq_device
soundcore 4566 1 snd
snd_page_alloc 6217 2 snd_hda_intel,snd_pcm

Then snd modules could be removed from current live system, for my Intel RealTek SoundBlaster, I had to remove following modules in (remove) order as follows:


root@pcfreak:/var/www# rmmod soundcore
ERROR: Module soundcore is in use by snd
root@pcfreak:/var/www# rmmod snd_hda_codec_realtec
ERROR: Module snd_hda_codec_realtec does not exist in /proc/modules
root@pcfreak:/var/www# rmmod snd_hda_intel
root@pcfreak:/var/www# rmmod snd_hda_codec
ERROR: Module snd_hda_codec is in use by snd_hda_codec_realtek
root@pcfreak:/var/www# rmmod snd_hda_codec_realtek
root@pcfreak:/var/www# rmmod snd_hda_codec
root@pcfreak:/var/www# rmmod snd_pcm_oss
root@pcfreak:/var/www# rmmod snd_seq_midi
root@pcfreak:/var/www# rmmod snd_rawmidi
root@pcfreak:/var/www# rmmod snd_seq_midi_event
root@pcfreak:/var/www# rmmod snd_seq
root@pcfreak:/var/www# rmmod snd_timer
ERROR: Module snd_timer is in use by snd_pcm
root@pcfreak:/var/www# rmmod snd_seq_device
root@pcfreak:/var/www# rmmod snd_pcm
root@pcfreak:/var/www# rmmod snd_seq_device
ERROR: Module snd_seq_device does not exist in /proc/modules
root@pcfreak:/var/www# rmmod snd_hda_intel
ERROR: Module snd_hda_intel does not exist in /proc/modules
rmmod snd_hwdep
root@pcfreak:/var/www# rmmod snd_mixer_oss
root@pcfreak:/var/www# rmmod snd_timer
root@pcfreak:/var/www# rmmod snd
root@pcfreak:/var/www# rmmod soundcore
root@pcfreak:/var/www#

Next step is to permanently disable all (blacklist) on system boot time loaded kernel modules, to do so in file /etc/modprobe.d/snd-bkaclist.conf, put:


blacklist soundcore
blacklist snd
blacklist snd_pcm
blacklist snd_pcsp
blacklist pcspkr

You can do it from shell ‘echo’-ing into file, like so:

# touch /etc/modprobe.d/snd-blacklist.conf
# cd /etc/modprobe.d/
# echo ‘blacklist soundcore’ >> snd-blacklist.conf
# echo ‘blacklist snd’ >> snd-blacklist.conf
# echo ‘blacklist snd_pcm’ >> snd-blacklist.conf
# echo ‘blacklist snd_pcsp’ >> snd-blacklist.conf
# echo ‘blacklist pcspkr’ >> snd-blacklist.conf

Another way is to use a tiny shellscript containing all previously shown rmmod commands and set the script to be executed via /etc/rc.local by adding the rmmod modules script, before exit 0 rc.local line.

Shell script removing my Realtek ICH sound driversis here
If you like to use it download it in /usr/local/bin or somewhere and invoke it via rc.local.
Removing sound blaster kernel support does not impact the overall machine performance, but in terms of security. Having sound driver modules constantly loaded in memory is a point which a possible attacker can use to root the host, so in my view always sound driver support should be removed.
Well that’s it hope this post helps someone 🙂

How to: Improve Adobe Flash Player Video speed on Debian / Ubuntu Linux

Friday, October 12th, 2012

How to improve Adobe Flash Player Video, accelerate Flash video speed on Ubuntu, Xubuntu, Debian, Fedora - ArchLinux

I have recently installed Xubuntu to a friend with an old computer hardware. The computer is used just for basic access to the Internet web browsing – (Firefox, Opera) and Skype. All runs smoothly but sometimes the Videos in Youtube are lagging. Hence I looked for a way to make the Adobe Flash Player run smoother on this (Ubuntu 12.04) based Linux.

After a bit of searching if there is something written on the topic of Optimizing Flash Player / Flash Videos speed on Linux, I’ve stumbled acrossed one flash variable, which if used could improve Video Speed; The variable is OverrideGPUValidation and should be turned on in Flash Player with:


OverrideGPUValidation=true

The Flash Player configuration, settings on Linux could be set either globally by using:

  • /etc/adobe/mms.cfg – (system-wide configuration file, set Flash player policy for all existing users)

or locally for individual users through:

  • ~/.adobe/mms.cfg – (user-local configuration file affecting only /home/sampleuser/ flash player settings)

For Desktop Linux purposes which are used as a home desk station it is quite rarely the host to be used than more than one single user, so if that’s the case with you there is no worth to set OverrideGPUValidation=true via /etc/adobe/mms.cfg

Well anyways if need to set Flash player setting globally you will have to create /etc/adobe (which is created on deb flash player package install):


root@xubuntu:~# mkdir /etc/adobe
root@xubuntu:~# echo 'OverrideGPUValidation=true' >> /etc/adobe/mms.cfg

The local user (hidden) directory ~/.adobe is created automatically on first time the Flash Player is used in browser, just like usual with rest of Linux programs. Inside are a few directories created used by flash player but mss.cfg is not created.
For local users hence to enable OverrideGPUValidation=true type in terminal:

Enabling

user@xubuntu:~$ echo "OverrideGPUValidation=true" >> ~/.adobe/mms.cfg

The option does accelerate a bit the Flash Videos, but don’t expect huge speed ups. Normally using this option on some hosts up to 10 to 20/ 30% in Video playing (overall) speed, could be improved. On some hosts it is possible using the variable does not have a significant impact at all.

The options should work equal on Linux hosts and only Debian based ones as it is a Flash Player it is however tested with latest Flash Player Linux version which of time of writing this post is v. (11.2.202.243)
Don’t know if the same option will work on earlier Flash Player versions, so it is up to testing it. I will be glad to hear from people who tested the value and can report a speed improvement. I will be glad to hear the Video Adapter and general hardware configuration on whom OverrideGPUValidation=true speed up Flash Player.
Hope this tip helps someone.

How to Install and configure webcam trust WB 3320X Live on Ubuntu /Debian Linux

Wednesday, September 26th, 2012

Trust Hires Webcam Live WB 3320X on Ubuntu, Debian, Xubuntu Install how to

I had to install WebCAM TRUST WB 3320X on one Xubuntu Linux install. Unfortunately by default the camera did not get detected (the Webcam vendor did not provide driver or specifications for Linux either).
Thus I researched on the internet if and how this camera can be made work on Ubuntu Linux. I found some threads discussing the same issues as mine in Ubuntu Forums here . The threads even suggested a possible fix, which when followed literally did not work on this particular 32-bit Xubuntu 12.04.1 installation.

I did 20 minutes research more but couldn’t find much on how to make the Webcam working. I used Cheese and Skype to test if the webcamera can capture video, but in both of them all I see was just black screen.

he camera was detected in lsusb displayed info as:


# lsusb | grep -i webcam

Bus 002 Device 002: ID 093a:2621 Pixart Imaging, Inc. PAC731x Trust Webcam

After reading further a bit I found out some people online suggesting loading the gspca kernel module. I searched what kind of gspca*.kokernel modules are available using:


locate gspca |grep -i .ko

1. Load proper camera kernel modules

I found a dozen of modules and after some testing with few of the found ones I realized the Camera works, whether gspca_pac730.ko and gspca_pac7311 are loaded, to test the camera I loaded both with:


# /sbin/modprobe gspca_pac730
# /sbin/modprobe gspca_pac7311

Seeing while this two modules are loaded the camera is fine capturing video. I added the above two to auto load on each Ubuntu boot:


# echo "gspca_pac730" >> /etc/modules
# echo "gspca_pac7311" >> /etc/modules

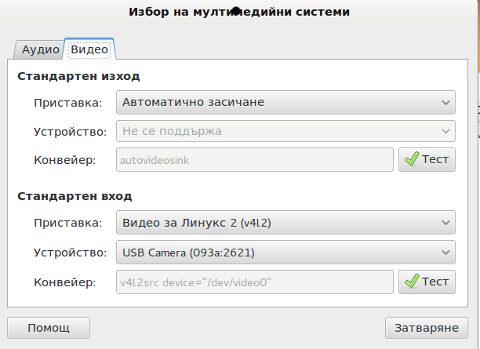
Before really I can see the camera properly capturing video, though I had to adjust few settings in default GNOME settings for Video device in gstreamer-properties

2. Change settings for video camera in gstreamer-properties


$ gstreamer-properties

The settings in the Video tab should be as you see in screenshot:

3. Testing if video camera works with VLC

There are numerous ways to test if camera is properly capturing video, vlc, mplayer, cheese or even Skype can be used. First time I tested it I used VLC, like so:


vlc v4l2:///dev/video0

Above as VLC argument I use /dev/video0 as video capturing device cause video camera is found under /dev/video0. This might vary on other Linux distros; to check the exact assigned dev, ls it:


# ls -al /dev/vide*

crw-rw----+ 1 root video 81, 0 sep 25 20:53 /dev/video0

Testing the Trust WB 3320X Live on Linux can be done with Cheese or Skype too by running them vide a LD_PRELOAD predefined bash variable;


$ LD_PRELOAD=/usr/lib/i386-linux-gnu/libv4l/v4l1compat.so cheese

or for Skype


LD_PRELOAD=/usr/lib/i386-linux-gnu/libv4l/v4l1compat.so skype

Still using vlc to test webcam is preferrable, as there is no need to invoke it via a predefined LD_PRELOAD=/usr/lib/i386-linux-gnu/libv4l/v4l1compat.so bash var.

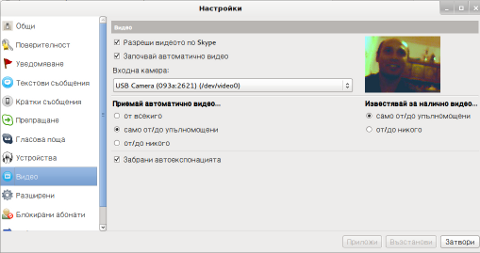
Anyways below is a screenshot of the WebCam capturing video in Skype (on the Screenshot Sali a very good person who help me a lot here in Netherlands).

Though the camera driver works, the quality is quite bad the capture image is distorted and whenever there is a movement in front of the camera the picture is really bad … Expect quality of the captured video to be maybe about 2 times? worser than those in Windows OS.

Lest the bad quality the picture is good enough to distinguish you and recognize you on the other side, so for people who are not image quality freaks quality will be okay.

4. Making the Trust WB 3320 work in skype

As prior said you need to each time invoke Skype binary with a LD_PRELOAD pre-defined variable:


$ LD_PRELOAD=/usr/lib/i386-linux-gnu/libv4l/v4l1compat.so skype

Same goes for Cheese too:


$ LD_PRELOAD=/usr/lib/i386-linux-gnu/libv4l/v4l1compat.so cheese

Typing all this long line and even remembering it is a taugh task, so I created two little wrappers scripts for both Cheese and Skype in /usr/local/bin/skype-camera-fix and /usr/local/bin/cheese-camera-fix.


$ su root
Password:
# echo '#!/bin/bash' >> /usr/local/bin/skype-camera-fix
# echo 'LD_PRELOAD=/usr/lib/i386-linux-gnu/libv4l/v4l1compat.so skype' >> /usr/local/bin/skype-camera-fix
# chmod +x /usr/local/bin/skype-camera-fix

and


# echo '#!/bin/bash' >> /usr/local/bin/cheese-camera-fix
# echo 'LD_PRELOAD=/usr/lib/i386-linux-gnu/libv4l/v4l1compat.so cheese' >> /usr/local/bin/cheese-camera-fix
# chmod +x /usr/local/bin/cheeese-camera-fix

Now as this two wrappers, are existing it is good idea to modify in GNOME menus Skype and Cheese to launch the modified bash wrapper scripts instead of the original binaries:

4. Changing default Skype and Cheese path in GNOME to skype-camera-fix and cheese-camera-fix wrapper scripts

Edit /usr/share/applications/skype.desktop and change inside, where the line says:


Exec=skype

to


Exec=/usr/local/bin/skype-camera-fix

After the change the content of skype.desktop should be as:


[Desktop Entry]
Name=Skype
Comment=Skype Internet Telephony
Exec=/usr/local/bin/skype-cam-fix
Icon=skype.png
Terminal=0
Type=Application
Encoding=UTF-8
Categories=Network;Application;

Then same goes for Cheese, change the Exec= line in file /usr/share/applications/cheese.desktop to equal to:


Exec=/usr/local/bin/cheese-camera-fix

Now after restarting the PC or logging off and then logging in again to GNOME both applications should be executing via the wrapper script.

5. Changing Brightness and tuning various other Webcam settings

As I red online, there are plenty of apps that can be used to tune up webcam color gamma, saturation, explosure etc.

I however tried only two ;

  • v4l2ucp
  • guvcview
  • I red online there is also another (camera settings feature rich) program – gtk-v4l, though never tried this one.

    From my little testing I concluded v4lucp seems to be more options rich, so I suggest using it as a primary tool for tuning webcam:

    Besides that v4l2ucp is present inside standard Ubuntu / Debian repositories, so there is no need to add any extra repositories to install it.
    Install v4l2ucp via:


    # apt-get install v4l2ucp
    # apt-get install v4l2loopback-dkms

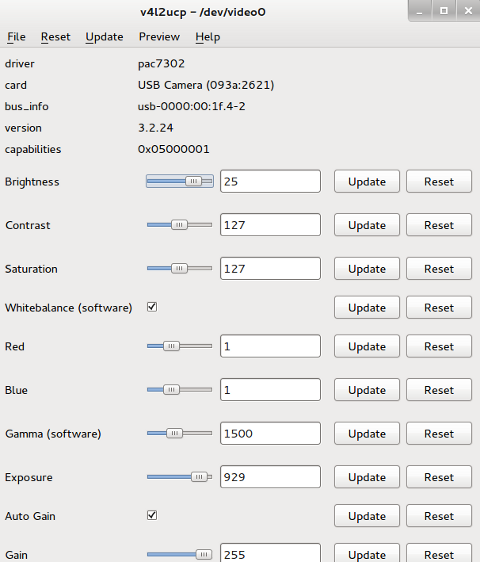
    v4l2ucp has multiple of settings you can play with, so after installing it run it to see if you can make the camera video display a bit better. In my case it was beneficial to raise up a bit the camera brightness and correct the red as the captured video was reddish and darky


    $ v4l2ucp

    v4l2ucp change linux webcam video4linux settings

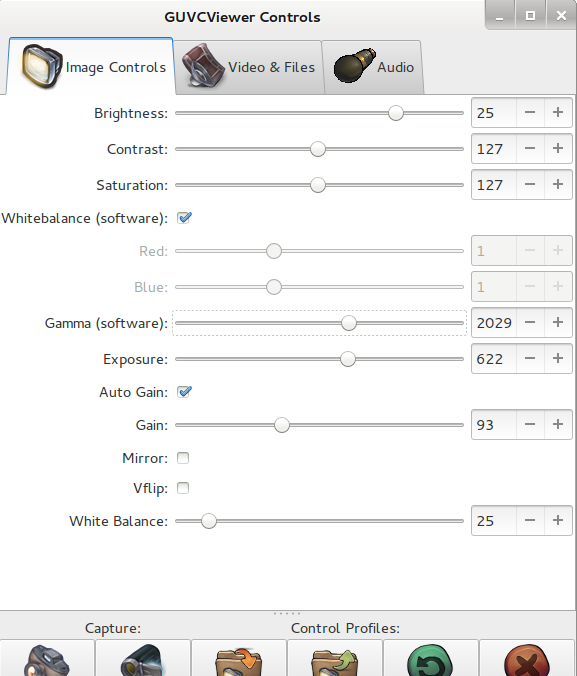
    Secondly I give a try gucview. Unfortunately it is not part of official Ubuntu repositories, so I had to add external repository:


    # add-apt-repository ppa:pj-assis/ppa
    # apt-get update
    # apt-get install guvcview

    GUVCView Chainging brightness / saturation on Trust 3220X webcam

    Well thats all though the picture is a bit distorted, Camera works. Distorted is better than none at all. Cheers 😉

How to convert OGG Vorbis .ogg to MP3 on GNU / Linux and FreeBSD

Friday, July 27th, 2012

I’ve used K3B just recently to RIP an Audio CD with music to MP3. K3b has done a great job ripping the tracks, the only problem was By default k3b RIPs songs in OGG Vorbis (.ogg) and not mp3. I personally prefer OGG Vorbis as it is a free freedom respecting audio format, however the problem was the .ogg-s cannot be read on many of the audio players and it could be a problem reading the RIPped oggs on Windows. I’ve done the RIP not for myself but for a Belarusian gfriend of mine and she is completely computer illiterate and if I pass her the songs in .OGG, there is no chance she succed in listening the oggs. I’ve seen later k3b has an option to choose to convert directly to MP3 Using linux mp3 lame library this however is time consuming and I have to wait another 10 minutes or so for the songs to be ripped to shorten the time I decided to directly convert the existing .ogg files to .mp3 on my (Debian Linux). There are probably many ways to convert .ogg to mp3 on linux and likely many GUI frontends (like SoundConverter) to use in graphic env.

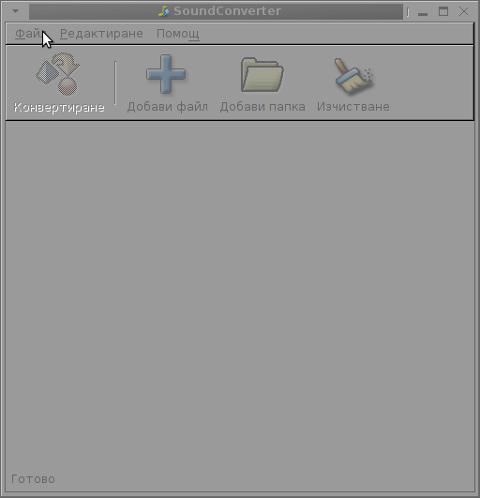
SoundConverter Debian GNU Linux graphic GUI environment program for convertion of ogg to mp3 and mp3 to ogg, convert multiple sound formats on GNU / Linux.

I however am a console freak so I preferred doing it from terminal. I’ve done quick research on the net and figured out the good old ffmpeg is capable of converting .oggs to .mp3s. To convert all mp3s just ripped in the separate directory I had to run ffmpeg in a tiny bash loop.

A short bash shell script 1 liner combined with ffmpeg does it, e.g.;

for f in *.ogg; do ffmpeg -i "$f" "`basename "$f" .ogg`.mp3"; done.....

The loop example is in bash so in order to make the code work on FreeBSD it is necessery it is run in a bash shell and not in BSDs so common csh or tcsh.

Well, that’s all oggs are in mp3; Hip-hip Hooray 😉

How to increase brightness on Fujitsu Siemens Amilo PI22515 notebook with Slackware Linux

Friday, March 9th, 2012

Increase LCD screen brightness on Fujitsu Siemens Amilo laptop with Linux Slackware

A friend of mine has Fujitsu Siemens Amilo laptop and is full time using his computer with Slackware Linux.

He is quite happy with Slackware Linux 13.37 on the laptop, but unfortunately sometimes his screen brightness lowers. One example when the screen gets darkened is when he switch the computer on without being plugged in the electricity grid. This lowered brightness makes the screen un-user friendly and is quite tiring for the eye …

By default the laptop has the usual function keys and in theory pressing Function (fn) + F8 / F7 – should increase / decrease the brightness with no problems, however on Slackware Linux (and probably on other Linuxes too?), the function keys are not properly recognized and not responding whilst pressed.
I used to have brigtness issues on my Lenovo notebook too and remember how irritating this was.
After a bit of recalling memories on how I solved this brightness issues I remembered the screen brigthness on Linux is tunable through /proc virtual (memory) filesystem.

The laptop (Amilo) Fujitsu Siemens video card is:

lspci |grep -i vga
00:02.0 VGA compatible controller: Intel Corporation Mobile GM965/GL960 Integrated Graphics Controller (primary) (rev 03)

I took a quick look in /proc and found few files called brightness:
 

  • /proc/acpi/video/GFX0/DD01/brightness
  • /proc/acpi/video/GFX0/DD02/brightness
  • /proc/acpi/video/GFX0/DD03/brightness
  • /proc/acpi/video/GFX0/DD04/brightness
  • /proc/acpi/video/GFX0/DD05/brightness

cat-ting /proc/acpi/video/GFX0/DD01/brightness, /proc/acpi/video/GFX0/DD03/brightness, /proc/acpi/video/GFX0/DD04/brightness all shows not supported and therefore, they cannot be used to modify brightness:

bash-4.1# for i in $(/proc/acpi/video/GFX0/DD0{1,3,4,5}/brightness); do \
cat $i;
done
<not supported>
<not supported>
<not supported>
<not supported>

After a bit of testing I finally succeeded in increasing the brightness.
Increasing the brightness on the notebook Intel GM965 video card model is done, through file:

/proc/acpi/video/GFX0/DD02/brightness

To see all the brightness levels the Fujitsu LCD display supports:

bash-4.1# cat /proc/acpi/video/GFX0/DD02/brightness
levels: 13 25 38 50 63 75 88 100
current: 25

As you can see the dark screen was caused cause the current: brightness is set to a low value of 25.
To light up the LCD screen and make the screen display fine again, I increased the brightness to the maximum level 100, e.g.:

bash-4.1# echo '100' > /proc/acpi/video/GFX0/DD02/brigthness

Just for the fun, I've written also a two lines script which gradually increases LCDs brightness 🙂

bash-4.1# echo '13' > /proc/acpi/video/GFX0/DD02/brightness;
bash-4.1# for i in \
$(cat /proc/acpi/video/GFX0/DD02/brightness|grep 'levels'|sed -e 's#levels:##g'); do \
echo $i > /proc/acpi/video/GFX0/DD02/brightness; sleep 1; \done

fujitsu_siemens_brightness_fun.sh script is fun to observe in changing the LCD screen gradually in one second intervals 🙂

Here is also a tiny program that reduces and increases the notebook laptop brightness written in C. My friend Dido, coded it in just few minutes just for the fun 🙂
To permanently solve the issues with darkened screen on boot time it is a good idea to include echo '100' > /proc/acpi/video/GFX0/DD02/brigthness in /etc/rc.local:

bash-4.1# echo '100' > /proc/acpi/video/GFX0/DD02/brigthness

I've also written another Universal Linux Increase laptop screen brightness Shell script which should be presumable also working for all Laptop models running Linux 🙂

My maximize_all_linux_laptops_brightness.sh "universal increase Linux brightness" script is here
I'll be glad to hear from people who had tested the script on other laptops and can confirm it works fine for them.