Posts Tagged ‘eye’

How to check Apache Webserver and MySQL server uptime – Check uptime of a running daemon with PS (process) command

Tuesday, March 10th, 2015

check_Apache_Webserver_and_MySQL_server_uptime_-_Check-uptime-of-running-daemon-service-with-PS-process-command

Something very useful that most Apache LAMP (Linux Apache MySQL PHP) admins should know is how to check Apache Webserver uptime and MySQL server running (uptime).
Checking Apache / MySQL uptime is primary useful for scripting purposes – creating auto Apache / MySQL service restart scripts, or just as a quick console way to check what is the status and uptime of Webserver / SQL.

My experience as a sysadmin shows that lack of Periodic Apache and MySQL restart every week or every month often creates sys-admin a lot of a headaches cause (Apache / NGINX / SQL  server) starts eating too much memory or under some circumstances leads to service or system crashes. Periodic system main services restart is especially helpful in case if Website's backend programming code is writetn in a bad and buggy uneffient way by unprofessional (novice) programmers.
While I was still working as Senior SysAdmin in Design.BG, I've encountered many such Crappy Web applications developed by dozen of different programmers (because company's programmers changed too frequently and many of the hired Web Developers ,were still learning to program, I guess same is true also for other Start-UP Web / IT Company where crappy programming code is developed you will certainly need to keep an eye on Apache / MYSQL uptime.  If that's the case below 2 quick one liners with PS command will help you keep an eye on Apache / MYSQL uptime


ps -eo "%U %c %t"| grep apache2 | grep -v grep|grep root
root     apache2            02:30:05

Note that above example is Debian specific on RPM based distributions you will have to grep for httpd instead of apache2
 

ps -eo "%U %c %t"| grep http| grep -v grep|grep root

root     apache2            10:30:05

To check MySQL uptine:
 

ps -eo "%U %c %t"| grep mysqld
root     mysqld_safe        20:42:53
mysql    mysqld             20:42:53


Though example is for mysql and Apache you can easily use ps cmd in same way to check any other Linux service uptime such as Java / Qmail / PostgreSQL / Postfix etc.
 

ps -eo "%U %c %t"|grep qmail
qmails   qmail-send      19-01:10:48
qmaill   multilog        19-01:10:48
root     qmail-lspawn    19-01:10:48
qmailr   qmail-rspawn    19-01:10:48
qmailq   qmail-clean     19-01:10:48
qmails   qmail-todo      19-01:10:48
qmailq   qmail-clean     19-01:10:48
qmaill   multilog        40-18:02:53


 ps -eo "%U %c %t"|grep -i nginx|grep -v root|uniq
nobody   nginx           55-01:22:44


ps -eo "%U %c %t"|grep -i java|grep -v root |uniq
hipo   java            27-22:02:07


Linux watch Windows equivalent command bat script – How to Run a command every XXX seconds on Windows

Tuesday, May 27th, 2014

windows-watch-command-linux-watch-windows-equivalent-run-script-every-xxx-seconds-on-microsoft-windows
If you're a Linux administrator you're probably already quite used to watch command which allows to execute a program periodically, showing output fullscreen. Watch is very useful to run a specific command every XXX seconds, and see the results constantly updated. watch is very useful to keep an eye on growing files, i.e.: lets say keep an eye on SQL dump:

watch "ls -al some-dump-file.sql"

or keep an eye on how a directory keeps growing in real time

watch -n 5 "du -hsc /tmp"


Above command would tell watch to refresh du -hsc /tmp on a 5 seconds interval.

So a logical question pops up "Is there a command line equivalent to Linux's watch?" In Windows there is no native command equivalent of Linux watch but there is one liner bat (Batch) script to equivalent to emulate Linux watch in Windows. The Watch like script in Windows OS looks like so:

@ECHO OFF
:loop
tasklist timeout /t 2
goto loop


Use notepad and paste above batch script to any file and save it as whateverfile.bat, running it will make all processes to get listed occuring every 2 seconds (/t 2 – is an argumeent telling the loop to expire on every 2 seconds).

Modify the script to monitor whatever Windows command you like 🙂
Enjoy


Text Monitoring of connection server (traffic RX / TX) business in ASCII graphs with speedometer / Easy Monitor network traffic performance

Friday, May 4th, 2012

While reading some posts online related to MS-Windows TcpViewnetwork traffic analyzing tool. I've came across very nice tool for tracking connection speed for Linux (Speedometer). If I have to compare it, speedometer is somehow similar to nethogs and iftop bandwidth network measuring utilities .

What differentiates speedometer from iftop / nethogs / iptraf is it is more suitable for visualizing a network file or data transfers.
The graphs speedometer draws are way easier to understand, than iftop graphs.

Even complete newbies can understand it with no need for extraordinary knowledge in networking. This makes Speedometer, a top tool to visually see the amount of traffic flowing through server network interface (eth0) … (eth1) etc.

What speedometer shows is similar to the Midnight Commander's (mc) file transfer status bar, except the statistics are not only for a certain file transfer but can show overall statistics over server passing network traffic amount (though according to its manual it can be used to also track individual file transfers).

The simplicity for basic use makes speedometer nice tool to track for network congestion issues on Linux. Therefore it is a  must have outfit for every server admin. Below you see a screenshot of my terminal running speedometer on a remote server.
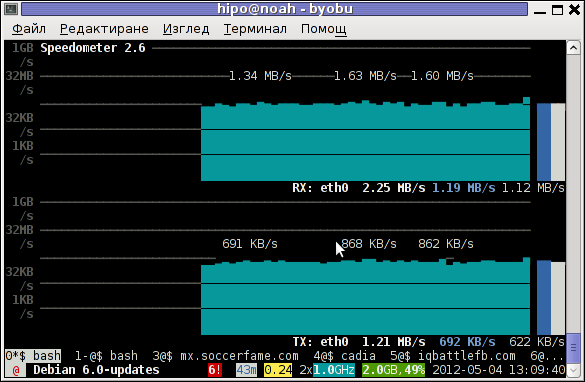
Speedometer ascii traffic track server network business screenshot in byobu screen like virtual terminal emulator

1. Installing speedometer on Debian / Ubuntu and Debian derivatives

For Debian and Ubuntu server administrators speedometer is already packaged as a deb so its installation is as simple as:

debian:~# apt-get --yes install speedometer
....

2. Installing speedometer from source for other Linux distributions CentOS, Fedora, SuSE etc.

Speedometer is written in python programming language, so in order to install and use on other OS Linux platforms, it is necessery to have installed (preferably) an up2date python programming language interpreter (python ver. 2.6 or higher)..
Besides that it is necessary to have installed the urwid -( console user interface library for Python) available for download via excess.org/urwid/


Hence to install speedometer on RedHat based Linux distributions one has to follow these steps:

a) Download & Install python urwid library

[root@centos ~]# cd /usr/local/src
[root@centos src]# wget -q http://excess.org/urwid/urwid-1.0.1.tar.gz
[root@centos src]# tar -zxvvf urwid-1.0.1.tar.gz
....
[root@centos src]# cd urwid-1.0.1
[root@centos urwid-1.0.1]# python setup.py install
running install
running build
running build_py
creating build
creating build/lib.linux-i686-2.4
creating build/lib.linux-i686-2.4/urwid
copying urwid/tests.py -> build/lib.linux-i686-2.4/urwid
copying urwid/command_map.py -> build/lib.linux-i686-2.4/urwid
copying urwid/graphics.py -> build/lib.linux-i686-2.4/urwid
copying urwid/vterm_test.py -> build/lib.linux-i686-2.4/urwid
copying urwid/curses_display.py -> build/lib.linux-i686-2.4/urwid
copying urwid/display_common.py -> build/lib.linux-i686-2.4/urwid
....

b) Download and install python-setuptools

python-setuptools is one other requirement of speedometer, happily on CentOS and Fedora the rpm package is already there and installable with yum:

[root@centos ~]# yum -y install python-setuptools
....

c) Download and install Speedometer

[root@centos urwid-1.0.1]# cd /usr/local/src/
[root@centos src]# wget -q http://excess.org/speedometer/speedometer-2.8.tar.gz
[root@centos src]# tar -zxvvf speedometer-2.8.tar.gz
.....
[root@centos src]# cd speedometer-2.8
[root@centos speedometer-2.8]# python setup.py install
Traceback (most recent call last):
File "setup.py", line 26, in ?
import speedometer
File "/usr/local/src/speedometer-2.8/speedometer.py", line 112
n = n * granularity + (granularity if r else 0)
^

While running the CentOS 5.6 installation of speedometer-2.8, I hit the
"n = n * granularity + (granularity if r else 0)
error.

After consultation with some people in #python (irc.freenode.net), I've figured out this error is caused due the outdated version of python interpreter installed by default on CentOS Linux 5.6. On CentOS 5.6 the python version is:

[root@centos ~]# python -V
Python 2.4.3

As I priorly said speedometer 2.8's minimum requirement for a python to be at v. 2.6. Happily there is quick way to update python 2.4 to python 2.6 on CentOS 5.6, as there is an RPM repository maintained by Chris Lea which contains RPM binary of python 2.6.

To update python 2.4 to python 2.6:

[root@centos speedometer-2.8]# rpm -Uvh http://yum.chrislea.com/centos/5/i386/chl-release-5-3.noarch.rpm[root@centos speedometer-2.8]# rpm --import /etc/pki/rpm-gpg/RPM-GPG-KEY-CHL[root@centos speedometer-2.8]# yum install python26

Now the newly installed python 2.6 is executable under the binary name python26, hence to install speedometer:

[root@centos speedometer-2.8]# python26 setup.py install
[root@centos speedometer-2.8]# chown root:root /usr/local/bin/speedometer
[root@centos speedometer-2.8]# chmod +x /usr/local/bin/speedometer

[root@centos speedometer-2.8]# python26 speedometer -i 1 -tx eth0

The -i will instruct speedometer to refresh the screen graphs once a second.

3. Using speedometer to keep an eye on send / received traffic network congestion

To observe, the amount of only sent traffic via a network interface eth0 with speedometer use:

debian:~# speedometer -tx eth0

To only keep an eye on received traffic through eth0 use:

debian:~# speedometer -rx eth0

To watch over both TX and RX (Transmitted and Received) network traffic:

debian:~# speedometer -tx eth0 -rx eth0

If you want to watch in separate windows TX and RX traffic while  running speedometer you can run in separate xterm windows speedometer -tx eth0 and speedometer -rx eth0, like in below screenshot:
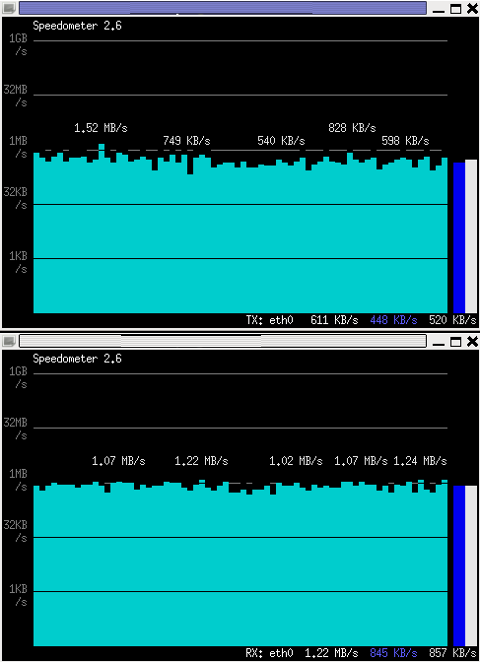
Monitor Received and Transmitted server Network traffic in two separate xterm windows with speedometer ascii graphs

4. Using speedometer to test network maximum possible transfer speed between server (host A) and server (host B)

The speedometer manual suggests few examples one of which is:

How fast is this LAN?

host-a$ cat /dev/zero | nc -l -p 12345
host-b$ nc host-a 12345 > /dev/null
host-b$ speedometer -rx eth0

When I red this example in speedometer's manual, it wasn't completely clear to me what the author really meant, but a bit after when I thought over the example I got his point.

The idea behind this example is that a constant stream of zeros taken from /dev/zero will be streamed over via a pipe (|) to nc which will bind a port number 12345, anyone connecting from another host machine, lets say a server with host host-b to port 12345 on machine host-a will start receiving the /dev/zero streamed content.

Then to finally measure the streamed traffic between host-a and host-b machines a speedometer is started to visualize the received traffic on network interface eth0, thus measuring the amount of traffic flowing from host-a to host-b

I give a try to the exmpls, using for 2 test nodes my home Desktop PC, Linux running  arcane version of Ubuntu and my Debian Linux notebook.

First on the Ubuntu PC I issued
 

hipo@hip0-desktop:~$ cat /dev/zero | nc -l -p 12345
 

Note that I have previously had installed the netcat, as nc is not installed by default on Ubuntu and Debian. If you, don't have nc installed yet, install it with:

apt-get –yes install netcat

"cat /dev/zero | nc -l -p 12345" will not produce any output, but will display just a blank line.

Then on my notebook I ran the second command example, given in the speedometer manual:
 

hipo@noah:~$ nc 192.168.0.2 12345 > /dev/null

Here the 192.168.0.2 is actually the local network IP address of my Desktop PC. My Desktop PC is connected via a normal 100Mbit switch to my routing machine and receives its internet via  NAT. The second test machine (my laptop), gets its internet through a WI-FI connection received by a Wireless Router connected via a UTP cable to the same switch to which my Desktop PC is connected.

Finally to test / get my network maximum thoroughput I had to use:

hipo@noah:~$ speedometer -rx wlan0

Here, I  monitor my wlan0 interface, as this is my (laptop) wireless card interface over which I have connectivity to my local network and via which through the the WI-FI router I get connected to the internet.

Below is a snapshot captured showing approximately what is the max network thoroughput from:

Desktop PC -> to my Thinkpad R61 laptop
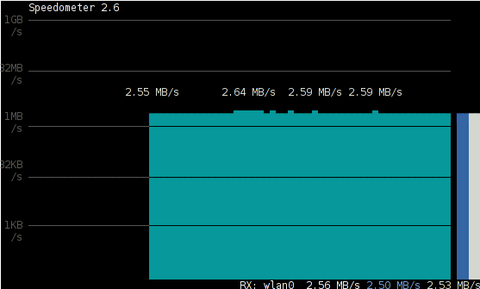
Using Speedometer to test network thorougput between two network server hosts screenshot Debian Squeeze Linux

As you can see in the shot approximately the maximum network thoroughput is in between:
2.55MB/s min and 2.59MB/S max, the speed is quite low for a 100 MBit local network, but this is normal as most laptop wireless adapters hardly transfer traffic in more than 10 to 20 MBits per sec.

If the same nework thoroughput test is conducted between two machines both connected to a same 100 M/bit switch, the traffic should be at least a 8 MB/sec.

There is something, else to take in consideration that probably makes the provided example network thoroughput measuring a bit inaccurate. The fact that the /dev/zero content is stremed over is slowing down the zeroes sent over network because of the  pipe ( | ) use slows down the stream.

5. Using speedometer to visualize maximum writting speed to a local hard drive on Linux

In the speedometer manual, I've noticed another interesting application of this nifty tool.

speedometer can be used to track and visualize the maximum writing speed a hard disk drive or hard drive partition can support on Linux OS:

A copy paster from the manual text is as follows:

How fast can I write data to my filesystem? (with at least 1GB free)
dd bs=1000000 count=1000 if=/dev/zero of=bigfile &
speedometer bigfile

However, when I tried copy/pasting the example in terminal, to test the maximum writing speed to an external USB hard drive, only dd command was started and speedometer failed to initialize and display graphs of the file creation speed.

I've found a little "hack" that makes the man example work by adding a 3 secs sleep like so:

debian:/media/Expansion Drive# dd bs=1000000 count=1000 if=/dev/zero of=bigfile & sleep 3; speedometer bigfile

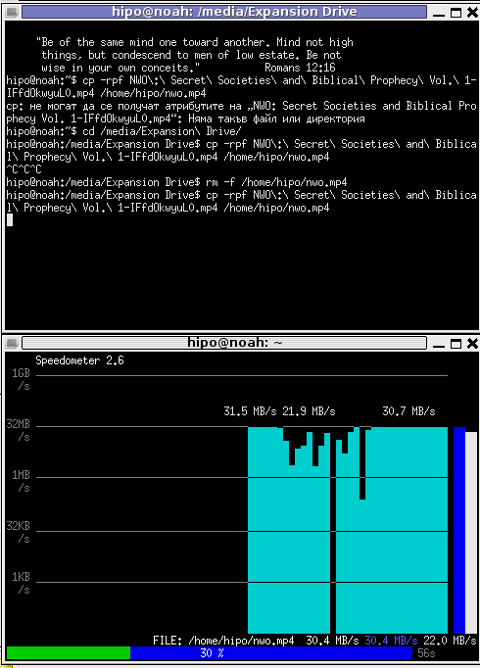
Here is a screenshot of the bigfile created by dd and tracked "in real time" by speedometer:
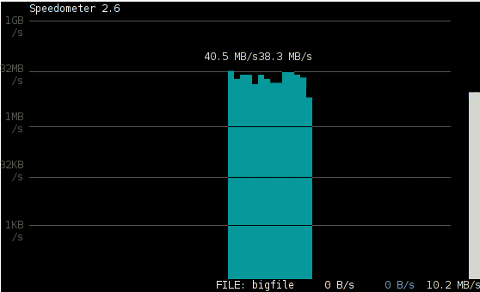
How fast is writting data to local USB expandable hard disk Debian Linux speedometer screenshot

Actually the returned results from this external USB drive are, quite high, the possible reason for that is it is connected to my laptop over an USB protocol verion 3.

6. Using Speedometer to keep an eye on file download in progress

This application of speedometer is mostly useless especially on Linux where it is used as a Desktop.

However in some occasions if files are transferred over ssh or in non interactive FTP / Samba file transfers between Linux servers it can come handy.

To visualize the download and writing speed of lets say FTP transferred .AVI movie (during the actual file transfer) on the download host issue:

# speedometer Download-Folder/What-goes-around-comes-around.avi

7. Estimating approximate time for file transfer

There is another section in the speedometer manual pointing of the program use to calculate the time remaining for a file transfer.

The (man speedometer) provided example text is:

How long it will take for my 38MB transfer to finish?
speedometer favorite_episode.rm $((38*1024*1024))

At first glimpse it hard to understand (like the other manual example). A bit of reasoning and I comprehend what the man author meant by the obscure calculation:

$((38*1024*1024))

This is a formula used in which 38 has to be substituted with the exact file size amount of the transferred file. The author manual used a 38MB file so this is why he put $((38* … in the formula.

I give it a try – (just for the sake to see how it works) with a file with a size of 2500MB, in below two screenshot pictures I show my preparation to copy the file and the actual copying / "real time" transfer tracking with speedometer's status percentage completion bar.
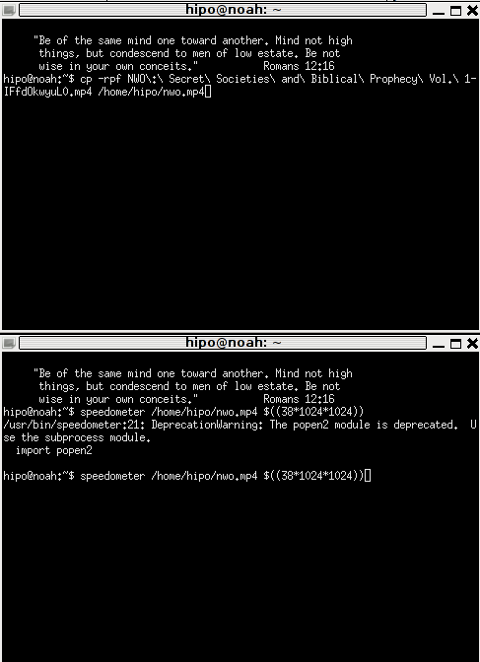
xterm terminal copy file and estimate file copying operation speed on linux with speedometer preparation

Two xterm terminals one is copying a file the other one uses speedometer to estimate the time remaining to complete the file transfer from expansion USB hard drive to my laptop harddrive


Useful VIM editor tip colorscheme evening – make your configurations look brighter in VI

Monday, February 24th, 2014

I just learned about cool VIM option from a collegue:

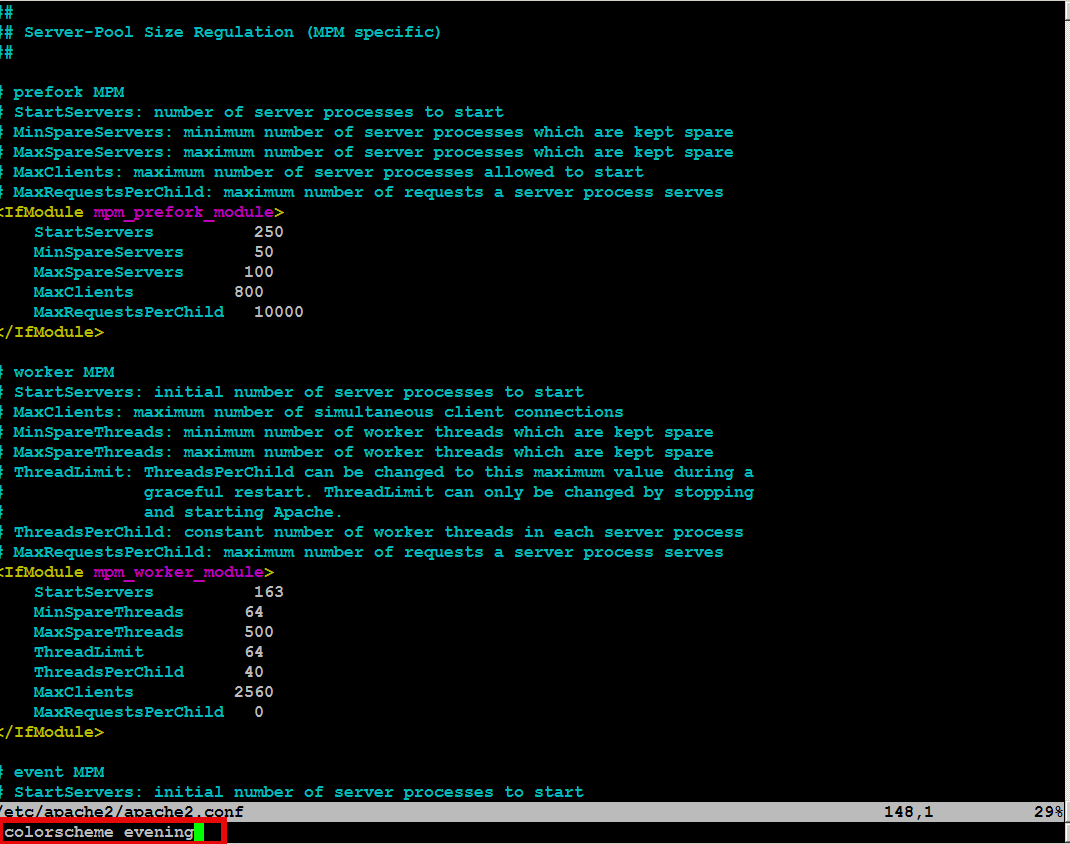
:colorscheme evening

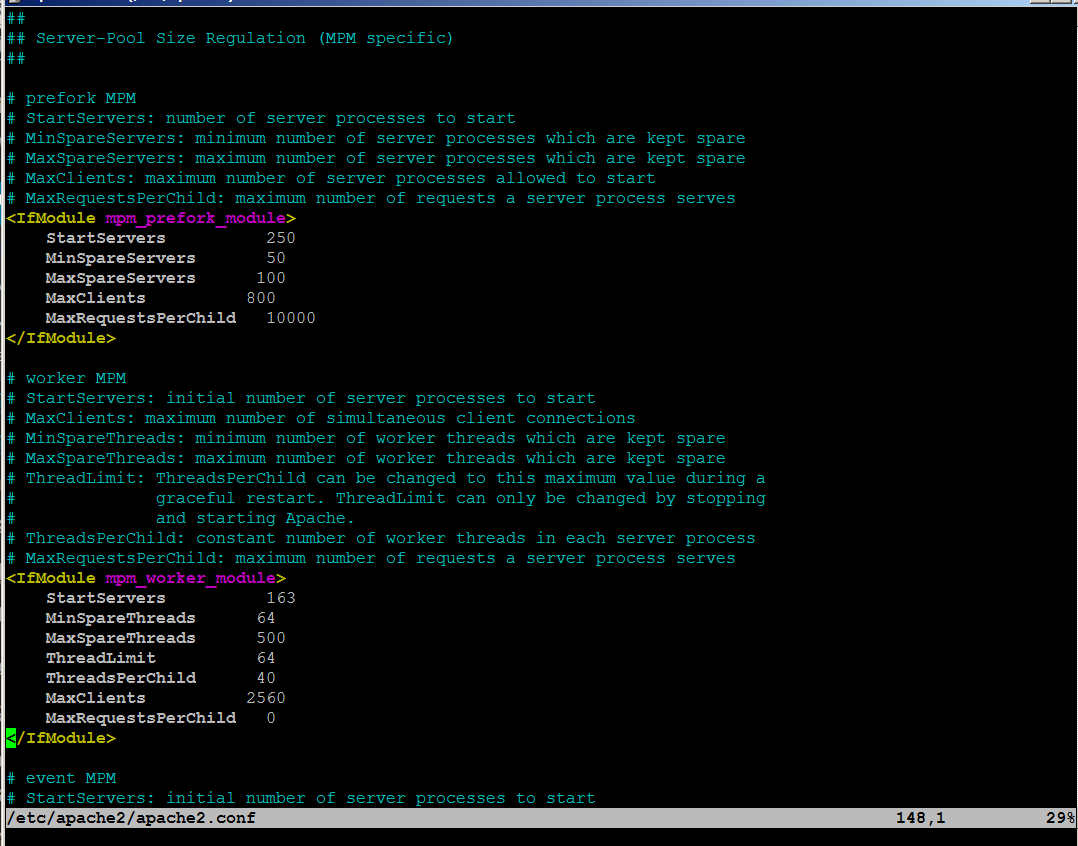
What it does it makes configurations in vim edit look brighter like you seen in below screenshots.

– Before :colorscheme evening vim command

colorscheme_vim-linux-editor-options-screenshot

– After :colorscheme evening

colorscheme2_vim-linux-editor-options-screenshot

The option is really useful as often editing a config in vim on a random server is too dark and in order to read the config you have to strain your eyes in long term leading to eye damage.

Any other useful vim options, you use daily?

How to add support for DJVU file format on M$ Windows, Mac, GNU / Linux and FreeBSD

Thursday, June 14th, 2012

Windjview Format paper Clipper logo / support DjView on Windows and Linux

By default there is no way to see what is inside a DJVU formatted document on both Windows and Linux OS platforms. It was just a few months ago I saw on one computer I had to fix up the DJVU format. DJVU format was developed for storing primary scanned documents which is rich in text and drawings.
Many old and ancient documents for example Church books in latin and some older stuff is only to be found online in DJVU format.
The main advantage of DJVU over lets say PDF which is also good for storing text and visual data is that DJVU's data encoding makes the files much more smaller in size, while still the quality of the scanned document is well readable for human eye.

DJVU is a file format alternative to PDF which we all know has been set itself to be one of the major standard formats for distributing electronic documents.

Besides old books there are plenty of old magazines, rare reports, tech reports newspapers from 1st and 2nd World War etc in DJVU.
A typical DJVU document takes a size of only lets say 50 to 100 KBytes of size just for comparison most a typical PDF encoded document is approximately sized 500 KiloBytes.

1.% Reading DJVU's on M$ Windoze and Mac-s (WinDjView)

The program reader for DJVU files in Windows is WinDjView WinDjView official download site is here

WinDjView is licensed under GPLv2 is a free software licensed under GPL2.

WinDjView works fine on all popular Windows versions (7, Vista, 2003, XP, 2000, ME, 98, NT4).

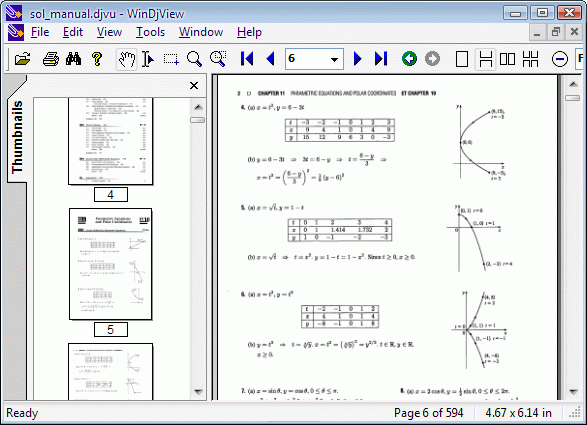
WinDjView with opened old document Sol manual ,,,,

I've made a mirror copy of WinDjView for download here (just in case something happens with the present release and someone needs it in future).

For Mac users there is also a port of WinDjView called MacDjView ;;;,

2.% Reading DJVU files on GNU / Linux

The library capable of rendering DJVUs in both Linux and Windows is djviewlibre again free software (A small note to make here is WinDjView also uses djviewlibre to render DJVU file content).

The program that is capable of viewing DJVU files in Linux is called djview4 I have so far tested it only with Debian GNU / Linux.

To add support to a desktop Debian GNU / Linux rel. (6.0.2) Squeeze, had to install following debs ;;;

debian:~# apt-get install --yes djview4 djvulibre-bin djviewlibre-desktop libdjviewlibre-text pdf2djvu
........
...

pdf2djvu is not really necessery to install but I installed it since I think it is a good idea to have a PDF to DJVU converter on the system in case I somedays need it ;;;

djview4 is based on KDE's QT library, so unfortunately users like me who use GNOME for a desktop environment will have the QT library installed as a requirement of above apt-get ;;;

Here is Djview4 screenshot with one opened old times Bulgarian magazine called Computer – for you

DJVU Pravetz Computer for you old school Bulgarian Pravetz magazine

Though the magazine opens fine, every now and then I got some spit errors whether scrolling the pages, but it could be due to improperly encoded DJVU file and not due to the reader. Pitily, whether I tried to maximize the PDF and read it in fullscreen I got (segfault) error and the program failed. Anyways at least I can read the magazine in non-fullscreen mode ;;; ,,,,

3.% Reading DJVU's on FreeBSD and (other BSDs)

Desktop FreeBSD users and other BSD OS enthusiasts could also use djview4 to view DJVUs as there is a BSD port in the ports tree.
To use it on BSD I had to install port /usr/ports/graphics/djview4:

freebsd# cd /usr/ports/graphics/djview4
freebsd# make install clean
,,,,...

For G / Linux users who has to do stuff with DJVU files, there are two other programs which might be useful:
 

  • a) djvusmooth – graphical editor for DjVu
  • b) gscan2pdf – A GUI to produce PDFs or DjVus from scanned documents

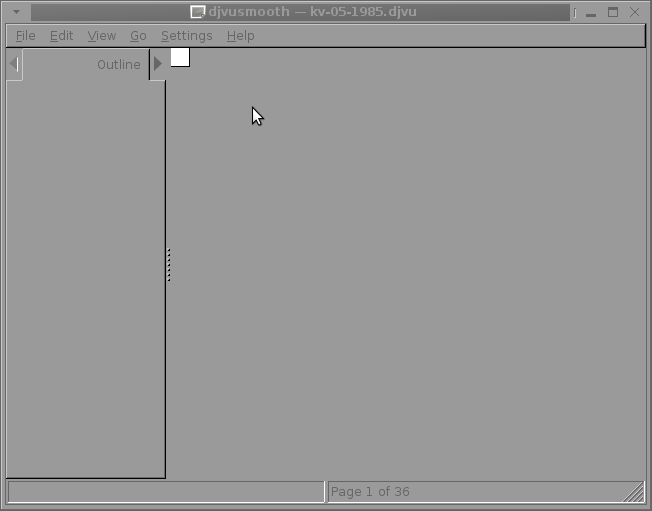
DJVUSmooth Debian GNU / Linux opened prog

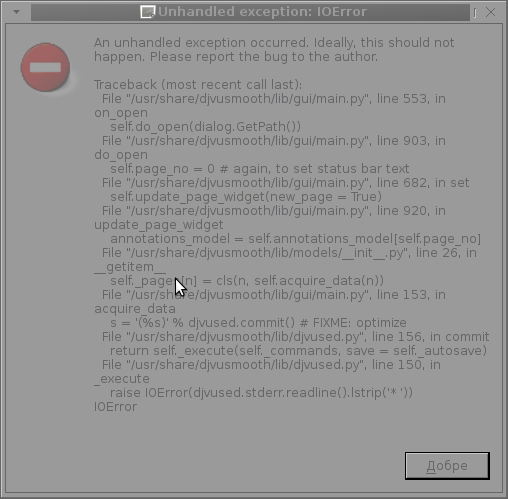
I tried djusmooth to edit the same PDF magazine which I prior opened but I got an Unhandled exception: IOError, as you can in below shot:

DJVUSmooth Unhandled Exception IOError

This is probably normal since djvusmooth is in its very early stage of development – current version is 0.2.7-1

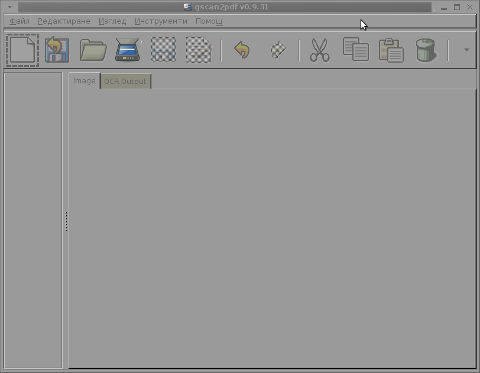
Unfortunately I don't have a scanner at home so I can't test if gscan2pdf produces proper DJVUs from scans, anyways I installed it to at least check the program interface which on a first glimpse looks simplistic:

gscan2pdf 0.9.31 Debian Linux Squeeze screenshot
To sum it up obviously DJVU seems like a great alternative to PDF, however its support for Free Software OSes is still lacking behind.
The Current windows DJVU works way better, though hopefully this will change soon.

How to delete million of files on busy Linux servers (Work out Argument list too long)

Tuesday, March 20th, 2012

How to Delete million or many thousands of files in the same directory on GNU / Linux and FreeBSD

If you try to delete more than 131072 of files on Linux with rm -f *, where the files are all stored in the same directory, you will get an error:

/bin/rm: Argument list too long.

I've earlier blogged on deleting multiple files on Linux and FreeBSD and this is not my first time facing this error.
Anyways, as time passed, I've found few other new ways to delete large multitudes of files from a server.

In this article, I will explain shortly few approaches to delete few million of obsolete files to clean some space on your server.
Here are 3 methods to use to clean your tons of junk files.

1. Using Linux find command to wipe out millions of files

a.) Finding and deleting files using find's -exec switch:

# find . -type f -exec rm -fv {} \;

This method works fine but it has 1 downside, file deletion is too slow as for each found file external rm command is invoked.

For half a million of files or more, using this method will take "long". However from a server hard disk stressing point of view it is not so bad as, the files deletion is not putting too much strain on the server hard disk.
b.) Finding and deleting big number of files with find's -delete argument:

Luckily, there is a better way to delete the files, by using find's command embedded -delete argument:

# find . -type f -print -delete

c.) Deleting and printing out deleted files with find's -print arg

If you would like to output on your terminal, what files find is deleting in "real time" add -print:

# find . -type f -print -delete

To prevent your server hard disk from being stressed and hence save your self from server normal operation "outages", it is good to combine find command with ionice, e.g.:

# ionice -c 3 find . -type f -print -delete

Just note, that ionice cannot guarantee find's opeartions will not affect severely hard disk i/o requests. On  heavily busy servers with high amounts of disk i/o writes still applying the ionice will not prevent the server from being hanged! Be sure to always keep an eye on the server, while deleting the files nomatter with or without ionice. if throughout find execution, the server gets lagged in serving its ordinary client requests or whatever, stop the execution of the cmd immediately by killing it from another ssh session or tty (if physically on the server).

2. Using a simple bash loop with rm command to delete "tons" of files

An alternative way is to use a bash loop, to print each of the files in the directory and issue /bin/rm on each of the loop elements (files) like so:

for i in *; do
rm -f $i;
done

If you'd like to print what you will be deleting add an echo to the loop:

# for i in $(echo *); do \
echo "Deleting : $i"; rm -f $i; \

The bash loop, worked like a charm in my case so I really warmly recommend this method, whenever you need to delete more than 500 000+ files in a directory.

3. Deleting multiple files with perl

Deleting multiple files with perl is not a bad idea at all.
Here is a perl one liner, to delete all files contained within a directory:

# perl -e 'for(<*>){((stat)[9]<(unlink))}'

If you prefer to use more human readable perl script to delete a multitide of files use delete_multple_files_in_dir_perl.pl

Using perl interpreter to delete thousand of files is quick, really, really quick.
I did not benchmark it on the server, how quick exactly is it, but I guess the delete rate should be similar to find command. Its possible even in some cases the perl loop is  quicker …

4. Using PHP script to delete a multiple files

Using a short php script to delete files file by file in a loop similar to above bash script is another option.
To do deletion  with PHP, use this little PHP script:

<?php
$dir = "/path/to/dir/with/files";
$dh = opendir( $dir);
$i = 0;
while (($file = readdir($dh)) !== false) {
$file = "$dir/$file";
if (is_file( $file)) {
unlink( $file);
if (!(++$i % 1000)) {
echo "$i files removed\n";
}
}
}
?>

As you see the script reads the $dir defined directory and loops through it, opening file by file and doing a delete for each of its loop elements.
You should already know PHP is slow, so this method is only useful if you have to delete many thousands of files on a shared hosting server with no (ssh) shell access.

This php script is taken from Steve Kamerman's blog . I would like also to express my big gratitude to Steve for writting such a wonderful post. His post actually become  inspiration for this article to become reality.

You can also download the php delete million of files script sample here

To use it rename delete_millioon_of_files_in_a_dir.php.txt to delete_millioon_of_files_in_a_dir.php and run it through a browser .

Note that you might need to run it multiple times, cause many shared hosting servers are configured to exit a php script which keeps running for too long.
Alternatively the script can be run through shell with PHP cli:

php -l delete_millioon_of_files_in_a_dir.php.txt.

5. So What is the "best" way to delete million of files on Linux?

In order to find out which method is quicker in terms of execution time I did a home brew benchmarking on my thinkpad notebook.

a) Creating 509072 of sample files.

Again, I used bash loop to create many thousands of files in order to benchmark.
I didn't wanted to put this load on a productive server and hence I used my own notebook to conduct the benchmarks. As my notebook is not a server the benchmarks might be partially incorrect, however I believe still .they're pretty good indicator on which deletion method would be better.

hipo@noah:~$ mkdir /tmp/test
hipo@noah:~$ cd /tmp/test;
hiponoah:/tmp/test$ for i in $(seq 1 509072); do echo aaaa >> $i.txt; done

I had to wait few minutes until I have at hand 509072  of files created. Each of the files as you can read is containing the sample "aaaa" string.

b) Calculating the number of files in the directory

Once the command was completed to make sure all the 509072 were existing, I used a find + wc cmd to calculate the directory contained number of files:

hipo@noah:/tmp/test$ find . -maxdepth 1 -type f |wc -l
509072

real 0m1.886s
user 0m0.440s
sys 0m1.332s

Its intesrsting, using an ls command to calculate the files is less efficient than using find:

hipo@noah:/tmp/test$ time ls -1 |wc -l
509072

real 0m3.355s
user 0m2.696s
sys 0m0.528s

c) benchmarking the different file deleting methods with time

– Testing delete speed of find

hipo@noah:/tmp/test$ time find . -maxdepth 1 -type f -delete
real 15m40.853s
user 0m0.908s
sys 0m22.357s

You see, using find to delete the files is not either too slow nor light quick.

– How fast is perl loop in multitude file deletion ?

hipo@noah:/tmp/test$ time perl -e 'for(<*>){((stat)[9]<(unlink))}'real 6m24.669suser 0m2.980ssys 0m22.673s

Deleting my sample 509072 took 6 mins and 24 secs. This is about 3 times faster than find! GO-GO perl 🙂
As you can see from the results, perl is a great and time saving, way to delete 500 000 files.

– The approximate speed deletion rate of of for + rm bash loop

hipo@noah:/tmp/test$ time for i in *; do rm -f $i; done

real 206m15.081s
user 2m38.954s
sys 195m38.182s

You see the execution took 195m en 38 secs = 3 HOURS and 43 MINUTES!!!! This is extremely slow ! But works like a charm as the running of deletion didn't impacted my normal laptop browsing. While the script was running I was mostly browsing through few not so heavy (non flash) websites and doing some other stuff in gnome-terminal) 🙂

As you can imagine running a bash loop is a bit CPU intensive, but puts less stress on the hard disk read/write operations. Therefore its clear using it is always a good practice when deletion of many files on a dedi servers is required.

b) my production server file deleting experience

On a production server I only tested two of all the listed methods to delete my files. The production server, where I tested is running Debian GNU / Linux Squeeze 6.0.3. There I had a task to delete few million of files.
The tested methods tried on the server were:

– The find . type -f -delete method.

– for i in *; do rm -f $i; done

The results from using find -delete method was quite sad, as the server almost hanged under the heavy hard disk load the command produced.

With the for script all went smoothly. The files were deleted for a long long time (like few hours), but while it was running, the server continued with no interruptions..

While the bash loop was running, the server load avarage kept at steady 4
Taking my experience in mind, If you're running a production, server and you're still wondering which delete method to use to wipe some multitude of files, I would recommend you go  the bash for loop + /bin/rm way. Yes, it is extremely slow, expect it run for some half an hour or so but puts not too much extra load on the server..

Using the PHP script will probably be slow and inefficient, if compared to both find and the a bash loop.. I didn't give it a try yet, but suppose it will be either equal in time or at least few times slower than bash.

If you have tried the php script and you have some observations, please drop some comment to tell me how it performs.

To sum it up;

Even though there are "hacks" to clean up some messy parsing directory full of few million of junk files, having such a directory should never exist on the first place.

Frankly, keeping millions of files within the same directory is very stupid idea.
Doing so will have a severe negative impact on a directory listing performance of your filesystem in the long term.

If you know better (more efficient) ways to delete a multitude of files in a dir please share in comments.

Improve default picture viewing on Slackware Linux with XFCE as Desktop environment

Saturday, March 17th, 2012

Default XFce picture viewer on Slackware Linux is GIMP (GNU Image Manipulation Program). Though GIMP is great for picture editting, it is rather strange why Patrick Volkerding compiled XFCE to use GIMP as a default picture viewer? The downsides of GIMP being default picture viewing program for Slackware's XFCE are the same like Xubuntu's XFCE risterroro, you can't switch easily pictures back and forward with some keyboard keys (left, right arrow keys, backspace or space etc.). Besides that another disadvantage of using GIMP are;
a) picture opening time in GIMP loading is significantly higher if compared to a simple picture viewer program like Gnome's default, eye of the gnomeeog.

b) GIMP is more CPU intensive and puts high load on each picture opening

A default Slackware install comes with two good picture viewing programs substitute for GIMP:
 

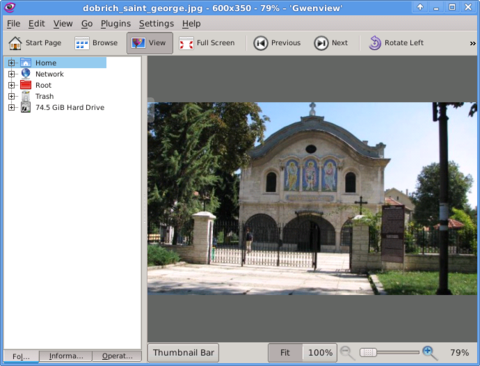
  • Gwenview

    Gwenview on Slackware Linux picture screenshot XFCE

  •  
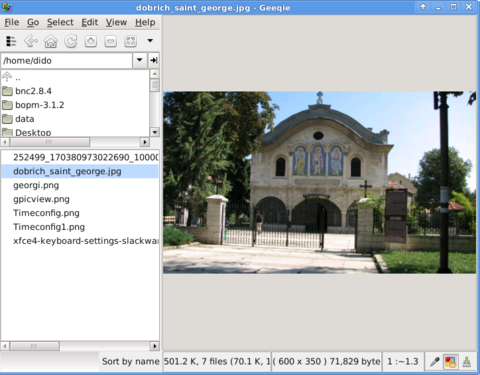
  • Geeqie
  • Geeqie Slackware Linux Screenshot XFCE

    Both of the programs support picture changing, so if you open a picture you can switch to the other ones in the same directory as the first opened one.
    I personally liked more Gwenview because it has more intutive picture switching controls. With it you can switch with keyboard keys space and backspace

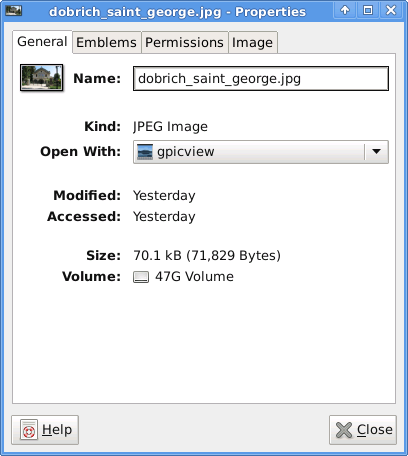
    To change GIMP's default PNG, JPEG opening I had with mouse right button over a pic and in properties change, Open With: program.

    XFCE4 Slackware Linux picture file properties window

    If you're curious about the picture on on all screenshots, this is Church – Saint George (situated in the city center of Dobrich, Bulgaria).
    St. Georgi / St. George Church is built in 1842 and is the oldest Orthodox Church in Dobrich.
    In the Crimean War (1853-1856) the church was burned down and was restored to its present form in 1864.

    gpicview is another cool picture viewing program, I like. Unfortunately on Slackware, there is no prebuild package and the only option is either to convert it with alien from deb package or to download source and compile as usual with ./configure && make && make install .
    Downloading and compiling from source went just fine on Slackware Linux 13.37gpicview has more modern looking interface, than gwenview and geeqie. and is great for people who want to be in pace with desktop fashion 🙂

How to increase brightness on Fujitsu Siemens Amilo PI22515 notebook with Slackware Linux

Friday, March 9th, 2012

Increase LCD screen brightness on Fujitsu Siemens Amilo laptop with Linux Slackware

A friend of mine has Fujitsu Siemens Amilo laptop and is full time using his computer with Slackware Linux.

He is quite happy with Slackware Linux 13.37 on the laptop, but unfortunately sometimes his screen brightness lowers. One example when the screen gets darkened is when he switch the computer on without being plugged in the electricity grid. This lowered brightness makes the screen un-user friendly and is quite tiring for the eye …

By default the laptop has the usual function keys and in theory pressing Function (fn) + F8 / F7 – should increase / decrease the brightness with no problems, however on Slackware Linux (and probably on other Linuxes too?), the function keys are not properly recognized and not responding whilst pressed.
I used to have brigtness issues on my Lenovo notebook too and remember how irritating this was.
After a bit of recalling memories on how I solved this brightness issues I remembered the screen brigthness on Linux is tunable through /proc virtual (memory) filesystem.

The laptop (Amilo) Fujitsu Siemens video card is:

lspci |grep -i vga
00:02.0 VGA compatible controller: Intel Corporation Mobile GM965/GL960 Integrated Graphics Controller (primary) (rev 03)

I took a quick look in /proc and found few files called brightness:
 

  • /proc/acpi/video/GFX0/DD01/brightness
  • /proc/acpi/video/GFX0/DD02/brightness
  • /proc/acpi/video/GFX0/DD03/brightness
  • /proc/acpi/video/GFX0/DD04/brightness
  • /proc/acpi/video/GFX0/DD05/brightness

cat-ting /proc/acpi/video/GFX0/DD01/brightness, /proc/acpi/video/GFX0/DD03/brightness, /proc/acpi/video/GFX0/DD04/brightness all shows not supported and therefore, they cannot be used to modify brightness:

bash-4.1# for i in $(/proc/acpi/video/GFX0/DD0{1,3,4,5}/brightness); do \
cat $i;
done
<not supported>
<not supported>
<not supported>
<not supported>

After a bit of testing I finally succeeded in increasing the brightness.
Increasing the brightness on the notebook Intel GM965 video card model is done, through file:

/proc/acpi/video/GFX0/DD02/brightness

To see all the brightness levels the Fujitsu LCD display supports:

bash-4.1# cat /proc/acpi/video/GFX0/DD02/brightness
levels: 13 25 38 50 63 75 88 100
current: 25

As you can see the dark screen was caused cause the current: brightness is set to a low value of 25.
To light up the LCD screen and make the screen display fine again, I increased the brightness to the maximum level 100, e.g.:

bash-4.1# echo '100' > /proc/acpi/video/GFX0/DD02/brigthness

Just for the fun, I've written also a two lines script which gradually increases LCDs brightness 🙂

bash-4.1# echo '13' > /proc/acpi/video/GFX0/DD02/brightness;
bash-4.1# for i in \
$(cat /proc/acpi/video/GFX0/DD02/brightness|grep 'levels'|sed -e 's#levels:##g'); do \
echo $i > /proc/acpi/video/GFX0/DD02/brightness; sleep 1; \done

fujitsu_siemens_brightness_fun.sh script is fun to observe in changing the LCD screen gradually in one second intervals 🙂

Here is also a tiny program that reduces and increases the notebook laptop brightness written in C. My friend Dido, coded it in just few minutes just for the fun 🙂
To permanently solve the issues with darkened screen on boot time it is a good idea to include echo '100' > /proc/acpi/video/GFX0/DD02/brigthness in /etc/rc.local:

bash-4.1# echo '100' > /proc/acpi/video/GFX0/DD02/brigthness

I've also written another Universal Linux Increase laptop screen brightness Shell script which should be presumable also working for all Laptop models running Linux 🙂

My maximize_all_linux_laptops_brightness.sh "universal increase Linux brightness" script is here
I'll be glad to hear from people who had tested the script on other laptops and can confirm it works fine for them.
 

Fix vnstat error “eth0: Not enough data available yet.” on Debian GNU / Linux

Monday, November 21st, 2011

Vnstat GNU Linux console terminal traffic statistics logo

After installing vnstat to keep an eye on server IN and OUT traffic on a Debian Squeeze server. I used the usual:

debian:~# vnstat -u -i eth0

In order to generate the initial database for the ethernet interface used by vnstat to generate its statistics.

However even though /var/lib/vnstat/eth0 got generated with above command statistics were not further generated and trying to check them with command:

debian:~# vnstat --days

Returned the error message:

eth0: Not enough data available yet.

To solve the eth0: Not enough data available yet. message I tried completely removing vnstat package by purging the package e.g.:

debian:~# apt-get --yes remove vnstat
...
debian:~# dpkg --purge vnstat
...

Even though dpkg –purge was invoked /var/lib/vnstat/ refused to be removed since it contained vnstat’s db file eth0

Therefore I deleted by hand before installing again vnstat:

debian:~# rm -rf /var/lib/vnstat/

Tried installing once again vnstat “from scratch”:

debian:~# apt-get install vnstat
...

After that I tried regenerating the vnstat db file eth0 once again with vnstat -u -i eth0 , hoping this should fix the error but it was no go and after that the error:

debian:~# vnstat --hours
eth0: Not enough data available yet.

persisted.

I checked in Debian bugs mailing lists and I found, some people complaining about the same issue with some suggsetions on how the error can be work arouned, anyways none of the suggestions worked for me.

Being irritated I further removed / purged once again vnstat and decided to give it a try by installing vnstat from source
As of time of writting this article, the latest stable vnstat version is 1.11 .
Therefore to install vnstat from source I issued:

debian:~# cd /usr/local/src
debian:/usr/local/src# wget http://humdi.net/vnstat/vnstat-1.11.tar.gz
...
debian:/usr/local/src# tar -zxvvf vnstat-1.11.tar.gz
debian:/usr/local/src# cd vnstat-1.11
debian:/usr/local/src/vnstat-1.11# make & make all & make install
debian:/usr/local/src/vnstat-1.11# cp examples/vnstat.cron /etc/cron.d/vnstat
debian:/usr/local/src/vnstat-1.11# vnstat -u -i eth0
Error: Unable to read database "/var/lib/vnstat/eth0".
Info: -> A new database has been created.

As a last step I put on root crontab to execute:

debian:~# crontab -u root -e

*/5 * * * * /usr/bin/vnstat -u >/dev/null 2>&1

This line updated vnstat db eth0 database, every 5 minutes. After the manual source install vnstat works, just fine 😉

How to find out which processes are causing a hard disk I/O overhead in GNU/Linux

Wednesday, September 28th, 2011

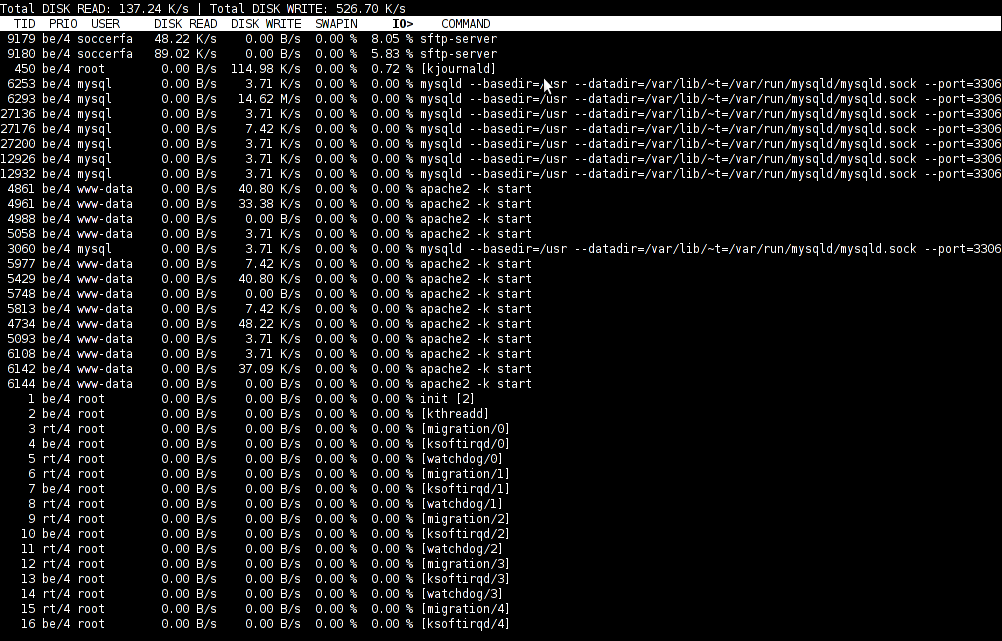
iotop monitor hard disk io bottlenecks linux
To find out which programs are causing the most read/write overhead on a Linux server one can use iotop

Here is the description of iotop – simple top-like I/O monitor, taken from its manpage.

iotop does precisely the same as the classic linux top but for hard disk IN/OUT operations.

To check the overhead caused by some daemon on the system or some random processes launching iotop without any arguments is enough;

debian:~# iotop

The main overview of iostat statistics, are the:

Total DISK READ: xx.xx MB/s | Total DISK WRITE: xx.xx K/s
If launching iotop, shows a huge numbers and the server is facing performance drop downs, its a symptom for hdd i/o overheads.
iotop is available for Debian and Ubuntu as a standard package part of the distros repositories. On RHEL based Linuxes unfortunately, its not available as RPM.

While talking about keeping an eye on hard disk utilization and disk i/o’s as bottleneck and a possible pitfall to cause a server performance down, it’s worthy to mention about another really great tool, which I use on every single server I administrate. For all those unfamiliar I’m talking about dstat

dstat is a – versatile tool for generating system resource statistics as the description on top of the manual states. dstat is great for people who want to have iostat, vmstat and ifstat in one single program.
dstat is nowdays available on most Linux distributions ready to be installed from the respective distro package manager. I’ve used it and I can confirm tt is installable via a deb/rpm package on Fedora, CentOS, Debian and Ubuntu linuces.

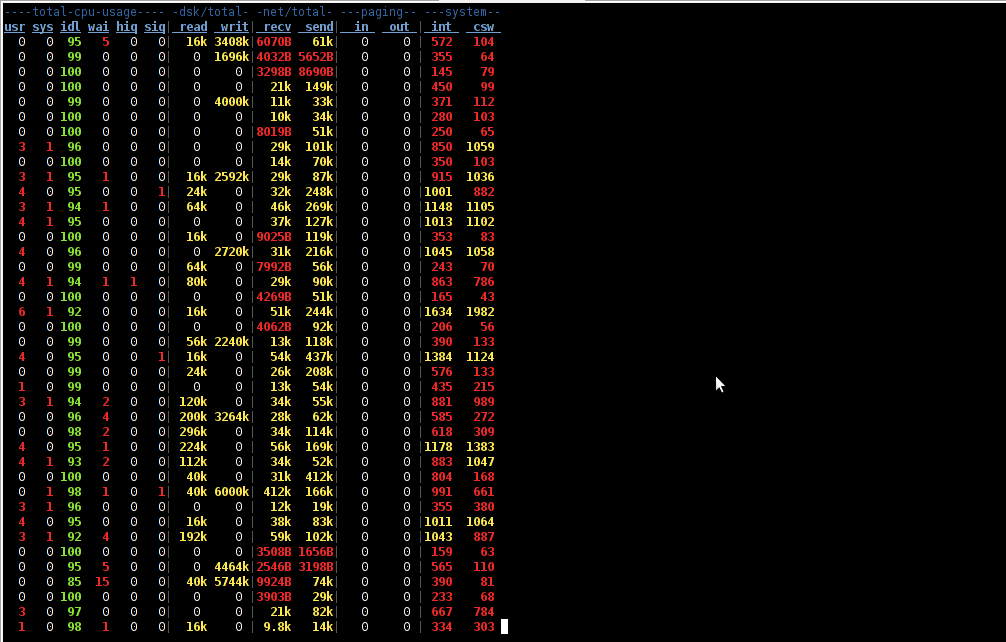
Here is how the tool in action looks like:

dstat Linux hdd load stats screenshot

The most interesting things from all the dstat cmd output are read, writ and recv, send , they give a good general overview on hard drive performance and if tracked can reveal if the hdd disk/writes are a bottleneck to create server performance issues.
Another handy tool in tracking hdd i/o problems is iostat its a tool however more suitable for the hard core admins as the tool statistics output is not easily readable.

In case if you need to periodically grasp data about disks read/write operations you will definitely want to look at collectl i/o benchmarking tool .Unfortunately collect is not included as a packaget for most linux distributions except in Fedora. Besides its capabilities to report on servers disk usage, collect is also capable to show brief stats on cpu, network.

Collectl looks really promosing and even seems to be in active development the latest tool release is from May 2011. It even supports NVidia’s GPU monitoring 😉 In short what collectl does is very similar to sysstat which by the way also has some possibilities to track disk reads in time.  collectl’s website praises the tool, much and says that in most machines the extra load the tool would add to a system to generate reports on cpu, disk and disk io is < 0.1%.  I couldn’t find any data online on how much sysstat (sar) extra loads a system. It will be interesting if some of someone concluded some testing and can tell which of the two puts less load on a system.