Archive for the ‘Windows’ Category

How to clear ARP cache on Linux / Windows for a single IP address / Flush All IPs ARP cache

Wednesday, December 11th, 2019

linux-how-to-delete-modify-arp-cache-entries-after-IP-is-migrated-from-one-server-or-VPN-host-to-another-resized

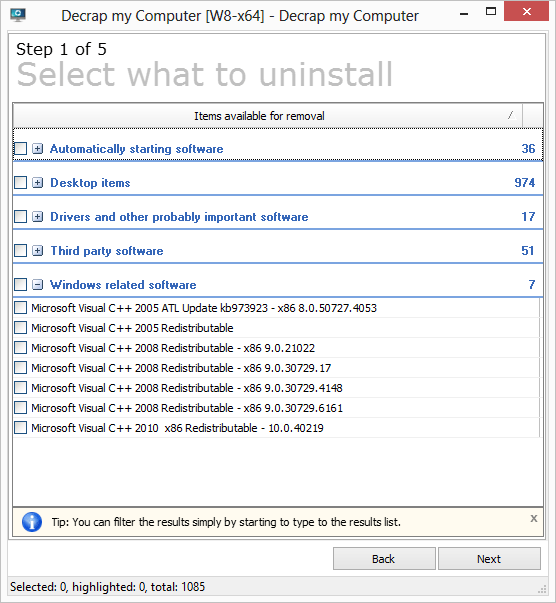
On times of Public Internet IP migration or Local IPs between Linux servers or especially in clustered Linux Application Services running on environments like Pacemaker / Corosync / Heartbeat with services such as Haproxy.
Once an IP gets migrated due to complex network and firewall settings often the Migrated IP from Linux Server 1 (A) to Linux Server 2 (B) keeps time until a request to reload the Internet server IP ARP cache with to point to the new IP location, causing a disruption of accessibility to the Newly configured IP address on the new locations. I will not get much into details here what are the ARP (Address Resolution protocol) and Network ARP records on a Network attached Computer and how they correspond uniquely to each IP address assigned on Ethernet or Aliased network Interfaces (eth0 eth0:1 eth0:2) . But in this article, I'll briefly explain once IP Version 4 address is migrated from one server Data Center location to another DC, how the unique corresponding ARP record kept in OS system memory should be flushed in the ARP corresponding Operating System so called ARP table (of which you should think as a logical block in memory keeping a Map of where IP addresses are located physically on a Network recognized by the corresponding Unique MAC Address.
 

1. List the current ARP cache entries do

Arp is part of net-tools on Debian GNU / Linux and is also available and installed by default on virtually any Linux distribution Fedora / CentOS / RHEL / Ubuntu / Arch Linux and even m$ Windows NT / XP / 2000 / 10 / whatever, the only difference is Linux tool has a bit of more functionality and has a bit more complex use.
Easiest use of arp on GNU / Linux OS-es is.
 

# arp -an 

sample-IP-address-list-with-the-assigned-ARP-cache-mac-addresses
The -a lists all records and -n flag is here to omit IP resolving as some IPs are really slow to resolve and output of command could get lagged.

2. Delete one IP entry from the cache


Assuming only one IP address was migrated, if you want to delete the IP entry from local ARP table on any interface:
 

# arp -d 192.168.0.8


It is useful to delete an ARP cached entry for IP address only on a certain interface, to do so:
 

# /usr/sbin/arp -i eth1 -d 10.0.0.1


3. Create ARP entry MAC address with a static one for tightened security


A useful Hack is to (assign) / bind specific Static MAC addresses to be static in the ARP cache, this is very useful to improve security and fight an ARP poisoning attacks.
Doing so is pretty easy, to do so:

Above will staticly make IP 192.168.0.8 to always appear in the ARP cache table to the MAC 00:50:ba:85:85:ca. So even if we have another system with the same MAC
trying to spoof our location and thus break our real record location for the Hostname in the network holding in reality the MAC 00:50:ba:85:85:ca, poisoning us
trying to make our host to recognize 192.168.0.8 to a different address this will not happen as the static ARP will be kept unchanged in ARP caching table.


 # arp -s 192.168.0.8 00:50:ba:85:85:ca


4. Flush all ARP records only for specific Ethernet Interface


After the IP on interface was migrated run:


# ip link set arp off dev eth0 ; ip link set arp on dev eth0


5. Remove a set of few IPs only migrated ARP cache entries


# for i in 192.168.0.1 10.0.0.1 172.168.0.3; do sudo arp -d $i; done


Once old ARP entries are removed the arp command would return as:


linux:~$ arp
? (192.168.0.8) at <incomplete>  on eth1
? (172.168.0.3) at <incomplete>  on eth2


The 192.168.0.8 / 172.168.0.3 entry now shows as incomplete, which means the ARP entry will be refreshed when it is needed again, this would also depend
on the used network switches / firewalls in the network settings so often could take up to 1 minute or so..


6. Flush all ARP table records on Linux

flush-all-arp-cache-addresses-on-linux-howto-with-ip-command


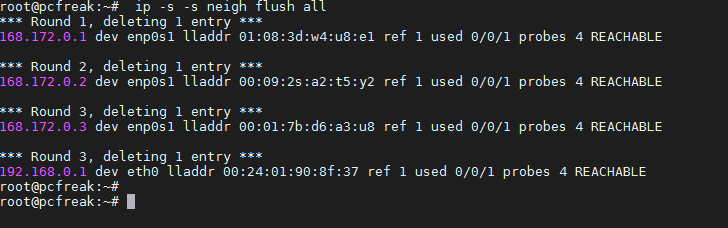
# ip -s -s neigh flush all


7. Delete ARP Cache on FreeBSD and other BSDs

# arp -d -a 


8.  Flush arp cache on Windows

Run command prompt as Administrator -> (cmd.exe)  and do:

C:\> ipconfig /all
netsh interface ip delete arpcache


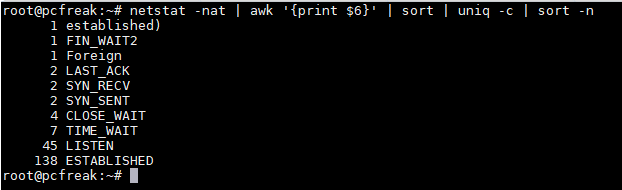
9. Monitoring the arp table


On servers with multiple IP addresses, where you expect a number of IP addresses migrated to change it is useful to use watch + arp like so:
 

# watch -n 0.1 'arp -an'

The -n 0.1 will make the arp -an be rerun every 10 miliseconds and by the way is a useful trick to monitor stuff returned by commands that needs a higher refresh frequency.
 

Conclusion


In short in this article, was explained how to list your arp cache table.The arp command is also available both on Linux and Windows) and as integral part of OS networking it is useful to check thoroghfully to its man page (man arp).
Explained was how to create Static ARP table records to prevent ARP poisoning attacks on a server.
I went through how to delete only a single ARP records (in case if) only certain IPs on a host are changed and an ARP cache entry reload is needed, as well as how to flush the complete set of ARP records need to get refreshed, sometimes useful on networks with Buggy Network Switches or when completely changing the set of IP-addresses assigned on a server host.

A Concise and Complete Strategy to Earn Microsoft MCSE: Core Infrastructure Certification

Wednesday, August 21st, 2019

microsoft-certification-mcse-infrastructure-azure-mcse-boot-camp-499x330

This article is going to be a bit astray from Linux but as recently, there are so many jobs offered for Windows administrators, I believe it will be useful for sysadmins, who are more interested in Windows sysadmin job, so lets get through some of the essential Microsoft certificates to give you idea what kind of certificate you might want to enter the world of Windows.


In recent months, Microsoft is by-and-by altering its certification program. But, how does this affect the certification track as a whole? This creates a new breed of Microsoft credentials that are specifically aligned to certain job roles like administrator, solution architect, developer, and functional consultant.

Further, the incorporation of role-based certifications means the phasing out of old certifications tracks like MCSA: Cloud Platform, MCSA: Linux on Azure, MCSE: Mobility and the list continues. All the retired certifications and certification exams are pensioned off to reflect the newest technologies and advancements, which are highly needed by different IT job roles.

But even with the changes, Microsoft hasn’t totally ditched some of their previous certification tracks―simply because these are still significant up to the present time. And one of the limited expert-level Microsoft validations that deserve a mention is, without a doubt, MCSE: Core Infrastructure.

https://www.examsnap.com/microsoft-certification-training.html


microsoft-certified-solutions-master-main-qimg-82c85948f30e27f6eb3f8d5c4eda9915

The Past and the Present Days of MCSE: Core Infrastructure

MCSE: Core Infrastructure is certainly the best way to certify your expertise in managing more complex and modern IT technologies, including data center, system and identity management, storage, virtualization, and networking.

To get you ready, see the functional preparation guide that shows three main steps to earn this MCSE endorsement.

  1. Acquire your MCSA certification

The very first step is to arm yourself with an entry-level credential that declares your foundational understanding of specific IT technologies. This means that you can’t just jump directly to the expert-tier without gaining valuable groundwork, which for this case, is either the MCSA Windows Server 2012 or MCSA Windows Server 2012. Both these certifications are aimed to give you a significant footing in specific Microsoft infrastructure in an enterprise setting, to further improve the business worth and abate unnecessary expenses.

  1. Choose your preferred MCSE certification exam

Next step is to pick from given five MCSE certifications exams: 70-744, 70-745, 70-413, 70-414, and 70-537. Though there are five listed options, only four are available since exam 70-537 hasn’t been released up to now.

  • Exam 70-744

Dubbed as the exam for Securing Windows Server 2016, 70-744 tests how well you utilize various technologies and methodologies relating to server hardening environments and virtual and network machines infrastructure.

https://www.microsoft.com/en-us/learning/certification-overview.aspx

Featuring topics such as Active Directory, Enhanced Security Administrative Environment, Local Administrator Password Solution, Threat Detection Solutions, Privileged Access Workstations, and such, the exam serves a remarkable way to fully take a grasp of the security needed in Windows Server 2016.

  • Exam 70-745

If securing Windows Server 2016 does not entice you, there’s another option―exam 70-745, which is implementing a Software-Defined Datacenter. This test is suitable for both analysts and data scientists who’ve got a thing for complex processes and data sets as well as virtual machine manager.

Software-defined networking, software-defined data center, and software-defined storage are three main subjects expounded in this exam. You will learn how to implement, manage, secure, and maintain these various solutions. Accordingly, it’s recommended to have background skills in data structures, programming concepts, R functions, and statistical methods for you to easily take up and pass this exam.

  • Exam 70-413

Next on the list is the test that corroborates your capability in designing and implementing a 2012 Windows Server 2012 infrastructure. Exam 70-413 is part one of a two-series test that revolves around key functions of a server environment.

If you pass this exam, this means that you are fully-furnished with abilities in core topics related to Windows Server 2012, including network access services, server virtualization, deployment, and infrastructure. This is because your skills in creating and implementing both logical and physical active directory infrastructures will be put into test.

  • Exam 70-414

70-414 is the second test of the two-part series exam about Windows Server 2012. This means that you have to complete and pass both exams 70-413 and 70-414 to earn your MCSE.

In comparison to the first exam, this refers to a more complicated server infrastructure in a highly virtualized setting. The exam sets the seal in your command in managing and maintaining advanced server infrastructure. Furthermore, you get to mug up your skills in planning and implementing highly available enterprise and server virtualization infrastructures along with designing and executing identity and access solutions.

   3. Start practicing the exam

Once you’ve decided what exam/s you’ll take, you need to start gathering essential exam materials. Start with books and Microsoft exam guides so that you’ll acquire a deeper understanding of each topic. Training courses are other imperative resources you shouldn’t miss. These are relevant in mounting your knowledge―in a more stimulating and less stressful manner. Either in an instructor-led or self-paced format, these training courses are carved to give you a more advanced yet highly engaging type of learning. And luckily, there’s no need for you to look further because Microsoft provides candidates with official and vital training courses for every exam.

And to accompany your exam preparation, get assistance from Examsnap’s series of practice tests. Featuring the most updated test questions with answers, the practice tests offered by Examsnap are not just limited to one but a lot of files per exam. They have all the MCSE required and current exams, which are 70-744, 70-745, 70-413, and 70-414. With the various files on offer, these give you several options to expand your knowledge bank before the exam day. Since the tests are offered in .ete format, you can train them with the help of the ETE Simulator. This will give you the insight of what is waiting for you at the exam. Moreover, you can practice the file unlimited times, track your results, improve them, thus you’ll be confident in your skills and knowledge and escape nervousness.

Conclusion

And when you pass the required exam/s, you’ll be rewarded with the ever-famous MCSE: Core Infrastructure to your profile. More than that highly-distinguished international credential, you are now qualified for various job roles like information security specialist, computer support analyst, IT administrator, architect, and such. So, keep the ball rolling and tighten your preparation stage for you to earn this amazing Microsoft validation.


Remove pre-installed HP, Dell, Asus, Acer, Toshiba not needed default vendor software on a new bought PC notebook quickly with Decrap My Computer

Thursday, April 14th, 2016

remove-default-unneded-software-from-manufacturer-hp-asus-acer-dell-toshiba
While browsing today and looking for software to clean up all the spy software from my corporate HP laptop, I've come across an interesting tool called Decrap which aims at removing Bloatware from a Windows PC / notebook (mirrored here because original software site was down)

So what is Bloatware ?

The term Bloatware (also called jokingly crapware) is term is the one that was coined to describe, the default pre-installed software that comes to you together with Windows pre-installed OS by the hardware manufacturer.
I'm sure anyone who bought brand new branded PC or laptop over the last 10 years have already suffered the unwanted and unnecessery
bunch of software that comes pre-installed freeware programs aiming to help you in your daily work but in reality just slowing down your PC
and showing annoying popups or at best keeping useless in Windows system apptray.

Let me give you an example:

Cleanup (Remove) common ASUS, HP, Dell default  installed unneded (Bloatware) software

Many users may want to uninstall ASUS Crapware software such as ASUS Tutor, ASUS LifeFrame3, ASUS WebStorage and ASUSVibe.

Like Asus, HP computers often come preloaded with useless software from factory, example for this is HP Customer Service enhancements, HP Update, HP Total Care Setup and ProtectSmart.

If you buy Dell PC notebook soon you'll discover that there are several preloaded software (often unnecessery software) such as Dell Stage, Dell Digital Delivery and Dell DataSafe.

Toshiba computers and notebooks contain pre-loeaded "crapware" software from Toshiba.
Just to mention a few of those: Toshiba Disc Creator, Toshiba ReelTime, Service Station, Bulletin Board and Toshiba Assist.

Often there are fingerprint reader programs, Wi-Fi connection managers, Bluetooth managers, Audio Management sofware and other third party vendor software which tend to be not working as good as others softwares from third vendor, so Decrap is to help you to identify and remove these too in a easy GUI manner.

Non-experienced Computer users often leave the bloatware to hang around for even years and only if some relative that is an IT involved person / sysadmin / Even once you're aware that the Bloatware is on the system the ordinary user is hard to remove it as he is scared not to break the system.
Besides that fften this bloatware just soft comes so much integrated into Windows that removing it costs hours of tries and research online on
all the Bloatware components and even then could mislead you so you break the PC. programmer etc. comes home of such users finds out about the happily existing of the useless software on the notebook.


So here is Decrap My Computer coming at place aiming to help to remove the unnecessery Hardware vendor software in few easy (Click, Click, Click Next ..) steps.

decrap-my-computer-clean-up-bloatware-crapware-on-windows-laptop-main-gui

Then decrap does silently all the complex operations and suggestions to make the HP, Dell, Asus, Toshiba manufacturer prebundled software to be stopped and uninstalled.
Decrap My Computer is a freeware, lightweight and easy to use and lets you safely remove crapware and bloatware, or any software, from any Windows PC.

Even for Old computers, Decrap comes handy for the unexperienced avarage user who used his laptop with this useless  default vendors programs silently killing the performance respectively user experience for years.

Using Decrap is quite intuitive PC is scanned for Bloatware and then after a backup Windows Restore Point is offered you're offered to review and Uninstall the unwanted softwares. There is also an automatic mode but those one still could be a bit dangerous, so use the automatic mode only on multiple machines with the same model  / brand notebooks that comes prebundled with same sofware after testing and confirming the automatic mode on 1 initial machine will not break up some needed functionality.

decrap-your-pc-clean-up-windows-from-hp-dell-toshiba-asus-bloatware-unuseful-programs

Here is few screenshots of the tool in action:
decrap-choose-what-default-laptop-manufacturer-software-you-want-to-clean-from-new-bought-pc

decrap-choose-what-default-laptop-manufacturer-software-you-want-to-clean-from-new-bought-pc-1

decrap-choose-what-default-laptop-manufacturer-software-you-want-to-clean-from-new-bought

Another good alternative (since decrap seems to be not maintained anymore) as I just leardned from Natasha Myles (thanks for pointing me about the broken link to decrap website) is SpeedUpPC more on speeding up old PC or laptop is her article 

Check the count and monitor of established / time_wait TCP, UDP connections on Linux and Windows with netstat command

Wednesday, February 6th, 2019

netstat-windows-linux-commands-to-better-understand-your-server-type-of-networrk-tcp-udp-connections

For me as a GNU / Linux sysadmin it is intuitive to check on a server the number of established connections / connections in time_wait state and so on .

I will not explain why this is necessery as every system administrator out there who had a performance or network issues due to server / applications connection overload or have been a target of Denial of Service (DoS)
or Distributed Denial of Service attacks (DDoS)  
is well aware that a number of connections in different states such as SYN_ACK /  TIME_WAIT or ESTABLISHED state could be very nasty thing and could cause a productive application or Infrastructure service to be downed for some time causing from thousands of Euros to even millions to some bussinesses as well as some amount of data loss …

To prevent this therefore sysadmins should always take a look periodically on the Connection states on the adminned server (and in this number I say not only sys admins but DevOps guys who are deploying micro-services for a customer in the Cloud – yes I believe Richard Stallman is right here they're clouding your minds :).

Even though cloud services could provide a very high amount of Hardware (CPU / Memory / Storage) resources, often for custom applications migrating the application in the Cloud does not solve it's design faults or even problems on a purely classical system administration level.


1. Get a statistic for FIN_WAIT1, FOREIGN, SYNC_RECV, LAST_ACK, TIME_WAIT, LISTEN and ESTABLISHED  Connections on GNU / Linux


On GNU / Linux and other Linux like UNIXes the way to do it is to grep out the TCP / UDP connection type you need via netstat a very useful cmd in that case is:


root@pcfreak:~# netstat -nat | awk '{print $6}' | sort | uniq -c | sort -n
      1 established)
      1 FIN_WAIT1
      1 Foreign
      1 SYN_RECV
      3 LAST_ACK
      4 FIN_WAIT2
      8 TIME_WAIT
     45 LISTEN
    147 ESTABLISHED


2. Netstat 1 liner to Get only established and time_wait connections state 


Other ways to check only TCP ESTABLISHED connections on Linux I use frequently are:


root@pcfreak:~# netstat -etna|grep -i establi|wc -l
145


netstat-connection-types-statistics-linux-established-time-wait-check-count

Or to get whole list of connections including the ones who are about to be esatablished in FIN_WAIT2, TIME_WAIT, SYN_RECV state:


root@pcfreak:~# netstat -tupen |wc -l
164


3. Other Linux useful one liner commands to track your connection types
 

netstat -n -p | grep SYN_REC | sort -u

List out the all IP addresses involved instead of just count.

netstat -n -p | grep SYN_REC | awk '{print $5}' | awk -F: '{print $1}'


List all the unique IP addresses of the node that are sending SYN_REC connection status.

netstat -ntu | awk '{print $5}' | cut -d: -f1 | sort | uniq -c | sort -n


Use netstat command to calculate and count the number of connections each IP address makes to the server.

netstat -anp |grep 'tcp\|udp' | awk '{print $5}' | cut -d: -f1 | sort | uniq -c | sort -n


List count of number of connections the IPs are connected to the server using TCP or UDP protocol.

netstat -ntu | grep ESTAB | awk '{print $5}' | cut -d: -f1 | sort | uniq -c | sort -nr


Check on ESTABLISHED connections instead of all connections, and displays the connections count for each IP.


netstat -plan|grep :80|awk {'print $5'}|cut -d: -f 1|sort|uniq -c|sort -nk 1


Show and list IP address and its connection count that connect to port 80 on the server. Port 80 is used mainly by HTTP web page request.

Examples are taken from this nice blog post


4. Check the count of esatblished connections on M$ Windows


As I'm forced to optimize a couple of Microsoft Windows DNS servers which are really slow to resolve the
The logical question for me was how the Established and TIME_WAIT state connections then could be checked on Windows OS, after a quick investigation online I've come up with this:


C:\Users\admin> netstat -nao | find /i "estab" /c
78


netstat-check-number-of-established-ports-connections-windows


C:\Users\admin> netsatt -nao | find /i "time_wait" /c
333


If you're used to Linux watch command, then to do same on Windows OS (e.g. check the output of netstat) command every second
and print output use:


netstat –an 1 | find “3334”


Below commands will show stats for services listening on TCP port 3334

To find out which process on system sends packets to remote destination:


netstat –ano 1 | find “Dest_IP_Addr”


The -o parameter outputs the process ID (PID) responsible for the connection.
then if you need further you can find the respective process name with tasklist< cmd.
Another handy Windows netstat option is -b which will show EXE file running as long as
the related used DLL Libraries which use TCP / UDP .

Other useful netsatat Win example is to grep for a port and show all established connections for it with:


netstat –an 1 | find “8080” | find “ESTABLISHED”


5. Closure


Hopefully this article will give you some idea on what is eating your bandwidth connections or overloading your GNU / Linux – Windows systems. And will point you to the next in line logical thing to do optimization / tuning
settings to be made on your system for example if Linux with sysctl – see my previous relater article here

I'll be intested to hear from sysadm colleagoes for other useful ways to track connections perhaps with something like ss tool (a utility to investigate sockets).
Also any optimization hints that would cause servers less downtime and improve network / performance thouroughput is mostly welcome.


Export / Import PuTTY Tunnels SSH Sessions from one to another Windows machine howto

Thursday, January 31st, 2019

Putty-copy-ssh-tunnels-howto-from-one-to-another-windows-machine-3

As I've started on job position – Linux Architect in last November 2018 in Itelligence AG as a contractor (External Service) – a great German company who hires the best IT specialists out there and offers a flexible time schedules for emploees doing various very cool IT advanced operations and Strategic advancement of SAP's Cloud used Technology and Services improvements for SAP SE – SAP S4HANA and HEC (HANA Enterprise Cloud) and been given for work hardware a shiny Lenovo Thinkpad 500 Laptop with Windows 10 OS (SAP pre-installed), I needed to make some SSH Tunnels to machines to (Hop Station / Jump hosts) for that purpose, after some experimenting with MobaXterm Free (Personal Edition 11.0) and the presumable limitations of tunnels of the free client as well as my laziness to add the multiple ssh tunnels to different ssh / rdp / vnc etc. servers, finally I decided to just copy all the tunnels from a colleague who runs Putty and again use the good old Putty – old school Winblows SSH Terminal Client but just for creating the SSH tunnels and for rest use MobaXterm, just like in old times while still employe in Hewlett Packard. For that reason to copy the Tunnels from my dear German Colleague Henry Beck (A good herated collegue who works in field of Storage dealing with NetApps / filer Clusters QNap etc.).

Till that moment I had no idea how copying a saved SSH Tunnels definition is possible, I did a quick research just to find out this is done not with Putty Interface itself but, insetead through dumping Windows Putty Stored Registry records into a File, then transfer to the PC where Tunnels needs to be imported and then again (either double click the registry file) to load it, into registry or use Windows registry editor command line interface reg, here is how:
 

1. Export


Run cmd.exe (note below command) 

requires elevated Run as Administrator prompt:

Only sessions:

regedit /e "%USERPROFILE%\Desktop\putty-sessions.reg" HKEY_CURRENT_USER\Software\SimonTatham\PuTTY\Sessions

All settings:

regedit /e "%USERPROFILE%\Desktop\putty.reg" HKEY_CURRENT_USER\Software\SimonTatham

Powershell:

If you have powershell installed on machine, to dump

Only sessions:


reg export HKCU\Software\SimonTatham\PuTTY\Sessions ([Environment]::GetFolderPath("Desktop") + "\putty-sessions.reg")

All settings:

reg export HKCU\Software\SimonTatham ([Environment]::GetFolderPath("Desktop") + "\putty.reg")


2. Import

Double-click on the 

*.reg

 file and accept the import.


Alternative ways:


cmd.exe

require elevated command prompt:

regedit /i putty-sessions.reg regedit /i putty.reg

PowerShell:

reg import putty-sessions.reg reg import putty.reg


Below are some things to consider:

Note !do not replace 

SimonTatham

 with your username.


Note !: It will create a 

reg

 file on the Desktop of the current user (for a different location modify path)


Note !: It will not export your related (old system stored) SSH keys.

What to expect next?

Putty-Tunnels-SSH-Sessions-screenshot-Windows

The result is in Putty you will have the Tunnel sessions loadable when you launch (Portable or installed) Putty version.
Press Load button over the required saved Tunnels list and there you go under


Connection SSH -> Tunnels 


you will see all the copied tunnels.

Enjoy!

Make laptop not to sleep on close on Microsoft Windows 10 / Disable notebook LID close sleep Windows

Thursday, November 8th, 2018

Windows10-Define-power-options-actions-settings

I have to use Windows 10 Enterprise on a notebook for Work purposes once again and use a Docking station connected to an external Display Monitor at the Company Office work location one of the first things to configure is to disable LID Display Sleep on laptop close because otherwise the notebook has to be left opened almost half opened in order to work with the PC to change that unwanted behavior there is an easy way via Windows Control Panel configuration, here is how:

Open

Windows Control Panel 


navigate to:

edit-plan-settings-power-settings-windows-10.png


Power Options


choose:

Change advanced power settings, scroll down a bit to:

power-options-power-buttons-and-lid-lid-close-action-do-nothing-windows-10-scresnshot


Power Buttons and lid (menu) 


press over it from sub-menu
 

Plugged in


Select


Do nothing


That's all from now on closing the notebook when plugged in to the Dock station or to a direct External Monitor will no longer do the sleep.

As you can see from the menus, there is a lot of triggering rules to configure further from Power Management (Advanced Settings) on how applications / USBs / Multimedia and Hard Disks should behave under different power conditions so if you have the time I recommend you go through them and check them for yourself.

Putty load as default session another session – Save other Putty session configuration to default howto

Thursday, November 29th, 2018

putty-load-button-screenshot

Recently I had to use PuTTY which I haven't used for years to open a number of SSH Pernanent Tunnels necessery for my daily work as a SAP Consultant.

I've saved them under a certain new profile and saved the set SSH Tunnel configuration not in the default Session but in separate named one, therefore had to press Load button every time after clicking over my Putty shortcut icon. 

That was annoying and took few seconds out of my life every next morning for about a week, so finally I found osme time to google it and it seemed it is pretty easy to have any Putty sessoin loaded you like.

Here is how:

1. Create a new Putty Shortcut

putty-screenshot1

putty-shortcut-screenshot-windows

Click over Putty icon while holding CTRL + SHIFT (Control SHIFT keys simultaneously ) and move the mouse somewhere on the desktop to create the shortcut.
 

2. Right click on Putty Shortcut

putty-target-screenshot-windows1

putty-target-screenshot-windows2


"C:\Program Files\PuTTY\putty.exe" -load "your_saved_session" "username@your_server_address" -pw "your_password"


fill out "target" field of shortcut using above code (alter to your own properties).
click Apply button.

If you need to pass a user and password from Shortcut itself (which is a bad practice for security but sometimes useful, for not so important Tunnels – for example a tunnel to an Open Proxy), do it by typing in the target field like so:
 

"C:\Program Files\PuTTY\putty.exe" -load "your_saved_session" "username@your_server_address" -pw "your_password"


And Hooray !!! After that when you click on PuTTy shortcut it loads your session automatically using given username and password.

Tux for Kids (Tux Math, Tux Paint, Tux Typing) 3 games to develop your children Intellect

Monday, September 27th, 2010

tuxforkids-linux-games-logo

Every now and then I have to install a new Windows computer that has to be good for children development.
When I do that I always strive to provide the notebook or desktop with something really worthy that will help up the children personal development.
In that thoughts direction I would have to share about Tux4Kids – High Quality Education Software Alternatives

This project is truly wonderful it includes a number of small games that generally develops thinking in children.

1. TuxMath is a project dedicate do develop children simple mathematic abilities.

2. TuxPaint is a project aimed to develop children painting abilities.

3. Tux Typing is a project that is dedicated to develop children's computer typing abilities.

Here are few shiny screenshot of the fun games for kids:

Tux Math of Command
Tux Math

Tux Typing
Tux Typing

Tux Paint
Tux Paint

The good things about the three games are that they're completely open source under the GPL license

This 3 are available for both Linux, Windows and Mac OS
The games are also quite fun even for adult, so I suggest if you yet haven't tried them check them out.

How to enable Gravis UltraSound in DOSBox for enhanced music experience in DOS programs and Games

Tuesday, October 31st, 2017

DOSBox

Gravis UltraSound Classic


Gravis UltraSound

Gravis UltraSound or GUS is a sound card for the IBM PC compatible systems.
It was lunched in 1992 and is notable for it's ability to use real-world sound recordings (wavetable) of a musical instruments rather than artificial computer-generated waveforms.
As one of my friends used to say back then: "it sounds like a CD".

To enable GUS in DOSBox all you need to do is:

1. Download the archive with the GUS files from https://alex.www.pc-freak.net/files/GUS/ULTRASND.zip. Extract the archive (there is already a directory in it so you don't have to create one) preferably where you keep your DOSBox stuff (like Games).

2. Find your DOSBox config file. Depending on the version or host OS, the dosbox conf file is located either inside the user profile folder or inside the same folder as dosbox.exe. In Windows 7 the config file is located at

"C:\Users\Fred\AppData\Local\VirtualStore\Program Files (x86)\dosbox.conf"

where "Fred" is your username.

In GNU/Linux it's in "/home/Fred/.dosbox/dosbox.conf" where "Fred" is your username.

The name of the conf file may also have dosbox version (for example –

"dosbox-0.74.conf").

Open it with a text editor like notepad (Windows) or equvalent for GNU/Linux (vi, Kate, gedit…). Locate "[gus]" section (without the quotes) and edit it so it looks like this:

[gus]
#      gus: Enable the Gravis Ultrasound emulation.
#  gusrate: Sample rate of Ultrasound emulation.
#           Possible values: 44100, 48000, 32000, 22050, 16000, 11025, 8000, 49716.
#  gusbase: The IO base address of the Gravis Ultrasound.
#           Possible values: 240, 220, 260, 280, 2a0, 2c0, 2e0, 300.
#   gusirq: The IRQ number of the Gravis Ultrasound.
#           Possible values: 5, 3, 7, 9, 10, 11, 12.
#   gusdma: The DMA channel of the Gravis Ultrasound.
#           Possible values: 3, 0, 1, 5, 6, 7.
# ultradir: Path to Ultrasound directory. In this directory
#           there should be a MIDI directory that contains
#           the patch files for GUS playback. Patch sets used
#           with Timidity should work fine.

gus=true
gusrate=44100
gusbase=240
gusirq=5
gusdma=3
ultradir=C:\ULTRASND

Then save the dosbox conf file.

3. Start DOSBox and mount "ULTRASND" directory to "C:".

You can do that with

mount c (directory to ULTRASND)

For example if you have extracted the archive in "C:\Games" it has created "C:\Games\ULTRASND" and the command you will have to write in DOSBox is

mount c c:\Games

(example: if your game is in "C:\Games\Heroes2" and your GUS directory is "C:\Games\ULTRSND" (if you have extracted the archive "C:\Games\") then you "mount c c:\Games" and you are set)

or for GNU/Linux if you have extracted the archive in "/home/Fred/Games" it has created "/home/Fred/Games/ULTRASND" and the command you will have to write in DOSBox is

mount c /home/Fred/Games (where "Fred" is your user name).

(example: if your game is in "/home/Fred/Games/Heroes2" and your GUS directory is "/home/Fred/Games/ULTRSND" (if you have extracted the archive" /home/Fred/Games/") in  then you "mount c /home/Fred/Games" and you are set)

You can make this automatic so you don't have to write it everytime by adding this command in the end (bottom) part of your dosbox conf file and save it.

You're practicly ready. All you need to do now is set Gravis UltraSound in your game or application setup (for example with the file "setup.exe") with IO: 240, IRQ 5 and DMA 3. If you prefer you previous sound card you can do that by selecting it again from the setup without disabling GUS from the dosbox conf file.

Happy listening!

Gravis Ultrasound


Article written by Alex