Posts Tagged ‘Search’
Sunday, September 25th, 2011 I’ve had two domain names which were pointing to the same website content.
As one can read in any SEO guide around this is a really bad practice as search engines things automatically there is a duplicate site content and this has automatically a negative effect on the site pagerank.
To deal with situation where multiple domains are pointing to the same websites its suggested by many SEO specialists that a 301 redirect is created from all the domain websites to a single website domain which will open the actual website.
Making the 301 direct domain from the sample domain my-redirect-domain.com to www.mydomain.com can be done with a virtualhost dfefinition in either httpd.conf or with the respective file containing the domain virtualhost definitions:
Here is the exact VirtualHost code I use to make a 301 redirect.
<VirtualHost *>
ServerAdmin support@mydomain.com ServerName my-redirected-domain.com
ServerAlias my-redirected-domain.com www.my-redirected-domain.com
RewriteEngine on RewriteRule ^/(.*) http://www.mydomain.com/$1 [L,R=301]
</VirtualHost>
After placing the VirtualHost redirect, an apache redirect is required.
Further on when a Gooogle or Yahoo Bot visits the website and does any request to my-redirect-domain.com or www.my-redirect-domain.com , they will be redirected with a 301 reuturned code to www.mydomain.com
This kind of redirect however can have a negative impact on the Apache CPU use (performance), especially if the my-redirect-domain.com is high traffic domain. This is because the redirect is done with mod_rewrite.
Therefore it might be better on high traffic domains to create the mod_rewrite redirect by using a vhost like:
<VirtualHost *>

ServerAdmin support@mydomain.com

ServerName my-redirected-domain.com

Redirect 301 / http://www.mydomain.com/

</VirtualHost>
The downside of using the Apache 301 redirect capabilities like in the above example is that any passed domain urls like let’s say http://www.my-redirected-domain.com/support/ would not be 301 redirected to http://www.mydomain.com/support/ but instead the redirect will be done straight to http://www.mydomain.com/
Tags: apache, capabilities, com, conf, CPU, definitions, domain names, domain websites, downside, Gooogle, guide, httpd, impact, kind, lt, mydomain, nbsp, negative impact, pagerank, rewrite, RewriteEngine, RewriteRule, Search, search engines, seo specialists, ServerName, traffic domain, traffic domains, use, vhost, Virtualhost, website content, website domain, www, Yahoo
Posted in SEO, System Administration, Various, Web and CMS | 2 Comments »
Monday, August 15th, 2011 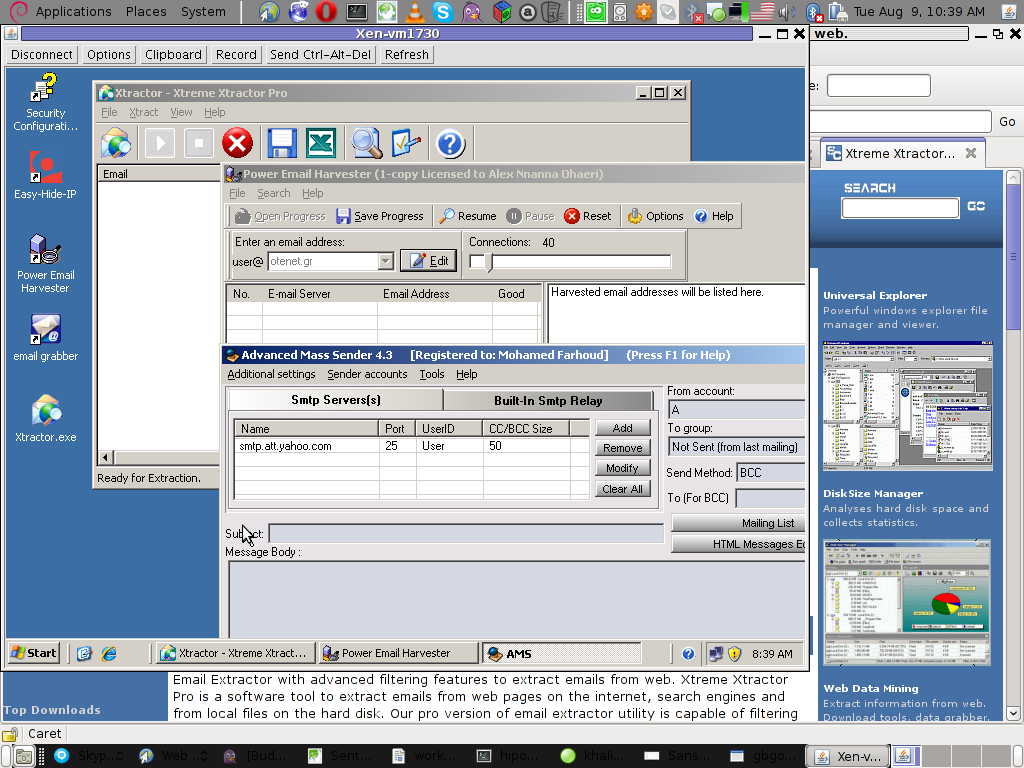
Few days ago, I’ve catch some Spammers on some of the servers running Windows inside Virtual Private Servers.
I was doubting if I want to write an article to mention about this 3 piece of software as it might be a bit boury however eventually I thought the goods of it will be better so I just took minutes and wrote it.
Back to the topic the three programs which the spammer was installed and prepare to do his spamming job on the VPS server was:
1. Xtractor Extreme
2. Power Email Harvester
3. Advanced Mass Sender
In order to hide his real IP address and prevent the IP he was spamming, he has also installed some anonyous proxy like Windows software called Hide My IP
The first program Xtractor is basicly an Email collector, the program crawls the net and searches to match email string on web pages.
It get target websites from major search engines.
You put an email like @gmail.com inside it and it starts spidering and grabs all email strings under the domain @gmail.com. Besides that Xtractor Extreme Pro is freeware and can be easily downloaded from many locations online.
Power Email Harvester‘s program name is also quite self-explanatory, what it does is it digs the net for email addresses and generates spam lists … This is the ultimate tool for a spammer, however the guys who create this piece of disruptive software has branded it as “a marketing tool” and even sold and advertised as a tool to help an e-marketing campaign.
This is of course just a word play and in fact in my viewe these program should be prohibited by international law.
Advanced Mass Sender is another piece of Spammer software which officially is tagged as marketing software and is sold and recommended as an useful tool for e-marketing.
I’ve take the time to take a quick and test the spammer installed AMS , honestly I’ve been amazed how far spamming has went during the last 5 years.
This AMS shit is capable of creating a target groups which could easily be spammed whether each group can contain up to 200000+ ! target emails
Advanced Mass Sender can even check if a certain email is present on the remote mail server and only then tries to deliver.
Besides that it even supports sending the spam mails via multiple mail servers (simultaneously) to increase the thoroughput as well as supports proxy servers…
I decided to write this few lines article to raise some awareness about this shitty sofware in a hope that somebody who is Administrating / Supporting client owned Windows servers or Virtual Private Servers will be able to read about this 3 ones and stop spammers before they succeed to create mail havoc with their ugly spam stuff.
Tags: AMS, awareness, com, course, email addresses, email collector, extreme power, freeware, Gmail, grabs, Harvester, IPThe, job, major search engines, marketing campaign, marketing software, marketing tool, piece, power, power email harvester, Search, software, spammer, Spammers, spidering, targe, target websites, three windows, time, tool, topic, Virtual, virtual private servers, VPS, windows programs, windows software, word play
Posted in Computer Security, Everyday Life, System Administration | 1 Comment »
Monday, May 9th, 2011 
I needed a handy way to recover some old data of an expired domain containing a website, with some really imprtant texts.
The domains has expired before one year and it was not renewed for the reason that it’s holder was not aware his website was gone. In the meantime somebody registered this domain as a way to generate ads profit from it the website was receiving about 500 to 1000 visitors per day.
Now I have the task to recover this website permanently lost from the internet data. I was not able to retrieve anything from the old domain name be contained via google cache, yahoo cache, bing etc.
It appears most of the search engines store a cached version of a crawled website for only 34 months. I’ve found also a search engine gigablast which was claimed to store crawled website data for 1 year, but unfortunately gigablast contained not any version of the website I was looking for.Luckily (thanks God) after a bit of head-banging there I found a website that helped me retrieve at least some parts from the old lost website.
The website which helped me is called WayBack Machine
The Wayback Machine , guys keeps website info snapshots of most of the domain names on the internet for a couple of years back, here is how wayback machine website describes its own provided services:
The Internet Archive's Wayback Machine puts the history of the World Wide Web at your fingertips.
Another handy feature wayback machine provides is checking out how certain websites looked like a couple of years before, let’s say you want to go back in the past and see how yahoo’s website looked like 2 years ago.
Just go to web.archive.org and type in yahoo and select a 2 years old website snapshot and enjoy 😉
It’s really funny how ridiculous many websites looked like just few years from now 😉
Tags: cache yahoo, cached version, couple, data, domain, domain name, domain names, expired domain, feature, fingertips, gigablast, google, handy feature, history of the world wide web, info, information data, internet archive, internet data, meantime, name, org, reason, Search, search engines, snapshot, snapshots, store, texts, type, version, visitors per day, way, wayback, wayback machine, web archive, World, world wide web, Yahoo, year
Posted in Various | 5 Comments »
Thursday, April 21st, 2011 As I’m manually configuring a Xserver via xorg.conf I have noticed a block of code in:
Section "Monitor"

Identified "Generic Monitor"

Option "DPMS"

EndSection
That triggered my curiousity to research further what is DPMS . A very quick google search revealed that DPMS’s purpose is to communicate to communicate between the monitor and the computer, to make the computer turn off the (CRT or LED) based monitor if the computer is not used
Thus in short to rephrase DPMS is a power saving handy Xorg feature. I many custom configured xorg.conf like the mine I’m building right now does not include DPMS as many people doesn’t have idea what DPMS is and how to enable it.
DPMS is also an interface to the Energy start power-saving capability if not all, most of the modern day monitor screens.
DPMS enables the Xserver to control automatically the computer screen and thus reduces the overall computer power consumption.
To enable the use of DPMS on my Linux, all I had to do is place a couple of configuration directives in my xorg.conf .:
Here is how I enabled DPMS in my Xorg server:
1. Edit with a text editor /etc/X11/xorg.conf
2. Find the Monitor Section , e.g.:
Section "Monitor"

....

EndSection
3. Add inside the Monitor Section
Options "DPMS" "true"
4. Lookup for the ServeryLayout section , e.g.:
Section "ServerLayout"

...

EndSection
5. Place inside the ServerLayout section For instance the following options:
Option "StandbyTime" "20"

Option "SuspendTime" "10"

Option "OffTime "25"
You might like to change the options StandbyTime, SuspendTIme or OffTime to match your likings.
6. As a last step restart the Xorg server.
Press Ctrl+Alt+BackSpace or by issuing:
host:~# pkill -HUP X
Test that DPMS is loaded properly by reviewing /var/log/Xorg.0.log for example:
host:~# grep -i /var/log/Xorg.0.log

(II) Loading extensions DPMS
Tags: Alt, backspace, capability, computer power consumption, computer screen, configuration directives, consumption, CRT, curiousity, custom, dpms, feature, google, instance, interface, likings, Linux, OffTime, option, place, power, Press, rephrase, screen, screens, Search, server press, StandbyTime, text, turn, Xorg, xserver, xtest
Posted in Linux, Linux and FreeBSD Desktop, Linux Audio & Video | No Comments »
Monday, April 4th, 2011 There are plenty of articles, on how to increase search engine ranking in wordpress and I’m sure this article might be not that interesting but still I thought it might be nice to mention about this 3 wordpress plugins Auto-Tags, SEO Slugs and Platinium SEO Pack which will help you increase your traffic.
Let me say a few words for each of the 3 plugins:
1. Auto-tags
Below is the description of the plugin directly taken from the plugin website http://wordpress.org/extend/plugins/auto-tag/
This plugin uses the Yahoo.com and tagthe.net APIs to find the most relevant keywords

from the content of your post, and then adds them as tags.

New for version 0.2: an options page allows to choose how many tags are

retrieved from each service The tag adding is fully automatic,

so if you're using a plugin like feedwordpress to display RSS feeds

on your blog as posts, everything will get done as the feed

posts are published. No user intervention necessary!
Here are the installation instructions for auto-tags:
debian:~# cd /var/www/blog/wp-content/plugins

debian:/var/www/wp-content/plugins:# wget https://www.pc-freak.net/files/auto-tag.0.4.6.zip

100%[================================>] 14,325 45.3K/s in 0.3s
2011-04-04 12:30:17 (45.3 KB/s) – `auto-tag.0.4.6.zip’ saved [14325/14325]
debian:/var/www/wp-content/plugins:# unzip auto-tag.0.4.6.zip
…
In the above example my wordpress installation is in /var/www/blog/ , if your wordpress is installed in another directory location change to the respective directory.
To activate the Plugin go to:
Plugins -> Auto Tags

Press over Activate to activate the plugin.
To configure the Auto-tags plugin navigate to:
Settings -> Auto tags plugin
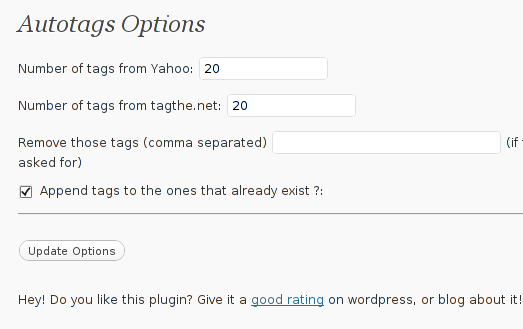
Therein you can configure the number of post tags to be retrieved from Yahoo, tagthe.net. The settings also allows you to disable certain tags you don’t want to appear in your post tags from the field, Remove those tags (comma separated)
The plugin also has an option called Append tags to the ones that already exist which on my wordpress 3.1 installation doesn’t work
After ending up your desired configuration simply press the Update Options button.
Now each time you type a new post in your wordpress blog, a tags related to the post will automatically be included.
Based on this tags Search engines will easily find content that relates to your blog tags and thus your page indexing will get better.
Tags: apis, Auto, auto tag, Auto-tags, change, com, comma, comman, configure, description, directory location, everything, feedwordpress, few words, freak, installation, location, location change, number, option, Pack, page, plugin, Search, search engine ranking, Slugs, tag, tagthe, traffic, wget, wordpress plugins, Yahoo
Posted in SEO, Web and CMS | 4 Comments »
Saturday, March 13th, 2010 Since some time I’m trying to setup Yahooo Search Field on my nanoblogger without success. I also have difficulties every now and then with escaping source code whenever I decide to drop it in my nanoblogger. Knowing that the official nanoblogger page has the yahoo search next to the google search enabled up and running and considering the fact I couldn’t find any tutorial or instructions online both on nanoblogger’s official webpage as well as to the rest of the searchable internet, I decided to mail Nanoblogger’s author to ask him if he could help me setting up this Yahoo Search Field Plugin as well as ask him what I can do to have a proper code escaping without breaking the blog. I explained that currently I tried a bunch of things without success etc. Below you’ll find my correspondence with Kevin Wood (Nanoblogger’s Author):
Date: Mon, 22 Feb 2010 17:09:58 +0200

From: "G. Georgiev" myemail@gmail.com

User-Agent: Mozilla-Thunderbird 2.0.0.22 (X11/20091109)

To: n1xt3r@fastmail.fm

Subject: 2 questions concerning nanoblogger

Hi man,

First Thanks for the wonderful soft.

I have two questions.

1. Where can I get yahoo.sh script which is

used on http://nanoblogger.sourceforge.net

2. Whenever I try to post codethat needs to be escaped let's say apache

directives an error occurs,

during generation of the blog and I cannot

seem to get the post online

How can I get through that?
Thanks in advance.
Kindest Regards
Georgi
Date: Sat, 27 Feb 2010 20:46:34 -0500

From: Kevin Wood kevinw@fastmail.fm

To: "G. Georgiev" myemail@gmail.com

Subject: Re: 2 questions concerning nanoblogger

User-Agent: Mutt/1.5.20 (2009-06-14)
Hi Georgi,
Attached is my yahoo.sh plugin. Just drop it in your plugins directory
and add $NB_Yahoo to your main_index.htm template. In order to work, it
expects that you have BLOG_FEED_URL set in blog.conf.
You should use the markdown.sh plugin to post escaped HTML code. When
editing your entry you can add markdown to the FORMAT field. Oh, the
markdown plugin requires that you have Markdown installed on your
system and you may have to tweak MARKDOWN_CMD and MARKDOWN_OPTS in your
blog.conf before it will work. Good luck!
>From http://daringfireball.net/projects/markdown/basics
Kevin
Now here is the yahoo.sh nanoblogger yahoo search plugin that Kevin sent me.
After putting it in my nanoblogger plugins directory and enabling BLOG_FEED_URL, now all works like a charm.
Tags: field, nanoblogger, plugin, Search, Yahoo
Posted in System Administration | No Comments »
Sunday, August 30th, 2009 Epiphany is the browser of choice I have. In that manner of thouhgs today I realized it’s really irritating that by default epiphany lacks. The Google Search Bar just like Firefox for example includes by default. I’ve googled to find a quick solution and stucked on the following explanation of how to do the trick.Hereby I quote it literally.
If you go into bookmarks, you will see a link that says “Search the Webâ€. Go into edit bookmarks. Right click on the “Search the Web†link, and choose the “show on toolbar†option. Exit out of bookmarks. Presto! You should now have a google search bar in the toolbar, just like in firefox.
The whole concept of adding bookmarks to Epiphany is called Smart Bookmarks . Smart Bookmarks allows you to do numerous valueable things like for example adding Google Image Search Toolbar as well as Yahoo Search Toolbar in Epiphany or any other nice handy toolbar shortcut.
Hope that this would help to somebody out there.END—–
Tags: epiphany, google, Search
Posted in Linux and FreeBSD Desktop | 2 Comments »


