
How to set-up Virtualbox shared folder to Copy files from PC Host and Guest Virtualized OS?
Running VirtualBox Host is an easy thing to set-up across all Operating Systems. Once you have it sooner or later you will need to copy files from the VM Host OS (that in my case is GNU / Linux) to the virtualized Guest operating system (again in my case that's again another Linux ISO running indide the Virtual Machine).
Below are steps to follow To use Virtualbox Shared Folder functionality to copy files between VBox and your Desktop / server Linux install.
1. Install Virtualbox Guest Additions CD Image ISO
I've explained how to add the Guest Additions CD image thoroughfully in my previous article Howto enable Copy / Paste Virtualbox betwen Linux guest and Host OS
Anyways I'll repeat myself below for sake of clarity:
To do so use Oracle VBox menus (on the booted virtualized OS VBox window):
Devices -> Insert Guest additions CD Image
Mount the ISO inside the Linux Virtual Machine:
root@debian:~# mount /media/cdrom1/
If the mount fails and there are no files inside the mount point it might be because the virtualbox-dkms and virtualbox-guest-dkms packages might be missing on the Host OS.
To install them (on Debian GNU / Linux) assuming that you're using virtualbox default distro packages /etc/apt/sources.list :
apt-get install –yes -qq virtualbox-dkms virtualbox-guest-dkms
and run:
root@debian:/media/cdrom1# cd /media/cdrom1; sh VBoxLinuxAdditions.run
…
2. Create directory for Shared Folder that will be used to access Host / OS files from the Guest Virtualized OS
root@debian:~# mkdir /mnt/shared_folder
3. Map from VBox program interface Shared folder settings and Mount /mnt/shared_folder location
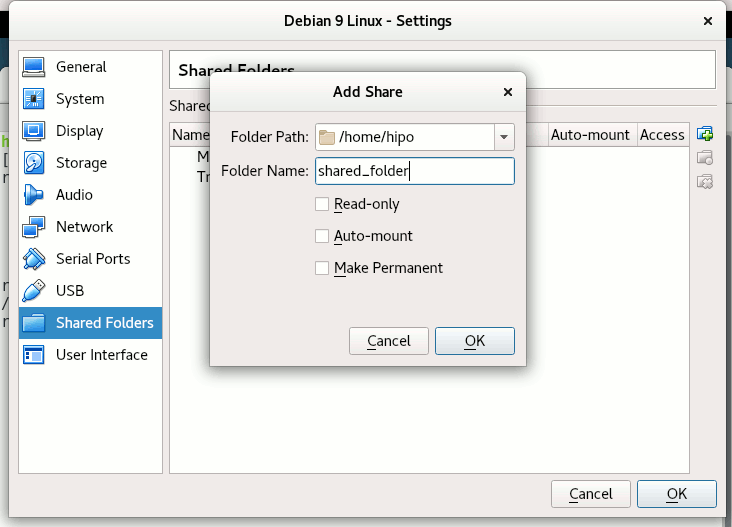
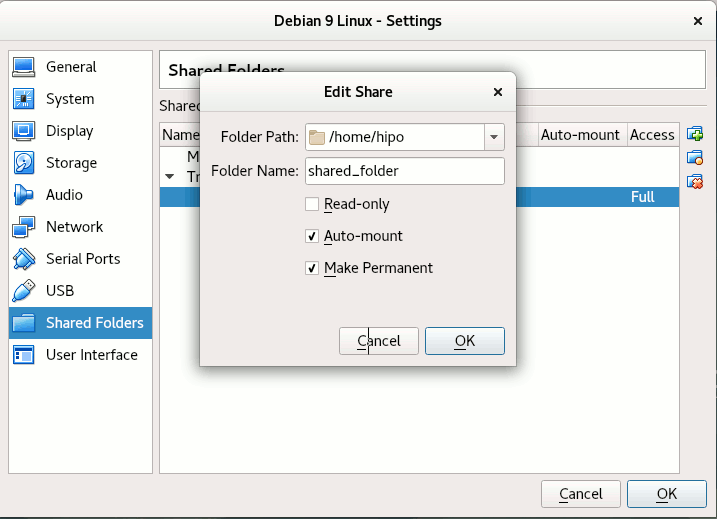
Devices -> Shared Folder -> Shared Folder settings -> Transient Folders (click blue folder add small button right)
From Transient Folders add whatever directory you want to be shared from your local notebook / PC to the VM.
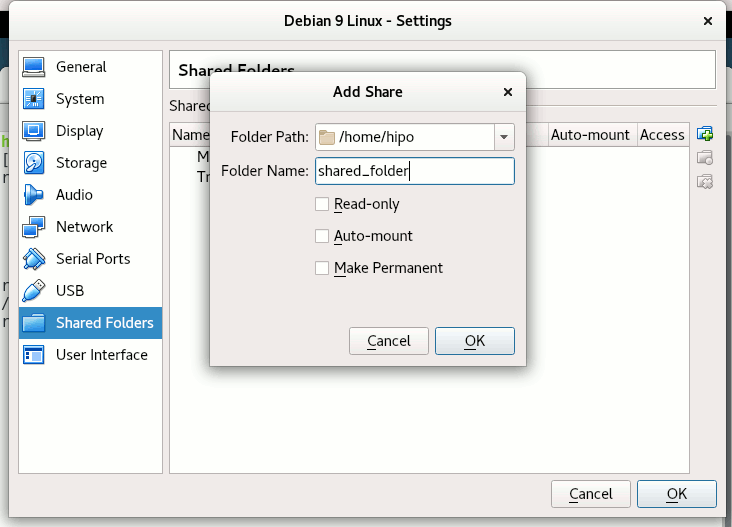 Depending on whether you would like to mount the shared folder only for reading files (choose Read Only) to make it a permanent shared folder (and not just for the one session of current running Virtual Machine until its killed use Make Permanent) or check Auto-Mount tick if you want the shared_folder mapping to be mounted on every VM boot.
Once the shared_folder directory location is set-up from GUI menu click OK and in order for the settings to take effect, you'll need to restart the VM Guest with Linux (use halt command from terminal) or Power Off the Machine via the VBox menus.
To mount use command like:
mount -t vboxsf name_of_folder_linked_from_vbox /mnt/name_folder_guest_os/
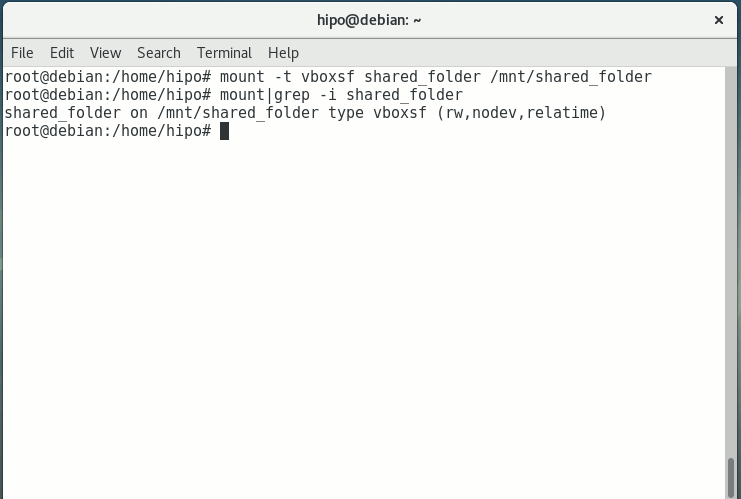
In my case I wanted to share home folder /home so the command I used is:
root@debian:~# mount -t vboxsf shared_folder /mnt/shared_folder
If everything is fine your Host OS file content from /home will be visible (for read and write if you Mapped it so)
under /mnt/shared_folder …
And as Turtles Ninja used to heavily say Cowabunga !!! 🙂
You have it mounted and ready for file share between Desktop -> Virtualized OS.
Bear in mind that above mount command has to run as root (superuser) to succeed.
You now could copy files from your Host OS (running the Virtual Machine) and the Guest OS (Virtualized OS) using /mnt/shared_folder mount point without problems.
The example is if you want to share files between VirtualBox installed Linux and the Guest (Desktop / server) OS, however at many cases mounting your Host OS directory for root users might be not very practical but, instead you might prefer to do the mount for specific non admin user, for example I prefer to do the shared folder mount with my pointed non-root username hipo.
Here is how to do above VM shared_folder mount for non-root user:
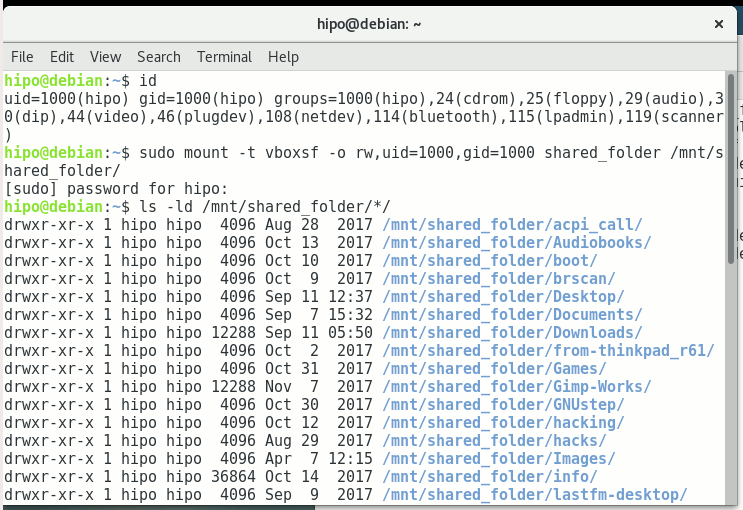
First you need to know the exact UID / GID (User ID / Group ID) of user, you can get that with id command:
hipo@linux:~$ id
uid=1000(hipo) gid=1000(hipo) groups=1000(hipo),24(cdrom),25(floppy),29(audio),30(dip),44(video),46(plugdev),108(netdev),114(bluetooth),115(lpadmin),119(scanner)
As you see UID / GID in my case are 1000 / 1000
hipo@linux:~$ sudo mount -t vboxsf -o rw,uid=1000,gid=1000 shared_folder /mnt/shared_folder
4. Mounting configured shared_folder to automatically mount into the Guest OS Linux on every boot
a) Configuring shared_folder auto-mount using /etc/rc.local
If you need the shared_folder to automatically mount next-time you boot the virtual machine quickest way is to add the mount command to /etc/rc.local (on Debian 8 and Debian 9 and newer Ubuntu Linuxes rc.local is missing by default to enable it to work like it worked before read follow my previous article ).
b) Configuring auto-mount for shared_folder through /etc/fstab
The more professional way to auto-mount on emulated OS VM boot time, you could add the vboxsf mount definitions to /etc/fstab with your favourite text-editor mcedit, nano, joe etc. … (for me that's vim).
Syntax of /etc/fstab is as follows:
<Device> <Mount Point> <Type> <Options> <Dump> <Pass>
root@linux:~# vim /etc/fstab
shared_folder /mnt/shared_folder vboxsf rw,uid=1000,gid=1000 0 0
Note that you will want to change 1000 / 1000, id / gid with the ones of the non-admin user you would like to add to mount it for.
A quick way to add it to /etc/fstab with a shell one-liner is with command
root@linux:~# echo 'shared_folder /mnt/shared_folder vboxsf rw,uid=1000,gid=1000 0 0' >> /etc/fstab
An alternative way to add a user to have permissions for vboxsf file system (without specifying the long -o uid=1000,gid=1000 options is to simply add the username in question to group vboxsf like so:
c) Adding non super user username to vboxsf group
root@linux:~# usermod -G vboxsf hipo
root@linux:~# grep -i vboxsf /etc/group
vboxsf:x:999:hipo
hipo@linux:~$ sudo mount -t vboxsf shared_folder /mnt/shared_folder
without the extra arguments and the options to pass to /etc/fstab (for eventual requirement to auto mount the shared_folder) would be more simple e.g.:
echo 'shared_folder /mnt/shared_folder vboxsf ' >> /etc/fstab
One note to make here is if the uesr is added to vboxsf the line for /etc/fstab to auto mount to mount for root user and non-root will be identical.
Then you can get the /etc/fstab auto-mount configured tested by running:
c) Checking auto-mount is working
hipo@linux:~# mount -a
hipo@linux:~# mount |grep -i vboxsf
shared_folder on /mnt/shared_folder type vboxsf (rw,nodev,relatime)
5. What if you end up with mounting failed errors ? – What might be causing the mounting failed Protocol error (a few things to check to solve)
In case of troubles with the mount you might get an error like:
hipo@linux:~# mount -t vboxsf share_folder /mnt/shared_folder
/sbin/mount.vboxsf: mounting failed with the error: Protocol error
This error might be caused because of Insert Guest Additions CD Image might be not properly enabled and installed using the ISO provided VBoxLinuxAdditions.sh shell script.
Other common reason you might get this error if you have mistyped the Folder name: given in Shared Folders -> Folder Path -> Add Share for example I have given shared_folder as a Map name but as you can see in above mount -t vboxsf, I've mistyped share_folder instead of the correct one shared_folder inserted.
In some VBox releases this error was caused by bugs in the Virtual Machine.
One useful tip is to be able to check whether a Virtualbox Virtual Machine has a configured shared_folder (if you're logging to manage the machine on remote server – nomatter whether you have logged in with VNC / Teamviewer / Citrix etc. or via SSH session.
To do so use VBoxControl as of time of writting usually located on most distributions under (/usr/bin/VBoxControl)
hipo@linux:~# VBoxControl sharedfolder list -automount
Oracle VM VirtualBox Guest Additions Command Line Management Interface Version 5.2.18
(C) 2008-2018 Oracle Corporation
All rights reserved.
Auto-mounted Shared Folder mappings (0):
No Shared Folders available.
You can use VBoxControl command to get set and list a number of settings on the VBox VM, here is an useful example with it where you get information about numerous VBox info values:
root@linux:~# VBoxControl guestproperty enumerate
Oracle VM VirtualBox Guest Additions Command Line Management Interface Version 5.2.18
(C) 2008-2018 Oracle Corporation
All rights reserved.
Name: /VirtualBox/GuestInfo/OS/Product, value: Linux, timestamp: 1536681633430852000, flags: <NULL>
Name: /VirtualBox/GuestInfo/Net/0/V4/IP, value: 10.0.2.15, timestamp: 1536681633438717000, flags: <NULL>
Name: /VirtualBox/HostInfo/GUI/LanguageID, value: en_US, timestamp: 1536697521395621000, flags: RDONLYGUEST
Name: /VirtualBox/GuestInfo/Net/0/MAC, value: 08002762FA1C, timestamp: 1536681633442120000, flags: <NULL>
Name: /VirtualBox/GuestInfo/OS/ServicePack, value: <NULL>, timestamp: 1536681633431259000, flags: <NULL>
Name: /VirtualBox/HostInfo/VBoxVerExt, value: 5.2.18, timestamp: 1536681619002646000, flags: TRANSIENT, RDONLYGUEST
Name: /VirtualBox/GuestInfo/Net/0/V4/Netmask, value: 255.255.255.0, timestamp: 1536681633440157000, flags: <NULL>
Name: /VirtualBox/GuestInfo/OS/Version, value: #1 SMP Debian 4.9.110-3+deb9u2 (2018-08-13), timestamp: 1536681633431125000, flags: <NULL>
Name: /VirtualBox/GuestAdd/VersionExt, value: 5.2.18, timestamp: 1536681633431582000, flags: <NULL>
Name: /VirtualBox/GuestAdd/Revision, value: 124319, timestamp: 1536681633432515000, flags: <NULL>
Name: /VirtualBox/HostGuest/SysprepExec, value: <NULL>, timestamp: 1536681619002355000, flags: TRANSIENT, RDONLYGUEST
Name: /VirtualBox/GuestInfo/OS/LoggedInUsers, value: 1, timestamp: 1536681673447293000, flags: TRANSIENT, TRANSRESET
Name: /VirtualBox/GuestInfo/Net/0/Status, value: Up, timestamp: 1536681633443911000, flags: <NULL>
Name: /VirtualBox/GuestInfo/Net/0/Name, value: enp0s3, timestamp: 1536681633445302000, flags: <NULL>
Name: /VirtualBox/HostGuest/SysprepArgs, value: <NULL>, timestamp: 1536681619002387000, flags: TRANSIENT, RDONLYGUEST
Name: /VirtualBox/GuestAdd/Version, value: 5.2.18, timestamp: 1536681633431419000, flags: <NULL>
Name: /VirtualBox/HostInfo/VBoxRev, value: 124319, timestamp: 1536681619002668000, flags: TRANSIENT, RDONLYGUEST
Name: /VirtualBox/GuestInfo/Net/0/V4/Broadcast, value: 10.0.2.255, timestamp: 1536681633439531000, flags: <NULL>
Name: /VirtualBox/HostInfo/VBoxVer, value: 5.2.18, timestamp: 1536681619002613000, flags: TRANSIENT, RDONLYGUEST
Name: /VirtualBox/GuestInfo/OS/LoggedInUsersList, value: hipo, timestamp: 1536681673446498000, flags: TRANSIENT, TRANSRESET
Name: /VirtualBox/GuestInfo/Net/Count, value: 1, timestamp: 1536698949773993000, flags: <NULL>
Name: /VirtualBox/GuestInfo/OS/Release, value: 4.9.0-7-amd64, timestamp: 1536681633431001000, flags: <NULL>
Name: /VirtualBox/GuestInfo/OS/NoLoggedInUsers, value: false, timestamp: 1536681673447965000, flags: TRANSIENT, TRANSRESET
Name: /VirtualBox/GuestAdd/HostVerLastChecked, value: 5.2.18, timestamp: 1536681702832389000, flags: <NULL>
Hope you enjoyed ! Have phun! 🙂


How rescue unbootable Windows PC, Windows files through files Network copy to remote server shared Folder using Hirens Boot CD
Saturday, November 12th, 2011I'm rescuing some files from one unbootable Windows XP using a livecd with Hirens Boot CD 13
In order to rescue the three NTFS Windows partitions files, I mounted them after booting a Mini Linux from Hirens Boot CD.
Mounting NTFS using Hirens BootCD went quite smoothly to mount the 3 partitions I used cmds:
# mount /dev/sda1 /mnt/sda1# mount /dev/sda2 /mnt/sda2
# mount /dev/sdb1 /mnt/sdb1
After the three NTFS file partitions are mounted I used smbclient to list all the available Network Shares on the remote Network Samba Shares Server which by the way possessed the NETBIOS name of SERVER 😉
# smbclient -L //SERVER/Enter root's password:
Domain=[SERVER] OS=[Windows 7 Ultimate 7600] Server=[Windows 7 Ultimate 6.1]
Sharename Type Comment
——— —- ——-
!!!MUSIC Disk
ADMIN$ Disk Remote Admin
C$ Disk Default share
Canon Inkjet S9000 (Copy 2) Printer Canon Inkjet S9000 (Copy 2)
D$ Disk Default share
Domain=[SERVER] OS=[Windows 7 Ultimate 7600] Server=[Windows 7 Ultimate 6.1]
Server Comment
——— ——-
Workgroup Master
——— ——-
Further on to mount the //SERVER/D network samba drive – (the location where I wanted to transfer the files from the above 3 mounted partitions):
# mkdir /mnt/D# mount //192.168.0.100/D /mnt/D
#
Where the IP 192.168.0.100 is actually the local network IP address of the //SERVER win smb machine.
Afterwards I used mc to copy all the files I needed to rescue from all the 3 above mentioned win partitions to the mounted //SERVER/D
Tags: admin, admin c, boot cd, bootcd, Canon, canon inkjet, cd 13, Comment, copy, default, default share, Disk, domain, domain server, drive, hirens boot cd, ip, livecd, local network, location, machine, Master, Mini, mini linux, mnt, mount dev, music disk, nbsp, netbios, netbios name, network ip address, network shares, NTFS, os windows, partitions, password, printer canon, Printer Canon Inkjet S9000 Copy, Remote, remote admin, remote server, rescue, root, samba shares, sda, sdb, Server Comment, server os, server windows, Sharename, unbootable, Windows, windows files, windows pc
Posted in Everyday Life, Linux, System Administration, Windows | 1 Comment »