Posts Tagged ‘piece of cake’

Adding another level of security to your shared Debian Linux webhosting server with SuPHP

Tuesday, April 7th, 2015

suphp_improve-apache-security-protect-against-virus-internal-server-infections-suphp-webserver-logo

There are plenty of security schemes and strategies you can implement if you're a Shared Web Hosting company sysadmin however probably the most vital one is to install on Apache + PHP Webserver SuPHP module.

# apt-cache show suphp-common|grep -i descrip -A 4

Description: Common files for mod suphp Suphp consists of an Apache module (mod_suphp for either Apache 1.3.x or Apache 2.x) and a setuid root binary (suphp) that is called by the Apache module to change the uid of the process executing the PHP interpreter to the owner of the php script.

So what SuPHP actuall  does is to run separate CPanel / Kloxo etc. Users with separate username and groupid permissions coinciding with the user present in /etc/passwd , /etc/shadow files existing users, thus in case if someone hacks some of the many customer sites he would be able to only write files and directories under the user with which the security breach occured.

On servers where SuPHP is not installed, all  systemusers are using the same UserID / GuID to run PHP executable scripts under separate domains Virtualhost which are coinciding with Apache (on Debian / Ubuntu  uid, gid – www-data) or on (CentOS / RHEL / Fedora etc. – user apache) so once one site is defaced  exploited by a worm all or most server websites might end up infected with a Web Virus / Worm which will be trying to exploit even more sites of a type running silently in the background.  This is very common scenarios as currently there are donezs of PHP / CSS / Javasripts / XSS vulnerability exploited on VPS and Shared hosting servers due to failure of a customer to update his own CMS  scripts / Website  (Joomla, Wordpress, Drupal etc.) and the lack of resource to regularly monitor all customer activities / websites.

Therefore installing SuPHP Apache module is essential one to install on new serverslarge hosting providers as it saves the admin a lot of headache from spreading malware across all hosted servers sites ..
Some VPS admins that are security freaks tend to also install SuPHP module together with many chrooted Apache / LiteSpeed / Nginx webservers each of which running in a separate Jailed environment.

Of course using SuPHP besides giving a improved security layer to the webserver has its downsides such as increased load for the server and making Apache PHP scripts being interpretted a little bit slower than with plain Apache + PHP but performance difference while running a site on top of SuPHP is often not so drastic so you can live it up ..

Installing SuPHP on a Debian / Ubuntu servers is a piece of cake, just run the as root superuser, usual:
 

# apt-get install libapache2-mod-suphp


Once installed only thing to make is to turn off default installed Apache PHP module (without SuPHP compiled support and restart Apache webserver):
 

# a2dismod php5 …

# /etc/init.d/apache2 restart


To test the SuPHP is properly working on the Apache Webserver go into some of many hosted server websites DocumentRoot

And create new file called test_suphp.php with below content:

# vim test_suphp.php
<?php
system('id');
?>

Then open in browser http://whatever-website/test_suphp.php assuming that system(); function is not disabled for security reasons in php.ini you should get an User ID, GroupID bigger than reserved system IDs on GNU / Linux e.g. ID > UID / GID 99

Its also a good idea to take a look into SuPHP configuration file /etc/suphp/suphp.conf and tailor options according to your liking 

If different hosted client users home directories are into /home directory, set in suphp.conf

;Path all scripts have to be in

docroot=/home/


Also usually it is a good idea to set 

umask=0022 

find text strings recursively in Linux and UNIX – find grep in sub-directories command examples

Tuesday, May 13th, 2014

unix_Linux_recursive_file_search_string_grep
GNU Grep
is equipped with a special option "-r" to grep recursively. Looking for string in a file in a sub-directories tree with the -r option is a piece of cake. You just do:

grep -r 'string' /directory/

or if you want to search recursively non-case sensitive for text

grep -ri 'string' .
 

Another classic GNU grep use (I use almost daily) is whether you want to match all files containing (case insensitive) string  among all files:

grep -rli 'string' directory-name
 

Now if you want to grep whether a string is contained in a file or group of files in directory recursively on some other UNIX like HP-UX or Sun OS / Solaris where there is no GNU grep installed by default here is how to it:

find /directory -exec grep 'searched string' {} dev/null ;

Note that this approach to look for files containing string on UNIX is very slowThus on not too archaic UNIX systems for some better search performance it is better to use xargs;

find . | xargs grep searched-string


A small note to open here is by using xargs there might be weird results when run on filesystems with filenames starting with "-".

Thus comes the classical (ultimate) way to grep for files containing string with find + grep, e.g.

find / -exec grep grepped-string {} dev/null ;

Another way to search a string recursively in files is by using UNIX OS '*' (star) expression:

grep pattern * */* */*/* 2>/dev/null

Talking about recursive directory text search in UNIX, should mention  another good GNU GREP alternative ACK – check it on betterthangrep.com 🙂 . Ack is perfect for programmers who have to dig through large directory trees of code for certain variables, functions, objects etc.


How to convert Adobe PDF file format to Microsoft Word DOC on MS Windows 2000 / XP / Vista / 7

Tuesday, July 24th, 2012

How to convert PDF to DOC on Microsoft Windows XP, MS Windows 7, Win Vista convert PDF to MS DOC 2003, ABBYY Covert Page
I had to convert Adobe PDF file to Microsoft Word ( .doc) file on Microsoft Windows OS for a friend. There is plenty of software available to convert PDF to DOC on Windows, as well as few web-site services claiming to convert correcly PDF to DOC. Converting PDF to DOC is easy and can be done with Open Office, however the reverse process is a real pain in the ass. I tried a dozen of free web serviecs to convert an ancient Latin writting PDF to DOC but none of them couldn’t properly convert it. Failing with the web services as a tool to convert, I’ve turned to seeking a tool that will do the trick. After trying few PDF to DOC converters which failed to produce a properly structed edittable DOC from the PDF file, I’ve come across ABBYY PDF Transformer 2.0. Abbyy PDF Transformer finally did it …

I’ve tried hard to look for a free software good PDF to DOC converter alternative for Windows but it seems as of time of writing this post there is no GPLed free software that does properly convert PDFs to MS WORD DOC ….

Using Abbyy PDF Transformer 2.0 is a piece of cake all I had to do is select the PDF file (pressing Open PDF) and then click on Convert (in right bottom corner). Below is a shot of Abby PDF transformer in action.

How to convert PDF to DOC on Microsoft Windows XP, MS Windows 7, Win Vista convert PDF to MS DOC 2003, abby pdf converter in action

How to convert Ogg Video (.ogv) to Flash video (.flv) on Linux and FreeBSD

Thursday, September 29th, 2011

ffmpeg is the de-facto standard for Video conversion on Linux and BSD platforms. I was more than happy to find out that ffmpeg is capable of converting an .ogv file format to .flv (Flash compressed Video).
Ogg Vorbis Video to Flash’s conversion on Linux is a real piece of cake with ffmpeg .
Here is how to convert .ogv to .flv:

debian:~# ffmpeg -i ogg_vorbis_video_to_convert_.ogv converted_ogg_vorbis_video_to_flash_video.flv
...

Conversion of a 14MB ogg vorbis video to flv took 28 seconds, the newly produced converted_ogg_vorbis_video_to_flash_video.flv has been reduced to a size of 9MB. This is on a system with 2 GB of memory and dual core 1.8 Ghz intel CPU.

Scanning shared hosting servers to catch abusers, unwanted files, phishers, spammers and script kiddies with clamav

Friday, August 12th, 2011

Clamav scanning shared hosting servers to catch abusers, phishers, spammers, script kiddies etc. logo

I’m responsible for some GNU/Linux servers which are shared hosting and therefore contain plenty of user accounts.
Every now and then our company servers gets suspended because of a Phishing websites, Spammers script kiddies and all the kind of abusers one can think of.

To mitigate the impact of the server existing unwanted users activities, I decided to use the Clamav Antivirus – open source virus scanner to look up for potentially dangerous files, stored Viruses, Spammer mailer scripts, kernel exploits etc.

The Hosting servers are running latest CentOS 5.5. Linux and fortunately CentOS is equipped with an RPM pre-packaged latest Clamav release which of the time of writting is ver. (0.97.2).

Installing Clamav on CentOS is a piece of cake and it comes to issuing:

[root@centos:/root]# yum -y install clamav
...

After the install is completed, I’ve used freshclam to update clamav virus definitions

[root@centos:/root]# freshclam
ClamAV update process started at Fri Aug 12 13:19:32 2011
main.cvd is up to date (version: 53, sigs: 846214, f-level: 53, builder: sven)
WARNING: getfile: daily-13357.cdiff not found on remote server (IP: 81.91.100.173)
WARNING: getpatch: Can't download daily-13357.cdiff from db.gb.clamav.net
WARNING: getfile: daily-13357.cdiff not found on remote server (IP: 163.1.3.8)
WARNING: getpatch: Can't download daily-13357.cdiff from db.gb.clamav.net
WARNING: getfile: daily-13357.cdiff not found on remote server (IP: 193.1.193.64)
WARNING: getpatch: Can't download daily-13357.cdiff from db.gb.clamav.net
WARNING: Incremental update failed, trying to download daily.cvd
Downloading daily.cvd [100%]
daily.cvd updated (version: 13431, sigs: 173670, f-level: 60, builder: arnaud)
Downloading bytecode.cvd [100%]
bytecode.cvd updated (version: 144, sigs: 41, f-level: 60, builder: edwin)
Database updated (1019925 signatures) from db.gb.clamav.net (IP: 217.135.32.99)

In my case the shared hosting hosted websites and FTP user files are stored in /home directory thus I further used clamscan in the following way to check report and log into file the scan results for our company hosted user content.

[root@centos:/root]# screen clamscan -r -i --heuristic-scan-precedence=yes --phishing-scan-urls=yes --phishing-cloak=yes --phishing-ssl=yes --scan-archive=no /home/ -l /var/log/clamscan.log
home/user1/mail/new/1313103706.H805502P12513.hosting,S=14295: Heuristics.Phishing.Email.SpoofedDomain FOUND/home/user1/mail/new/1313111001.H714629P29084.hosting,S=14260: Heuristics.Phishing.Email.SpoofedDomain FOUND/home/user1/mail/new/1305115464.H192447P14802.hosting,S=22663: Heuristics.Phishing.Email.SpoofedDomain FOUND/home/user1/mail/new/1311076363.H967421P17372.hosting,S=13114: Heuristics.Phishing.Email.SpoofedDomain FOUND/home/user1/mail/domain.com/infos/cur/859.hosting,S=8283:2,S: Heuristics.Phishing.Email.SSL-Spoof FOUND/home/user1/mail/domain.com/infos/cur/131.hosting,S=6935:2,S: Heuristics.Phishing.Email.SSL-Spoof FOUND

I prefer running the clamscan in a screen session, because it’s handier, if for example my ssh connection dies the screen session will preserve the clamscan cmd execution and I can attach later on to see how scan went.

clamscan of course is slower as it does not use Clamav antivirus daemon clamd , however I prefer running it without running the daemon, as having a permanently running clamd on the servers sometimes creates problems or hangs and it’s not really worthy to have it running since I’m intending to do a clamscan no more than once per month to see some potential users which might need to be suspended.

Also later on, after it finishes all possible problems are logged to /var/log/clamscan.log , so I can read the file report any time.

A good idea might also be to implement the above clamscan to be conducted, once per month via a cron job, though I’m still in doubt if it’s better to run it manually once per month to search for the malicious users content or it’s better to run it via cron schedule.

One possible pitfall with automating the above clamscan /home virus check up, might be the increased load it puts to the system. In some cases the Webserver and SQL server might be under a heavy load at the exactly same time the clamscan cron work is running, this might possible create severe issues for users websites, if it’s not monitored.
Thus I would probably go with running above clamscan manually each month and monitor the server performance.
However for people, who have “iron” system hardware and clamscan file scan is less likely to cause any issues, probably a cronjob would be fine. Here is sample cron job to run clamscan:

10 05 01 * * clamscan -r -i --heuristic-scan-precedence=yes --phishing-scan-urls=yes --phishing-cloak=yes --phishing-ssl=yes --scan-archive=no /home/ -l /var/log/clamscan.log >/dev/null 2>&1

I’m interested to hear if somebody already is using a clamscan to run on cron without issues, once I’m sure that running it on cron would not lead to server down-times, i’ll implement it via cron job.

Anyone having experience with running clamscan directory scan through crond? 🙂

How to auto restart CentOS Linux server with software watchdog (softdog) to reduce server downtime

Wednesday, August 10th, 2011

How to auto restart centos with software watchdog daemon to mitigate server downtimes, watchdog linux artistic logo

I’m in charge of dozen of Linux servers these days and therefore am required to restart many of the servers with a support ticket (because many of the Data Centers where the servers are co-located does not have a web interface or IPKVM connected to the server for that purpose). Therefore the server restart requests in case of crash sometimes gets processed in few hours or in best case in at least half an hour.

I’m aware of the existence of Hardware Watchdog devices, which are capable to detect if a server is hanged and auto-restart it, however the servers I administrate does not have Hardware support for Watchdog timer.

Thanksfully there is a free software project called Watchdog which is easily configured and mitigates the terrible downtimes caused every now and then by a server crash and respective delays by tech support in Data Centers.

I’ve recently blogged on the topic of Debian Linux auto-restart in case of kernel panic , however now i had to conifgure watchdog on some dozen of CentOS Linux servers.

It appeared installation & configuration of Watchdog on CentOS is a piece of cake and comes to simply following few easy steps, which I’ll explain quickly in this post:

1. Install with yum watchdog to CentOS

[root@centos:/etc/init.d ]# yum install watchdog
...

2. Add to configuration a log file to log watchdog activities and location of the watchdog device

The quickest way to add this two is to use echo to append it in /etc/watchdog.conf:

[root@centos:/etc/init.d ]# echo 'file = /var/log/messages' >> /etc/watchdog.conf
echo 'watchdog-device = /dev/watchdog' >> /etc/watchdog.conf

3. Load the softdog kernel module to initialize the software watchdog via /dev/watchdog

[root@centos:/etc/init.d ]# /sbin/modprobe softdog

Initialization of softdog should be indicated by a line in dmesg kernel log like the one above:

[root@centos:/etc/init.d ]# dmesg |grep -i watchdog
Software Watchdog Timer: 0.07 initialized. soft_noboot=0 soft_margin=60 sec (nowayout= 0)

4. Include the softdog kernel module to load on CentOS boot up

This is necessery, because otherwise after reboot the softdog would not be auto initialized and without it being initialized, the watchdog daemon service could not function as it does automatically auto reboots the server if the /dev/watchdog disappears.

It’s better that the softdog module is not loaded via /etc/rc.local but the default CentOS methodology to load module from /etc/rc.module is used:

[root@centos:/etc/init.d ]# echo modprobe softdog >> /etc/rc.modules
[root@centos:/etc/init.d ]# chmod +x /etc/rc.modules

5. Start the watchdog daemon service

The succesful intialization of softdog in step 4, should have provided the system with /dev/watchdog, before proceeding with starting up the watchdog daemon it’s wise to first check if /dev/watchdog is existent on the system. Here is how:

[root@centos:/etc/init.d ]# ls -al /dev/watchdogcrw------- 1 root root 10, 130 Aug 10 14:03 /dev/watchdog

Being sure, that /dev/watchdog is there, I’ll start the watchdog service.

[root@centos:/etc/init.d ]# service watchdog restart
...

Very important note to make here is that you should never ever configure watchdog service to run on boot time with chkconfig. In other words the status from chkconfig for watchdog boot on all levels should be off like so:

[root@centos:/etc/init.d ]# chkconfig --list |grep -i watchdog
watchdog 0:off 1:off 2:off 3:off 4:off 5:off 6:off

Enabling the watchdog from the chkconfig will cause watchdog to automatically restart the system as it will probably start the watchdog daemon before the softdog module is initialized. As watchdog will be unable to read the /dev/watchdog it will though the system has hanged even though the system might be in a boot process. Therefore it will end up in an endless loops of reboots which can only be fixed in a linux single user mode!!! Once again BEWARE, never ever activate watchdog via chkconfig!

Next step to be absolutely sure that watchdog device is running it can be checked with normal ps command:

[root@centos:/etc/init.d ]# ps aux|grep -i watchdog
root@hosting1-fr [~]# ps axu|grep -i watch|grep -v greproot 18692 0.0 0.0 1816 1812 ? SNLs 14:03 0:00 /usr/sbin/watchdog
root 25225 0.0 0.0 0 0 ? ZN 17:25 0:00 [watchdog] <defunct>

You have probably noticed the defunct state of watchdog, consider that as absolutely normal, above output indicates that now watchdog is properly running on the host and waiting to auto reboot in case of sudden /dev/watchdog disappearance.

As a last step before, after being sure its initialized properly, it’s necessery to add watchdog to run on boot time via /etc/rc.local post init script, like so:

[root@centos:/etc/init.d ]# echo 'echo /sbin/service watchdog start' >> /etc/rc.local

Now enjoy, watchdog is up and running and will automatically restart the CentOS host 😉

How to delete entries from routing table on Linux

Thursday, July 7th, 2011

Every now and then I had to tamper routing tables in Linux and every time I had to do it I forgot how I did it last time so finally I decided to put it on my blog and find how I can delete from Linux routing table easier

Deleting a record from a wrong routing table on Linux is a piece of cake basicly, here is an example:

linux:~# route -n
Kernel IP routing table
Destination Gateway Genmask Flags Metric Ref Use Iface
192.168.0.1 0.0.0.0 255.255.255.0 U 0 0 0 eth0
169.254.0.0 0.0.0.0 255.255.0.0 U 0 0 0 eth0
0.0.0.0 192.168.0.1 0.0.0.0 UG 0 0 0 eth0

Let’s say this is the routing table and it’s incorrect as the routing through the node 169.254.0.0 should not be there.
Here is how the routing through 169.254.0.0 can be deleted:

linux:~# /sbin/route del -net 169.254.0.0 netmask 255.255.0.0

Now here is the difference after deletion:

linux:~# route -n
Kernel IP routing table
Destination Gateway Genmask Flags Metric Ref Use Iface
192.168.0.1 0.0.0.0 255.255.255.0 U 0 0 0 eth0
0.0.0.0 192.168.0.1 0.0.0.0 UG 0 0 0 eth0

If you want to delete the default gateway just use 0.0.0.0, e.g. -net 0.0.0.0 .. in above cmd example.
This would delete default gateway record from routing table which by the way in routing tables is marked with the UG flag.
Cheers 😉

12 must have Joomla extension plugins / Essential modules for new Joomla CMS install

Thursday, June 16th, 2011

Joomla bundle of must have extensions picture

These days very often I have to install, plain new Joomla based websites. I’ve realized that since there is no structured guide to follow describing the most essential plugins that every new fresh new joomla installation is required to have.
Thus I took the time and wrote this post, as it will be useful to myself in my future new joomla based websites establishment, I also believe these guide will be useful to other Joomla enthusiasts or administrators in their daily work.

Below I will describe in short the installation, configuration and oddities I’ve faced during installment of the above described bundle of plugins on a plan Joomla 1.5 install.These article will walk through 12 joomla essential plugins that I believe every fresh Joomla installation should be equipped with.
Hope this guide will be helpful to you. Now let’s start it up:

1. JoomlaXplorer – A sophisticated web file explorer for Joomla

One of the basic modules, beneficial with a new joomla CMS install is Joomla Xptplorer . This module enables the joomla admin to browse files in a web file explorer, on the server where the joomla CMS is installed. Below you see how handy the joomla web explorer provided by the plugin is:
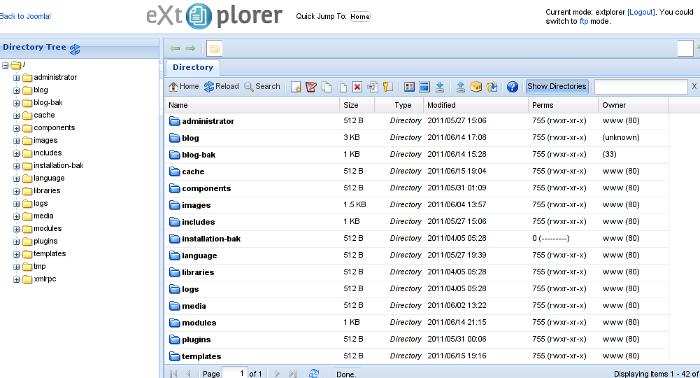
Joomla file explorer extplorer module

Installing and using the plugin is a piece of cake. To install the plugin:

a. download Joomla file Xplorer from here or from the official plugin website.

b. Install the plugin through the admin joomla menu:

Extensions -> Install/Uninstall

c. Start using the newly installed plugin by following to menus:

Components -> eXtplorer

2. JCrawler Generate easily sitemap.xml to aim the overall Joomla website SEO optimization

JCrawler logo plugin joomla

I have previously written a very through tutorial on how to install configure and generate website sitemap with Jcrawler module, You can read my article titled: How to build website sitemap.xml in Joomla here

3. sh404SEF – Make your Joomla links and content more user friendly

sh404sef Joomla Search Engine Optimization plugin

sh404SEF is a great Joomla plugin, which will seriously improve SEO and could contribute well for a website to be better indexed with major search engines.

I have previously written an article describing thoroughfully the install and use procedures for the module.
You can read the article Making your Joomla URLS Google friendly with sh404sef plugin / Simple Joomla link SEO here

4. Akeeba Backup Joomla solution

Akeeba backup Joomla Module

Installing a joomla backup solution is very essential if you does take care about your data, it often happens that server hard disk got crashes or a RAID massives got corrupted or some kind of other unexpected disaster hits the server. In these terrible times, having a website backup will save you nerves and data recovery funds, not to mention that in many cases data recovery is impossible.

Joomla has a very easy to use software for creating full website backup called Akeeba Backup

To start using the software one must:

a. Download Akeeba Backup and install it via:

Extensions -> Install/Uninstall

After the Akeeba Backup installation is over, to create your first backup, one needs to navigate to:

Components -> Akeeba Backup -> Backup Now

Each Akeeba backup (a version of the website’s files data and sql info) will be created in an archive file with the extension .jpa
The backup files are created under joomla’s website (main) root directory in directory location administrator/components/com_akeeba/backup

The Akeeba plugin also has capabilities to recover a (.jpa) backup restore point easily.
To recover a backup with the Akeeba plugin one needs to do it once again, via the plugin joomla web interface.
5. Google Analytics (place easy tracking code) in Joomla

Google Analytics Tracking Module for Joomla

a. Download the Google Analytics Tracking Module
The module is available from Joomla Extensions on joomla.org

At the current time of writting you need to download the analytics_tracking15,zip file

b. Install the Google Analytics Tracking Module;
Login as joomla admin and navigate to;

Extensions -> Install

Place the analytics_tracking15.zip url to the Install URL: field.
Again as of time of writting you need to place https://www.pc-freak.net/files/analytics_tracking15.zip;

c. Open the Module Manager

Extensions -> Module Manager

d. Click over Google Analytics Tracking Module
On the right pane you will notice in the Module Parameters the Analytics_uacct_code field. In the uacct_code field you need to paste your UA obtained from your created google-analytics account.
This code is usually something like UA-2101595-10
Now place your code their and press the save green button located near the right top of the screen. You should see the text in blue Item Saved which would indicate your UA code is stored already in the Google Analytics Tracking Module, now press the Cancel button located again on the right top.
As a last step before the Google analytics is set-up on the Joomla you need to enable the plugin to do you need to press over the tick left sided from the text reading Google Analytics Tracking Module in the Module Manager
e. Click over the Enabled button in Module Manager;
Google Analytics Tracking Module -> Enabled

6. Itprism (Facebook, Twitter etc.) Social Network share buttons Joomla plugin

ITPShare Large Social Buttons Joomla

a. to add the itpsocialbuttons to joomla Download the Itpsocialbuttons latest module files from http://itprism.com/free-joomla-extensions/social-buttons-plugin or use my mirrored module files below:

Download mod_itpsocialbuttons .zip file
Download plg_itpsocialbuttons .zip

After having the two files necessery to be installed to make the ITPSocialButtons appear on website, installation is done like with any other installation:

Extensions -> Install/Uninstall -> Upload Package File (Choose File)

Next its necessery to configure the plugin to do so, follow to menus:

Extensions -> Module Manager -> Share

You will notice the Share dialog in the list of Module Name column in Module Manager

Here is a screenshot on how the settings options for ITpsocialbuttons will look like:
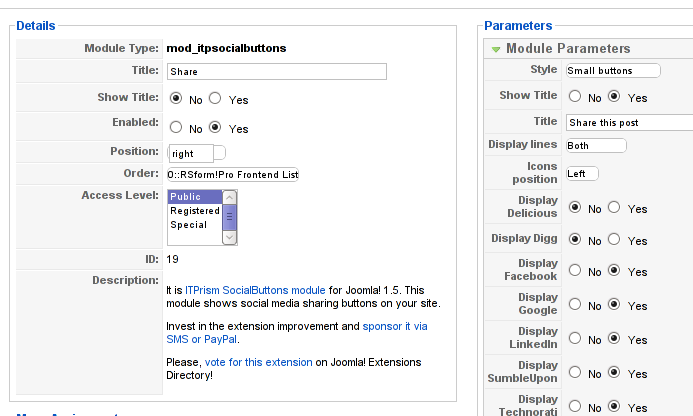
Mod ITpSocialButtons settings screen

The options which I personally changed was:

Show Title – I set this one to No as I wanted to omit the plugin title text to appear on my website.
Further on I’ve set the Enabled option to Yes to enable the plugin and choose the buttons Style option to be of a Small buttons type.
I’ve also found that the most suitable position for the Social Share buttons were to be of a right – Position .

Here is how the social network itprism share buttons looks like:

ITprism Joomla Social Share Plugin various button types

The plugin supports sharing of joomla pages to the following list of social networks:
 

  • Delicios.com
  • Digg.com
  • Facebook
  • Google Bookmarks
  • StumbleUpon
  • Technorati
  • Twitter
  • LinkedIn

The module configuration, also allows the user to configure the type of social network buttons, one wants to display on the website.

7. Joomla JCE Content Editor

This content editor is really awesome compared to the default editor TinyMCE. If you want to have an options rich content editor for Joomla, then this is the one for you 🙂
download JCE Content Editor here

After installing the JCE Joomla content editor in order to enable it as a default editor you need to go to the following location:

Site -> Global Configuration -> Default WYSIWYG Editor

There place on Editor TinyMCE and change it with Editor – JCE

Now go to edit some article, and you will see the difference in the editor 🙂

8. Add gallery Joomla capabilities with sigplus (Image Gallery Plus) and Very Simple Image Gallery

Image Gallery Plus sigplus Joomla Screenshot

Image Gallery Plus plugin (sigplus) gallery review screenshot

sigplus Image Gallery Plus is a straightforward way to add image or photo galleries to a Joomla article with a simple syntax. It takes a matter of minutes to set up a gallery but those who are looking for a powerful gallery solution will not be disappointed either: sigplus is suitable for both beginner and advanced users.

Download Sigplus Joomla Image Gallery plugin here
Using sigllus is quite easy all one has to do is use Joomla Media Manager from links:

Site -> Media Manager

Create new folder in the stories folder, let’s say New Pictures and further on use Media Manager to upload all desired pictures to be later displayed.

Being done with uploading the images you want to display, go to Article Manager :

Content -> Article Manager

From there choose your article where new uploaded pictures you want to display and type in the article:

{gallery}New Pictures{/gallery}.

Note that New Pictures is the directory just recently created as stated below, it’s important that there is no spacing between {gallery}and New Pictures, if one tries {gallery} New Pictures {/gallery} instead of {gallery}New Pictures{/gallery} an error will occur instead of the pictures being displayed in a scrolled gallery.

Sigplus Image Gallery has also a number of configuration options, which might make it look a bit more decent.
I have to say in my view the default way sigplus displays pictures is awful!

Another alternative if you don’t like Sigplus ‘s way of creating new galleries is to use Very Simple Image Gallery

Very Simple Image Gallery joomla screenshot

Here is a screenshot on a sample gallery created with Very Simple Image Gallery Joomla Plugin

You can download Very simple image gallery here

After installing the plugin. It’s use is analogous to the Sigplus . To use it likewise sigplus create new directory through Media Manager and in stories and upload your files in let’s say New Pictures1 . Later on in your article place, the code

{vsig}New Pictures1{/vsig}

Gallery will be generated automatically by the plugin. I think Simple Image Gallery is a bit more advanced and gives a better outlook to Galleries, though it’s configuration settings are much less than with SigPlus image gallery.

To add pictures comments e.g. img link alt=” and title=” tib you need to place a code within the Article manager similar to:

{vsig_c}0|Picture_1.JPG|Some sample text|Some other text{/vsig_c}
{vsig_c}0|Picture_2.JPG|Some example text|Some text{/vsig_c}
etc. ..

Note that the 0 in above example specifies the gallery number if you for instance are using a couple of galleries with Simple Image Gallery , the first one you used would be call 0 . The text specified as comments to the picture will also appear after you preview the gallery right below the picture when clicked on as a picture description in a really nice way.
9. Install Google maps plugin for Joomla
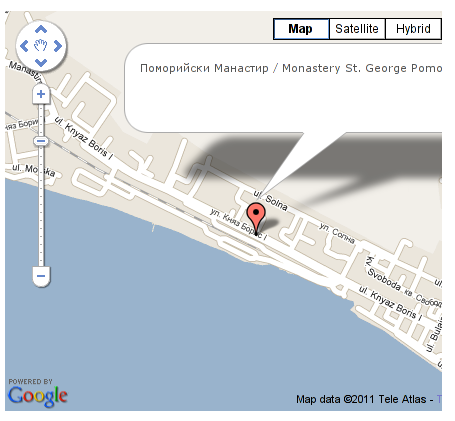
Google Maps plugin for Joomla screenshot

It’s a wise idea that every website has a location map on it’s website, for that reason Google maps is just great.
To install Google maps capability to joomla one can use a plugin called Google Maps .

You can straighly download Joomla’s Googlemap plugin from here

Afterwards use Extension Manager to install the plugin e.g. follow:

Extensions -&gr; Install/Uninstall (Choose File)

and click on Upload File & Install button.

To further enable and configure the Joomla Googlemap plugin you will have to go to the location:

Extensions -> Plugin Manager

Therein you will have to find and enable the Google Maps plugin which is to be found in the column named Plugin Manager
On my Joomla installation the plugin was located in the second page with modules, so if you don’t find the module on the listing with modules on the first page, make sure you scroll to the bottom of the page and click on Next button.

Therein in the list you will most likely notice Google Maps use the Enable button to enable it.

Next step is to configure the plugin, to do so press on the plugin name Google Maps
All configuration necessery here is to place Googlemaps API Key in the respective field (you will see it among config options).

Issuing a new Google Maps api key takes just few seconds, if you already have a gmail account just go to http://code.google.com/apis/maps/signup.html and take few seconds to issue the key.

You will get the key right on your gmail account after being issued (to repeat myself issuing takes few seconds so no worrier here).

One moreOnce having the key place it in the Googlemaps API Key field and configuring Address (which is one of the list of many options the plugin provides) you will be done with configuration.

To display a google map the location you just configured go to the Article Manager , select the article where you want the google maps location picture of your address to appear and type in the Article:

{mosmap|text='Exact street address location'|zoom='15'|zoomType='Large'|zoomNew='0'}

After you save the article a very nice Google map showing you the location’s streets will appear.
You can further conifgure a number of things related to the google map to appear, one thing you might want to play with is the zoom option which as you see in below’s code is equal to 15, e.g. zoom=’15’
Set it to another one if you want to regulate your googlemaps zoom level. For more thoroughful options take a look at the extensive plugin documentation.

10. Joomla Xmap (generating static HTML sitemap) Download Xmap from here , install it the usual plugin way.

Right after installation on the plugin succesful install screen you will notice the link component menu .
Clicking on the component menu you will be leaded to a page showing you few links Sitemap’s URL :
 

  • XML Sitemap:
  • HTML Sitemap:
  • News Sitemap:
  • Images Sitemap:

11. Add Joomla donate Paypal capabilities with Joomla PAYPAL DONATION MODULE

Paypal Donation Module Joomla Screenshot

Just recently I’ve written a a post on how to add a paypal donation capabilities to joomla, you can read my previous post here

12. Install Joomla RSForms Module (Advanced Joomla Forms Support)
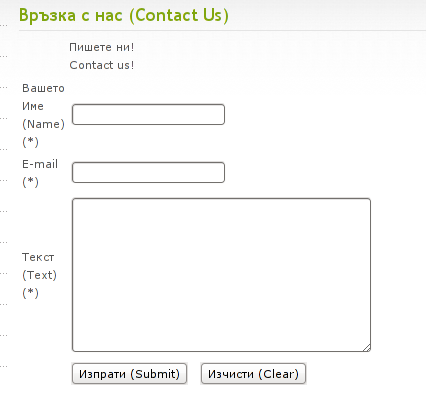
Simple Joomla RsForm contact form

If you’re planning to add a complicated form support for Joomla, there are plenty of plugins, however one that was suggested by a friend of mine which is deep in Joomla world and moreover works good on my joomla installations is RSForms

Joomla – RSForms! is free to download and has great and easy interface to create new joomla forms.

At the time of writting I use these three RSForms components on new Joomla installations:

RSform Pro 1.1.0 com
Mod RsForm for Joomla 1.5
Mod Rsform list for Joomla

For latest release of RSForms! use the link http://www.rsjoomla.com/joomla-components/rsform.html

Installation is like any other module and is done through Extensions -> Install/Uninstall menu.

After installation, setting up a new form is available from the Joomla Menus:

Components -> RSform!Pro -> Manage Forms

I would not enter in details on how to edit the default RSForms or create a new RSForm. Just take some time and learn it by trying 😉

After the rsform is ready, to enable the new form, navigate to Joomla menus:

Menus -> Main Menu

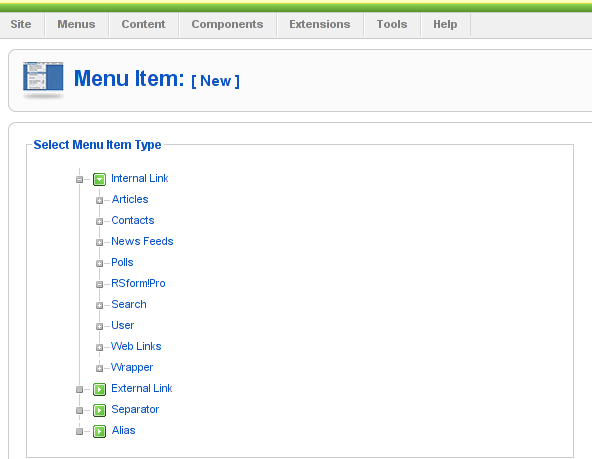
Press the New button located in the buttons bar nearby the page header in the list of options in Select Menu item Type you will notice the RSForm!Pro as an option, press on it to establish the new form in the menus.

A follow up window will appear where one can set a Title: and Alias: for the new form as well as few other options.
After finalizing the settings press on Apply button to save the settings and the new form should appear in Joomla.

Probably there are many more handy plugins, which I’m missing here thus I’ll be glad if readers suggest some more helpful essential (must have plugins) for Joomla.
Feedback on this tutorial is very welcome!
Looking forward to hear for your opinions if my article was helpful to you 😉

How to fix clamd “ERROR: LOCAL: Socket file /tmp/clamd.socket is in use by another process.”

Monday, May 23rd, 2011

One of the Qmail server installations I’m taking care of’s clamd antivirus process started loading the system heavily.
After a bit of log reading and investigation I’ve found the following error in my /var/log/clamd/current

@400000004dda1e1815cf03f4 ERROR: LOCAL: Socket file /tmp/clamd.socket is in use by another process.

I’ve noticed in my process list that actually I do have two processes clamd :

11608 ? Sl 0:05 /usr/local/sbin/clamd
11632 ? S 0:00 /usr/bin/multilog t /var/log/clamd
16013 ? Sl 0:06 /usr/local/sbin/clamd

It appeared that for some weird reason one of the clamd process was failing to connect constantly to the clam server socket /tmp/clamd.socket and each time it tried to connect and failed to connect to the socket the system gets about 5% of extra load …

Resolving the issues was a piece of cake, all I had to do is stop the clamd server delete the /tmp/clamd.socket and relaunch the clamd server.

Here is exactly the commands I issued:

debian:~# cd /service/
debian:/service# svc -a clamd
debian:/service# svc -h clamd
debian:/service# svc -d clamd
debian:/service# rm -f /tmp/clamd.socket
debian:/service# svc -u clamd

Afterwards the clamd extra load went out and in /var/log/clamd/current I can see clamd loads fine without errors, e.g.:

Listening daemon: PID: 16013
MaxQueue set to: 150
No stats for Database check - forcing reload
Reading databases from /usr/local/share/clamav
Database correctly reloaded (966822 signatures)
SelfCheck: Database status OK.
...