Posts Tagged ‘linux?’

Linux Send Monitoring Alert Emails without Mail Server via relay SMTP with ssmtp / msmtp

Friday, July 10th, 2020

ssmtp-linux-server-sending-email-without-a-local-mail-server-mta-relay-howto

If you have to setup a new Linux server where you need to do a certain local running daemons monitoring with a custom scripts on the local machine Nagios / Zabbix / Graphana etc. that should notify about local running custom programs or services in case of a certain criteria is matched or you simply want your local existing UNIX accounts to be able to send outbound Emails to the Internet.

Then usually you need to install a fully functional SMTP Email server that was Sendmail or QMAIL in old times in early 21st century andusually postfix or Exim in recent days and configure it to use as as a Relay mail server some Kind of SMTP.

The common Relay smtp setting would be such as Google's smtp.gmail.com, Yahoo!'s  smtp.mail.yahoo.com relay host, mail.com or External configured MTA Physical server with proper PTR / MX records or a SMTP hosted on a virtual machine living in Amazon's AWS or m$ Azure that is capable to delivere EMails to the Internet.

Configuring the local installed Mail Transport Agent (MTA) as a relay server is a relatively easy task to do but of course why should you have a fully stacked MTA service with a number of unnecessery services such as Email Queue, Local created mailboxes, Firewall rules, DNS records, SMTP Auth, DKIM keys etc. and even the ability to acccept any emails back in case if you just want to simply careless send and forget with a confirmation that remote email was send successfully?

This is often the case for some machines and especially with the inclusion of technologies such as Kubernettes / Clustered environments / VirtualMachines small proggies such as ssmtp / msmtp that could send mail without a Fully functional mail server installed on localhost ( 127.0.0.1 ) is true jams.

ssmtp program is Simple Send-only sendMail emulator  has been around in Debian GNU / Linux, Ubuntu, CentOS and mostly all Linuxes for quite some a time but recently the Debian package has been orphaned so to install it on a deb based server host you need to use instead msmtp.
 

1. Install ssmtp on CentOS / Fedora / RHEL Linux

In RPM distributions you can't install until epel-release repository is enabled.

[root@centos:~]# yum –enablerepo=extras install epel-release

[root@centos:~]# yum install ssmtp


2. Install ssmp / msmtp Debian / Ubuntu Linux

If you run older version of Debian based distribution the package to install is ssmtp, e.g.:

root@debian:~# apt-get install –yes ssmtp


On Newer Debians as of Debian 10.0 Buster onwards install instead

root@debian:~# apt install –yes msmtp-mta

can save you a lot of effort to keep an eye on a separately MTA hanging around and running as a local service eating up resources that could be spared.
 

3. Configure Relay host for ssmtp


A simple configuration to make ssmtp use gmail.com SMTP servers as a relay host below:

linux:~# cat << EOF > /etc/ssmtp/ssmtp.conf
# /etc/ssmtp/ssmtp.conf
# The user that gets all the mails (UID < 1000, usually the admin)
root=user@host.name
# The full hostname.  Must be correctly formed, fully qualified domain name or GMail will reject connection.
hostname=host.name
# The mail server (where the mail is sent to), both port 465 or 587 should be acceptable
# See also https://support.google.com/mail/answer/78799
mailhub=smtp.gmail.com:587
#mailhub=smtp.host.name:465

# The address where the mail appears to come from for user authentication.
rewriteDomain=gmail.com
# Email 'From header's can override the default domain?

FromLineOverride=YES

# Username/Password
AuthUser=username@gmail.com
AuthPass=password
AuthMethod=LOGIN
# Use SSL/TLS before starting negotiation
UseTLS=YES
UseTLS=Yes
UseSTARTTLS=Yes
logfile        ~/.msmtp.log

EOF

This configuration is very basic and it is useful only if you don't want to get delivered mails back as this functionality is also supported even though rarely used by most.

One downside of ssmtp is mail password will be plain text, so make sure you set proper permissions to /etc/ssmtp/ssmtp.conf
 

– If your Gmail account is secured with two-factor authentication, you need to generate a unique App Password to use in ssmtp.conf. You can do so on your App Passwords page. Use Gmail username (not the App Name) in the AuthUser line and use the generated 16-character password in the AuthPass line, spaces in the password can be omitted.

– If you do not use two-factor authentication, you need to allow access to unsecure apps.
 

4. Configuring different msmtp for separate user profiles


SSMTP is capable of respecting multiple relays for different local UNIX users assuming each of whom has a separate home under /home/your-username

To set a certain user lets say georgi to relay smtp sent emails with mail or mailx command create ~/.msmtprc


linux:~# vim ~/.msmtprc


Append configuration like:

# Set default values for all following accounts.
defaults
port 587
tls on
tls_trust_file /etc/ssl/certs/ca-certificates.crt
account gmail
host smtp.gmail.com
from <user>@gmail.com
auth on
user <user>
passwordeval gpg –no-tty -q -d ~/.msmtp-gmail.gpg
# Set a default account

account default : gmail


To add it for any different user modify the respective fields and set the different Mail hostname etc.
 

5. Using mail address aliases


msmtp also supports mail aliases, to make them work you will need to have file /etc/msmptrc with
 

aliases               /etc/aliases


Standard aliasses them should work 

linux:~# cat /etc/aliases
# Example aliases file
     
# Send root to Joe and Jane
root: georgi_georgiev@example.com, georgi@example.com
   
# Send everything else to admin
default: admin@domain.example


6. Get updated when your Debian servers have new packages to update 

msmpt can be used for multiple stuff one example use would be to use it together with cron to get daily updates if there are new debian issued security or errata update pending packages, to do so you can use the apticron shell script.

To use it on debian install the apticron pack:
 

root@debian:~# apt-get install –yes apticron

apticron has the capability to:

 * send daily emails about pending upgrades in your system;
 * give you the choice of receiving only those upgrades not previously notified;
 * automatically integrate to apt-listchanges in order to give you by email the
   new changes of the pending upgrade packages;
 * handle and warn you about packages put on hold via aptitude/dselect,
   avoiding unexpected package upgrades (see #137771);
 * give you all these stuff in a simple default installation;


To configure it you have to place a config copy the one from /usr/lib/apticron/apticron.conf to /etc/apticron/apticron.conf

The only important value to modify in the config is the email address to which an apt-listchanges info for new installable debs from the apt-get dist-upgrade command. Output from them will be be send to the configured EMAIL field  in apticron.conf.
 

EMAIL="<your-user@email-addr-domain.com>"


The timing at which the offered new pending package update reminder will be sent is controlled by /etc/cron.d/apticron
 

debian:~# cat /etc/cron.d/apticron
# cron entry for apticron

48 * * * * root if test -x /usr/sbin/apticron; then /usr/sbin/apticron –cron; else true; fi

apticron will use the local previous ssmtp / msmpt program to deliver to configured mailbox.
To manually trigger apticron run:
 

root@debian:~# if test -x /usr/sbin/apticron; then /usr/sbin/apticron –cron; else true; fi


7. Test whether local mail send works to the Internet

To test mail sent we can use either mail / mailx or sendmail command or some more advanced mailer as alpine or mutt.

Below is few examples.

linux:~$ echo -e "Subject: this is the subject\n\nthis is the body" | mail user@your-recipient-domain.com

To test attachments to mail also works run:

linux:~$ mail -s "Subject" recipient-email@domain.com < mail-content-to-attach.txt

or

Prepare the mail you want to send and send it with sendmail

linux:~$ vim test-mail.txt
To:username@example.com
From:youraccount@gmail.com
Subject: Test Email
This is a test mail.

linux:~$ sendmail -t < test-mail.txt

Sending encoded atacchments with uuencode is also possible but you will need sharutils Deb / RPM package installed.

To attach lets say 2 simple text files uuencoded:

linux:~$ uuencode file.txt myfile.txt | sendmail user@example.com

echo "

To: username@domain.com From: username@gmail.com Subject: A test Hello there." > test.mail

linux:~$ cat test.mail | msmtp -a default <username>@domain.com


That's all folks, hope you learned something, if you know of some better stuff like ssmtp please shar e it.

Make Laptop Sleep on LID (Monitor) close in Linux Debian and Ubuntu systemd Linux

Monday, June 22nd, 2020

make-laptop-auto-sleep-on-lid-close-in-Linux-Ubuntu-Debian-Linux


I need to make my laptop automatically sleep on LID Screen close but it doesn't why?

If have used your laptop for long years with Windows or any Windows user is used to the default beavrior of Windows to automatically sleep the computer on PC close. This default behavior of automatically sleep on LID Close has been Windows standard for many years
and the reason behind that usually laptop is used for mobility and working on a discharging battery so a LID screen close puts the laptop in (SLEEP) BATTERY SUSPEND MODE aiming to make the charged battery last longer. However often for Desktop use in the Office LID close 
trigger of laptop sleep mode is annoying and undesired I've blogged earlier on that issue and how to make laptop not to sleep on LID close on M$ Windows 10 here.

This bahavior was copied and was working in many of the Linux distributions for years however in Debian GNU / Linux and Ubuntu 16.X this feature is often not properly working due to a systemd bug. Of course closing the notebook LID screen without putting
the PC in sleep mode is not a bug but a very useful feature for those who use their laptop as a Desktop machine that is non-stop running, however for most ppl default behavior to auto-suspend the computer on Laptop Monitor close is desired.

Here is how to  force the close of the laptop lid to go to suspend/sleep mode and when open the lid, it wake it up.


1. First requirement is to make sure the laptop has installed the package pm-utils, if it is not there install it with:


# apt-get install –yes pm-utils


2. Next we need to edit logind.conf and append 3 variables


# vim /etc/systemd/logind.conf


Normally the file should have a bit of commented informative lines as well as a commented variables that could be enabled like so:


[Login]
#NAutoVTs=6
#ReserveVT=6
#KillUserProcesses=no
#KillOnlyUsers=
#KillExcludeUsers=root
#InhibitDelayMaxSec=5
#HandlePowerKey=poweroff
#HandleSuspendKey=suspend
#HandleHibernateKey=hibernate
#HandleLidSwitch=suspend
#HandleLidSwitchExternalPower=suspend
#HandleLidSwitchDocked=ignore
#PowerKeyIgnoreInhibited=no
#SuspendKeyIgnoreInhibited=no
#HibernateKeyIgnoreInhibited=no
#LidSwitchIgnoreInhibited=yes
#HoldoffTimeoutSec=30s
#IdleAction=ignore
#IdleActionSec=30min
#RuntimeDirectorySize=10%
#RemoveIPC=yes
#InhibitorsMax=8192
#SessionsMax=8192


These entries are usually the files that are used by default as a systemd settings.
Before starting make a copy just you happen to mess systemd.conf, e.g.:


cp -rpf /etc/systemd/logind.conf /etc/systemd/logind.conf_bak


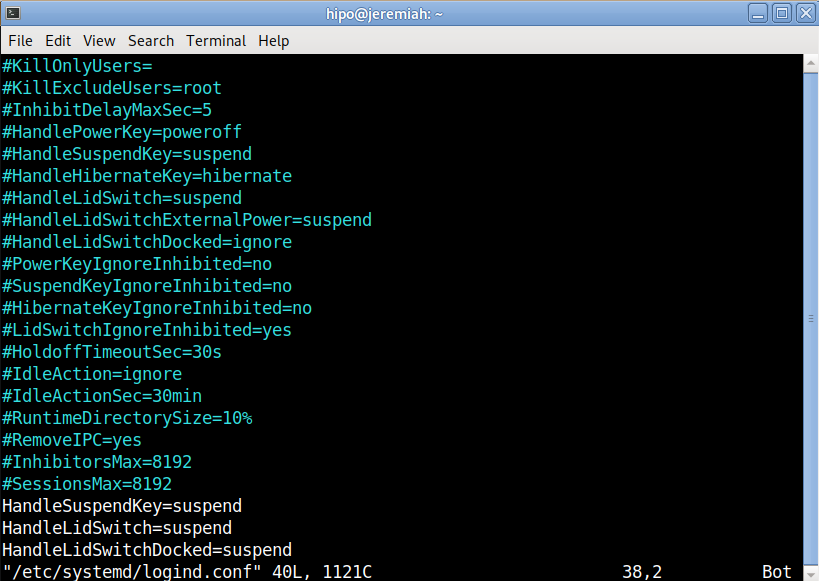
To make the PC LID close active append in the end of file below 3 lines:


HandleSuspendKey=suspend
HandleLidSwitch=suspend
HandleLidSwitchDocked=suspend


systemd-logind-conf-enable-suspend-sleep-on-laptop-lid-screen-close-linux

Save the file and to make systemd daemon reload restart the PC, even though theoretically systemd can be reloaded to digest its new /etc/systemd/logind.conf with:


# systemctl daemon-reexec


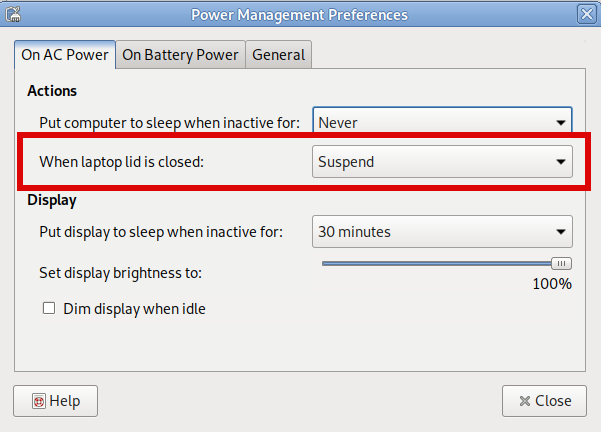
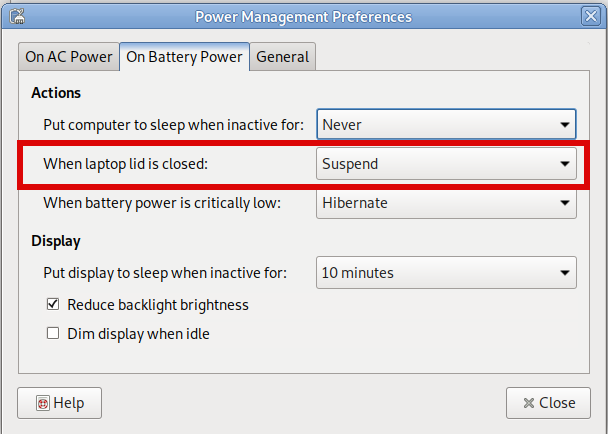
3. Assure yourself the Power Management LID setting of the Desktop Graphical User Interface are set to SUSPEND on close


I use MATE Desktop environment as it is simplistic and quite stable fork of GNOME 2.0, anyway depending on the GUI used on the Linux powered laptop e.g. GNOME / KDE Plasma / XFce etc. make sure the respective
 

Control Panel -> Power Management


settings are set to Force the Laptop Screen LID SUSPEND on Close.

Below is how this is done on MATE:

power-management-preferences-when-lid-is-closed-MATE-on-AC-power

power-management-preferences-when-lid-closed-on-battery-suspend

That's all folks, now close your Laptop and enjoy it going to sleep, open it up and get it awaked 🙂 Cheers ! 


Sysadmin tip: How to force a new Linux user account password change after logging to improve security

Thursday, June 18th, 2020

chage-linux-force-password-expiry-check-user-password-expiry-setting

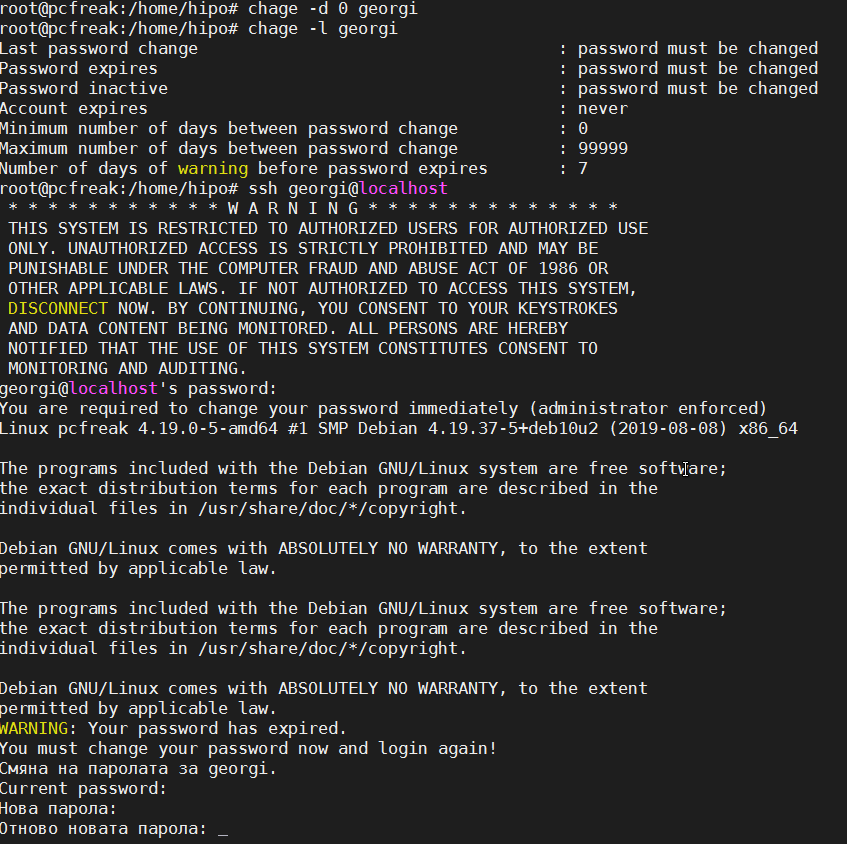
Have you logged in through SSH to remote servers with the brand new given UNIX account in your company just to be prompted for your current Password immediately after logging and forced to change your password?
The smart sysadmins or security officers use this trick for many years to make sure the default set password for new user is set to a smarter user to prevent default password leaks which might later impose a severe security risk for a company Demiliterized networks confidential data etc.

If you haven't seen it yet and you're in the beautiful world of UNIX / Linux as a developer qa tester or sysadmin sooner or later you will face it.
Here of course I'm talking about plain password local account authentication using user / pass credentials stored in /etc/passwd or /etc/shadow.

Lets Say hello to the main command chage that is used to do this sysadmin trick.
chage command is used to change user password expiry information and  set and alter password aging parameters on user accounts.


1. Force chage to make password expire on next user login for a new created user
 

# chage -d 0 {user-name} 


Below is a real life example
 

chage-force-user-account-password-expiry-linux


2. Get information on when account expires


[hipo@linux ~]$ chage -l hipo
Last password change                                    : Apr 03, 2020
Password expires                                        : Jul 08, 2020
Password inactive                                       : never
Account expires                                         : never
Minimum number of days between password change          : 0
Maximum number of days between password change          : 90
Number of days of warning before password expires       : 14


3. Use chage to set user account password expiration

The most straight forward way to set an expiration date for an active user acct is with:


# chage -E 2020-08-16 username


To make the account get locked automatically if the password has expired and the user did not logged in to it for 2 days after its expiration.

# chage -I 2 username


– Set Password expire with Minimum days 7 (-n mindays 7), (-x maxdays 28) and (-w warndays 5)

# passwd -n 7 -x 28 -w 5 username

To check the passwod expiration settings use list command:

# chage -l username
Last password change                                    : юни 18, 2020
Password expires                                        : юли 16, 2020
Password inactive                                       : never
Account expires                                         : never
Minimum number of days between password change          : 7
Maximum number of days between password change          : 28
Number of days of warning before password expires       : 5


chage is a command is essential sysadmin command that is mentioned in every Learn Linux book out there, however due to its often rare used many people and sysadmins either, don't know it or learn of it only once it is needed. 
A note to make here is some sysadmins prefer to use usermod to set a password expire instead of chage.

usermod -e 2020-10-14 username


For those who wonder how to set password expiry on FreeBSD and other BSD-es is done, there it is done via the pw system user management tool as chage is not present there.


A note to make here is chage usually does not provide information for Linux user accounts that are stored in LDAP. To get information of such you can use ldapsearch with a query to the LDAP domain store with something like.
 

ldapsearch -x -ZZ -LLL -b dc=domain.com,dc=com objectClass=*


It is worthy to mention also another useful command when managing users this is getent used to get entries from Name Service Switch libraries. 
getent is useful to get various information from basic /etc/ stored db files such as /etc/services /etc/shadow, /etc/group, /etc/aliases, /etc/hosts and even do some simple rpc queries.

Monitoring Linux hardware Hard Drives / Temperature and Disk with lm_sensors / smartd / hddtemp and Zabbix Userparameter lm_sensors report script

Thursday, April 30th, 2020

monitoring-linux-hardware-with-software-temperature-disk-cpu-health-zabbix-userparameter-script

I'm part of a  SysAdmin Team that is partially doing some minor Zabbix imrovements on a custom corporate installed Zabbix in an ongoing project to substitute the previous HP OpenView monitoring for a bunch of Legacy Linux hosts.
As one of the necessery checks to have is regarding system Hardware, the task was to invent some simplistic way to monitor hardware with the Zabbix Monitoring tool.  Monitoring Bare Metal servers hardware of HP / Dell / Fujituse etc. servers  in Linux usually is done with a third party software provided by the Hardware vendor. But as this requires an additional services to run and sometimes is not desired. It was interesting to find out some alternative Linux native ways to do the System hardware monitoring.
Monitoring statistics from the system hardware components can be obtained directly from the server components with ipmi / ipmitool (for more info on it check my previous article Reset and Manage intelligent  Platform Management remote board article).
With ipmi
 hardware health info could be received straight from the ILO / IDRAC / HPMI of the server. However as often the Admin-Lan of the server is in a seperate DMZ secured network and available via only a certain set of routed IPs, ipmitool can't be used.

So what are the other options to use to implement Linux Server Hardware Monitoring?

The tools to use are perhaps many but I know of two which gives you most of the information you ever need to have a prelimitary hardware damage warning system before the crash, these are:
 

1. smartmontools (smartd)

Smartd is part of smartmontools package which contains two utility programs (smartctl and smartd) to control and monitor storage systems using the Self-Monitoring, Analysis and Reporting Technology system (SMART) built into most modern ATA/SATA, SCSI/SAS and NVMe disks

Disk monitoring is handled by a special service the package provides called smartd that does query the Hard Drives periodically aiming to find a warning signs of hardware failures.
The downside of smartd use is that it implies a little bit of extra load on Hard Drive read / writes and if misconfigured could reduce the the Hard disk life time.


linux:~#  /usr/sbin/smartctl -a /dev/sdb2
smartctl 6.6 2017-11-05 r4594 [x86_64-linux-4.19.0-5-amd64] (local build)
Copyright (C) 2002-17, Bruce Allen, Christian Franke, www.smartmontools.org

=== START OF INFORMATION SECTION ===
Device Model:     KINGSTON SA400S37240G
Serial Number:    50026B768340AA31
LU WWN Device Id: 5 0026b7 68340aa31
Firmware Version: S1Z40102
User Capacity:    240,057,409,536 bytes [240 GB]
Sector Size:      512 bytes logical/physical
Rotation Rate:    Solid State Device
Device is:        Not in smartctl database [for details use: -P showall]
ATA Version is:   ACS-3 T13/2161-D revision 4
SATA Version is:  SATA 3.2, 6.0 Gb/s (current: 3.0 Gb/s)
Local Time is:    Thu Apr 30 14:05:01 2020 EEST
SMART support is: Available – device has SMART capability.
SMART support is: Enabled

=== START OF READ SMART DATA SECTION ===
SMART overall-health self-assessment test result: PASSED

General SMART Values:
Offline data collection status:  (0x00) Offline data collection activity
                                        was never started.
                                        Auto Offline Data Collection: Disabled.
Self-test execution status:      (   0) The previous self-test routine completed
                                        without error or no self-test has ever
                                        been run.
Total time to complete Offline
data collection:                (  120) seconds.
Offline data collection
capabilities:                    (0x11) SMART execute Offline immediate.
                                        No Auto Offline data collection support.
                                        Suspend Offline collection upon new
                                        command.
                                        No Offline surface scan supported.
                                        Self-test supported.
                                        No Conveyance Self-test supported.
                                        No Selective Self-test supported.
SMART capabilities:            (0x0002) Does not save SMART data before
                                        entering power-saving mode.
                                        Supports SMART auto save timer.
Error logging capability:        (0x01) Error logging supported.
                                        General Purpose Logging supported.
Short self-test routine
recommended polling time:        (   2) minutes.
Extended self-test routine
recommended polling time:        (  10) minutes.

SMART Attributes Data Structure revision number: 1
Vendor Specific SMART Attributes with Thresholds:
ID# ATTRIBUTE_NAME          FLAG     VALUE WORST THRESH TYPE      UPDATED  WHEN_FAILED RAW_VALUE
  1 Raw_Read_Error_Rate     0x0032   100   100   000    Old_age   Always       –       100
  9 Power_On_Hours          0x0032   100   100   000    Old_age   Always       –       2820
 12 Power_Cycle_Count       0x0032   100   100   000    Old_age   Always       –       21
148 Unknown_Attribute       0x0000   100   100   000    Old_age   Offline      –       0
149 Unknown_Attribute       0x0000   100   100   000    Old_age   Offline      –       0
167 Unknown_Attribute       0x0000   100   100   000    Old_age   Offline      –       0
168 Unknown_Attribute       0x0012   100   100   000    Old_age   Always       –       0
169 Unknown_Attribute       0x0000   100   100   000    Old_age   Offline      –       0
170 Unknown_Attribute       0x0000   100   100   010    Old_age   Offline      –       0
172 Unknown_Attribute       0x0032   100   100   000    Old_age   Always       –       0
173 Unknown_Attribute       0x0000   100   100   000    Old_age   Offline      –       0
181 Program_Fail_Cnt_Total  0x0032   100   100   000    Old_age   Always       –       0
182 Erase_Fail_Count_Total  0x0000   100   100   000    Old_age   Offline      –       0
187 Reported_Uncorrect      0x0032   100   100   000    Old_age   Always       –       0
192 Power-Off_Retract_Count 0x0012   100   100   000    Old_age   Always       –       16
194 Temperature_Celsius     0x0022   034   052   000    Old_age   Always       –       34 (Min/Max 19/52)
196 Reallocated_Event_Count 0x0032   100   100   000    Old_age   Always       –       0
199 UDMA_CRC_Error_Count    0x0032   100   100   000    Old_age   Always       –       0
218 Unknown_Attribute       0x0032   100   100   000    Old_age   Always       –       0
231 Temperature_Celsius     0x0000   097   097   000    Old_age   Offline      –       97
233 Media_Wearout_Indicator 0x0032   100   100   000    Old_age   Always       –       2104
241 Total_LBAs_Written      0x0032   100   100   000    Old_age   Always       –       1857
242 Total_LBAs_Read         0x0032   100   100   000    Old_age   Always       –       1141
244 Unknown_Attribute       0x0000   100   100   000    Old_age   Offline      –       32
245 Unknown_Attribute       0x0000   100   100   000    Old_age   Offline      –       107
246 Unknown_Attribute       0x0000   100   100   000    Old_age   Offline      –       15940

SMART Error Log Version: 1
No Errors Logged

SMART Self-test log structure revision number 1
No self-tests have been logged.  [To run self-tests, use: smartctl -t]

Selective Self-tests/Logging not supported


2. hddtemp


Usually if smartd is used it is useful to also use hddtemp which relies on smartd data.
 The hddtemp program monitors and reports the temperature of PATA, SATA
 or SCSI hard drives by reading Self-Monitoring Analysis and Reporting
 Technology (S.M.A.R.T.)
information on drives that support this feature.
 

linux:~# /usr/sbin/hddtemp /dev/sda1
/dev/sda1: Hitachi HDS721050CLA360: 31°C
linux:~# /usr/sbin/hddtemp /dev/sdc6
/dev/sdc6: KINGSTON SV300S37A120G: 25°C
linux:~# /usr/sbin/hddtemp /dev/sdb2
/dev/sdb2: KINGSTON SA400S37240G: 34°C
linux:~# /usr/sbin/hddtemp /dev/sdd1
/dev/sdd1: WD Elements 10B8: S.M.A.R.T. not available


3. lm-sensors / i2c-tools 

 Lm-sensors is a hardware health monitoring package for Linux. It allows you
 to access information from temperature, voltage, and fan speed sensors.
i2c-tools
was historically bundled in the same package as lm_sensors but has been seperated cause not all hardware monitoring chips are I2C devices, and not all I2C devices are hardware monitoring chips.

The most basic use of lm-sensors is with the sensors command


linux:~# sensors
i350bb-pci-0600
Adapter: PCI adapter
loc1:         +55.0 C  (high = +120.0 C, crit = +110.0 C)


coretemp-isa-0000
Adapter: ISA adapter
Physical id 0:  +28.0 C  (high = +78.0 C, crit = +88.0 C)
Core 0:         +26.0 C  (high = +78.0 C, crit = +88.0 C)
Core 1:         +28.0 C  (high = +78.0 C, crit = +88.0 C)
Core 2:         +28.0 C  (high = +78.0 C, crit = +88.0 C)
Core 3:         +28.0 C  (high = +78.0 C, crit = +88.0 C)


On CentOS Linux useful tool is also  lm_sensors-sensord.x86_64 – A Daemon that periodically logs sensor readings to syslog or a round-robin database, and warns of sensor alarms.

In Debian Linux there is also the psensors-server (an HTTP server providing JSON Web service which can be used by GTK+ Application to remotely monitor sensors) useful for developers
psesors-server

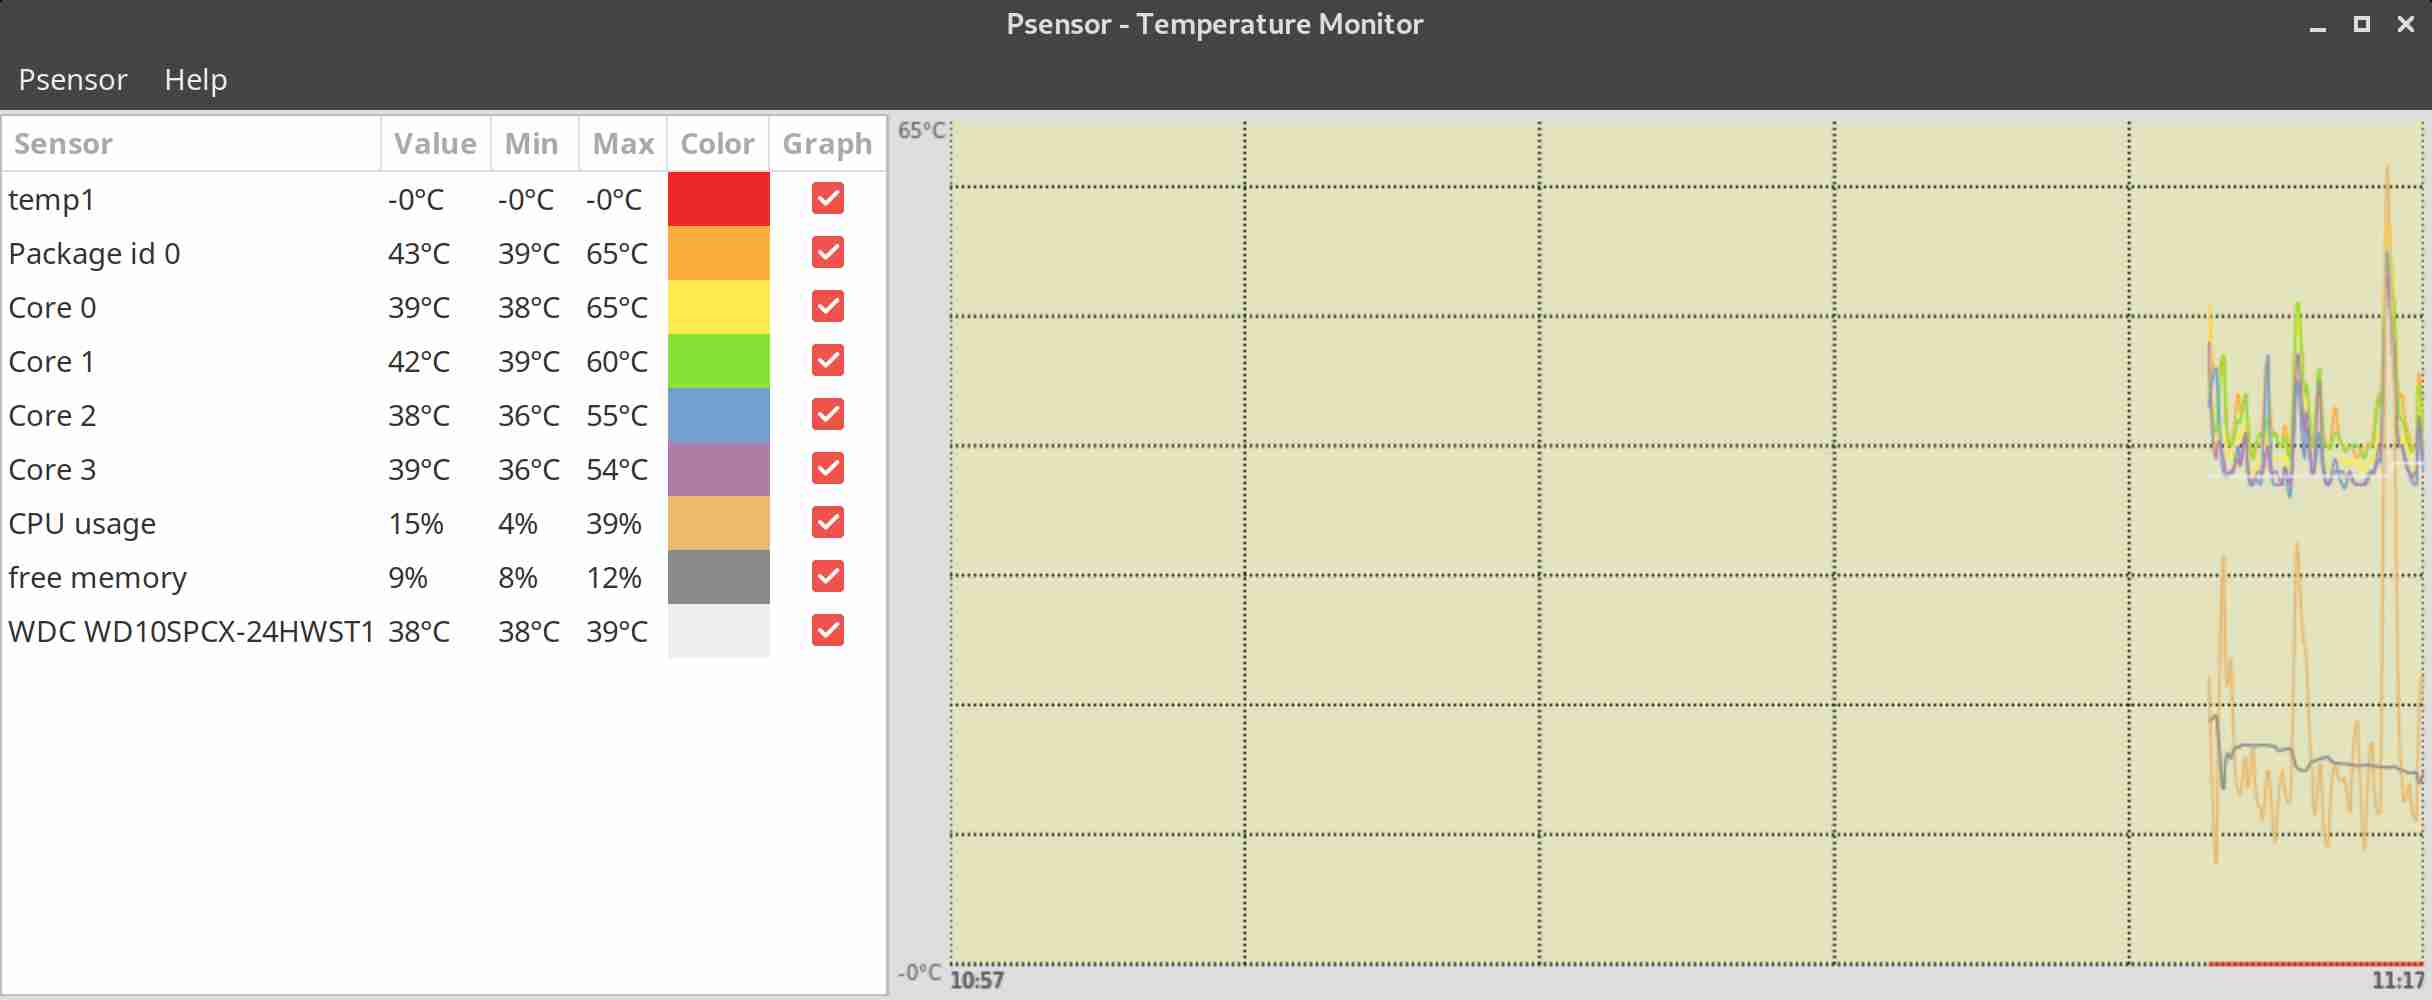
psensor-linux-graphical-tool-to-check-cpu-hard-disk-temperature-unix

If you have a Xserver installed on the Server accessed with Xclient or via VNC though quite rare,
You can use xsensors or Psensora GTK+ (Widget Toolkit for creating Graphical User Interface) application software.

With this 3 tools it is pretty easy to script one liners and use the Zabbix UserParameters functionality to send hardware report data to a Company's Zabbix Sserver, though Zabbix has already some templates to do so in my case, I couldn't import this templates cause I don't have Zabbix Super-Admin credentials, thus to work around that a sample work around is use script to monitor for higher and critical considered temperature.
Here is a tiny sample script I came up in 1 min time it can be used to used as 1 liner UserParameter and built upon something more complex.

SENSORS_HIGH=`sensors | awk '{ print $6 }'| grep '^+' | uniq`;
SENSORS_CRIT=`sensors | awk '{ print $9 }'| grep '^+' | uniq`; ;SENSORS_STAT=`sensors|grep -E 'Core\s' | awk '{ print $1" "$2" "$3 }' | grep "$SENSORS_HIGH|$SENSORS_CRIT"`;
if [ ! -z $SENSORS_STAT ]; then
echo 'Temperature HIGH';
else 
echo 'Sensors OK';
fi 

Of course there is much more sophisticated stuff to use for monitoring out there


Below script can be easily adapted and use on other Monitoring Platforms such as Nagios / Munin / Cacti / Icinga and there are plenty of paid solutions, but for anyone that wants to develop something from scratch just like me I hope this
article will be a good short introduction.
If you know some other Linux hardware monitoring tools, please share.

Linux: Compress website images for better responsiveness with Trimage Graphical tool

Tuesday, March 10th, 2020

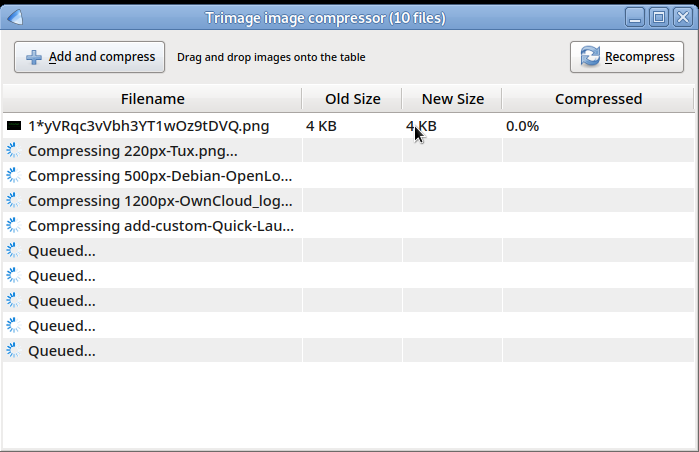
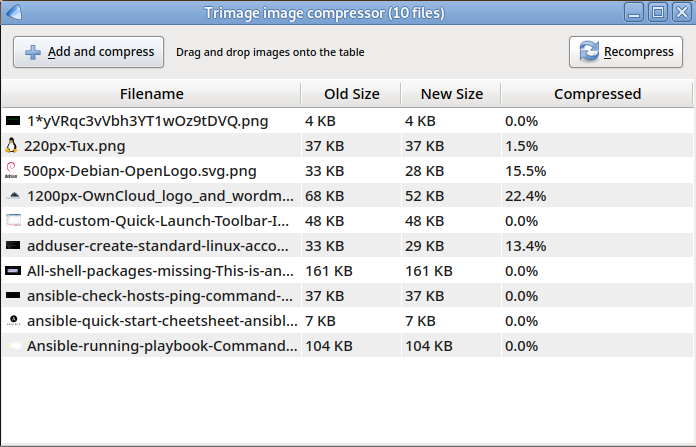
trimage-compress-reduce-lossless-encoding-of-pictures-for-seo-linux-screenshot0

If you run a Website or a Blog with images sooner or later you will end up with in looking for better ways to optimize the SEO of the website. I had a small discussion today with a friend of mine Mitko Ivanov who is working as SEO consultant expert,  we had a small discussion on the good practice of optimizing website pictures to reduce the website opening time. Ingeral part of Website responsiveness is the time the Browser needs to fetch all the page Images. Thus if your site is with multiple images, like this blog here, picture comperssion is definitely something that could make miracles in how website visualize for end user and increase rank in Search Engines. The easiest way to compress images of an amateur website of course is to use external picture compression service such as tinypng.com, this requires no knowledge at any computer technology and you can do it easy, but the problem is it shares your image to the remote website used for conversion and I personally think this is not the best idea.
For WordPress website owners of course there is plenty of plugins such as eWWW Image Optimizer that does realtime reduce of size of picture by chunking out the unnecessery bits.
Alternative to especially for people who have a little bit of technical knowledge is is to use some command line tool as optipng together with some kind of shell for loopfor details see my previous article Optimize PNG images by compressing on GNU / Linux, FreeBSD server to Improve Website overall Performance.
But for Many of Webmaster site owners this solution takes too much time as well many people just don't have even basic command line knowledge / are kinda of scared from the console but need to do image compression in a simple GUI way for those the good news are there is  Graphical cross-platform tool for losslessly optimizing PNG and JPG files for web. Trimage.
To use it it even unexperienced non enthusiast could simply roll out a new Virtual Machine on top of some VM Host machine such as Virtual Box and roll out some kind of Linux distribution via a graphical installer which is mega easy well guided and takes 15-20 minutes time.

Once machine is set-up either the Graphical Distribution tool for page management or via apt you can fetch Trimage. It is now existing in most Linux distributions so, to install it on any deb based distribution Debian / Mint / Ubuntu etc. do the usual:

# apt-get install –yes trimage


trimage-compress-reduce-lossless-encoding-of-pictures-for-seo-linux-screenshot1

Once you have it, just move the pictures you want to compress for losslessly optimizing from your website to your Computer with Linux. Trimage GUI on the background will run commands optipng, pngcrush, advpng or jpegoptim, imageoptim and depending on the filetype remove the unnecessery file data that are appended by the program with which image was produced Gimp / Photoshop / Camera software etc. All image files are losslessy compressed on the highest available compression levels, and EXIF and other metadata is removed so you just have to recopy ( upload ) the optimized images back to the website.

trimage-compress-reduce-lossless-encoding-of-pictures-for-seo-linux-screenshot2

That's all folks Enjoy ! 🙂


Fix eth changing network interface names from new Linux naming scheme ens, eno, em1 to legacy eth0, eth1, eth2 on CentOS Linux

Thursday, January 16th, 2020

Change-systemd-Linux-servers-network-interface-name-ensxx-to-eth0-copy

On CentOS / RHEL 7 / Fedora 19+ and other Linux distributions, the default network eth0, eth1 .. interface naming scheme has been changed and in newer Linux kernels OS-es to names such as – ens3 , eno1, enp5s2, em1 etc.,  well known old scheme for eth* is now considered a legacy.
This new Network card naming in Linux OS is due to changes made in Kernel / modules and udev  rules which resembles how Ethernet ifaces are named on other UNIX like systems.
The weird name is taken depending on the Hardware Network card vendor name and is a standard for years in FreeBSD and Mac OSX, however this was not so over the years,
so for old school sysadmins that's pretty annoying as, we're much used to the eth0 / eth1 / eth2 / eth3 naming standard which brought some clearness on the network card naming.

Also for systems which are upgraded from old Linux OS distro releases to a newer ones, that includes this great new "cool" feature, that fits so well the New age-of computing Cloud craziness.
That behaviour could create a number of problems, especially if the already Production working servers due to failure to bring up some of the network devices after the upgrade or, even if you fix that by editting the /etc/network* / etc/sysconfig/networking/* by hand still there is even more stuff that won't work properly, such as any custom made iptables / ipset firewalls rules, or any kind of custom used third party Shell / Perl scripts that depend on the old-school conventional and (convenient easy to remember!!!) eth0, eth2 etc. naming


For sysadmins who are using some kind of Application Clustering with something like corosync / pacemaker this new fuzzy improvement makes things even worse as having a changed interface name of the card will break the cluster …


1. Get list of the LAN Card Server hardware


To get a better view on the server installed and recognized LAN Cards use lspci / dmidecode commands:

 lspci |grep -i Ether -A1 -B1
01:00.4 USB controller: Hewlett-Packard Company Integrated Lights-Out Standard Virtual USB Controller (r                                                                                                           ev 03)
02:00.0 Ethernet controller: Broadcom Inc. and subsidiaries NetXtreme BCM5719 Gigabit Ethernet PCIe (rev                                                                                                            01)
02:00.1 Ethernet controller: Broadcom Inc. and subsidiaries NetXtreme BCM5719 Gigabit Ethernet PCIe (rev                                                                                                            01)
02:00.2 Ethernet controller: Broadcom Inc. and subsidiaries NetXtreme BCM5719 Gigabit Ethernet PCIe (rev                                                                                                            01)
02:00.3 Ethernet controller: Broadcom Inc. and subsidiaries NetXtreme BCM5719 Gigabit Ethernet PCIe (rev                                                                                                            01)
03:00.0 RAID bus controller: Hewlett-Packard Company Smart Array Gen9 Controllers (rev 01)
05:00.0 Ethernet controller: Broadcom Inc. and subsidiaries NetXtreme BCM5719 Gigabit Ethernet PCIe (rev                                                                                                            01)
05:00.1 Ethernet controller: Broadcom Inc. and subsidiaries NetXtreme BCM5719 Gigabit Ethernet PCIe (rev                                                                                                            01)
05:00.2 Ethernet controller: Broadcom Inc. and subsidiaries NetXtreme BCM5719 Gigabit Ethernet PCIe (rev                                                                                                            01)
05:00.3 Ethernet controller: Broadcom Inc. and subsidiaries NetXtreme BCM5719 Gigabit Ethernet PCIe (rev                                                                                                            01)
7f:08.0 System peripheral: Intel Corporation Xeon E7 v3/Xeon E5 v3/Core i7 QPI Link 0 (rev 02)


lspci reports all attached LAN Cards to server which are plugged in on the Motherbord, since that specific server has a Motherboard integrated LAN Adapters too, we can see this one
via dmidecode.

# dmidecode |grep -i Ether -A 5 -B 5

Handle 0x00C5, DMI type 41, 11 bytes
Onboard Device
        Reference Designation: Embedded LOM 1 Port 3
        Type: Ethernet
        Status: Enabled
        Type Instance: 3
        Bus Address: 0000:XX:00.X

Handle 0x00C6, DMI type 41, 11 bytes
Onboard Device
        Reference Designation: Embedded LOM 1 Port 4
        Type: Ethernet
        Status: Enabled
        Type Instance: 4
        Bus Address: 0000:0X:00.X

Handle 0x00C7, DMI type 41, 11 bytes


       Strings:
                PciRoot(0x0)/Pci(0x2,0x0)/Pci(0x0,0x0)
                NIC.Slot.2.1
                HP Ethernet 1Gb 4-port 331T Adapter – NIC
                Slot 2

Handle 0x00E3, DMI type 203, 34 bytes
OEM-specific Type
        Header and Data:


The illustrate the eth0 changing name issue, here is example taken from server on how eth1 interface is named on a new CentOS install:
 

# ip addr show

…..
eno1: [BROADCAST,MULTICAST,UP,LOWER_UP] mtu 1500 qdisc pfifo_fast state UP qlen 1000
link/ether 6c:0b:84:6c:48:1c brd ff:ff:ff:ff:ff:ff
inet 10.10.9.5/24 brd 10.10.9.255 scope global eno1
inet6 2606:b400:c00:48:6e0b:84ff:fe6c:481c/128 scope global dynamic
valid_lft 2326384sec preferred_lft 339184sec
inet6 fe80::6e0b:84ff:fe6c:481c/64 scope link
valid_lft forever preferred_lft forever


2. Disable Network Manager on the server


To prevent potential problems for future with randomly changing Network card names order on reboots and other mess,
it is generally a good idea to disable Network Manager.


# systemctl disable NetworkManager
rm '/etc/systemd/system/multi-user.target.wants/NetworkManager.service'
rm '/etc/systemd/system/dbus-org.freedesktop.NetworkManager.service'
rm '/etc/systemd/system/dbus-org.freedesktop.nm-dispatcher.service'


3. Check and correct network configuration if necessery in  /etc/sysconfig/network-scripts/ifcfg-*


Either fix the naming across all files ifcfg-* to match eth0 / eth1 / ethXX or even better both change the NAME and DEVICE in files and completely rename the files ifcfg-eno1 to ifcfg-eth1 ..
ifcfg-enoXX to ifcfg-ethXX
 

server:~# cat /etc/sysconfig/network-scripts/ifcfg-eno1
……
NAME=eth0
DEVICE=eth0
……


4. Fix the interface scheme naming through passing a GRUB boot parameter to Kernel


a. Create backup of /etc/default/grub
 

cp -rpf /etc/default/grub /etc/default/grub_bak_date +"%Y_%m_%Y"


b. Edit /etc/default/grub

c. Find config parameter GRUB_CMDLINE_LINUX

d. Add net.ifnames=0 biosdevname=0 to the line


net.ifnames=0 biosdevname=0


After the change the line should look like

GRUB_CMDLINE_LINUX=" crashkernel=auto net.ifnames=0 biosdevname=0 rhgb quiet"


e. Regenerate GRUB loader to have included the new config

server:~# grub2-mkconfig -o /boot/grub2/grub.cfg

f. Reboot the sytem
 

server:~# shutdown -r now


5. Fix auto-generated inconvenient naming by modifying udev rules

The Mellanox Ehternet server card vendor's workaround to the ever changing eth names is modify udev rules to be able to have the ordinary eth0 / eth1 / eth2 … Lan card name scheme.
In short this is recommended for Mellanox but should work on any other Lan card device attached on a Linux powered server.
 

# cat /etc/sysconfig/network-scripts/ifcfg-eth1
DEVICE="eth1"
BOOTPROTO="static"
HWADDR="7c:fe:90:cb:76:02"
IPADDR=10.10.9.2
NETMASK=255.255.255.0
ONBOOT="yes"


# cat /etc/sysconfig/network-scripts/ifcfg-eth2
DEVICE="eth1"
BOOTPROTO="static"
HWADDR="7c:fe:90:cb:76:02"
IPADDR=10.10.99.99
NETMASK=255.255.255.0
ONBOOT="yes"


# vi /etc/udev/rules.d/70-persistent-net.rules

SUBSYSTEM=="net", ACTION=="add", DRIVERS=="?*", ATTR{address}=="7c:fe:90:cb:76:02", ATTR{dev_id}=="0x0", ATTR{type}=="1", KERNEL=="eth*", NAME="eth1"

SUBSYSTEM=="net", ACTION=="add", DRIVERS=="?*", ATTR{address}=="7c:fe:90:cb:76:03", ATTR{dev_id}=="0x0", ATTR{type}=="1", KERNEL=="eth*", NAME="eth2"


Next step is to reboot.
 

# /sbin/reboot


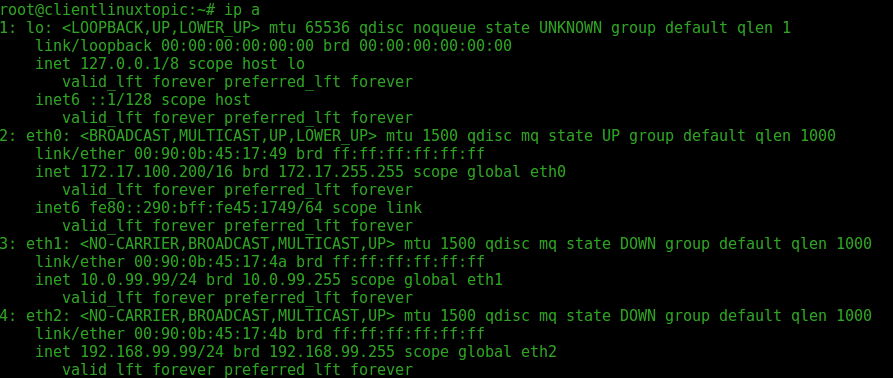
After a while when the server boots check with ip or ifconfig the configuration to make sure the ethXX ordering is proper again.

interface-list-eth1-eth2-screenshot

# /sbin/ifconfig eth1
eth1: flags=4163<UP,BROADCAST,RUNNING,MULTICAST> mtu 1500
inet 10.0.99.99 netmask 255.255.255.0 broadcast 10.10.9.255
inet6 fe80::7efe:90ff:fecb:7602 prefixlen 64 scopeid 0x20<link>
ether 7c:fe:90:cb:76:02 txqueuelen 1000 (Ethernet)
RX packets 0 bytes 0 (0.0 B)
RX errors 0 dropped 0 overruns 0 frame 0
TX packets 23 bytes 3208 (3.1 KiB)
TX errors 0 dropped 0 overruns 0 carrier 0 collisions 0
eth2: flags=4099<UP,BROADCAST,MULTICAST> mtu 1500
ether 7c:fe:90:cb:76:03 txqueuelen 1000 (Ethernet)
RX packets 0 bytes 0 (0.0 B)
RX errors 0 dropped 0 overruns 0 frame 0
TX packets 0 bytes 0 (0.0 B)
TX errors 0 dropped 0 overruns 0 carrier 0 collisions 0

On some Linux distributions, if it happens this udev extra configuration is not venerated, use net.ifnames=0 biosdevname=0 grub configuration.

6. Verify eth interfaces are present    

# ip addr show

…..

eth0: [BROADCAST,MULTICAST,UP,LOWER_UP] mtu 1500 qdisc pfifo_fast state UP qlen 1000

link/ether 6c:0b:84:6c:48:1c brd ff:ff:ff:ff:ff:ff

inet 10.10.9.5/24 brd 10.10.9.255 scope global eno1

inet6 2606:b400:c00:48:6e0b:84ff:fe6c:481c/128 scope global dynamic

valid_lft 2326384sec preferred_lft 339184sec

inet6 fe80::6e0b:84ff:fe6c:481c/64 scope link

valid_lft forever preferred_lft forever

That's all this should put an end to the annoying auto generated naming lan device naming.


Summary


So what was explained up was how to resolve problems caused by autogenerated ethernet interface cards by a new functionality in the Linux kernel, so Network cards are again visible via ip address show / ifconfig again in a proper order eth0 / eth1 / eth2 / eth3 etc. instead of a vendor generated cryptic names as ens / eno / em etc. This is possible via either by editing udev rules or grub configuration. Doing so saves nerves and makes sysadmin life better, at least it did mine.
That's all this should put an end to the annoying auto generated naming.
 

How to debug failing service in systemctl and add a new IP network alias in CentOS Linux

Wednesday, January 15th, 2020

linux-debug-failing-systemctl-systemd-service--add-new-IP-alias-network-cable

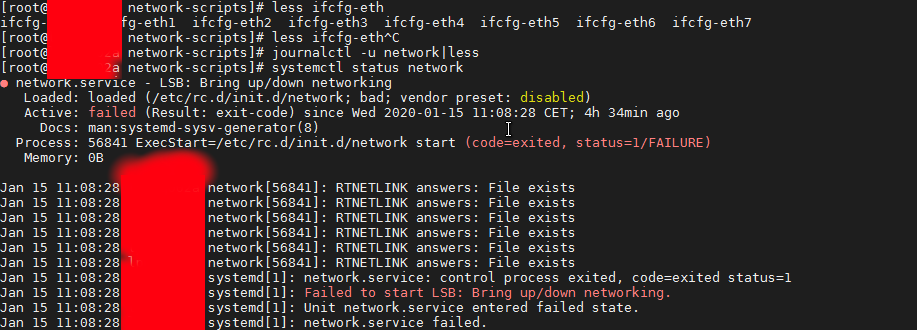
If you get some error with some service that is start / stopped via systemctl you might be pondering how to debug further why the service is not up then then you'll be in the situation I was today.
While on one configured server with 8 eth0 configured ethernet network interfaces the network service was reporting errors, when atempted to restart the RedHat way via:
 

service network restart


to further debug what the issue was as it was necessery I had to find a way how to debug systemctl so here is how:


How to do a verbose messages status for sysctlct?


linux:~# systemctl status network

linux:~# systemctl status network


Another useful hint is to print out only log messages for the current boot, you can that with:

# journalctl -u service-name.service -b


if you don't want to have the less command like page separation ( paging ) use the –no-pager argument.


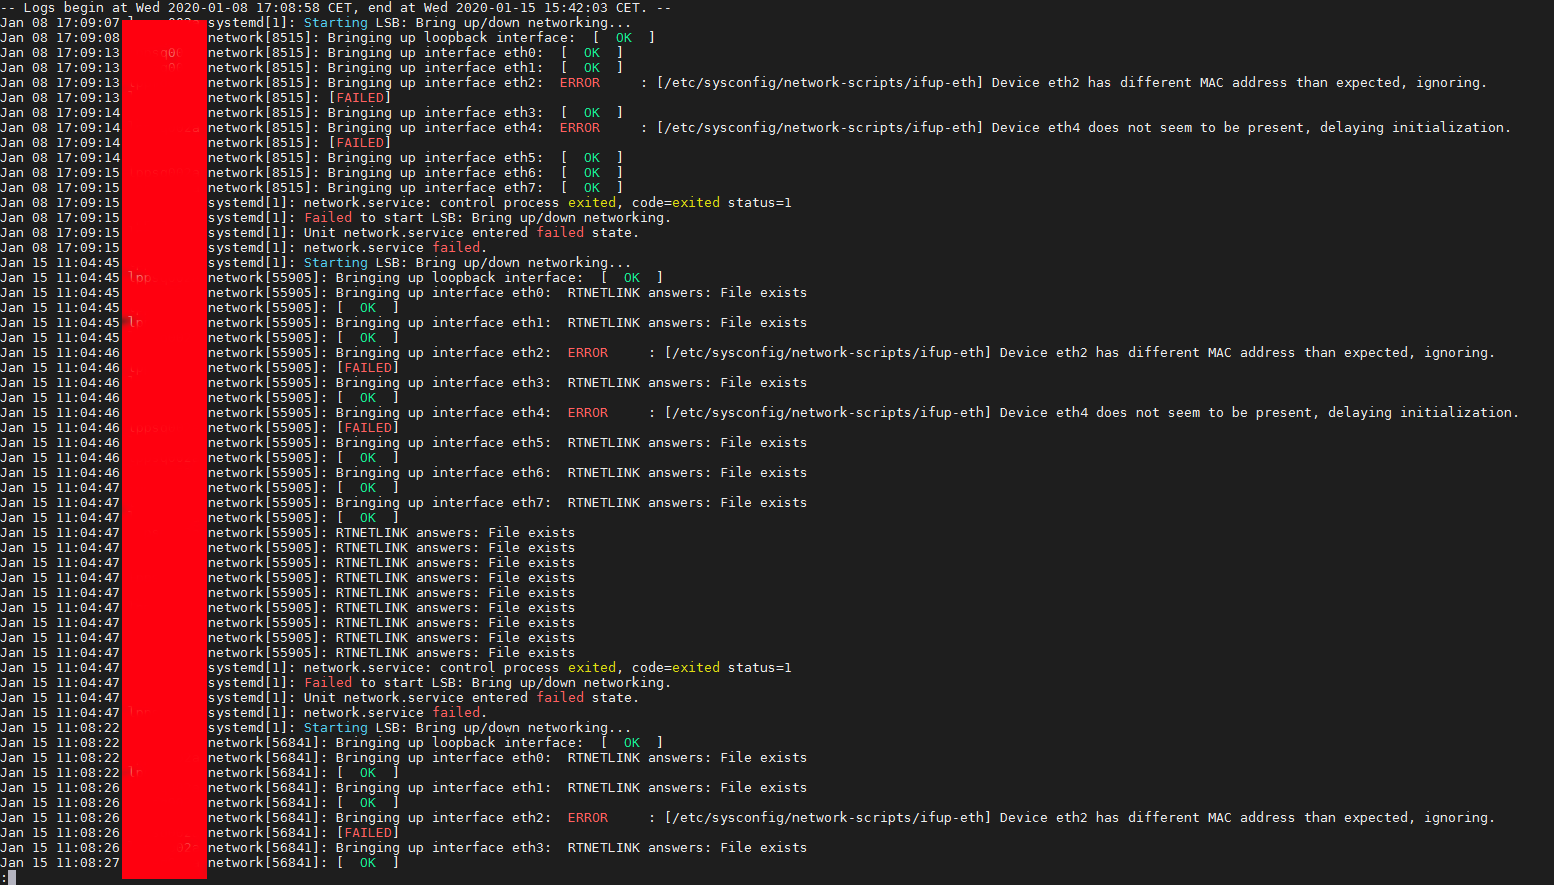
# journalctl -u network –no-pager

Jan 08 17:09:14 lppsq002a network[8515]: Bringing up interface eth5:  [  OK  ]

    Jan 08 17:09:15 lppsq002a network[8515]: Bringing up interface eth6:  [  OK  ]
    Jan 08 17:09:15 lppsq002a network[8515]: Bringing up interface eth7:  [  OK  ]
    Jan 08 17:09:15 lppsq002a systemd[1]: network.service: control process exited, code=exited status=1
    Jan 08 17:09:15 lppsq002a systemd[1]: Failed to start LSB: Bring up/down networking.
    Jan 08 17:09:15 lppsq002a systemd[1]: Unit network.service entered failed state.
    Jan 08 17:09:15 lppsq002a systemd[1]: network.service failed.
    Jan 15 11:04:45 lppsq002a systemd[1]: Starting LSB: Bring up/down networking…
    Jan 15 11:04:45 lppsq002a network[55905]: Bringing up loopback interface:  [  OK  ]
    Jan 15 11:04:45 lppsq002a network[55905]: Bringing up interface eth0:  RTNETLINK answers: File exists
    Jan 15 11:04:45 lppsq002a network[55905]: [  OK  ]
    Jan 15 11:04:45 lppsq002a network[55905]: Bringing up interface eth1:  RTNETLINK answers: File exists
    Jan 15 11:04:45 lppsq002a network[55905]: [  OK  ]
    Jan 15 11:04:46 lppsq002a network[55905]: Bringing up interface eth2:  ERROR     : [/etc/sysconfig/network-scripts/ifup-eth] Device eth2 has different MAC address than expected, ignoring.
    Jan 15 11:04:46 lppsq002a network[55905]: [FAILED]
    Jan 15 11:04:46 lppsq002a network[55905]: Bringing up interface eth3:  RTNETLINK answers: File exists
    Jan 15 11:04:46 lppsq002a network[55905]: [  OK  ]
    Jan 15 11:04:46 lppsq002a network[55905]: Bringing up interface eth4:  ERROR     : [/etc/sysconfig/network-scripts/ifup-eth] Device eth4 does not seem to be present, delaying initialization.
    Jan 15 11:04:46 lppsq002a network[55905]: [FAILED]
    Jan 15 11:04:46 lppsq002a network[55905]: Bringing up interface eth5:  RTNETLINK answers: File exists
    Jan 15 11:04:46 lppsq002a network[55905]: [  OK  ]
    Jan 15 11:04:46 lppsq002a network[55905]: Bringing up interface eth6:  RTNETLINK answers: File exists
    Jan 15 11:04:47 lppsq002a network[55905]: [  OK  ]
    Jan 15 11:04:47 lppsq002a network[55905]: Bringing up interface eth7:  RTNETLINK answers: File exists
    Jan 15 11:04:47 lppsq002a network[55905]: [  OK  ]
    Jan 15 11:04:47 lppsq002a network[55905]: RTNETLINK answers: File exists
    Jan 15 11:04:47 lppsq002a network[55905]: RTNETLINK answers: File exists
    Jan 15 11:04:47 lppsq002a network[55905]: RTNETLINK answers: File exists
    Jan 15 11:04:47 lppsq002a network[55905]: RTNETLINK answers: File exists
    Jan 15 11:04:47 lppsq002a network[55905]: RTNETLINK answers: File exists
    Jan 15 11:04:47 lppsq002a network[55905]: RTNETLINK answers: File exists
    Jan 15 11:04:47 lppsq002a network[55905]: RTNETLINK answers: File exists
    Jan 15 11:04:47 lppsq002a network[55905]: RTNETLINK answers: File exists
    Jan 15 11:04:47 lppsq002a network[55905]: RTNETLINK answers: File exists
    Jan 15 11:04:47 lppsq002a systemd[1]: network.service: control process exited, code=exited status=1
    Jan 15 11:04:47 lppsq002a systemd[1]: Failed to start LSB: Bring up/down networking.
    Jan 15 11:04:47 lppsq002a systemd[1]: Unit network.service entered failed state.
    Jan 15 11:04:47 lppsq002a systemd[1]: network.service failed.
    Jan 15 11:08:22 lppsq002a systemd[1]: Starting LSB: Bring up/down networking…
    Jan 15 11:08:22 lppsq002a network[56841]: Bringing up loopback interface:  [  OK  ]
    Jan 15 11:08:22 lppsq002a network[56841]: Bringing up interface eth0:  RTNETLINK answers: File exists
    Jan 15 11:08:22 lppsq002a network[56841]: [  OK  ]
    Jan 15 11:08:26 lppsq002a network[56841]: Bringing up interface eth1:  RTNETLINK answers: File exists
    Jan 15 11:08:26 lppsq002a network[56841]: [  OK  ]
    Jan 15 11:08:26 lppsq002a network[56841]: Bringing up interface eth2:  ERROR     : [/etc/sysconfig/network-scripts/ifup-eth] Device eth2 has different MAC address than expected, ignoring.
    Jan 15 11:08:26 lppsq002a network[56841]: [FAILED]
    Jan 15 11:08:26 lppsq002a network[56841]: Bringing up interface eth3:  RTNETLINK answers: File exists
    Jan 15 11:08:27 lppsq002a network[56841]: [  OK  ]


2020-01-15-15_42_11-root-server


Another useful thing debug arguments is the -xe to do:

# journalctl -xe –no-pager


  • -x (– catalog)
    Augment log lines with explanation texts from the message catalog.
    This will add explanatory help texts to log messages in the output
    where this is available.
  •  -e ( –pager-end )  Immediately jump to the end of the journal inside the implied pager
      tool.

2020-01-15-15_42_32-root-server

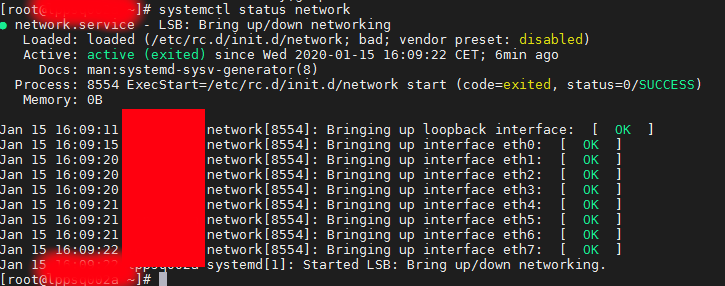
Finally after fixing the /etc/sysconfig/networking-scripts/* IP configuration issues I had all the 8 Ethernet interfaces to work as expected
 

# systemctl status network


2020-01-15-16_15_38-root-server


2. Adding a new IP alias to eth0 interface


Further on I had  to add an IP Alias on the CenOS via its networking configuration, this is done by editing /etc/sysconfig/network-scripts/ifcfg* files.
To create an IP alias for first lan interface eth0, I've had to created a new file named ifcfg-eth0:0
 

linux:~# cd /etc/sysconfig/network-scripts/
linux:~# vim ifcfg-eth0:0


with below content

NAME="eth0:0"
ONBOOT="yes"
BOOTPROTO="none"
IPADDR="10.50.10.5"
NETMASK="255.255.255.0"


Adding this IP address network alias works across all RPM based distributions and should work also on Fedora and Open SuSE as well as Suse Enterprise Linux.
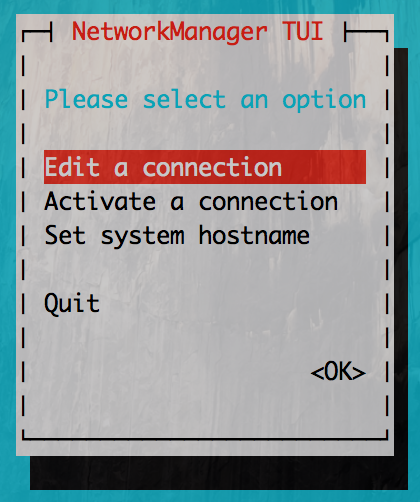
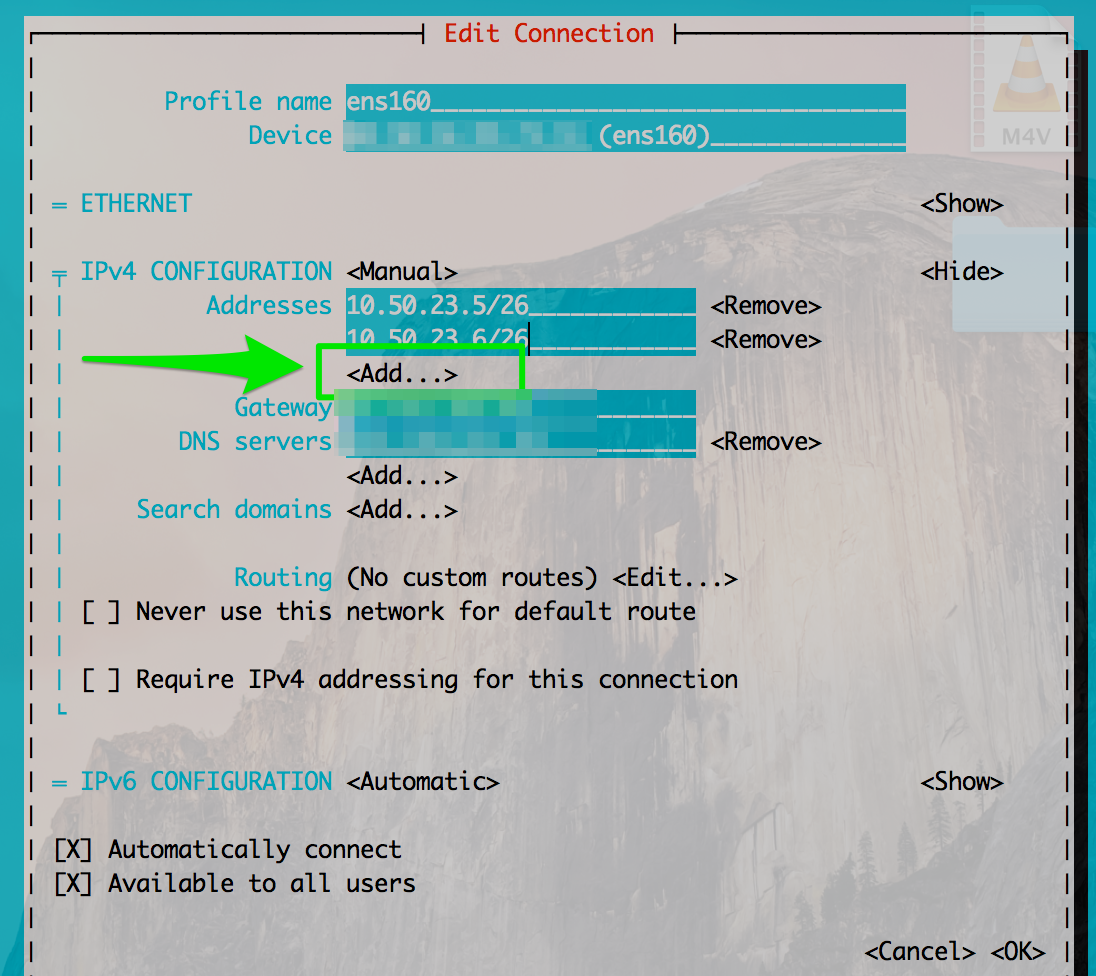
If you however prefer to use a text GUI and do it the CentOS server administration way you can use nmtui (Text User Interface for controlling NetworkManager). tool.
 

linux:~# nmtui


centos7_nmtui-ncurses-network-configuration-sysadmin-tool

nmtui_add_alias_interface-screenshot

How to install jcmd on CentOS 7 to diagnose running Java Virtual Machine crashing applications

Tuesday, January 14th, 2020

how-to-install-jcmd-centos-jcdm-java-logo-1

jcmd utility is well known in the Brane New wonderful world of Java but if you're like me a classical old school sysadmins and non-java developer you probably never heard it hence before going straight into how to install it on CentOS 7 Linux servers, I'll shortly say few words on what it is.
jcmd is used to send diagnostic requests to running Java Virtual Machine (JVM) it is available in both in Oracle Java as well as OpenJDK.
The requests jcmd sends to VM are based on the running Java PID ID and are pretty useful for controlling Java Flight Recordings, troubleshoot, and diagnose JVM and Java Applications. It must be used on the same machine where the JVM is running.

 Used without arguments or with the -l option, jcmd prints the list of running Java processes with their process id, their main class and their command line arguments.
When a main class is specified on the command line, jcmd sends the diagnostic command request to all Java processes for which the command line argument is a substring of the Java process' main class.
jcmd could be useful if the JConsoleJMX (Java Management Extensions) can't be used for some reason on the server or together with Java Visual VM (visual interface for viewing detailed info about Java App).

In most Linux distributionsas as  of year 2020 jcmd is found in  java-*-openjdk-headless.

To have jcmd on lets say Debian GNU / Linux, you're up to something like:


apt-get install –yes openjdk-12-jdk-headless
 

or

apt-get install openjdk-11-jdk-headless
however in CentOS
7 jcmd is not found in java*openjdk*headless but instead to have it on server, thus it take me a while to look up where it is foundso after hearing
from some online post it is part of package java*openjdk*devel* to make sure this so true, I've used the  –download-only option
 

 yum install –downloadonly –downloaddir=/tmp java-1.8.0-openjdk-devel


So the next question was how to inspect the downloaded rpm package into /tmp usually, this is possible via Midnight Commander (mc) easily to view contents, however as this
server did not have installed mc due to security policies I had to do it differently after pondering a while on how to to list the RPM package file content come up using following command


 rpm2cpio java-1.8.0-openjdk-devel-1.8.0.232.b09-0.el7_7.x86_64.rpm |cpio -idmv|grep -i jcmd|less


To then install  java-1.8.0-openjdk-devel-1.8.0.232.b09-0.el7_7.x86_64.rpm to do so run:


yum -y install  java-1.8.0-openjdk-devel-1.8.0*


Once the jcmd, I've created the following bash script  that was set that was tracking for application errors and checking whether the JBoss application server pool-available-count is not filled up and hence jboss refuses to serve connections  through jboss-cli.sh query automatically launching jcmd to get various diagnostic data about Java Virtual Machine (e.g. a running snapshot) – think of it like the UNIX top for debugging or Windows System Monitor but run one time. 


# PID_OF_JAVA=$(pgrep -l java)
# jcmd $PID_OF_JAVA GC.heap_dump GC.heap_dump_file-$(date '+%Y-%m-%d_%H-%M-%S').jfr
# jcmd $PID_OF_JAVA Thread.print > Thread.print-$(date '+%Y-%m-%d_%H-%M-%S').jfr


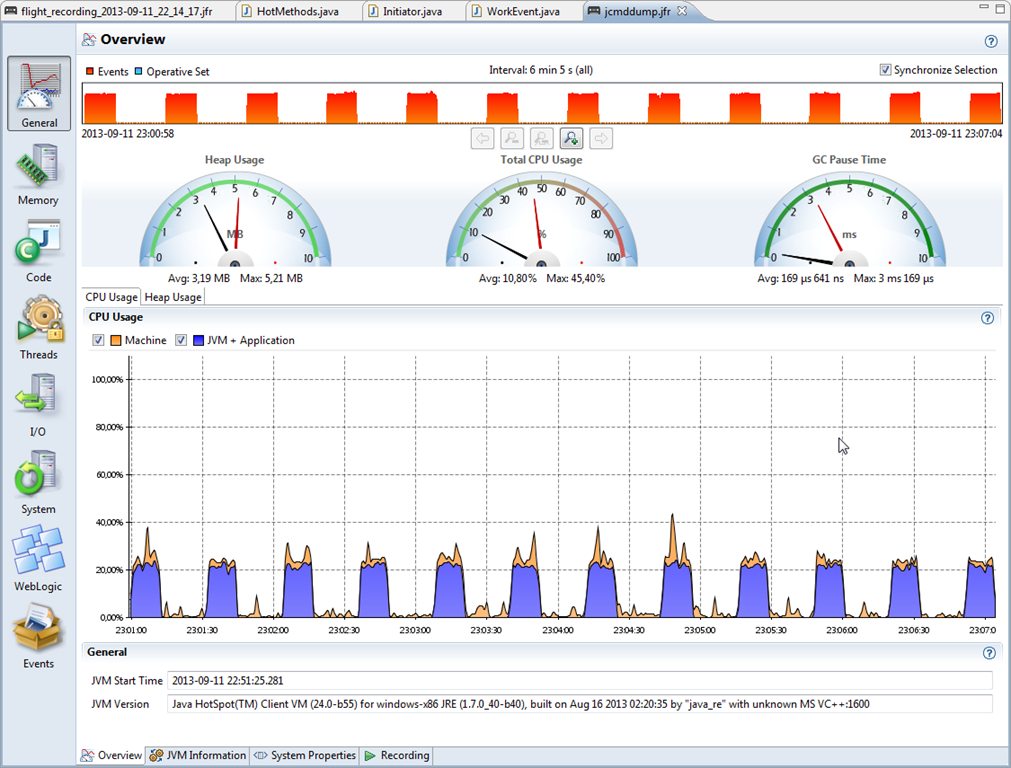
The produced log files can then be used by the developer to visualize some Java specific stuff "Flight recordings" like in below screenshot:

jcmd-java-tool-dump-jfr-flight-recordings-visualized-java 

If you're interested on some other interesting tools that can be used to Monitor  and Debug a Running Java VM take a look at Java's official documentation Monitoring Tools.
So that's all Mission Accomplished 🙂 Now the Java Application developer could observe the log and tell why exactly the application crashed after the multitude of thrown Exceptions in the JBoss server.log.