Posts Tagged ‘data’

How to Copy large data directories between 2 Linux / Unix servers without direct ssh / ftp access between server1 and server2 other by using SSH, TAR and Unix pipes

Monday, April 27th, 2015

how-to-copy-large-data-directories-between-2-linux-unix-servers-without-direct-ssh-ftp-access-btween-each-other

In a Web application data migration project, I've come across a situation where I have to copy / transfer 500 Gigabytes of data from Linux server 1 (host A) to Linux server 2 (host B). However the two machines doesn't have direct access to each other (via port 22) for security reasons and hence I cannot use sshfs to mount remotely host dir via ssh and copy files like local ones.

As this is a data migration project its however necessery to migrate the data finding a way … Normal way companies do it is to copy the data to External Hard disk storage and send it via some Country Post services or some employee being send in Data center to attach the SAN to new server where data is being migrated However in my case this was not possible so I had to do it different.

I have access to both servers as they're situated in the same Corporate DMZ network and I can thus access both UNIX machines via SSH.

Thanksfully there is a small SSH protocol + TAR archiver and default UNIX pipe's capabilities hack that makes possible to transfer easy multiple (large) files and directories. The only requirement to use this nice trick is to have SSH client installed on the middle host from which you can access via SSH protocol Server1 (from where data is migrated) and Server2 (where data will be migrated).

If the hopping / jump server from which you're allowed to have access to Linux  servers Server1 and Server2 is not Linux and you're missing the SSH client and don't have access on Win host to install anything on it just use portable mobaxterm (as it have Cygwin SSH client embedded )

Here is how:
 

jump-host:~$ ssh server1 "tar czf – /somedir/" | pv | ssh server2 "cd /somedir/; tar xf


As you can see from above command line example an SSH is made to server1  a tar is used to archive the directory / directories containing my hundred of gigabytes and then this is passed to another opened ssh session to server 2  via UNIX Pipe mechanism and then TAR archiver is used second time to unarchive previously passed archived content. pv command which is in the middle is not obligitory though it is a nice way to monitor status about data transfer like below:
 

500GB 0:00:01 [10,5MB/s] [===================================================>] 27%


P.S. If you don't have PV installed install it either with apt-get on Debian:


debian:~# apt-get install –yes pv


Or on CentOS / Fedora / RHEL etc.


[root@centos ~]# yum -y install pv


Below is a small chunk of PV manual to give you better idea of what it does:

NAME
       pv – monitor the progress of data through a pipe

SYNOPSIS
       pv [OPTION] [FILE]…
       pv [-h|-V]

DESCRIPTION
       pv  allows  a  user to see the progress of data through a pipeline, by giving information such as time elapsed, percentage
       completed (with progress bar), current throughput rate, total data transferred, and ETA.

       To use it, insert it in a pipeline between two processes, with the appropriate options.  Its standard input will be passed
       through to its standard output and progress will be shown on standard error.

       pv  will  copy  each  supplied FILE in turn to standard output (- means standard input), or if no FILEs are specified just
       standard input is copied. This is the same behaviour as cat(1).

       A simple example to watch how quickly a file is transferred using nc(1):

              pv file | nc -w 1 somewhere.com 3000

       A similar example, transferring a file from another process and passing the expected size to pv:

              cat file | pv -s 12345 | nc -w 1 somewhere.com 3000


Note that with too big file transfers using PV will delay data transfer because everything will have to pass through another 2 pipes, however for file transfers up to few gigabytes its really nice to include it.

If you only need to transfer huge .tar.gz archive and you don't bother about traffic security (i.e. don't care whether transferred traffic is going through encrypted SSH tunnel and don't want to put an overhead to both systems for encrypting the data and you have some unfiltered ports between host 1 and host 2 you can run netcat on host 2 to listen for connections and forward .tar.gz content via netcat's port like so:
 

linux2:~$ nc -l -p 12345 > /path/destinationfile
linux2:~$ cat /path/sourcfile | nc desti.nation.ip.address 12345


Another way to transfer large data without having connection with server1 and server2 but having connection to a third host PC is to use rsync and good old SSH Tunneling, like so:
 

jump-host:~$ ssh -R 2200:Linux-server1:22 root@Linux-server2 "rsync -e 'ssh -p 2200' –stats –progress -vaz /directory/to/copy root@localhost:/copy/destination/dir"

Howto install Bible on Nokia 9300i (SymbianBible)

Thursday, January 7th, 2010

Since I’m a Christian and firmly believe in the Lord Jesus Christ
as a Lord and Saviour and I love to read the bible every now and then
I found it a nice idea to have the Bible on my mobile phone.
After some research in uncle Google, I found the software that suits mymobile phone Nokia 9300i. The software is called
(SymbianBible): Bible Reader for Symbian OS Series 60 and 80
The software comes without a bible data file, thus requires you to download andplace the bible data file to some location on your mobile phone.
Here is how to install:


1. Download s80biblev2-0.98.1.sis
2. Download Some Bible data file from your choice here


or Use

that includes both the SymbianBible and the King James Bible version data file.
You can now enjoy reading the Holy Bible on your smartphone and Bless
the Lord for letting me write this post!

Remove URL from comments in WordPress Blogs and Websites to mitigate comment spam URLs in pages

Friday, February 20th, 2015

remove-comment-spam-url-field-wordpress-website-or-blog-working-how-to
If you're running a WordPress blog or Website where you have enabled comments for a page and your article or page is well indexing in Google (receives a lot of visit / reads ) daily, your site posts (comments) section is surely to quickly fill in with a lot of "Thank you" and non-sense Spam comments containing an ugly link to an external SPAM or Phishing website.

Such URL links with non-sense message is a favourite way for SPAMmers to raise their website incoming (other website) "InLinks" and through that increase current Search Engine position. 

We all know a lot of comments SPAM is generally handled well by Akismet but unfortunately still many of such spam comments fail to be identified as Spam  because spam Bots (text-generator algorithms) becomes more and more sophisticated with time, also you can never stop paid a real-persons Marketers to spam you with a smart crafted messages to increase their site's SEO ).
In all those cases Akismet WP (Anti-Spam) plugin – which btw is among the first "must have"  WP extensions to install on a new blog / website will be not enough ..

To fight with worsening SEO because of spam URLs and to keep your site's SEO better (having a lot of links pointing to reported spam sites will reduce your overall SEO Index Rate) many WordPress based bloggers, choose to not use default WordPress Comments capabilities – e.g. use exnternal commenting systems such as Disqus – (Web Community of Communities), IntenseDebate, LiveFyre, Vicomi

However as Disqus and other 3rd party commenting systems are proprietary software (you don't have access to comments data as comments are kept on proprietary platform and shown from there), I don't personally recommend (or use) those ones, yes Disqus, Google+, Facebook and other comment external sources can have a positive impact on your SEO but that's temporary event and on the long run I think it is more advantageous to have comments with yourself.
A small note for people using Disqos and Facebook as comment platforms – (just imagine if Disqos or Facebook bankrupts in future, where your comments will be? 🙂 )

So assuming that you're a novice blogger and I succeeded convincing you to stick to standard (embedded) WordPress Comment System once your site becomes famous you will start getting severe amount of comment spam. There is plenty of articles already written on how to remove URL comment form spam in WordPress but many of the guides online are old or obsolete so in this article I will do a short evaluation on few things I tried to remove comment spam and how I finally managed to disable URL link spam to appear on site.
 

1. Hide Comment Author Link (Hide-wp-comment-author-link)

This plugin is the best one I found and I started using it since yesterday, I warmly recommend this plugin because its very easy, Download, Unzip, Activate and there you're anything typed in URL field will no longer appear in Posts (note that the URL field will stay so if you want to keep track on person's input URL you can get still see it in Wp-Admin). I'm using default WordPress WRC (Kubrick), but I guess in most newer wordpress plugins is supposed to work. If you test it on another theme please drop a comment to inform whether works for you.  Hide Comment Author Link works on current latest Wordpress 4.1 websites.

A similar plugin to hide-wp-author-link that works and you can use is  Hide-n-Disable-comment-url-field, I tested this one but for some reason I couldn't make it work.

wordpress-remove-delete-hide-n-disable-url-comment-without-deleting-the-form-url-field-screenshot-reduce-comment-spam
Whatever I type in Website field in above form, this is wiped out of comment once submitted 🙂
 

2. Disable hide Comment URL (disable-hide-comment-url)

I've seen reports disable-hide-comment-url works on WordPress 3.9.1, but it didn't worked for me, also the plugin is old and seems no longer maintaned (its last update was 3.5 years ago), if it works for you please please drop in comment your WP version, on WP 4.1 it is not working.

disable-hide-comment-url-screenshot-plugin-to-disable-comment-url-spam-in-wordpress-sites


3. WordPress Anti-Spam plugin

WordPress Anti-Spam plugin is a very useful addition plugin to install next to Akismet. The plugin is great if you don't want to remove commenter URL to show in the post but want to cut a lot of the annoying Spam Robots crawling ur site.
 

Anti-spam plugin blocks spam in comments automatically, invisibly for users and for admins.

  • no captcha, because spam is not users' problem
  • no moderation queues, because spam is not administrators' problem
  • no options, because it is great to forget about spam completely

Plugin is easy to use: just install it and it just works.

Anti bot works fine on WP 4.1

4. Stop Spam Comments

Stop Spam Comments is:

  • Dead simple: no setup required, just activate it and enjoy your spam-free website.
  • Lightweight: no additional database queries, it doesn't add script files or other assets in your theme. This means your website performance will not be affected and your server will thank you.
  • Invisible by design: no captchas, no tricky questions or any other user interaction required at all.
     

Stop Spam Comments works fine on WP 4.1.

I've mentioned few of the plugins which can help you solve the problem, but as there are a lot of anti-spam URL plugins available for WP its up to you to test and see what fits you best. If you know or use some other method to protect yourself from Comment Url Spam to share it please.

Import thing to note is it usually a bad idea to mix up different anti-spam plugins so don't enable both Stop Spam Comments and WordPress Anti Spam plugin.

5. Comment Form Remove Url field Manually 

This (Liberian) South) African blog describes a way how to remove URL field URL manually

In short to Remove Url Comment Field manually either edit function.php (if you have Shell SSH access) or if not do it via Wp-Admin web interface:
 

WordPress admin page –> Appearance –> Editor


Paste at the end of file following PHP code:


add_filter('comment_form_default_fields', 'remove_url');
 function remove_url($fields)
 {
 if(isset($fields[‘url’]))
 unset($fields[‘url’]);
 return $fields;
 }


Now to make changes effect, Restart Apache / Nginx Webserver and clean any cache if you're using a plugin like W3 Total Cache plugin etc.

Other good posts describing some manual and embedded WordPress ways to reduce / stop comment spam is here and here, however as it comes to my blog, none of the described manual (code hack) ways I found worked on WordPress v. 4.1.
Thus I personally stuck to using Hide and Disable Comment URL plugin  to get rid of comment website URL.

Save data from failing hard disk on Linux – Rescuing data from failing disk with bad blocks

Wednesday, April 16th, 2014

save-data-from-failing-hard-drive-data-recovery-badblocks-linux_1.jpg
Sooner or later your Linux Desktop or Linux server hard drive will start breaking up, whether you have a hardware or software RAID 1, 6 or 10 you can  and good hard disk health monitoring software you can react on time but sometimes as admins we have to take care of old servers which either have RAID 0 or missing RAID configuration and or disk firmware is unable to recognize failing blocks on time and remap them. Thus it is quite useful to have techniques to save data from failing hard disk drives with physical badblocks.

With ddrescue tool there is still hope for your Linux data though disk is full of unrecoverable I/O errors.

apt-cache show ddrescue
 

apt-cache show ddrescue|grep -i description -A 12

Description: copy data from one file or block device to another
 dd_rescue is a tool to help you to save data from crashed
 partition. Like dd, dd_rescue does copy data from one file or
 block device to another. But dd_rescue does not abort on errors
 on the input file (unless you specify a maximum error number).
 It uses two block sizes, a large (soft) block size and a small
 (hard) block size. In case of errors, the size falls back to the
 small one and is promoted again after a while without errors.
 If the copying process is interrupted by the user it is possible
 to continue at any position later. It also does not truncate
 the output file (unless asked to). It allows you to start from
 the end of a file and move backwards as well. dd_rescue does
 not provide character conversions.


To use ddrescue for saving data first thing is to shutdown the Linux host boot the system with a Rescue LiveCD like SystemRescueCD – (Linux system rescue disk), Knoppix (Most famous bootable LiveCD / LiveDVD), Ubuntu Rescue Remix or BackTrack LiveCD – (A security centered "hackers" distro which can be used also for forensics and data recovery), then mount the failing disk (I assume disk is still mountable :). Note that it is very important to mount the disk as read only, because any write operation on hard drive increases chance that it completely becomes unusable before saving your data!

To make backup of your whole hard disk data to secondary mounted disk into /mnt/second_disk

# mkdir /mnt/second_disk/rescue
# mount /dev/sda2 /mnt/second_disk/rescue
# dd_rescue -d -r 10 /dev/sda1 /mnt/second_disk/rescue/backup.img
# mount -o loop /mnt/second_disk/rescue/backup.img

In above example change /dev/sda2 to whatever your hard drive device is named.

Whether you have already an identical secondary drive attached to the Linux host and you would like to copy whole failing Linux partition (/dev/sda) to the identical drive (/dev/sdb) issue:

ddrescue -d -f -r3 /dev/sda /dev/sdb /media/PNY_usb/rescue.logfile

If you got just a few unreadable files and you would like to recover only them then run ddrescue just on the damaged files:

ddrescue -d –R -r 100 /damaged/disk/some_dir/damaged_file /mnt/secondary_disk/some_dir/recoveredfile

-d instructs to use direct I/O
-R retrims the error area on each retry
-r 100 sets the retry limit to 100 (tries to read data 100 times before resign)

Of course this is not always working as on some HDDs recovery is impossible due to hard physical damages, if above command can't recover a file in 10 attempts it is very likely that it never succeeds …

A small note to make here is that there is another tool dd_rescue (make sure you don't confuse them) – which is also for recovery but GNU ddrescue performs better with recovery.
How ddrescue works is it keeps track of the bad sectors, and go back and try to do a slow read of that data in order to read them.
By the way BSD users would happy to know there is ddrescue port already, so data recovery on BSDs *NIX filesystems if you're a Windows user you can use ddrescue to recover data too via Cygwin.
Of course final data recovery is also very much into God's hands so before launching ddrescue, don't forget to say a prayer 🙂

Archive Outlook mail in Outlook 2010 to free space in your mailbox

Thursday, May 15th, 2014

outlook-archive-old-mail-to-prevent-out-of-space-problems-outlook-logo
If you're working in a middle or big sized IT company or corporation like IBM or HP, you're already sucked into the Outlook "mail whirlwind of corporate world" and daily flooded with tons of corporate spam emails with fuzzy business random terms like taken from Corporate Bullshit Generator

Many corporations, because probably of historic reasons still provide employees with small sized mailboxes half a gigabyte, a gigabyte or even in those with bigger user Mailboxes like in Hewlett Packard, this is usually no more than 2 Gigabytes.

This creates a lot of issues in the long term because usually mail communication in Inbox, Sent Items, Drafts Conversation History, Junk Email and Outbox grows up quickly and for a year or a year and a half, available Mail space fills up and you stop receiving email communication from customers. This is usually not too big problem if your Mailbox gets filled when you're in the Office (in office hours). However it is quite unpleasent and makes very bad impression to customers when you're in a few weeks Summar Holiday with no access to your mailbox and your Mailbox free space  depletes, then you don't get any mail from the customer and all the time the customer starts receiving emails disrupting your personal or company image with bouncing messages saying the "INBOX" is full.

To prevent this worst case scenario it is always a good idea to archive old mail communication (Items) to free up space in Outlook 2010 mailbox.
Old Outlook Archived mail is (Saved) exported in .PST outlook data file format. Later exported Mail Content and Contacts could be easily (attached) from those .pst file to Outlook Express, leaving you possibility to still have access to your old archived mail keeping the content on your hard drive instead on the Outlook Exchange Mailserver (freeing up space from your Inbox).

Here is how to archive your Outlook mail Calendar and contacts:

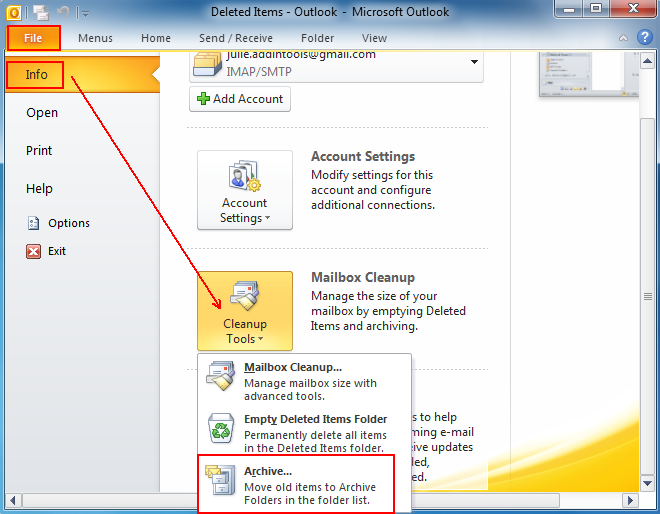
Archive-outlook-mail-in-microsoft-outlook-2010-free-space-in-your-mailbox

1. Click on the "File" tab on the top horizontal bar.Select "Cleanup Tools" from the options.

2. Click "Cleanup Tools" from the options.

3. Click on the "Archive this folder and all subfolders" option.

4. Select what to archive (e.g. Inbox, Drafts, Sent Items, Calendar whatever …)

5. Choose archive items older than (this is quite self-explanatory)

6. Select the location of your archive file (make sure you palce the .PST file into directory you will not forget later)

That's all now you have old mails freed up from Outlook Exchange server. Now make sure you create regular backups ot old-archived-mail.pst file you just created, it is a very good idea to upload this folder to encrypted file system on USB stick or use something like TrueCrypt to encrypt the file and store it to external hard drive, if you already don't have a complete backup corporate solution backuping up all your Laptop content.

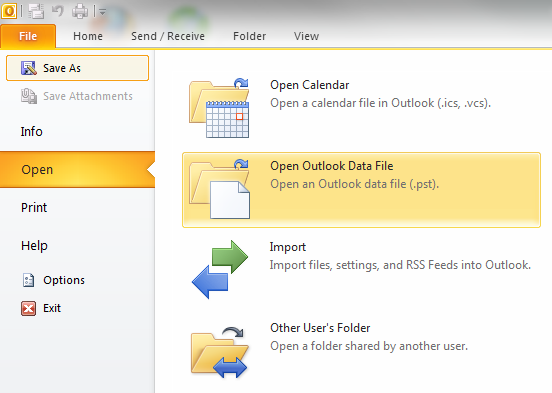
Later Attaching or detaching exported .PST file in Outlook is done from:

File -> Open -> Open Outlook Data File

outlook-open-backupped-pst-datafile-archive-importing-to-outlook-2010


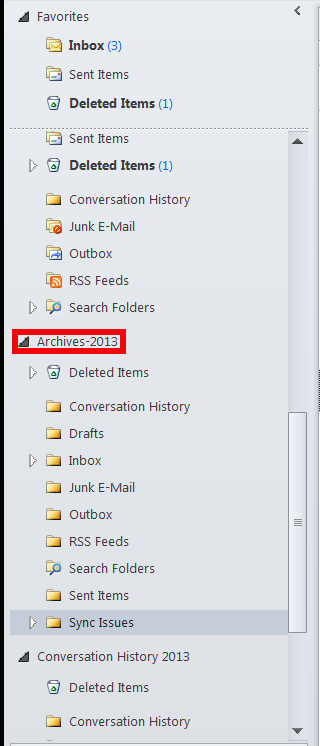
Once .PST file is opened and attached in Left Inbox pane you will have the Archived old mail folder appear.


outlook-archived-mail-pannel-screenshot-windows-7
You can change Archived name (like I did to some meaningful name) like I've change it to Archives-2013 by right clicking on it (Data File properties -> Advanced)

ping “General Failure” no internet connection Windows 7 on HP work computer – Reasons for general failure and solution

Monday, May 26th, 2014

windows-7-general-failure-error-fix-on-hp-workbook
Out of a sudden today after running Malware Bytes – Free Anti-Malware & Internet Security Software, and after it found some Malware (Pup.Optional.Opencandy) and removed it it WI-FI internet on my work computer HP Elitebook 8470p mysteriously stopped working.

That's quite nasty because today I'm working from Home – well known among Hewlett Packard employees under WFH abbreviation. I couldn't connect normally to my home Access Point and tried pinging Google from command line just to get an error:
 

Transmit Failed: General Failure


and first I thought it is a wi-fi router related problem and restarted my WIFI RouterD-Link DI524. As I could normally connect to the WIFI and I see there is an internet IP assigned running:

ipconfig /all
...
Wireless LAN adapter Wireless Network Connection:
Connection-specific DNS Suffix . :
Description . . . . . . . . . . . : Intel(R) Centrino(R) Ultimate-N 6300 AGN
Physical Address. . . . . . . . . : 3C-A9-F4-4C-E7-98
DHCP Enabled. . . . . . . . . . . : Yes
Autoconfiguration Enabled . . . . : Yes
Link-local IPv6 Address . . . . . : fe80::5d2f:97b8:9e1a:2b13%63(Preferred)
IPv4 Address. . . . . . . . . . . : 192.168.2.159(Preferred)
Subnet Mask . . . . . . . . . . . : 255.255.255.0
Lease Obtained. . . . . . . . . . : May 23, 2014 14:19:01 PM
Lease Expires . . . . . . . . . . : May 30, 2014 14:32:49 PM
Default Gateway . . . . . . . . . : 192.168.2.1
DHCP Server . . . . . . . . . . . : 192.168.2.1
DHCPv6 IAID . . . . . . . . . . . : 1094494708
DHCPv6 Client DUID. . . . . . . . : 00-01-00-01-19-CB-1A-5D-A4-5D-36-5A-EB-84
DNS Servers . . . . . . . . . . . : 8.8.8.8
192.168.2.1
NetBIOS over Tcpip. . . . . . . . : Enabled

As you see in above output I have notebook IP, default gateway and DNS IP assigned – i.e. all seems fine, so as I got General Failure from pinging the Internet in order to make sure my Linux router is not the bottleneck I tried pinging Default GW

C:UsersGeorgi> ping 192.168.2.1 Pinging 192.168.2.1 with 32 bytes of data:
PING: transmit failed. General failure.
Ping statistics for 192.168.2.1:
Packets: Sent = 4, Received = 0, Lost = 4 (100% loss)

Just to realize I'm continually getting General Failure error

I tried trying to renew IPs, to make sure there is no some kind of IP assignment conflict with my other WIFI connected devices,reflushing DNS and resetting WinSock stack, hoping this could help:

> ipconfig /renew
> ipconfig /flushdns
> netsh winsock reset

Then I tried restarting the PC a couple of times, but unfortunately none of those helped the shitty error:
 

PING: Transmit failed. General Failure

continued …

I was totally out of idea .. and red some people managed to fix the issue after booting Windows into Safe mode with Networking. I tried booting in Safe mode, but as Hard Drive data is encrypted with Bitlocker encryption I was asked about some kinf of Serial Key – which I don't have at hand – hence I couldn't boot into Safe mode …

Here is moment to say even loopback device was returning "General Failure"!

I tried even connecting the laptop directly into my homelan with UTP cable, but though everything got connected, there was no local network and internet. I tried even connecting via Vivacom's mobile network 3G modem and even there I got the "General Failure" error …

Running out of options, I decided it might be that Malware Bytes broke something during Malware removal hence I put out back Quarantined Malware files – but this didn't solve it either.

solution-to-no-internet-general-failure-ping-error-firewall-off-screenshot.png

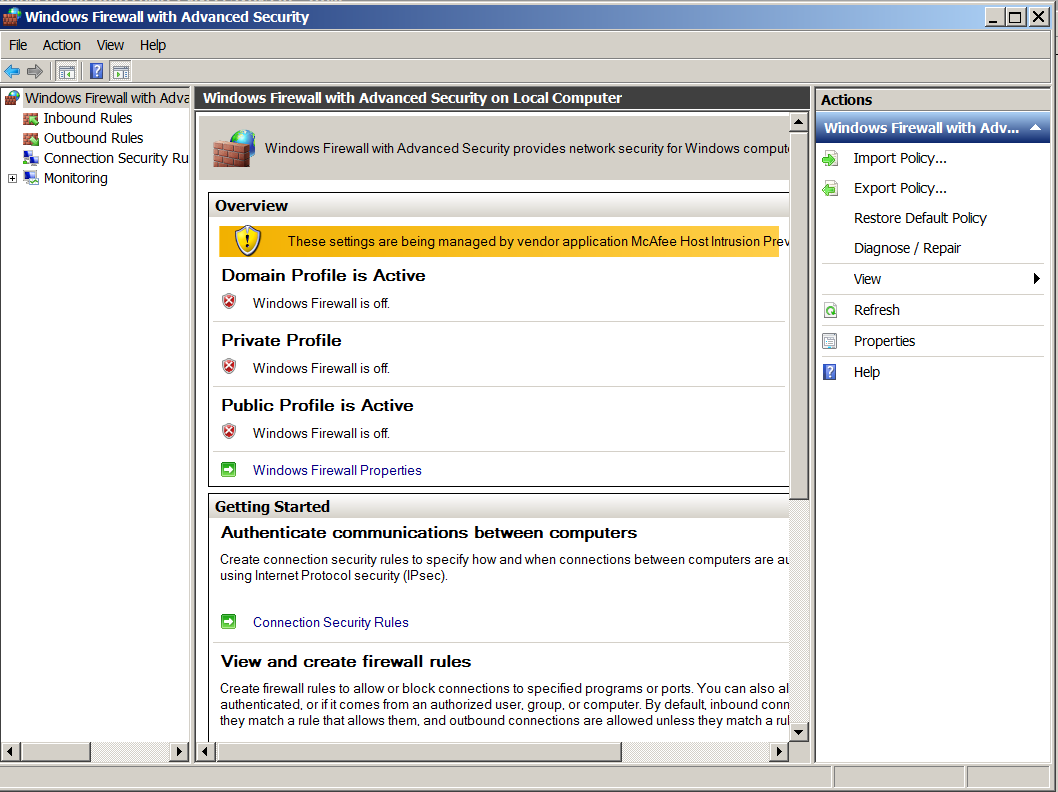
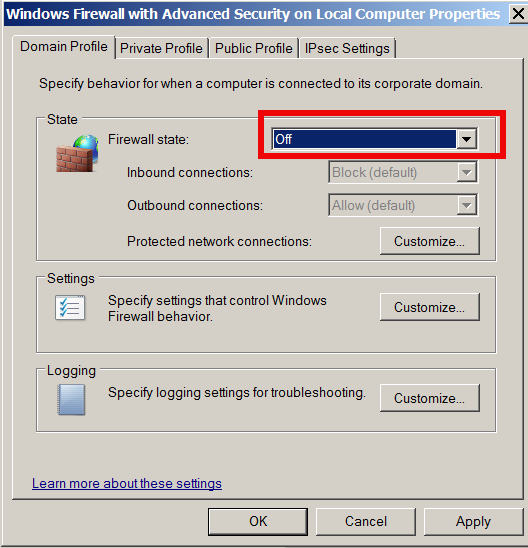
Finally I found this post and this thread talking that reason for "General Failure" might be firewall related. After checking my firewall settings in Windows Firewall and Advanced Security, surprisingly I realized everything related to firewall – e.g. Default Profile, Inbound, Outbound connections are Turned off!!!

windows-firewall-off-reason-for-general-failure-no-internet

I switched everything back and my Internet and local connection came back! THANKS GOD! Pfuu, now I can continue working. It seems HP work computers are patched with software / configured to not allow Internet connection in case if Firewall is Off. If you happen to be an HP Employee and you get the PING: Transmit failed. General Failure, be sure the first place to check is whether Windows Firewall is enabled? – if not enable it and this will solve your connectivity issues. Cheers ! 🙂

Your Firefox profile cannot be loaded. It may be missing or inaccessible – Fix

Tuesday, May 27th, 2014


your-firefox-profile-cannot-be-loaded-it-may-be-missing-or-inaccessible

When I opened firefox I was offered that firefox cleans some data. Pressing on it took a long so I killed firefox process from Windows taskmanager (taskmgr).  . Next time Firefox was started I got the error (warning):
 

Your Firefox profile cannot be loaded. It may be missing or inaccessible"

Firefox version is 29.0.1.

Once the dialog, Firefox fails to further open. To fix Your Firefox profile cannot be loaded. It may be missing or inaccessible press windows-key+R to invoke <Open program prompt and type in:

%appdata%Mozilla

In explorer Window that will pop=up rename the folder labelled "Firefox" to something like old-Firefox.
On next start of firefox, you will be offered to recrate "the missiong profile and it will force Firefox to re-create profile.

If you want to import some of your old data into the new profile afterwards: Recovering important data from an old profile check Recovering important data from an old profile Another approach is to to go to Firefox profile folder and delete profiles.ini, this will also make firefox recreate the file on its next start. Enjoy ! 🙂


How to read ext2 / ext3 / ext4 Linux filesystem and Mac OS X HFS+ partitions from Windows

Thursday, November 27th, 2014

access-linux-drives-filesystem-disks-from-microsoft-windows-howto-picture
If you are using a Dual-boot PC with installed M$ Windows and GNU .Linux OS storing many of your Documents / Music / Movie data on Linux's ext3 / ext4 filesystem partition  but using often also Windows PC for Professional Graphic Design or Photoshop CS5 / Coreldraw Graphics Suite X7 / 3D Studio / Adobe Drewmweaver you will certainly want to be able to mount (Map drive) as a drive Linux partitions ext3 / ext4 or Mac OS's HFS+ read / use it straight from Windows.

Below are few softs that does allow mounting Mac and Linux (Debian, Ubuntu, Fedora, SuSE etc.) partitions on Windows

1. Mapping Linux ext3 and ext4 as a Windows drive

There are number of programs that can map Linux partition as a drive / directly explore Linux FS content. Most famous (free) ones are:

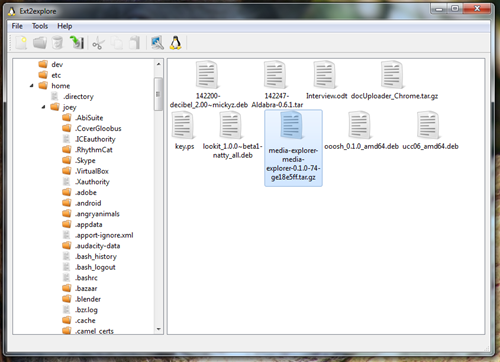
  • Ext2Explore (also known as Ext2Read) – Probably best historically known Windows driver that does Linux ext FS reading 


    ext2explore-access-ubuntu-debian-fedora-suse-linux-from-your-windows-screenshot
     

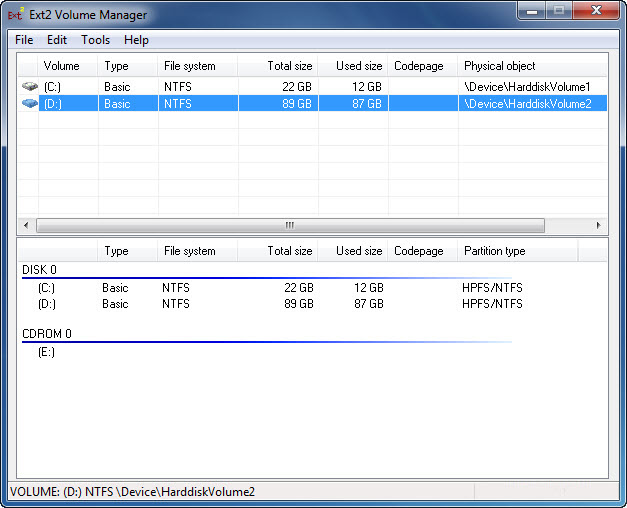
  • Ext2FSD – Open source file system driver for Windows (2K / XP / WIN7 / WIN8 – both x86 and 64 bit arch) supports ext2 / ext3 FSs and even CIFS protocol shares over network mounts. Ext4 filesystems are supported in read only mode only. It supports many language codepage utf8, cp936, cp950 etc..- Cyrillic file names shown correctly 🙂


    ext2fsd-mount-linux-partitions-in-microsoft-windows-screenshot
     

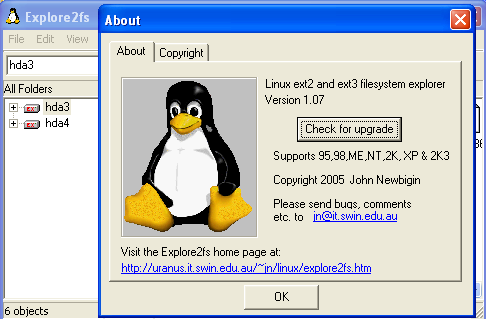
  • Explore2FS – GUI explorer tool for accessing ext2 and ext3 filesystems. It runs under all versions of Windows and can read almost any ext2 and ext3 filesystem.


    explore2fs-linux-partitions-from-widnows-screenshot
     

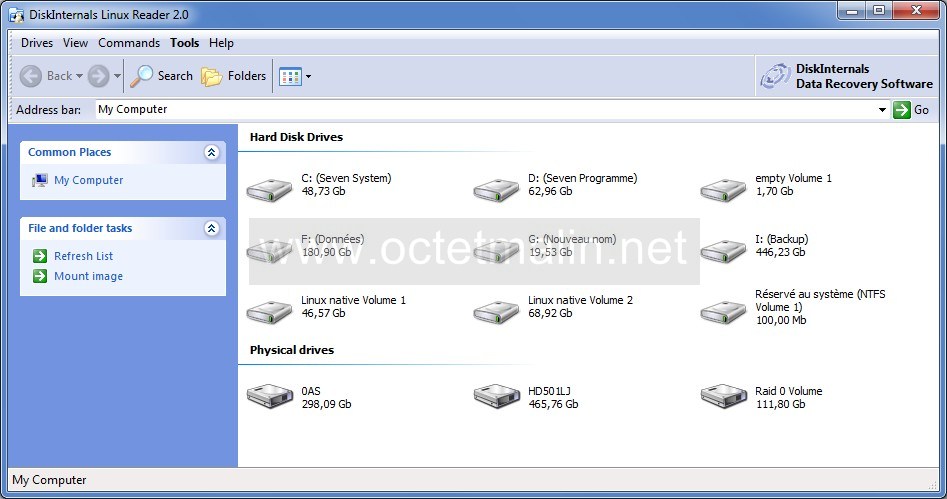
  • Disk Internals Linux reader – A freeware tool for reading and extracting files from EXT2/EXT3/EXT4, HFS, UFS2, Reiser4, and ReiserFS partitions in Windows.


    disk-internals-linux-reader-2.0-screenshot-proprietary-linux-filesystem-reader-mounter-for-windows


Other useful multiplatorm Linux FS reader unfortunately proprietary one is ParagonExtFS – proprietary software having version for both Win OS and Mac (Supports also mounting Linux partitionons Mac).

Note that if you copy some files using some of above tools to Windows permissions held in Linux could screw up, so it is not a good idea to try backup Linux configuration files to Windows's partitions 🙂

2. Read Copy files from Mac OS HFS+ filesystem to Windows

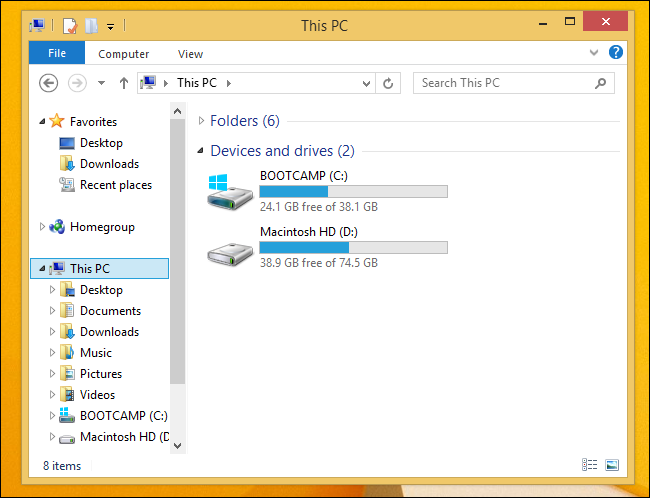
Apple has Boot Camp driver package which allows Mac OS's HFS+ to be viewable from Windows.

reading-Mac-OSX-HFS-plus-partitions-from-ms-windows-with-bootcamp-driver

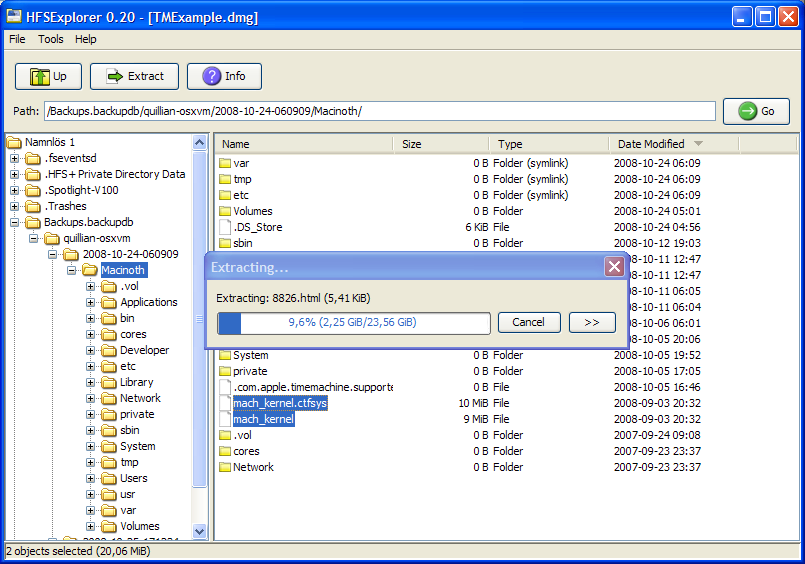
For people who don't intend to continuosly read data HFS+ it might be better to not load Boot Camp but use:

hfsexplorer-explorero-allowing-read-access-to-mac-osx-from-ms-windows-os

 Only problem with Boot Camp and HFSExplorer is it allows you to read data from Mac OS filesystem only read only.If you want to write to HFS+ filesystem from Windows you will need:

  • Proprietary Paragon HFS+ (or)

How to split / rar in parts large data archive files on Linux and Windows – Transfer big files across servers located in DMZ rescticted areas

Friday, November 28th, 2014

how-to-split-rar-in-parts-large-data-archive-files-on-Linux-and-Windows-Transfer-big-files-across-servers-in-firewalled-restricted-areas

I was working on a Application Migration Project whose goal was to Install a business application called Asset Guardian and then move current company Data from the old server to the new AppServer.
F
or that purpose the company vendor Asset Guardian shipped to a Public access FTP, a huge (12GB) ZIP archive file which had to be transferred into a well secured DMZ-ed corporation network with various implemented Traffic Shaping Network policies, a resctrictive firewall allowing access to Internal Network only and to Few (Restrictive configured) Proxy Server IPs on port 80 and 8080.

One of the proxy servers allowed access to the Internet and I set this one and tried downloading the Huge Archive file  with the Windows 2012 server default browser Internet Explorer 10, though the download started it kept slow between ~ 300 – 500KB sec and when reached 3.4GB download failed. I tried resuming the download but as the remote Public FTP server where files resides doesn't support FTP RESUME function.
I thought it might be that Internet Explorer is badly managing the download so, I go forward and installed Portable Firefox (mirrored version 33.1.1 is here). Re-running download with firefox also failed, so the next logical step was for me to try downloading with Windows version of Wget (Wget) and with Portable Free Download Manager 3.9.14.1481 (mirrored here) using both of them was unable to complete download (probably due to firewall or Proxy screwing the proxy inspected traffic) thus I had to look for another way to copy the enormous archive into the company network.

To get around the issue I tried to download the file from FTP to another Server running Apache and tried re-downloading the big file archive (Asset-Guardian-data.zip) from Apache Webserver via HTTP protocol, this download method didn't work neither using plain HTTP protocol for download when downloaded file reached (3.4GB), thus I realized this is due to restrictive Proxy servers (dropping file downloads) bigger than  3.4GBs).

Then to be able to transfer the huge 12GB file, it seems the only left option was to to chop the big file on smaller file chunks and transfer them one by one.
In my case I had the Asset-Guardian-Files.zip transferred already to the Apache (Webserver) host which is running Linux so basicly the task was to Transfer Big archive file between the SuSE Linux Enterprise Server (SLES) 11 and Windows 2012 Server.

Quickesy way to do that is by using UNIX split command, i.e.:

split -b 1024m Asset-Guardian-Files.zip


The outputted files each 1GB are with naming (xaa, xab, xac, xad, xae, xaf, gaf etc.) in same folder where split command is run:

To later merge the files on the Windows 2012 server (copy) command is used:

copy /b file1 + file2 + file3 + file4 filetogether


In my case the command to issue on Win 2012 server was:

copy /b xaa + xab + xac + xae + xae + xaf + xaf + xag xah xai xaj xak Asset-Guardian-files.zip


This method to chop and transfer the file is most simple one and it doesn't require the two servers to have WinRAR or Console RAR / unrar installed.

If instead of Copy Huge File from Linux -> Windows host you need to copy too big file (lets say 100GB) between 2 Windows servers (Windows server host A and Windows server Host B – both situated in different firewall corporate networks) you will need to download to Win Host A and use Windows UNIX split equivalent tool called sfk (The Swiss File Knife) , sfk has port also for Mac OS so in case of need for need for migrating huge archive file from Mac OS X host it will serve as Linux's split – I've made SFK (current version) mirror here.

Another way to cut the 12GB file in parts and transfer to destination host via HTTP was to use rar (on the Linux host), then download the file on Win 2012 server and use Winrar Portable Free to extract the multiple files:

To make archive separate in parts set out to certain size out of a huge file with rar on Linux use:

cd /var/www
rar -a -v1000000k Asset_Guardian_Files.splitted.rar /var/www/Asset_Guardian_Files.zip

10000000Kbs = 10000000/1024 = 976MBs, hence rar produced parts will be sized to 976MB rar parts.

To find out archives check for *splitted*.rar in your /var/www

ls -al /var/www/*splitted*.rar
-rw-r–r– 1 root root 1048576 ное 28 18:34 Asset-Guardian-Files.splitted.part1.rar
-rw-r–r– 1 root root 1048576 ное 28 18:34 Asset-Guardian-Files.splitted.part2.rar
-rw-r–r– 1 root root 1048576 ное 28 18:34 Asset-Guardian-Files.splitted.part3.rar
-rw-r–r– 1 root root 1048576 ное 28 18:34 Asset-Guaridna-Filse.splitted.part4.rar


Then to download the files M$ Win 2012 server IE (http://my-linux-host.com/Asset-Guardian-Files.splitted.part1.rar, http://my-linux-host.com/Asset-Guardian-Files.splitted.part2.rar. etc.)

Thanks God, Problem Solved 🙂