Posts Tagged ‘data’
Monday, December 1st, 2014 
Recently, I've blogged on how to move large files from source to destination server in parts on a slow / restricted networks or whenever the media is limtied in size. This is not a common scenario but it happens so if you're admin sooner or later you will need that. I give example with UNIX's split and unrar. However strip's file naming can get you insane (in case if you don't want to use cstrip command – split a file into sections determined by context lines instead) plus normal split Linux / *nix command doesn't support compression and encryption. On the other side on many Company internal Networks with Windows server hosts running – Winblows (2003, 2008, 1012) for security purposes it might be that WinRar is not installed, thus you might need to transfer the file parted between the GNU / Linux server and Windows server in standard OS supported by Windows ZIP format. Assuming that you have root (admin) access to the Linux host you can then archive your file in parts using ZIP encryption algorithm with 7zip.
1. Installing 7zip on CentOS / Fedora / RHEL and other Redhat based Linuces
If the Linux server is running:
Fedora / CentOS / RHEL and you don't have 7zip installed yet install it with:
yum -y install p7zip
According to distros version it might be the name could be a bit different if p7zip is different to find the one you need search with:
yum search p7zip
and install whatever you need
2. Installing 7zip on Debian / Ubuntu and other Debian based servers
apt-get install –yes p7zip-full
Depending on Deb based distro just like with fedora if p7zip-full pack is not installable, check 7zip's package distro version:
apt-cache search p7zip
3. Archiving ZIP file in multiple (sized) parts on GNU / Linux
7z a -v512m Large-file-separated-in-multi-parts.zip Large-Many-Gigabytes-File.SQL
This would output multiple files:
Large-file-separated-in-multi-parts.zip.001, Large-file-separated-in-multi-parts.zip.002, Large-file-separated-in-multi-parts.zip.003, Large-file-separated-in-multi-parts.004 etc.
If you want to add security to the transferred file to protect newly created ZIP archive with password use following command:
7z a -v512m Large-file-separated-in-multi-parts.zip Large-Many-Gigabytes-File.SQL
7-Zip [64] 9.20 Copyright (c) 1999-2010 Igor Pavlov 2010-11-18
p7zip Version 9.20 (locale=bg_BG.UTF-8,Utf16=on,HugeFiles=on,2 CPUs)
Scanning
Creating archive Large-file-separated-in-multi-parts.zip
Enter password (will not be echoed) :
…
Once you have transferred all the many parts via (SSH/ FTPS or not preferrably HTTP / HTTPS / FTP) place them in the same folder and use Windows standard ZIP to unarchive.
If the archived 7zip files are to be unarchived on another Linux host (in case if multi part zip transfer is between Linux -> Linux hosts) to unarchive, parted files:
7z x Large-file-separated-in-multi-parts.zip.* …
Tags: case, Creating, data, file, Linux, need, password, root admin, security, SQL, use, Windows, zip
Posted in Everyday Life, Linux, Linux and FreeBSD Desktop, System Administration, Various, Windows | 1 Comment »
Tuesday, November 2nd, 2010 You will need png2ico
First you will have to download the png2ico source
Now you will have to download compile and install the program by issuing:
debian:~# wget http://www.winterdrache.de/freeware/png2ico/data/png2ico-src-2002-12-08.tar.gz

debian:~# tar -zxvf png2ico-src-2002-12-08.tar.gz...

debian:~# cd png2ico/

debian:/root/png2ico# make

debian:/root/png2ico# cp -rpf png2ico /usr/local/bin/
Convertion is pretty easy and it comes to executing simply:
debian:/home/hipo$ png2ico favicon.ico png_picture_to_convert.png
Note that your png_picture_to_convert.png has to be in a graphic dimensions of 16×16
That’s all now you should have your favicon.ico on your Linux created.
Tags: Convert, Convert png files to ico on Linux, data, debian cd, download, gz, Linux, make, png, program, root, src, tar, zxvf
Posted in Linux | 2 Comments »
Wednesday, January 15th, 2014 
Recently I've been asked How to make communication to MySQL database encrypted. The question was raised by a fellow developer who works on developing a Desktop standalone application in Delphi Programming Language with DevArt an (SQL Connection Component capable to connect Delphi applications to multiple databases like MySQL, Oracle, PostgreSQL, Interbase, Firebird etc.
Communicating in Secured form to MySQL database is not common task to do, as MySQL usually communicates to applications hosted on same server or applications to communicate to MySQL are in secured DMZ or administrated via phpMyAdmin web interface.
MySQL supports encrypted connections to itself using Secure Socket Layer (SSL) encryption. Setting up MySQL db to be communicated encrypted is a must for standalone Desktop applications which has to extract / insert data via remote SQL.
Configuring SQL to support communicated queries encrpytion is supported by default and easily configured on most standard Linux version distributions (Debian, RHEL, Fedora) with no need to recompile it.
1. Generate SSL Certificates
$ mkdir /etc/mysql-ssl && cd mysql-ssl
# Create CA certificate
$ openssl genrsa 2048 > ca-key.pem
$ openssl req -new -x509 -nodes -days 3600 \
-key ca-key.pem -out ca-cert.pem
Create server certificate, remove passphrase, and sign it
server-cert.pem is public key, server-key.pem is private key
$ openssl req -newkey rsa:2048 -days 3600 \
-nodes -keyout server-key.pem -out server-req.pem
$ openssl rsa -in server-key.pem -out server-key.pem
$ openssl x509 -req -in server-req.pem -days 3600 \
-CA ca-cert.pem -CAkey ca-key.pem -set_serial 01 -out server-cert.pem
Create client certificate, remove passphrase, and sign it
client-cert.pem is public key and client-key.pem is private key
$ openssl req -newkey rsa:2048 -days 3600 \
-nodes -keyout client-key.pem -out client-req.pem
$ openssl rsa -in client-key.pem -out client-key.pem
$ openssl x509 -req -in client-req.pem -days 3600 \
-CA ca-cert.pem -CAkey ca-key.pem -set_serial 01 -out client-cert.pem
After generating the certificates, verify them:
$ openssl verify -CAfile ca-cert.pem server-cert.pem client-cert.pem
2. Add SSL support variables to my.cnf
Once SSL key pair files are generated in order to active SSL encryption support in MySQL server, add to (/etc/my.cnf, /etc/mysql/my.cnf, /usr/local/etc/my.cnf … ) or wherever config is depending on distro …
# SSL

ssl-ca=/etc/mysql-ssl/ca-cert.pem

ssl-cert=/etc/mysql-ssl/server-cert.pem

ssl-key=/etc/mysql-ssl/server-key.pem
3. Restart MySQL server
 /etc/init.d/mysqld restart

...
4. Create SQL user to require SSL login
Create new user with access to database;
GRANT ALL ON Sql_User_DB.* TO Sql_User@localhost;

FLUSH PRIVILEGES;
To create administrator privileges user:
 GRANT ALL PRIVILEGES ON *.* TO ‘ssluser’@'%’ IDENTIFIED BY ‘pass’ REQUIRE SSL;

FLUSH PRIVILEGES;
5. Test SSL Connection with MySQL CLI client or with few lines of PHP
To use mysql cli for testing whether SSL connection works:
$ mysql -u ssluser -p'pass' –ssl-ca /etc/mysql-ssl/client-cert.pem –ssl-cert /etc/mysql-ssl/client-key.pem
Once connected to MySQL to verify SSL connection works fine:
 mysql> SHOW STATUS LIKE 'Ssl_Cipher';

 +---------------+--------------------+

| Variable_name | Value              |

 +---------------+--------------------+

| Ssl_cipher    | DHE-RSA-AES256-SHA |

+---------------+--------------------+
If you get this output this means MySQL SSL Connection is working as should.
Alternative way is to use test-mysqli-ssl.php script to test availability to mysql over SSL.
$conn=mysqli_init();

mysqli_ssl_set($conn, '/etc/mysql-ssl/client-key.pem', '/etc/mysql-ssl/client-cert.pem', NULL, NULL, NULL);

if (!mysqli_real_connect($conn, '127.0.0.1', 'ssluser', 'pass')) { die(); }

$res = mysqli_query($conn, 'SHOW STATUS like "Ssl_cipher"');

print_r(mysqli_fetch_row($res));

mysqli_close($conn);
Note: Change username password according to your user / pass before using the script
That's all now you have mysql communicating queries data over SSL
Tags: administrator, application, change, cnf, common, data, databases, Debian, Delphi Programming Language, Desktop, DMZ, fellow, How to, make, multiple, null, openssl, password, pem, php, queries, rhel, script, setting, SSL, testing, username, variables
Posted in MySQL, System Administration, Web and CMS | No Comments »
Wednesday, November 6th, 2013 
It is common solution for personal use to generate SSL certificates which are self-signed. Self-signed certificates are dangerous as no authority or company guarantees that remote site is trustable. However for private use having encrypted connection whether you need to transfer personal data is better than not having such. There are plenty of tutorials online pointing how to set-up Apache webserver to provide access via SSL port 443 with self-signed certifacate, but anyways I decided to blog here a one-liner command way, which makes generating self-signed certificate a piece of cake. Self-signed certificates on UNIX are generated with openssl command part of openssl (Secure Socket Layer cryptocgraphic tools).
On Debian Linux to install openssl (if you still don't have it):
apt-get install --yes openssl
On Fedora, RHEL, CentOS etc. same install should be done with:
yum install -y openssl
On FreeBSD to install it use ports;
cd /usr/ports/security/openssl

make install clean
Once openssl is available, here is command to generate self signed SSL certitifacate;
openssl req -x509 -nodes -days 3650 -newkey rsa:2048 -keyout my-sitename.key -out my-sitename.crt
Generating a 2048 bit RSA private key
............................................+++
..............................................................+++
writing new private key to 'key.pem'
Enter PEM pass phrase:
Verifying - Enter PEM pass phrase:
-----
You are about to be asked to enter information that will be incorporated
into your certificate request.
What you are about to enter is what is called a Distinguished Name or a DN.
There are quite a few fields but you can leave some blank
For some fields there will be a default value,
If you enter '.', the field will be left blank.
-----
Country Name (2 letter code) [AU]:BG
State or Province Name (full name) [Some-State]:Sofia
Locality Name (eg, city) []:Sofia
Organization Name (eg, company) [Internet Widgits Pty Ltd]:Pc Freak
Organizational Unit Name (eg, section) []:Pc Freak
Common Name (eg, YOUR name) []:www.pc-freak.net
Email Address []:testing@www.pc-freak.net
The generated certificate Private Key file is placed in my-sitename.key
, actual certificate is located in my-sitename.crt -days option tells for how long period certificate will be valid. Regenerating certificate every year (360 days) is good security practice but it is pretty annoying to see your certificate has expered thus for private self signed SSL certificate it is more confortable to generate cert for 10 years time.
To use my-sitename.key and my-sitename.crt copy them to /etc/ssl/crt/
cp -rpf my-sitename.crt /etc/ssl/crt/

cp -rpf my-sitename.key /etc/ssl/crt/
Next what's left is to configure Apache to use new generated certs. Quickest way is to add it inside virtual host. Adding to Apache also depends on Linux distribution where SSL has to be added but in general, what should work is something like:
 SSLEngine on

SSLCertificateFile /etc/ssl/crt/my-sitename.crt

SSLCertificateKeyFile /etc/ssl/crt/my-sitename.key
Note that if SSL has to be enabled for specific Virtual Host you will have to place above Apache directives into the Vhost. Though certifiate will only be trusted by your authority RSA 2048 bit encryption in transfer data between your Webserver and Browser should guarantee you extra security of data, not that it is impossible for data to be still sniffed by a skilled hacker but makes data securily transferred in probably 99% of cases 🙂
Tags: cert, certificate, command, data, How to, key, openssl, pem, rpf, self, SSL, time, use
Posted in Computer Security, System Administration, Web and CMS | 1 Comment »
Friday, January 26th, 2007 Well Praise the LORD. I was able to cheat today on the International Law exam. I know this is not very christian but you know. I was ill and in the end why should I know by heart things that I don’t know in my daily life. The exam continued for 2 hours. After that I went home, because I had to upload the file data and sql data of one new domain we started hosting today http://eurohold.bg. Everything in uploading file data and sql data went smoothly. After that I did a change in the DNS for the planex.bg domain to use their own mail server. And right now I’m trying to emulate some sort of DEC machine with homerx, but I can’t find out the password for it. Will google around to check about it. Today I feel much better than yesterday, well thanks God you rule! Blessings in the name of Jesus Christ 😛
Tags: better than yesterday, bg domain, blessings, change, Cheated, christian, data, DEC, domain, everything, exam, file, google, heart, home, homerx, jesus christ, life, mail server, name, name of jesus, nbsp, own mail, password, planex, Praise, sort, sql data, today, upload
Posted in Everyday Life | No Comments »
Friday, July 22nd, 2011 
These days, I’m managing a number of OpenVZ Virtual Machine host servers. Therefore constantly I’m facing a lot of problems with users who run shit scripts inside their Linux Virtual Machines.
Commonly user Virtual Servers are used as a launchpad to attack hosts do illegal hacking activities or simply DDoS a host..
The virtual machines users (which by the way run on top of the CentOS OpenVZ Linux) are used to launch a Denial service scripts like kaiten.pl, trinoo, shaft, tfn etc.
As a consequence of their malicious activities, oftenly the Data Centers which colocates the servers are either null routing our server IPs until we suspend the Abusive users, or the servers go simply down because of a server overload or a kernel bug hit as a result of the heavy TCP/IP network traffic or CPU/mem overhead.
Therefore to mitigate this abusive attacks, I’ve written few bash shell scripts which, saves us a lot of manual check ups and prevents in most cases abusers to run the common DoS and “hacking” script shits which are now in the wild.
The first script I’ve written is kill_abusers.sh , what the script does is to automatically look up for a number of listed processes and kills them while logging in /var/log/abusers.log about the abusive VM user procs names killed.
I’ve set this script to run 4 times an hour and it currently saves us a lot of nerves and useless ticket communication with Data Centers (DCs), not to mention that reboot requests (about hanged up servers) has reduced significantly.
Therefore though the scripts simplicity it in general makes the servers run a way more stable than before.
Here is OpenVZ kill/suspend Abusers procs script kill_abusers.sh ready for download
Another script which later on, I’ve written is doing something similar and still different, it does scan the server hard disk using locate and find commands and tries to identify users which has script kiddies programs in their Virtual machines and therefore are most probably crackers.
The scripts looks up for abusive network scanners, DoS scripts, metasploit framework, ircds etc.
After it registers through scanning the server hdd, it lists only files which are preliminary set in the script to be dangerous, and therefore there execution inside the user VM should not be.
search_for_abusers.sh then logs in a files it’s activity as well as the OpenVZ virtual machines user IDs who owns hack related files. Right after it uses nail mailing command to send email to a specified admin email and reports the possible abusers whose VM accounts might need to either be deleted or suspended.
search_for_abusers can be download here
Honestly I truly liked my search_for_abusers.sh script as it became quite nice and I coded it quite quickly.
I’m intending now to put the Search for abusers script on a cronjob on the servers to check periodically and report the IDs of OpenVZ VM Users which are trying illegal activities on the servers.
I guess now our beloved Virtual Machine user script kiddies are in a real trouble ;P
Tags: admin job, bash scripts, bash shell scripts, CentOS, check ups, consequence, data, DDoS, Denial, denial service, download, host, host servers, job, kill, launchpad, Linux, log, malicious activities, network traffic, number, openvz, overhead, quot, script, script kiddies, Search, server overload, servers, Shell, shits, tcp ip network, tfn, ticket, trinoo, ups, Virtual, virtual machine, virtual machines, virtual servers, vm user
Posted in System Administration | 29 Comments »
Friday, August 5th, 2011 One of the servers running Cpanel has been suspended today and the Data Center decided to completely bring down our server and gave us access to it only through rescue mode running linux livecd.
Thus I had no way to access the Cpanel web interface to suspend the “hacker” who by the way was running a number of instances of this old Romanian script kiddies brute force ssh scanner called sshscan .
Thanksfully Cpanel is equipped with a number of handy scripts for emergency situations in /scripts directory. These shell management scripts are awesome for situations like this one, where no web access is not avaiable.
To suspend the abuser / (abusive user ) I had to issue the command:
root@rescue [/]# /scripts/suspendacct abuse_user

Changing Shell to /bin/false...chsh: Unknown user context is not authorized to change the shell of abuse_user

Done

Locking Password...Locking password for user abuse_user.

passwd: Success

Done

Suspending mysql users

warn [suspendmysqlusers] abuse_user has no databases.

Notification => reports@santrex.net via EMAIL [level => 3]

Account previously suspended (password was locked).

/bin/df: `/proc/sys/fs/binfmt_misc': No such file or directory

Using Universal Quota Support (quota=0)

Suspended document root /home/abuse_user/public_html

Suspended document root /home/abuse_user/public_html/updateverificationonline.com

Using Universal Quota Support (quota=0)

Updating ftp passwords for abuse_user

Ftp password files updated.

Ftp vhost passwords synced

abuse_user's account has been suspended
That’s all now the user is suspended, so hopefully the DC will bring the server online in few minutes.
Tags: brute force, center, data, document root, emergency, emergency situations, few minutes, file, Ftp, ftp passwords, hacker, handy scripts, home abuse, instances, level, level 3, livecd, management scripts, mysql users, notification, number, password, password files, quot, Quota, quota support, rescue, rescue mode, root, santrex, scanner, script, script kiddies, Shell, shell command, ssh, Success, Universal, web access, web interface
Posted in System Administration, Various, Web and CMS | 1 Comment »
Thursday, October 27th, 2011 I just installed munin to track in web the performance of few Debian servers. I’ve configured munin to open via a Virtualhosts in Apache. As its always wise to protect any statistics data about the server from the unwanted possible security violators, I decided to protect Munin with Apache .htaccess.
The munin htmldir output dir is configured to be in /var/www/munin, hence I protected my munin with password by:
1. Creating .htaccess file in /var/www/munin with following content
AuthUserFile /etc/apache2/.munin_htpasswd

AuthGroupFile /dev/null

AuthName EnterPassword

AuthType Basic
require user admin
2. Creating /etc/apache2/.munin_htpasswd with htpasswd (htaccess password generator cmd)
debian:/var/www/munin# htpasswd -c /etc/apache2/.munin_htpasswd admin

New password:

Re-type new password:

Adding password for user admin
Another important thing I had to do is set my VirtualHost file to be configured with AllowOverride All , if AllowOverride All is missing the .htaccess and .htpasswd are not red at all.
Afterwards munin is protected with password, and when my virtualdomain where munin lays e.g. http://munin.mydomain.com is accessed the .htpasswd password dialog pops up 😉
Tags: Allowoverride, apache, apache htaccess, AuthGroupFile, AuthType, AuthUserFile, Creating, data, dev, dialog, dir, EnterPassword, generator, GNU, htaccess password generator, htpasswd, Linux, null, password, performance, pops, security, servers, statistics data, var, Virtualhost, web statistics, www
Posted in Linux, System Administration, Web and CMS | No Comments »
Wednesday, August 10th, 2011 
I’m in charge of dozen of Linux servers these days and therefore am required to restart many of the servers with a support ticket (because many of the Data Centers where the servers are co-located does not have a web interface or IPKVM connected to the server for that purpose). Therefore the server restart requests in case of crash sometimes gets processed in few hours or in best case in at least half an hour.
I’m aware of the existence of Hardware Watchdog devices, which are capable to detect if a server is hanged and auto-restart it, however the servers I administrate does not have Hardware support for Watchdog timer.
Thanksfully there is a free software project called Watchdog which is easily configured and mitigates the terrible downtimes caused every now and then by a server crash and respective delays by tech support in Data Centers.
I’ve recently blogged on the topic of Debian Linux auto-restart in case of kernel panic , however now i had to conifgure watchdog on some dozen of CentOS Linux servers.
It appeared installation & configuration of Watchdog on CentOS is a piece of cake and comes to simply following few easy steps, which I’ll explain quickly in this post:
1. Install with yum watchdog to CentOS
[root@centos:/etc/init.d ]# yum install watchdog

...
2. Add to configuration a log file to log watchdog activities and location of the watchdog device
The quickest way to add this two is to use echo to append it in /etc/watchdog.conf:
[root@centos:/etc/init.d ]# echo 'file = /var/log/messages' >> /etc/watchdog.conf

echo 'watchdog-device = /dev/watchdog' >> /etc/watchdog.conf
3. Load the softdog kernel module to initialize the software watchdog via /dev/watchdog
[root@centos:/etc/init.d ]# /sbin/modprobe softdog
Initialization of softdog should be indicated by a line in dmesg kernel log like the one above:
[root@centos:/etc/init.d ]# dmesg |grep -i watchdog

Software Watchdog Timer: 0.07 initialized. soft_noboot=0 soft_margin=60 sec (nowayout= 0)
4. Include the softdog kernel module to load on CentOS boot up
This is necessery, because otherwise after reboot the softdog would not be auto initialized and without it being initialized, the watchdog daemon service could not function as it does automatically auto reboots the server if the /dev/watchdog disappears.
It’s better that the softdog module is not loaded via /etc/rc.local but the default CentOS methodology to load module from /etc/rc.module is used:
[root@centos:/etc/init.d ]# echo modprobe softdog >> /etc/rc.modules

[root@centos:/etc/init.d ]# chmod +x /etc/rc.modules
5. Start the watchdog daemon service
The succesful intialization of softdog in step 4, should have provided the system with /dev/watchdog, before proceeding with starting up the watchdog daemon it’s wise to first check if /dev/watchdog is existent on the system. Here is how:
[root@centos:/etc/init.d ]# ls -al /dev/watchdogcrw------- 1 root root 10, 130 Aug 10 14:03 /dev/watchdog
Being sure, that /dev/watchdog is there, I’ll start the watchdog service.
[root@centos:/etc/init.d ]# service watchdog restart

...
Very important note to make here is that you should never ever configure watchdog service to run on boot time with chkconfig. In other words the status from chkconfig for watchdog boot on all levels should be off like so:
[root@centos:/etc/init.d ]# chkconfig --list |grep -i watchdog

watchdog 0:off 1:off 2:off 3:off 4:off 5:off 6:off
Enabling the watchdog from the chkconfig will cause watchdog to automatically restart the system as it will probably start the watchdog daemon before the softdog module is initialized. As watchdog will be unable to read the /dev/watchdog it will though the system has hanged even though the system might be in a boot process. Therefore it will end up in an endless loops of reboots which can only be fixed in a linux single user mode!!! Once again BEWARE, never ever activate watchdog via chkconfig!
Next step to be absolutely sure that watchdog device is running it can be checked with normal ps command:
[root@centos:/etc/init.d ]# ps aux|grep -i watchdog

root@hosting1-fr [~]# ps axu|grep -i watch|grep -v greproot 18692 0.0 0.0 1816 1812 ? SNLs 14:03 0:00 /usr/sbin/watchdog

root 25225 0.0 0.0 0 0 ? ZN 17:25 0:00 [watchdog] <defunct>
You have probably noticed the defunct state of watchdog, consider that as absolutely normal, above output indicates that now watchdog is properly running on the host and waiting to auto reboot in case of sudden /dev/watchdog disappearance.
As a last step before, after being sure its initialized properly, it’s necessery to add watchdog to run on boot time via /etc/rc.local post init script, like so:
[root@centos:/etc/init.d ]# echo 'echo /sbin/service watchdog start' >> /etc/rc.local
Now enjoy, watchdog is up and running and will automatically restart the CentOS host 😉
Tags: CentOS, crash, data, dmesg, existence, file, free software project, half an hour, hardware support, host, init, installation, installation configuration, kernel panic, Linux, linux server, linux servers, log, log messages, modprobe, necessery, piece of cake, root, server crash, server downtime, software, support, support ticket, tech support, ticket, time, topic, Watchdog, watchdog timer, web interface, yum
Posted in Linux, System Administration | 1 Comment »
Tuesday, July 12th, 2011 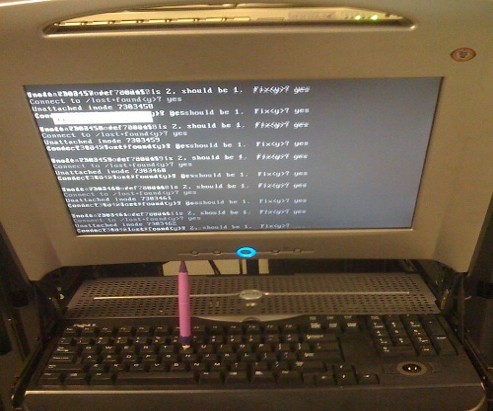
Are you an administrator of servers and it happens a server is DOWN.
You request the Data Center to reboot, however suddenly the server fails to boot properly and you have to request for IPKVM or some web java interface to directly access the server physical terminal …
This is a very normal admin scenario and many people who have worked in the field of remote system administrators (like me), should have experienced that bad times multiple times.
Sadly enough only a insignifant number of administrators try to do their best to reduce this down times to resolve client stuff downtime but prefer spending time playing the ztype! game or watching some porn website 😉
Anyways there are plenty of things like Server Auto Reboot on Crash with software Watchdog etc., that we as sysadmins can do to reduce server downtimes and most of the manual human interactions on server boot time.
In that manner of thougts a very common thing when setting up a new Linux server that many server admins forget or don’t know is to enable all the server partition filesystems to be auto fscked during server boot time.
By not enabling the auto filesystem check options in Linux the server filesystems did not automatically scan and fix hard drive partitions for fs innode inconsistencies.
Even though the filesystems are tuned to automatically get checked on every 38 system reboots, still if some kind of filesystem errors are found that require a manual confirmation the boot process is interrupted and the admin ends up with a server which is not reachable remotely via ssh !
For the remote system administrator, this times are a terrible times of waitings, prayers and hopes that the server hardware is fine 😉 as well as being on hold to get a KVM to get into the server manually and enter the necessery input to fsck prompt.
Many of this bad times can be completely avoided with a very simple fix through /etc/fstab by enabling all server partitions containing any filesystem to be automatically checked and fixed in case if inconsistencies or errors are found by fsck.ext3, fsck.ext4, fsck.reiserfs etc. commands.
A very typical default /etc/fstab file you will find on many servers should look something like:
/dev/sda8 / ext3 errors=remount-ro 0 1

tmpfs /dev/shm tmpfs defaults 0 0

devpts /dev/pts devpts gid=5,mode=620 0 0

sysfs /sys sysfs defaults 0 0

proc /proc proc defaults 0 0

/dev/sda1 /home ext3 defaults 0 0
Notice the line:
/dev/sda1 /home ext3 defaults 0 0
The first column in the example contains the device name, the second one its mount point, third its filesystem type, fourth the mount options, fifth (a number) dump options, and sixth (another number) filesystem check options. Let’s take a closer look at this stuff.
The ones which are interesting to enable auto fsck checking and error resolving is provided usually by the last sixth variable (filesystem check option) which in the above example equals 0 .
When the filesystem check option equals 0 this means the auto fsck and repair for the respective filesystem is disabled.
Some time in the past the dump backup option (5th option in the example) was also used but as far as I can understand today it’s not that important in modern GNU/Linux distributions.
Now having the above sample crontab in order to enable the fsck file checking on Linux boot for /dev/sda1 , we will need to modify the above line’s filesystem check option be 2, e.g. the line would afterwards look like:
/dev/sda1 /home ext3 defaults 0 2
Setting the 2 as an option for filesystem check is necessery for every filesystem which is not mounted as a root filesystem /
In above example /etc/fstab you already see that auto filesystem fsck is enabled for root partition:
/dev/sda8 / ext3 errors=remount-ro 0 1
(notice the 1 in the end of the line)
Finally a modified version of the default sample /etc/fstab which will check the extra /dev/sda1 /home partition would look like so:
/dev/sda8 / ext3 errors=remount-ro 0 1

tmpfs /dev/shm tmpfs defaults 0 0

devpts /dev/pts devpts gid=5,mode=620 0 0

sysfs /sys sysfs defaults 0 0

proc /proc proc defaults 0 0

/dev/sda1 /home ext3 defaults 0 2
Making sure all Linux server partitions has the auto filesystem check option enabled is something absoultely necessery!
Enabling the auto fsck on servers always makes me sleep calmer 😉
Hope it helps your too. 🙂
Tags: auto reboot, boot process, boot time, center, client, crash, data, ext, file, filesystem errors, hard drive partitions, human interactions, inconsistencies, java interface, linux server, multiple times, necessery, number, option, partition, physical terminal, porn website, reiserfs, root, sda, server boot, server downtimes, server hardware, shm, software, something, spending, spending time, system administrators, terminal, terrible times, time, Watchdog, web java, ztype
Posted in Linux, System Administration | 2 Comments »


