Archive for the ‘Computer Security’ Category

How to turn keyboard backlight on GNU / Linux, keyboard no backlight solution

Friday, October 20th, 2017

how-to-make-CM_Storm_Devastator-keyboard_backlight-work-on-linux-enabled-disable-keyboard-glowing-gnu-linux

If you're a GNU / Linux user and you happen to buy a backlighted keyboard, some nice new laptop whose keyboard supports the more and more modern keyboard growing or if you happen to install a GNU / Linux for a Gamer friend no matter the Linux distribution, you might encounter sometimes  problem even in major Linux distributions Debian / Ubuntu / Mint / Fedora with keyboard backlight not working.

Lets say you buy a Devastator II backlighted keyboard or any other modern keyboard you plug it into the Linux machine and there is no nice blinking light coming out of the keyboard, all the joy is gone yes I know. The free software coolness would have been even more grandiose if your keyboard was shiny and glowing in color / colors 🙂

But wait, there is hope for your joy to be made complete.

To make the keyboard backlight switch on Just issue commands:


xmodmap -e 'add mod3 = Screen_Lock'


# Turn on the keyboard bright lamps
xset led on

# Turns off the keyboard bright lamps
xset led off


If you want to make the keyboard backlight be enabled permanent the easiest solution is to

– add the 3 command lines to /etc/rc.local

E.g. to do so open /etc/rc.local and before exit 0 command just add the lines:


vim /etc/rc.local


xmodmap -e 'add mod3 = Screen_Lock'

# Turn on the keyboard bright lamps
xset led on

# Turns off the keyboard bright lamps
xset led off


If you prefer to have the keyboard colorful backlight enable and disabled from X environment on lets say GNOME , here is how to make yourself an icon that enabled and disables the colors.

That's handy because at day time it is a kind of meaningless for the keyboard to glow.

Here is the shell script:

#!/bin/bash
sleep 1
xset led 3
xmodmap -e 'add mod3 = Scroll_Lock'


I saved it as /home/hipo/scripts/backlight.sh

(don't forget to make it executable!, to do so run):


chmod +x /home/hipo/scripts/backlight.sh


Then create  the .desktop file at /etc/xdg/autostart/backlight.desktop so that it runs the new shell script, like so:

[Desktop Entry]
Type=Application
Name=Devastator Backlight
Exec=/home/hipo/scripts/backlight.sh
Icon=system-run
X-GNOME-Autostart-enabled=true

List of vulnerable wordpress plugins. Hacked, dangerous, vulnerable

Tuesday, October 17th, 2017

list-of-vulnerable-wordpress-pluginshacked-dangerous-vulnerable-wp


Have your wordpress has been hacked recently? Mine has Don't despair, below is a list of famous WordPress Plugins for its hackability.
Hope this helps you prevent your self on time and wipe out all the unnecessery plugins.
Double check the version number of Vulnerable plugins, and remove it only when you're sure its hackable. If you're sure you happen to run on your WordPress Blog or site one of the below plugins immediately deactivate and delete it.


Vulnerability types

A quick reminder of the most common security holes and issues WordPress plugins face. Please note that most problems are a combination of two or more types listed below.

Arbitrary file viewing
Instead of allowing only certain file source to be viewed (for example plugin templates) the lack of checks in the code allows the attacker to view the source of any file, including those with sensitive information such as wp-config.php

Arbitrary file upload
Lack of file type and content filtering allows for upload of arbitrary files that can contain executable code which, once run, can do pretty much anything on a site

Privilege escalation
Once the attacker has an account on the site, even if it’s only of the subscriber type, he can escalate his privileges to a higher level, including administrative ones.

SQL injection
By not escaping and filtering data that goes into SQL queries, malicious code can be injected into queries and data deleted, updated or inserted into the database. This is one of the most common vulnerabilities.

Remote code execution (RCE)
Instead of uploading and running malicious code, the attacker can run it from a remote location. The code can do anything, from hijacking the site to completely deleting it.

Plugin Name Vulnerability Type Min / Max Versions Affected
1 Flash Gallery arbitrary file upload 1.3.0 / 1.5.6
360 Product Rotation arbitrary file upload 1.1.3 / 1.2.0
Tevolution arbitrary file upload 2.0 / 2.2.9
Addblockblocker arbitrary file upload 0.0.1
Ads Widget remote code execution (RCE) 2.0 / n/a
Advanced Access Manager privilege escalation 3.0.4 / 3.2.1
Advanced Ajax Page Loader arbitrary file upload 2.5.7 / 2.7.6
Advanced Video Embed Embed Videos Or Playlists arbitrary file viewing n/a / 1.0
Analytic remote code execution (RCE) 1.8
Analytics Counter PHP object injection 1.0.0 / 3.4.1
Appointments PHP object injection 1.4.4 Beta / 2.2.0
Asgaros Forum settings change 1.0.0 / 1.5.7
Aspose Cloud Ebook Generator arbitrary file viewing 1.0
Aspose Doc Exporter arbitrary file viewing 1.0
Aspose Importer Exporter arbitrary file viewing 1.0
Aspose Pdf Exporter arbitrary file viewing 1.0
Attachment Manager arbitrary file upload 1.0.0 / 2.1.1
Auto Attachments arbitrary file upload 0.2.7 / 0.3
Bbpress Like Button SQL injection 1.0 / 1.5
Bepro Listings arbitrary file upload 2.0.54 / 2.2.0020
Blaze Slide Show For WordPress arbitrary file upload 2.0 / 2.7
Brandfolder local file inclusion (LFI) 2.3 / 3.0
Breadcrumbs Ez remote code execution (RCE) n/a
Candidate Application Form arbitrary file viewing 1.0
Category Grid View Gallery arbitrary file upload 0.1.0 / 0.1.1
Cherry Plugin arbitrary file upload 1.0 / 1.2.6
Chikuncount arbitrary file upload 1.3
Cip4 Folder Download Widget arbitrary file viewing 1.4 / 1.10
Cms Commander Client PHP object injection 2.02 / 2.21
Contus Video Gallery arbitrary file viewing 2.2 / 2.3
Cookie Eu remote code execution (RCE) 1.0
Cp Image Store arbitrary file viewing 1.0.1 / 1.0.5
Cross Rss arbitrary file viewing 0.5
Custom Content Type Manager remote code execution 0.9.8.8
Custom Lightbox possible remote code execution (RCE) 0.24
Cysteme Finder arbitrary file viewing 1.1 / 1.3
Db Backup arbitrary file viewing 1.0 / 4.5
Delete All Comments arbitrary file upload 2.0
Developer Tools arbitrary file upload 1.0.0 / 1.1.4
Disclosure Policy Plugin remote file inclusion (RFI) 1.0
Display Widgets remote code execution 2.6
Dop Slider arbitrary file upload 1.0
Download Zip Attachments arbitrary file viewing 1
Downloads Manager arbitrary file upload 1.0 Beta / 1.0 rc-1
Dp Thumbnail arbitrary file upload 1.0
Dropbox Backup PHP object injection 1.0 / 1.4.7.5
Dukapress arbitrary file viewing 2.3.7 / 2.5.3
Ebook Download arbitrary file viewing 1.1
Ecstatic arbitrary file upload 0.90 (x9) / 0.9933
Ecwid Shopping Cart PHP Object Injection 3.4.4 / 4.4.3
Enable Google Analytics remote code execution (RCE) n/a
Estatik arbitrary file upload 1.0.0 / 2.2.5
Event Commerce Wp Event Calendar persistent cross-site scripting (XSS) 1.0
Filedownload arbitrary file viewing 0.1
Flickr Gallery PHP object injection 1.2 / 1.5.2
Form Lightbox option update 1.1 / 2.1
Formidable information disclosure 1.07.5 / 2.0.07
Fresh Page arbitary file upload .11 / 1.1
Front End Upload arbitrary file upload 0.3.0 / 0.5.3
Front File Manager arbitrary file upload 0.1
Fs Real Estate Plugin SQL injection 1.1 / 2.06.03
G Translate remote code execution (RCE) 1.0 / 1.3
Gallery Objects SQL injection 0.2 / 0.4
Gallery Slider remote code execution (RCE) 2.0 / 2.1
Genesis Simple Defaults arbitrary file upload 1.0.0
Gi Media Library arbitrary file viewing 1.0.300 / 2.2.2
Google Analytics Analyze remote code execution (RCE) 1.0
Google Document Embedder SQL injection 2.5 / 2.5.16
Google Maps By Daniel Martyn remote code exection (RCE) 1.0
Google Mp3 Audio Player arbitrary file viewing 1.0.9 / 1.0.11
Grapefile arbitrary file upload 1.0 / 1.1
Gravityforms reflected cross-site scripting (XSS) 1.7 / 1.9.15.11
Hb Audio Gallery Lite arbitrary file viewing 1.0.0
History Collection arbitrary file viewing 1.1. / 1.1.1
Html5avmanager arbitrary file upload 0.1.0 / 0.2.7
I Dump Iphone To WordPress Photo Uploader arbitrary file upload 1.1.3 / 1.8
Ibs Mappro arbitrary file viewing 0.1 / 0.6
Image Export arbitrary file viewing 1.0.0 / 1.1.0
Image Symlinks arbitrary file upload 0.5 / 0.8.2
Imdb Widget arbitrary file viewing 1.0.1 / 1.0.8
Inboundio Marketing arbitrary file upload 1.0.0 / 2.0
Infusionsoft arbitrary file upload 1.5.3 / 1.5.10
Inpost Gallery local file inclusion (LFI) 2.0.9 / 2.1.2
Invit0r arbitrary file upload 0.2 / 0.22
Is Human remote code execution 1.3.3 / 1.4.2
Iwp Client PHP object injection 0.1.4 / 1.6.0
Jssor Slider arbitrary file upload 1.0 / 1.3
Like Dislike Counter For Posts Pages And Comments SQL injection 1.0 / 1.2.3
Mac Dock Gallery arbitrary file upload 1.0 / 2.7
Magic Fields arbitrary file upload 1.5 / 1.5.5
Mailchimp Integration remote code execution (RCE) 1.0.1 / 1.1
Mailpress local file inclusion (LFI) 5.2 / 5.4.6
Mdc Youtube Downloader arbitrary file viewing 2.1.0
Menu Image malicious JavaScript loading 2.6.5 / 2.6.9
Miwoftp arbitrary file viewing 1.0.0 / 1.0.4
Mm Forms Community arbitrary file upload 1.0 / 2.2.6
Mobile App Builder By Wappress arbitrary file upload n/a / 1.05
Mobile Friendly App Builder By Easytouch arbitrary file upload 3.0
Multi Plugin Installer arbitrary file viewing 1.0.0 / 1.1.0
Mypixs local file inclusion (LFI) 0.3
Nmedia User File Uploader arbitrary file upload 1.8
Option Seo remote code execution (RCE) 1.5
Page Google Maps remote code execution (RCE) 1.4
Party Hall Booking Management System SQL injection 1.0 / 1.1
Paypal Currency Converter Basic For Woocommerce arbitrary file viewing 1.0 / 1.3
Php Analytics arbitrary file upload n/a
Pica Photo Gallery arbitrary file viewing 1.0
Pitchprint arbitrary file upload 7.1 / 7.1.1
Plugin Newsletter arbitrary file viewing 1.3 / 1.5
Post Grid file deletion 2.0.6 / 2.0.12
Posts In Page authenticated local file inclusion (LFI) 1.0.0 / 1.2.4
Really Simple Guest Post local file inclusion (LFI) 1.0.1 / 1.0.6
Recent Backups arbitrary file viewing 0.1 / 0.7
Reflex Gallery arbitrary file upload 1.0 / 3.0
Resume Submissions Job Postings arbitrary file upload 2.0 / 2.5.3
Return To Top remote code execution (RCE) 1.8 / 5.0
Revslider arbitrary file viewing 1.0 / 4.1.4
S3bubble Amazon S3 Html 5 Video With Adverts arbitrary file viewing 0.5 / 0.7
Sam Pro Free local file inclusion (LFI) 1.4.1.23 / 1.9.6.67
Se Html5 Album Audio Player arbitrary file viewing 1.0.8 / 1.1.0
Sell Downloads arbitrary file viewing 1.0.1
Seo Keyword Page remote code execution (RCE) 2.0.5
Seo Spy Google WordPress Plugin arbitrary file upload 2.0 / 2.6
Seo Watcher arbitrary file upload 1.3.2 / 1.3.3
Sexy Contact Form arbitrary file upload 0.9.1 / 0.9.8
Share Buttons Wp remote code execution (RCE) 1.0
Showbiz arbitrary file viewing 1.0 / 1.5.2
Simple Ads Manager information disclosure 2.0.73 / 2.7.101
Simple Download Button Shortcode arbitrary file viewing 1.0
Simple Dropbox Upload Form arbitrary file upload 1.8.6 / 1.8.8
Simple Image Manipulator arbitrary file viewing 1.0
Simplr Registration Form privilege escalation 2.2.0 / 2.4.3
Site Import remote page inclusion 1.0.0 / 1.2.0
Slide Show Pro arbitrary file upload 2.0 / 2.4
Smart Slide Show arbitrary file upload 2.0 / 2.4
Smart Videos remote code execution (RCE) 1.0
Social Networking E Commerce 1 arbitrary file upload 0.0.32
Social Sharing possible arbitrary file upload 1.0
Social Sticky Animated remote code execution (RCE) 1.0
Spamtask arbitrary file upload 1.3 / 1.3.6
Spicy Blogroll local file inclusion (LFI) 0.1 / 1.0.0
Spotlightyour arbitrary file upload 1.0 / 4.5
Stats Counter PHP object injection 1.0 / 1.2.2.5
Stats Wp remote code execution 1.8
Store Locator Le unrestricted email sending 2.6 / 4.2.56
Tera Charts reflected cross-site scripting (XSS) 0.1 / 1.0
The Viddler WordPress Plugin cross-site request forgery (CSRF)/cross-site scripting (XSS) 1.2.3 / 2.0.0
Thecartpress local file inclusion (LFI) 1.1.0 / 1.1.5
Tinymce Thumbnail Gallery arbitrary file viewing v1.0.4 / v1.0.7
Ultimate Product Catalogue arbitrary file upload 1.0 / 3.1.1
User Role Editor privilege escalation 4.19 / 4.24
Web Tripwire arbitrary file upload 0.1.2
Webapp Builder arbitrary file upload 2.0
Website Contact Form With File Upload arbitrary file upload 1.1 / 1.3.4
Weever Apps 20 Mobile Web Apps arbitrary file upload 3.0.25 / 3.1.6
Woocommerce Catalog Enquiry arbitrary file upload 2.3.3 / 3.0.0
Woocommerce Product Addon arbitrary file upload 1.0 / 1.1
Woocommerce Products Filter authenticated persistent cross-site scripting (XSS) 1.1.4 / 1.1.4.2
Woopra arbitrary file upload 1.4.1 / 1.4.3.1
WordPress File Monitor persistent cross-site scripting (XSS) 2.0 / 2.3.3
Wp Appointment Schedule Booking System persistent cross-site scripting (XSS) 1.0
Wp Business Intelligence Lite arbitrary file upload 1.0 / 1.0.7
Wp Crm arbitrary file upload 0.15 / 0.31.0
Wp Custom Page arbitrary file viewing 0.5 / 0.5.0.1
Wp Dreamworkgallery arbitrary file upload 2.0 / 2.3
Wp Easybooking reflected cross-site scripting (XSS) 1.0.0 / 1.0.3
Wp Easycart authenticated arbitrary file upload 1.1.27 / 3.0.8
Wp Ecommerce Shop Styling authenticated arbitrary file viewing 1.0 / 2.5
Wp Editor authenticated arbitrary file upload 1.0.2 / 1.2.5.3
Wp Filemanager arbitrary file viewing 1.2.8 / 1.3.0
Wp Flipslideshow persistent cross-site scripting (XSS) 2.0 / 2.2
Wp Front End Repository arbitrary file upload 1.0.0 / 1.1
Wp Handy Lightbox remote code execution (RCE) 1.4.5
Wp Homepage Slideshow arbitrary file upload 2.0 / 2.3
Wp Image News Slider arbitrary file upload 3.0 / 3.5
Wp Levoslideshow arbitrary file upload 2.0 / 2.3
Wp Miniaudioplayer arbitrary file viewing 0.5 / 1.2.7
Wp Mobile Detector authenticated persistent cross-site scripting (XSS) 3.0 / 3.2
Wp Mon arbitrary file viewing 0.5 / 0.5.1
Wp Online Store arbitrary file viewing 1.2.5 / 1.3.1
Wp Piwik persistent cross-site scripting (XSS) 0.10.0.1 / 1.0.10
Wp Popup remote code execution (RCE) 2.0.0 / 2.1
Wp Post Frontend arbitrary file upload 1.0
Wp Property arbitrary file upload 1.20.0 / 1.35.0
Wp Quick Booking Manager persistent cross-site scripting (XSS) 1.0 / 1.1
Wp Royal Gallery persistent cross-site scripting (XSS) 2.0 / 2.3
Wp Seo Spy Google arbitrary file upload 3.0 / 3.1
Wp Simple Cart arbitrary file upload 0.9.0 / 1.0.15
Wp Slimstat Ex arbitrary file upload 2.1 / 2.1.2
Wp Superb Slideshow arbitrary file upload 2.0 / 2.4
Wp Swimteam arbitrary file viewing 1 / 1.44.1077
Wp Symposium arbitrary file upload 13.04 / 14.11
Wp Vertical Gallery arbitrary file upload 2.0 / 2.3
Wp Yasslideshow arbitrary file upload 3.0 / 3.4
Wp2android Turn Wp Site Into Android App arbitrary file upload 1.1.4
Wpeasystats local file inclusion (LFI) 1.8
Wpmarketplace arbitrary file viewing 2.2.0 / 2.4.0
Wpshop arbitrary file upload 1.3.1.6 / 1.3.9.5
Wpstorecart arbitrary file upload 2.0.0 / 2.5.29
Wptf Image Gallery arbitrary file viewing 1.0.1 / 1.0.3
Wsecure remote code execution (RCE) 2.3
Wysija Newsletters arbitrary file upload 1.1 / 2.6.7
Xdata Toolkit arbitrary file upload 1.6 / 1.9
Zen Mobile App Native arbitrary file upload 3.0
Zingiri Web Shop arbitrary file upload 2.3.6 / 2.4.3
Zip Attachments arbitrary file viewing 1.0 / 1.4


Have your WordPress site been hacked?

Don’t despair; it happens to the best of us. It’s tough to give generic advice without having a look at your site.

How to check who is flooding your Apache, NGinx Webserver – Real time Monitor statistics about IPs doing most URL requests and Stopping DoS attacks with Fail2Ban

Wednesday, August 20th, 2014

check-who-is-flooding-your-apache-nginx-webserver-real-time-monitoring-ips-doing-most-url-requests-to-webserver-and-protecting-your-webserver-with-fail2ban

If you're Linux ystem administrator in Webhosting company providing WordPress / Joomla / Drupal web-sites hosting and your UNIX servers suffer from periodic denial of service attacks, because some of the site customers business is a target of competitor company who is trying to ruin your client business sites through DoS or DDOS attacks, then the best thing you can do is to identify who and how is the Linux server being hammered. If you find out DoS is not on a network level but Apache gets crashing because of memory leaks and connections to Apache are so much that the CPU is being stoned, the best thing to do is to check which IP addresses are causing the excessive GET / POST / HEAD requests in logged.
 

There is the Apachetop tool that can give you the most accessed webserver URLs in a refreshed screen like UNIX top command, however Apachetop does not show which IP does most URL hits on Apache / Nginx webserver. 


1. Get basic information on which IPs accesses Apache / Nginx the most using shell cmds


Before examining the Webserver logs it is useful to get a general picture on who is flooding you on a TCP / IP network level, with netstat like so:
 

# here is howto check clients count connected to your server
netstat -ntu | awk '{print $5}' | cut -d: -f1 | sort | uniq -c | sort -n


If you get an extensive number of connected various IPs / hosts (like 10000 or something huge as a number), depending on the type of hardware the server is running and the previous scaling planned for the system you can determine whether the count as huge as this can be handled normally by server, if like in most cases the server is planned to serve a couple of hundreds or thousands of clients and you get over 10000 connections hanging, then your server is under attack or if its Internet server suddenly your website become famous like someone posted an article on some major website and you suddenly received a tons of hits.


There is a way using standard shell tools, to get some basic information on which IP accesses the webserver the most with:

tail -n 500 /var/log/apache2/access.log | cut -d' ' -f1 | sort | uniq -c | sort -gr

Or if you want to keep it refreshing periodically every few seconds run it through watch command:

watch "tail -n 500 /var/log/apache2/access.log | cut -d' ' -f1 | sort | uniq -c | sort -gr"

monioring-access-hits-to-webserver-by-ip-show-most-visiting-apache-nginx-ip-with-shell-tools-tail-cut-uniq-sort-tools-refreshed-with-watch-cmd


Another useful combination of shell commands is to Monitor POST / GET / HEAD requests number in access.log :
 

 awk '{print $6}' access.log | sort | uniq -c | sort -n

     1 "alihack<%eval
      1 "CONNECT
      1 "fhxeaxb0xeex97x0fxe2-x19Fx87xd1xa0x9axf5x^xd0x125x0fx88x19"x84xc1xb3^v2xe9xpx98`X'dxcd.7ix8fx8fxd6_xcdx834x0c"
      1 "x16x03x01"
      1 "xe2
      2 "mgmanager&file=imgmanager&version=1576&cid=20
      6 "4–"
      7 "PUT
     22 "–"
     22 "OPTIONS
     38 "PROPFIND
   1476 "HEAD
   1539 "-"
  65113 "POST
 537122 "GET


However using shell commands combination is plenty of typing and hard to remember, plus above tools does not show you, approximately how frequenty IP hits the webserver


2. Real-time monitoring IP addresses with highest URL reqests with logtop


Real-time monitoring on IP addresses with highest URL requests is possible with no need of "console ninja skills"  through – logtop.


2.1 Install logtop on Debian / Ubuntu and deb derivatives Linux


a) Installing Logtop the debian way

LogTop is easily installable on Debian and Ubuntu in newer releases of Debian – Debian 7.0 and Ubuntu 13/14 Linux it is part of default package repositories and can be straightly apt-get-ed with:

apt-get install –yes logtop

b) Installing Logtop from source code (install on older deb based Linuxes)

On older Debian – Debian 6 and Ubuntu 7-12 servers to install logtop compile from source code – read the README installation instructions or if lazy copy / paste below:

cd /usr/local/src
wget https://github.com/JulienPalard/logtop/tarball/master
mv master JulienPalard-logtop.tar.gz
tar -zxf JulienPalard-logtop.tar.gz

cd JulienPalard-logtop-*/
aptitude install libncurses5-dev uthash-dev

aptitude install python-dev swig

make python-module

python setup.py install

make

make install


mkdir -p /usr/bin/
cp logtop /usr/bin/


2.2 Install Logtop on CentOS 6.5 / 7.0 / Fedora / RHEL and rest of RPM based Linux-es

b) Install logtop on CentOS 6.5 and CentOS 7 Linux

– For CentOS 6.5 you need to rpm install epel-release-6-8.noarch.rpm
 

wget http://dl.fedoraproject.org/pub/epel/6/x86_64/epel-release-6-8.noarch.rpm
rpm -ivh epel-release-6-8.noarch.rpm
links http://dl.fedoraproject.org/pub/epel/6/SRPMS/uthash-1.9.9-6.el6.src.rpm
rpmbuild –rebuild
uthash-1.9.9-6.el6.src.rpm
cd /root/rpmbuild/RPMS/noarch
rpm -ivh uthash-devel-1.9.9-6.el6.noarch.rpm


– For CentOS 7 you need to rpm install epel-release-7-0.2.noarch.rpm


links http://download.fedoraproject.org/pub/epel/beta/7/x86_64/repoview/epel-release.html
 

Click on and download epel-release-7-0.2.noarch.rpm

rpm -ivh epel-release-7-0.2.noarch
rpm –import /etc/pki/rpm-gpg/RPM-GPG-KEY-EPEL-7
yum -y install git ncurses-devel uthash-devel
git clone https://github.com/JulienPalard/logtop.git
cd logtop
make
make install


2.3 Some Logtop use examples and short explanation


logtop shows 4 columns as follows – Line number, Count, Frequency, and Actual line


The quickest way to visualize which IP is stoning your Apache / Nginx webserver on Debian?


tail -f access.log | awk {'print $1; fflush();'} | logtop


logtop-check-which-ip-is-making-most-requests-to-your-apache-nginx-webserver-linux-screenshot

On CentOS / RHEL

tail -f /var/log/httpd/access_log | awk {'print $1; fflush();'} | logtop


Using LogTop even Squid Proxy caching server access.log can be monitored.
To get squid Top users by IP listed:


tail -f /var/log/squid/access.log | awk {'print $1; fflush();'} | logtop


logtop-visualizing-top-users-using-squid-proxy-cache
 

Or you might visualize in real-time squid cache top requested URLs
 

tail -f /var/log/squid/access.log | awk {'print $7; fflush();'} | logtop


visualizing-top-requested-urls-in-squid-proxy-cache-howto-screenshot


3. Automatically Filter IP addresses causing Apache / Nginx Webservices Denial of Service with fail2ban
 

Once you identify the problem if the sites hosted on server are target of Distributed DoS, probably your best thing to do is to use fail2ban to automatically filter (ban) IP addresses doing excessive queries to system services. Assuming that you have already installed fail2ban as explained in above link (On Debian / Ubuntu Linux) with:
 

apt-get install –yes fail2ban


To make fail2ban start filtering DoS attack IP addresses, you will have to set the following configurations:
 

vim /etc/fail2ban/jail.conf


Paste in file:
 

[http-get-dos]
 
enabled = true
port = http,https
filter = http-get-dos
logpath = /var/log/apache2/WEB_SERVER-access.log
# maxretry is how many GETs we can have in the findtime period before getting narky
maxretry = 300
# findtime is the time period in seconds in which we're counting "retries" (300 seconds = 5 mins)
findtime = 300
# bantime is how long we should drop incoming GET requests for a given IP for, in this case it's 5 minutes
bantime = 300
action = iptables[name=HTTP, port=http, protocol=tcp]


Before you paste make sure you put the proper logpath = location of webserver (default one is /var/log/apache2/access.log), if you're using multiple logs for each and every of hosted websites, you will probably want to write a script to automatically loop through all logs directory get log file names and automatically add auto-modified version of above [http-get-dos] configuration. Also configure maxtretry per IP, findtime and bantime, in above example values are a bit low and for heavy loaded websites which has to serve thousands of simultaneous connections originating from office networks using Network address translation (NAT), this might be low and tuned to prevent situations, where even the customer of yours can't access there websites 🙂

To finalize fail2ban configuration, you have to create fail2ban filter file:

vim /etc/fail2ban/filters.d/http-get-dos.conf


Paste:
 

# Fail2Ban configuration file
#
# Author: http://www.go2linux.org
#
[Definition]
 
# Option: failregex
# Note: This regex will match any GET entry in your logs, so basically all valid and not valid entries are a match.
# You should set up in the jail.conf file, the maxretry and findtime carefully in order to avoid false positives.
 
failregex = ^<HOST> -.*"(GET|POST).*
 
# Option: ignoreregex
# Notes.: regex to ignore. If this regex matches, the line is ignored.
# Values: TEXT
#
ignoreregex =


To make fail2ban load new created configs restart it:
 

/etc/init.d/fail2ban restart


If you want to test whether it is working you can use Apache webserver Benchmark tools such as ab or siege.
The quickest way to test, whether excessive IP requests get filtered – and make your IP banned temporary:
 

ab -n 1000 -c 20 http://your-web-site-dot-com/

This will make 1000 page loads in 20 concurrent connections and will add your IP to temporary be banned for (300 seconds) = 5 minutes. The ban will be logged in /var/log/fail2ban.log, there you will get smth like:

2014-08-20 10:40:11,943 fail2ban.actions: WARNING [http-get-dos] Ban 192.168.100.5
2013-08-20 10:44:12,341 fail2ban.actions: WARNING [http-get-dos] Unban 192.168.100.5

Optimizing Linux TCP/IP Networking to increase Linux Servers Performance

Tuesday, April 8th, 2008

optimize-linux-servers-for-network-performance-to-increase-speed-and-decrease-hardware-costs-_tyan-exhibits-hpc-optimized-server-platforms-featuring-intel-xeon-processor-e7-4800-v3-e5-2600-supercomputing-15_full

Some time ago I thought of ways to optimize my Linux Servers network performance.

Even though there are plenty of nice articles on the topic on how to better optimize Linux server performance by tunning up the kernel sysctl (variables).

Many of the articles I found was not structed in enough understandable way so I decided togoogle around and  found few interesting websites which gives a good overview on how one can speed up a bit and decrease overall server loads by simply tuning few basic kernel sysctl variables.

Below article is a product of my research on the topic on how to increase my GNU / Linux servers performance which are mostly running LAMP (Linux / Apache / MySQL / PHP) together with Qmail mail servers.

The article is focusing on Networking as networking is usual bottleneck for performance.
Below are the variables I found useful for optimizing the Linux kernel Network stack.

Implementing the variables might reduce your server load or if not decrease server load times and CPU utilization, they would at lease increase thoroughput so more users will be able to access your servers with (hopefully) less interruptions.
That of course would save you some Hardware costs and raise up your Servers efficiency.

Here are the variables themselves and some good example:
 

# values.net.ipv4.ip_forward = 0 ( Turn off IP Forwarding )

net.ipv4.conf.default.rp_filter = 1

# ( Control Source route verification )
net.ipv4.conf.default.accept_redirects = 0

# ( Disable ICMP redirects )
net.ipv4.conf.all.accept_redirects = 0 ( same as above )
net.ipv4.conf.default.accept_source_route = 0

# ( Disable IP source routing )
net.ipv4.conf.all.accept_source_route = 0
( - || - )net.ipv4.tcp_fin_timeout = 40

# ( Decrease FIN timeout ) - Useful on busy/high load
serversnet.ipv4.tcp_keepalive_time = 4000 ( keepalive tcp timeout )
net.core.rmem_default = 786426 - Receive memory stack size ( a good idea to increase it if your server receives big files )
net.ipv4.tcp_rmem = "4096 87380 4194304"
net.core.wmem_default = 8388608 ( Reserved Memory per connection )
net.core.wmem_max = 8388608
net.core.optmem_max = 40960
( maximum amount of option memory buffers )

# like a homework investigate by yourself what the variables below stand for :)
net.ipv4.tcp_max_tw_buckets = 360000
net.ipv4.tcp_reordering = 5
net.core.hot_list_length = 256
net.core.netdev_max_backlog = 1024


# Below are newly added experimental
#net.core.rmem_max = 16777216
#net.core.wmem_max = 16777216
##kernel.msgmni = 1024
##kernel.sem = 250 256000 32 1024
##vm.swappiness=0
kernel.sched_migration_cost=5000000


Also a good sysctl.conf file which one might want to substitite or use as a skele for some productive server is ready for download here


Even if you can't reap out great CPU reduction benefits from integrating above values or similar ones, your overall LAMP performance to end customers should increase – at some occasions dramatically, at others little bit but still noticable.

If you're unsure on exact kernel variable values to use check yourself what should be the best values that fits you according to your server Hardware – usually this is done by experimenting and reading the kernel documentation as provided for each one of uplisted variables.

Above sysctl.conf is natively created to run on Debian and on other distributions like CentOS, Fedora Slackware some values might either require slight modifications.

Hope this helps and gives you some idea of how network optimization in Linux is usually done. Happy (hacking) tweakening !

Block Web server over loading Bad Crawler Bots and Search Engine Spiders with .htaccess rules

Monday, September 18th, 2017

howto-block-webserver-overloading-bad-crawler-bots-spiders-with-htaccess-modrewrite-rules-file

In last post, I've talked about the problem of Search Index Crawler Robots aggressively crawling websites and how to stop them (the article is here) explaning how to raise delays between Bot URL requests to website and how to completely probhit some bots from crawling with robots.txt.

As explained in article the consequence of too many badly written or agressive behaviour Spider is the "server stoning" and therefore degraded Web Server performance as a cause or even a short time Denial of Service Attack, depending on how well was the initial Server Scaling done.

The bots we want to filter are not to be confused with the legitimate bots, that drives real traffic to your website, just for information

 The 10 Most Popular WebCrawlers Bots as of time of writting are:
 

1. GoogleBot (The Google Crawler bots, funnily bots become less active on Saturday and Sundays :))

2. BingBot (Bing.com Crawler bots)

3. SlurpBot (also famous as Yahoo! Slurp)

4. DuckDuckBot (The dutch search engine duckduckgo.com crawler bots)

5. Baiduspider (The Chineese most famous search engine used as a substitute of Google in China)

6. YandexBot (Russian Yandex Search engine crawler bots used in Russia as a substitute for Google )

7. Sogou Spider (leading Chineese Search Engine launched in 2004)

8. Exabot (A French Search Engine, launched in 2000, crawler for ExaLead Search Engine)

9. FaceBot (Facebook External hit, this crawler is crawling a certain webpage only once the user shares or paste link with video, music, blog whatever  in chat to another user)

10. Alexa Crawler (la_archiver is a web crawler for Amazon's Alexa Internet Rankings, Alexa is a great site to evaluate the approximate page popularity on the internet, Alexa SiteInfo page has historically been the Swift Army knife for anyone wanting to quickly evaluate a webpage approx. ranking while compared to other pages)

Above legitimate bots are known to follow most if not all of W3C – World Wide Web Consorium (W3.Org) standards and therefore, they respect the content commands for allowance or restrictions on a single site as given from robots.txt but unfortunately many of the so called Bad-Bots or Mirroring scripts that are burning your Web Server CPU and Memory mentioned in previous article are either not following /robots.txt prescriptions completely or partially.

Hence with the robots.txt unrespective bots, the case the only way to get rid of most of the webspiders that are just loading your bandwidth and server hardware is to filter / block them is by using Apache's mod_rewrite through


.htaccess


file

Create if not existing in the DocumentRoot of your website .htaccess file with whatever text editor, or create it your windows / mac os desktop and transfer via FTP / SecureFTP to server.

I prefer to do it directly on server with vim (text editor)


vim /var/www/sites/your-domain.com/.htaccess


RewriteEngine On

IndexIgnore .htaccess */.??* *~ *# */HEADER* */README* */_vti*

SetEnvIfNoCase User-Agent "^Black Hole” bad_bot
SetEnvIfNoCase User-Agent "^Titan bad_bot
SetEnvIfNoCase User-Agent "^WebStripper" bad_bot
SetEnvIfNoCase User-Agent "^NetMechanic" bad_bot
SetEnvIfNoCase User-Agent "^CherryPicker" bad_bot
SetEnvIfNoCase User-Agent "^EmailCollector" bad_bot
SetEnvIfNoCase User-Agent "^EmailSiphon" bad_bot
SetEnvIfNoCase User-Agent "^WebBandit" bad_bot
SetEnvIfNoCase User-Agent "^EmailWolf" bad_bot
SetEnvIfNoCase User-Agent "^ExtractorPro" bad_bot
SetEnvIfNoCase User-Agent "^CopyRightCheck" bad_bot
SetEnvIfNoCase User-Agent "^Crescent" bad_bot
SetEnvIfNoCase User-Agent "^Wget" bad_bot
SetEnvIfNoCase User-Agent "^SiteSnagger" bad_bot
SetEnvIfNoCase User-Agent "^ProWebWalker" bad_bot
SetEnvIfNoCase User-Agent "^CheeseBot" bad_bot
SetEnvIfNoCase User-Agent "^Teleport" bad_bot
SetEnvIfNoCase User-Agent "^TeleportPro" bad_bot
SetEnvIfNoCase User-Agent "^MIIxpc" bad_bot
SetEnvIfNoCase User-Agent "^Telesoft" bad_bot
SetEnvIfNoCase User-Agent "^Website Quester" bad_bot
SetEnvIfNoCase User-Agent "^WebZip" bad_bot
SetEnvIfNoCase User-Agent "^moget/2.1" bad_bot
SetEnvIfNoCase User-Agent "^WebZip/4.0" bad_bot
SetEnvIfNoCase User-Agent "^WebSauger" bad_bot
SetEnvIfNoCase User-Agent "^WebCopier" bad_bot
SetEnvIfNoCase User-Agent "^NetAnts" bad_bot
SetEnvIfNoCase User-Agent "^Mister PiX" bad_bot
SetEnvIfNoCase User-Agent "^WebAuto" bad_bot
SetEnvIfNoCase User-Agent "^TheNomad" bad_bot
SetEnvIfNoCase User-Agent "^WWW-Collector-E" bad_bot
SetEnvIfNoCase User-Agent "^RMA" bad_bot
SetEnvIfNoCase User-Agent "^libWeb/clsHTTP" bad_bot
SetEnvIfNoCase User-Agent "^asterias" bad_bot
SetEnvIfNoCase User-Agent "^httplib" bad_bot
SetEnvIfNoCase User-Agent "^turingos" bad_bot
SetEnvIfNoCase User-Agent "^spanner" bad_bot
SetEnvIfNoCase User-Agent "^InfoNaviRobot" bad_bot
SetEnvIfNoCase User-Agent "^Harvest/1.5" bad_bot
SetEnvIfNoCase User-Agent "Bullseye/1.0" bad_bot
SetEnvIfNoCase User-Agent "^Mozilla/4.0 (compatible; BullsEye; Windows 95)" bad_bot
SetEnvIfNoCase User-Agent "^Crescent Internet ToolPak HTTP OLE Control v.1.0" bad_bot
SetEnvIfNoCase User-Agent "^CherryPickerSE/1.0" bad_bot
SetEnvIfNoCase User-Agent "^CherryPicker /1.0" bad_bot
SetEnvIfNoCase User-Agent "^WebBandit/3.50" bad_bot
SetEnvIfNoCase User-Agent "^NICErsPRO" bad_bot
SetEnvIfNoCase User-Agent "^Microsoft URL Control – 5.01.4511" bad_bot
SetEnvIfNoCase User-Agent "^DittoSpyder" bad_bot
SetEnvIfNoCase User-Agent "^Foobot" bad_bot
SetEnvIfNoCase User-Agent "^WebmasterWorldForumBot" bad_bot
SetEnvIfNoCase User-Agent "^SpankBot" bad_bot
SetEnvIfNoCase User-Agent "^BotALot" bad_bot
SetEnvIfNoCase User-Agent "^lwp-trivial/1.34" bad_bot
SetEnvIfNoCase User-Agent "^lwp-trivial" bad_bot
SetEnvIfNoCase User-Agent "^Wget/1.6" bad_bot
SetEnvIfNoCase User-Agent "^BunnySlippers" bad_bot
SetEnvIfNoCase User-Agent "^Microsoft URL Control – 6.00.8169" bad_bot
SetEnvIfNoCase User-Agent "^URLy Warning" bad_bot
SetEnvIfNoCase User-Agent "^Wget/1.5.3" bad_bot
SetEnvIfNoCase User-Agent "^LinkWalker" bad_bot
SetEnvIfNoCase User-Agent "^cosmos" bad_bot
SetEnvIfNoCase User-Agent "^moget" bad_bot
SetEnvIfNoCase User-Agent "^hloader" bad_bot
SetEnvIfNoCase User-Agent "^humanlinks" bad_bot
SetEnvIfNoCase User-Agent "^LinkextractorPro" bad_bot
SetEnvIfNoCase User-Agent "^Offline Explorer" bad_bot
SetEnvIfNoCase User-Agent "^Mata Hari" bad_bot
SetEnvIfNoCase User-Agent "^LexiBot" bad_bot
SetEnvIfNoCase User-Agent "^Web Image Collector" bad_bot
SetEnvIfNoCase User-Agent "^The Intraformant" bad_bot
SetEnvIfNoCase User-Agent "^True_Robot/1.0" bad_bot
SetEnvIfNoCase User-Agent "^True_Robot" bad_bot
SetEnvIfNoCase User-Agent "^BlowFish/1.0" bad_bot
SetEnvIfNoCase User-Agent "^JennyBot" bad_bot
SetEnvIfNoCase User-Agent "^MIIxpc/4.2" bad_bot
SetEnvIfNoCase User-Agent "^BuiltBotTough" bad_bot
SetEnvIfNoCase User-Agent "^ProPowerBot/2.14" bad_bot
SetEnvIfNoCase User-Agent "^BackDoorBot/1.0" bad_bot
SetEnvIfNoCase User-Agent "^toCrawl/UrlDispatcher" bad_bot
SetEnvIfNoCase User-Agent "^WebEnhancer" bad_bot
SetEnvIfNoCase User-Agent "^TightTwatBot" bad_bot
SetEnvIfNoCase User-Agent "^suzuran" bad_bot
SetEnvIfNoCase User-Agent "^VCI WebViewer VCI WebViewer Win32" bad_bot
SetEnvIfNoCase User-Agent "^VCI" bad_bot
SetEnvIfNoCase User-Agent "^Szukacz/1.4" bad_bot
SetEnvIfNoCase User-Agent "^QueryN Metasearch" bad_bot
SetEnvIfNoCase User-Agent "^Openfind data gathere" bad_bot
SetEnvIfNoCase User-Agent "^Openfind" bad_bot
SetEnvIfNoCase User-Agent "^Xenu’s Link Sleuth 1.1c" bad_bot
SetEnvIfNoCase User-Agent "^Xenu’s" bad_bot
SetEnvIfNoCase User-Agent "^Zeus" bad_bot
SetEnvIfNoCase User-Agent "^RepoMonkey Bait & Tackle/v1.01" bad_bot
SetEnvIfNoCase User-Agent "^RepoMonkey" bad_bot
SetEnvIfNoCase User-Agent "^Zeus 32297 Webster Pro V2.9 Win32" bad_bot
SetEnvIfNoCase User-Agent "^Webster Pro" bad_bot
SetEnvIfNoCase User-Agent "^EroCrawler" bad_bot
SetEnvIfNoCase User-Agent "^LinkScan/8.1a Unix" bad_bot
SetEnvIfNoCase User-Agent "^Keyword Density/0.9" bad_bot
SetEnvIfNoCase User-Agent "^Kenjin Spider" bad_bot
SetEnvIfNoCase User-Agent "^Cegbfeieh" bad_bot


<Limit GET POST>
order allow,deny
allow from all
Deny from env=bad_bot
</Limit>


Above rules are Bad bots prohibition rules have RewriteEngine On directive included however for many websites this directive is enabled directly into VirtualHost section for domain/s, if that is your case you might also remove RewriteEngine on from .htaccess and still the prohibition rules of bad bots should continue to work
Above rules are also perfectly suitable wordpress based websites / blogs in case you need to filter out obstructive spiders even though the rules would work on any website domain with mod_rewrite enabled.

Once you have implemented above rules, you will not need to restart Apache, as .htaccess will be read dynamically by each client request to Webserver

2. Testing .htaccess Bad Bots Filtering Works as Expected


In order to test the new Bad Bot filtering configuration is working properly, you have a manual and more complicated way with lynx (text browser), assuming you have shell access to a Linux / BSD / *Nix computer, or you have your own *NIX server / desktop computer running
 

Here is how:


lynx -useragent="Mozilla/5.0 (compatible; MegaIndex.ru/2.0; +http://megaindex.com/crawler)" -head -dump http://www.your-website-filtering-bad-bots.com/


Note that lynx will provide a warning such as:

Warning: User-Agent string does not contain "Lynx" or "L_y_n_x"!

Just ignore it and press enter to continue.

Two other use cases with lynx, that I historically used heavily is to pretent with Lynx, you're GoogleBot in order to see how does Google actually see your website?
 

  • Pretend with Lynx You're GoogleBot


lynx -useragent="Mozilla/5.0 (compatible; Googlebot/2.1; +http://www.google.com/bot.html)" -head -dump http://www.your-domain.com/


  • How to Pretend with Lynx Browser You are GoogleBot-Mobile


lynx -useragent="Mozilla/5.0 (iPhone; U; CPU iPhone OS 4_1 like Mac OS X; en-us) AppleWebKit/532.9 (KHTML, like Gecko) Version/4.0.5 Mobile/8B117 Safari/6531.22.7 (compatible; Googlebot-Mobile/2.1; +http://www.google.com/bot.html)" -head -dump http://www.your-domain.com/


Or for the lazy ones that doesn't have Linux / *Nix at disposal you can use WannaBrowser website

Wannabrowseris a web based browser emulator which gives you the ability to change the User-Agent on each website req1uest, so just set your UserAgent to any bot browser that we just filtered for example set User-Agent to CheeseBot

The .htaccess rule earier added once detecting your browser client is coming in with the prohibit browser agent will immediately filter out and you'll be unable to access the website with a message like:
 

HTTP/1.1 403 Forbidden


Just as I've talked a lot about Index Bots, I think it is worthy to also mention three great websites that can give you a lot of Up to Date information on exact Spiders returned user-agent, common known Bot traits as well as a a current updated list with the Bad Bots etc.

Bot and Browser Resources information user-agents, bad-bots and odd Crawlers and Bots specifics

1. botreports.com
2. user-agents.org
3. useragentapi.com


An updated list with robots user-agents (crawler-user-agents) is also available in github here regularly updated by Caia Almeido

There are also a third party plugin (modules) available for Website Platforms like WordPress / Joomla / Typo3 etc.

Besides the listed on these websites as well as the known Bad and Good Bots, there are perhaps a hundred of others that might end up crawling your webdsite that might or might not need  to be filtered, therefore before proceeding with any filtering steps, it is generally a good idea to monitor your  HTTPD access.log / error.log, as if you happen to somehow mistakenly filter the wrong bot this might be a reason for Website Indexing Problems.

Hope this article give you some valueable information. Enjoy ! 🙂


How to configure mutual Apache WebServer SSL authentication – Two Way SSL mutual authentication for better security and stronger encryption

Tuesday, September 12th, 2017

how-to-configure-one-way-and-two-way-handshake-authentication-apache-one-and-two-way-ssl-handshake-authentication-explained-diagram

In this post I'm about to explain how to configure Apache Web server for Two Way SSL Authentication alone and how to configure Two Way SSL Authentication for a Certain Domain URL Locations and the mixture of both One Way standar SSL authentication and Two Way Handshake Authentication .
 

Generally before starting I have to say most Web sites does not require a Mutual SSL  Authentication (the so called Two-Way SSL).

In most configurations Apache Web server is configured for One Way Basic authentication where The Web server authenticates to the Client usuall that's Browser program such as Mozilla  Firefox / Chrome / IE / Epiphany whatever presenting certificate signed by Trustable Certificate Authority such as VeriSign.

1WaySSL-clien-to-server-illustrated
 

The authority then autneticates to the browser that the Installed certificate on the Apache Web Server is trustable and the website is not a fraudulant, that is especially important for websites where sensitive data is being transferred, lets say Banks (Doing Money Transfers online), Hospitals (Transfelling your Medical results data) or purchasing something from Amazon.com, Ebay.Com, PayPal etc.

Once client validates the certificate the communication line gets encrypted based on Public Key, below diagram illustrates this.

Public Ke Cryptography diagram how it works

However in some casis where an additional Security Hardening is required, the Web Server might be configured to require additional certificate so the authentication between Client -> Server doesn't work by certificating with just a Server provided certificate but to work Two Ways, e.g. the Client might be setup to also have a Trusted Authority Certificate and to present it to server and send back this certificate to the Server as well for a mutual authentication and only once the certificate handshake between;

client -> server and server -> client

2WaySSL-client-to-server-and-server-to-client-mutual-authentication-illustration

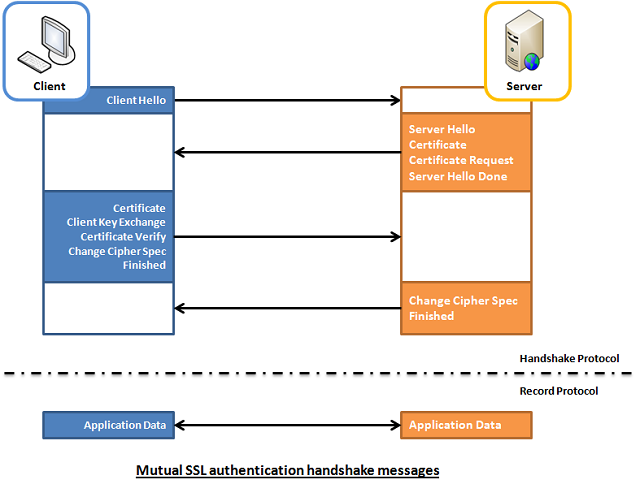
is confirmed as successful the two could establish a trustable encypted SSL channel over which they can talk securely this is called
Two way SSL Authentication.


1. Configure Two Way SSL Authentication on Apache HTTPD
 

To be able to configure Two Way SSL Authentication handshake on Apache HTTPD just like with One way standard one, the mod_ssl Apache module have to enabled.

Enabling two-way SSL is usually not done on normal clients but is done with another server acting as client that is using some kind of REST API to connect to the server


The Apache directive used for Mutual Authentication is SSLVerifyClient directive (this is provided by mod_ssl)

the options that SSLVerifyClient receives are:

none: instructs no client Certificate is required
optional: the client is allowed to present a valid certificate but optionally
require: the client is always required to present a valid Certificate for mutual Authenticaton
optional_no_ca: the client is asked to present a valid Certificate however it has to be successfully verified.

In most of Apache configuratoins the 2 ones that are used are either none or require
because optional is reported to not behave properly with some of the web browsers and
optional_no_ca is not restrictive and is usually used just for establishing basic SSL test pages.

At some cases when configuring Apache HTTPD it is required to have a mixture of both One Way and Two Way Authentication, if that is your case the SSLVerifyClient none is to be used inside the virtual host configuration and then include SSLVerifyClient require to each directory (URL) location that requires a client certificate with mutual auth.

Below is an example VirtualHost configuration as a sample:


The SSLVerifyClient directive from mod_ssl dictates whether a client certificate is required for a given location:
 

<VirtualHost *:443>

SSLVerifyClient none
<Location /whatever_extra_secured_location/dir>
            …
            SSLVerifyClient require
</Location>
</VirtualHost>


Because earlier in configuration the SSLVerifyClient none is provided, the client will not be doing a Two Way Mutual Authentication for the whole domain but just the selected Location the client certificate will be not requested by the server for a 2 way mutual auth, but only when the client requests the Location setupped resouce a renegotiation will be done and client will be asked to provide certificate for the two way handshake authentication.

Keep in mind that on a busy servers with multitudes of connections this renegotiation might put an extra load on the server and this even can turn into server scaling issue on a high latency networks, because of the multiple client connects. Every new SSL renegotiation is about to assign new session ID and that could have a negative impact on overall performance and could eat you a lot of server memory.
To avoid this often it i suseful to use SSLRenegBufferSize directive which by default is set in Apache 2.2.X to 128 Kilobytes and for multiple connects it might be wise to raise this.

A mutual authentication that is done on a Public Server that is connected to the Internet without any DMZ might be quite dangerous thing as due to to the multiple renegotiations the server might end up easily a victim of Denial of Service (DOS) attack, by multiple connects to the server trying to consume all its memory …
Of course the security is not dependent on how you have done the initial solution design but also on how the Client software that is doing the mutual authentication is written to make the connections to the Web Server.


2. Configure a Mixture of One Way Standard (Basic) SSL Authentication together with Two Way Client Server Handshake SSL Authentication


Below example configuring is instructing Apache Webserver to listen for a mixture of One Way standard Client to browser authentication and once the client browser establishes the session it asks for renegotiation for every location under Main Root / to be be authenticated with a Mutual Two Way Handshake Authentication, then the received connection is proxied by the Reverse Proxy to the end host which is another proxy server listening on the same host on (127.0.0.1 or localhost) on port 8080.


<VirtualHost *:8001>
  ServerAdmin name@your-server.com
  SSLEngine on
  SSLCertificateFile /etc/ssl/server-cert.pem
  SSLCertificateKeyFile /etc/ssl/private/server-key.pem

  SSLVerifyClient require
  SSLVerifyDepth 10
  SSLCACertificateFile /home/etc/ssl/cacert.pem
  <location />
    Order allow,deny
    allow from all
    SSLRequire (%{SSL_CLIENT_S_DN_CN} eq "clientcn")
 </location>
  ProxyPass / http://127.0.0.1:8080/
  ProxyPassReverse / http://127.0.0.1:8080/
</VirtualHost>


3. So what other useful options do we have?


Keep Connections Alive

This is a good option but it may consume significant amount of memory. If Apache is using the prefork MPM (as many Webservers still do instead of Apache Threading), keeping all connections alive means multiple live processes. For example, if Apache has to support 1000 concurrent connections, each process consuming 2.7MB, an additional 2700MB should be considered. This may be of lesser significance when using other MPMs. This option will mitigate the problem but will still require SSL renegotiation when the SSL sessions will time out.

Another better approach in terms of security to the mixture of requirement for both One Side Basic SSL Authentication to a Webserver and Mutual Handshake SSL Auth is just to set different Virtualhosts one or more configuration to serve the One Way SSL authentication and others that are configured just to do the Mutual Two Way Handshake SSL to specified Locations.

4. So what if you need to set-up multiple Virtualhosts with SSL authentication on the Same IP address Apache (SNI) ?


For those who did not hear still since some time Apache Web Server has been rewritten to support SNI (Server Name Indication), SNI is really great feature as it can give to the webserver the ability to serve multiple one and two way handshake authentications on the same IP address. For those older people you might remember earlier before SNI was introduced, in order to support a VirtualHost with SSL encryption authentication the administrator had to configure a separate IP address for each SSL certificate on each different domian name.  

SNI feature can also be used here with both One Way standard Apache SSL auth or Two Way one the only downside of course is SNI could be a performance bottleneck if improperly scaled. Besides that some older browsers are not supporting SNI at all, so possibly for public services SNI is less recommended but it is better to keep-up to the good old way to have a separate IP address for each :443 set upped VirtualHost.
One more note to make here is SNI works by checking the Host Header send by the Client (browser) request
SSL with Virtual Hosts Using SNI.

SNI (Server Name Indication) is a cool feature. Basically it allows multiple virtual hosts with different configurations to listen to the same port. Each virtual host should specify a unique server name identification using the SeverName directive. When accepting connections, Apache will select a virtual host based on the host header that is part of the request (must be set on both HTTP and SSL levels). You can also set one of the virtual hosts as a default to serve clients that don’t support SNI. You should bear in mind that SNI has different support levels in Java. Java 1.7 was the first version to support SNI and therefore it should be a minimum requirement for Java clients.

5. Overall list of useful Options for Mutual Two Way And Basic SSL authentication
 

Once again the few SSL options for Apache Mutual Handhake Authentication

SSLVerifyClient -> to enable the two-way SSL authentication

SSLVerifyDepth -> to specify the depth of the check if the certificate has an approved CA

SSLCACertificateFile -> the public key that will be used to decrypt the data recieved

SSLRequire -> Allows only requests that satisfy the expression


Below is another real time example for a VirtualHost Apache configuration configured for a Two Way Handshake Mutual Authentication


For the standard One way Authentication you need the following Apache directives


SSLEngine on -> to enable the single way SSL authentication

SSLCertificateFile -> to specify the public certificate that the WebServer will show to the users

SSLCertificateKeyFIle -> to specify the private key that will be used to encrypt the data sent


6. Configuring Mutual Handshake SSL Authentication on Apache 2.4.x

Below guide is focusing on Apache HTTPD 2.2.x nomatter that it can easily be adopted to work on Apache HTTPD 2.4.x branch, if you're planning to do a 2 way handshake auth on 2.4.x I recommend you check SSL / TLS Apache 2.4.x Strong Encryption howto official Apache documentation page.

In meantime here is one working configuration for SSL Mutual Auth handshake for Apache 2.4.x:


<Directory /some-directory/location/html>
    RedirectMatch permanent ^/$ /auth/login.php
    Options -Indexes +FollowSymLinks

    # Anything which matches a Require rule will let us in

    # Make server ask for client certificate, but not insist on it
    SSLVerifyClient optional
    SSLVerifyDepth  2
    SSLOptions      +FakeBasicAuth +StrictRequire

    # Client with appropriate client certificate is OK
    <RequireAll>
        Require ssl-verify-client
        Require expr %{SSL_CLIENT_I_DN_O} eq "Company_O"
    </RequireAll>

    # Set up basic (username/password) authentication
    AuthType Basic
    AuthName "Password credentials"
    AuthBasicProvider file
    AuthUserFile /etc/apache2/htaccess/my.passwd

    # User which is acceptable to basic authentication is OK
    Require valid-user

    # Access from these addresses is OK
    Require ip 10.20.0.0/255.255.0.0
    Require ip 10.144.100
</Directory>

Finally to make the new configurations working depending you need to restart Apache Webserver depending on your GNU / Linux / BSD or Windows distro use the respective script to do it.

Enjoy!

Find all running hosts, used IPs and ports on your local wireless / ethernet network or how to do a basic network security audit with nmap

Monday, September 4th, 2017

Find all running hosts / used IPs on your local wireless or ethernet network

nmap-scn-local-network-find-all-running-hosts-used-IPs-on-your-wireless-ethernet-network

If you're using a Free Software OS such as GNU / Linux or some other proprietary OS such as Mac OS X or Windows and you need a quick way to check all running IPs hosts / nodes locally on your current connected Ethernet or Wireless network, here is how to do it with nmap (Network exploration and security tool port scanner).

So why would you do scan that? 

Well just for fun, out of curiousity or just because you want to inspect your local network whether someone unexpected cracker did not break and is not using your Wi-Fi or Ethernet local network and badly snoring your network listening for passwords.

Before you start you should have installed NMAP network scanner on your GNU / Linux, to do so on 

Redhat Based Linux (Fedora / CentOS / Redhat Enterprise RHEL):


yum -y install nmap


On Deb based GNU / Linux-es such as Ubuntu / Mint / Debian etc.


apt-get install –yes nmap


To install nmap on FreeBSD / NetBSD / OpenBSD OS issue from console or terminal:


cd /usr/ports/security/nmap
make install clean 


or if you prefer to install it from latest binary instead of compiling


pkg_add -vr nmap


On a proprietary Mac OS X (I don't recommend you to use this obnoxious OS which is designed as a proprpietary software to steal your freedom and control you, but anyways for Mac OS victims), you can do it to with Macs equivalent tool of apt-get / yum called homebrew:

Open Mac OS X terminal and to install homebrew run:


ruby -e "$(curl -fsSL https://raw.githubusercontent.com/Homebrew/install/master/install)"
brew install nmap
brew search nmap
brew info nmap


If you want to do it system wide become root (super user) from Mac terminal with


su root


and run above commands as administrator user.

Windows users might take a look at Nmap for Windows or use the M$ Windows native portqry command line port scanner

Test whether nmap is properly installed and ready to use with command:


nmap –help
Nmap 6.00 ( http://nmap.org )
Usage: nmap [Scan Type(s)] [Options] {target specification}
TARGET SPECIFICATION:
  Can pass hostnames, IP addresses, networks, etc.
  Ex: scanme.nmap.org, microsoft.com/24, 192.168.0.1; 10.0.0-255.1-254
  -iL <inputfilename>: Input from list of hosts/networks
  -iR <num hosts>: Choose random targets
  –exclude <host1[,host2][,host3],…>: Exclude hosts/networks
  –excludefile <exclude_file>: Exclude list from file
HOST DISCOVERY:
  -sL: List Scan – simply list targets to scan
  -sn: Ping Scan – disable port scan
  -Pn: Treat all hosts as online — skip host discovery
  -PS/PA/PU/PY[portlist]: TCP SYN/ACK, UDP or SCTP discovery to given ports
  -PE/PP/PM: ICMP echo, timestamp, and netmask request discovery probes
  -PO[protocol list]: IP Protocol Ping
  -n/-R: Never do DNS resolution/Always resolve [default: sometimes]
  –dns-servers <serv1[,serv2],…>: Specify custom DNS servers
  –system-dns: Use OS's DNS resolver
  –traceroute: Trace hop path to each host
SCAN TECHNIQUES:
  -sS/sT/sA/sW/sM: TCP SYN/Connect()/ACK/Window/Maimon scans
  -sU: UDP Scan
  -sN/sF/sX: TCP Null, FIN, and Xmas scans
  –scanflags <flags>: Customize TCP scan flags
  -sI <zombie host[:probeport]>: Idle scan
  -sY/sZ: SCTP INIT/COOKIE-ECHO scans
  -sO: IP protocol scan
  -b <FTP relay host>: FTP bounce scan
PORT SPECIFICATION AND SCAN ORDER:
  -p <port ranges>: Only scan specified ports
    Ex: -p22; -p1-65535; -p U:53,111,137,T:21-25,80,139,8080,S:9
  -F: Fast mode – Scan fewer ports than the default scan
  -r: Scan ports consecutively – don't randomize
  –top-ports <number>: Scan <number> most common ports
  –port-ratio <ratio>: Scan ports more common than <ratio>
SERVICE/VERSION DETECTION:
  -sV: Probe open ports to determine service/version info
  –version-intensity <level>: Set from 0 (light) to 9 (try all probes)
  –version-light: Limit to most likely probes (intensity 2)
  –version-all: Try every single probe (intensity 9)
  –version-trace: Show detailed version scan activity (for debugging)
SCRIPT SCAN:
  -sC: equivalent to –script=default
  –script=<Lua scripts>: <Lua scripts> is a comma separated list of 
           directories, script-files or script-categories
  –script-args=<n1=v1,[n2=v2,…]>: provide arguments to scripts
  –script-args-file=filename: provide NSE script args in a file
  –script-trace: Show all data sent and received
  –script-updatedb: Update the script database.
  –script-help=<Lua scripts>: Show help about scripts.
           <Lua scripts> is a comma separted list of script-files or
           script-categories.
OS DETECTION:
  -O: Enable OS detection
  –osscan-limit: Limit OS detection to promising targets
  –osscan-guess: Guess OS more aggressively
TIMING AND PERFORMANCE:
  Options which take <time> are in seconds, or append 'ms' (milliseconds),
  's' (seconds), 'm' (minutes), or 'h' (hours) to the value (e.g. 30m).
  -T<0-5>: Set timing template (higher is faster)
  –min-hostgroup/max-hostgroup <size>: Parallel host scan group sizes
  –min-parallelism/max-parallelism <numprobes>: Probe parallelization
  –min-rtt-timeout/max-rtt-timeout/initial-rtt-timeout <time>: Specifies
      probe round trip time.
  –max-retries <tries>: Caps number of port scan probe retransmissions.
  –host-timeout <time>: Give up on target after this long
  –scan-delay/–max-scan-delay <time>: Adjust delay between probes
  –min-rate <number>: Send packets no slower than <number> per second
  –max-rate <number>: Send packets no faster than <number> per second
FIREWALL/IDS EVASION AND SPOOFING:
  -f; –mtu <val>: fragment packets (optionally w/given MTU)
  -D <decoy1,decoy2[,ME],…>: Cloak a scan with decoys
  -S <IP_Address>: Spoof source address
  -e <iface>: Use specified interface
  -g/–source-port <portnum>: Use given port number
  –data-length <num>: Append random data to sent packets
  –ip-options <options>: Send packets with specified ip options
  –ttl <val>: Set IP time-to-live field
  –spoof-mac <mac address/prefix/vendor name>: Spoof your MAC address
  –badsum: Send packets with a bogus TCP/UDP/SCTP checksum
OUTPUT:
  -oN/-oX/-oS/-oG <file>: Output scan in normal, XML, s|<rIpt kIddi3,
     and Grepable format, respectively, to the given filename.
  -oA <basename>: Output in the three major formats at once
  -v: Increase verbosity level (use -vv or more for greater effect)
  -d: Increase debugging level (use -dd or more for greater effect)
  –reason: Display the reason a port is in a particular state
  –open: Only show open (or possibly open) ports
  –packet-trace: Show all packets sent and received
  –iflist: Print host interfaces and routes (for debugging)
  –log-errors: Log errors/warnings to the normal-format output file
  –append-output: Append to rather than clobber specified output files
  –resume <filename>: Resume an aborted scan
  –stylesheet <path/URL>: XSL stylesheet to transform XML output to HTML
  –webxml: Reference stylesheet from Nmap.Org for more portable XML
  –no-stylesheet: Prevent associating of XSL stylesheet w/XML output
MISC:
  -6: Enable IPv6 scanning
  -A: Enable OS detection, version detection, script scanning, and traceroute
  –datadir <dirname>: Specify custom Nmap data file location
  –send-eth/–send-ip: Send using raw ethernet frames or IP packets
  –privileged: Assume that the user is fully privileged
  –unprivileged: Assume the user lacks raw socket privileges
  -V: Print version number
  -h: Print this help summary page.
EXAMPLES:
  nmap -v -A scanme.nmap.org
  nmap -v -sn 192.168.0.0/16 10.0.0.0/8
  nmap -v -iR 10000 -Pn -p 80
SEE THE MAN PAGE (http://nmap.org/book/man.html) FOR MORE OPTIONS AND EXAMPLES


Most local router local networks are running under an IP range of 192.168.0.1/24 (192.168.0.1.254) or 192.168.1.1/24 or at some weird occasions depending on how the router is configured it might be something like 192.168.10.0/24 to be sure on what kind of network your computer is configured, you can check with ifconfig command, what kind of network IP has the router assigned to your computer, here is output from my Debian GNU / Linux /sbin/ifconfig


 hipo@noah:~$ /sbin/ifconfig 
lo        Link encap:Local Loopback  
          inet addr:127.0.0.1  Mask:255.0.0.0
          inet6 addr: ::1/128 Scope:Host
          UP LOOPBACK RUNNING  MTU:16436  Metric:1
          RX packets:336 errors:0 dropped:0 overruns:0 frame:0
          TX packets:336 errors:0 dropped:0 overruns:0 carrier:0
          collisions:0 txqueuelen:0 
          RX bytes:26656 (26.0 KiB)  TX bytes:26656 (26.0 KiB)


wlan0     Link encap:Ethernet  HWaddr 00:1c:bf:bd:27:59  
          inet addr:192.168.0.103  Bcast:192.168.0.255  Mask:255.255.255.0
          inet6 addr: fe80::21c:bfff:ffbd:2759/64 Scope:Link
          UP BROADCAST RUNNING MULTICAST  MTU:1500  Metric:1
          RX packets:112836 errors:0 dropped:0 overruns:0 frame:0
          TX packets:55363 errors:0 dropped:0 overruns:0 carrier:0
          collisions:0 txqueuelen:1000 
          RX bytes:141318655 (134.7 MiB)  TX bytes:7391330 (7.0 MiB)


As evident from above output my router assigns IPs via DHCP once authenticated into the Wi-Fi router under standard IP range of 192.168.0.0/24

So under this IP range case, to inspect my small local networkconnected computer I had to run from gnome-terminal or under a /dev/ttyX virtual console:


hipo@noah:~$ nmap -sn 192.168.0.0/24

Starting Nmap 6.00 ( http://nmap.org ) at 2017-09-04 12:45 EEST
Nmap scan report for pcfreak (192.168.0.1)
Host is up (0.011s latency).
Nmap scan report for 192.168.0.103
Host is up (0.00011s latency).
Nmap done: 256 IP addresses (2 hosts up) scanned in 2.53 seconds


-sn argument instructs nmap to do the so called ping scan, e.g. not to do a port s
can after host discovery but just print available hosts that are responding

Some bigger corporate networks are configured to run a couple of local networks simultaneously such as 192.168.168.0.0/24, 192.168.1.0/24, 192.168.2.0/24 etc.

So if that's the case you can add more virtual IPs to your ifconfig after becoming root super user with:


hipo@noah:~$ su root 
Password: 
root@noah:/home/hipo# 


And then run:


/sbin/ifconfig wlan0:0 192.168.1.110 netmask 255.255.255.0
/sbin/ifconfig wlan0:1 192.168.2.110 netmask 255.255.255.0


etc.

Note that here I purposefully choose .110 IP because often the 192.168.1.1 is an IP assigned to the router and that might cause some IP conflicts and trigger alarms in the router security which I want to avoid.

To check just added extra Virtual IPs on wlan0 wireless interface (note that depending on your Wi-Fi card and your driver this interface might come under a different name on your computer):


root@noah# /sbin/ifconfig |grep -i wlan0 -A 1
wlan0     Link encap:Ethernet  HWaddr 00:1c:bf:bd:25:59  
          inet addr:192.168.0.103  Bcast:192.168.0.255  Mask:255.255.255.0

wlan0:0   Link encap:Ethernet  HWaddr 00:1c:bf:bd:25:59  
          inet addr:192.168.1.110  Bcast:192.168.1.255  Mask:255.255.255.0

wlan0:1   Link encap:Ethernet  HWaddr 00:1c:bf:bd:27:59  
          inet addr:192.168.2.110  Bcast:192.168.2.255  Mask:255.255.255.0


If you're scanning not on your own network but on a public connected network you might prefer to not use the ping scan as this might identify you in router's firewall as possible intruder and could cause you headaches, besides that some network connected nodes are connected to not respond on a ping scan (some networks purposefully disable pings at all) to avoid possibility of the so called ping flood that might overload a router buffer or bring down hosts on the network beinf flooded.

If you have doubts that a network has ping disabled and it shows no result you can give a try to the so called SYN / FIN Stealth packet scan with added requirement to scan for UDP open ports (-sS) argument


root@noah:/~# nmap -sS -sU -sT 192.168.0.1-255

Starting Nmap 6.00 ( http://nmap.org ) at 2017-09-04 13:31 EEST
Nmap scan report for pcfreak (192.168.0.1)
Host is up (0.012s latency).
Not shown: 998 closed ports
PORT     STATE SERVICE
80/tcp   open  http
1900/tcp open  upnp
MAC Address: 10:FE:ED:43:CF:0E (Unknown)

Nmap scan report for 192.168.0.100
Host is up (0.0036s latency).
Not shown: 998 closed ports
PORT      STATE SERVICE
625/tcp   open  apple-xsrvr-admin
49153/tcp open  unknown
MAC Address: 84:38:35:5F:28:75 (Unknown)

Nmap scan report for 192.168.0.103
Host is up (0.000012s latency).
Not shown: 999 closed ports
PORT   STATE SERVICE
22/tcp open  ssh


You might also like to add some verbosy (that would generate a lot of output so be careful):

In case if above scan fails due to firewalls and you have a ping scan disabled on the network too you might also try out the so called nmap connect TCP connect scan (-sT), that would avoid the SYN scan. The -sT is useful also if you're not possessing root superprivileges on nmap running host.


nmap -sS -sU 192.168.0.1-255


Note that connect scan could take ages as nmap tries to connect every port from default port scanned ranged on remote found hosts that are reporting as up and running.

If the shown results lead you find some unknown computer / tablet / mobile / phone device connected to your network, then connect to your router and thoroughfully inspect the traffic flowing through it, if you find intruder cut him off and change immediately your router passwords and monitor your network periodically to make sure the unwanted guest did not go back in future.

There is much more you can do with nmap so if you have some extra time and interest into penetration testing I recommend you check out Nmap Book (The Official Nmap project guide to Network Discovery and Security Scanning)

Upgrade old crappy Windows 7 32 bit to Windows 10 32 bit, post install fixes and impressions / How to enter Safe Mode in Windows 10

Wednesday, June 28th, 2017

Upgrade-Windows-7-Vista-XP-to-Windows-10-upgrade-howto-observations-post-fixes

However as I've been upgrading my sister's computer previously running Windows 7 to Windows 10 (the process of upgrading is really simple you just download Windows-Media-Creation-tool from Microsoft website and the rest comes to few clicks (Accept Windows 10 User Agreement, Create current install  restore point (backup) 
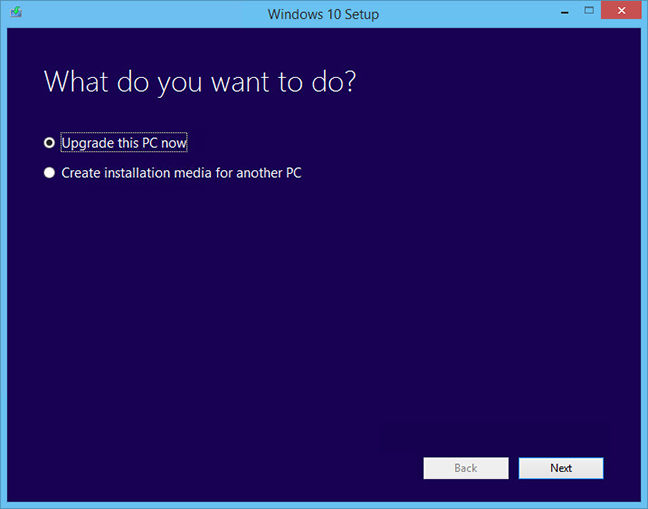
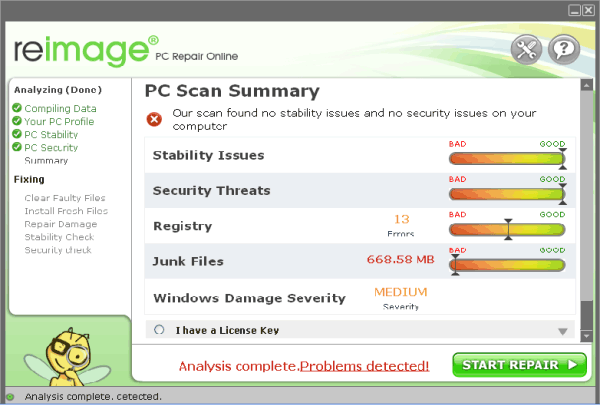
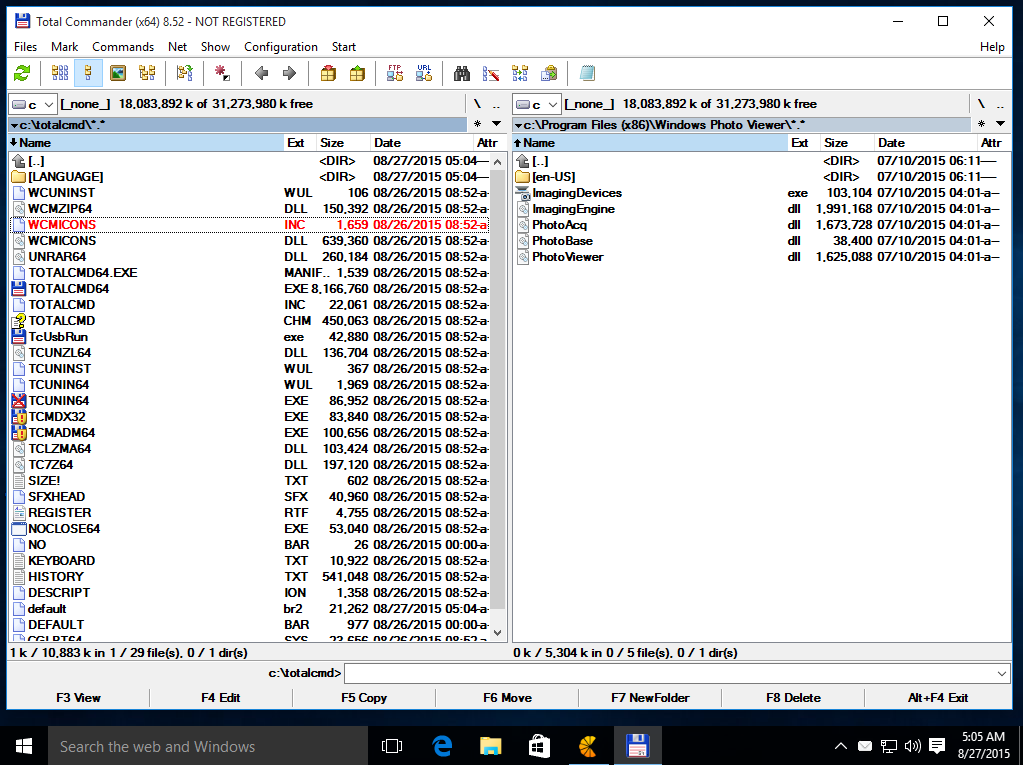
etc.) and waiting some 30 minutes or so for the upgrade to complete.

windows-7-to-10-windows-setup-upgrade-this-pc-prompt

Then it was up to downloading some other updates on a few times and restarting the computer, each time the upgrades were made and all the computer was ready. I've installed Avira (AntiVirus) as I usually do on new PCs and downloaded a bunch of anti-malware (MalwareBytes / Rfkill  / Zemanta)  to make sure that the old upgraded  WIndows was not already infected before the upgrade and I've found a bunch of malware, that got quickly cleared up.

Anyways I've tried also another tool called ReimagePlus – Online Computer Repair in order to check whether there are no some broken WIndows system files after the upgrade

Reimage_Repair-Windows-fix-windows-failing-services-and-broken-windows-installations-clear-up-malware
(here I have to say I've done that besides running in an Administrator command prompt (cmd.exe) and running
 

sfc /scannow


command to check base system files integrity, which luckily showed no problems with the Win base system files.

ReimagePlus however showed some failed services and some failed programs that were previously installed from Windows 7 before the upgrade and even it showed indication for Trojan present on computer but since ReImagePlus is a payed software and I didn't have the money to spend on it, I just proceeded to clean up what was found manually.

After that the computer ran fine, with the only strange thing that some data was from hard drive was red a bit too frequently, after a short call with a close friend (Nomen) – thx man, he suggested that the frequenty hdd usage might be related to Windows Search Indexing service database rebuilt and he adviced me to disable it which I did following this article How to speed up Windows by disabling Search Index Service.

One issue worthy to mention  stumbled upon after the upgrade was problems with Windows Explorer which was frequently crashing and "restarting the Desktop", but once, I've enabled all upgrades from Microsoft and Applied them after some update failures and restarts, once all was up2date to all latest from Microsoft, Explorer started working normally.

In the mean time while Windows Explorer was crashing in order to browse my file system I used the good old Win Total Command or Norton Commander for Windows – WinNC (with its most cool bizzarre own File Explorer tool).

Windows-Total-commander-tool-running-on-MS-Windows-10

As I wanted to run a MalwareBytes scan and Antivirus under Windows Safe-Mode, I tried entering it by restarting the Computer and pressing F8 a number of times before the Windows boot screen but this didn't work as Safe-Mode boot was changed in Windows 10 to be callable in another way because of some extra Windows Boot speed up optimizations, in short the easiest way I found to enter Windows 10 Safe Mode was to Hit Start Button -> Choose Restart PC and keep pressed SHIFT button simultaneously
that calls a menu that gives you some restore options, along with safe mode options for those who want to read more on How to Enter Safe mode (Command Prompt) on Windows 10 – please read this article.

Windows-10-enable-Safe-Mode-options-screen

Once the upgrade was over and all below done unfortunately I've realized her previously installed WIndows 7 is x86 (32 bit) version and the Acer notebook 5736Z where it is being installed is actually X64 (64 bit), hence I've decided to upgrade my dear sis computer to a 64 Bit Windows 10 and researched online whether, there is some tool that is capable to upgrade WIndows 10 from 32 bit to Windows 10 64 bit just to find out the only option is to either use some program to creaty a backup of files on the PC or to manually copy files to external hard drive and reinstall with a Windows 10 64 bit bootable USB Flash or CD / DVD image, so I took my USB flash and used again Windows Media Creation Tool to burn Windows and re-install with the 64 bit iso.

If you're wonder about why I choose to re-install finally Win 10 32 bit with Win 64 bit, because you might think performance difference might be not really so dramatic, then I have to say the Acer notebook is equipped with 4 Gigabytes of RAM Memory and Windows 10 32bit  (Pro) could recognize a maximum of 3 Gigabytes (2.9 GB if I have to be precise) and 1 Gigabyte of memory stays totally unusued all the time with  Winblows 10 32 bit.

Windows-10-4gb-memory-present-only-3gb-usable-why-reason-and-solution

I've tried my best actually to not loose time to fully upgrade Windows 7 (32 bit) -> Windows 10 (64 bit) but to make Windows 7 32 bit Windows to use more than the default Limitation of 3GB of memory by using this thirt party PAE Externsion Kernel Patch
which is patching the Windows Kernel to extend the Windows support for PCs with up to 128 GB of memory however it turned out that this Patch file is not compatible with my Windows Kernel version once I followed readme instructions.

It seems the PAE (Physical Address Extension) is supported by default  by Microsoft only on 32 bit Windows Server 10 to read more on the PAE if interested give a look here.

Well that's all folks, the rest I did was to just boot from the USB drive just burned and re-install WIndows and copy my files from User profile / Downloads / Pictures / Music etc. to the same locations on the new installed Windows 10 professional 64 bit and enjoy the better performance.

Unique MenuetOS – Free Software 32 / 64 bit OS entirely written in assembly language

Wednesday, July 10th, 2013


unique operating-system menuetos written-in-assembler-programming-logo

Something very unique, I stumbled on some time ago and worthy to mention and recommend for everyone to test is MenuetOS. Can you imagine, someone might write an operating system entirely from scratch in 32 / 64 bit Assemler? Idea sounds crazy and impossible but in fact developers of MenuetOS already achieved it!

Unique OS - menuetos asm free os start-menu screenshot

Normally every modern operating system nowadays is based on some kind of UNIX / Linux / or NT (Windows) technology or at least follows some kind of POSIX standartization.
 The design goal of MenuetOS since the first release in year 2000, is to remove the extra layers between different parts of an OS. The more the layers more complicated the programming behind is and therefore this creates bugs more bugs. MenuetOS follows the idea of KISS model (Keep It Simple Stupid). Its amazing what people can write in pure asm programming!! 64 bit version of menuet is also backward compatible with 32 bit. MenuetOS supports mostly all any other modern OS does. Here is list of Supported Features:


  • – Pre-emptive multitasking with 1000hz scheduler, multithreading, multiprocessor, ring-3 protection
  • – Responsive GUI with resolutions up to 1920×1080, 16 million colours
  • – Free-form, transparent and skinnable application windows, drag'n drop
  • – SMP multiprocessor support with currently up to 8 cpus
  • – IDE: Editor/Assembler for applications
  • – USB 2.0 HiSpeed Classes: Storage, Printer, Webcam Video and TV/Radio support
  • – USB 1.1 Keyboard and Mouse support
  • – TCP/IP stack with Loopback & Ethernet drivers
  • – Email/ftp/http/chess clients and ftp/mp3/http servers
  • – Hard real-time data fetch
  • – Fits on a single floppy, boots also from CD and USB drives

MenuetOS has fully functional Graphic interface (environment). Though it is so simple it is much more fast (as written in assembler) and behaves more stable than other OS-es written in C / C++.
Its bundled with a POP3 / Imap mail client soft

menuetos assmebly OS mail client
As of time even some major legendary Games like DoomQuake, Sokoban and Chess are ported to MenuetOS !!!

doom2-id-games-running-on-menuetos-operating-system-in-assembler-from-scratch

MenuetOS Doom

quake legendary game running on Menuetos asm free OS

Quake I port on MenuetOS

Below are some more screenshots of Apps and stuff running

Maniac Mansion running on MenuetOS assembler build free Operating system

The world famous Maniac Mansion (1987)

Prince of Persia running on 32 64 bit assembler written GPL free-OS

Arcade Classic of 16 bit and 8 bit computers Prince of Persia running on top of dosbox on MenuetOS

For those who like to program old school MenuetOS has BASIC compiler, C library (supports C programming), debuggers, Command Prompt.

It even supports Networking and has some  most popular network adapters drivers as well as has basic browsing support through HTTP application.

unique-os-menuetos-browsing-with-httpc-browser

You can listen music with CD Player but no support for mp3 yet.
To give MenuetOS a try just like any other Live Linux distribution it has Bootable LiveCD version – you can download it from here
MenuetOS is a very good for people interested to learn good 32 bit and 64 bit Assembler Programming.
Enjoy this unique ASM true hacker OS 😉

Pc-Freak Anti Microsoft Phreak, Hack Crack Organization crew short history timeline

Monday, April 9th, 2012


pC Freak Crew Hacking Cracking Anti Microsoft Organization Glowing Logo prepared with GIMP


Pc-Freak used to be anti-Microsoft Phreak / Hack / Anarchy Cracking (PHACK) magazine at a times, whether cracking was still a "craft". Pc-Freak started by a small crew of two persons Dark Doomer and Hip0.
Dark Doomer was the main magazine editor of Pc-Freak and the person who was ahead in computer technology, back at the distant 1995.
The project was simply started as a fun and aiming to help us, get better understanding on computer technology. The basic aim of it wasto gather a group of people who hold interest in Information Technolgy Telephone cracking and security cracking. At a point Dark Doomer resigned as he didn't believed in the project anymore and Hip0 took the lead of the project.

During his leadership, he created and maintaned a small IRC (Internet Relay Chat) channel in UNIBG – nowdays reachable via (irc.data.bg port 6667) this used to be around the years 1999 – 2006. The most active years of Pc-Freak were not in publishing text file format (txt) magazines, but in mostly discussion related to Computer Security, Ethical Hacking, Cracking and shared love for computer science. Around the year of 2001 a notable member joined Pc Freak, a person under the alias of ORDER. ORDER was mostly interested in how credit card processing works this is how he took the pseudonim. He used to have a good knowledge on CCs and how this kind of Credit Card processing operates. ORDER used to also like a back bone for the Pc-Freak and was the second person in line thanks to him the crew existed. A bit later a very notable members joined Pc Freak. A personal with an IRC alias STRASHARO. He used to be an(an amazing Windows XP cracker) and used to be known for his great cracking skills. STRASHARO and the rest of the crew planned and organized a number of cracking for fun sessions. Some of the other important person for development of PC FREAK as a crew , were the members  SICSTATIC, Nomen, Alex and FREAX. FreaX was the one that left pc-freak the earliest as he decided to completely quit being a computer and pc-freak activist.


Nowdays PC-FREAK  has changed a lot.
The person who gave birth to Pc-Freak (hip0)
Still maintains a personal website under the name PC-FREAK.
The Pc-Freak creator is active computer hobbyist 
and part time hacker.

However Pc-Freak Organization doesn't exist any more as a structured body the magazine is not published for a very long time and people who used to be involved somehow in the project are rarely in touch. During the PC-Freak life only 3 issues were published and actually the base idea of the magazine never came to reality. What is important is Pc-Freak used to play key role for the development and existence of current www.pc-freak.net website.

PC Freak currently contains plenty of information related to computer of security, old exploit codes, little hacks on GNU / Linux and FreeBSD (on hip0s) blog, as well as plenty of information on Orthodox Christianity and generally to Christian Faith. On www.pc-freak.net today, there are also plenty of resources on Computer Security, System Administartion, Business Administration, E-Marketing and Business Consutancy.