Posts Tagged ‘Admins’

Recover lost / forgotten root password for CentOS 7 Linux / Boot CentOS 6 into Single User mode to reset admin pass

Friday, September 27th, 2024

centos-community-enterprise-operating-system-logo.

If you have some old CentOS 7 Virtual machine hanging for a long time and you don't remember the root password or you don't remember where you have stored it, but you have something important as data left over, you might need to recover root password for your CentOS 7 Virtual Machine.

I recently had to resolve that issue and here is the few easy steps to take to recover the lost root password.

Assuming you have tried to boot the VM and the VM boots fine and your few attempts to input manually some default passwords of yours failed, next 

1. Reboot the Virtual Machine to the GRUB boot menu


grub.png

The GRUB boot screen should appear and be there for few secs

2. Edit the boot loader kernel options ( add add rd.break enforcing=0 )


How to reset root password on CentOS Linux - Clouvider

Press 'e' to Edit the boot loader and modify the boot commands options passed to the linux kernel.

In GRUB edit mode:

add rd.break enforcing=0


to the end of the line starting with linux at the end of passed parameters list as shown in the picture.

When done editing, press Ctrl-x (Control button x key simultaneously) to boot with changed parameters.

ALTERNATIVE WAY TO BOOT THE SYSTEM INTO ROOT WITHOUT PASSWORD PROMPT:

Alternative options to use instead of add rd.break.enforcing=0 are to substitute the rhgb quiet kernel option with init=/bin/bash

Edit CentOS Grub Boot Menu Entries rhgb quiet options shot

Modify kernel parameters pass init=/bin/bash to kernel to boot emergency mode centos linux


As you might wonder for the meaning of the passed 2 parameters:

rd.break breaks the boot process at initramfs while
enforcing=0 disables the SELinux (which often enabled by default on CentOS).

Another way is to 

3. Boot in CentOS emergency mode and Reset the root password
 

When done editing, press Ctrl-x to boot with changed parameters.

As you might wonder for the meaning of the passed parameters:

rd.break breaks the boot process at initramfs while
enforcing=0 disables the SELinux (which often enabled by default on CentOS).

Whence system boots up with the modified kernel options cmd, the switch_root prompt will appear.
As the emerency mode boots the filesystem into read-only mode under /sysroot default directory, in order to be able to
modify the MD5 root password stored hash inside RO mounted /sysroot/etc/shadow you need to remount the Filesystme
in read-write mode.

To Remount the read-only file system /sysroot in write mode:

# mount -o remount,rw /sysroot

As the /sysroot is not the root directory to be able to use a standard passwd command you need to make /sysroot
as the default root folder for the booted linux by chrooting into it.
 

  • Generate MD5 password manually (for Hardcore masochistic admins 🙂 )

If you're a hard core linux sysadmin of course, generate your own new md5 password and directly modify /etc/shadow copy pasting the md5 string.

If you want to manually generate the md5 string, you can do it depending on the required encryption algorithm with:

For (md5, sha256, sha512) encrypted pass

# openssl passwd -6 -salt xyz  yourpass

For   (md5, sha256, sha512) encrypted pwd

# mkpasswd –method=SHA-512 –stdin

For (des, md5, sha256, sha512) encrypted pw

# perl -e 'print crypt("YourPasswd", "salt", "sha512"),"\n"'


Once the string is generated;

# vim  /etc/shadow


and exchange the old with new string for MD5

  • Change password with chroot (the easy common way)

remount read write the filesystem in emergency single user mode CentOS LINUX

# chroot /sysroot

That should drop you into another shell bash-4.x


Reset root user password in CentOS 7

# passwd
Changing password for user root.
New password:
Retype new password:

We need have to sync the entire filesystem we have to use the sync command, for novice sys admins who never heard about this command, below
short description:

The Linux sync command synchronizes cached data to permanent storage.
This data includes modified superblocks, modified inodes, delayed reads and writes, and others. sync uses several system calls:

sync()
syncfs()
fsync()
fdatasync()


For example, the sync command utilizes the sync() system call to write all buffered modifications to file data and metadata to an underlying storage device.

As a Linux systems administrator or developer, understanding the sync command can be crucial for efficient file synchronization. Additionally, sync can be helpful after crashes or when the file system becomes corrupted.

In this tutorial, we’ll explore the various aspects of the sync command. Also, we’ll see how we can use sync in different scenarios.

# sync

# exec /sbin/init

Try out the root password after booting normally into CentOS and the new set administrator pass should work.


Resetting forgotten (lost) root password on CentOS 6

The process is absolutely the same except on the Step 1 (in the modification of GRUB boot menu by pressing e key), add to

rhgb quiet

at the end one 'S'

This S character means 'boot CentOS into Single user mode'

rhgb quiet S


Go to single user mode on CentOS 6 Linux in boot loader S kernel setting

Then, press ENTER key and press b key to boot CentOS 6 into to single user mode.
 

Check the Type and Model of available installed Memory on Linux / Unix / BSD Server howto

Monday, October 30th, 2023

how-linux-kernel-manages-memory-picture

As a system administrator one of the common task, one has to do is Add / Remove or Replace (of Broken or failing Bank of RAM memory) a piece of additional Bank of memory Bank to a Linux / BSD / Unix server.  Lets say you need to fullfil the new RAM purchase and provide some information to the SDM (Service Delivery Manager) of the compnay you're hirder in or you need to place the purchase yourself. Then you  need to know the exact speed and type of RAM currently installed on the server installed.

In this article i'll shortly explain how do I find out ram (SDRAM) information from a via ordinary remote ssh shell session cmd prompt. In short will be shown how can one check RAM speed configured and detected by Linux / Unix kernel ? 
As well as  how to Check the type of memory (if it is DDR / DDR2 / DDR or DDR4) or ECC with no access to Hardware Console.  Please note this article will be definitely boring for the experienced sysadmins but might help to a starter sysadmins to get on board with a well know basic stuff.

There are several approaches, of course easiest one is to use remote hardware access interrace statistics web interface of ILO (on IBM machine) or the IDRAC on (Dell Server) or Fujitsu's servers iRMC. However as not always access to remote Remote hardware management interface is available to admin. Linux comes with few commands that can do the trick, that are available to most Linux distributions straight for the default package repositories.

Since mentioning about ECC a bit up, most old school admins and computer users knows pretty well about DDRs as they have been present over time but ECC is being used over actively on servers perhaps over the last 10 / 15 years and for those not dealt with it below is a short description on what is ECC RAM Memory.

ECC RAM, short for Error Correcting Code Random Access Memory, is a kind of RAM can detect most common kinds of memory errors and correct a subset of them. ECC RAM is common in enterprise deployments and most server-class hardware. Above a certain scale and memory density, single-bit errors which were up to this point are sufficiently statistically unlikely begin to occur with enough frequency that they can no longer be ignored. At certain scales and densities of memory arbitrary memory errors that are literally "one in a million chances" (or more) may in fact occur several times throughout a system's operational life.

Putting some basics, Lets proceed and Check RAM speed and type (line DDR or DDR2 or DDR3 or DDR4) without having to physically go to the the Data Center numbered rack that is containing the server.


Most famous and well known (also mentioned) on few occasions in my previous articles are: dmidecode and lshw

Quickest way to get a quick overview of installed servers memory is with:
 

root@server:~# dmidecode -t memory | grep -E "Speed:|Type:" | sort | uniq -c
      4     Configured Memory Speed: 2133 MT/s
     12     Configured Memory Speed: Unknown
      4     Error Correction Type: Multi-bit ECC
      2     Speed: 2133 MT/s
      2     Speed: 2400 MT/s
     12     Speed: Unknown
     16     Type: DDR4


To get more specifics on the exact type of memory installed on the server, the respective slots that are already taken and the free ones:

root@server:~# dmidecode –type 17 | less

Usually the typical output the command would produce regarding lets say 4 installed Banks of RAM memory on the server will be like:

Handle 0x002B, DMI type 17, 40 bytes
Memory Device
        Array Handle: 0x0029
        Error Information Handle: Not Provided
        Total Width: 72 bits
        Data Width: 64 bits
       
Size: 16 GB
        Form Factor: RIMM
        Set: None
        Locator: CPU1 DIMM A1
        Bank Locator: A1_Node0_Channel0_Dimm1
       
Type: DDR4
        Type Detail: Synchronous
       
Speed: 2400 MT/s
        Manufacturer: Micron
       
Serial Number: 15B36358
        Asset Tag: CPU1 DIMM A1_AssetTag
       
Part Number: 18ASF2G72PDZ-2G3B1 
        Rank: 2
       
Configured Memory Speed: 2133 MT/s
        Minimum Voltage: Unknown
        Maximum Voltage: Unknown
        Configured Voltage: Unknown

Handle 0x002E, DMI type 17, 40 bytes
Memory Device
        Array Handle: 0x0029
        Error Information Handle: Not Provided
        Total Width: Unknown
        Data Width: Unknown
        Size: No Module Installed
        Form Factor: RIMM
        Set: None
        Locator: CPU1 DIMM A2
        Bank Locator: A1_Node0_Channel0_Dimm2
        Type: DDR4
        Type Detail: Synchronous
        Speed: Unknown
        Manufacturer: NO DIMM
        Serial Number: NO DIMM
        Asset Tag: NO DIMM
        Part Number: NO DIMM
        Rank: Unknown
        Configured Memory Speed: Unknown
        Minimum Voltage: Unknown
        Maximum Voltage: Unknown
        Configured Voltage: Unknown


Handle 0x002D, DMI type 17, 40 bytes
Memory Device
        Array Handle: 0x0029
        Error Information Handle: Not Provided
        Total Width: 72 bits
        Data Width: 64 bits
        Size: 16 GB
        Form Factor: RIMM
        Set: None
        Locator: CPU1 DIMM B1
        Bank Locator: A1_Node0_Channel1_Dimm1
        Type: DDR4
        Type Detail: Synchronous
        Speed: 2400 MT/s
        Manufacturer: Micron
        Serial Number: 15B363AF
        Asset Tag: CPU1 DIMM B1_AssetTag
        Part Number: 18ASF2G72PDZ-2G3B1 
        Rank: 2
        Configured Memory Speed: 2133 MT/s
        Minimum Voltage: Unknown
        Maximum Voltage: Unknown
        Configured Voltage: Unknown

Handle 0x0035, DMI type 17, 40 bytes
Memory Device
        Array Handle: 0x0031
        Error Information Handle: Not Provided
        Total Width: 72 bits
        Data Width: 64 bits
        Size: 16 GB
        Form Factor: RIMM
        Set: None
        Locator: CPU1 DIMM D1
        Bank Locator: A1_Node0_Channel3_Dimm1
        Type: DDR4
        Type Detail: Synchronous
        Speed: 2133 MT/s
        Manufacturer: Micron
        Serial Number: 1064B491
        Asset Tag: CPU1 DIMM D1_AssetTag
        Part Number: 36ASF2G72PZ-2G1A2  
        Rank: 2
        Configured Memory Speed: 2133 MT/s
        Minimum Voltage: Unknown
        Maximum Voltage: Unknown
        Configured Voltage: Unknown

Handle 0x0033, DMI type 17, 40 bytes
Memory Device
        Array Handle: 0x0031
        Error Information Handle: Not Provided
        Total Width: 72 bits
        Data Width: 64 bits
        Size: 16 GB
        Form Factor: RIMM
        Set: None
        Locator: CPU1 DIMM C1
        Bank Locator: A1_Node0_Channel2_Dimm1
        Type: DDR4
        Type Detail: Synchronous
        Speed: 2133 MT/s
        Manufacturer: Micron
        Serial Number: 10643A5B
        Asset Tag: CPU1 DIMM C1_AssetTag
        Part Number: 36ASF2G72PZ-2G1A2  
        Rank: 2
        Configured Memory Speed: 2133 MT/s
        Minimum Voltage: Unknown
        Maximum Voltage: Unknown
        Configured Voltage: Unknown


The marked in green are the banks of memory that are plugged in the server. The

field Speed: and Configured Memory Speed: are fields indicating respectively the Maximum speed on which a plugged-in RAM bank can operate and the the actual Speed the Linux kernel has it configured and uses is at.

It is useful for the admin to usually check the complete number of available RAM slots on a server, this can be done with command like:

root@server:~#  dmidecode –type 17 | grep -i Handle | grep 'DMI'|wc -l
16


As you can see at this specific case 16 Memory slots are avaiable (4 are already occupied and working configured on the machine at 2133 Mhz and 12 are empty and can have installed a memory banks in).


Perhaps the most interesting information for the RAM replacement to be ordered is to know the data communication SPEED on which the Memory is working on the server and interacting with Kernel and Processor to find out.

root@server:~#  dmidecode –type 17 | grep -i "speed"|grep -vi unknown
    Speed: 2400 MT/s
    Configured Memory Speed: 2133 MT/s
    Speed: 2400 MT/s
    Configured Memory Speed: 2133 MT/s
    Speed: 2133 MT/s
    Configured Memory Speed: 2133 MT/s
    Speed: 2133 MT/s
    Configured Memory Speed: 2133 MT/s


If you're lazy to remember the exact dmidecode memory type 17 you can use also memory keyword:

root@server:~# dmidecode –type memory | more

For servers that have the lshw command installed, a quick overview of RAM installed and Full slots available for memory placement can be done with:
 

root@server:~#  lshw -short -C memory
H/W path                 Device        Class          Description
=================================================================
/0/0                                   memory         64KiB BIOS
/0/29                                  memory         64GiB System Memory
/0/29/0                                memory         16GiB RIMM DDR4 Synchronous 2400 MHz (0.4 ns)
/0/29/1                                memory         RIMM DDR4 Synchronous [empty]
/0/29/2                                memory         16GiB RIMM DDR4 Synchronous 2400 MHz (0.4 ns)
/0/29/3                                memory         RIMM DDR4 Synchronous [empty]
/0/29/4                                memory         16GiB RIMM DDR4 Synchronous 2133 MHz (0.5 ns)
/0/29/5                                memory         RIMM DDR4 Synchronous [empty]
/0/29/6                                memory         16GiB RIMM DDR4 Synchronous 2133 MHz (0.5 ns)
/0/29/7                                memory         RIMM DDR4 Synchronous [empty]
/0/29/8                                memory         RIMM DDR4 Synchronous [empty]
/0/29/9                                memory         RIMM DDR4 Synchronous [empty]
/0/29/a                                memory         RIMM DDR4 Synchronous [empty]
/0/29/b                                memory         RIMM DDR4 Synchronous [empty]
/0/29/c                                memory         RIMM DDR4 Synchronous [empty]
/0/29/d                                memory         RIMM DDR4 Synchronous [empty]
/0/29/e                                memory         RIMM DDR4 Synchronous [empty]
/0/29/f                                memory         RIMM DDR4 Synchronous [empty]
/0/43                                  memory         768KiB L1 cache
/0/44                                  memory         3MiB L2 cache
/0/45                                  memory         30MiB L3 cache

Now once we know the exact model and RAM Serial and Part number you can google it online and to purchase more of the same RAM Model and Type you need so the installed memory work on the same Megaherzes as the installed ones.
 

Fix “init: Id “ad” respawning too fast: disabled for 5 minutes” – Reload /etc/inittab changes in memory apply without rebooting Linux server

Thursday, April 15th, 2021

inittab-logo-reload-inittab-without-reboot

During my daily sysadmin tasks I've been contacted by a colleague, reporting issues with missing logs in rsyslog on a very old Redhat Server release 5.11.
Exact version is:

root@linux-server:~# cat /etc/redhat-release
Red Hat Enterprise Linux Server release 5.11 (Tikanga)

After checking the logs, I have confirmed his finding that in reality since about more than a year logs were not produced and al I could find multiple messages in /var/log/messages reading like:

init: Id "ad" respawning too fast: disabled for 5 minutes

I've checked the status of rsyslog which seemed to be fine

root@linux-server:~# /etc/init.d/rsyslog status
rsyslogd (pid  13709) is running…

The redhat version on the system was

root@linux-server:~# rpm -qa |grep -i rsyslog
rsyslog-3.22.1-7.el5


root@linux-server:~# tail -n 16 /var/log/messages
Apr 15 17:21:25 linux-server init: Id "ad" respawning too fast: disabled for 5 minutes
Apr 15 17:26:26 linux-server init: Id "ad" respawning too fast: disabled for 5 minutes
Apr 15 17:31:27 linux-server init: Id "ad" respawning too fast: disabled for 5 minutes
Apr 15 17:36:28 linux-server init: Id "ad" respawning too fast: disabled for 5 minutes
Apr 15 17:41:29 linux-server init: Id "ad" respawning too fast: disabled for 5 minutes
Apr 15 17:46:30 linux-server init: Id "ad" respawning too fast: disabled for 5 minutes
Apr 15 17:51:31 linux-server init: Id "ad" respawning too fast: disabled for 5 minutes
Apr 15 17:56:32 linux-server init: Id "ad" respawning too fast: disabled for 5 minutes
Apr 15 18:01:33 linux-server init: Id "ad" respawning too fast: disabled for 5 minutes
Apr 15 18:06:34 linux-server init: Id "ad" respawning too fast: disabled for 5 minutes
Apr 15 18:11:35 linux-server init: Id "ad" respawning too fast: disabled for 5 minutes
Apr 15 18:16:38 linux-server init: Id "ad" respawning too fast: disabled for 5 minutes
Apr 15 18:21:39 linux-server init: Id "ad" respawning too fast: disabled for 5 minutes


root@linux-server:~# /etc/init.d/rsyslog status
rsyslogd (pid  13709) is running…

Since the system is so old and I've seen this message and experienced this "respawning too fast: disabled for 5 minutes" myself in the past on some old Redhat 6.0 before RHEL was born as well as on Slackware Linux. The /etc/inittab which is nowadays obsoleted in newer Linux distributions was used to keep respawing a processes which have the chance to die out for some reason. 

For those unfamiliar with inittab there is a short extract from man inittab to get idea what it is.


NAME
       inittab  –  format of the inittab file used by the sysv-compatible init
       process

DESCRIPTION
       The inittab file describes which processes are started  at  bootup  and
       during  normal  operation  (e.g. /etc/init.d/boot, /etc/init.d/rc, get-
       tys…).  Init(8) distinguishes multiple runlevels, each of  which  can
       have  its  own  set of processes that are started.  Valid runlevels are
       0-6 plus A, B, and C for ondemand entries.  An  entry  in  the  inittab
       file has the following format:

              id:runlevels:action:process
 

So for example the use of /etc/inittab was very handy to configure a separate TTY12 (physical console) in the text environment of Linux to log all your messages. Another good use if you had a bash / perl / python script that you wanted to respawn (resurrect itself if it does out) on OS level without adding additional software like Dan Bernstein's all famous daemontools inittab was the right thing to use. It is a pity nowadays inittab is obsoleted in modern Linux OSes but the most likely reason to remove it is if you put some broken script that overeats CPU or memory if it runs multiple times you can easily get into a hung system.

Thus the logical thing to do is to check /etc/inittab content for any strange issues with less /etc/inittab and near the end of file found the problematic process which was triggering a never ending error messages to rsyslog and the module to protect from such messages in rsyslog by values $SystemLogRateLimitInterval and $SystemLogRateLimitBurst

# configure rsyslog rate limiting
# Rate-limiting
$SystemLogRateLimitInterval 5
$SystemLogRateLimitBurst 50000

The problem causing respawning too fast: disabled for 5 minutes

Was an old version of TivSM IBM Tivoli Service Manager /opt/tivoli/tsm/client/ba/bin/dsmc, set in the past in /etc/inittab it seems some colleague after updating to a more recent version has either changed the location of dsmc binary either the architecture of old tsm itself required a record in /etc/inittab in case if for some reasons or bugs the dsmc during backup creation was dying.

root@linux-server:~# tail -8 /etc/inittab
6:2345:respawn:/sbin/mingetty tty6

# Run xdm in runlevel 5
x:5:respawn:/etc/X11/prefdm -nodaemon

#ad:2345:respawn:/opt/tivoli/tsm/client/ba/bin/dsmc sched >/dev/null 2>&1

root@linux-server:~# rpm -qa |grep -i tivsm
TIVsm-API-5.3.4-0
TIVsm-stagent-5.3.4-0
TIVsm-BA-5.3.4-0
TIVsm-API64-5.3.4-0


The logical thing to do was to check whether this binary exist at all here is the result:

root@linux-server:~$ ls -al /opt/tivoli/tsm/client/ba/bin/dsmc
ls: /opt/tivoli/tsm/client/ba/bin/dsmc: No such file or directory

Obviously someone decided to comment out the inittab support for /opt/tivoli/tsm/client/ba/bin/dsmc as the binary was not present and the dsmc backup was executed via a separate one time cron job or the service itself was configured to run continue, but forgot to reread its configuration so in the kernel memory inittab was still having the instruction to loop over the dsmc binary, since the Linux machine was not rebooted ages (1472 days) or 4.8 years time.

root@linux-server:~#  uname -a; echo; uptime
Linux linux-server2.6.18-419.el5 #1 SMP Wed Feb 22 22:40:57 EST 2017 x86_64 x86_64 x86_64 GNU/Linux

 19:04:34 up 1472 days,  5:20,  1 user,  load average: 0.12, 0.07, 0.06


So what really happens is <b>inittab</b> is trying to kind of re-run all the time dsmc process in a similar way like it would in a bash never ending loop;


while [ 1 ]; do 
/opt/tivoli/tsm/client/ba/bin/dsmc sched
done

Since the $PATH location to the binary returns 'No such file or directory' message this message floods up the rsyslog every second which triggers the LimitBurst protection of rsyslog causing rsyslog to disable completely logging for 5 minutes. The next 5 minutes when the time expires for blocking out logging due to reached limit burst.
dsmc binary sends again few ten thousand of messages for few seconds which are already waiting in a queue of rsyslog and the LimitBurst anti DDoS protection activates again. The reason for the LimitBurst is simply because if it logging is not disabled quickly the repeating message is going to fill the hard drive of the system and noone will be able to login. So rsyslog activated the good protection.

It seems noone from support colleagues, never ever noticed this init: Id "ad" respawning too fast: disabled for 5 minutes in /var/log/messages. So since the syslog was continuesly blocked by overflow of non-sense messages, systems  normal logging was interruped and respectively prevented any other meaningful error messages and warnings from the system to get properly logged  and perhaps flooed the remote rsyslog logging servers @logging-servers:514 in /etc/rsyslog.conf


Fix to respawning too fast: disabled for 5 minutes

Very simply make /etc/inittab get reloaded in memory with:

root@linux-server:~# /sbin/init q

or with the linked telnet, which was so much used by us sys admins in the past

root@linux-server:~# /sbin/telinit q

To make the rsyslog suspension disabled of course we need to restart it again.

root@linux-server:~# /etc/init.d/rsyslog restart

root@linux-server:~# /etc/init.d/rsyslog status
rsyslogd (pid  13710) is running…

And Voila logs from services are being delivered normally via configured stuff in /etc/rsyslog.conf, to make sure this is so:

root@linux-server:~# tail -8 /var/log/messages
Apr 15 14:36:29 linux-serverinit: Id "ad" respawning too fast: disabled for 5 minutes
Apr 15 14:41:37 linux-serverinit: Id "ad" respawning too fast: disabled for 5 minutes
Apr 15 14:51:22 linux-serverinit: Id "ad" respawning too fast: disabled for 5 minutes
Apr 15 14:56:30 linux-serverinit: Id "ad" respawning too fast: disabled for 5 minutes
Apr 15 15:01:38 linux-serverinit: Id "ad" respawning too fast: disabled for 5 minutes
Apr 15 15:06:45 linux-serverinit: Id "ad" respawning too fast: disabled for 5 minutes
Apr 15 18:21:49 linux-server init: Re-reading inittab
Apr 15 18:21:54 linux-server kernel: imklog 3.22.1, log source = /proc/kmsg started.
Apr 15 18:21:54 linux-server rsyslogd: [origin software=”rsyslogd” swVersion=”3.22.1″ x-pid=”13709″ x-info=”http://www.rsyslog.com”] (re)start
Apr 15 18:41:54 linux-server rsyslogd: — MARK —
Apr 15 19:01:54 linux-server rsyslogd: — MARK —
Apr 15 19:21:54 linux-server rsyslogd: — MARK —
Apr 15 19:41:54 linux-server rsyslogd: — MARK —
Apr 15 20:01:54 linux-server rsyslogd: — MARK —

Saving multiple passwords in Linux with Revelation and Keepass2 – Keeping track of multiple passwords

Thursday, October 17th, 2013

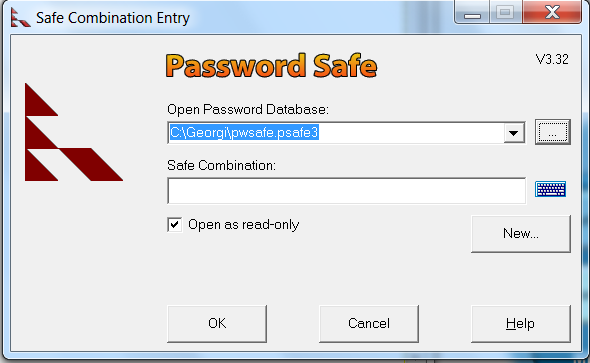
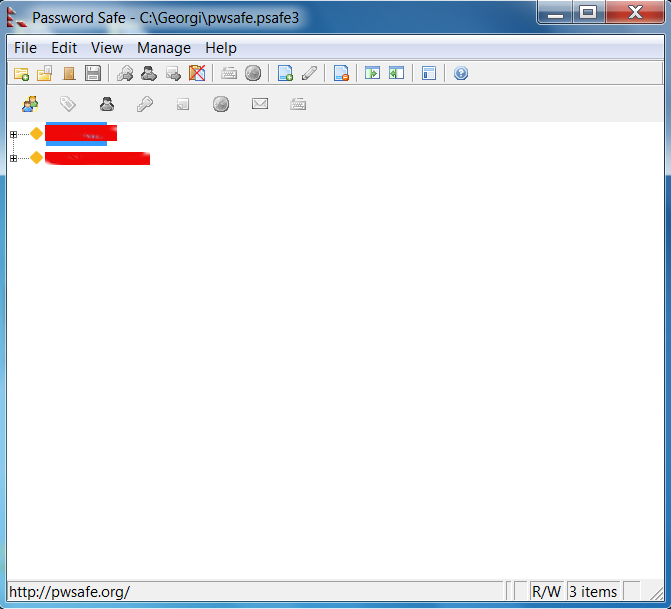
System Administrators who use MS Windows to access multiple hosts in big companies like HP or IBM certainly use some kind of multiple password manager like PasswordSafe.

Keep multiple passwords safe in Microsoft Windows 7 passwordsafe with masterpassword

When number of passwords you have to keep in mind grows significantly using something like PasswordSafe becomes mandatory. Same is valid also for valid for system administrators who use GNU / Linux as a Desktop environment to administer thousands or hundreds of servers. I'm one of those admins who for years use Linux and until recently I kept logging all my passwords in separate directory full with text files created with vim (text editor). As the number of passwords and accesses to servers and web interfaces grow up dramatically as well as my requirement for security raised up I wanted to have my passwords secured being kept encrypted on my hard drive. For those who never use PasswordSafe the idea of program is to store all passwords you have in encrypted database which can be only opened through PasswordSafe by providing a master password.

passwordsafe on microsoft windows keep in order multiple passwords manager

Of course having one master password imposes other security risks as someone who knows the MasterPass can easily access all your passwords anyways for now such level of security perfectly fits my needs.

PasswordSafe is since recently Open Source so there is a Linux port, but the port is still in beta and though I tried hard to install it using provided .deb binaries as well as compile from source, I finally give it up. And decided to review what kind of password managers are available in Debian Wheezy's ports.

Here are those I found with;

apt-cache search password|grep -i manager

cpm – Curses based password manager using PGP-encryption
fpm2 – password manager with GTK+ 2.x GUI
gringotts – secure password and data storage manager
kedpm – KED Password Manager
kedpm-gtk – KED Password Manager
keepass2 – Password manager
keepassx – Cross Platform Password Manager
kwalletmanager – secure password wallet manager
password-gorilla – cross-platform password manager
revelation – GNOME2 Password manager

I didn't have the time to test each one of them, so I installed and checked only those which seemed more reliable, i.e.:
keepass2 and revelation

# apt-get install –yes fpm2 keepass2 revelation

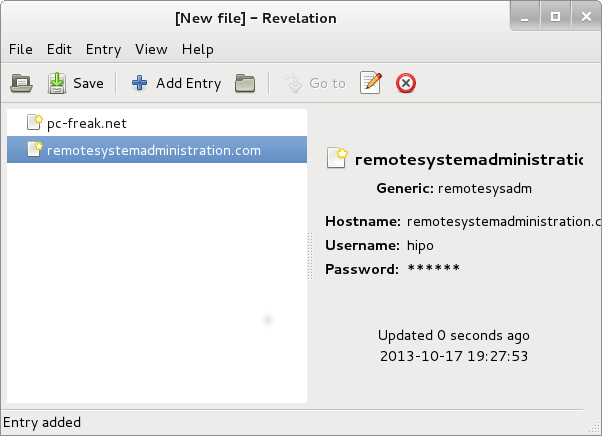
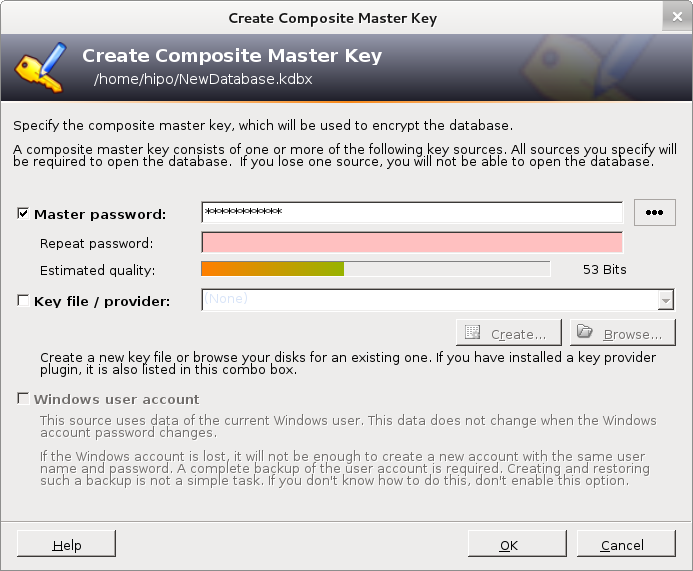
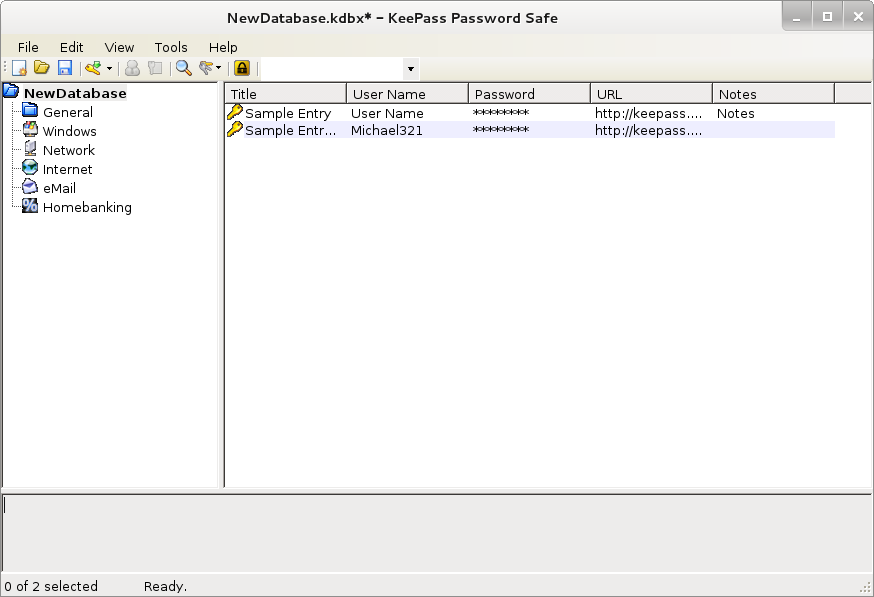
Below is screenshot of each one of managers:

Revelation Linux Gnome graphic password manager program

Revelation – GNOME Password Manager

keepass2 Linux gui password manager screenshot Debian - graphic manager for storing passwords

kde password safe gui program Linux Debian screenshot

KDE QT Interface Linux GUI Password Manager (KeePass2)

With one of this tools admin's life is much easier as you don't have to get crazy and remember thousands of passwords.
Hope this helps some admin out there! Enjoy ! 🙂
 

Windows add to startUP / Make MS Windows XP / Vista / 7 and 8 to start program automatically on start-up

Monday, July 22nd, 2013

On Linux, it is quite easy to run programs on OS boot via /etc/rc.local.
For Linux admins like me who are not much into Windows, it is interesting How it is possible to make Application run on Windows boot?

Running Program auto on boot is precious, especially for running small custom written .BAT (batch scripts)
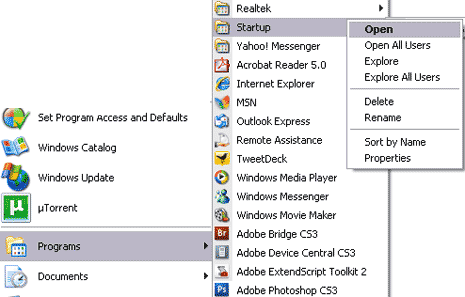
On Windows XP there is a Startup Folder. Anything placed in Startup folder launches whenever Windows start.

Windows XP open startup folder screenshot

  • Click on Start button -> All Programs, right mouse click on Startup folder -> Open.
  • Open Folder location that contains Program want to make start-up on Windows start.
  • Right-click Program and then click Create Shortcut. Newly created shortcut appears in same location as the original item.
  • Drag with Mouse new shortcut into the Startup folder.

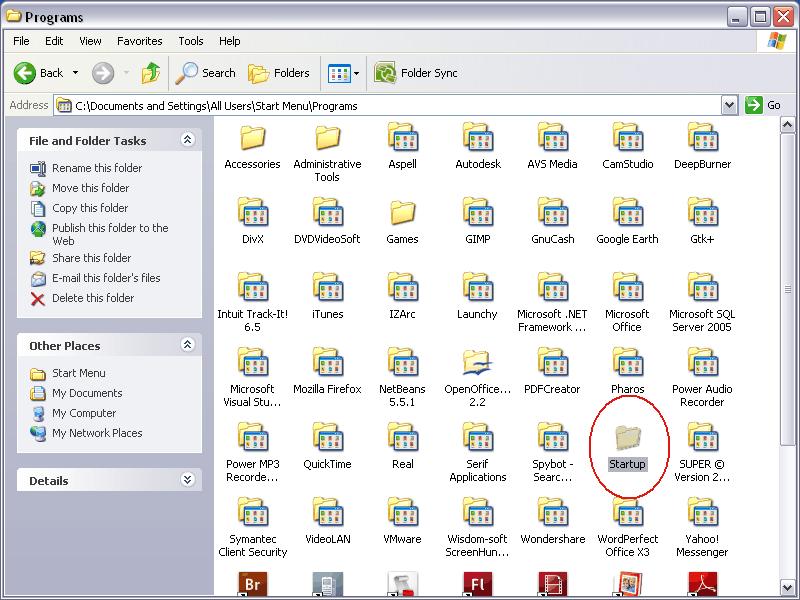
Alternative way to reach Windows  Start-Up (on Windows XP) is via C:\Users\Documents and Settings\All Users\Start Menu\Programs

Windows XP Start menu programs start up

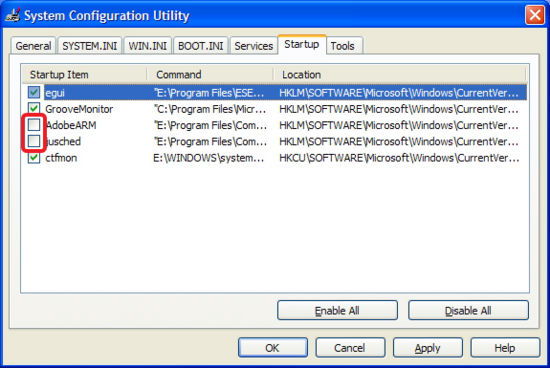
To remove already, scheduled program to start, just remove it from Startup Folder or run in command prompt Start -> run (cmd.exe) ->

msconfig

And from StartUp tab, remove tick from Program you'd like to disable:

Alter Remove from Windows XP Startup Programs

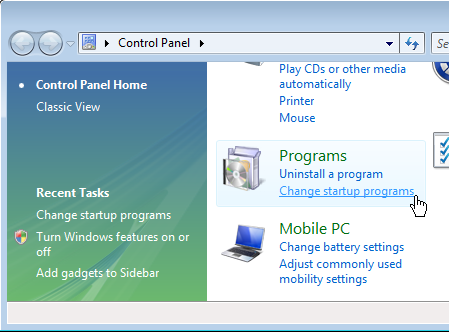
On Windows Vista / 7 Add / Remove Program on Start-up is done also from:
Control Panel -> Program -> Change Startup Programs

Control Panel Programs Add / Remove Programs on Windows Vista / 7 Start-up

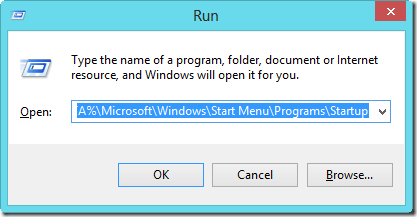
On Windows 8 to add / remove Programs to Startup (press Ctrl+C) in Run box that appears run:

%APPDATA%\Microsoft\Windows\Start Menu\Programs\Startup

run command for start up program add Remove Microsoft Windows 8

Then just like on XP, create shortcut and Paste Shortcut linked to program to run on Win Start

That's all you have to do on Next Windows Startup-up Program will automatically run.
Following same logic it is possible to make Word DOC / .TXT / PDF / Mp3 / Movie run automatically on Windows boot. Enjoy 🙂

P.S. Dear Windows Admin Gurus, I'm sorry if this article was too boring, please accept my kind apologies if so:)

Linux: Configure Midnight Commander to use mcedit instead of nano or vi text editor

Friday, June 21st, 2013

reverting mc text editor to mcedit fix problem with mcedit not working in linux

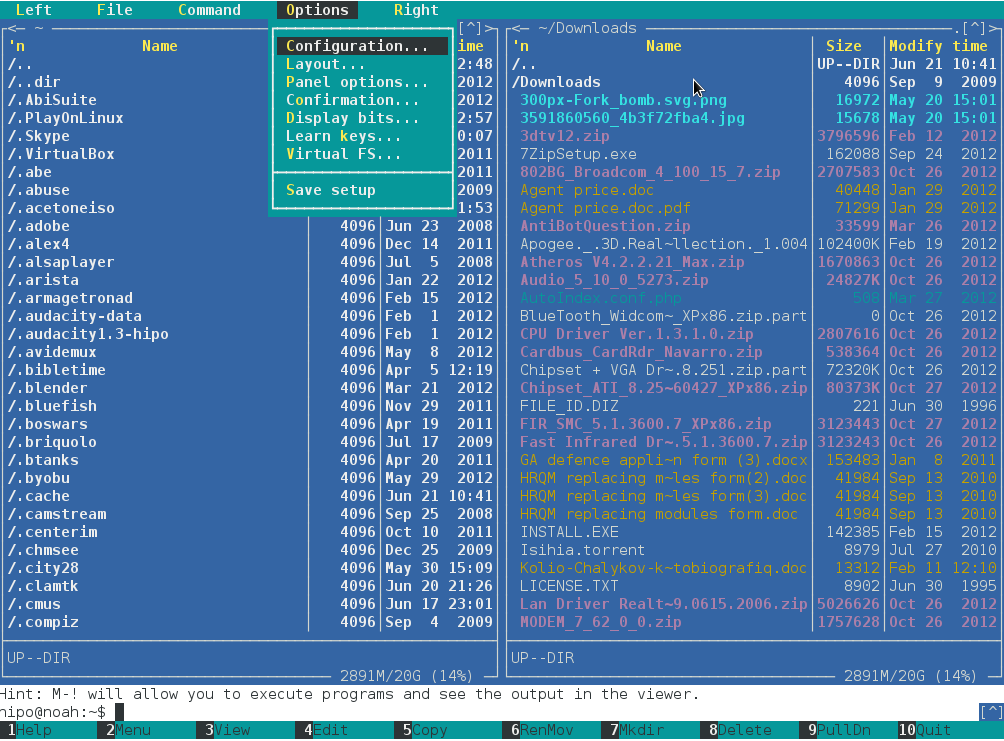
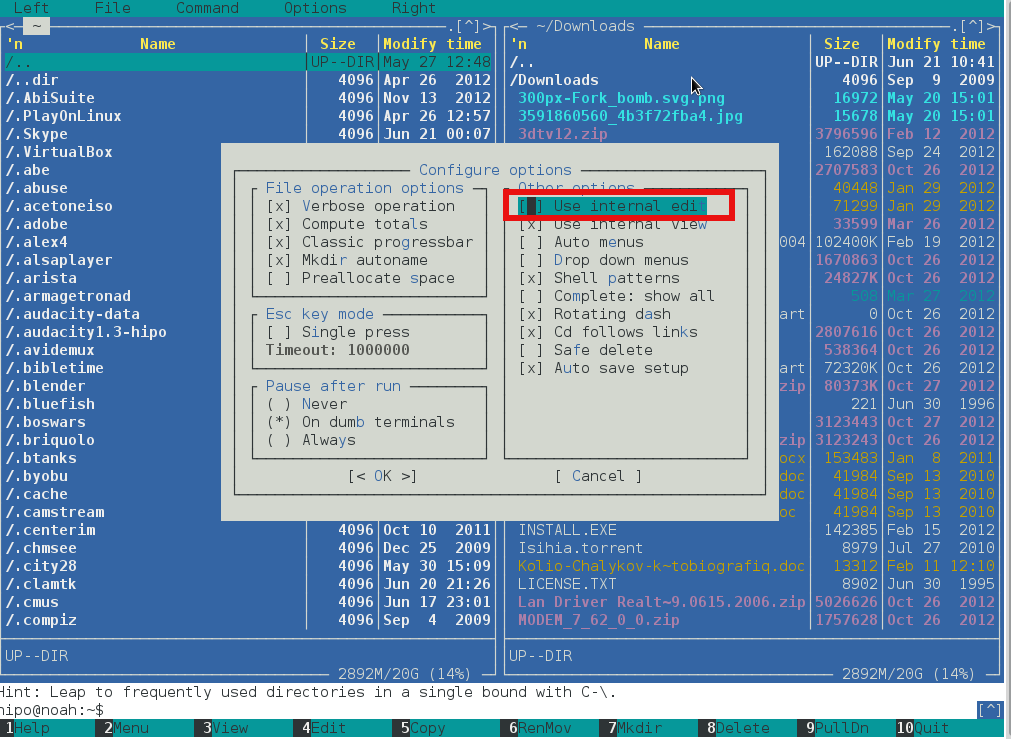
I use Midnight Commander console file manager on any UNIX like servers, since my early days as system administrator. mc comes with its own text editor mcedit which is often very handy for reading config files or pieces of source code. Many times I had to modify files which were spitting errors which I couldn't track in VIM, jor or whatever text editor had on server at hand and after checking file with mcedit I caught my config or source code mistake. I guess many other admins has similar nice experiences with mcedit Internal file editor of GNU Midnight Commander. Nowadays, I install mostly Debian Linux on new configured servers and using mc to navigate in file system is very useful. I prefer mc to open files for edit with F4 (Edit – kbd shortcut) with its default mcedit, however for some reasons most of Debian / Ubuntu and other Linuxes, nowadays has set global environment text editor to nano. I totally dislike this text editor and like changing mc always to use mcedit. This is done straight from MC menus by:

Pressing F9 -> Going to Options -> Configuration -> (Setting mark on) -> Use Inernal Edit
/code>

unix terminal file manager midnight commander configuration menu screenshot

linux console file manager midnight commander use internal edit menu unchecked screenshot

<

How to list and delete mail queue on Qmail / Sendmail / Postfix and Exim SMTP server

Wednesday, April 3rd, 2013

How to list and manage delete Qmail Postfix Sendmail Exim mail SMTP queue View-and delete manage Linux and FreeBSD mail server queue

I have to administrate different kind of mail servers. Different clients has different requirements so in daily job I had to take care for all major mail server platforms our there. Often I have to fix problems with mail servers one very useful thing is to check the mail server queue to see what is there holding to be delivered. Often problems with busy mail servers are rooted in overfilled queues with undelivered mails so checking the queue on Postfix / Exim / Sendmail and Qmail is among the first thing to do to diagnose a problem with improperly working SMTP. In this little article I will show how one can check what is in the queue even if he didn't have the technical background on how each of those mail delivery agents works.

1. How to check and manage queue of Qmail Mail Server

Essential info on how many messages are in the queue and to list this messages in Qmail are done with qmail-qstat and qmail-qread.

a) Checking how many messages are in Qmail queue undelivered to remote SMTPs

root@mail:~# qmail-qstat
messages in queue: 1
messages in queue but not yet preprocessed: 0

b) Listing undelivered e-mails held in Qmail queue

root@mail:~# qmail-qread
26 Mar 2013 01:33:07 GMT  #9609259  748  <info@pomoriemonastery.com>
    remote    bpfejd@gprizm.com
root@mail:~#

One other useful command in dealing with Qmail queue is qmail-qread type it and see for yourself what it does.
c) Flushing qmail queue

Use a tiny shell script ( flush_qmail_queue.sh ), deleting all files in /var/qmail/queue/mess – directory where qmail stores undelivered messages in queue.

# ./flush_qmail_queue.sh

Though above script should be working in some cases, where there are permission problems with Queue or some other mess it is better to use more sophisticated Qmail Queue cleaining tool Qmail MailRemove. To use its necessary to have a working version of Python programming language. Once downloaded Qmail MailRemove, mkdir  /var/qmail/queue/filter (a directory needed for MailRemove to work). Then run script

# ./mailRemove.py email_to_remove

Other variant to clean messed qmail queue is to use qmailHandle.

2. How to check and delete mails from queue in Postfix SMTP

On postfix queue is checked using both postqueue command which is postfix's specific tool for viewing the queue or the standard sendmail mailq. mailq is actually – Postfix to sendmail compitability interface, i.e. this command is not the native way to view queue in Postfix but is just a wrapper binary which invokes postqueue with an option to visualize what is in queue for SMTP admins accustomed to work with sendmail.

a) Checking list of undelivered e-mails

Below is an examples:

mail:~# mailq

-Queue ID- –Size– —-Arrival Time—- -Sender/Recipient——-
4A22BBE1A3*     657 Mon Apr  1 18:46:01  www-data@debian.uk2net.com
                                         csacpabb@nasvalke.com

25824BE18B*     660 Thu Mar 28 18:15:03  www-data@debian.uk2net.com
                                         Aliermarl@fmailxc.com.com

D2AA7BE1BF      652 Sun Mar 31 04:30:21  www-data@debian.uk2net.com
(host mail.drugsellr.com[37.1.218.81] refused to talk to me: 421 Too many concurrent SMTP connections; please try again later.)
                                         Erudge@drugsellr.com

mail:~# postfix -p
-Queue ID- –Size– —-Arrival Time—- -Sender/Recipient——-
36911BE18D*     662 Mon Mar 25 11:08:01  www-data@debian.uk2net.com
                                         lutuaslenty@fmailxc.com.com

C2439BE207*     662 Fri Mar 22 14:59:45  www-data@debian.uk2net.com
                                         Gavepolla@fmailxc.com.com

4A22BBE1A3*     657 Mon Apr  1 18:46:01  www-data@debian.uk2net.com
                                         csacpabb@nasvalke.com

b) Checking the  number of undelivered mails living in Postfix queue

postfix:~#  postqueue -p|wc -l
433

c) Viewing content of specific mail held in Postfix queue

Whether you need to check content of specific undelivered mail kept in queue you should do it by its ID, to view last mail from earlier postfix -p example:

postfix:~# postcat -q 4A22BBE1A3

*** ENVELOPE RECORDS deferred/A/4A22BBE1A3 ***
message_size:             656             187               1               0             656
message_arrival_time: Tue Apr  2 14:25:34 2013
create_time: Tue Apr  2 14:25:35 2013
named_attribute: rewrite_context=local
sender_fullname: www-data
sender: www-data@debian.uk2net.com
*** MESSAGE CONTENTS deferred/A/4A22BBE1A3 ***
Received: by postfix (Postfix, from userid 33)
        id AA379BE07A; Tue,  2 Apr 2013 14:25:34 +0100 (BST)
To: hawtiene@drugsellr.com
Subject: =?UTF8?B?QWNjb3VudCBpbmZvcm1hdGlvbiBmb3IgU09DQ0VSRkFNRQ==?=
X-PHP-Originating-Script: 1000:register_login_functions.php
From: SOCCERFAME <no-reply@mail.host.com>
Content-type:text/plain; charset=UTF8
Message-Id: <20130402132535.AA379BE07A@mail.host.com>
Date: Tue,  2 Apr 2013 14:25:34 +0100 (BST)

Please keep that email. It contains your username and password for postfix.
—————————-
nick : hawtiene
pass : 1v7Upjw3nT
—————————-

*** HEADER EXTRACTED deferred/A/4A22BBE1A3 ***
original_recipient: hawtiene@drugsellr.com
recipient: hawtiene@drugsellr.com
*** MESSAGE FILE END deferred/A/4A22BBE1A3 ***

d) Deleting mails in Postfix queue

To delete all mails in Postfix queue run:

postfix:~# postsuper -d ALL

If Postfix cannot deliver a message to a recipient it is placed in the deferred queue.  The queue manager will scan the deferred queue to see it if can place mail back into the active queue.  How often this scan occurs is determined by the queue_run_delay.
The queue_run_delay is by default 300s or 300 seconds. If you have a very busy mail server you may see a large deferred queue.
To delete all mails in deferred queue.

postfix:~# postsuper -d ALL deferred

3. How to check mail queue of Exim mail server

Viewing number of messages and list of undelivered messages in Exim queue is done using exim command by specifying arguments.

a) Checking the list of undelivered mails kept undelivered in Exim SMTP Queue


root@iqtestfb:/etc/exim4# exim -bp

4d 416 1UI1fS-00021I-1s <root@ETC_MAILNAME> *** frozen *** hipo@www.pc-freak.net 4d 746 1UI1gc-00023T-0S <root@ETC_MAILNAME> *** frozen *** root@ETC_MAILNAME 4d 752 1UI1lR-0003H0-89 <root@ETC_MAILNAME> *** frozen *** root@ETC_MAILNAME 4d 894 1UI1lR-0003H5-I6 <www-data@ETC_MAILNAME> *** frozen *** www-data@ETC_MAILNAME

b) Counting number of Exim undelivered messages kept in Mail Queue
exim-smtp:/etc/exim4# exim -bpc 2063 c) Getting a summary of all messages in Exim Queue (Count, Volume, Oldest, Newest, Destination Domain)
exim-smtp:/etc/exim4# exim -bp| exiqsumm

Count Volume Oldest Newest Domain —– —— —— —— —— 1 862 22h 22h 126.com 2 1751 12h 5h 163.com 21 3111KB 4d 3h abv.bg 2 766KB 42h 7h alice.it 1 383KB 7h 7h aol.com 1 383KB 4d 4d att.net 1 383KB 3d 3d beotel.net 2 766KB 20h 19h bih.net.ba 1685 3291KB 4d 1m etc_mailname 1 383KB 70h 70h facebook.com 1 383KB 66h 66h gaaa 81 22MB 4d 15m gmail.com 1 564 3d 3d gmaill.com 1 383KB 3d 3d googlemail.com 1 383KB 64h 64h hotmai.rs 33 10MB 4d 2h hotmail.com 25 9193KB 4d 79m hotmail.it 1 383KB 4d 4d hotmailcom 2 1128 24h 20h icloud.com 2 766KB 67h 67h inwind.it 11 3831KB 3d 7h libero.it 1 383KB 20h 20h live.co.uk 3 767KB 37h 3h live.com 6 1916KB 67h 45h live.it 1 552 28h 28h live.no 1 383KB 67h 67h llle.it 1 383KB 67h 67h lllle.it 1 383KB 33m 33m luigimori.it 2 389KB 56h 4h mail.bg 1 383KB 66h 66h mailmetrash.com 1 383KB 39h 39h malltron.it 1 562 7h 7h me.com 1 383KB 4d 4d msn.com 2 1116 49h 47h net.hr 1 383KB 28h 28h orion.rs 1 383KB 3d 3d paskaa.com 75 31KB 4d 3d www.pc-freak.net 1 572 3d 3d prismamedia.ro 1 383KB 71h 71h rediffmail.com 1 383KB 28h 28h seznam.cz 1 383KB 14m 14m siol.net 36 11KB 4d 3d sms.mtel.net 1 557 53h 53h t-com.hr 1 383KB 23h 23h tecnobagno.191.it 1 383KB 4d 4d teol.net 2 766KB 67h 44h virgilio.it 1 383KB 42h 42h windwslive.com 1 549 3d 3d yahoo 43 9213KB 4d 74m yahoo.com 2 766KB 70h 46h yahoo.it 1 383KB 71h 71h ymail.com ————————————————————— 2068 76MB 4d 1m TOTAL


c)  List Exim queued messages sorted by recipient address and sender address

  To list e-mails in queue sorted by recipient address

exim-smtp:/etc/exim4# exim -bpr|grep -Eo "^\s*[^ ]*@[^ ]*$" |sort | uniq -c

To List queued messages grouped by address of sender
exim-smtp:/etc/exim4# exim -bpr | grep -Eo "<[^ ]*@[^ ]*>" | sort | uniq -c  

d) Forcing Exim  to attempt re-send e-mails kept inside
queue

As Exim is relatively new SMTP its authors thought deeply before writting it and included options to do queue e-mail sent whether server is not under extremely high loads as well as send, regardless of load. Make Exim start sending queue e-mails if server is not overloaded (no extra-high server load)
exim-smtp:/etc/exim4# exim -q -v

  To make Exim force a queue run regardless of system load exim-smtp:/etc/exim4# exim -qf -v  

To make Exim deliver only e-mails sent from server to server (usually e-mails from local server monitoring software and log reports)
exim-smtp:/etc/exim4# exim -ql -v

e) Deleting e-mails from Exim mail queue

To Remove a message from queue identify by ID

exim-smtp:/etc/exim4# exim -Mrm <message-id>     Force Exim delivery of a message regardless of Frozen status

exim-smtp:/etc/exim4# exim -M<message-id >  

f) Removing Exim mails older than certain seconds or hours To remove all mails older than 12hrs (43000 seconds) exim-smtp:~# exiqgrep -o 43000 -i | xargs exim -Mrm

Deleting all frozen mails from queue is done with:

exim-smtp:~# exiqgrep -z -i | xargs exim -Mrm  

Removing all e-mails belonging to particular sender

exim-smtp:~# exiqgrep -i -f user@domain.com | xargs exim -Mrm

  Removing all mails from a sender that are older than 12hrs

exim-smtp:~# exiqgrep -o 43000 -i -f user@domain.com | xargs exim -Mrm
 

g) Flushing Exim mail queue
Use

exim-smtp:~# runq
  or

exim-smtp:~# exim -q

4. How to view and manage sendmail SMTP queue

a) Listing all e-mails stored in Sendmail queue

To list the mail queue in sendmail

sendmail:~# sendmail -bp
/var/spool/mqueue is empty
        Total requests: 0

or

sendmail:~# mailq
 

/var/spool/mqueue (3 requests) —–Q-ID—– –Size– —–Q-Time—– ————Sender/Recipient———– m9TMLQHG012749 1103 Thu Oct 30 11:21 <apache@localhost.localdomain> (host map: lookup (electrictoolbox.com): deferred) <test@electrictoolbox.com> m9TMLRB9012751 37113 Thu Oct 30 11:21 <apache@localhost.localdomain> (host map: lookup (electrictoolbox.com): deferred) <test@electrictoolbox.com> m9TMLPcg012747 240451 Thu Oct 30 11:21 <apache@localhost.localdomain> (host map: lookup (electrictoolbox.com): deferred) <test@electrictoolbox.com> Total requests: 3

b) Checking queue for specific mail sender or recipient

sendmail:~# mailq | grep -i email@domain-name.com -A 2 -B 2
....

c) Removing all e-mails from Sendmail queue

To delete everything stored in Sendmail queue delete files from directory where sendmail stores still undelivered mails. In sendmail this is /var/spool/mqueue and /var/mqueue

sendmail:~# rm /var/spool/mqueue/*.*
sendmail:~# rm /var/mqueue/*.*

Deleting all pending mails from queue

To remove / delete e-mails originating from certain domain / user or recipient

sendmail:~# sendmail -qS -v domain-name.com

To delete e-mail from certain user or recipieint

sendmail:~# sendmail -qR -v yahoo.co.uk


Happy System Administrator Day – It’s 31 of July again ;)

Friday, July 29th, 2011

Happy System Administrator’s Day to all Sys Admins, who read my blog regularly! 😉

There are some many mafias around the world, Maybe one day there should be a sysadmin mafia 😉
Cheers! 😉