Posts Tagged ‘dependency’
Wednesday, September 27th, 2017 
I just tried to upgrade my Debian Wheezy 7 to the latest stable Debian Stretch 9 by not thinking too much and just changing the word wheezy with stretch in /etc/apt/sources.list so onwards on it looked like so:
cat /etc/apt/sources.list
deb http://ftp.bg.debian.org/debian/ stretch main contrib non-free
deb-src http://ftp.bg.debian.org/debian/ stretch main
deb http://security.debian.org/ stretch/updates main
deb-src http://security.debian.org/ stretch/updates main
# stretch-updates, previously known as 'volatile'
##deb http://deb.debian.org/debian/ stretch-updates main
deb-src http://deb.debian.org/debian/ stretch-updates main
I also make sure all the defined Google Chrome / Opera / Skype and Squeeze Backports repositories existent in /etc/apt/sources.list.d directory files which in my case were like so;
root@noah:/etc/apt/sources.list.d# ls
google-chrome.list opera-stable.list squeeze-backports.list
opera.list skype-stable.list
were commented out because they were producing extra apt update errors …
And afterwards ran as usual:
apt-get update
apt-get –yes upgrade
The upgrade command executed fine and a lot of packages got downloaded and reinstalled without much issue, so I thought everything would be fine and just proceeded with the attempt to finalize the distribution major release 7 to major release 9 by running:
apt-get –yes dist-upgrade
But guess what now I got some dependency errors with cron and other installed packages that depend on package versions that are not going to be installed as the apt-get tool informed me.
I tried to out-smart the dpkg dependency system and removed all the packages reporting to have a missing dependencies with a short for bash loop after duming all the problematic packages showing dependency issues with commands such as:
apt-get -f dist-upgrade >> out.txt
for i in $(cat out.txt); awk '{ print $1 }' >> to_delete.txt; done
Before proceeding further I had to manually edit few lines in a text editor to remove some of the junk left from apt-get too.
So i was brave and just removed the dependency missing packages with following other for loop:
for i in $(cat to_delete.txt); do dpkg -r –force-all $i; done
Now I was hoping that rerunning:
apt-get autoremove
dpkg --configure -a
apt-get update -f
apt-get dist-upgrade -f
would no longer complain and I would just install the removed packages in another for shell loop once every other packages gets installed.
But guess what I was wrong … the system entered into another bunch of depedency terribly issues and messed up so badly that there were at least 50 packages reporting to have a missing / broken or uninstallable deb version depedency …
I got totally Angry, I knew already from experience that just trying to jump over while skipping a major release e.g. upgrade Debian 7 to Debian 9, instead of first upgrading to Debian 8 Linux and then upgrading Debian 8 to Debian 9 have always produced the same mess but I was lame and stupid again to f**k it up and I was out of mind swearing (a truly bad habid I'm not proud of) …
So as the notebook with Linux so far was perfectly working with Debian 7 and had a tons of old installed software and I was in a state where if I restart the system it was very likely my Thinkpad r61 laptop won't boot at all, I googled around to find a solution unfortunately without any luck, so finally I used the good old and tested method to DO IT MYSELF and Find the Fix without Uncle Google's help and by God's grace I did, after experimenting a while with the aptitude package / install / remove update tool without much success, finally I find the solution to the totally messed up Debian package dependencies and it all came to a simply reverting back my /etc/apt/source.list to look like following:
# deb cdrom:[Debian GNU/Linux 7.0.0 _Wheezy_ – Official amd64 CD Binary-1 20130504-14:44]/ wheezy main
##deb cdrom:[Debian GNU/Linux 7.0.0 _Wheezy_ – Official amd64 CD Binary-1 20130504-14:44]/ wheezy main
deb http://ftp.bg.debian.org/debian/ wheezy main contrib non-free
deb-src http://ftp.bg.debian.org/debian/ wheezy main
deb http://security.debian.org/ wheezy/updates main
deb-src http://security.debian.org/ wheezy/updates main
# wheezy-updates, previously known as 'volatile'
##deb http://deb.debian.org/debian/ wheezy-updates main
deb-src http://deb.debian.org/debian/ wheezy-updates main
##deb http://www.deb-multimedia.org wheezy main non-free
#deb http://ftp.debian.org/debian/ wheezy-backports main
###deb http://ftp.debian.org/debian/ wheezy-backports main contrib non-free
##deb http://dl.google.com/linux/chrome/deb/ wheezy main
#deb http://ftp2.de.debian.org/debian-volatile wheezy/volatile main
###deb http://www.deb-multimedia.org wheezy main non-free
run of the following two depedency fix commands !!!!
aptitude upgrade –full-resolver
…
aptitude full-upgrade –full-resolver
…
After a while a Debian LinuxOS system downgrade was initated and the missing packages were found, downloaded from the correct wheezy repositories and all broken and missing dependencies packages were fixed !!! HOORAY IT WORKS AGAIN!!
Tags: aptitude, aptitude full resolve, bg, dependency, fix package problems after upgrade debian ubuntu how to, fix unfixable badly messed packages linux, How to, list, mismatch, org, release, security, system
Posted in Everyday Life, Linux Audio & Video, Linux Backup tools, Linux Package Management, Various | No Comments »
Thursday, March 10th, 2016 
If you happen to be installing Qmail Mail server on a Debian or Ubuntu (.deb) based Linux, you will notice by default there will be some kind of MTA (Mail Transport Agent) already installed mail-transfer-agent package will be installed and because of Debian .deb package depedency to have an MTA always installed on the system you will be unable to remove Exim MTA without installing some other MTA (Postix / Qmail) etc.
This will be a problem for those like me who prefer to compile and install Qmail from source, thus to get around this it is necessery to create a dummy package that will trick the deb packaging depencies that actually mta-local MTA package is present on the server.
The way to go here is to use equivs (Circumvent debian package dependencies):
debian:~# apt-cache show equivs|grep -i desc -A 10
Description: Circumvent Debian package dependencies
This package provides a tool to create trivial Debian packages.
Typically these packages contain only dependency information, but they
can also include normal installed files like other packages do.
.
One use for this is to create a metapackage: a package whose sole
purpose is to declare dependencies and conflicts on other packages so
that these will be automatically installed, upgraded, or removed.
.
Another use is to circumvent dependency checking: by letting dpkg
think a particular package name and version is installed when it
Btw creating a .deb dummy package will be necessery in many other cases when you have to install from some third party debian repositories or some old and alrady unmaintaned deb-src packages for the sake of making some archaic software to resurrect somewhere, so sooner or later even if you're not into Mail servers you will certainly need equivs.
Then install equivs and go on proceeding creating the dummy mail-transport-agent package
debian:~# cd /tmp debian:~# cp -rpf /usr/share/doc/equivs/examples/mail-transport-agent.ctl . debian:~# equivs-build mail-transport-agent.ctl
Above command will build and package /tmp/mta-local_1.0_all.deb dummy package.
So continue and install it with dpkg as you use to install debian packages
debian:~# dpkg -i /tmp/mta-local_1.0_all.deb
…
From then on you can continue your standard LWQ – Life with Qmail or any other source based qmail installation with:
./config-fast mail.yourmaildomain.net
…
So that's it now .deb packaging system consistency will be complete so standard security package updates with apt-get and aptitude updates or dpkg -i third party custom software insatlls will not be breaking up any more.
Hope that helped someone 🙂
Tags: checking, deb package, debian repositories, Debian Ubuntu, dependencies, dependency, dpkg, LWQ, mail, necessery, net, package, pseudo, third party, tmp, use, www
Posted in Qmail, System Administration, Various | No Comments »
Monday, June 11th, 2012 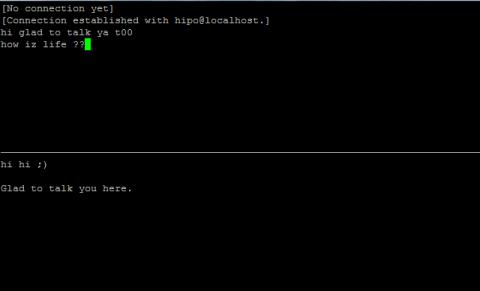
After writting in previous article on how talk be used to handle interactive chat console sessions on FreeBSD, I thought of dropping a few lines on how same is done on Debian, so here is how:
1.; Install talk and talkd
noah:/home/hipo# apt-get --yes install talk talkd

Reading package lists... Done

Building dependency tree

Reading state information... Done

The following NEW packages will be installed:

talk talkd

0 upgraded, 2 newly installed, 0 to remove and 93 not upgraded.

Need to get 19.0 kB/42.3 kB of archives.

After this operation, 201 kB of additional disk space will be used.

Get:1 http://ftp.nl.debian.org/debian/ stable/main talkd amd64 0.17-14 [19.0 kB]

Fetched 19.0 kB in 0s (67.1 kB/s)

Selecting previously deselected package talk.

(Reading database ... 90%

Unpacking talk (from .../talk_0.17-14_amd64.deb) ...

Selecting previously deselected package talkd.

Unpacking talkd (from .../talkd_0.17-14_amd64.deb) ...

Processing triggers for man-db ...

Setting up talk (0.17-14) ...

update-alternatives: using /usr/bin/netkit-ntalk to provide /usr/bin/talk (talk) in auto mode.

Setting up talkd (0.17-14) ...
2.;; Check and make sure talk and ntalkd lines are present in /etc/inetd.conf
noah:/home/hipo# grep -i talk /etc/inetd.conf

#:BSD: Shell, login, exec and talk are BSD protocols.

talk dgram udp wait nobody.tty /usr/sbin/in.talkd in.talkd

ntalk dgram udp wait nobody.tty /usr/sbin/in.ntalkd in.ntalkd
Now you probably wonder why are there two lines in /etc/inetd.conf for ))
in.talkd and in.ntald
in.talkd daemon's aim is to deliver talk sessions between logged in users on one Linux host with few logged in users willing to talk to each other locally;;
Wheter in.ntalkd is designed to serve interactive user talks between the host where in.ntalkd is installed and remote systems ruwhich have the talk client program installed. Of course in order for remote talks to work properly the firewall (if such has to be modified to allow in.ntalkd chats. I've never used in.ntalkd and on most machines having in.ntald hanging around from inetd, could be a potential security hole so, for people not planning to initiate remote TALKs between Unix / Linux / BSD hosts on a network it is a good practice the ntalkd line seen above in inetd.conf to be commented out ::;
noah:/home/hipo# grep -i talk /etc/inetd.conf

#:BSD: Shell, login, exec and talk are BSD protocols.

talk dgram udp wait nobody.tty /usr/sbin/in.talkd in.talkd

#ntalk dgram udp wait nobody.tty /usr/sbin/in.ntalkd in.ntalkd
3.;;; Restart openbsd-inetd init script and talk is ready to use
noah:~# /etc/init.d/openbsd-inetd restart

* Restarting internet superserver inetd
Onwards to use talk between two users the syntax is same like on other BSD, as a matter of fact TALK – console / terminal interactive chat originally was developed for the 4.2BSD UNIX release ;; the Linux code is a port of this BSD talk and not rewrite from scratch.
Using talk between two logged in users on pts/1 (lets say user test) and tty1 (user logged as root) is done with:
noah:~$ tty

noah:~$ talk root@localhost tty1

/dev/pts/1
On tty1 the user has to have enabled Talk sessions request, by default this behaviour in Debian and probably other Debian based Linuxes (Ubuntu) for instance is configured to have talks disabled, i,e ,,,
root@noah:~# mesg

is n
Enabling it on root console is done with:
root@noah:~# mesg y
Once enabled the root will be able to see the TALK service requests on tty1 otherwise, the user gets nothing. With enabled messaging the root user will get on his tty:
Message from TalkDaemon@his_machine...

talk: connection requested by your_name@your_machine.

talk: respond with: talk your_name@your_machine
So on the root console to reply back to talk chat request:
noah:~$ talk hipo@localhost
Tags: aim, Auto, auto mode, building, configured, confnoah, daemon, deb, debian gnu, dependency, dependency tree, dgram, Disk, disk space, DoneBuilding, Draft, exec, Fetched, freebsd, gnu linux, inetd, information, Install, Installing, interactive user, localhost, login, mesg, network, noah, nobody, ntalk, ntalkd, operation, package, protocols, reading database, reading package, request, root, root user, sbin, sessions, Shell, shell login, state information, tree, tty, wait, work, writting
Posted in Curious Facts, Everyday Life, Linux, Various | No Comments »
Wednesday, June 27th, 2012 
1.: Don't use a ring tone or use a short landline phone ringtone on incoming calls
In the past, we all had a local stand line phones, most of the landline phones rung using a very specific ring sound which was almost identical on all phones around the world. This ringing tone used was following some telephone standards. The result was everyone could distinguish a ringing phone in a room or closed space and tell for sure, this sound is generated by a phone. Nowdays with the boom of cellular phone ringtones, there is almost noone who uses a standard old-fashioned telephone ringtone as a ring melody.
The consequence of this is in our minds we start loosing the boundary between whether communicating on the phone or communicating without it.
In younger people this boundary between phone line and a physical communication is more evident than in adults (as youngsters has grown in society where mobile was used everywhere). The implication of this is more and more people are starting to perceive mobile communication as so natural as the person to person communication. Spending big part of the day talking over the phone mostly senseless things, not being consciously aware that this is done due to a heavy phone addiction and repeating behaviour trait stored sub-consciously.
Today everyone chooses a custom mobile phone ringtone melody (popular or impopular) song and sets it up to be a standard incoming call signal. As you can guess there are consequences on the mind, as the ringtone set is heard ten times or more a day during each and every phone call. The result is just like with alcoholics or drug addicts, the more you take from a certain "good" the more attached you become to it. Hence the more we listen to a certain song chunk daily on incoming calls, the sub-conscious becomes dependent on hearing this sound at least a number of times daily. If a day passes without no-one calling us and we don't hear the ringtone indicating a call the sub-conscious stored dependency starts popping up and we could start feeling lonely and we feel like calling someone (and we often do). Obviously this is dependency and even if someone might argue me this is a severe addiction which as every other addiction could be very dangerous and hard to fight.
As I prior said due to the fact that the phone use dependency is built in our minds starting with the phone ring melody, we can reduce this dependency by switching off the phone ringtone completely or at least changing it to a unique beep which is not likely to be heard or seen somewhere in your surrounding environment.
By setting the ringtone to some popular song we see on (TV, Radio or Internet on daily basis) this might become a trigger for us to associate hearing this sound with talking on the phone and hence make you increase the time you spend on the phone ,,, so be careful ,,,,
2.:: Stop Mobile Beeps and sounds on menu navigation
All new mobiles sold on the market are configured to have buzzling sounds on events and various beeps on keypad lock / unlock and menu navigation.
This sounds are there mostly to make you more alert and concentrated on using your mobile and often as a consequence whether one uses his mobile his awareness is comletely taken by the phone screen (you're totally "absorbed" by the phone use).
Besides designed to alert you the Managers and CEO's who decided to have a heavy beep sounds on mobiles made it having probably something else on mind? The beeps on keypad navigation makes the user emotionally and sub-consciously attached to the Cell Phone. The idea here is like in popular music streamed on radios and TVs and mostly everywhere …. The more you listen to a song, the higher the mind trait it leaves in you, so later when one hears a music pattern or a whole song, which he / she listened already thousands of times this brings back "good" old memories. It is very simple actually our minds are constructed in a way that the mor certain "information" is heard / saw / smell the bigger the mind influence this leaves on us. Back to the mobile sounds, the more you use the mobile phone with turned on sounds, the more addicted and mind stucked the beep and melodies during use of the cell phone becomes in the mind. For example many people take a look at their mobile automatically (without being consciously aware) and do the activity of (unlock) and (lock) the phone screen not knowing they do it automatic. More or less we all do such an auto-mated learned behaviour because of the subconscious dependency that is built in our minds. Whether we lock and unlock the mobile phone almost robotically, we do it because our sub-conscious mind plays a trick on us and "force" us to do a previous learned activity (association in our mind with the unlock / lock beep sound).
3.::: Use your mobile in different ways
Any modern mobile is quite advanced in functionality and there is more than one way to initiate a phone call. E.g. the mobile has a shortcut buttons assigned to do quick phone calls, quickly evoke SMS menu etc.
Learn them and occasionally use the shortcut buttons instead of the menu navigation. Our minds like changing patterns and doing things different.
Even if you have no chance to do a things via a certain menu, you can always change the position of the phone screen to different distance to eyesight 🙂 You can for example type on the keypad following the menu steps by watching from left or right eye periphery or you can use the menus with your phone screen turned backwards 🙂 If you're used to type on the keypad or touch screen with right hand try doing it with the left hand 🙂
This will take time but the fun worths it. Plus the most valuable thing in using the mobile in different ways each time is there is no specific inflicting pattern associated in your mind and hence the depepdency set in your sub-conscious mind on phone use is lesser.
Actually there are too many various "hacks" one could come up with on how to use mobile as differently as possible. It is up to your imagination. Though using the mobile "each-time-different" can be sometimes more time-consuming it surely makes your phone use amusing.
Tags: alcoholics, Auto, beep, boundary, call signal, callsIn, chunk, closed space, consequence, custom, dependency, Draft, drug addicts, everyone, good, GSM, implication, incoming call, incoming calls, keypad, landline phone, menu, Mobile, mobile communication, nowdays, old fashioned telephone, old fashioned telephone ringtone, person, person communication, person to person, phone ringtones, physical communication, quot, Ring, ring tone, ringing phone, ringing tone, ringtone, screen, senseless things, someone, spending, three ways, trait
Posted in Business Management, Everyday Life, Various | No Comments »
Friday, April 13th, 2012 1. Dump all installed server packages from Debian Linux server1
First it is necessery to dump a list of all installed packages on the server from which the intalled deb packages 'selection' will be replicated.
debian-server1:~# dpkg --get-selections \* > packages.txt
The format of the produced packages.txt file will have only two columns, in column1 there will be the package (name) installed and in column 2, the status of the package e.g.: install or deinstall
Note that you can only use the –get-selections as root superuser, trying to run it with non-privileged user I got:
hipo@server1:~$ dpkg --set-selections > packages.txt

dpkg: operation requires read/write access to dpkg status area
2. Copy packages.txt file containing the installed deb packages from server1 to server2
There is many way to copy the packages.txt package description file, one can use ftp, sftp, scp, rsync … lftp or even copy it via wget if placed in some Apache directory on server1.
A quick and convenient way to copy the file from Debian server1 to server2 is with scp as it can also be used easily for an automated script to do the packages.txt file copying (if for instance you have to implement package cloning on multiple Debian Linux servers).
 root@debian-server1:~# scp ./packages.txt hipo@server-hostname2:~/packages.txt

The authenticity of host '83.170.97.153 (83.170.97.153)' can't be established. RSA key fingerprint is 38:da:2a:79:ad:38:5b:64:9e:8b:b4:81:09:cd:94:d4. Are you sure you want to continue connecting (yes/no)? yes Warning: Permanently added '83.170.97.153' (RSA) to the list of known hosts. hipo@83.170.97.153's password:

packages.txt
As this is the first time I make connection to server2 from server1, I'm prompted to accept the host RSA unique fingerprint.
3. Install the copied selection from server1 on server2 with apt-get or dselect
debian-server2:/home/hipo# apt-get update

...

debian-server2:/home/hipo# apt-get upgrade

Reading package lists... Done

Building dependency tree

Reading state information... Done

debian-server2:/home/hipo# dpkg --set-selections < packages.txt

debian-server2:/home/hipo# apt-get -u dselect-upgrade --yes
The first apt-get update command assures the server will have the latest version of the packages currently installed, this will save you from running an outdated versions of the installed packages on debian-server2
Bear in mind that using apt-get sometimes, might create dependency issues. This is depending on the exact package names, being replicated in between the servers
Therefore it is better to use another approach with bash for loop to "replicate" installed packages between two servers, like so:
debian-server2:/home/hipo# for i in $(cat packages.txt |awk '{ print $1 }'); do aptitude install $i; done
If you want to automate the questioning about aptitude operations pass on the -y
debian-server2:/home/hipo# for i in $(cat packages.txt |awk '{ print $1 }'); do aptitude -y install $i; done
Be cautious if the -y is passed as sometimes some packages might be removed from the server to resolve dependency issues, if you need this packages you will have to again install them manually.
4. Mirroring package selection from server1 to server2 using one liner
A quick one liner, that does replicate a set of preselected packages from server1 to server2 is also possible with either a combination of apt, ssh, awk and dpkg or with ssh + dpkg + dselect :
a) One-liner code with apt-get unifying the installed packages between 2 or more servers
debian-server2:~# apt-get --yes install `ssh root@debian-server1 "dpkg -l | grep -E ^ii" | awk '{print $2}'`

...
If it is necessery to install on more than just debian-server2, copy paste the above code to all servers you want to have identical installed packages as with debian-server1 or use a shor for loop to run the commands for each and every host of multiple servers group.
In some cases it might be better to use dselect instead as in some situations using apt-get might not correctly solve the package dependencies, if encountering problems with dependencies better run:
debian-server2:/home/hipo# ssh root@debian-server1 'dpkg --get-selections' | dpkg --set-selections && dselect install
As you can see using this second dselect installed "package" mirroring is also way easier to read and understand than the prior "cryptic" method with apt-get, hence I personally think using dselect method is a better.
Well that's basically it. If you need to synchronize also configurations, either an rsync/scp shell script, should be used with all defined server1 config files or in case if a cloning of packages between identical server machines is necessery dd or some other tool like Norton Ghost could be used.
Hope this helps, someone.
Tags: apache, aptitude, authenticity, b4, clone, cloning, copying, deb packages, debian linux, deinstall, dependency, description, dpkg, dump, file, fingerprint, hosts, instance, lftp, Linux, linux servers, Mirroring, necessery, operation, package, package description, Permanently, privileged user, quot, root, rsync, scp, server packages, server1, server2, sftp, ssh, wget
Posted in Linux, System Administration | No Comments »
Friday, March 16th, 2012 
Are you a Debian System Administrator and you recently run apt-get upgrade && apt-get upgrade finding out there are plenty of new packagesfor upgrade? Do you need only a pre-selected number of packages to upgrade with apt?
I run apt-get update && apt-get upgrade on one of our company Debian servers, just to see there are a number of packages to be upgraded among which there was some I didn't wanted to upgrade. Here is a little paste output from apt-get upgrade:
debian:~# apt-get update && apt-get upgrade

Hit http://security.debian.org squeeze/updates Release.gpg

...

Hit http://security.debian.org squeeze/updates/main amd64 Packages

Fetched 128 kB in 0s (441 kB/s)

Reading package lists... Done

Reading package lists... Done

Building dependency tree

Reading state information... Done

The following packages will be upgraded:

at imagemagick libdbd-pg-perl libfreetype6 libmagickcore3 libmagickcore3-extra libmagickwand3 libmysqlclient16 mysql-client

mysql-client-5.1 mysql-common mysql-server mysql-server-5.1 mysql-server-core-5.1

Do you want to continue [Y/n]

14 upgraded, 0 newly installed, 0 to remove and 0 not upgraded.
From first sight it seems logical to issue apt-get upgrade packagename to upgrade only single package with its package dependencies, instead of the whole group the above packs. However doing:
apt-get upgrade imagemagick will still try to upgrade all the packages instead of just imagemagick and its dependency package deb libmagickcore3
debian:~# apt-get upgrade imagemagick

Reading package lists... Done

Building dependency tree

Reading state information... Done

The following packages will be upgraded:

at imagemagick libdbd-pg-perl libfreetype6 libmagickcore3 libmagickcore3-extra libmagickwand3 libmysqlclient16 mysql-client

mysql-client-5.1 mysql-common mysql-server mysql-server-5.1 mysql-server-core-5.1

14 upgraded, 0 newly installed, 0 to remove and 0 not upgraded.

Do you want to continue [Y/n]
Doing all package,upgrade is not a good idea in my case, since upgrading mysql-server will require a MySQL server restart (something which we cannot afford to do right now) on this production server.
MySQL server restart during upgrade is never a good idea especially on productive busy (heavy loaded) SQL servers.
A restart of the MySQL server serving thousands of requests per second could lead often to crashed tables and hence temporary server downtime etc.
Still it is a good idea to upgrade the rest of packages with their newer versions. For exmpl. to upgrade; imagemagick, at , libfreetype6 and so on.
In order to upgrade only this 3 ones and their respective package dependencies, issue:
debian:~# apt-get --yes install imagemagick at libfreetype6
Repeat the apt-get install command with passing all the single package name you want to be upgraded and voila you're done :).
Be sure the apt-get install packagename upgrade doesn't require also upgrade of myssql-server, mysql-client, mysql-common or mysql-server-core-5.1 or any of the package name you want to preserve from upgrading.
Tags: administrator, amp, Auto, building, deb, debian system, dependencies, dependency, dependency tree, doesn, DoneBuilding, Draft, Fetched, information, libfreetype, libmysqlclient, Linux, mysql server, number, package, packagesfor, pg, production, reading package, Repeat, second, server mysql, servers, something, SQL, squeeze, state information, system administrator, tree, Ubuntu, ubuntu linux, upgradeHit, voila
Posted in Linux, System Administration | No Comments »
Wednesday, January 18th, 2012 I had to make one old Samsung ML-2010P Laser Printer work on Xubuntu Linux . I've had some issues in installing it, I couldn't fine any step by step tutorial online, on how the printer can be made work fine on Linux. Therefore I took the time to experiment and see if I could make it work. Since the printer is old, not much people are interested any more in making the printer operational on Linux, hence I couldn't find too much relevant posts and sites on the net, anyways thanks God after a bit of pondering I finally succeeded to make the Samsung ML-2010P printer to print on Linux.This are the exact steps one has to follow to make this old bunch of hardware to play nice on Linux:
1. use lsusb to list the printer model
root@linux:~# lsusb |grep -i samsung

Bus 001 Device 003: ID 04e8:326c Samsung Electronics Co., Ltd ML-2010P Mono Laser Printer
You see the printer reports as Samsung Electronics Co., Ltd ML-2010P Mono Laser Printer
2. Install cups printing service required packages
root@linux:~# apt-get install cups cups-bsd cups-client cups-common

root@linux:~# apt-get install cups-driver-gutenprint ghostscript-cups

root@linux:~# apt-get install python-cups python-cupshelpers
3. Install foomatic packages
root@linux:~# apt-get install foomatic-db foomatic-db-engine foomatic-db-gutenprint

root@linux:~# apt-get install foomatic-filters python-foomatic
4. Install hpijs hplip printconfand other packages necesssery for proper printer operation
root@linux:~# apt-get install hpijs hplip hplip-data ijsgutenprint

root@linux:~# apt-get install min12xxw openprinting-pdds printconf foo2zjs
P.S. Some of the packages I list might already have been installed as a dependency to another package, as I'm writting this article few days after I've succeeded installing the printer, I don't remember the exact install order.
5. Install splix (SPL Driver for Unix)
Here is a quote taken from Spix's project website:
"SpliX is a set of CUPS printer drivers for SPL (Samsung Printer Language) printers.
If you have a such printer, you need to download and use SpliX. Moreover you will find documentation about this proprietary language.
"
root@linux:~# apt-get install splix
For more information on splix, check on Splix SPL driver for UNIX website http://splix.ap2c.org/
You can check on the projects website the Samsung ML 2010 Printer is marked as Working
Next step is to configure the Printer
6. Go to Cups interface on localhost in browser and Add the Samsung printer.
Use Firefox, SeaMonkey or any browser of choice to configure CUPS:
Type in the browser:
http://localhost:631
Next a password prompt will appear asking for a user/pass. The user/pass you have to use is the same as the password of the user account you're logged on with.
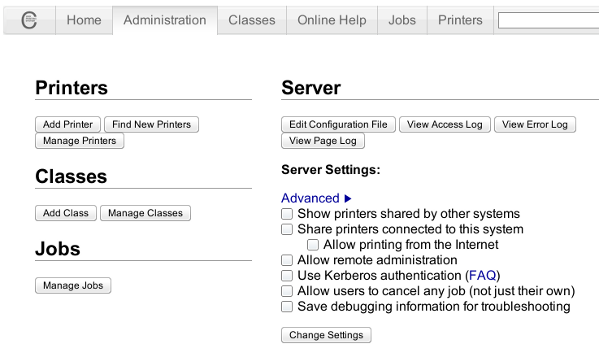
Click on the Add Printer button and choose to add the Samsung ML-2010.
Then restart the CUP Service (cupsd) to make it load the new settings:
root@linux:~# /etc/init.d/cups restart
Now give the printer a try in printing some page in SeaMonkey, Chrome or Firefox (the quickest way is through pressing CTRL + P )
Following this steps, I've managed to run the printer on Xubuntu Linux, though the same steps if followed should most probably make the Samsnung ML 2010 play nice with other Linux distributions with a little or no adjustments.
I'll be glad to hear if someone succeeded in making the printer work on other distributions, if so please drop me a comment.
That's all folks! Enjoy printing 😉
Tags: Auto, Bus, configure, dependency, Draft, Driver, exact steps, experiment, few days, foo, foomatic, GNU, grep, hplip, Install, Laser, Linux, ML, mono laser printer, operation, package, password, printer model, printer operation, printer work, printing, printing service, python, quot, relevant posts, root, root linux, samsung, samsung electronics, samsung electronics co, samsung electronics co ltd, samsung ml, Service, SPL, time, tutorial, work, Xubuntu
Posted in Linux, System Administration, Web and CMS | 2 Comments »


