Posts Tagged ‘operation’

xkill for Windows – Kill hanged programs with one click like in UNIX

Thursday, September 18th, 2014

Windows Xkill by Solo Dev logo kill easily hanged, crashed windows programs - Linux xkill for Windows alternative

I’ve used Linux as I’ve used it over the last 10 years and thus I’m so used to xkill that I consider it as a normal tool every modern operating system should have.

Since I’m forced to work on a Windows platform over the last 1 year, every now and then I have crashing / hanged apps Window which sometimes is hard to kill using Task Manager or command line tools like tasklist, taskkill or pstools – Windows Sysinternal tools cause you don’t know the exact process name of the Windows crashed application.

Thanksfully a good hearted guy SuprVillain made Windows Xkill program. Windows Xkill is portable app, so you don’t need to install it but simply download and run it.

windows-7-system-tray-xkill-screenshot-xkill-for-windows

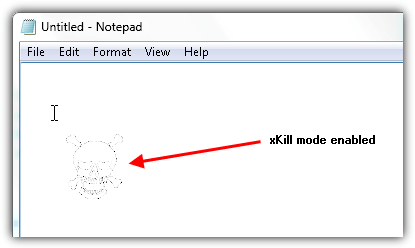
Win-Xkill runs in system tray and has “kill mode” of operation, when Kill mode it is running Windowns Xkill operates exactly like UNIX’s xkill. The mouse pointer turns into Skull and Cross Bones, you point at a Window app you wanted to kill and it gets terminated.
Windows Xkill kill mode enabled killing a windows notepad app
Win Xkill kill mode, can be invoked using also a key press Control+Alt+Backspace as well as there is an option to leave xkill running in the background background, but disabling the tiny skull icon in systray from its interface.
Enjoy 🙂

PortQRY Native Windows command line Nmap like port scanner – Check status of remote host ports on Windows

Monday, June 30th, 2014

Windows_command_line_and_gui_port-scanner-portqry-like-nmap-check-status-of-remote-host-service-windows-xp-7-2000-2003-2008-server
Linux users know pretty well Nmap (network mapper) tool which is precious in making a quick server host security evaluation.
Nmap binary port is available for Windows too, however as nmap is port for its normal operation you have to install WinPcap (Packet Capture Library).
And more importantly it is good to mention if you need to do some remote port scanning from Windows host, there is Microsoft produced native tool called PortQry (Port Query).

PortQRY is a must have tool for the Windows Admin as it can help you troubleshoot multiple network issues.

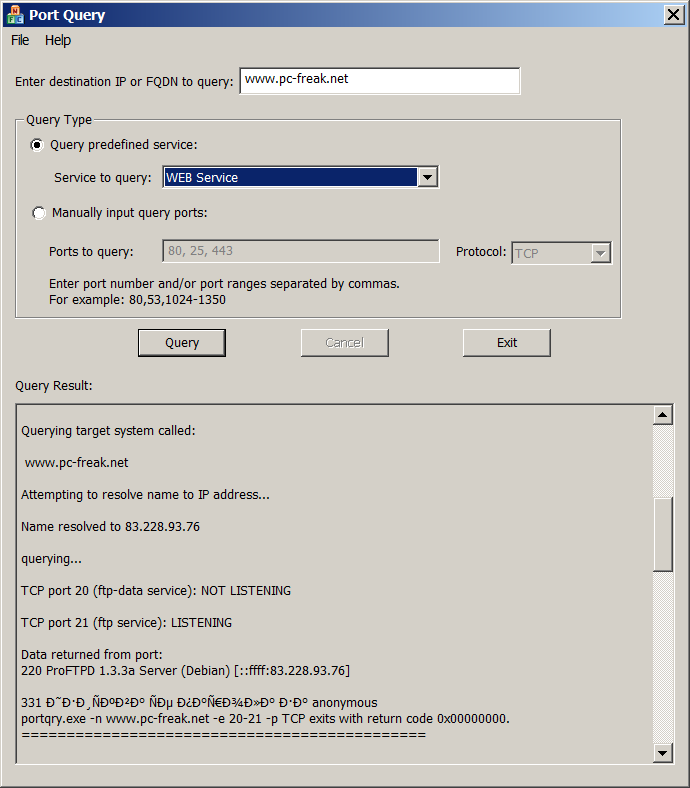
windows-nmap-native-alternative-portqry-gui-ui-web-service-port-scan-screenshot
As of time of writting this post PortQRY is at version 2, PortQRY tool has also a GUI (UI) Version for those lazy to type in command line.

Port Query UI tool (portqueryui.exe) is a tool to query open ports on a machine. This tool makes use of command line version port query tool (portqry.exe). The UI provides the following functionalities:

   1. Following "Enter destination IP or FQDN to query:”, an edit box needs the user to specify the IP address or FDQN name of the destination to query port status.

   2. The end user is able to choose Query type:

        – Predefined services type. It groups ports into service, so that you can query multiple ports for a service by a single click. Service includes "Domains and Trusts", "DNS Queries", "NetBIOS     communication", "IPSEC", "Networking", "SQL Service", "WEB Service", "Exchange Server",          "Netmeeting", and other services.

You can check detail port and protocol info for each service category by opening Help -> Predefined Services…

PORTQRY is part of Windows Server 2003 Support Tools and can be added to any NT based Windows (XP, 2003, Vista, 7, 8)
 You can download portqry command line tool here or my mirrored portqry version command line port scanner here and PortQRY UI here.

PortQRY comes in PortQryV2.exe package which when run extracts 3 files: PortQry.exe program, EULA and readme file. Quickest way to make portqry globally accessible from win command prompt is to copy it to %SystemRoot% (The environment variable holding default location for Windows Installation directory).
It is good idea to add PortQRY to default PATH folder to make it accessible from command line globally.

PorQry has 3 modes of operation:

Command Line Mode, Interactive Mode and Local Mode

portqry-windows-native-security-port-network-scanner-nmap-equivalent-help-screenshot
 

Command Line Mode – is when it is invoked with parameters.

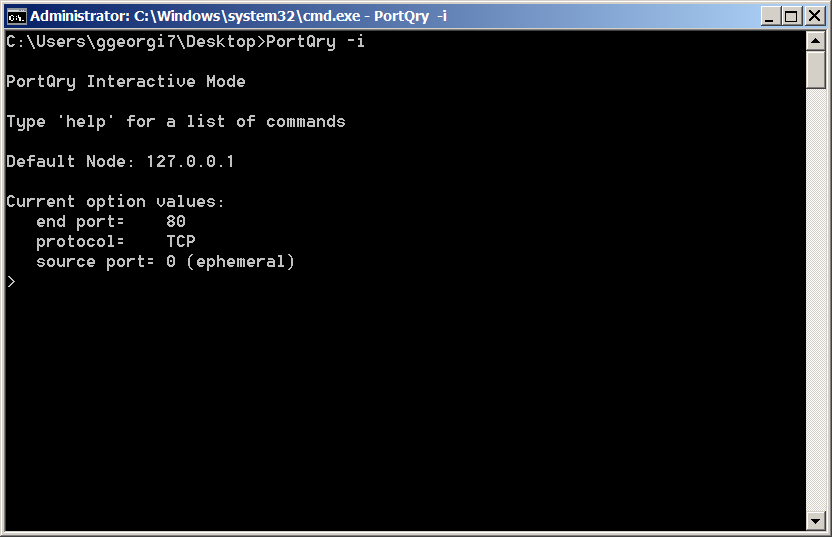
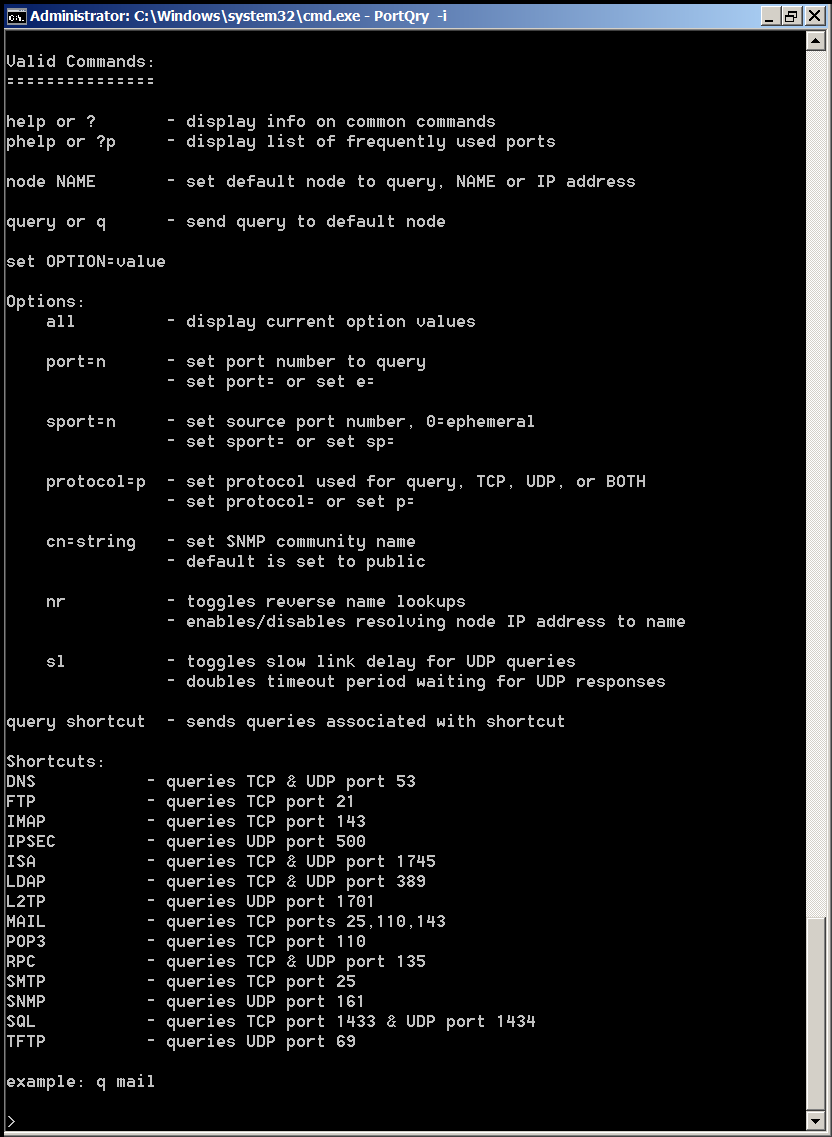
Interactive Mode is when it runs in interactive CLI console

portqry-windows-native-security-port-network-scanner-nmap-equivalent-interactive-mode-screenshot

portqry-windows-native-security-port-network-scanner-nmap-equivalent-interactive-mode-help-screenshot
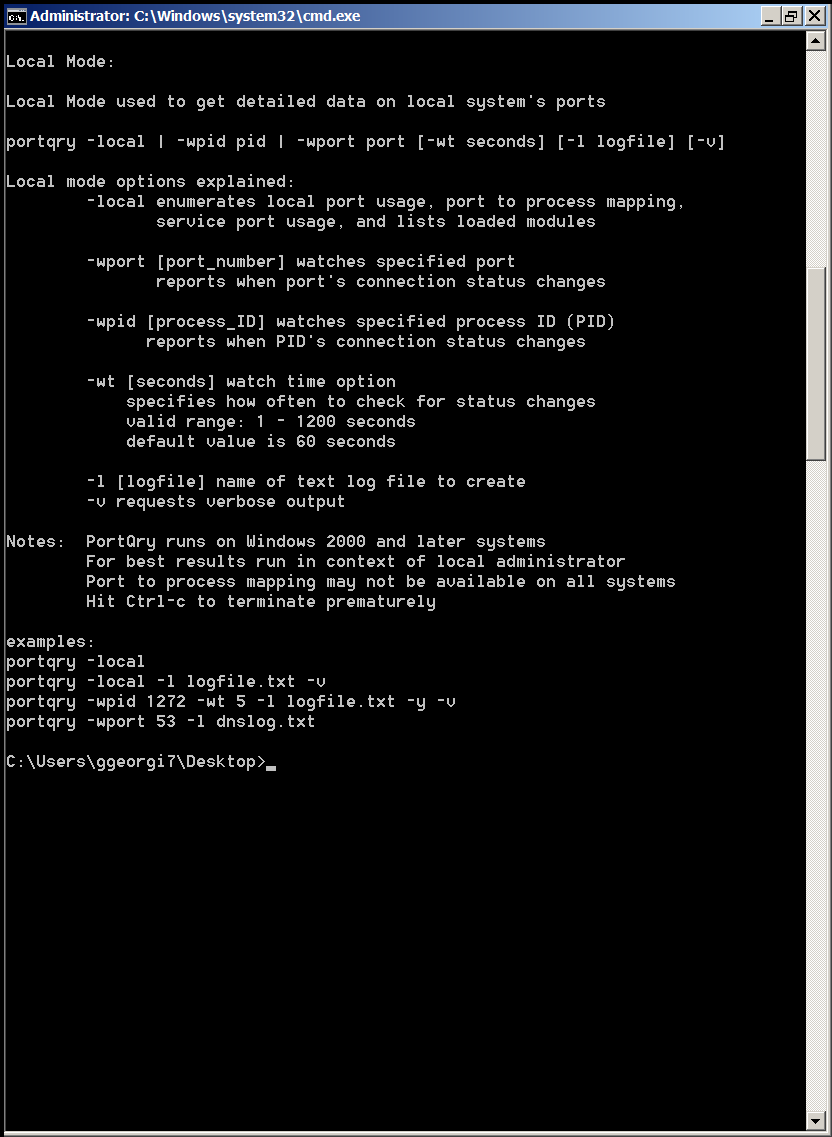
and Local Mode is used whether information on local system ports is required.

portqry-windows-native-security-port-network-scanner-nmap-equivalent-local-mode-screenshot


Here are some examples on basic usage of portqry:
 

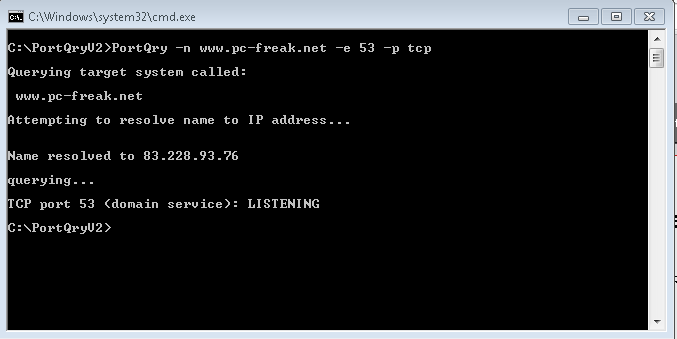
1. Check if remote server is running webserver is listening on (HTTPS protocol) TCP port 80

portqry -n servername -e 80
 

Querying target system called:

 www.pc-freak.net

Attempting to resolve name to IP address…


Name resolved to 83.228.93.76

querying…

TCP port 80 (http service): FILTERED

2. Check whether some common Samba sharing and DNS UDP ports are listening

portqry -n servername -p UDP -o 37,53,88,135
 

Querying target system called:

servername

Attempting to resolve name to IP address…


Name resolved to 74.125.21.100

querying…

UDP port 37 (time service): NOT LISTENING

UDP port 53 (domain service): NOT LISTENING

UDP port 88 (kerberos service): NOT LISTENING

UDP port 135 (epmap service): NOT LISTENING

3. Scan open ports in a port range – Check common services port range (port 1-1024)

portqry -n 192.168.1.20 -r 1:1024 | find ": LISTENING"

4. Logging network scan output to file

Portqry –n localhost –e 135 -l port135.txt
 

Querying target system called:

 localhost

Attempting to resolve name to IP address…


Name resolved to 127.0.0.1

querying…

TCP port 135 (epmap service): LISTENING

Using ephemeral source port
Querying Endpoint Mapper Database…
Server's response:

UUID: d95afe70-a6d5-4259-822e-2c84da1ddb0d
ncacn_ip_tcp:localhost[49152]

UUID: 2f5f6521-cb55-1059-b446-00df0bce31db Unimodem LRPC Endpoint
ncacn_np:localhost[PIPEwkssvc]

Total endpoints found: 38


5. Scanning UDP and TCP protocols port

PortQry -n www.pc-freak.net -e 25 -p both


Querying target system called:

 www.pc-freak.net

Attempting to resolve name to IP address…


Name resolved to 83.228.93.76

querying…

TCP port 53 (domain service): LISTENING

UDP port 53 (domain service): LISTENING or FILTERED

Sending DNS query to UDP port 53…


6. Checking remote server whether LDAP ports are listening

Portqry -remotehost.com -p tcp -e 389
Portqry -n remotehost.com -p tcp -e 636
Portqry -n remotehost.com -p both -e 3268
Portqry -n remotehost.com -p tcp -e 3269


7. Making SNMP community name requests

portqry -n host2 -cn !my community name! -e 161 -p udp


8. Initiating scan from pre-selected source port

A network socket request initiation is useful from certain port because, some remote services expect connection from certain ports, lets say you're connecting to mail server, you might want to set as a source port – port 25, to make remote server another SMTP is connecting.

portqry -n www.pc-freak.net -e 25 -sp 25


9. Scanning whether server ports required by Active Directories are opened

Common ports used in Windows hosts to communicate between each other to sustain Active Directory are:

88 (Kerberos)
135 (RPC)
389 (LDAP)
445 (CIFS)
3268 (Global Catalog)

portqry -n remote-host.com -o 88,135,389,445,3268 -p both

portqry has also a silent mode with the "-q" switch if you want to get only whether a port is LISTENING (opened).

On port scan it returns three major return codes (very useful for scripting purposes);

  • returncode 0 – if port / service is listening
  • returncode 1 – if service is not listening
  • returncode 2 – if service is listening or filtered

PortQry is very simple port scanner for win sysadms and is precious tool for basic network debugging (services)  on Windows farms, however it doesn't have the powerful cracker functionality, application / OS versioning etc. like Nmap.


How a Ponzi Scheme works – Ponzi the most famous fraudulent network

Monday, March 4th, 2013

Classic_Ponzi_Scheme_ad_650

Those who are living in ex-communist countries who have been through the so called "Perestroika" – Pre-structuring of economy and in the so called privatization process which is selling factories, land and whateve in a country to a private sector business investors have already experienced the so called "Pyramidal" structure businesses which at the end collapse and left after itself a tens of thousands of cheated "investors" without their capital money. In my homeland Bulgaria, during this pre-structuring which in practice was "destructioning" there was thousands of companies for a very long period of time who somehow used this pyramidal structures to steal people investments which already melted in times because of the severe inflation that invaded the country. Near my city in Dobrich. There was a company called Yugoagent started by a "serbian Pharaoh – a charlatan CEO" whose company was promising extraordinary profit interest for people who invested money in Yugoagent as well as big reduction of prices of all investors to purchase "white technigue" home equipment from Yugoagent stores. What happened was maybe between 10 000 to 30 000 of people because "investors" to Yugoagent led only by the blind faith and personal desire to earn. The interest offered by Yugoagent was more than 10% to money put in, I believe he was offering 30% of interest or so and people easily get into the trap of his pre-determined to collapse company. What happened after was Mirolub Gaich's company survived for few years while some of the "investors" ripped benefits, where the multitude just lost their money because of epochal bankruptcy of YUGOAGENT.… I know even some of my relatives has been fooled into the obvious fraudulent business, because our society in Bulgaria lived in communism and was not prepared to face the sad reality of money only centered economy – the so loudly proclaimed as "just" democracy.

Today there are plenty of companies around the world still opened and operated under the same fraudulent model leaving after their bankruptcy their makers with millions in banks smartly stolen and claimed as company losses right before the collosal company collapse. A friend of mine Zlati, took the time to invest some time to research more into how this fraudulent Scheme works and found some references to wikipedia which explains the Scheme in details. Thus I also red a bit and thought my dear readers might be interested to know also how the scheme works. I believe it is a must for anyone who has the intention to be in business. It is good to know to escape the trap, cause even in Pro and High profit businesses there are companies operating under the same hood. Today there are plenty of online based companies today who are somehow involved into Offshore business or even do some kind of money laundry frauds, while offering beneficial investments in a booming companies. It is useful for even ordinary people to get to know the fraudulent scheme to escape from it. With the worsening crisis, the fraudulent activities and companies that does some kind of fraud to make profit increased dramatically and thus the old but well known fraudulent model is blooming.


How Ponzi scheme works explained in 5 minutes

To know a bit more about the Ponzi scheme as well as the so called "Pyramid" based fraudulent business check in Wikipedia Ponzi scheme

For those lazy to read in Wikipedia, here is extract from it explaining the Ponzi fraudulent Scheme in short

A Ponzi scheme is a fraudulent investment operation that pays returns to its investors from their own money or the money paid by subsequent investors, rather than from profit earned by the individual or organization running the operation.
The Ponzi scheme usually entices new investors by offering higher returns than other investments, in the form of short-term returns that are either abnormally high or unusually consistent. Perpetuation of the high returns requires an ever-increasing flow of money from new investors to keep the scheme going The system is destined to collapse because the earnings, if any, are less than the payments to investors. Usually, the scheme is interrupted by legal authorities before it collapses because a Ponzi scheme is suspected or because the promoter is selling unregistered securities. As more investors become involved, the likelihood of the scheme coming to the attention of authorities increases. The scheme is named after Charles Ponzi, who became notorious for using the technique in 1920.
Ponzi did not invent the scheme (for example, Charles Dickens' 1844 novel Martin Chuzzlewit and 1857 novel Little Dorrit each described such a scheme),[ but his operation took in so much money that it was the first to become known throughout the United States. Ponzi's original scheme was based on the arbitrage of international reply coupons for postage stamps; however, he soon diverted investors' money to make payments to earlier investors and himself.
How to solve “Incorrect key file for table ‘/tmp/#sql_9315.MYI’; try to repair it” mysql start up error

Saturday, April 28th, 2012

When a server hard disk scape gets filled its common that Apache returns empty (no content) pages…
This just happened in one server I administer. To restore the normal server operation I freed some space by deleting old obsolete backups.
Actually the whole reasons for this mess was an enormous backup files, which on the last monthly backup overfilled the disk empty space.

Though, I freed about 400GB of space on the the root filesystem and on a first glimpse the system had plenty of free hard drive space, still restarting the MySQL server refused to start up properly and spit error:

Incorrect key file for table '/tmp/#sql_9315.MYI'; try to repair it" mysql start up error

Besides that there have been corrupted (crashed) tables, which reported next to above error.
Checking in /tmp/#sql_9315.MYI, I couldn't see any MYI – (MyISAM) format file. A quick google look up revealed that this error is caused by not enough disk space. This was puzzling as I can see both /var and / partitions had plenty of space so this shouldn't be a problem. Also manally creating the file /tmp/#sql_9315.MYI with:

server:~# touch /tmp/#sql_9315.MYI

Didn't help it, though the file created fine. Anyways a bit of a closer examination I've noticed a /tmp filesystem mounted besides with the other file system mounts ????
You can guess my great amazement to find this 1 Megabyte only /tmp filesystem hanging on the server mounted on the server.

I didn't mounted this 1 Megabyte filesystem, so it was either an intruder or some kind of "weird" bug…
I digged in Googling to see, if I can find more on the error and found actually the whole mess with this 1 mb mounted /tmp partition is caused by, just recently introduced Debian init script /etc/init.d/mountoverflowtmp.
It seems this script was introduced in Debian newer releases. mountoverflowtmp is some kind of emergency script, which is triggered in case if the root filesystem/ space gets filled.
The script has only two options:

# /etc/init.d/mountoverflowtmp
Usage: mountoverflowtmp [start|stop]

Once started what it does it remounts the /tmp to be 1 megabyte in size and stops its execution like it never run. Well maybe, the developers had something in mind with introducing this script I will not argue. What I should complain though is the script design is completely broken. Once the script gets "activated" and does its job. This 1MB mount stays like this, even if hard disk space is freed on the root partition – / ….

Hence to cope with this unhandy situation, once I had freed disk space on the root partition for some reason mountoverflowtmp stop option was not working,
So I had to initiate "hard" unmount:

server:~# mount -l /tmp

Also as I had a bunch of crashed tables and to fix them, also issued on each of the broken tables reported on /etc/init.d/mysql start start-up.

server:~# mysql -u root -p
mysql> use Database_Name;
mysql> repair table Table_Name extended;
....

Then to finally solve the stupid Incorrect key file for table '/tmp/#sql_XXYYZZ33444.MYI'; try to repair it error, I had to restart once again the SQL server:

Stopping MySQL database server: mysqld.
Starting MySQL database server: mysqld.
Checking for corrupt, not cleanly closed and upgrade needing tables..
root@server:/etc/init.d#

Tadadadadam!, SQL now loads and works back as before!

How to copy / clone installed packages from one Debian server to another

Friday, April 13th, 2012

1. Dump all installed server packages from Debian Linux server1

First it is necessery to dump a list of all installed packages on the server from which the intalled deb packages 'selection' will be replicated.

debian-server1:~# dpkg --get-selections \* > packages.txt

The format of the produced packages.txt file will have only two columns, in column1 there will be the package (name) installed and in column 2, the status of the package e.g.: install or deinstall

Note that you can only use the –get-selections as root superuser, trying to run it with non-privileged user I got:

hipo@server1:~$ dpkg --set-selections > packages.txt
dpkg: operation requires read/write access to dpkg status area

2. Copy packages.txt file containing the installed deb packages from server1 to server2

There is many way to copy the packages.txt package description file, one can use ftp, sftp, scp, rsync … lftp or even copy it via wget if placed in some Apache directory on server1.

A quick and convenient way to copy the file from Debian server1 to server2 is with scp as it can also be used easily for an automated script to do the packages.txt file copying (if for instance you have to implement package cloning on multiple Debian Linux servers).

root@debian-server1:~# scp ./packages.txt hipo@server-hostname2:~/packages.txt
The authenticity of host '83.170.97.153 (83.170.97.153)' can't be established. RSA key fingerprint is 38:da:2a:79:ad:38:5b:64:9e:8b:b4:81:09:cd:94:d4. Are you sure you want to continue connecting (yes/no)? yes Warning: Permanently added '83.170.97.153' (RSA) to the list of known hosts. hipo@83.170.97.153's password:
packages.txt

As this is the first time I make connection to server2 from server1, I'm prompted to accept the host RSA unique fingerprint.

3. Install the copied selection from server1 on server2 with apt-get or dselect

debian-server2:/home/hipo# apt-get update
...
debian-server2:/home/hipo# apt-get upgrade
Reading package lists... Done
Building dependency tree
Reading state information... Done
debian-server2:/home/hipo# dpkg --set-selections < packages.txt
debian-server2:/home/hipo# apt-get -u dselect-upgrade --yes

The first apt-get update command assures the server will have the latest version of the packages currently installed, this will save you from running an outdated versions of the installed packages on debian-server2

Bear in mind that using apt-get sometimes, might create dependency issues. This is depending on the exact package names, being replicated in between the servers

Therefore it is better to use another approach with bash for loop to "replicate" installed packages between two servers, like so:

debian-server2:/home/hipo# for i in $(cat packages.txt |awk '{ print $1 }'); do aptitude install $i; done

If you want to automate the questioning about aptitude operations pass on the -y

debian-server2:/home/hipo# for i in $(cat packages.txt |awk '{ print $1 }'); do aptitude -y install $i; done

Be cautious if the -y is passed as sometimes some packages might be removed from the server to resolve dependency issues, if you need this packages you will have to again install them manually.

4. Mirroring package selection from server1 to server2 using one liner

A quick one liner, that does replicate a set of preselected packages from server1 to server2 is also possible with either a combination of apt, ssh, awk and dpkg or with ssh + dpkg + dselect :

a) One-liner code with apt-get unifying the installed packages between 2 or more servers

debian-server2:~# apt-get --yes install `ssh root@debian-server1 "dpkg -l | grep -E ^ii" | awk '{print $2}'`
...

If it is necessery to install on more than just debian-server2, copy paste the above code to all servers you want to have identical installed packages as with debian-server1 or use a shor for loop to run the commands for each and every host of multiple servers group.

In some cases it might be better to use dselect instead as in some situations using apt-get might not correctly solve the package dependencies, if encountering problems with dependencies better run:

debian-server2:/home/hipo# ssh root@debian-server1 'dpkg --get-selections' | dpkg --set-selections && dselect install

As you can see using this second dselect installed "package" mirroring is also way easier to read and understand than the prior "cryptic" method with apt-get, hence I personally think using dselect method is a better.

Well that's basically it. If you need to synchronize also configurations, either an rsync/scp shell script, should be used with all defined server1 config files or in case if a cloning of packages between identical server machines is necessery dd or some other tool like Norton Ghost could be used.
Hope this helps, someone.

How to delete million of files on busy Linux servers (Work out Argument list too long)

Tuesday, March 20th, 2012

How to Delete million or many thousands of files in the same directory on GNU / Linux and FreeBSD

If you try to delete more than 131072 of files on Linux with rm -f *, where the files are all stored in the same directory, you will get an error:

/bin/rm: Argument list too long.

I've earlier blogged on deleting multiple files on Linux and FreeBSD and this is not my first time facing this error.
Anyways, as time passed, I've found few other new ways to delete large multitudes of files from a server.

In this article, I will explain shortly few approaches to delete few million of obsolete files to clean some space on your server.
Here are 3 methods to use to clean your tons of junk files.

1. Using Linux find command to wipe out millions of files

a.) Finding and deleting files using find's -exec switch:

# find . -type f -exec rm -fv {} \;

This method works fine but it has 1 downside, file deletion is too slow as for each found file external rm command is invoked.

For half a million of files or more, using this method will take "long". However from a server hard disk stressing point of view it is not so bad as, the files deletion is not putting too much strain on the server hard disk.
b.) Finding and deleting big number of files with find's -delete argument:

Luckily, there is a better way to delete the files, by using find's command embedded -delete argument:

# find . -type f -print -delete

c.) Deleting and printing out deleted files with find's -print arg

If you would like to output on your terminal, what files find is deleting in "real time" add -print:

# find . -type f -print -delete

To prevent your server hard disk from being stressed and hence save your self from server normal operation "outages", it is good to combine find command with ionice, e.g.:

# ionice -c 3 find . -type f -print -delete

Just note, that ionice cannot guarantee find's opeartions will not affect severely hard disk i/o requests. On  heavily busy servers with high amounts of disk i/o writes still applying the ionice will not prevent the server from being hanged! Be sure to always keep an eye on the server, while deleting the files nomatter with or without ionice. if throughout find execution, the server gets lagged in serving its ordinary client requests or whatever, stop the execution of the cmd immediately by killing it from another ssh session or tty (if physically on the server).

2. Using a simple bash loop with rm command to delete "tons" of files

An alternative way is to use a bash loop, to print each of the files in the directory and issue /bin/rm on each of the loop elements (files) like so:

for i in *; do
rm -f $i;
done

If you'd like to print what you will be deleting add an echo to the loop:

# for i in $(echo *); do \
echo "Deleting : $i"; rm -f $i; \

The bash loop, worked like a charm in my case so I really warmly recommend this method, whenever you need to delete more than 500 000+ files in a directory.

3. Deleting multiple files with perl

Deleting multiple files with perl is not a bad idea at all.
Here is a perl one liner, to delete all files contained within a directory:

# perl -e 'for(<*>){((stat)[9]<(unlink))}'

If you prefer to use more human readable perl script to delete a multitide of files use delete_multple_files_in_dir_perl.pl

Using perl interpreter to delete thousand of files is quick, really, really quick.
I did not benchmark it on the server, how quick exactly is it, but I guess the delete rate should be similar to find command. Its possible even in some cases the perl loop is  quicker …

4. Using PHP script to delete a multiple files

Using a short php script to delete files file by file in a loop similar to above bash script is another option.
To do deletion  with PHP, use this little PHP script:

<?php
$dir = "/path/to/dir/with/files";
$dh = opendir( $dir);
$i = 0;
while (($file = readdir($dh)) !== false) {
$file = "$dir/$file";
if (is_file( $file)) {
unlink( $file);
if (!(++$i % 1000)) {
echo "$i files removed\n";
}
}
}
?>

As you see the script reads the $dir defined directory and loops through it, opening file by file and doing a delete for each of its loop elements.
You should already know PHP is slow, so this method is only useful if you have to delete many thousands of files on a shared hosting server with no (ssh) shell access.

This php script is taken from Steve Kamerman's blog . I would like also to express my big gratitude to Steve for writting such a wonderful post. His post actually become  inspiration for this article to become reality.

You can also download the php delete million of files script sample here

To use it rename delete_millioon_of_files_in_a_dir.php.txt to delete_millioon_of_files_in_a_dir.php and run it through a browser .

Note that you might need to run it multiple times, cause many shared hosting servers are configured to exit a php script which keeps running for too long.
Alternatively the script can be run through shell with PHP cli:

php -l delete_millioon_of_files_in_a_dir.php.txt.

5. So What is the "best" way to delete million of files on Linux?

In order to find out which method is quicker in terms of execution time I did a home brew benchmarking on my thinkpad notebook.

a) Creating 509072 of sample files.

Again, I used bash loop to create many thousands of files in order to benchmark.
I didn't wanted to put this load on a productive server and hence I used my own notebook to conduct the benchmarks. As my notebook is not a server the benchmarks might be partially incorrect, however I believe still .they're pretty good indicator on which deletion method would be better.

hipo@noah:~$ mkdir /tmp/test
hipo@noah:~$ cd /tmp/test;
hiponoah:/tmp/test$ for i in $(seq 1 509072); do echo aaaa >> $i.txt; done

I had to wait few minutes until I have at hand 509072  of files created. Each of the files as you can read is containing the sample "aaaa" string.

b) Calculating the number of files in the directory

Once the command was completed to make sure all the 509072 were existing, I used a find + wc cmd to calculate the directory contained number of files:

hipo@noah:/tmp/test$ find . -maxdepth 1 -type f |wc -l
509072

real 0m1.886s
user 0m0.440s
sys 0m1.332s

Its intesrsting, using an ls command to calculate the files is less efficient than using find:

hipo@noah:/tmp/test$ time ls -1 |wc -l
509072

real 0m3.355s
user 0m2.696s
sys 0m0.528s

c) benchmarking the different file deleting methods with time

– Testing delete speed of find

hipo@noah:/tmp/test$ time find . -maxdepth 1 -type f -delete
real 15m40.853s
user 0m0.908s
sys 0m22.357s

You see, using find to delete the files is not either too slow nor light quick.

– How fast is perl loop in multitude file deletion ?

hipo@noah:/tmp/test$ time perl -e 'for(<*>){((stat)[9]<(unlink))}'real 6m24.669suser 0m2.980ssys 0m22.673s

Deleting my sample 509072 took 6 mins and 24 secs. This is about 3 times faster than find! GO-GO perl 🙂
As you can see from the results, perl is a great and time saving, way to delete 500 000 files.

– The approximate speed deletion rate of of for + rm bash loop

hipo@noah:/tmp/test$ time for i in *; do rm -f $i; done

real 206m15.081s
user 2m38.954s
sys 195m38.182s

You see the execution took 195m en 38 secs = 3 HOURS and 43 MINUTES!!!! This is extremely slow ! But works like a charm as the running of deletion didn't impacted my normal laptop browsing. While the script was running I was mostly browsing through few not so heavy (non flash) websites and doing some other stuff in gnome-terminal) 🙂

As you can imagine running a bash loop is a bit CPU intensive, but puts less stress on the hard disk read/write operations. Therefore its clear using it is always a good practice when deletion of many files on a dedi servers is required.

b) my production server file deleting experience

On a production server I only tested two of all the listed methods to delete my files. The production server, where I tested is running Debian GNU / Linux Squeeze 6.0.3. There I had a task to delete few million of files.
The tested methods tried on the server were:

– The find . type -f -delete method.

– for i in *; do rm -f $i; done

The results from using find -delete method was quite sad, as the server almost hanged under the heavy hard disk load the command produced.

With the for script all went smoothly. The files were deleted for a long long time (like few hours), but while it was running, the server continued with no interruptions..

While the bash loop was running, the server load avarage kept at steady 4
Taking my experience in mind, If you're running a production, server and you're still wondering which delete method to use to wipe some multitude of files, I would recommend you go  the bash for loop + /bin/rm way. Yes, it is extremely slow, expect it run for some half an hour or so but puts not too much extra load on the server..

Using the PHP script will probably be slow and inefficient, if compared to both find and the a bash loop.. I didn't give it a try yet, but suppose it will be either equal in time or at least few times slower than bash.

If you have tried the php script and you have some observations, please drop some comment to tell me how it performs.

To sum it up;

Even though there are "hacks" to clean up some messy parsing directory full of few million of junk files, having such a directory should never exist on the first place.

Frankly, keeping millions of files within the same directory is very stupid idea.
Doing so will have a severe negative impact on a directory listing performance of your filesystem in the long term.

If you know better (more efficient) ways to delete a multitude of files in a dir please share in comments.

How to resolve (fix) WordPress wp-cron.php errors like “POST /wp-cron.php?doing_wp_cron HTTP/1.0″ 404” / What is wp-cron.php and what it does

Monday, March 12th, 2012

fix wordpress wp-cron.php 404 HTTP error, what is wp-cron.php schedule logo

One of the WordPress websites hosted on our dedicated server produces all the time a wp-cron.php 404 error messages like:

xxx.xxx.xxx.xxx - - [15/Apr/2010:06:32:12 -0600] "POST /wp-cron.php?doing_wp_cron HTTP/1.0

I did not know until recently, whatwp-cron.php does, so I checked in google and red a bit. Many of the places, I've red are aa bit unclear and doesn't give good exlanation on what exactly wp-cron.php does. I wrote this post in hope it will shed some more light on wp-config.php and how this major 404 issue is solved..
So

what is wp-cron.php doing?


  • wp-cron.php is acting like a cron scheduler for WordPress.
  • wp-cron.php is a wp file that controls routine actions for particular WordPress install.
  • Updates the data in SQL database on every, request, every day or every hour etc. – (depending on how it's set up.).
  • wp-cron.php executes automatically by default after EVERY PAGE LOAD!
  • Checks all pending comments for spam with Akismet (if akismet or anti-spam plugin alike is installed)
  • Sends all scheduled emails (e.g. sent a commentor email when someone comments on his comment functionality, sent newsletter subscribed persons emails etc.)
  • Post online scheduled articles for a day and time of particular day

Suppose you're writting a new post and you want to take advantage of WordPress functionality to schedule a post to appear Online at specific time:

What is wordpress wp-cron.php, Scheduling wordpress post screenshot

The Publish Immediately, field execution is being issued on the scheduled time thanks to the wp-cron.php periodic invocation.

Another example for wp-cron.php operation is in handling flushing of WP old HTML Caches generated by some wordpress caching plugin like W3 Total Cache
wp-cron.php takes care for dozens of other stuff silently in the background. That's why many wordpress plugins are depending heavily on wp-cron.php proper periodic execution. Therefore if something is wrong with wp-config.php, this makes wordpress based blog or website partially working or not working at all.
 

Our company wp-cron.php errors case

In our case the:
212.235.185.131 – – [15/Apr/2010:06:32:12 -0600] "POST /wp-cron.php?doing_wp_cron HTTP/1.0" 404
is occuring in Apache access.log (after each unique vistor request to wordpress!.), this is cause wp-cron.php is invoked on each new site visitor site request.
This puts a "vain load" on the Apache Server, attempting constatly to invoke the script … always returning not found 404 err.

As a consequence, the WP website experiences "weird" problems all the time. An illustration of a problem caused by the impoper wp-cron.php execution is when we are adding new plugins to WP.

Lets say a new wordpress extension is download, installed and enabled in order to add new useful functioanlity to the site.

Most of the time this new plugin would be malfunctioning if for example it is prepared to add some kind of new html form or change something on some or all the wordpress HTML generated pages.
This troubles are result of wp-config.php's inability to update settings in wp SQL database, after each new user request to our site.
So the newly added plugin website functionality is not showing up at all, until WP cache directory is manually deleted with rm -rf /var/www/blog/wp-content/cache/

I don't know how thi whole wp-config.php mess occured, however my guess is whoever installed this wordpress has messed something in the install procedure.

Anyways, as I researched thoroughfully, I red many people complaining of having experienced same wp-config.php 404 errs. As I red, most of the people troubles were caused by their shared hosting prohibiting the wp-cron.php execution.
It appears many shared hostings providers choose, to disable the wordpress default wp-cron.php execution. The reason is probably the script puts heavy load on shared hosting servers and makes troubles with server overloads.

Anyhow, since our company server is adedicated server I can tell for sure in our case wordpress had no restrictions for how and when wp-cron.php is invoked.
I've seen also some posts online claiming, the wp-cron.php issues are caused of improper localhost records in /etc/hosts, after a thorough examination I did not found any hosts problems:

hipo@debian:~$ grep -i 127.0.0.1 /etc/hosts
127.0.0.1 localhost.localdomain localhost

You see from below paste, our server, /etc/hosts has perfectly correct 127.0.0.1 records.

Changing default way wp-cron.php is executed

As I've learned it is generally a good idea for WordPress based websites which contain tens of thousands of visitors, to alter the default way wp-cron.php is handled. Doing so will achieve some efficiency and improve server hardware utilization.
Invoking the script, after each visitor request can put a heavy "useless" burden on the server CPU. In most wordpress based websites, the script did not need to make frequent changes in the DB, as new comments in posts did not happen often. In most wordpress installs out there, big changes in the wordpress are not common.

Therefore, a good frequency to exec wp-cron.php, for wordpress blogs getting only a couple of user comments per hour is, half an hour cron routine.

To disable automatic invocation of wp-cron.php, after each visitor request open /var/www/blog/wp-config.php and nearby the line 30 or 40, put:

define('DISABLE_WP_CRON', true);

An important note to make here is that it makes sense the position in wp-config.php, where define('DISABLE_WP_CRON', true); is placed. If for instance you put it at the end of file or near the end of the file, this setting will not take affect.
With that said be sure to put the variable define, somewhere along the file initial defines or it will not work.

Next, with Apache non-root privileged user lets say www-data, httpd, www depending on the Linux distribution or BSD Unix type add a php CLI line to invoke wp-cron.php every half an hour:

linux:~# crontab -u www-data -e

0,30 * * * * cd /var/www/blog; /usr/bin/php /var/www/blog/wp-cron.php 2>&1 >/dev/null

To assure, the php CLI (Command Language Interface) interpreter is capable of properly interpreting the wp-cron.php, check wp-cron.php for syntax errors with cmd:

linux:~# php -l /var/www/blog/wp-cron.php
No syntax errors detected in /var/www/blog/wp-cron.php

That's all, 404 wp-cron.php error messages will not appear anymore in access.log! 🙂

Just for those who can find the root of the /wp-cron.php?doing_wp_cron HTTP/1.0" 404 and fix the issue in some other way (I'll be glad to know how?), there is also another external way to invoke wp-cron.php with a request directly to the webserver with short cron invocation via wget or lynx text browser.

– Here is how to call wp-cron.php every half an hour with lynxPut inside any non-privileged user, something like:
01,30 * * * * /usr/bin/lynx -dump "http://www.your-domain-url.com/wp-cron.php?doing_wp_cron" 2>&1 >/dev/null

– Call wp-cron.php every 30 mins with wget:

01,30 * * * * /usr/bin/wget -q "http://www.your-domain-url.com/wp-cron.php?doing_wp_cron"

Invoke the wp-cron.php less frequently, saves the server from processing the wp-cron.php thousands of useless times.

Altering the way wp-cron.php works should be seen immediately as the reduced server load should drop a bit.
Consider you might need to play with the script exec frequency until you get, best fit cron timing. For my company case there are only up to 3 new article posted a week, hence too high frequence of wp-cron.php invocations is useless.

With blog where new posts occur once a day a script schedule frequency of 6 up to 12 hours should be ok.


How to exclude files on copy (cp) on GNU / Linux / Linux copy and exclude files and directories (cp -r) exclusion

Saturday, March 3rd, 2012

I've recently had to make a copy of one /usr/local/nginx directory under /usr/local/nginx-bak, in order to have a working copy of nginx, just in case if during my nginx update to new version from source mess ups.

I did not check the size of /usr/local/nginx , so just run the usual:

nginx:~# cp -rpf /usr/local/nginx /usr/local/nginx-bak
...

Execution took more than 20 seconds, so I check the size and figured out /usr/local/nginx/logs has grown to 120 gigabytes.

I didn't wanted to extra load the production server with copying thousands of gigabytes so I asked myself if this is possible with normal Linux copy (cp) command?. I checked cp manual e.g. man cp, but there is no argument like –exclude or something.

Even though the cp command exclude feature is not implemented by default there are a couple of ways to copy a directory with exclusion of subdirectories of files on G / Linux.

Here are the 3 major ones:

1. Copy directory recursively and exclude sub-directories or files with GNU tar

Maybe the quickest way to copy and exclude directories is through a littke 'hack' with GNU tar nginx:~# mkdir /usr/local/nginx-new;
nginx:~# cd /usr/local/nginx#
nginx:/usr/local/nginx# tar cvf - \. --exclude=/usr/local/nginx/logs/* \
| (cd /usr/local/nginx-new; tar -xvf - )

Copying that way however is slow, in my case it fits me perfectly but for copying large chunks of data it is better not to use pipe and instead use regular tar operation + mv

# cd /source_directory
# tar cvf test.tar --exclude=dir_to_exclude/*\--exclude=dir_to_exclude1/* . \
# mv test.tar /destination_directory
# cd /destination# tar xvf test.tar

2. Copy folder recursively excluding some directories with rsync

P>eople who has experience with rsync , already know how invaluable this tool is. Rsync can completely be used as for substitute=de.a# rsync -av –exclude='path1/to/exclude' –exclude='path2/to/exclude' source destination

This example, can also be used as a solution to my copy nginx and exclude logs directory casus like so:

nginx:~# rsync -av --exclude='/usr/local/nginx/logs/' /usr/local/nginx/ /usr/local/nginx-new

As you can see for yourself, this is a way more readable for the tar, however it will not work on servers, where rsync is not installed and it is unusable if you have to do operations as a regular users on such for that case surely the GNU tar hack is more 'portable' across systems.
rsync has also Windows version and therefore, the same methodology should be working on MS Windows and good for batch scripting.
I've not tested it myself, yet as I've never used rsync on Windows, if someone has tried and it works pls drop me a short msg in comments.
3. Copy directory and exclude sub directories and files with find

Find in collaboration with cp can also be used to exclude certain directories while copying. Actually this method is better than the GNU tar hack and surely more efficient. For machines, where rsync is not installed it is just a perfect way to copy files from location to location, while excluding some directories, here is an example use of find and cp, for the above nginx case:

nginx:~# cd /usr/local/nginx
nginx:~# mkdir /usr/local/nginx
nginx:/usr/local/nginx# find . -type d \( ! -name logs \) -print -exec cp -rpf '{}' /usr/local/nginx-bak \;

This will find all directories inside /usr/local/nginx with find command print them on the screen, then execute recursive copy over each found directory and copy to /usr/local/nginx-bak

This example will work fine in the nginx case because /usr/local/nginx does not contain any files but only sub-directories. In other occwhere the directory does contain some files besides sub-directories the files had to also be copied e.g.:

# for i in $(ls -l | egrep -v '^d'); do\
cp -rpf $i /destination/directory

This will copy the files from source directory (for instance /usr/local/nginx/my_file.txt, /usr/local/nginx/my_file1.txt etc.), which doesn't belong to a subdirectory.

The cmd expression:

# ls -l | egrep -v '^d'

Lists only the files while excluding all the directories and in a for loop each of the files is copied to /destination/directory

If someone has better ideas, please share with me 🙂

How to install Samsung ML-2010 (ML-2010P) Mono Laser Printer on Xubuntu GNU/Linux

Wednesday, January 18th, 2012

I had to make one old Samsung ML-2010P Laser Printer work on Xubuntu Linux . I've had some issues in installing it, I couldn't fine any step by step tutorial online, on how the printer can be made work fine on Linux. Therefore I took the time to experiment and see if I could make it work. Since the printer is old, not much people are interested any more in making the printer operational on Linux, hence I couldn't find too much relevant posts and sites on the net, anyways thanks God after a bit of pondering I finally succeeded to make the Samsung ML-2010P printer to print on Linux.This are the exact steps one has to follow to make this old bunch of hardware to play nice on Linux:

1. use lsusb to list the printer model

root@linux:~# lsusb |grep -i samsung
Bus 001 Device 003: ID 04e8:326c Samsung Electronics Co., Ltd ML-2010P Mono Laser Printer

You see the printer reports as Samsung Electronics Co., Ltd ML-2010P Mono Laser Printer

2. Install cups printing service required packages

root@linux:~# apt-get install cups cups-bsd cups-client cups-common
root@linux:~# apt-get install cups-driver-gutenprint ghostscript-cups
root@linux:~# apt-get install python-cups python-cupshelpers

3. Install foomatic packages

root@linux:~# apt-get install foomatic-db foomatic-db-engine foomatic-db-gutenprint
root@linux:~# apt-get install foomatic-filters python-foomatic

4. Install hpijs hplip printconfand other packages necesssery for proper printer operation

root@linux:~# apt-get install hpijs hplip hplip-data ijsgutenprint
root@linux:~# apt-get install min12xxw openprinting-pdds printconf foo2zjs

P.S. Some of the packages I list might already have been installed as a dependency to another package, as I'm writting this article few days after I've succeeded installing the printer, I don't remember the exact install order.

5. Install splix (SPL Driver for Unix)

Here is a quote taken from Spix's project website:

"SpliX is a set of CUPS printer drivers for SPL (Samsung Printer Language) printers.
If you have a such printer, you need to download and use SpliX. Moreover you will find documentation about this proprietary language.
"

root@linux:~# apt-get install splix

For more information on splix, check on Splix SPL driver for UNIX website http://splix.ap2c.org/

You can check on the projects website the Samsung ML 2010 Printer is marked as Working
Next step is to configure the Printer

6. Go to Cups interface on localhost in browser and Add the Samsung printer.

Use Firefox, SeaMonkey or any browser of choice to configure CUPS:

Type in the browser:

http://localhost:631

Next a password prompt will appear asking for a user/pass. The user/pass you have to use is the same as the password of the user account you're logged on with.

UNIX Linux Administration CUPS Printer adding Samsung ML 2010 ML-2010P Xubuntu

Click on the Add Printer button and choose to add the Samsung ML-2010.

Then restart the CUP Service (cupsd) to make it load the new settings:

root@linux:~# /etc/init.d/cups restart

Now give the printer a try in printing some page in SeaMonkey, Chrome or Firefox (the quickest way is through pressing CTRL + P )

Following this steps, I've managed to run the printer on Xubuntu Linux, though the same steps if followed should most probably make the Samsnung ML 2010 play nice with other Linux distributions with a little or no adjustments.
I'll be glad to hear if someone succeeded in making the printer work on other distributions, if so please drop me a comment.
That's all folks! Enjoy printing 😉