I've just installed the phpbb forum on a Debian Linux because we needed a goodquick to install communication media in order to improve our internal communication in a student project in Strategic HR we're developing right now in Arnhem Business School.
Here are the exact steps I followed to have a properly it properly instlled:
1. Install the phpbb3 debian package
This was pretty straight forward:
debian:~# apt-get install phpbb3
At this point of installation I've faced a dpkg-reconfigure phpbb deb package configuration issue:
I was prompted to pass in the credentials for my MySQL password right after I've selected the MySQL as my preferred database back engine.
I've feeded my MySQL root password as well as my preferred forum database name, however the database installation failed because, somehow the configuration procedure tried to connect to my MySQL database with the htcheck user.
I guess this has to be a bug in the package itself or something from my previous installation misconfigured the way the debian database backend configuration was operating.
My assumption is that my previously installed htcheck package or something beforehand I've done right after the htcheck and htcheck-php packages installation.
after the package configuration failed still the package had a status of properly installed when I reviewed it with dpkg
I've thought about trying to manually reconfigure it using the dpkg-reconfigure debian command and I gave it a try like that:
debian:~# dpkg-reconfigure phpbb3
This time along with the other fields I've to fill in the ncurses interface I was prompted for a username before the password prompted appeared.
Logically I tried to fill in the root as it's my global privileges MySQL allowed user.
However that didn't helped at all and again the configuration tried to send the credentials with user htcheck to my MySQL database server.
To deal with the situation I had to approach it in the good old manual way.
2. Manually prepare / create the required phpbb forum database
To completet that connected to the MySQL server with the mysql client and created the proper database like so:
debian:~# mysql -u root -p

mysql>

CREATE database phpbb3forum;
3. Use phpmyadmin or the mysql client command line to create a new user for the phpbb forum
Here since adding up the user using the phpmyadmin was a way easier to do I decided to go that route, anyways using the mysql cli is also an option.
From phpmyadmin It's pretty easy to add a new user and grant privileges to a certain database, to do so navigate to the following database:
Privileges -> -> Add a new user ->
Now type your User name: , Host , Password , Re-type password , also for a Host: you have to choose Local from the drop down menu.
Leave the Database for user field empty as we have already previously created our desired database in step 2 of this article
Now press the "Go" button and the user will get created.
Further after choose the Privileges menu right on the bottom of the page once again, select through the checkbox the username you have just created let's say the previously created user is phpbb3
Go to Action (There is a picture with a man and a pencil on the right side of this button
Scroll down to the page part saying Database-specific privileges and in the field Add privileges on the following database: fill in your previosly created database name in our case it's phpbb3forum
and then press the "Go" button once again.
A page will appear where you will have to select the exact privileges you would like to grant on the specific selected database.
For some simplicity just check all the checkbox to grant as many privilegs to your database as you could.
Then again you will have to press the "Go" button and there you go you should have already configured an username and database ready to go with your new phpbb forum.
4. Create a virtualhost if you would like to have the forum as a subdomain or into a separate domain
If you decide to have the forum on a separate sub-domain or domain as I did you will have to add some kind of Virtualhost into either your Apache configuration /etc/apache2/apache2.conf or into where officially the virutualhosts are laid in Debian Linux in /etc/apache2/sites-available
I've personally created a new file like for instance /etc/apache2/sites-available/mysubdomain.mydomain.com
Here is an example content of the new Virtualhost:
<VirtualHost *>

ServerAdmin admin-email@domain.com

ServerName mysubdomain.domain.com
# Indexes + Directory Root.
DirectoryIndex index.php index.php5 index.htm index.html index.pl index.cgi index.phtml index.jsp index.py index.asp
DocumentRoot /usr/share/phpbb3/www/
# Logfiles
ErrorLog /var/log/apache2/yourdomain/error.log
CustomLog /var/log/apache2/yourdomain/access.log combined
# CustomLog /dev/null combined
<Directory /usr/share/phpbb3/www/>
Options FollowSymLinks MultiViews -Includes ExecCGI
AllowOverride All
Order allow,deny
allow from all </Directory>
</VirtualHost>
In above Virtualhost just change the values for ServerAdmin , ServerName , DocumentRoot , ErrorLog , CustomLog and Directory declaration to adjust it to your situation.
5. Restart the Apache webserver for the new Virtualhost to take affect
debian:~# /etc/init.d/apache2 restart
Now accessing your http://mysubdomain.domain.com should display the installed phpbb3 forum
The default username and password for your forum you can use straight are:
username: admin
password: admin
So far so good you by now have the PHPBB3 forum properly installed and running, however if you try to Register a new user in the forum you will notice that it's impossible because of a terrible ugly message reading:
Sorry but this board is currently unavailable.
I've spend few minutes online to scrape through the forums before I can understand what I have to stop that annoying message from appearing and allow new users to register in the phpbb forum
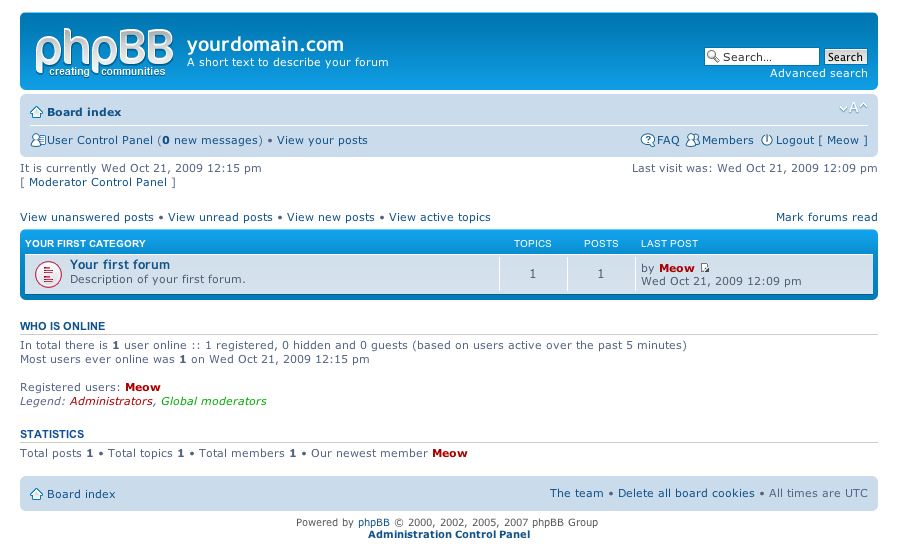
The solution came natural and was a setting that had to be changed with the forum admin account, thus login as admin and look at the bottom of the page, below the text reading Powered by phpBB © 2000, 2002, 2005, 2007 phpBB Group you will notice a link with Administration Control Panel
just press there a whole bunch of menus will appear on the screen allowing you to do numerous things, however what you will have to do is go to
Board Settings -> Disable Board
and change the radio button there to say No
That's all now your forum will be ready to go and your users can freely register and if the server where the forum is installed has an already running mail server, they will receive an emails with a registration data concerning their new registrations in your new phpbb forum.
Cheers and Enjoy your new shiny phpbb Forum 🙂


How to install and configure Jabber Server (Ejabberd) on Debian Lenny GNU / Linux
Wednesday, December 28th, 2011I've recently installed a jabber server on one Debian Lenny server and hence decided to describe my installations steps hoping this would help ppl who would like to run their own jabber server on Debian . After some research of the jabber server softwares available, I decided to install Ejabberd
The reasons I choose Ejabberd is has rich documentation, good community around the project and the project in general looks like one of the best free software jabber servers available presently. Besides that ejabberd doesn't need Apache or MySQL and only depends on erlang programming language.
Here is the exact steps I followed to have installed and configured a running XMPP jabber server.
1. Install Ejabberd with apt
The installation of Ejabberd is standard, e.g.:
debian:~# apt-get --yes install ejabberd
Now as ejabberd is installed, some minor configuration is necessery before the server can be launched:
2. Edit /etc/ejabberd/ejabberd.cfg
Inside I changed the default settings for:
a) Uncomment%%override_acls.. Changed:
%%%% Remove the Access Control Lists before new ones are added.%%%%override_acls.to
%%

%% Remove the Access Control Lists before new ones are added.

%%

override_acls.
b) Admin User from:
%% Admin user

{acl, admin, {user, "", "example.com"}}.
to
%% Admin user

{acl, admin, {user, "admin", "jabber.myserver-host.com"}}.
c) default %% Hostname of example.com to my real hostname:
%% Hostname

{hosts, ["jabber.myserver-host.com"]}.
The rest of the configurations in /etc/ejabberd/ejabberd.cfg can stay like it is, though it is interesting to read it carefully before continuing as, there are some config timings which might prevent the XMPP server from user brute force attacks as well as few other goodies like for example (ICQ, MSN , Yahoo etc.) protocol transports.
3. Add iptables ACCEPT traffic (allow) rules for ports which are used by Ejabberd
The minimum ACCEPT rules to add are:
/sbin/iptables -A INPUT -p tcp -m tcp --dport 22 -j ACCEPT

/sbin/iptables -A INPUT -p tcp -m tcp --dport 5222 -j ACCEPT

/sbin/iptables -A INPUT -p udp -m udp --dport 5222 -j ACCEPT

/sbin/iptables -A INPUT -p tcp -m tcp --dport 5223 -j ACCEPT

/sbin/iptables -A INPUT -p udp -m udp --dport 5223 -j ACCEPT

/sbin/iptables -A INPUT -p tcp -m tcp --dport 5269 -j ACCEPT

/sbin/iptables -A INPUT -p udp -m udp --dport 5269 -j ACCEPT

/sbin/iptables -A INPUT -p tcp -m tcp --dport 5280 -j ACCEPT

/sbin/iptables -A INPUT -p udp -m udp --dport 5280 -j ACCEPT

/sbin/iptables -A INPUT -p tcp -m tcp --dport 4369 -j ACCEPT

/sbin/iptables -A INPUT -p udp -m udp --dport 4369 -j ACCEPT

/sbin/iptables -A INPUT -p tcp -m tcp --dport 53873 -j ACCEPT
Of course if there is some specific file which stores iptables rules or some custom firewall these rules has to be added / modified to fit appropriate place or chain.
4. Restart ejabberd via init.d script
debian:~# /etc/init.d/ejabberd restart

Restarting jabber server: ejabberd is not running. Starting ejabberd.
5. Create ejabberd necessery new user accounts
debian:~# /usr/sbin/ejabberdctl register admin jabber.myserver-host.com mypasswd1
etc.debian:~# /usr/sbin/ejabberdctl register hipo jabber.myserver-host.com mypasswd2
debian:~# /usr/sbin/ejabberdctl register newuser jabber.myserver-host.com mypasswd3
debian:~# /usr/sbin/ejabberdctl register newuser1 jabber.myserver-host.com mypasswd4
...
ejabberdctl ejabberd server client (frontend) has multiple other options and the manual is a good reading.
One helpful use of ejabberdctl is:
debian:~# /usr/sbin/ejabberdctl status

Node ejabberd@debian is started. Status: started

ejabberd is running
ejabberctl can be used also to delete some existent users, for example to delete the newuser1 just added above:
debian:~# /usr/sbin/ejabberdctl unregister newuser jabber.myserver-host.com
6. Post install web configurations
ejabberd server offers a web interface listening on port 5280, to access the web interface right after it is installed I used URL: http://jabber.myserver-host.com:5280/admin/
To login to http://jabber.myserver-host.com:5280/admin/ you will need to use the admin username previously added in this case:
admin@jabber.myserver-host.com mypasswd1
Anyways in the web interface there is not much of configuration options available for change.
7. Set dns SRV records
I'm using Godaddy 's DNS for my domain so here is a screenshot on the SRV records that needs to be configured on Godaddy:
In the screenshto Target is the Fually qualified domain hostname for the jabber server.
Setting the SRV records for the domain using Godaddy's DNS could take from 24 to 48 hours to propagate the changes among all the global DNS records so be patient.
If instead you use own custom BIND DNS server the records that needs to be added to the respective domain zone file are:
_xmpp-client._tcp 900 IN SRV 5 0 5222 jabber.myserver-host.com.

_xmpp-server._tcp 900 IN SRV 5 0 5269 jabber.myserver-host.com.

_jabber._tcp 900 IN SRV 5 0 5269 jabber.myserver-host.com.
8. Testing if the SRV dns records for domain are correct
debian:~$ nslookup
> set type=SRV

> jabber.myserver-host.com

 ...
> myserver-host.com
If all is fine above nslookup request should return the requested domain SRV records.
You might be wondering what is the purpose of setting DNS SRV records at all, well if your jabber server has to communicate with the other jabber servers on the internet using the DNS SRV record is the way your server will found the other ones and vice versa.
DNS records can also be checked with dig for example
$ dig SRV _xmpp-server._tcp.mydomain.net
[…]
;; QUESTION SECTION:
;_xmpp-server._tcp.mydomain.net. IN SRV
;; ANSWER SECTION:
_xmpp-server._tcp.mydomain.net. 259200 IN SRV 5 0 5269 jabber.mydomain.net.
;; ADDITIONAL SECTION:
jabber.mydomain.net. 259200 IN A 11.22.33.44
;; Query time: 109 msec
;; SERVER: 212.27.40.241#53(212.27.40.241)
;; WHEN: Sat Aug 14 14:14:22 2010
;; MSG SIZE rcvd: 111
9. Debugging issues with ejabberd
Ejabberd log files are located in /var/log/ejabberd , you will have to check the logs in case of any issues with the jabber XMPP server. Here is the three files which log messages from ejabberd:
debian:~$ ls -1 /var/log/ejabberd/

ejabberd.log

erl_crash.dump

sasl.log
I will not get into details on the logs as the best way to find out about them is to read them 😉
10. Testing ejabberd server with Pidgin
To test if my Jabber server works properly I used Pidgin universal chat client . However there are plenty of other multiplatform jabber clients out there e.g.: Psi , Spark , Gajim etc.
Here is a screenshot of my (Accounts -> Manage Accounts -> Add) XMPP protocol configuration
Tags: admin, apache, best free software, brute force, cfg, com, configure, custom, default hostname, default settings, DNS, doesn, dport, ejabberd, ejabberdctl, exact steps, file, GNU, goodies, hostname, hosts, init, INPUT, Install, installation, Jabber, Linux, Lists, mypasswd, necessery, override, ports, ppl, programming language, Protocol, quot, quot quot, rich documentation, server, servers, software, tcp, transports, uncomment, User, xmpp
Posted in Linux, System Administration, Various | 8 Comments »