Posts Tagged ‘binaries’

How to install and configure djbdns from source as a Cachening Localhost Proxy resolver to increase resolving efficiency on Debian 6 Squeeze

Monday, August 1st, 2011

djbdns-logo-install-configure-djbdns-from-source-on-gnu-linux-to-accelerate-server-dns-resolving
It seems DjbDNS on Debian Squeeze has been not included as a Debian package. There is still possibility to install djbdns from an older deb package or install it from source. I however decided to install it from source as finding the old Debian package for Lenny and Etch takes time, plus I'm running an amd64 version of Debian and this might even more complicate the situation.
Installing it from source is not really a Debian way but at least it works.

In this article I assume that daemontools and ucspi-tcp are preliminary installed, if not one needs to install them with:

debian:~# apt-get install ucspi-tcp daemontools daemontools-run
...

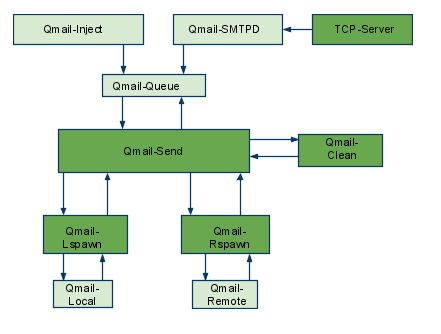
The above two ones are required as DJBDNS is originally made to run through djb's daemontools.

Here is the exact step I took to have it installed as local caching DNS server on a Debian Squeeze server:

1. Download and untar DjbDNS

debian:~# wget -q http://cr.yp.to/djbdns/djbdns-1.05.tar.gz debian:~# tar -zxvvf djbdns-1.05.tar.gz
...

2. Add DjbDNS users to /etc/passwd

Creating the below two users is not arbitrary but it's recommendable.

echo 'dnscache:*:54321:54321:dnscache:/dev/null:/dev/null' >> /etc/passwd
echo 'dnslog:*:54322:54322:dnslog:/dev/null:/dev/null' >> /etc/passwd

3. Compile DJBDNS nameserver

First it's necessery to use the below echo command to work around a common Linux bug:

debian:~# cd djbdns-1.05
debian:/root/djbdns-1.05# echo gcc -O2 -include /usr/include/errno.h > conf-cc

Next let's make it:

debian:/root/djbdns-1.05# make

4. Install the compiled djbdns binaries

debian:/root/djbdns-1.05# make setup check
# here comes some long install related output

If no errors are produced by make setup check this means that the djbdns should have installed itself fine.

As installation is compileted it's a good idea to report about the newly installed DjbDNS server if running a mail server. This info is used by Dan Bernstein to gather statistical data about the number of installations of djbdns servers throughout the world.

5. Do some general configurations to the newly installed DJBDNS

Now let's copy the list of the IP addresses of the global DNS root servers in /etc/.

debian:/root/djbdns-1.05# cp -rpf dnsroots.global /etc/ debian:/root/djbdns-1.05# ./dnscache-conf dnscache dnslog /etc/dnscache 0.0.0.0

dnscache-conf will generate some default configuration files for djbdns in /etc/dnscache

Next allow the networks which should be able to use the just installed djbdns server as a caching server:

debian:/root/djbdns-1.05# cd /etc/dnscache/root/ip
debian:/etc/dnscache/root# touch 192.168.1
debian:/root/djbdns-1.05# touch 123.123

First command will allow all ips in range 192.168.1.* to be able to access the DNS server and the second command will allow all ips from 123.123.1-255.1-255 to be able to query the server.

Some further fine tunning can be done from the files:

/etc/dnscache/env/CACHESIZE and /etc/dnscache/env/DATALIMIT

As a last step, before it's running, we have to link the /etc/dnscache to daemontools like so:

debian:/root/djbdns-1.05# ln -sf /etc/dnscache /etc/service/dnscache

If the daemontools is not linked to be accessible via /etc/service it's also a good to link it there:

debian:~# ln -sf /etc/service /

Now the DJBDNS should be running fine, to test if it's running without errors through daemontools I used:

debian:~# ps ax|grep -i readproc
5358 pts/18 R+ 0:00 grep -i readproc
11824 ? S 0:00 readproctitle service errors: ...........

If no errors are displayed it's configured and running to also test if it's capable of resolving I used the host command:

debian:~# host www.pc-freak.net localhost
Using domain server:
Name: localhost
Address: 127.0.0.1#53
Aliases:

www.pc-freak.net has address 83.228.93.76
www.pc-freak.net mail is handled by 0 mail.www.pc-freak.net.

Now the DJBDNS is properly installed and if you test it for a while with time host somehost.com localhost , you will see how quick it is in resolving.

The advantage of running DJBDNS is it does not require almost no maintance, its rock solid and great just like all other Dan Bernstein's written software.
Enjoy 😉

Windows add command to PATH variable – Adding (Putty, VIM) new binaries folder to windows %PATH%

Friday, June 27th, 2014

windows-add-to-path-location-of-new-binaries-putty-vim-etc-system-properties-environment-variable-screenshot
I want to use vim (text editor) on my Windows 7 work computer and hence installed VIM (VI Improved) port for Windows GVim.
VIM works perfect on Windows and for those coming from UNIX background having it installed is a must, however vim doesn't include a PATH location to its (vim) executable in Windows %PATH%.
PATH command line variable stores path locations to all binaries that could be executed directly from cmd line with no need to type full directory path to binary.

To illustrate what PATH is lets say you want to make Putty accessible straight from Windows command line (cmd.exe), you can add Putty's installation Path Folder to global Windows %PATH%. On my 64-bit Windows PC Putty binary is installed in C:Program Files (x86)PuTTY.

echo %PATH%
 

C:Perl64sitebin;C:Perl64bin;C:Program FilesRA2HP;C:Windowssystem32;C:
Windows;C:WindowsSystem32Wbem;C:WindowsSystem32WindowsPowerShellv1.0;C:
Program FilesWIDCOMMBluetooth Software;C:Program FilesWIDCOMMBluetooth Sof
twaresyswow64;C:Program Files (x86)Hewlett-PackardHP ProtectTools Security M
anagerBin;C:Program FilesActivIdentityActivClient;C:Program Files (x86)A
ctivIdentityActivClient;C:Program Files (x86)QuickTimeQTSystem


To make Putty accessible only by typing Putty instead of typing C:Program Files (x86)PuTTYPutty.exe, it has to be included in PATH, normally from Win command line (cmd.exe). This is done with:


set PATH=%PATH%;C:Program Files (x86)PuTTY


echo %PATH%


C:Usersggeorgi7Desktop>echo %PATH%
C:Perl64sitebin;C:Perl64bin;C:Program FilesRA2HP;C:Windowssystem32;C:
Windows;C:WindowsSystem32Wbem;C:WindowsSystem32WindowsPowerShellv1.0;C:
Program FilesWIDCOMMBluetooth Software;C:Program FilesWIDCOMMBluetooth Sof
twaresyswow64;C:Program Files (x86)Hewlett-PackardHP ProtectTools Security M
anagerBin;C:Program FilesActivIdentityActivClient;C:Program Files (x86)A
ctivIdentityActivClient;C:Program Files (x86)QuickTimeQTSystem;C:Program
Files (x86)PuTTY

To check all the exported variables, use SET command, here is my default SET variables:

C:> SET
 

ALLUSERSPROFILE=C:ProgramData
APPDATA=C:UsersgeorgiAppDataRoaming
CLASSPATH=.;C:Program Files (x86)Javajre6libextQTJava.zip
CommonProgramFiles=C:Program FilesCommon Files
CommonProgramFiles(x86)=C:Program Files (x86)Common Files
CommonProgramW6432=C:Program FilesCommon Files
COMPUTERNAME=GEORGI
ComSpec=C:Windowssystem32cmd.exe
DEFLOGDIR=C:ProgramDataMcAfeeDesktopProtection
FP_NO_HOST_CHECK=NO
HOMEDRIVE=C:
HOMEPATH=Usersggeorgi7
LOCALAPPDATA=C:Usersggeorgi7AppDataLocal
LOGONSERVER=G1W4730
NUMBER_OF_PROCESSORS=4
OS=Windows_NT

To make inclusion of VIM, Putty or other binary directory) into PATH variable permanent:


From Windows desktop, right-click My Computer and click Properties.
In the Advanced system settings click on Properties window, click on the Advanced tab.
In the Advanced System section, click the Environment Variables button.


windows-add-command-to-path-variable-adding-new-folder-to-windows-path-add-putty-vim-to-easy-execute
Finally, in the Environment Variables window, search for the Path variable in Systems Variable section and click the Edit button.
Add or modify the path lines including the paths to binaries you wish to be easy access.
Note that each different directory should be separated with a semicolon (;), e.g.
 

C:Program Files;C:Winnt;C:WinntSystem32; C:Perl64bin


ClamTK Linux Desktop Anti-Virus program – Checking Windows mapped drives with ClamTK

Thursday, June 20th, 2013

Linux desktop graphical program to scan for-viruses ClamTK clamav frontend application

In general Linux has fame for being Virus Free Operating System. During the 13 last years as dedicated GNU / Linux user, I've seen Linux servers with binaries infected with Viruses, however the hosts, were severely messed hosts because noone updated them on time and script kiddy crackers has "hacked" multiple times. In lifetime one of my old testing computers got infected with Virus because of my mistake of running "suspicious" pre-compiled "cracker" software binaries with no MD5 verification and "questionable" websites…
I share this story because, I want to beat-up the Myth that Linux cannot have Viruses. It CAN but not very likely to happen 🙂

As a Desktop user over the last 10 years, even though I installed plenty of packages from third party sources and never happened to infect my computer with Virus – or at least if I infected I never knew it. A lot of popular MS-Windows Anti-Virus programs, has already ports for Linux. Just to mention few non-free Linux AV software providing install binaries;

  • Avast

  • BitDefender

  • AVG

  • Dr. Web

Though risk of Viruses on Linux is so tiny, it is useful to have ANTI-Virus Software to check files received from Skype, E-mails and onse downloaded with Browser. I always prefer so until now I used Clamav Antivirus to keep an eye periodically on my Desktop Linux host and servers running mail servers (those who run Mail Servers know how useful is Clamav in stopping tons of E-mail attached Malware Viruses and Trojans).

I use mostly Debian Linux, so on every new server or Desktop one of first things I did was to install it, i.e.:

# apt-get --yes install clamav
...

Before I knew Clamav AV for Windows has GUI, anyways till recently I didn't know if there is some kind of free software AV Graphical frontend for Linux. I just found out about ClamTK

Linux Free Antivirus ClamTk clamav Virus Scanner graphical frontend

ClamTK is available in most Linux distributions from default package repositories

On Debian and Ubuntu to install it run common:

debian:~# apt-get --yes clamtk
...

On Fedora and CentOS Linux to install:

[root@fedora ~]# yum -y install clamtk
...

Its best to run it as root superuser (or via sudo) to make ClamTK able read all files or mounts on system:

hipo@debian:~$ sudo clamtk

ClamTK is very simple to use and there are only few configuration options;
clamtk desktop linux free antivirus startup preferences

clamtk scan for viruses linux gui proxy

linux Anti-Virus Desktop graphics easy to use AntiVirus ClamTK preferences screenshot

ClamTK is very useful when used with mounted Samba Shared (Mapped) Windows drives to scan for Viruses and malware, i.e, after mounting share using cmd like:

# smbmount //192.168.2.28/projects /mnt/projects -o user=USERNAME

How to set repository to install binary packages on amd64 FreeBSD 9.1

Friday, January 11th, 2013

Though, it is always good idea to build from source for better performance of Apache + MySQL + PHP, its not worthy the time on installing minor things like; trafshow, tcpdump or deco (MC – midnight commander like native freebsd BSD program).

If you're on a 64 bit version of FreeBSD ( amd64) 9.1 and you try to install a binary package with;

freebsd# pkg_add -vr vim

Ending up with an error;

Error: Unable to get ftp://ftp.freebsd.org/pub/FreeBSD/ports/amd64/packages-9.1-release/Latest/vim.tbz: File unavailable (e.g., file not found, no access)
pkg_add: unable to fetch 'ftp://ftp.freebsd.org/pub/FreeBSD/ports/amd64/packages-9.1-release/Latest/vim.tbz' by URL
pkg_add: 1 package addition(s) failed

The error is caused by lack of special packages-9.1-release directory existing on FreeBSD.org servers. I've realized this after doing a quick manual check opening ftp://ftp.freebsd.org/pub/FreeBSD/ports/amd64. The existing URL containing working fbsd 9.1 binaries is:

ftp://ftp.freebsd.org/pub/FreeBSD/ports/amd64/packages-9-current/Latest/
h

You will have to set a repository for FreeBSD 9.1 amd64 packages manually with cmd:
freebsd# echo $SHELL
/bin/csh
freebsd# setenv PACKAGESITE ftp://ftp.freebsd.org/pub/FreeBSD/ports/amd64/packages-9-current/Latest/

If you're on bash shell use export instead:

freebsd# export PACKAGESITE="ftp://ftp.freebsd.org/pub/FreeBSD/ports/amd64/packages-9-current/Latest/"

To make ftp://ftp.freebsd.org/pub/FreeBSD/ports/amd64/packages-9-current/Latest/ as a permanent binary repository:

echo 'setenv PACKAGESITE ftp://ftp.freebsd.org/pub/FreeBSD/ports/amd64/packages-9-current/Latest/' >> /root/.cshrc

or

echo 'export PACKAGESITE="ftp://ftp.freebsd.org/pub/FreeBSD/ports/amd64/packages-9-current/Latest/"' >> /root/.bashrc

Now, pkg_add as much as you like 😉

How to fix a broken QMAIL queue with queue-repair and qmhandle

Friday, May 27th, 2011

How qmail works, qmail queue picture :)

The aim of this small post is to give just a brief idea of how I fix my qmail server after breaking it or in case it is broken after mail bomb attacks, etc.

Most common cases when I break my qmail queue myself, are after I’m implementing some new patches and reinstall parts of the qmail server with a patched version of default qmail binaries.
On other occasions, I simply used the qmailctl to start or stop the server as a part of some routine tasks necessery for the administration of the qmail server.

Everybody who has already experience with qmail should have experienced, that qmail is very fragile and could break even with a simple changes, though if it works once it’s rock solid piece of mail servant.

Below I explain few ways I used through my days as a qmail sys admin to deal with broken or messed queues.

1. Fixing a broken qmail queue using automatic tools There are few handy tools which in most cases are able to solve issues with the queue, one very popular one isqueue-repair – check http://pyropus.ca/software/queue-repair/.
Installation of qmail-repair is dead easy, but it needs to be installed from source as no official debian package is available:

linux:/usr/local/src# wget http://pyropus.ca/software/queue-repair/queue-repair-0.9.0.tar.gz
linux:/usr/local/src# tar -xzvvf queue-repair-0.9.0.tar.gzdrwxr-xr-x charlesc/qcc 0 2003-10-22 16:54 queue-repair-0.9.0/
-rw-r--r-- charlesc/qcc 268 2003-10-22 16:54 queue-repair-0.9.0/TODO
-rw-r--r-- charlesc/qcc 1700 2003-10-22 16:54 queue-repair-0.9.0/CHANGELOG
-rw-r--r-- charlesc/qcc 18007 2003-10-22 16:54 queue-repair-0.9.0/COPYING
-rw-r--r-- charlesc/qcc 1098 2003-10-22 16:54 queue-repair-0.9.0/BLURB
-rwxr-xr-x charlesc/qcc 26286 2003-10-22 16:54 queue-repair-0.9.0/queue_repair.py

To check if there are issues fixable within the qmail queue it’s as easy as:

linux:/usr/local/src# cd queue-repair-0.9.0
linux:/usr/local/src/queue-repair-0.9.0# ./queue-repair -t
...
checking files...
checking queue/mess files...
checking split locations...

The tool will walk through the mail sub-directories containing mail queued files in /var/qmail/queue and will list any issues found.
It’s recommended that the qmail server is stopped before any queue modify operations are issued on the server:

linux:/usr/local/src# qmailctl stop
...

Further on in order to solve any found issues with the queue, there is the “-r”/repair option:

linux:/usr/local/src/queue-repair-0.9.0# ./queue-repair -r
...

Another tool which comes handy whether a repair of a messed qmail queue is needed is qmhandlehttp://sourceforge.net/projects/qmhandle/

The use of qmhandle is also pretty easy, all one has to do is to follow the usual classical steps of a download the source & compile:

linux:/usr/local/src# wget https://www.pc-freak.net/files/qmhandle-1.3.2.tar.gz
linux:/usr/local/src# tar -zxvvf qmhandle-1.3.2
...
linux:/usr/local/src# cd qmhandle-1.3.2

Once again it’s necessery that the qmail server is stopped via its init script before qmHandle tool is used, e.g.:

linux:~# qmailctl stop
...

There is a difference between qmail queue repair tool and qmail handle , while qmail queue-repair tool is used to fix improper permissions of queued files with the qmail queue, qmhandle ‘s application is to completely delete the stored mail contents of a broken queue.

Deleting all the qmail queue content is in some cases the only option to fix the queue.
Often such a drastic measure is required after a heavy mail server overload, let’s say a result of spammers or caused by virus infected mail users which send a massive amounts of spam mails.

Thus at many cases when queue-repair was unable to solve a queue mess, I use qmhandble and sacrifice all the queued emails by completely wiping them out like so:

linux:/usr/local/src/qmhandle-1.3.2# ./qmhandle -D
...

Above command would eradicate all queued emails. Hopefully after the qmail server gets launched again with qmailctl start all the mail server operations should be back to normal.

Note that the use of qmhandle’s queue delete capabilities is pretty dangerous, if you forgot to stop the qmail server before issuing the above command!

Note that in order to use both qmHandle and queue-repair tools you will need to install python interpreter as both of the tools are written in python.

To check what is currently in the queue in Qmail, there are also native tools available, as you should probably know if you have dealt with qmail, e.g.:

debian:~# qmail-qstat
messages in queue: 2
messages in queue but not yet preprocessed: 0

Often when there are problems with Qmail and more specificly with qmail server queue the qmail-qstat command does show messages in queue, however when an attempt to check what kind of messages are in the queue with qmail-qread no messages are shown, for instance below you see an example of that, even though qmail-qstat claims 2 messages are in the queue, qmail-qread is unable to list the messages:

debian:~# qmail-qread
debian:~#

If all is fine with qmail queue above’s qmail-qread command should have returned something similar to:

debian:~# qmail-qread
26 May 2011 07:46:47 GMT #659982 3517 <hipo@www.pc-freak.net>
remote somemail@gmail.nl
26 May 2011 07:46:47 GMT #659983 3517 <hipo@www.pc-freak.net>

2. Fixing qmail queue manually This is very dangerous initiative, so before you try anything, make sure that you know what you’re doing, the possibility that you make the situation worst if you attempt to tamper manually the qmail queue is quite high 🙂

However if you’re still convinced to try fixing it manually, take a look at /var/qmail/queue it’s very likely that there are permission issues with some of the queued files, in order to fix the situation it’s necessery that the following directories:

/var/qmail/queue/mess/
/var/qmail/queue/remote/
/var/qmail/queue/bounce
/var/qmail/queue/info

gets explored with midnight commander / mc or some kind of convenient file explorer.

If there are queued files owned by users different from qmailq and user group qmail , for instance if owned by the root user, a simple chown qmailq:qmail to the wrong permissions file, should be able to resolve the issues.

Apart from all I explain above, there are many other ways suggested online on howto clean a qmail queue, one very popular one is using James’s qfixq shell script.

This script as of this very date is not working on Debian based systems, the script is dedicated initially to run on Fedora and Redhat based Linuces

Moreover myy experience with qfixq was never successful.

One very important note which is often a cause of many problems, is always make sure you stop and start the qmail server with an interval of at least of 10 seconds.

I’ve managed many servers which after an immediate (undelayed) qmailctl stop and qmailctl start was unable to run the whole engine of the qmail server (and either email sending or email receiving was not properly working) afterwards.

In that cases many weird behaviours are common, consider this seriously if you deal with the qmail-queue, it might happen that even if you have fixed your qmail queue, after a restart the qmail might breaks up.
I’ve experienced this kind of oddities numerous times, thus when I do changes to qmail I always make sure I restart the server a couple of times (at least 5 times 😉 ) always with a good delay between the HUPs.

And as always with qmail prayer is always needed, this server is complex, you never know what will happen next 🙂

How to play Audio music CDs in GNU/Linux and Free/Net/Open BSDs

Sunday, January 22nd, 2012

If you still have some old dusty CDs left on the CD shelf, its quite cool to give it a ride in a rainy morning.

As I enjoy working in console so much, I thought it might be interesting to share how music audio CDs can be listened in plain text mode console.

For all console / terminal geeks Linux and BSDs can be equipped with a number of text/console audio cd console players.

There are plenty of free software console cd audio players on the net, however I found cdplay , cdcd and dcd to be the most popular ones.

On Debian and Ubuntu G*/Linuces cdplay and cdcd are installable via apt. To install cdtool:

root@xubuntu-desktop:~# apt-get install cdtool
...

cdtool package, contains a number of commands enabling you to listen/stop/shuffle/eject/get info about cd audio volumes. cdtool provides the following binaries:

cdeject
cdclose
cdir
cdinfo
cdpause
cdplay
cdstop
cdvolume
cdshuffle

Install cdcd on Debian and alike by typing:

root@xubuntu-desktop:~# apt-get install cdcd
...

cdcd has shell like interface the most basic use of it is with:

root@xubuntu-desktop:~# cdcd
cdcd> play

To play audiocds in console on FreeBSD , a command tool dcd is available and installable through ports.
To install it issue:

root@freebsd# cd /usr/ports/audio/dcd
root@freebsd# make install clean
...

dcd is also available for Linux but on most GNU/Linuxes it has to be built from source.

Lets say you'd like to Play the 5th song from audio CD:

freebsd# dcd 5

dcd has plenty of great arguments, to get some fun with it check the man page.

Another program that can be used to play audio CDs on both Linux and BSDs is the "classical" mplayer .

To play AUDIO CD with mplayer the command line to use is:

root@debian:~# mplayer -cdrom-device /dev/sr0 cdda:// -cache 5000
...

The argument -cache 5000 has to be passed to to work around choppy sound (if for example audio playback interruptions every few milliseconds).

For people who are keen on ncurses (Midnight Commander) like command line interfaces you might enjoy Herrie a minimalistic music player that supports plenty of sound formats, including audiocds.

Herrie is available for Debian and most deb based modern distros via apt, e.g.:

root@xubuntu-desktop:~# apt-get install herrie
...

Herrie Minimalistic Music player for Linux and BSD


Ports are also available for FreeBSD, NetBSD and OpenBSD.
To install on FreeBSD:

root@freebsd# cd /usr/ports/audio/herrie
root@freebsd# make install clean

I'll be happy to hear feedback and recommendations on any other console audio cd players I might forgot to mention.
Which is your favourite console text based cd audio player?

How to install Skype on 64 bit Ubuntu (amd64) architecture

Sunday, July 17th, 2011

It seems Skype has troubles installing on 64 bit Ubuntu via Ubuntu’s Graphical Package Install manager which in Ubuntu 11.04 is called (Ubuntu Software Center)

During my attempt to take advantage of the nice GUI apt frontend, I encontered the error:
Wrong Architecture amd64

And Skype install failed, as you see in below’s picture (which you might be unable to read since it’s stating the error in Bulgarian 😉

error Ubuntu 11.04 Skype Install error in architecture amd64

The error is quite understandable, since the Skype deb package which tried to install was built for the i386 architecture.
Since the Software Center was not intelligent enough to work around the issue, I finally fixed it myself using the good old apt-get in terminal, like so:

root@ubuntu:~# apt-get install skype
...

apt did not even complain that the package had a different architecture for i386 and installed skype without any errors as well Skype worked immediately even though the arthictural difference.
This is probably because even though it’s a amd64 Ubuntu it has a kernel module loaded to support i386 binaries 😉
Now my sister can enjoy her skype on the shiny Ubuntu 😉

How to fix “delivery 1: deferral: Sorry,_message_has_wrong_owner._(#4.3.5)/” qmail mail delivery failure message

Friday, May 20th, 2011

After a failed attempt to enable some wrapper scripts to enable domain keys support in a qmail powered mail server my qmail server suddenly stopped being able to normally send mail.

The exact error message which was logged in /var/log/qmail/current was:

@400000004dd66fcc16a088ac delivery 1: deferral: Sorry,_message_has_wrong_owner._(#4.3.5)/

This qmail messed happened after I substituted /var/qmail/bin/qmail-queue and /var/qmail/bin/qmail-remote with two respective wrapper shell scripts which were calling for the original qmail-queue and qmail-remote binaries under the names qmail-queue.orig and qmail-queue.orig

Restoring back qmail-queue.orig to /var/qmail/bin/qmail-queue and qmail-remote.orig to /var/qmain/bin/qmail-remote and restarting the mail server broke my qmail install.

After a bunch of nerves trying to isolate what is causing the error I found out that by mistake I forgot to copy the qmail-queue and qmail-remote permissions and ownership.

Thus I had to check another qmail working installation’s permissions for both binaries and fix the permissions to be equivalent to the permissions:

debian:~# ls -al /var/qmail/bin/qmail-remote
-rwx–x–x 1 root qmail 50464 2011-05-20 12:56 /var/qmail/bin/qmail-remote*
debian:~# ls -al /var/qmail/bin/qmail-queue
-rws–x–x 1 qmailq qmail 20392 2011-05-20 12:56 /var/qmail/bin/qmail-queue*

The exact chmod and chmod commands I issued to solve the shitty issues were as follows:

First I fixed the qmail-queue and qmail-remote ownership:

debian:~# chown qmailq:qmail /var/qmail/bin/qmail-queue
debian:~# chown root:qmail /var/qmail/bin/qmail-remote

Second I set the proper file permissions:

# make the qmail-queue binary suid
debian:~# chmod u+s /var/qmail/bin/qmail-queue
debian:~# chmod 611 /var/qmail/bin/qmail-queue
debian:~# chmod 611 /var/qmail/bin/qmail-remote

Third and last I did a restart of the qmail server and tested it sends properly

debian:~# /usr/bin/qmailctl stop
Stopping qmail...
qmail-send
qmail-smtpd
debian:~# /usr/bin/qmailctl start
Starting qmail

Finally to test that the qmail server qmail-queue was queing and sending with qmail-remote I used the system mail command like so:

debian:~# mail -s "test email" testuser@www.pc-freak.net
asdfafdsdf
.
Cc:

Afterwards the mail was properly received on my mail account testuser@www.pc-freak.net immediately.

In my /var/log/qmail/current log file all seemed fine:

@400000004dd6702a2eb2b064 starting delivery 1: msg 85281596 to remote testuser@www.pc-freak.net
@400000004dd6702a2eb2b834 status: local 0/20 remote 1/20
@400000004dd6702b34cc809c delivery 1: success: 83.228.93.76_accepted_message./Remote_host_said:_250_ok_
1305899099_qp_65293/
@400000004dd6702b34cc886c status: local 0/20 remote 0/20
@400000004dd6702b34cc8c54 end msg 85281596

The test mail was properly received on my mail account testuser@www.pc-freak.net immediately.

It took me like half an hour to figure out what exactly is wrong with the permissions in situations like this I really wanted to change all my qmail installs with postfix and forget forever I ever used qmail …

How to solve qmail /usr/local/bin/tcpserver: libc.so.6: failed to map segment from shared object: Cannot allocate memory

Saturday, April 30th, 2011

If you’re building (compiling) a new qmail server on some Linux host and after properly installing the qmail binaries and daemontools, suddenly you notice in readproctitle service errors: or somewhere in in qmail logs for instance in/var/log/qmail/current the error:

/usr/local/bin/tcpserver: error while loading shared libraries:
libc.so.6: failed to map segment from shared object: Cannot allocate memory

then you have hit a bug caused by insufficient memory assigned for tcpserver in your /var/qmail/supervise/qmail-smtpd/run daemontools qmail-smtpd initialize script:

This kind of issue is quite common especially on hardware architectures that are 64 bit and on Linux installations that are amd65 (x86_64) e.g. run 64 bit version of Linux.

It relates to the 64 bit architecture different memory distribution and thus as I said to solve requires increase in memory softlimit specified in the run script an example good qmail-smtpd run script configuration which fixed the libc.so.6: failed to map segment from shared object: Cannot allocate memory I use currently is as follows:

#!/bin/shQMAILDUID=`id -u vpopmail`NOFILESGID=`id -g vpopmail`MAXSMTPD=`cat /var/qmail/control/concurrencyincoming`# softlimit changed from 8000000exec /usr/local/bin/softlimit -m 32000000 /usr/local/bin/tcpserver -v -H -R -l 0 -x /home/vpopmail/etc/tcp.smtp.cdb -c "$MAXSMTPD"
-u "$QMAILDUID" -g "$NOFILESGID" 0 smtp
/var/qmail/bin/qmail-smtpd
/home/vpopmail/bin/vchkpw /bin/true 2>&1

The default value which was for softlimit was:

exec /usr/local/bin/softlimit -m 8000000

A good softlimit raise up values which in most cases were solving the issue for me are:

exec /usr/local/bin/softlimit -m 3000000

or exec /usr/local/bin/softlimit -m 4000000

The above example run configuration fixed the issue on a amd64 debian 5.0 lenny install, the server hardware was:

CPU: Intel(R) Core(TM)2 Duo CPU @ 2.93GHz
System Memory: 4GB
HDD Disk space: 240GB

The softlimit configuration which I had to setup on another server with system parameters:

Intel(R) Core(TM) i7 CPU (8 CPUS) @ 2.80GHz
System Memory: 8GB
HDD Disk Space: 1.4Terabytes

is as follows:

#!/bin/sh
QMAILDUID=`id -u vpopmail`
NOFILESGID=`id -g vpopmail`
MAXSMTPD=`cat /var/qmail/control/concurrencyincoming`
exec /usr/bin/softlimit -m 64000000
/usr/local/bin/tcpserver -v -H -R -l 0
-x /home/vpopmail/etc/tcp.smtp.cdb -c "$MAXSMTPD"
-u "$QMAILDUID" -g "$NOFILESGID" 0 smtp
/var/qmail/bin/qmail-smtpd
/home/vpopmail/bin/vchkpw /bin/true 2>&1

If none of the two configurations pointed out in the post works, for you just try to manually set up the exec /usr/bin/softlimit -m to some high value.

To assure that the newly set value is not producing the same error you will have to, reload completely the daemontools proc monitor system.
To do so open /etc/inittab comment out the line:

SV:123456:respawn:/command/svscanboot
to
#SV:123456:respawn:/command/svscanboot

Save again /etc/inittab and issue te cmd:

linux:~# init q

Now again open /etc/inittab and uncomment the commented line:

#SV:123456:respawn:/command/svscanboot to
SV:123456:respawn:/command/svscanboot

Lastly reload the inittab script once again with command:

linux:~# init q

To check if the error has disappeared check the readproctitle process, like so:

linux:~# ps ax|grep -i readproctitle

The command output should produce something like:

3070 ? S 0:00 readproctitle service errors: .......................................

Hope that helps.

How to edit, convert, join, split and re-time movie subtitle files on Linux (Fix Subtitles bad timing) / Install subtitle manipulation console tools for Linux

Tuesday, April 19th, 2011

As a Linux user I sometimes face difficulties with watching subtitled, movies. I mostly use Mplayer, Totem or VLC to watch the common video files.
The most common problems I face with subtitles are caused by bad timing, many times the solution to the bad timing issues is very simpleand comes up to changing the default movie player I use MPlayer to VLC or Totem.

However at many occasions trying to watch the movie with different kind of movie player does not help.
In this dark moments I get seriously irritated I am not a regular Windows user, where such kind of problems are almost none as many of the Windows movie player problems does fix bad timing issues automatically.

Luckily there is a work-around to this subtitles timing issues and other mishaps caused by guys who created a Movie subtitle files with a Windows subtitle editor program, subtitles timing, the Linux work-around takes a few more minutes to install a package called Subtitles

The Subtitles text utility is written in Perl and contains two executables subplay and subs .

Subtitles is the Linux subtitle Swiss Army Knife as it is capable of convert, join, split, and re-time of subtitles files

Installing Subtitles tools on Linux is a trivial job and it comes to download and installation of the 2 perl executables.
Here is how:

1. Download Subtitles.tar.gz toolsI have mirrored Linux Subtitles (Subtitles.tar.gz) here originally the binaries are to be found on URL address: http://karasik.eu.org/software/ , issue the commands:

linux:~# cd /usr/local/src
linux:/usr/local/src# wget https://www.pc-freak.net/files/Subtitles.tar.gz
...
2. Unarchive it

linux:/usr/local/src# tar -zxvvf tar -zxvvf Subtitles.tar.gz...
linux:/usr/local/src# cd Subtitles-1.0

3. Compile and install Subtitles system widePitily the Subtitles tools are not currently available as a packages in the repositories of Debian and Ubuntu Linux and thus easy installation without compilation via apt-get is unfortunately not available.

Here is the commands with which to compile and install Subtitles:

linux:/usr/local/src/Subtitles-1.0# perl Makefile.PL
...
linux:/usr/local/src/Subtitles-1.0# make
...
linux:/usr/local/src/Subtitles-1.0# make test
...

All tests successful.Files=1, Tests=17, 1 wallclock secs ( 0.05 usr 0.00 sys + 0.06 cusr 0.01 csys = 0.12 CPU)Result: PASS

linux:/usr/local/src/Subtitles-1.0# make install

Installing /usr/local/share/perl/5.10.1/Subtitles.pm
Installing /usr/local/man/man1/subplay.1p
Installing /usr/local/man/man1/subs.1p
Installing /usr/local/man/man3/Subtitles.3pm
Installing /usr/local/bin/subplay
Installing /usr/local/bin/subs
Appending installation info to /usr/local/lib/perl/5.10.1/perllocal.pod

Now as we have the subs executable installed, Let’s say your movie subtitles displays 5 seconds earlier before the movie scenes (bad timing), all you need to do to adjust your subtitles to show up in correct movie scenes is issue:

hipo@linux:/home/hipo/Movies$ subs -i -b 5 your_movie_subtitle_file_name.sub

now check out the subtitle files once again with your favourite player and the early subtitles display on your movie should be fixed.
Let’s have another scenario, say that your movie file is encoded to display 24 frames per seconds (fps) but the subtitle file is created to display the subtitles for a 25 fps, to solve this situation issue:

hipo@linux:~# subs -i -a 24/25 your_movie_subtitle_file.sub

Another possible scenario where subs command will be a precious asset is if you for example want to merge two subtitle files into one.Let’s say you have subtitles for a movie which are split over in 2 parts and the corresponding subtitles are in 2 different files, but eventually you find a better quality of the movie (DVD quality) in a single file and therefore you need the movie subtitles to be stored in one single file.
In that case to merge the subtitle files from let’s say the files movie_subtitle_file1.sub and movie_subtitle_file2.sub use the command:

subs -z movie_subtitle_file1.sub movie_subtitle_file2.sub

Some few other helpful things you can do with subs on Linux, are for example: splitting a file after a determined period of time, separating overlapped lines, and joining files into a single subtitle.

If you want to remove all the comments of gestures, facial expressions loud laughing etc. which displays usually the annoying (‘[Sneezing]’ or ‘[Music playing]) during the movie screen play, issue:

subs -e 's/[s-]*[.*]s*n*//gs' movie_subtitle_file.sub

Also other interesting Linux tool which is useful if you want to make conversions between subtitle in a (.sub) format to (.srt) format is called sub2srt perl script:

sub2srt’s home page is located on the URL address: http://www.robelix.com/sub2srt/, just to ensure it won’t just disappear with time I have created sub2srt mirror here

The most basic usage of sub2srt linux converting tool is by simply passing input sub and output srt file names like so:

linux:~# ./sub2srt 5rFF-pop.sub 5rFF-pop.srt

sub2srt supports changing of fps rate per second during conversion with the -f option as well as creationg of converted files in dos like end of file (CR+LF) with the –dos option.

Hope this article makes sense. If you find it useful, please drop me a thanks comment 😉