Posts Tagged ‘file’

Where are Apache log files on my server – Apache log file locations on Debian / Ubuntu / CentOS / Fedora and FreeBSD ?

Tuesday, November 7th, 2017

apache-where-are-httpd-access-log-files

Where are Apache log files on my server?

1. Finding Linux / FreeBSD operating system distribtion and version

Before finding location of Apache log files it is useful to check what is the remote / local Linux operating system version, hence

First thing to do when you login to your remote Linux server is to check what kind of GNU / Linux you're dealing with:

cat /etc/issue
cat /etc/issue.net


In most GNU / Linux distributions should give you enough information about the exact Linux distribution and version remote server is running.

You will get outputs like

# cat /etc/issue
SUSE LINUX Enterprise Server 10.2 Kernel \r (\m), \l

or

# cat /etc/issue
Debian GNU/Linux 8 \n \l

If remote Linux is Fedora look for fedora-release file:

cat /etc/fedora-release Fedora release 7 (Moonshine)

The proposed freedesktop.org standard with the introduction of systemd across all Linux distributions is

/etc/os-release


# cat /etc/os-release
PRETTY_NAME="Debian GNU/Linux 8 (jessie)"
NAME="Debian GNU/Linux"
VERSION_ID="8"
VERSION="8 (jessie)"
ID=debian
HOME_URL="http://www.debian.org/"
SUPPORT_URL="http://www.debian.org/support"
BUG_REPORT_URL="https://bugs.debian.org/"


Once we know what kind of Linux distribution we're dealing with, we can proceed with looking up for standard location of Apache config:

2. Apache config file location for Fedora / CentOS / RHEL and other RPM based distributions

RHEL / Red Hat / CentOS / Fedora Linux Apache access file location
 

/var/log/httpd/access_log


3. Apache config file location for Debian / Ubuntu and other deb based Linux distributions

Debian / Ubuntu Linux Apache access log file location

/var/log/apache2/access.log


4. Apache config file location for FreeBSD

FreeBSD Apache access log file location –

/var/log/httpd-access.log


5. Finding custom Apache access log locations
 

If for some reason the system administrator on the remote server changed default path for each of distributions, you can find custom configured log files through:

a) On Debian / Ubuntu / deb distros:

debian:~# grep CustomLog /etc/apache2/apache2.conf


b) On CentOS / RHEL / Fedora Linux RPM based ones:

[root@centos:  ~]# grep CustomLog /etc/httpd/conf/httpd.conf


c) On FreeBSD OS


freebsd# grep CustomLog /etc/httpd/conf/httpd.conf
 # a CustomLog directive (see below).
    #CustomLog "/var/log/httpd-access.log" common
    CustomLog "/var/log/httpd-access.log" combined

How to enable Gravis UltraSound in DOSBox for enhanced music experience in DOS programs and Games

Tuesday, October 31st, 2017

DOSBox

Gravis UltraSound Classic


Gravis UltraSound

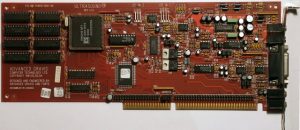
Gravis UltraSound or GUS is a sound card for the IBM PC compatible systems.
It was lunched in 1992 and is notable for it's ability to use real-world sound recordings (wavetable) of a musical instruments rather than artificial computer-generated waveforms.
As one of my friends used to say back then: "it sounds like a CD".

To enable GUS in DOSBox all you need to do is:

1. Download the archive with the GUS files from https://alex.www.pc-freak.net/files/GUS/ULTRASND.zip. Extract the archive (there is already a directory in it so you don't have to create one) preferably where you keep your DOSBox stuff (like Games).

2. Find your DOSBox config file. Depending on the version or host OS, the dosbox conf file is located either inside the user profile folder or inside the same folder as dosbox.exe. In Windows 7 the config file is located at

"C:\Users\Fred\AppData\Local\VirtualStore\Program Files (x86)\dosbox.conf"

where "Fred" is your username.

In GNU/Linux it's in "/home/Fred/.dosbox/dosbox.conf" where "Fred" is your username.

The name of the conf file may also have dosbox version (for example –

"dosbox-0.74.conf").

Open it with a text editor like notepad (Windows) or equvalent for GNU/Linux (vi, Kate, gedit…). Locate "[gus]" section (without the quotes) and edit it so it looks like this:

[gus]
#      gus: Enable the Gravis Ultrasound emulation.
#  gusrate: Sample rate of Ultrasound emulation.
#           Possible values: 44100, 48000, 32000, 22050, 16000, 11025, 8000, 49716.
#  gusbase: The IO base address of the Gravis Ultrasound.
#           Possible values: 240, 220, 260, 280, 2a0, 2c0, 2e0, 300.
#   gusirq: The IRQ number of the Gravis Ultrasound.
#           Possible values: 5, 3, 7, 9, 10, 11, 12.
#   gusdma: The DMA channel of the Gravis Ultrasound.
#           Possible values: 3, 0, 1, 5, 6, 7.
# ultradir: Path to Ultrasound directory. In this directory
#           there should be a MIDI directory that contains
#           the patch files for GUS playback. Patch sets used
#           with Timidity should work fine.

gus=true
gusrate=44100
gusbase=240
gusirq=5
gusdma=3
ultradir=C:\ULTRASND

Then save the dosbox conf file.

3. Start DOSBox and mount "ULTRASND" directory to "C:".

You can do that with

mount c (directory to ULTRASND)

For example if you have extracted the archive in "C:\Games" it has created "C:\Games\ULTRASND" and the command you will have to write in DOSBox is

mount c c:\Games

(example: if your game is in "C:\Games\Heroes2" and your GUS directory is "C:\Games\ULTRSND" (if you have extracted the archive "C:\Games\") then you "mount c c:\Games" and you are set)

or for GNU/Linux if you have extracted the archive in "/home/Fred/Games" it has created "/home/Fred/Games/ULTRASND" and the command you will have to write in DOSBox is

mount c /home/Fred/Games (where "Fred" is your user name).

(example: if your game is in "/home/Fred/Games/Heroes2" and your GUS directory is "/home/Fred/Games/ULTRSND" (if you have extracted the archive" /home/Fred/Games/") in  then you "mount c /home/Fred/Games" and you are set)

You can make this automatic so you don't have to write it everytime by adding this command in the end (bottom) part of your dosbox conf file and save it.

You're practicly ready. All you need to do now is set Gravis UltraSound in your game or application setup (for example with the file "setup.exe") with IO: 240, IRQ 5 and DMA 3. If you prefer you previous sound card you can do that by selecting it again from the setup without disabling GUS from the dosbox conf file.

Happy listening!

Gravis Ultrasound


Article written by Alex

xorg on Toshiba Satellite L40 14B with Intel GM965 video hangs up after boot and the worst fix ever / How to reinstall Ubuntu by keeping the old personal data and programs

Wednesday, April 27th, 2011

black screen ubuntu troubles

I have updated Ubuntu version 9.04 (Jaunty) to 9.10 and followed the my previous post update ubuntu from 9.04 to Latest Ubuntu

I expected that a step by step upgrade from a release to release will work like a charm and though it does on many notebooks it doesn't on Toshiba Satellite L40

The update itself went fine, whether I used the update-manager -d and followed the above pointed tutorial, however after a system restart the PC failed to boot the X server properly, a completely blank screen with blinking cursor appeared and that was all.

I restarted the system into the 2.6.35-28-generic kernel rescue-mode recovery kernel in order to be able to enter into physical console.

Logically the first thing I did is to check /var/log/messages and /var/log/Xorg.0.log but I couldn't find nothing unusual or wrong there.

I suspected something might be wrong with /etc/X11/xorg.conf so I deleted it:

ubuntu:~# rm -f /etc/X11/xorg.conf

and attempted to re-create the xorg.conf X configuration with command:

ubuntu:~# dpkg-reconfigure xserver-xorg

This command was reported to be the usual way to reconfigure the X server settings from console, but in my case (for unknown reasons) it did nothing.

Next the command which was able to re-generate the xorg.conf file was:

ubuntu:~# X -configure

The command generates a xorg.conf sample file in /root/xorg.conf.* so I used the conf to put it in /etc/X11/xorg.conf X's default location and restarted in hope that this would fix the non-booting issue.

Very sadly again the black screen of death appeared on the notebook toshiba screen.
I further thought of completely wipe out the xorg.conf in hope that at least it might boot without the conf file but this worked out neither.

I attempted to run the Xserver with a xorg.conf configured to work with vesa as it's well known vesa X server driver is supposed to work on 99% of the video cards, as almost all of them nowdays are compatible with the vesa standard, but guess what in my case vesa worked not!

The only version of X I can boot in was the failsafe X screen mode which is available through the grub's boot menu recovery mode.

Further on I decided to try few xorg.conf which I found online and were reported to work fine with Intel GM965 internal video , and yes this was also unsucessful.

Some of my other futile attempts were: to re-install the xorg server with apt-get, reinstall the xserver-xorg-video-intel driver e.g.:

ubuntu:~# apt-get install --reinstall xserver-xorg xserver-xorg-video-intel

As nothing worked out I was completely pissed off and decided to take an alternative approach which will take a lot of time but at least will probably be succesful, I decided to completely re-install the Ubuntu from a CD after backing up the /home directory and making a list of available packages on the system, so I can further easily run a tiny bash one-liner script to install all the packages which were previously existing on the laptop before the re-install:

Here is how I did it:

First I archived the /home directory:

ubuntu:/# tar -czvf home.tar.gz home/
....

For 12GB of data with some few thousands of files archiving it took about 40 minutes.

The tar spit archive became like 9GB and I hence used sftp to upload it to a remote FTP server as I was missing a flash drive or an external HDD where I can place the just archived data.

Uploading with sftp can be achieved with a command similar to:

sftp user@yourhost.com
Password:
Connected to yourhost.com.
sftp> put home.tar.gz

As a next step to backup in a file the list of all current installed packages, before I can further proceed to boot-up with the Ubuntu Maverich 10.10 CD and prooceed with the fresh install I used command:

for i in $(dpkg -l| awk '{ print $2 }'); do
echo $i; done >> my_current_ubuntu_packages.txt

Once again I used sftp as in above example to upload my_current_update_packages.txt file to my FTP host.

After backing up all the stuff necessery, I restarted the system and booted from the CD-rom with Ubuntu.
The Ubuntu installation as usual is more than a piece of cake and even if you don't have a brain you can succeed with it, so I wouldn't comment on it 😉

Right after the installation I used the sftp client once again to fetch the home.tar.gz and my_current_ubuntu_packages.txt

I placed the home.tar.gz in /home/ and untarred it inside the fresh /home dir:

ubuntu:/home# tar -zxvf home.tar.gz

Eventually the old home directory was located in /home/home so thereon I used Midnight Commander ( the good old mc text file explorer and manager ) to restore the important user files to their respective places.

As a last step I used the my_current_ubuntu_packages.txt in combination with a tiny shell script to install all the listed packages inside the file with command:

ubuntu:~# for i in $(cat my_current_ubuntu_packagespackages.txt); do
apt-get install --yes $i; sleep 1;
done

You will have to stay in front of the computer and manually answer a ncurses interface questions concerning some packages configuration and to be honest this is really annoying and time consuming.

Summing up the overall time I spend with this stupid Toshiba Satellite L40 with the shitty Intel GM965 was 4 days, where each day I tried numerous ways to fix up the X and did my best to get through the blank screen xserver non-bootable issue, without a complete re-install of the old Ubuntu system.
This is a lesson for me that if I stumble such a shitty issues I will straight proceed to the re-install option and not loose my time with non-sense fixes which would never work.

Hope the article might be helpful to somebody else who experience some problems with Linux similar to mine.

After all at least the Ubuntu Maverick 10.10 is really good looking in general from a design perspective.
What really striked me was the placement of the close, minimize and maximize window buttons , it seems in newer Ubuntus the ubuntu guys decided to place the buttons on the left, here is a screenshot:

Left button positioning of navigation Buttons in Ubuntu 10.10

I believe the solution I explain, though very radical and slow is a solution that would always work and hence worthy 😉
Let me hear from you if the article was helpful.

How to get rid of “PHP Warning: PHP Startup: Unable to load dynamic library ‘/usr/lib/php5/20090626/suhosin.so'” on Debian GNU / Linux

Tuesday, October 25th, 2011

PHP-warning-how-to-fix-warnings-and-errors-php-logo

After a recent new Debian Squeeze Apache+PHP server install and moving a website from another server host running on CentOS 5.7 Linux server, some of the PHP scripts running via crontab started displaying the following annoying PHP Warnings :

debian:~# php /home/website/www/cron/update.php

PHP Warning: PHP Startup: Unable to load dynamic library '/usr/lib/php5/20090626/suhosin.so' – /usr/lib/php5/20090626/suhosin.so: cannot open shared object file: No such file or directory in Unknown on line 0

Obviously the error revealed that PHP cli is not happy that, I've previously removes the suhosin php5-suhosin module from the system.
I wouldn't have removed php5-suhosin if sometimes it doesn't produced some odd experiences with the Apache webserver.
To fix the PHP Warning, I used first grep to see, where exactly the suhosin module gets included in debian's php.ini config files. debian:~# cd /etc/php5
debian:/etc/php5# grep -rli suhosin *
apache2/conf.d/suhosin.ini
cgi/conf.d/suhosin.ini
cli/conf.d/suhosin.ini
conf.d/suhosin.ini

Yeah that's right Debian has three php.ini php config files. One for the php cli/usr/bin/php, another for the Apache webserver loaded php library/usr/lib/apache2/modules/libphp5.so and one for Apache's cgi module/usr/lib/apache2/modules/mod_fcgid.so .

I was too lazy to edit all the above found declarations trying to include the suhosin module in PHP, hence I remembered that probably all this obsolete suhosin module declaration are still present because probably the php5-suhosin package is still not purged from the system.

A quick check with dpkg , further strenthened my assumption as the php5-suhosin module was still hanging around as an (rc – remove candidate);

debian:~# dpkg -l |grep -i suhosin
rc php5-suhosin 0.9.32.1-1 advanced protection module for php5

Hence to remove the obsolete package config and directories completely out of the system and hence solve the PHP Warning I used dpkg –purge, like so:

debian:~# dpkg --purge php5-suhosin
(Reading database ... 76048 files and directories currently installed.)
Removing php5-suhosin ...
Purging configuration files for php5-suhosin ...
Processing triggers for libapache2-mod-php5 ...
Reloading web server config: apache2.

Further on to make sure the PHP Warning is solved I did the cron php script another go and it produced no longer errors:

debian:~# php /home/website/www/cron/update.php
debian:~#

Optimizing Linux TCP/IP Networking to increase Linux Servers Performance

Tuesday, April 8th, 2008

optimize-linux-servers-for-network-performance-to-increase-speed-and-decrease-hardware-costs-_tyan-exhibits-hpc-optimized-server-platforms-featuring-intel-xeon-processor-e7-4800-v3-e5-2600-supercomputing-15_full

Some time ago I thought of ways to optimize my Linux Servers network performance.

Even though there are plenty of nice articles on the topic on how to better optimize Linux server performance by tunning up the kernel sysctl (variables).

Many of the articles I found was not structed in enough understandable way so I decided togoogle around and  found few interesting websites which gives a good overview on how one can speed up a bit and decrease overall server loads by simply tuning few basic kernel sysctl variables.

Below article is a product of my research on the topic on how to increase my GNU / Linux servers performance which are mostly running LAMP (Linux / Apache / MySQL / PHP) together with Qmail mail servers.

The article is focusing on Networking as networking is usual bottleneck for performance.
Below are the variables I found useful for optimizing the Linux kernel Network stack.

Implementing the variables might reduce your server load or if not decrease server load times and CPU utilization, they would at lease increase thoroughput so more users will be able to access your servers with (hopefully) less interruptions.
That of course would save you some Hardware costs and raise up your Servers efficiency.

Here are the variables themselves and some good example:
 

# values.net.ipv4.ip_forward = 0 ( Turn off IP Forwarding )

net.ipv4.conf.default.rp_filter = 1

# ( Control Source route verification )
net.ipv4.conf.default.accept_redirects = 0

# ( Disable ICMP redirects )
net.ipv4.conf.all.accept_redirects = 0 ( same as above )
net.ipv4.conf.default.accept_source_route = 0

# ( Disable IP source routing )
net.ipv4.conf.all.accept_source_route = 0
( - || - )net.ipv4.tcp_fin_timeout = 40

# ( Decrease FIN timeout ) - Useful on busy/high load
serversnet.ipv4.tcp_keepalive_time = 4000 ( keepalive tcp timeout )
net.core.rmem_default = 786426 - Receive memory stack size ( a good idea to increase it if your server receives big files )
net.ipv4.tcp_rmem = "4096 87380 4194304"
net.core.wmem_default = 8388608 ( Reserved Memory per connection )
net.core.wmem_max = 8388608
net.core.optmem_max = 40960
( maximum amount of option memory buffers )

# like a homework investigate by yourself what the variables below stand for :)
net.ipv4.tcp_max_tw_buckets = 360000
net.ipv4.tcp_reordering = 5
net.core.hot_list_length = 256
net.core.netdev_max_backlog = 1024


# Below are newly added experimental
#net.core.rmem_max = 16777216
#net.core.wmem_max = 16777216
##kernel.msgmni = 1024
##kernel.sem = 250 256000 32 1024
##vm.swappiness=0
kernel.sched_migration_cost=5000000


Also a good sysctl.conf file which one might want to substitite or use as a skele for some productive server is ready for download here


Even if you can't reap out great CPU reduction benefits from integrating above values or similar ones, your overall LAMP performance to end customers should increase – at some occasions dramatically, at others little bit but still noticable.

If you're unsure on exact kernel variable values to use check yourself what should be the best values that fits you according to your server Hardware – usually this is done by experimenting and reading the kernel documentation as provided for each one of uplisted variables.

Above sysctl.conf is natively created to run on Debian and on other distributions like CentOS, Fedora Slackware some values might either require slight modifications.

Hope this helps and gives you some idea of how network optimization in Linux is usually done. Happy (hacking) tweakening !

rc.local missing in Debian 8 Jessie and Debian 9 Stretch and newer Ubuntu 16, Fedora, CentOS Linux – Why is /etc/rc.local not working and how to make it work again

Monday, September 11th, 2017

rc.local-not-working-solve-fix-linux-startup-with-rc.local-explained-how-to-make-rc.local-working-again-on-newer-linux-distributions

If you have installed a newer version of Debian GNU / Linux such as Debian Jessie or Debian  9 Stretch or Ubuntu 16 Xenial Xerus either on a server or on a personal Desktop laptop and you want tto execute a number of extra commands next to finalization of system boot just like we GNU / Linux users used to do already for the rest 25+ years you will be surprised that /etc/rc.local is no longer available (file is completely missing!!!).

This kind of behaviour (to avoid use of /etc/rc.local and make the file not present by default right after Linux OS install) was evident across many RedHack (Redhat) distributions such as Fedora and CentOS Linux for the last number of releases and the tendency was to also happen in Debian based distros too as it often does, however there was a possibility on this RPM based distros as well as rest of Linux distros to have the /etc/rc.local manually created to work around the missing file.

But NOoooo, the smart new generation GNU / Linux architects with large brains decided to completely wipe out the execution on Linux boot of /etc/rc.local from finalization stage, SMART isn't it??

For instance If you used to eat certain food for the last 25+ years and they suddenly prohibit you to eat it because they say this is not necessery anymore how would you feel?? Crazy isn't it??

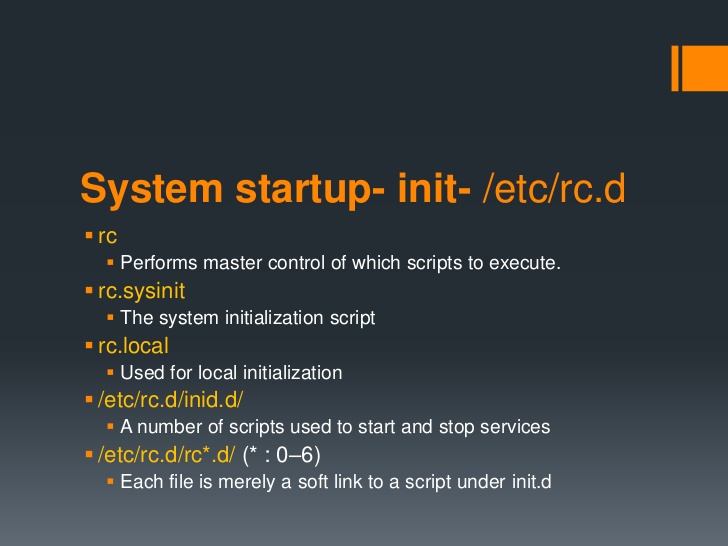
Yes I understand the idea to wipe out /etc/rc.local did have a reason as the developers are striving to constanly improve the boot speed process (and the introduction of systemd (system and service manager) in Debian 8 Jessie over the past years did changed significantly on how Linux boots (earlier used SysV boot and LSB – linux standard based init scripts), but come on guys /etc/rc.local
doesn't stone the boot process with minutes, including it will add just 2, 3 seconds extra to boot runtime, so why on earth did you decided to remove it??

What I really loved about Linux through the years was the high level of consistency and inter-operatibility, most things worked just the same way across distributions and there was some logic upgrade, but lately this kind of behaviour is changing so in many of the new things in both GUI and text mode (console) way to interact with a GNU / Linux PC all becomes messy sadly …

So the smart guys who develop Gnu / Linux distros said its time to depreciate /etc/rc.local to prevent the user to be able to execute his set of finalization commands at the end of each booted multiuser runlevel.

The good news is you can bring back (resurrect) /etc/rc.local really easy:

To so, just execute the following either in Physical /dev/tty Console or in Gnome-Terminal (for GNOME users) or for KDE GUI environment users in KDE's terminal emulator konsole:


cat <<EOF >/etc/rc.local
#!/bin/sh -e
#
# rc.local
#
# This script is executed at the end of each multiuser runlevel.
# Make sure that the script will "exit 0" on success or any other
# value on error.
#
# In order to enable or disable this script just change the execution
# bits.
#
# By default this script does nothing.
exit 0
EOF
chmod +x /etc/rc.local
systemctl start rc-local
systemctl status rc-local


I think above is self-explanatory /etc/rc.local file is being created and then to enable it we run systemctl start rc-local and then to check the just run rc-local service status systemctl status

You will get an output similar to below:


root@jericho:/home/hipo# systemctl start rc-local
root@jericho:/home/hipo# systemctl status rc-local
● rc-local.service – /etc/rc.local Compatibility
   Loaded: loaded (/lib/systemd/system/rc-local.service; static; vendor preset:
  Drop-In: /lib/systemd/system/rc-local.service.d
           └─debian.conf
   Active: active (exited) since Mon 2017-09-11 13:15:35 EEST; 6s ago
  Process: 5008 ExecStart=/etc/rc.local start (code=exited, status=0/SUCCESS)
    Tasks: 0 (limit: 4915)
   CGroup: /system.slice/rc-local.service
sep 11 13:15:35 jericho systemd[1]: Starting /etc/rc.local Compatibility…
setp 11 13:15:35 jericho systemd[1]: Started /etc/rc.local Compatibility.

To test /etc/rc.local is working as expected you can add to print any string on boot, right before exit 0 command in /etc/rc.local

you can add for example:
 

echo "YES, /etc/rc.local IS NOW AGAIN WORKING JUST LIKE IN EARLIER LINUX DISTRIBUTIONS!!! HOORAY !!!!";


On CentOS 7 and Fedora 18 codename (Spherical Cow) or other RPM based Linux distro if /etc/rc.local is missing you can follow very similar procedures to have it enabled, make sure

/etc/rc.d/rc.local

is existing

and /etc/rc.local is properly symlined to /etc/rc.d/rc.local

Also don't forget to check whether /etc/rc.d/rc.local is set to be executable file with ls -al /etc/rc.d/rc.local

If it is not executable, make it be by running cmd:
 

chmod a+x /etc/rc.d/rc.local


If file /etc/rc.d/rc.local happens to be missing just create it with following content:


#!/bin/sh

# Your boot time rc.commands goes somewhere below and above before exit 0

exit 0


That's all folks rc.local not working is solved,
enjoy /etc/rc.local working again 🙂


Converting .crt .cer .der to PEM, converting .PEM to .DER and convert .PFX PKCS#12 (.P12) to .PEM file using OpenSSL

Friday, September 1st, 2017

openssl_check_verify_crt_csr_key_certificate_consistency-with-openssl-command-openssl-logo

These commands allow you to convert certificates and keys to different formats to make them compatible with specific types of servers or software. For example, you can convert a normal PEM file that would work with Apache to a PFX (PKCS#12) file and use it with Tomcat or IIS.

  • Convert a DER file (.crt .cer .der) to PEM


    openssl x509 -inform der -in certificate.cer -out certificate.pem
    
  • Convert a PEM file to DER


    openssl x509 -outform der -in certificate.pem -out certificate.der
    
  • Convert a PKCS#12 file (.pfx .p12) containing a private key and certificates to PEM


    openssl pkcs12 -in keyStore.pfx -out keyStore.pem -nodes


    You can add -nocerts to only output the private key or add -nokeys to only output the certificates.

  • Convert a PEM certificate file and a private key to PKCS#12 (.pfx .p12)


    openssl pkcs12 -export -out certificate.pfx -inkey privateKey.key \
    -in certificate.crt -certfile CACert.crt

Disable Windows hibernate on a work notebook or Desktop Gamers PC – Save a lot of Space on Windows C Drive, delete hidefil.sys howto

Thursday, May 18th, 2017

how-to-to-disable-stop-hibernate-windows-8-10-to-save-disk-space-and-get-rid-of-hbierfil.sys-misteriously-occupying-space-improve-windows-performance

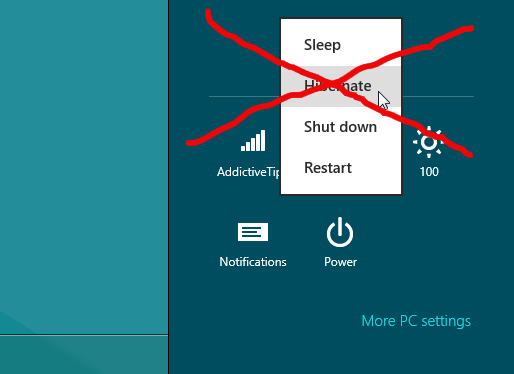
Some Windows  laptop / desktop users prefer not to shutdown computers (especially those coming back from Mac OS backgound) at the end of the day but  hibernate instead.

Hibernate is a great thing but historically we know well that in Windows hibernate is working much worser than on Macs and it is common that after multiple hibernates you will face problems with missing  C: drive space is it might be "misteriously" decreasing in a way that the PC performance degrades as the C:hibfile.sys hidden file occupies few 16Gigas or so (the occupied space by hibfile.sys does resemble the installed RAM Memory on the computer, so if your PC has 16Gigas the hibfile.sys will be lets say approximately 15 Gigabytes)

However most users never use hibernate and might never use it for a life time, especially those on a Desktop Windows PCs, I use Windows as a WorkStation as an employee of DXC (the ex Hewlett Packard or Hewlett Packard Enterprise that merged with CSC) but to be honest I've used hibernate function very raraly on the notebook, thus I find the hibernate more or less useless feature, especially because at many times I try to wake-up the PC after hibernate the computer boots but the display stays dark and I have to restart the Computer before I can go back to normal work operations. Of course my Windows 7 hibernation issues might be caused do to the corporate software installed on my PC or because the fact the hard drive is encrypted but nomatter that in my case and I guess in case of many the hibernate function on Windows 7 / 8 / 10 might be totally useless.


Few works is Hiberfil.sys File and Why you might want to complete disable / delete it


On Windows 7 / 8 / 10 the hiberfil.sys file is being used to store the PC current state at time of hibernation, so if you have to move from a place to place within an organization / university / office without a charger hibernation is a really nice way to save battery power without later wasting time for additional PC boot (where a lot of power is wasted for Operationg System to load and re-opening the opened Browser etc.

So in short sleeping the PC with Hibernate function does cause the Computer to write into C:hiberfil.sys all data at the moment stored in the PC RAM (Memory), which is being cleared up at time of Computer being in Sleep mode.
Once the computer receives a Wake-up call from the hibernation in order to present with the Desktop at the same state hiberfile.sys stored information is being red and transferred to PC flushable RAM so the RAM memory is again filled with same bits it used to have right before the hibernation was made.

Because hiberfil.sys is a system file it has the hidden attribute and it can only be write / read by a Administrator Win account and usually it is not a good idea to touch it

Some people haven't shutdown Windows for 20-30 days and especially if Windows has disabled updates it happens for some users to use the hibernate function for weeks (re-hibernating and waking up thousand times) for long periods so the effect is the hiberfile.sys might become gigantic and if you take the time to check what is file or directory is wasting all your C:> drive with leys say WinDirStat or SpaceSniffer you will notice the lets say 15Gigas being eaten by Hiberfil.sys.

Disable of hibfile.sys is also a great tip for Gamers desktop PCs as most gamers won't use hibernate function at all.

I. How to Disable Hibernate Mode in Windows 10, 8, 7, or Vista


In order to get rid of the file across Windows 7 / 8 / 10

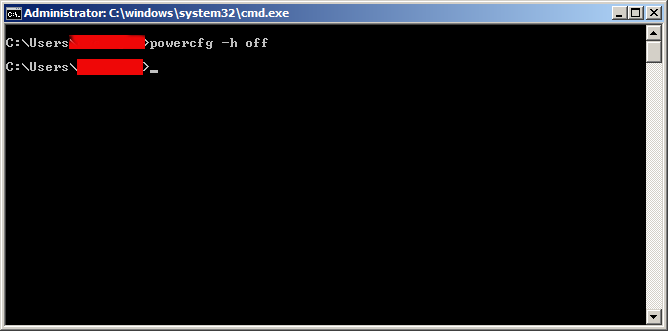
Open command prompt (as an Administartor, right click on the Command Prompt cmd.exe and choose Run as Administartor) and issue below cmd:

disable-hibernate-on-windows-7-8-10-powercfg-off-screenshot

C:> powercfg -h off

If later you decide you need the hibernate function again active on the PC or notebook do issue:

C:> powercfg -h on

You’re likely reading this because you noticed a gigantic hiberfil.sys file sitting on your system drive and you’re wondering if you can get rid of it to free up some space. Here’s what that file is and how you can delete it if you want to.


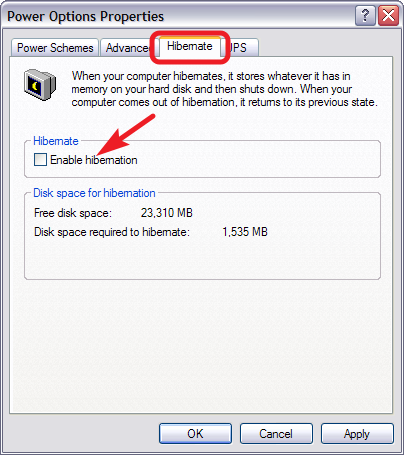
II. Disable Hibernate Mode in Windows XP

Hibernate function command is not present on Windows XP so in order to remove it on XP (hope you don't use XP any more and you're not a viction of the resent crypt catastrophic ransomware WannaCry 🙂

disable-hibernate-mode-windows-xp-screenshot

Control Panel -> Power Options

In the Power Options properties window, switch to the “Hibernate” tab and disable the “Enable hibernation” option.

After you disable hibernate mode, restart PC, and manually delete the hiberfil.sys file.

Now enjoy free-ing up few gigabytes of useless wasted C: hard drive space from your PC 🙂

Note: Removing hiberfil.sys is a precious thing to do on old Windows Computers which have been made with a little leys say 40Gigabyte partition drive C: whether with the time due to User profile use and Browsing caches the C: drive has left with leys say 1-2 Gigabyte of free space and the computers overall performance has fallen twice or so.

This post is in memoriam of Chriss Cornell (our generation used to grow with grunge and his music was one of the often listened by me and our generation)

R.I.P: Chriss Cornell (the head of SoundGarden and AudioSlave who passed away yesterday right on the day when we in Bulgarian Eastern Orthodox Church commemorate the memory of a great-martyr Nicolay Sofijski (Great Martyr Nicolas from Sofia martyred by Turkish Ottomans during year 1555).

I found surprising fact for me  that Chriss Cornell converted to Greek Eastern Orthodox faith under influence of his Greek Wife, below is paste from his Wikipedia page:

"

Chriss Cornell Personal life (Rest in Peace Chris)

Cornell was married to Susan Silver, the manager of Alice in Chains and Soundgarden.[123] They had a daughter, Lillian Jean, born in June 2000.[123] He and Silver divorced in 2004.[123] In December 2008, Cornell reported via his official website that he had finally won back his collection of 15 guitars after a four-year court battle with Silver.[124]

He was married to Vicky Karayiannis,[125] a Paris-based American publicist of Greek heritage. The union produced a daughter, Toni, born in September 2004, and a son, Christopher Nicholas, born in December 2005.[126] Cornell converted to the Greek Orthodox Church through her influence.[127]

When asked how Cornell beat all his addictions he stated, "It was a long period of coming to the realization that this way (sober) is better. Going through rehab, honestly, did help … it got me away from just the daily drudgery of depression and either trying to not drink or do drugs or doing them and you know, they give you such a simple message that any idiot can get and it's just over and over, but the bottom line is really, and this is the part that is scary for everyone, the individual kinda has to want it … not kinda, you have to want it and to not do that crap anymore or you will never stop and it will just kill you."[128]

In a 2011 interview,[129] Cornell said the major change with the reformed Soundgarden is a lack of alcohol: "The biggest difference I noticed … and we haven't even really talked about it: There are no bottles of Jack Daniel's around or beers. And we never talked about … it's just not there."


Enjoy!


Windows: Create quick screenshot and import it to Outlook Email – A great Outlook tip everybody should know

Saturday, October 3rd, 2015

https://www.pc-freak.net/images/make-quick-screenshot-from-your-windows-screen-with-microsoft-outlook-2010-embedded-feature

If you're into a huge company like IBM (no it doesn't stand for I Blame You butInternational Business Machines ) or Hewlett Packard – where using Microsoft Windows mailing is almost mandatory and you have to write tons of mails daily, you will certainly need to do plenty of screenshots.
Screenshotting in MS Windows is a very trivial thing, you press Prt + Scr (Print Screen Button), open Microsoft Paint and paste (CTRL+V) the file into it then Save the file as a lets say JPEG extension. However if you have to do that regularly, each time to create a screenshot you will have to loose a minute or two. Also it is quite annoying to open Paint and
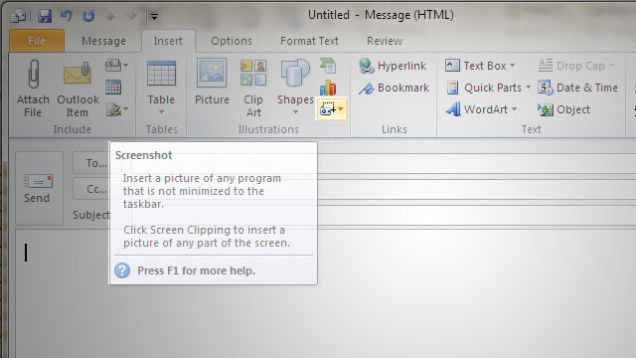
Outlook version 2010 has a very useful feature Take screenshot from any existing opened Window on Windows host.
To make screenshot directly from Outlook mail client. Click the Write new mail Button

New E-mail -> Insert (tab) -> (click Screenshot)
Depending on your ribbon menu setup, this might be a tiny icon—specifically, a little camera icon with a dotted rectangle.
You will be offered to choose along all opened Windows, for the Window from which you would like to have screenshot, choose one and enjoy
If you don't see a window you want to insert, make sure the program isn't minimized to the taskbar.
Alternatively, if you want just a portion of the screen, click on the Screen Clipping button at the bottom of the Screenshot dropdown. This will bring up a crosshair cursor for you to drag around the area of the screen you want to select.
Your selection should then be inserted into your emailscreenshot ready to share with your mates.

Linux: /var/log/wtmp – No such file or directory quick fix and why it might be missing on a server

Thursday, May 4th, 2017

fix-var-log-wtmp-btmp-no-such-file-or-directory-linux_last_command-howto-quick-fix

If you have to occasionally log  into some client old inherited (not installed by you) Linux servers on and just out of curiosity and for security sake dediced do a quick security (last user login) evaluation, e.g. issued the
last command just to find out you get the error:

last: /var/log/wtmp: No such file or directory

Perhaps this file was removed by the operator to prevent logging last info.

Then this might be a sure indicator that some malicious script kiddie (hax0r) activity has been run over the server or the ex-system administrator if fired recently decided to wipe out all his login tracks among with installing some other nasty rootkit or backdoor.

Under some circumstances the error might be caused also by badly written end user rotate script bugs (like shell or perl script) bugs or by a buggy deployment of Linux OS virtual machine.
The last: /var/log/wtmp: No such file or directory error is likely to happen on Ubuntu / Debian / Redhat / CentOS Linux distributions running on a Cloud PaaS service such as Amazon EC2, some of the Cloud services vendors do choose to explicitly remove /var/log/wtmp for the reason that many of end customers are using their Linux VM servers (Xen Virtualization / OpenVZ / LXC – Linux Containers) etc. irresponsibly and hence become a victim of script kiddie attacks and the failed logins attempts logged in /var/log/wtmp grow to many gigabytes.

Even some Linux distributions or system administrators of Linux server login hosts that has to keep tens of thousands of  login records monthly or are concentrating on simplicity and on an attempt to reduce size has purposefully deleted the last login entry file /var/log/wtmp file to save space.

But anyways if you happen to be missing this file always bear in mind that you might have been a victim of intrusion and you better run chkrootkit and rkhunter

Run below commands to fix the missing /var/log/wtmp

touch /var/log/wtmp
chmod 0664 /var/log/wtmp
chown root:utmp /var/log/wtmp

On some Linux distributions such as Ubuntu and Fedora you might also want to create /var/log/btmp (which is used to log failed login attempts to server)

touch /var/log/btmp
chmod 0664 /var/log/btmp
chown root:utmp /var/log/btmp

Once the files are created the last command will start logging server in logins and logouts as it is supposed to be again, e.g.:
 

linux:~# last -15
root pts/0 192.168.0.15 Fri May 5 16:41 still logged in


This article was inspired by a prior article found on root.bg the site is in Bulgarian so unfortunately you might not be able to read it, but as a content and concept it is pretty similar to www.pc-freak.net, actually the site author Nikolay Nikolov (known in Internet Relay Chat IRC under the pseudonym Joni-B, happened to be an old friend from youth geek IT years 🙂

Enjoy