Posts Tagged ‘file’

Install and make Apache + PHP to work with PosgreSQL database server on Debian Linux and set up server Web Posgre interface Pgpadmin howto

Wednesday, June 15th, 2016

make-apache-php-work-with-postgresql-pgsql-and-install-postgresql-db-web-admin-interface

In previous article I've wrote on how to install postgresql on Debian Linux using the deb repository this was necessery to import some PostGres DBs, however this was not enough to run the posgresql php based website aimed as connection from Apache / PHP module to PostGre was failing after a bit of investigation and a check in phpinfo(); I've realized the module PHP module for postgres pgsql.so was missing, here is what I did in order to install it:
 

debian:~# apt-get install php5-pgsql phppgadmin libapache2-mod-auth-pgsql 

PHP sessions enable configuration

As it is common a common problem with PHP applications written to use PostGres is to loose sessions and by default PHP does not have configured sessions.save_path it is a very good practice to directly enable it in /etc/php5/apache2/php.ini open the file in text editor:
 

debian:~# vim /etc/php5/apache2/php.ini


Find the commented directive line:
 

;session.save_path = “/tmp”


and uncomment it, i.e.:
 

session.save_path = “/tmp”


Quit saving vim with the usual :wq!

The 3 modules provides pgsql.so for PHP and mod_auth_pgsql.so for Apache2, the 3rd packae phpgadmin provides a Web administration interface for installed PostgreSQL servers Databases, for those experienced with MySQL Database its the same as PHPMyAdmin.


 Here is quick configuration for use of PostgreAdmin interface:

By default PHPPGADMIN installation process configure the Apache2 server' /etc/phppgadmin/apache.conf  to use  /etc/apache2/conf.d/phppgadmin


Here is the default my server package instaleld  file content:


Alias /phppgadmin /usr/share/phppgadmin

<Directory /usr/share/phppgadmin>

DirectoryIndex index.php
AllowOverride None

order deny,allow
deny from all
allow from 127.0.0.0/255.0.0.0 ::1/128
# allow from all

<IfModule mod_php5.c>
  php_flag magic_quotes_gpc Off
  php_flag track_vars On
  #php_value include_path .
</IfModule>
<IfModule !mod_php5.c>
  <IfModule mod_actions.c>
    <IfModule mod_cgi.c>
      AddType application/x-httpd-php .php
      Action application/x-httpd-php /cgi-bin/php
    </IfModule>
    <IfModule mod_cgid.c>
      AddType application/x-httpd-php .php
      Action application/x-httpd-php /cgi-bin/php
    </IfModule>
  </IfModule>
</IfModule>

</Directory>

It is generally a good practice to change the default Alias location of phppgadmin, so edit the file and change it to something like:
 

Alias /phppostgresgadmin /usr/share/phppgadmin


  • Then phpPgAdmin is available at http://servername.com/phppostgresadmin (only from localhost, however in my case I wanted to be able to access it also from other hosts so allowed PostgresGadmin from every hosts, to do so, I've commented in above config


# allow from 127.0.0.0/255.0.0.0 ::1/128


and uncommented #allow from all line, e.g.:
 

allow from all


Also another thing here is in your VirtualHost whenever you plan to access the PHPPGADMIN is to include in config ( in my case this is the file /etc/apache2/sites-enabled/000-default before (</VirtualHost> end line) following Alias:
 

Alias /phpposgreadmin /usr/share/phppgadmin


Then to access PostGreSQL PHP Admin interface in Firefox / Chrome open URL:


http://your-default-domain.com/phpposgreadmin
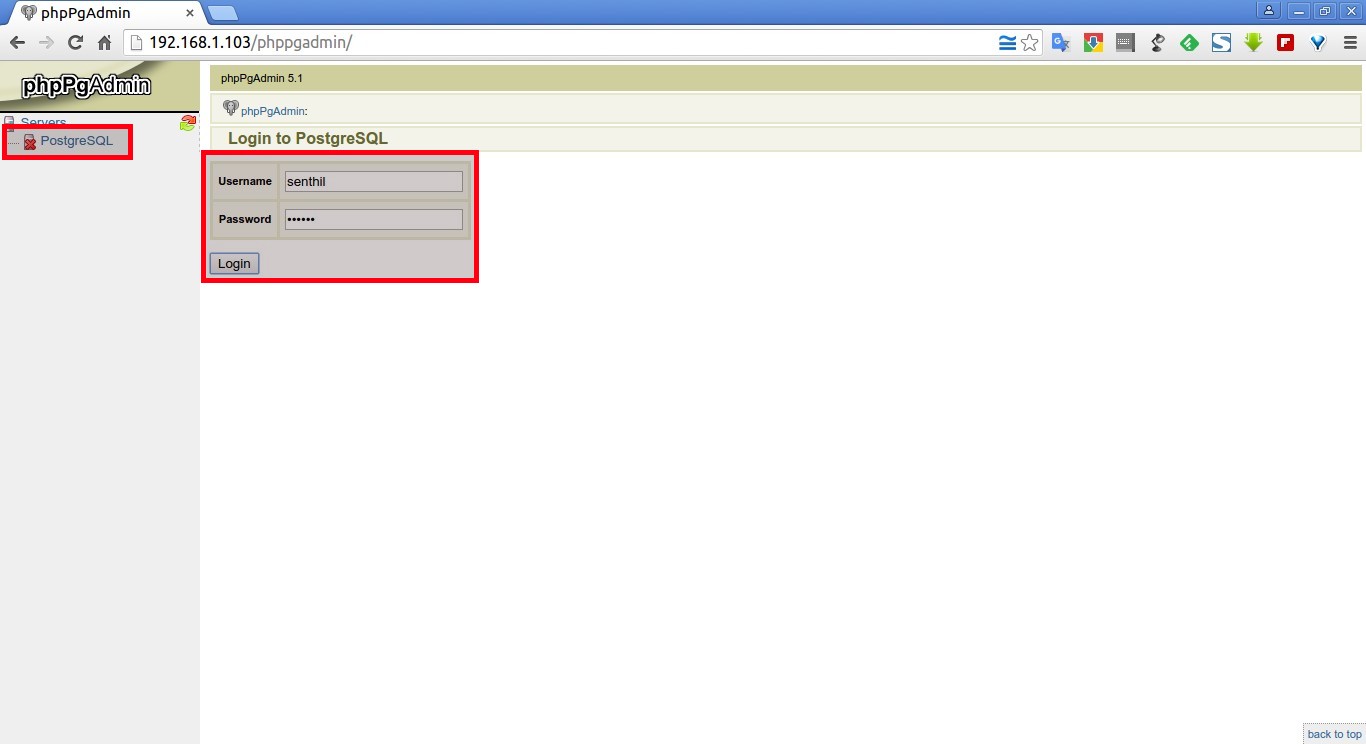
phpPgAdmin-postgresql-php-web-interface-debian-linux-screenshot


Configure access to a remote PostgreSQL Server

With PhpPgAdmin, you can manage many PostgreSQL servers locally (on the localhost) or on remote hosts.

First, you have to make sure that the distant PostgreSQL server can handle your request, that you can connect to it. You can do this by modifying the /etc/postgresql/9.5/main/filepg_hba.conf and adding a line like:

# PhpPgAdmin server access host all db_admin xx.xx.xx.xx 255.255.255.255 md5

Then, you need to add your distant PostgreSQL server into the config file for PhpPgAdmin. This file is  /etc/phppgadmin/config.inc.php the default postgresql port is 5432, however you might have configured it already to use some different port if you're not sure about the port number the postgresql is listening check it out:


debian:~# grep -i port /etc/postgresql/*/main/postgresql.conf
etc/postgresql/9.5/main/postgresql.conf:port = 5433                # (change requires restart)
/etc/postgresql/9.5/main/postgresql.conf:                    # supported by the operating system:
/etc/postgresql/9.5/main/postgresql.conf:# ERROR REPORTING AND LOGGING


To login to phppgadmin interface there is no root administrator user such as in PHP so you will need to priorly create some user and later use it for connection from Postgres Web interface.

To create from console new user in postgres:
 

debian:~# su – postgres
posgres@debian:~$ psql template1
posgres@debian:~$ psql -d template1 -U postgres


Welcome to psql 9.5, the PostgreSQL interactive terminal. Type: \copyright for distribution terms \h for help with SQL commands \? for help on internal slash commands \g or terminate with semicolon to execute query \q to quit template1=#

template1=# CREATE USER MyNewUser WITH PASSWORD 'myPassword';


To add a new database to postgres from shell:

template1=# CREATE DATABASE NewDatabase;
 

template1=# GRANT ALL PRIVILEGES ON DATABASE NewDatabase to MyNewUser;


template1=# q

Last command instructs it to quit if you want to get more info about possible commands do type instead of q ? for general help or for database / table commands only h
If you need to connect to NewDatabase just to test first it works in console before trying it from postgrepgadmin


posgres@debian:~$ psql -d NewDatabase -U MyNewUser
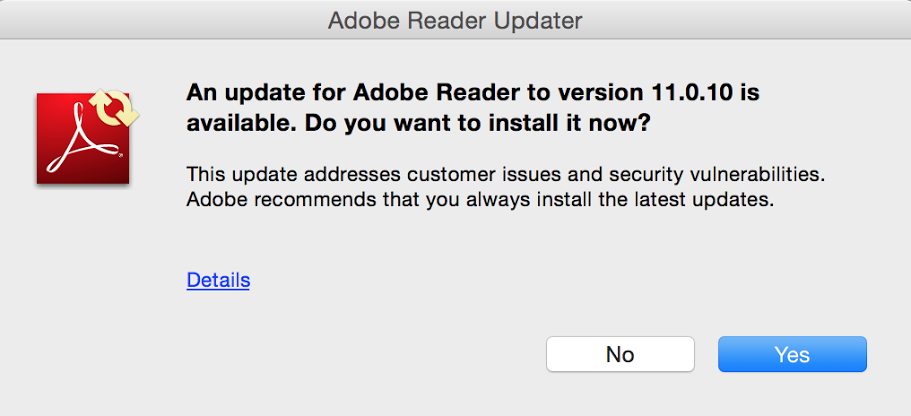


Adobe PDF Reader Mac OS X disable (Automatic) Update annoying prompt popping up every now and then

Wednesday, June 8th, 2016

Adobe-Reader-icon

Generally recent'y I've been more and more convinced the less you update the better. I've recently installed Adobe Reader on the Mac Book Air of Svetlana, cause I still have some illusions some PDFs are visible more clearly with Adobe. And soon I was unpleasently suprised that once installed Adobe automatically added auto-update service to the Mac and an auto-update policy that is popping up all the time with offers to update.

This could get crazy every normal person that prefer to not update software so often. There are not much people I know of that like to be puzzled on every next release about the new functionality he don't need anyways but I guess adobe's company aggressiveness escalated nowadays.

Thanksfully as I've googled quickly I found the fix on the common site for Mac problems Mac OS X Daily here

FlashUpdateNotification_annoying-prompt-how-to-disable

To get rid of the m'f'in Automatic Adobe Reader update


 Launch Terminal (located in /Applications/Utilities/)
* At the command prompt, paste this command exactly

defaults write com.adobe.AdobeUpdater.Admin Disable.Update -bool yes

* Hit return to execute the command 

You will get no output but anyways this nice command will have created for you inside your home directory (/Library/Preferences/) the file Preferences/com.adobe.AdobeUpdater.Admin.plist

You check the file's existence with command:


svetlana@localhost:~$ ls -al ~/Library/Preferences/com.adobe.AdobeUpdater.Admin.plist
-rw——-  1 svetlana  staff  62 Jun  6 19:52 /Users/svetlana/Library/Preferences/com.adobe.AdobeUpdater.Admin.plist


The conent of the file is simple it sets a boolean valiable of Disable.Update to True 


cat ~/Library/Preferences/com.adobe.AdobeUpdater.Admin.plist
bplist00?^Disable.Update


This will guarantee you that rebooting your Mac (which I guess was some 6 months ago or just a simple user logging out will not prompt you with the sh*tty annoying Adobe Update Manager

Windows unable to delete file, file locked unlocking with Unlocker tiny tool

Wednesday, April 13th, 2016

Windows-Unlocker-program-show-what-program-or-software-is-locking-your-file-why-file-cant-be-deleted-file-locked

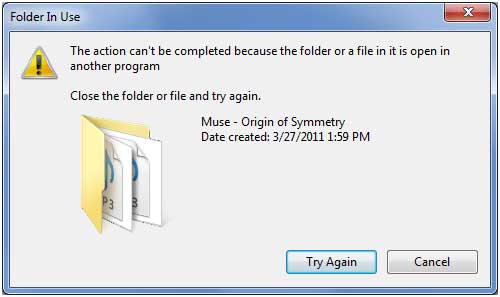
If you want to delete some file on a Windows server or Desktop but you get the a dialog with an error saying:

"This action can't be completed because the folder or a file in it is open in another program"

windows-unable-to-delete-file-file-locked-get-what-is-locking-it-and-unlock-the-file-with-Unlocker-tiny-desktop-graphic-tool-0

Then you need to find out which Program is preventing the file from deletion / locking the file, I've earlier blogged on how to check which process locks file with tasklist or wmic Windows commands

However some users might prefer to not bother with command line check what is locking a file and then killing the Process manually with taskmanager (taskmgr.exe) but do both file unlocking from one single gui interface, that's especially for lazy novice users, gamers and most of Desktop Windows users.

If you're one of those lazy users you will appriace

Unlocker – a useful utility for unlocking files, it will help you figure out which file is using a file what program is using the file you're prevented to delete.
Unlocker is the tool for you if you get any of below error messages, when you try to delete a file:


  • Cannot delete folder: It is being used by another person or program
  • Cannot delete file: Access is denied
  • There has been a sharing violation.
  • The source or destination file may be in use.
  • The file is in use by another program or user.
  • Make sure the disk is not full or write-protected and that the file is not currently in use.
     

windows-unable-to-delete-file-file-locked-get-what-is-locking-it-and-unlock-the-file-with-Unlocker-tiny-desktop-graphic-tool-1

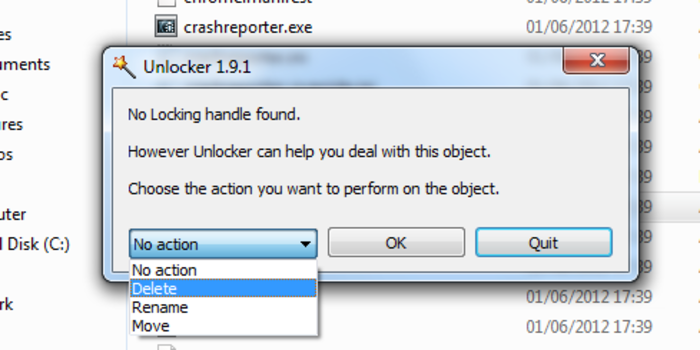
If you stumble unto an locked file once you download and install Unlocker tool and launch the tool ( in case it disappers in future a mirror of Unlocker tool here ).
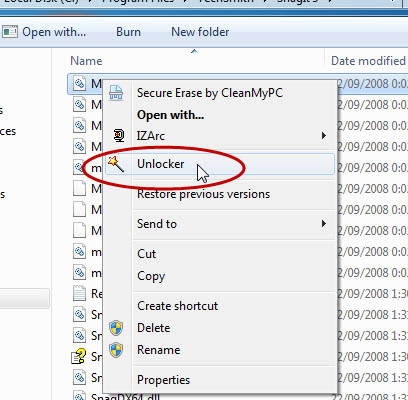
Once installed if you click properties over the file which is refused to be deleted you will get a new menu such as in below screenshot:

NB! Beware while installing Unlocker you might be offered to install a bunch of malware (make sure you deselect it). Also Unlocker's site is made in a way so the Download button could easily be confused with some Google Adsense

unlocker-windows-menu-added-to-properties-options-screenshot

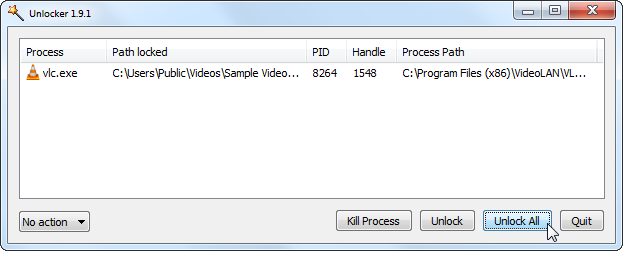
Click on the file that is being locked and choose the Unlocker button, for example if you have a bunch of Videos installed and the video is being locked by VLC clicking on the file you will be shown VLC like in below screenshot


Unlocker-screenshot-locked-file-because-movie-opened-in-VLC

As you see you're shown the Process PID that is being used by the file the full path to the locking program and you have the option to quickly kill the process or unlock the file. Note that at some cases unlocking a file used by some critical program lets say Microsoft Word / Excel or OneNote could cause you a data loss, so before unlocking a file make sure you know what you're doing.

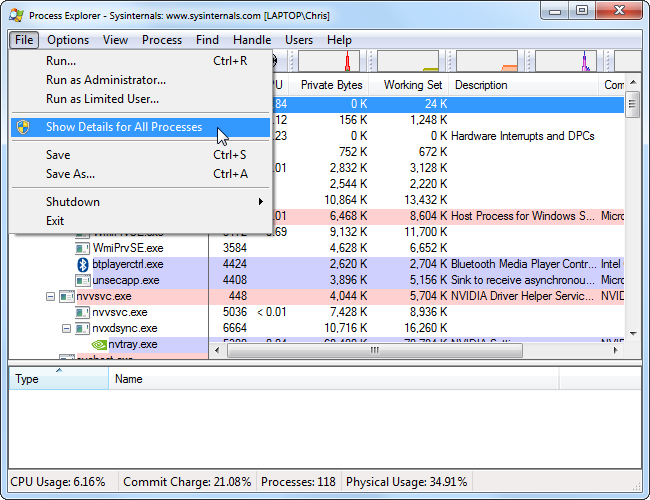
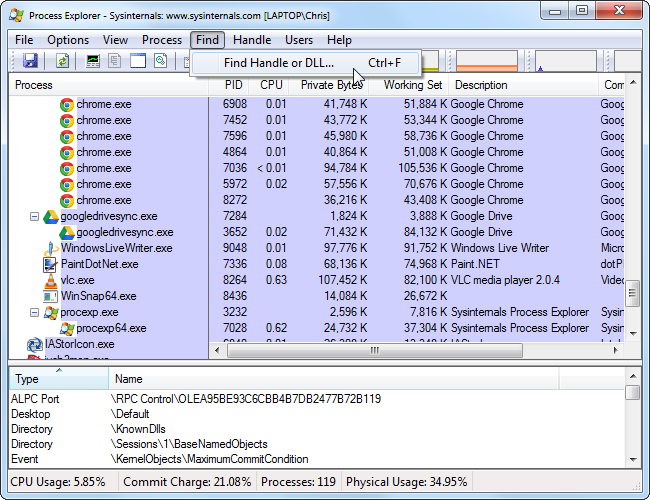
For more advanced users that still prefer GUI to find out what is Locking a file you can also check out Microsoft Process Explorer (advabced task manager) like tool.
If you haven't tried Process Explorer be sure to take a look at it as its a great tool for Win SysAdmins:

Process Explorer is very handy if you want to explore which .DLL (Windows Libraries) are used by a Process / Program

Windows-process-explorer-an-advanced-task-manager-for-windows-and-handy-tool-to-see-what-external-libraries-and-files-a-program-is-using.png

Windows-process-explorer-an-advanced-task-manager-for-windows-and-handy-tool-to-see-what-external-libraries-and-files-a-program-is-using-1


Remove string line from file on Linux and BSD – Delete entire line with string from file

Tuesday, March 15th, 2016

linux-remove-lines-containing-string-with-sed

If you're already used too using grep -v "sometring" filename to print everything from a file without the certain grepped string output and you want to do the same to delete lines based on strings without having to output the grepped string to a file and then overwritting the original file:
 

grep -v 'whatever' filename > filename1
mv filename1 filename


A much better way to delete an whole line containing a string match from a file is to use sed
sed
should be the tool of choice especially if you're scripting because sed is especially made for such batch edittings.

Here is how to do delete an entire line based on a given string:


sed –in-place '/some string to search and delete/d' myfilename


It might be a good idea to also create backups just to make sure something doesn't get deleted incidently to do use:

sed –in-place=.bak '/some string to search and delete/d' myfilename

If you need to wipe out an exact string from all files within a folder you might use a for loop or perl (some good examples check my previous article here)

In short to use bash's for loop here is how to backup and remove all lines with a string match within all files within a Linux directory:


for f in *.txt; do sed –in-place '/some string/d'
"$f"; done
find -name '*.txt' -exec sed –in-place=.bak '/some
string/d' "{}" ';'


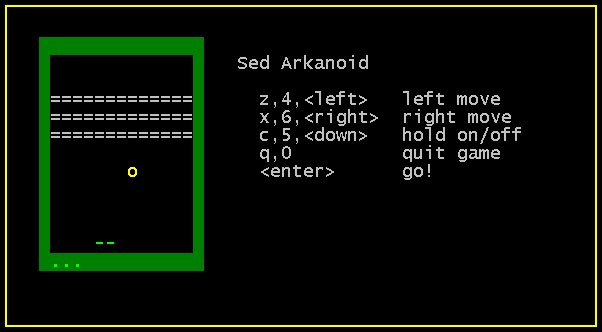
BTW SED is really rich editor and some people got so much into it that there is even a sed written text (console) version of arkanoid 🙂

sed-text-editor-written-arkanoid-game-linux-bsd

If you want to break the ice and get some fun in your boring sysadmin life get sed arkanoid code from here.
I have it installed under pc-freak.net free ASCII Games entertainment service, so if you want to give it a try just login and give a try.

Enjoy 🙂

How to install Winrar on Mac OS X on Console and Graphical Interface – IZIP and Keka Free archivers short review

Friday, February 19th, 2016

howto-install-winrar-free-gui-program-for-mac-osx-notebook-pc

If you're looking for just Mac OS X, console version of rar and unrar then standard WinRar website binaries for Mac should be perfect for you.
If you're an advanced Mac OS X user with UNIX background and you've already installed Mac Ports or Brew – The Missing package manager for Mac OS X
To install WinRar on Mac (with brew) with:
 

macosx# brew install unrar


If you're using MacPorts instead:
 

macosx:/home$ sudo port install unrar


However console version isn't the best choice for my wife which is not a console ninja, so I had to look and install some oher Graphic Interface program 🙂
As I don't like using AppleStore (I can't even properly register for an Apple Store ID,as I'm required to fill in my credit card … )
Hence I looked online on some WinRar dearchiver GUIs and  found IZip which is natively a ZIP archiver but also supports .RAR Archives.
Though IZIp website give the impression IZip is a great tiny prog, once installing the .DMG downloaded from the website and installing into Applications it turned out IZip is currently crashing on the Mac Book Air with Mac OS X 10.8.5Mountain Lion

If you want a simplistic interface program you would probably want to check out UnrarX though I personally didin't liked that one because it is not properly handing UTF-8 and CP-1251 filenames written in Russian, Bulgarian Cyrillic and probably also Chineese, Viatnamese and other exotic language encodings.
After few more minutes of searching I finally got KEKA – The Free  Mac OSX file archiver.

keka_winrar-archive-unarchive-free-program-for-macosx-icon

Though the program Logo is a little scary, Keka turned to be very nice tiny, easy  to install WinRAR GUI interfaced program for Mac OS X and the installation comes to standard download and run of .DMG file and moving it to the Finder Applications.

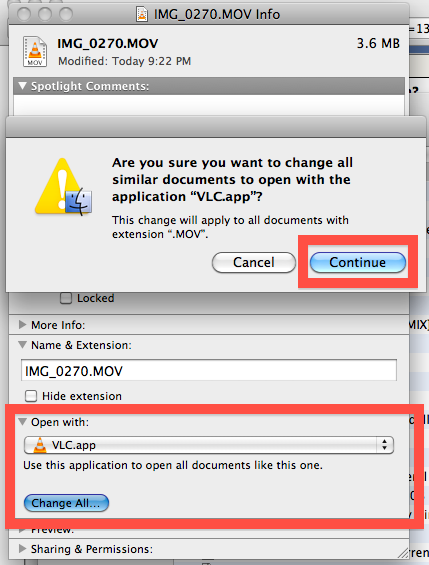
Once installed, if you turn to have a .rar file association issues (by default in my case) files were opened with VLC. To change the file type association of a certain file on the Mac I've had to press Command (button) + I over the .rar extensioned file, e.g:

  • Command + I
  • Click to expand the “Open with” section within that files info screen
  • From the pull down menu, select the application you want to open this specific file with
  • Close the Get Info window
     

change-mac-file-association-to-rar-kaka-free-winrar-winzip-archive-dearchive-macosx

Howto Fix “sysstat Cannot open /var/log/sysstat/sa no such file or directory” on Debian / Ubuntu Linux

Monday, February 15th, 2016

sysstast-no-such-file-or-directory-fix-Debian-Ubuntu-Linux-howto
I really love sysstat and as a console maniac I tend to install it on every server however by default there is some <b>sysstat</b> tuning once installed to make it work, for those unfamiliar with <i>sysstat</i> I warmly recommend to check, it here is in short the package description:<br /><br />
 

server:~# apt-cache show sysstat|grep -i desc -A 15
Description: system performance tools for Linux
 The sysstat package contains the following system performance tools:
  – sar: collects and reports system activity information;
  – iostat: reports CPU utilization and disk I/O statistics;
  – mpstat: reports global and per-processor statistics;
  – pidstat: reports statistics for Linux tasks (processes);
  – sadf: displays data collected by sar in various formats;
  – nfsiostat: reports I/O statistics for network filesystems;
  – cifsiostat: reports I/O statistics for CIFS filesystems.
 .
 The statistics reported by sar deal with I/O transfer rates,
 paging activity, process-related activities, interrupts,
 network activity, memory and swap space utilization, CPU
 utilization, kernel activities and TTY statistics, among
 others. Both UP and SMP machines are fully supported.
Homepage: http://pagesperso-orange.fr/sebastien.godard/


If you happen to install sysstat on a Debian / Ubuntu server with:

server:~# apt-get install –yes sysstat


, and you try to get some statistics with sar command but you get some ugly error output from:


server:~# sar Cannot open /var/log/sysstat/sa20: No such file or directory


And you wonder how to resolve it and to be able to have the server log in text databases periodically the nice sar stats load avarages – %idle, %iowait, %system, %nice, %user, then to FIX that Cannot open /var/log/sysstat/sa20: No such file or directory

You need to:

server:~# vim /etc/default/sysstat


By Default value you will find out sysstat stats it is disabled, e.g.:

ENABLED="false"

Switch the value to "true"

ENABLED="true"


Then restart sysstat init script with:

server:~# /etc/init.d/sysstat restart

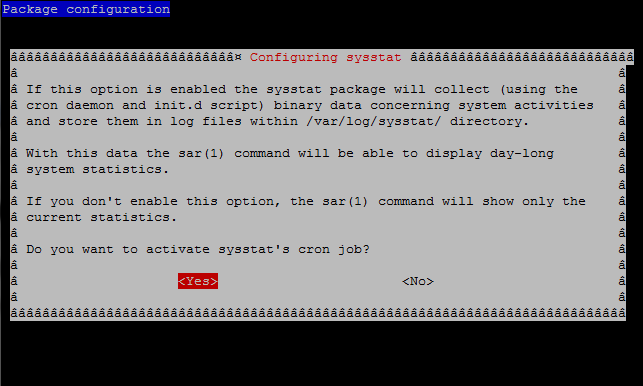
However for those who prefer to do things from menu Ncurses interfaces and are not familiar with Vi Improved, the easiest way is to run dpkg reconfigure of the sysstat:

server:~# dpkg –reconfigure


sysstat-reconfigure-on-gnu-linux


root@server:/# sar
Linux 2.6.32-5-amd64 (pcfreak) 15.02.2016 _x86_64_ (2 CPU)

0,00,01 CPU %user %nice %system %iowait %steal %idle
0,15,01 all 24,32 0,54 3,10 0,62 0,00 71,42
1,15,01 all 18,69 0,53 2,10 0,48 0,00 78,20
10,05,01 all 22,13 0,54 2,81 0,51 0,00 74,01
10,15,01 all 17,14 0,53 2,44 0,40 0,00 79,49
10,25,01 all 24,03 0,63 2,93 0,45 0,00 71,97
10,35,01 all 18,88 0,54 2,44 1,08 0,00 77,07
10,45,01 all 25,60 0,54 3,33 0,74 0,00 69,79
10,55,01 all 36,78 0,78 4,44 0,89 0,00 57,10
16,05,01 all 27,10 0,54 3,43 1,14 0,00 67,79


Well that's it now sysstat error resolved, text reporting stats data works again, Hooray! 🙂

How to Copy large data directories between 2 Linux / Unix servers without direct ssh / ftp access between server1 and server2 other by using SSH, TAR and Unix pipes

Monday, April 27th, 2015

how-to-copy-large-data-directories-between-2-linux-unix-servers-without-direct-ssh-ftp-access-btween-each-other

In a Web application data migration project, I've come across a situation where I have to copy / transfer 500 Gigabytes of data from Linux server 1 (host A) to Linux server 2 (host B). However the two machines doesn't have direct access to each other (via port 22) for security reasons and hence I cannot use sshfs to mount remotely host dir via ssh and copy files like local ones.

As this is a data migration project its however necessery to migrate the data finding a way … Normal way companies do it is to copy the data to External Hard disk storage and send it via some Country Post services or some employee being send in Data center to attach the SAN to new server where data is being migrated However in my case this was not possible so I had to do it different.

I have access to both servers as they're situated in the same Corporate DMZ network and I can thus access both UNIX machines via SSH.

Thanksfully there is a small SSH protocol + TAR archiver and default UNIX pipe's capabilities hack that makes possible to transfer easy multiple (large) files and directories. The only requirement to use this nice trick is to have SSH client installed on the middle host from which you can access via SSH protocol Server1 (from where data is migrated) and Server2 (where data will be migrated).

If the hopping / jump server from which you're allowed to have access to Linux  servers Server1 and Server2 is not Linux and you're missing the SSH client and don't have access on Win host to install anything on it just use portable mobaxterm (as it have Cygwin SSH client embedded )

Here is how:
 

jump-host:~$ ssh server1 "tar czf – /somedir/" | pv | ssh server2 "cd /somedir/; tar xf


As you can see from above command line example an SSH is made to server1  a tar is used to archive the directory / directories containing my hundred of gigabytes and then this is passed to another opened ssh session to server 2  via UNIX Pipe mechanism and then TAR archiver is used second time to unarchive previously passed archived content. pv command which is in the middle is not obligitory though it is a nice way to monitor status about data transfer like below:
 

500GB 0:00:01 [10,5MB/s] [===================================================>] 27%


P.S. If you don't have PV installed install it either with apt-get on Debian:


debian:~# apt-get install –yes pv


Or on CentOS / Fedora / RHEL etc.


[root@centos ~]# yum -y install pv


Below is a small chunk of PV manual to give you better idea of what it does:

NAME
       pv – monitor the progress of data through a pipe

SYNOPSIS
       pv [OPTION] [FILE]…
       pv [-h|-V]

DESCRIPTION
       pv  allows  a  user to see the progress of data through a pipeline, by giving information such as time elapsed, percentage
       completed (with progress bar), current throughput rate, total data transferred, and ETA.

       To use it, insert it in a pipeline between two processes, with the appropriate options.  Its standard input will be passed
       through to its standard output and progress will be shown on standard error.

       pv  will  copy  each  supplied FILE in turn to standard output (- means standard input), or if no FILEs are specified just
       standard input is copied. This is the same behaviour as cat(1).

       A simple example to watch how quickly a file is transferred using nc(1):

              pv file | nc -w 1 somewhere.com 3000

       A similar example, transferring a file from another process and passing the expected size to pv:

              cat file | pv -s 12345 | nc -w 1 somewhere.com 3000


Note that with too big file transfers using PV will delay data transfer because everything will have to pass through another 2 pipes, however for file transfers up to few gigabytes its really nice to include it.

If you only need to transfer huge .tar.gz archive and you don't bother about traffic security (i.e. don't care whether transferred traffic is going through encrypted SSH tunnel and don't want to put an overhead to both systems for encrypting the data and you have some unfiltered ports between host 1 and host 2 you can run netcat on host 2 to listen for connections and forward .tar.gz content via netcat's port like so:
 

linux2:~$ nc -l -p 12345 > /path/destinationfile
linux2:~$ cat /path/sourcfile | nc desti.nation.ip.address 12345


Another way to transfer large data without having connection with server1 and server2 but having connection to a third host PC is to use rsync and good old SSH Tunneling, like so:
 

jump-host:~$ ssh -R 2200:Linux-server1:22 root@Linux-server2 "rsync -e 'ssh -p 2200' –stats –progress -vaz /directory/to/copy root@localhost:/copy/destination/dir"

Adding another level of security to your shared Debian Linux webhosting server with SuPHP

Tuesday, April 7th, 2015

suphp_improve-apache-security-protect-against-virus-internal-server-infections-suphp-webserver-logo

There are plenty of security schemes and strategies you can implement if you're a Shared Web Hosting company sysadmin however probably the most vital one is to install on Apache + PHP Webserver SuPHP module.

# apt-cache show suphp-common|grep -i descrip -A 4

Description: Common files for mod suphp Suphp consists of an Apache module (mod_suphp for either Apache 1.3.x or Apache 2.x) and a setuid root binary (suphp) that is called by the Apache module to change the uid of the process executing the PHP interpreter to the owner of the php script.

So what SuPHP actuall  does is to run separate CPanel / Kloxo etc. Users with separate username and groupid permissions coinciding with the user present in /etc/passwd , /etc/shadow files existing users, thus in case if someone hacks some of the many customer sites he would be able to only write files and directories under the user with which the security breach occured.

On servers where SuPHP is not installed, all  systemusers are using the same UserID / GuID to run PHP executable scripts under separate domains Virtualhost which are coinciding with Apache (on Debian / Ubuntu  uid, gid – www-data) or on (CentOS / RHEL / Fedora etc. – user apache) so once one site is defaced  exploited by a worm all or most server websites might end up infected with a Web Virus / Worm which will be trying to exploit even more sites of a type running silently in the background.  This is very common scenarios as currently there are donezs of PHP / CSS / Javasripts / XSS vulnerability exploited on VPS and Shared hosting servers due to failure of a customer to update his own CMS  scripts / Website  (Joomla, Wordpress, Drupal etc.) and the lack of resource to regularly monitor all customer activities / websites.

Therefore installing SuPHP Apache module is essential one to install on new serverslarge hosting providers as it saves the admin a lot of headache from spreading malware across all hosted servers sites ..
Some VPS admins that are security freaks tend to also install SuPHP module together with many chrooted Apache / LiteSpeed / Nginx webservers each of which running in a separate Jailed environment.

Of course using SuPHP besides giving a improved security layer to the webserver has its downsides such as increased load for the server and making Apache PHP scripts being interpretted a little bit slower than with plain Apache + PHP but performance difference while running a site on top of SuPHP is often not so drastic so you can live it up ..

Installing SuPHP on a Debian / Ubuntu servers is a piece of cake, just run the as root superuser, usual:
 

# apt-get install libapache2-mod-suphp


Once installed only thing to make is to turn off default installed Apache PHP module (without SuPHP compiled support and restart Apache webserver):
 

# a2dismod php5 …

# /etc/init.d/apache2 restart


To test the SuPHP is properly working on the Apache Webserver go into some of many hosted server websites DocumentRoot

And create new file called test_suphp.php with below content:

# vim test_suphp.php
<?php
system('id');
?>

Then open in browser http://whatever-website/test_suphp.php assuming that system(); function is not disabled for security reasons in php.ini you should get an User ID, GroupID bigger than reserved system IDs on GNU / Linux e.g. ID > UID / GID 99

Its also a good idea to take a look into SuPHP configuration file /etc/suphp/suphp.conf and tailor options according to your liking 

If different hosted client users home directories are into /home directory, set in suphp.conf

;Path all scripts have to be in

docroot=/home/


Also usually it is a good idea to set 

umask=0022 

Fix MySQL ibdata file size – ibdata1 file growing too large, preventing ibdata1 from eating all your server disk space

Thursday, April 2nd, 2015

fix-solve-mysql-ibdata-file-size-ibdata1-file-growing-too-large-and-preventing-ibdata1-from-eating-all-your-disk-space-innodb-vs-myisam

If you're a webhosting company hosting dozens of various websites that use MySQL with InnoDB  engine as a backend you've probably already experienced the annoying problem of MySQL's ibdata1 growing too large / eating all server's disk space and triggering disk space low alerts. The ibdata1 file, taking up hundreds of gigabytes is likely to be encountered on virtually all Linux distributions which run default MySQL server <= MySQL 5.6 (with default distro shipped my.cnf). The excremental ibdata1 raise appears usually due to a application software bug on how it queries the database. In theory there are no limitation for ibdata1 except maximum file size limitation set for the filesystem (and there is no limitation option set in my.cnf) meaning it is quite possible that under certain conditions ibdata1 grow over time can happily fill up your server LVM (Storage) drive partitions.

Unfortunately there is no way to shrink the ibdata1 file and only known work around (I found) is to set innodb_file_per_table option in my.cnf to force the MySQL server create separate *.ibd files under datadir (my.cnf variable) for each freshly created InnoDB table.
 

1. Checking size of ibdata1 file

On Debian / Ubuntu and other deb based Linux servers datadir is /var/lib/mysql/ibdata1

server:~# du -hsc /var/lib/mysql/ibdata1
45G     /var/lib/mysql/ibdata1
45G     total


2. Checking info about Databases and Innodb storage Engine

server:~# mysql -u root -p
password:

mysql> SHOW DATABASES;
+——————–+
| Database           |
+——————–+
| information_schema |
| bible              |
| blog               |
| blog-sezoni        |
| blogmonastery      |
| daniel             |
| ezmlm              |
| flash-games        |


Next step is to get some understanding about how many existing InnoDB tables are present within Database server:


mysql> SELECT COUNT(1) EngineCount,engine FROM information_schema.tables WHERE table_schema NOT IN ('information_schema','performance_schema','mysql') GROUP BY engine;
+————-+——–+
| EngineCount | engine |
+————-+——–+
|         131 | InnoDB |
|           5 | MEMORY |
|         584 | MyISAM |
+————-+——–+
3 rows in set (0.02 sec)

To get some more statistics related to InnoDb variables set on the SQL server:
 

mysqladmin -u root -p'Your-Server-Password' var | grep innodb


Here is also how to find which tables use InnoDb Engine

mysql> SELECT table_schema, table_name
    -> FROM INFORMATION_SCHEMA.TABLES
    -> WHERE engine = 'innodb';

+————–+————————–+
| table_schema | table_name               |
+————–+————————–+
| blog         | wp_blc_filters           |
| blog         | wp_blc_instances         |
| blog         | wp_blc_links             |
| blog         | wp_blc_synch             |
| blog         | wp_likes                 |
| blog         | wp_wpx_logs              |
| blog-sezoni  | wp_likes                 |
| icanga_web   | cronk                    |
| icanga_web   | cronk_category           |
| icanga_web   | cronk_category_cronk     |
| icanga_web   | cronk_principal_category |
| icanga_web   | cronk_principal_cronk    |


3. Check and Stop any Web / Mail / DNS service using MySQL

server:~# ps -efl |grep -E 'apache|nginx|dovecot|bind|radius|postfix'

Below cmd should return empty output, (e.g. Apache / Nginx / Postfix / Radius / Dovecot / DNS etc. services are properly stopped on server).

4. Create Backup dump all MySQL tables with mysqldump

Next step is to create full backup dump of all current MySQL databases (with mysqladmin):

server:~# mysqldump –opt –allow-keywords –add-drop-table –all-databases –events -u root -p > dump.sql
server:~# du -hsc /root/dump.sql
940M    dump.sql
940M    total


If you have free space on an external backup server or remotely mounted attached (NFS or SAN Storage) it is a good idea to make a full binary copy of MySQL data (just in case something wents wrong with above binary dump), copy respective directory depending on the Linux distro and install location of SQL binary files set (in my.cnf).
To check where are MySQL binary stored database data (check in my.cnf):

server:~# grep -i datadir /etc/mysql/my.cnf
datadir         = /var/lib/mysql

If server is CentOS / RHEL Fedora RPM based substitute in above grep cmd line /etc/mysql/my.cnf with /etc/my.cnf

if you're on Debian / Ubuntu:

server:~# /etc/init.d/mysql stop
server:~# cp -rpfv /var/lib/mysql /root/mysql-data-backup

Once above copy completes, DROP all all databases except, mysql, information_schema (which store MySQL existing user / passwords and Access Grants and Host Permissions)

5. Drop All databases except mysql and information_schema

server:~# mysql -u root -p
password:


mysql> SHOW DATABASES;

DROP DATABASE blog;
DROP DATABASE sessions;
DROP DATABASE wordpress;
DROP DATABASE micropcfreak;
DROP DATABASE statusnet;

          etc. etc.

ACHTUNG !!! DON'T execute!DROP database mysql; DROP database information_schema; !!! – cause this might damage your User permissions to databases

6. Stop MySQL server and add innodb_file_per_table and few more settings to prevent ibdata1 to grow infinitely in future

server:~# /etc/init.d/mysql stop

server:~# vim /etc/mysql/my.cnf
[mysqld]
innodb_file_per_table
innodb_flush_method=O_DIRECT
innodb_log_file_size=1G
innodb_buffer_pool_size=4G

Delete files taking up too much space – ibdata1 ib_logfile0 and ib_logfile1

server:~# cd /var/lib/mysql/
server:~#  rm -f ibdata1 ib_logfile0 ib_logfile1
server:~# /etc/init.d/mysql start
server:~# /etc/init.d/mysql stop
server:~# /etc/init.d/mysql start
server:~# ps ax |grep -i mysql


You should get no running MySQL instance (processes), so above ps command should return blank.
 

7. Re-Import previously dumped SQL databases with mysql cli client

server:~# cd /root/
server:~# mysql -u root -p < dump.sql

Hopefully import should went fine, and if no errors experienced new data should be in.

Altearnatively if your database is too big and you want to import it in less time to mitigate SQL downtime, instead import the database with:

server:~# mysql -u root -p
password:
mysql>  SET FOREIGN_KEY_CHECKS=0;
mysql> SOURCE /root/dump.sql;
mysql> SET FOREIGN_KEY_CHECKS=1;


If something goes wrong with the import for some reason, you can always copy over sql binary files from /root/mysql-data-backup/ to /var/lib/mysql/
 

8. Connect to mysql and check whether databases are listable and re-check ibdata file size

Once imported login with mysql cli and check whther databases are there with:

server:~# mysql -u root -p
SHOW DATABASES;

Next lets see what is currently the size of ibdata1, ib_logfile0 and ib_logfile1
 

server:~# du -hsc /var/lib/mysql/{ibdata1,ib_logfile0,ib_logfile1}
19M     /var/lib/mysql/ibdata1
1,1G    /var/lib/mysql/ib_logfile0
1,1G    /var/lib/mysql/ib_logfile1
2,1G    total

Now ibdata1 will grow, but only contain table metadata. Each InnoDB table will exist outside of ibdata1.
To better understand what I mean, lets say you have InnoDB table named blogdb.mytable.
If you go into /var/lib/mysql/blogdb, you will see two files
representing the table:

  •     mytable.frm (Storage Engine Header)
  •     mytable.ibd (Home of Table Data and Table Indexes for blogdb.mytable)

Now construction will be like that for each of MySQL stored databases instead of everything to go to ibdata1.
MySQL 5.6+ admins could relax as innodb_file_per_table is enabled by default in newer SQL releases.


Now to make sure your websites are working take few of the hosted websites URLs that use any of the imported databases and just browse.
In my case ibdata1 was 45GB after clearing it up I managed to save 43 GB of disk space!!!

Enjoy the disk saving! 🙂