Posts Tagged ‘timing’

Monitoring MySQL server queries and debunning performance (slow query) issues with native MySQL commands and with mtop, mytop

Thursday, May 10th, 2012

If you're a Linux server administrator running MySQL server, you need to troubleshoot performance and bottleneck issues with the SQL database every now and then. In this article, I will pinpoint few methods to debug basic issues with MySQL database servers.

1. Troubleshooting MySQL database queries with native SQL commands

a)One way to debug errors and get general statistics is by logging in with mysql cli and check the mysql server status:

# mysql -u root -p
mysql> SHOW STATUS;
+-----------------------------------+------------+
| Variable_name | Value |
+-----------------------------------+------------+
| Aborted_clients | 1132 |
| Aborted_connects | 58 |
| Binlog_cache_disk_use | 185 |
| Binlog_cache_use | 2542 |
| Bytes_received | 115 |
.....
.....
| Com_xa_start | 0 |
| Compression | OFF |
| Connections | 150000 |
| Created_tmp_disk_tables | 0 |
| Created_tmp_files | 221 |
| Created_tmp_tables | 1 |
| Delayed_errors | 0 |
| Delayed_insert_threads | 0 |
| Delayed_writes | 0 |
| Flush_commands | 1 |
.....
.....
| Handler_write | 132 |
| Innodb_page_size | 16384 |
| Innodb_pages_created | 6204 |
| Innodb_pages_read | 8859 |
| Innodb_pages_written | 21931 |
.....
.....
| Slave_running | OFF |
| Slow_launch_threads | 0 |
| Slow_queries | 0 |
| Sort_merge_passes | 0 |
| Sort_range | 0 |
| Sort_rows | 0 |
| Sort_scan | 0 |
| Table_locks_immediate | 4065218 |
| Table_locks_waited | 196 |
| Tc_log_max_pages_used | 0 |
| Tc_log_page_size | 0 |
| Tc_log_page_waits | 0 |
| Threads_cached | 51 |
| Threads_connected | 1 |
| Threads_created | 52 |
| Threads_running | 1 |
| Uptime | 334856 |
+-----------------------------------+------------+
225 rows in set (0.00 sec)

SHOW STATUS; command gives plenty of useful info, however it is not showing the exact list of queries currently processed by the SQL server. Therefore sometimes it is exactly a stucked (slow queries) execution, you need to debug in order to fix a lagging SQL. One way to track this slow queries is via enabling mysql slow-query.log. Anyways enabling the slow-query requires a MySQL server restart and some critical productive database servers are not so easy to restart and the SQL slow queries have to be tracked "on the fly" so to say.
Therefore, to check the exact (slow) queries processed by the SQL server (without restarting it), do
 

mysql> SHOW processlist;
+——+——+—————+——+———+——+————–+——————————————————————————————————+
| Id | User | Host | db | Command | Time | State | Info |
+——+——+—————+——+———+——+————–+——————————————————————————————————+
| 609 | root | localhost | blog | Sleep | 5 | | NULL |
| 1258 | root | localhost | NULL | Sleep | 85 | | NULL |
| 1308 | root | localhost | NULL | Query | 0 | NULL | show processlist |
| 1310 | blog | pcfreak:64033 | blog | Query | 0 | Sending data | SELECT comment_author, comment_author_url, comment_content, comment_post_ID, comment_ID, comment_aut |
+——+——+—————+——+———+——+————–+——————————————————————————————————+
4 rows in set (0.00 sec)
mysql>

SHOW processlist gives a good view on what is happening inside the SQL.

To get more complete information on SQL query threads use the full extra option:

mysql> SHOW full processlist;

This gives pretty full info on running threads, but unfortunately it is annoying to re-run the command again and again – constantly to press UP Arrow + Enter keys.

Hence it is useful to get the same command output, refresh periodically every few seconds. This is possible by running it through the watch command:

debian:~# watch "'show processlist' | mysql -u root -p'secret_password'"

watch will run SHOW processlist every 2 secs (this is default watch refresh time, for other timing use watch -n 1, watch -n 10 etc. etc.

The produced output will be similar to:

Every 2.0s: echo 'show processlist' | mysql -u root -p'secret_password' Thu May 10 17:24:19 2012

Id User Host db Command Time State Info
609 root localhost blog Sleep 3 NULL1258 root localhost NULL Sleep 649 NULL1542 blog pcfreak:64981 blog Query 0 Copying to tmp table \
SELECT p.ID, p.post_title, p.post_content,p.post_excerpt, p.pos
t_date, p.comment_count, count(t_r.o
1543 root localhost NULL Query 0 NULL show processlist

Though this "hack" is one of the possible ways to get some interactivity on what is happening inside SQL server databases and tables table. for administering hundred or thousand SQL servers running dozens of queries per second – monitor their behaviour few times aday using mytop or mtop is times easier.

Though, the names of the two tools are quite similar and I used to think both tools are one and the same, actually they're not but both are suitable for monitoring sql database execution in real time.

As a sys admin, I've used mytop and mtop, on almost each Linux server with MySQL server installed.
Both tools has helped me many times in debugging oddities with sql servers. Therefore my personal view is mytop and mtop should be along with the Linux sysadmin most useful command tools outfit, still I'm sure many administrators still haven't heard about this nice goodies.

1. Installing mytop on Debian, Ubuntu and other deb based GNU / Linux-es

mytop is available for easy install on Debian and across all debian / ubuntu and deb derivative distributions via apt.

Here is info obtained with apt-cache show

debian:~# apt-cache show mytop|grep -i description -A 3
Description: top like query monitor for MySQL
Mytop is a console-based tool for monitoring queries and the performance
of MySQL. It supports version 3.22.x, 3.23.x, 4.x and 5.x servers.
It's written in Perl and support connections using TCP/IP and UNIX sockets.

Installing the tool is done with the trivial:

debian:~# apt-get --yes install mytop
....

mtop used to be available for apt-get-ting in Debian Lenny and prior Debian releases but in Squeeze onwards, only mytop is included (probably due to some licensing incompitabilities with mtop??).

For those curious on how mtop / mytop works – both are perl scripts written to periodically connects to the SQL server and run commands similar to SHOW FULL PROCESSLIST;. Then, the output is parsed and displayed to the user.

Here how mytop running, looks like:
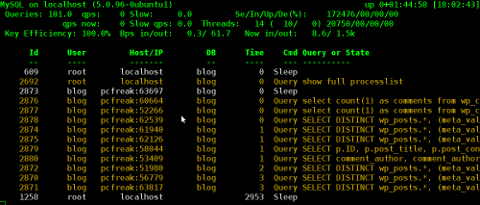
MyTOP showing queries running on Ubuntu 8.04 Linux - Debugging interactively top like MySQL

2. Installing mytop on RHEL and CentOS

By default in RHEL and CentOS and probably other RedHat based Linux-es, there is neither mtop nor mytop available in package repositories. Hence installing the tools on those is only available from 3rd parties. As of time of writting an rpm builds for RHEL and CentOS, as well as (universal rpm distros) src.rpm package is available on http://pkgs.repoforge.org/mytop/. For the sake of preservation – if in future those RPMs disappear, I made a mirror of mytop rpm's here

Mytop rpm builds depend on a package perl(Term::ReadKey), my attempt to install it on CentOS 5.6, returned following err:

[root@cenots ~]# rpm -ivh mytop-1.4-2.el5.rf.noarch.rpm
warning: mytop-1.4-2.el5.rf.noarch.rpm: Header V3 DSA signature: NOKEY, key ID 6b8d79e6
error: Failed dependencies:
perl(Term::ReadKey) is needed by mytop-1.4-2.el5.rf.noarch

The perl(Term::ReadKey package is not available in CentOS 5.6 and (probably other centos releases default repositories so I had to google perl(Term::ReadKey) I found it on http://rpm.pbone.net/ package repository, the exact url to the rpm dependency as of time of writting this post is:

ftp://ftp.pbone.net/mirror/yum.trixbox.org/centos/5/old/perl-Term-ReadKey-2.30-2.rf.i386.rpm

Quickest, way to install it is:

[root@centos ~]# rpm -ivh ftp://ftp.pbone.net/mirror/yum.trixbox.org/centos/5/old/perl-Term-ReadKey-2.30-2.rf.i386.rpmRetrieving ftp://ftp.pbone.net/mirror/yum.trixbox.org/centos/5/old/perl-Term-ReadKey-2.30-2.rf.i386.rpmPreparing... ########################################### [100%]
1:perl-Term-ReadKey ########################################### [100%]

This time mytop, install went fine:

[root@centos ~]# rpm -ivh mytop-1.4-2.el5.rf.noarch.rpm
warning: mytop-1.4-2.el5.rf.noarch.rpm: Header V3 DSA signature: NOKEY, key ID 6b8d79e6
Preparing... ########################################### [100%]
1:mytop ########################################### [100%]

To use it further, it is the usual syntax:

mytop -u username -p 'secret_password' -d database

CentOS Linux MyTOP MySQL query benchmark screenshot - vpopmail query

3. Installing mytop and mtop on FreeBSD and other BSDs

To debug the running SQL queries in a MySQL server running on FreeBSD, one could use both mytop and mtop – both are installable via ports:

a) To install mtop exec:

freebsd# cd /usr/ports/sysutils/mtop
freebsd# make install clean
....

b) To install mytop exec:

freebsd# cd /usr/ports/databases/mytop
freebsd# make install clean
....

I personally prefer to use mtop on FreeBSD, because once run it runs prompts the user to interactively type in the user/pass

freebsd# mtop

Then mtop prompts the user with "interactive" dialog screen to type in user and pass:

Mtop interactive type in username and password screenshot on FreeBSD 7.2

It is pretty annoying, same mtop like syntax don't show user/pass prompt:

freebsd# mytop
Cannot connect to MySQL server. Please check the:

* database you specified "test" (default is "test")
* username you specified "root" (default is "root")
* password you specified "" (default is "")
* hostname you specified "localhost" (default is "localhost")
* port you specified "3306" (default is 3306)
* socket you specified "" (default is "")
The options my be specified on the command-line or in a ~/.mytop
config file. See the manual (perldoc mytop) for details.
Here's the exact error from DBI. It might help you debug:
Unknown database 'test'

The correct syntax to run mytop instead is:

freebsd# mytop -u root -p 'secret_password' -d 'blog'

Or the longer more descriptive:

freebsd# mytop --user root --pass 'secret_password' --database 'blog'

By the way if you take a look at mytop's manual you will notice a tiny error in documentation, where the three options –user, –pass and –database are wrongly said to be used as -user, -pass, -database:

freebsd# mytop -user root -pass 'secret_password' -database 'blog'
Cannot connect to MySQL server. Please check the:

* database you specified "atabase" (default is "test")
* username you specified "ser" (default is "root")
* password you specified "ass" (default is "")
* hostname you specified "localhost" (default is "localhost")
* port you specified "3306" (default is 3306)
* socket you specified "" (default is "")a
...
Access denied for user 'ser'@'localhost' (using password: YES)

Actually it is interesting mytop, precededed historically mtop.
mtop was later written (probably based on mytop), to run on FreeBSD OS by a famous MySQL (IT) spec — Jeremy Zawodny .
Anyone who has to do frequent MySQL administration tasks, should already heard Zawodny's name.
For those who haven't, Jeremy used to be a head database administrators and developer in Yahoo! Inc. some few years ago.
His website contains plenty of interesting thoughts and writtings on MySQL server and database management
 

diskinfo Linux hdparm FreeBSD equivalent command for disk info and benchmarking

Thursday, March 8th, 2012

FreeBSD Linux hdparm equivalent is diskinfo artistic logo

On Linux there is the hdparm tool for various hard disk benchmarking and extraction of hard disk operations info.
As the Linux manual states hdparmget/set SATA/IDE device parameters

Most Linux users should already know it and might wonder if there is hdparm port or equivalent for FreeBSD, the aim of this short post is to shed some light on that.

The typical use of hdparm is like this:

linux:~# hdparm -t /dev/sda8

/dev/sda8:
Timing buffered disk reads: 76 MB in 3.03 seconds = 25.12 MB/sec
linux:~# hdparm -T /dev/sda8
/dev/sda8:
Timing cached reads: 1618 MB in 2.00 seconds = 809.49 MB/sec

The above output here is from my notebook Lenovo R61i.
If you're looking for alternative command to hdparm you should know in FreeBSD / OpenBSD / NetBSD, there is no exact hdparm equivalent command.
The somehow similar hdparm equivallent command for BSDs (FreeBSD etc.) is:
diskinfo

diskinfo is not so feature rich as linux's hdparm. It is just a simple command to show basic information for hard disk operations without no possibility to tune any hdd I/O and seek operations.
All diskinfo does is to show statistics for a hard drive seek times I/O overheads. The command takes only 3 arguments.

The most basic and classical use of the command is:

freebsd# diskinfo -t /dev/ad0s1a
/dev/ad0s1a
512 # sectorsize
20971520000 # mediasize in bytes (20G)
40960000 # mediasize in sectors
40634 # Cylinders according to firmware.
16 # Heads according to firmware.
63 # Sectors according to firmware.
ad:4JV48BXJs0s0 # Disk ident.

Seek times:
Full stroke: 250 iter in 3.272735 sec = 13.091 msec
Half stroke: 250 iter in 3.507849 sec = 14.031 msec
Quarter stroke: 500 iter in 9.705555 sec = 19.411 msec
Short forward: 400 iter in 2.605652 sec = 6.514 msec
Short backward: 400 iter in 4.333490 sec = 10.834 msec
Seq outer: 2048 iter in 1.150611 sec = 0.562 msec
Seq inner: 2048 iter in 0.215104 sec = 0.105 msec

Transfer rates:
outside: 102400 kbytes in 3.056943 sec = 33498 kbytes/sec
middle: 102400 kbytes in 2.696326 sec = 37978 kbytes/sec
inside: 102400 kbytes in 3.178711 sec = 32214 kbytes/sec

Another common use of diskinfo is to measure hdd I/O command overheads with -c argument:

freebsd# diskinfo -c /dev/ad0s1e
/dev/ad0s1e
512 # sectorsize
39112312320 # mediasize in bytes (36G)
76391235 # mediasize in sectors
75784 # Cylinders according to firmware.
16 # Heads according to firmware.
63 # Sectors according to firmware.
ad:4JV48BXJs0s4 # Disk ident.

I/O command overhead:
time to read 10MB block 1.828021 sec = 0.089 msec/sector
time to read 20480 sectors 4.435214 sec = 0.217 msec/sector
calculated command overhead = 0.127 msec/sector

Above diskinfo output is from my FreeBSD home router.

As you can see, the time to read 10MB block on my hard drive is 1.828021 (which is very high number),
this is a sign the hard disk experience too many read/writes and therefore needs to be shortly replaced with newer faster one.
diskinfo is part of the basis bsd install (bsd world). So it can be used without installing any bsd ports or binary packages.

For the purpose of stress testing hdd, or just some more detailed benchmarking on FreeBSD there are plenty of other tools as well.
Just to name a few:
 

  • rawio – obsolete in FreeBSD 7.x version branch (not available in BSD 7.2 and higher)
  • iozone, iozone21 – Tools to test the speed of sequential I/O to files
  • bonnie++ – benchmark tool capable of performing number of simple fs tests
  • bonnie – predecessor filesystem benchmark tool to bonnie++
  • raidtest – test performance of storage devices
  • mdtest – Software to test metadata performance on filsystems
  • filebench – tool for micro-benchmarking storage subsystems

Linux hdparm allows also changing / setting various hdd ATA and SATA settings. Similarly, to set and change ATA / SATA settings on FreeBSD there is the:

  • ataidle

tool.

As of time of writting ataidle is in port path /usr/ports/sysutils/ataidle/

To check it out install it as usual from the port location:

FreeBSD also has also the spindown port – a small program for handling automated spinning down ofSCSI harddrive
spindown is useful in setting values to SATA drives which has problems with properly controlling HDD power management.

To keep constant track on hard disk operations and preliminary warning in case of failing hard disks on FreeBSD there is also smartd service, just like in Linux.
smartd enables you to to control and monitor storage systems using the Self-Monitoring, Analysisand Reporting Technology System (S.M.A.R.T.) built into most modern ATA and SCSI hard disks.
smartd and smartctl are installable via the port /usr/ports/sysutils/smartmontools.

To install and use smartd, ataidle and spindown run:

freebsd# cd /usr/ports/sysutils/smartmontools
freebsd# make && make install clean
freebsd# cd /usr/ports/sysutils/ataidle/
freebsd# make && make install clean
freebsd# cd /usr/ports/sysutils/spindown/
freebsd# make && make install clean

Check each one's manual for more info.

How to configure NTP server (ntpd) to synchronize server clock over the Internet on FreeBSD

Friday, February 10th, 2012


FreeBSD ntpd logo / How to configure ntpd to synchronize with internet time servers on FreeBSD

On FreeBSD ntpd , ntpdc , ntpdate , ntpq doesn't need to be installed via a specific package like on GNU/Linux as they're part of the FreeBSD world (binary standardly shipped with FreeBSD basis system).

The FreeBSD handbook has a chapter explaining thoroughfully on ntp on FreeBSD ,however for the lazy ones here is a short few steps tutorial on how to install and configure ntpd on bsd :

1. Copy sample ntp.conf file to /etc/

freebsd# cp -rpf /usr/src/etc/ntp.conf /etc/ntp/

No need for any modifications if you don't want to apply some specific restrictions on whom can access the ntpd server. If you update regularly the FreeBSD system with freebsd-update or directly by rebuilding the FreeBSD kernel / world adding restrictions might be not necessery..

If you check /usr/src/etc/ntp.conf you will notice freebsd project people are running their own ntp servers , by default ntpd will use this servers to fetch timing information. The exact server hosts which as of time of writting are used can be seen in ntp.conf and are:

server 0.freebsd.pool.ntp.org iburst maxpoll 9
server 1.freebsd.pool.ntp.org iburst maxpoll 9
server 2.freebsd.pool.ntp.org iburst maxpoll 9

2. Add ntpd daemon to load on system boot via /etc/rc.conf

By default ntpd is disabled on FreeBSD, you can see if it is disabled or enabled by invoking:

freebsd# /etc/rc.d/ntpd rcvar
# ntpd
ntpd_enable=NO

To Enable ntpd to get loaded each time it boots , following 3 lines has to be added in /etc/rc.conf .

ntpdate_enable="YES"
ntpdate_flags="europe.pool.ntp.org"
ntpd_enable="YES"

Quick way to add them is to use echo :

echo 'ntpdate_enable="YES" >> /etc/rc.conf
echo 'ntpdate_flags="europe.pool.ntp.org" >> /etc/rc.conf
echo 'ntpd_enable="YES" >> /etc/rc.conf

Now as the 3 rc.conf vars are set to "YES", the ntpd can be started. Without having this variables in /etc/rc.conf , "/etc/rc.d/ntpd start" will refuse to start ntpd.

3. Start the ntpd service

freebsd# /etc/rc.d/ntpd start
...

One interesting note to make is ntpd can also operate without specifying any config file (/etc/ntp.conf), the only requirement for the server to start is to have a properly set ntpdate server, like lets say (ntpdate_flags="europe.pool.ntp.org")

4. Permit only certain host or localhost to "talk" to the ntpd server

If you want to imply some ntp server restrictions, the configuration directives are same like on Linux:

To allow only a a host inside a local network with IP 192.168.0.2 as well as localhost, to be able to fetch time information via ntpd server put inside /etc/ntp.conf:

restrict 127.0.0.1
restrict 192.168.0.1 mask 255.255.255.0 nomodify notrap

If you want to prohibit ntpd to serve as a Network Time Server, to any other host except localhost, add in /etc/ntp.conf :

restrict default ignore

Allowing and denying certain hosts can be also done on pf (packet filter) or ipfw firewall level, and in my view is easier (and less confusing), than adding restrictions through ntp.conf. Besides that using directly the server firewall to apply restrictions is more secure. If for instance a remote exploit vulnerability is discovered affecting your ntpd server. this will not affect you externally as access to the UDP port 123 will be disabled on a firewall level.
Something good to mention is NTP servers communicate between each other using the UDP source/destination (port 123). Hence if the NTPD server has to be publicly accessible and there is a firewall already implemented, access to source/dest port 123 should be included in the configured firewall …

5. Check if the ntp server is running properly / ntp server query operations

[root@pcfreak /home/hipo]# ps axuww|grep -i ntp
root 15647 0.0 0.2 4672 1848 ?? Ss 2:49PM 0:00.04 /usr/sbin/ntpd -c /etc/ntp.conf -p /var/run/ntpd.pid -f /var/db/ntpd.drift

To query the now running ntpd server as well as set various configuration options "on the fly" (e.g. without need for ntp.conf edits and init script restart), a tool called ntpdc exists. ntpdc tool could be used to connect to localhost running ntpd as well as to connect and manage remotely a ntpd server.
The most basic use of ntpdc is to check (server peers).:
freebsd# ntpdc localhost
ntpdc> peers
remote local st poll reach delay offset disp
===================================================

kgb.comnet.bg 83.228.93.76 2 64 377 0.00282 -0.050575 0.06059
*billing.easy-la 83.228.93.76 2 64 377 0.01068 -0.057400 0.06770
=ns2.novatelbg.n 83.228.93.76 2 64 377 0.01001 -0.055290 0.06058

ntpdc has also a non-interactive interface, handy if there is a need for requests to a ntpd to be scripted. To check ntpd server peers non-interactively:

freebsd# ntpdc -p localhost
===================================================
kgb.comnet.bg 83.228.93.76 2 64 377 0.00284 -0.043157 0.06184
=billing.easy-la 83.228.93.76 2 64 377 0.01059 -0.042648 0.05811
*ns2.novatelbg.n 83.228.93.76 2 64 377 0.00996 -0.041097 0.06094

ntpdc has plenty of other ntpd query options, e.g. :

ntpdc> help
ntpdc commands:
addpeer controlkey fudge keytype quit timeout
addrefclock ctlstats help listpeers readkeys timerstats
addserver debug host loopinfo requestkey traps
addtrap delay hostnames memstats reset trustedkey
authinfo delrestrict ifreload monlist reslist unconfig
broadcast disable ifstats passwd restrict unrestrict
clkbug dmpeers iostats peers showpeer untrustedkey
clockstat enable kerninfo preset sysinfo version
clrtrap exit keyid pstats sysstats

ntpdc is an advanced query tool for ntpd , servers. Another tool exists called ntpq which syntax is almost identical to ntpdc . The main difference between the two is ntpq is a monitoring tool mostly used just for monitoring purposes, where ntpdc can also change plenty of things in the server configuration.

For people who want to learn more on ntpd the man page is a great reading , containing chapters describing thoroughfully exactly how NTPD time servers operate, etc.

How to take a screenshot of a game or Full Screen running program inside GNOME or KDE desktop environment on GNU / Linux and FreeBSD

Thursday, December 15th, 2011

Image Magick logo take screenshot of fullscreen running program with import on Linux / FreeBSD

I’m writting some game reviews and movie reviews, every now and then and therefore being able to capture a fullscreen running program like let’s say mplayer or vlc or some full screen running game is something I really need.

The usual PrtScr button which normally works to prepare screenshots in GNOME or KDE, however is not working if the root window handler is being passed to a different program than the Window Manager and pressing it while inside of many older programs or applicationsdoes not produce a print screen of the current screen.

Anyways I found a hack to this using the good old ImageMagickimport command line screenshotting program.

To take a screenshot of a certain program run from gnome-terminal or konsole using import cmd its possible to use a quick one liner which will take a snapshot of the root Window the started program will use.

Let’s say you want to make a screenshot of the entry screen of the FreeDOOM (DooM 3d shooter classical game arcade free Software Alternative).

Launch gnome-terminal or konsole , xterm , depending on the GUI environment you use and issue the commands:

debian:~$ ( sleep 15; import -window root my_desired_screenshot_name.png ) &
debian:~$ freedoom

The first command will launch import after a sleep of 15 secs and therefore will screenshot the active window which will be at focus after 15 seconds, where the & sign will background it and the second one will launch FreeDooM . You will have to wait for a certain secs and switch to the exact screen you will want to screenshot.
If you want to screenshot some game scene that will appear in 20 minutes change above sleep 15 cmd to be to something like sleep 180
That method can be used for screenshotting any other program running on fullscreen, the method is a bit inflexible as you will have to adjust a timing but it works fine 😉

How to edit, convert, join, split and re-time movie subtitle files on Linux (Fix Subtitles bad timing) / Install subtitle manipulation console tools for Linux

Tuesday, April 19th, 2011

As a Linux user I sometimes face difficulties with watching subtitled, movies. I mostly use Mplayer, Totem or VLC to watch the common video files.
The most common problems I face with subtitles are caused by bad timing, many times the solution to the bad timing issues is very simpleand comes up to changing the default movie player I use MPlayer to VLC or Totem.

However at many occasions trying to watch the movie with different kind of movie player does not help.
In this dark moments I get seriously irritated I am not a regular Windows user, where such kind of problems are almost none as many of the Windows movie player problems does fix bad timing issues automatically.

Luckily there is a work-around to this subtitles timing issues and other mishaps caused by guys who created a Movie subtitle files with a Windows subtitle editor program, subtitles timing, the Linux work-around takes a few more minutes to install a package called Subtitles

The Subtitles text utility is written in Perl and contains two executables subplay and subs .

Subtitles is the Linux subtitle Swiss Army Knife as it is capable of convert, join, split, and re-time of subtitles files

Installing Subtitles tools on Linux is a trivial job and it comes to download and installation of the 2 perl executables.
Here is how:

1. Download Subtitles.tar.gz toolsI have mirrored Linux Subtitles (Subtitles.tar.gz) here originally the binaries are to be found on URL address: http://karasik.eu.org/software/ , issue the commands:

linux:~# cd /usr/local/src
linux:/usr/local/src# wget https://www.pc-freak.net/files/Subtitles.tar.gz
...
2. Unarchive it

linux:/usr/local/src# tar -zxvvf tar -zxvvf Subtitles.tar.gz...
linux:/usr/local/src# cd Subtitles-1.0

3. Compile and install Subtitles system widePitily the Subtitles tools are not currently available as a packages in the repositories of Debian and Ubuntu Linux and thus easy installation without compilation via apt-get is unfortunately not available.

Here is the commands with which to compile and install Subtitles:

linux:/usr/local/src/Subtitles-1.0# perl Makefile.PL
...
linux:/usr/local/src/Subtitles-1.0# make
...
linux:/usr/local/src/Subtitles-1.0# make test
...

All tests successful.Files=1, Tests=17, 1 wallclock secs ( 0.05 usr 0.00 sys + 0.06 cusr 0.01 csys = 0.12 CPU)Result: PASS

linux:/usr/local/src/Subtitles-1.0# make install

Installing /usr/local/share/perl/5.10.1/Subtitles.pm
Installing /usr/local/man/man1/subplay.1p
Installing /usr/local/man/man1/subs.1p
Installing /usr/local/man/man3/Subtitles.3pm
Installing /usr/local/bin/subplay
Installing /usr/local/bin/subs
Appending installation info to /usr/local/lib/perl/5.10.1/perllocal.pod

Now as we have the subs executable installed, Let’s say your movie subtitles displays 5 seconds earlier before the movie scenes (bad timing), all you need to do to adjust your subtitles to show up in correct movie scenes is issue:

hipo@linux:/home/hipo/Movies$ subs -i -b 5 your_movie_subtitle_file_name.sub

now check out the subtitle files once again with your favourite player and the early subtitles display on your movie should be fixed.
Let’s have another scenario, say that your movie file is encoded to display 24 frames per seconds (fps) but the subtitle file is created to display the subtitles for a 25 fps, to solve this situation issue:

hipo@linux:~# subs -i -a 24/25 your_movie_subtitle_file.sub

Another possible scenario where subs command will be a precious asset is if you for example want to merge two subtitle files into one.Let’s say you have subtitles for a movie which are split over in 2 parts and the corresponding subtitles are in 2 different files, but eventually you find a better quality of the movie (DVD quality) in a single file and therefore you need the movie subtitles to be stored in one single file.
In that case to merge the subtitle files from let’s say the files movie_subtitle_file1.sub and movie_subtitle_file2.sub use the command:

subs -z movie_subtitle_file1.sub movie_subtitle_file2.sub

Some few other helpful things you can do with subs on Linux, are for example: splitting a file after a determined period of time, separating overlapped lines, and joining files into a single subtitle.

If you want to remove all the comments of gestures, facial expressions loud laughing etc. which displays usually the annoying (‘[Sneezing]’ or ‘[Music playing]) during the movie screen play, issue:

subs -e 's/[s-]*[.*]s*n*//gs' movie_subtitle_file.sub

Also other interesting Linux tool which is useful if you want to make conversions between subtitle in a (.sub) format to (.srt) format is called sub2srt perl script:

sub2srt’s home page is located on the URL address: http://www.robelix.com/sub2srt/, just to ensure it won’t just disappear with time I have created sub2srt mirror here

The most basic usage of sub2srt linux converting tool is by simply passing input sub and output srt file names like so:

linux:~# ./sub2srt 5rFF-pop.sub 5rFF-pop.srt

sub2srt supports changing of fps rate per second during conversion with the -f option as well as creationg of converted files in dos like end of file (CR+LF) with the –dos option.

Hope this article makes sense. If you find it useful, please drop me a thanks comment 😉