Archive for the ‘Remote System Administration’ Category

Howto Fix “sysstat Cannot open /var/log/sysstat/sa no such file or directory” on Debian / Ubuntu Linux

Monday, February 15th, 2016

sysstast-no-such-file-or-directory-fix-Debian-Ubuntu-Linux-howto
I really love sysstat and as a console maniac I tend to install it on every server however by default there is some <b>sysstat</b> tuning once installed to make it work, for those unfamiliar with <i>sysstat</i> I warmly recommend to check, it here is in short the package description:<br /><br />
 

server:~# apt-cache show sysstat|grep -i desc -A 15
Description: system performance tools for Linux
 The sysstat package contains the following system performance tools:
  – sar: collects and reports system activity information;
  – iostat: reports CPU utilization and disk I/O statistics;
  – mpstat: reports global and per-processor statistics;
  – pidstat: reports statistics for Linux tasks (processes);
  – sadf: displays data collected by sar in various formats;
  – nfsiostat: reports I/O statistics for network filesystems;
  – cifsiostat: reports I/O statistics for CIFS filesystems.
 .
 The statistics reported by sar deal with I/O transfer rates,
 paging activity, process-related activities, interrupts,
 network activity, memory and swap space utilization, CPU
 utilization, kernel activities and TTY statistics, among
 others. Both UP and SMP machines are fully supported.
Homepage: http://pagesperso-orange.fr/sebastien.godard/


If you happen to install sysstat on a Debian / Ubuntu server with:

server:~# apt-get install –yes sysstat


, and you try to get some statistics with sar command but you get some ugly error output from:


server:~# sar Cannot open /var/log/sysstat/sa20: No such file or directory


And you wonder how to resolve it and to be able to have the server log in text databases periodically the nice sar stats load avarages – %idle, %iowait, %system, %nice, %user, then to FIX that Cannot open /var/log/sysstat/sa20: No such file or directory

You need to:

server:~# vim /etc/default/sysstat


By Default value you will find out sysstat stats it is disabled, e.g.:

ENABLED="false"

Switch the value to "true"

ENABLED="true"


Then restart sysstat init script with:

server:~# /etc/init.d/sysstat restart

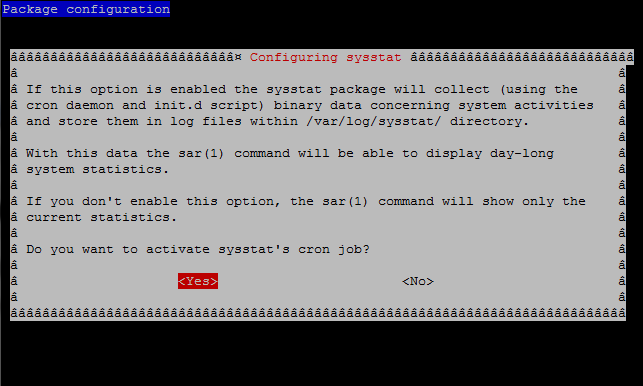
However for those who prefer to do things from menu Ncurses interfaces and are not familiar with Vi Improved, the easiest way is to run dpkg reconfigure of the sysstat:

server:~# dpkg –reconfigure


sysstat-reconfigure-on-gnu-linux


root@server:/# sar
Linux 2.6.32-5-amd64 (pcfreak) 15.02.2016 _x86_64_ (2 CPU)

0,00,01 CPU %user %nice %system %iowait %steal %idle
0,15,01 all 24,32 0,54 3,10 0,62 0,00 71,42
1,15,01 all 18,69 0,53 2,10 0,48 0,00 78,20
10,05,01 all 22,13 0,54 2,81 0,51 0,00 74,01
10,15,01 all 17,14 0,53 2,44 0,40 0,00 79,49
10,25,01 all 24,03 0,63 2,93 0,45 0,00 71,97
10,35,01 all 18,88 0,54 2,44 1,08 0,00 77,07
10,45,01 all 25,60 0,54 3,33 0,74 0,00 69,79
10,55,01 all 36,78 0,78 4,44 0,89 0,00 57,10
16,05,01 all 27,10 0,54 3,43 1,14 0,00 67,79


Well that's it now sysstat error resolved, text reporting stats data works again, Hooray! 🙂

Apache Webserver disable hostnamelookups “HostnameLookups off” for minor performance increase

Friday, February 12th, 2016

apache-disable-dns-lookups-for-speed-hostnamelookups-off-directive-building-scalable-php-applications

If you don't much care about logging in logs from which domain / hostnames requests to webserver originate and you want to boost up the Apache Webserver performance a bit especially on a heavy loaded Websites, where no need for stuff like Webalizer, Awstats etc. , e.g. you're using GoogleAnalytics to already track requests (beware as sometimes GoogleAnalytics could be missing requests to your webserver, so having some kind of LogAnalyzer software on server is always a plus). But anyways accepting that many of us already trust GoogleAnalytitcs.


Then a great tuning option to use in default domain configuration or in multiple VirtualHosts config is:

HostnameLookups off

If you want to make the HostnameLookups off as a default behaviour to all your virtualhosts on  Debian / Ubuntu / CentOS / SuSE / RHEL distro virtualhosts add either to default config /etc/apache2/sites-enabled/000-default (on Deb based Linuxes) or (on RPM based ones), add directive to /etc/httpd/httpd.conf

For self-hosted websites (if run your own small hosting) or for a home situated webservers with up to 20-50 websites it is also a useful optimization tip to include in /etc/hosts file all the IPs of sites with respective domain names following the normal syntax of /etc/hosts, e.g. in my own /etc/hosts, I have stuff like:
 

pcfreak:~$ cat /etc/hosts
127.0.0.1 localhost localhost.localdomain
127.0.1.1 pcfreak.www.pc-freak.net pcfreak mail.www.pc-freak.net
192.168.0.14 new-pcfreak
219.22.88.70 fw
212.36.0.70 ftp.bg.debian.org
212.211.132.32 security.debian.org
83.228.93.76 pcfreak.biz www.pc-freak.net www.pc-freak.net
# for wordpress plugins
216.58.209.3 gstatic.com
91.225.248.129 www.linkedin.com
74.50.119.198 www.blogtopsites.com
94.31.29.40 static.addtoany.com
216.58.209.202 fonts.googleapis.com
216.58.209.14 www.google-analytics.com
216.58.209.14 feeds.feedburner.com
93.184.220.241 wprp.zemanta.com
199.30.80.32 stumbleupon.com
156.154.168.17 stumbleupon.com
2.18.89.251 platform.linkedin.com
# The following lines are desirable for IPv6 capable hosts

# … etc. put IPs and hostnames following above syntax


As you see from above commented section for wordpress plugins, I've included some common websites used by WordPress enabled plugins to prevent my own hosting server to query DNS server every time. The normal way the Linux / Unix works is it first checks in /etc/hosts and only if the hostname is not defined there then it queries the DNS caching server in my case this is a local DJBDNS cache server, however defining the hosts in /etc/hosts saves a lot of milisecons on every request and often if multiple hosts are defined could save (decrease site opening for end users) with seconds.


Well now use some website speed testing plugin like Yslow, Firebug Fiddler or HTTPWatch


How to mount NFS network filesystem to remote server via /etc/fstab on Linux

Friday, January 29th, 2016

mount-nfs-in-linux-via--etc-fstab-howto-mount-remote-partitions-from-application-server-to-storage-server
If you have a server topology part of a project where 3 (A, B, C) servers need to be used to deliver a service (one with application server such as Jboss / Tomcat / Apache, second just as a Storage Server holding a dozens of LVM-ed SSD hard drives and an Oracle database backend to provide data about the project) and you need to access server A (application server) to server B (the Storage "monster") one common solution is to use NFS (Network FileSystem) Mount. 
NFS mount is considered already a bit of obsoleted technology as it is generally considered unsecre, however if SSHFS mount is not required due to initial design decision or because both servers A and B are staying in a serious firewalled (DMZ) dedicated networ then NTS should be a good choice.
Of course to use NFS mount should always be a carefully selected Environment Architect decision so remote NFS mount, imply  that both servers are connected via a high-speed gigabyte network, e.g. network performance is calculated to be enough for application A <-> to network storage B two sides communication not to cause delays for systems end Users.

To test whether the NFS server B mount is possible on the application server A, type something like:


mount -t nfs -o soft,timeo=900,retrans=3,vers=3, proto=tcp remotenfsserver-host:/home/nfs-mount-data /mnt/nfs-mount-point


If the mount is fine to make the mount permanent on application server host A (in case of server reboot), add to /etc/fstab end of file, following:

1.2.3.4:/application/local-application-dir-to-mount /application/remote-application-dir-to-mount nfs   rw,bg,nolock,vers=3,tcp,timeo=600,rsize=32768,wsize=32768,hard,intr 1 2


If the NTFS server has a hostname you can also type hostname instead of above example sample IP 1.2.3.4, this is however not recommended as this might cause in case of DNS or Domain problems.
If you want to mount with hostname (in case if storage server IP is being commonly changed due to auto-selection from a DHCP server):

server-hostA:/application/local-application-dir-to-mount /application/remote-application-dir-to-mount nfs   rw,bg,nolock,vers=3,tcp,timeo=600,rsize=32768,wsize=32768,hard,intr 1 2

In above example you need to have the /application/local-application-dir-to-mount (dir where remote NFS folder will be mounted on server A) as well as the /application/remote-application-dir-to-mount
Also on server Storage B server, you have to have running NFS server with firewall accessibility from server A working.

The timeou=600 (is defined in) order to make the timeout for remote NFS accessibility 1 hour in order to escape mount failures if there is some minutes network failure between server A and server B, the rsize and wsize
should be fine tuned according to the files that are being red from remote NFS server and the network speed between the two in the example are due to environment architecture (e.g. to reflect the type of files that are being transferred by the 2)
and the remote NFS server running version and the Linux kernel versions, these settings are for Linux kernel branch 2.6.18.x which as of time of writting this article is obsolete, so if you want to use the settings check for your kernel version and
NTFS and google and experiment.

Anyways, if you're not sure about wsize and and rise, its perfectly safe to omit these 2 values if you're not familiar to it.

To finally check the NFS mount is fine,  grep it:


# mount|grep -i nfs
sunrpc on /var/lib/nfs/rpc_pipefs type rpc_pipefs (rw)
server-hostA:/application/remote-application-dir-to-mount on /application/remote-application-dir-to-mount type nfs (rw,bg,nolock,nfsvers=3,tcp,timeo=600,rsize=32768,wsize=32768,hard,intr,addr=1.2.3.4)


That's all enjoy 🙂


How to use wget and curl via HTTP Proxy server / How to set a HTTPS proxy server on a bash shell on Linux

Wednesday, January 27th, 2016

linux-ssl-proxy-configuration-from-command-line-with-wget-and-curl-howto

I've been working a bit on a client's automation, the task is to automate process of installations of Apaches / Tomcats / JBoss and Java servers, so me and colleagues don't waste too
much time in trivial things. To complete that I've created a small repository on a Apache with a WebDav server with major versions of each general branch of Application servers and Javas.
In order to access the remote URL where the .tar.gz binaries archives reside, I had to use a proxy serve as the client runs all his network in a DMZ and all Web Port 80 and 443 HTTPS traffic inside the client network
has to pass by the network proxy.

Thus to make the downloads possible via the shell script, writting I needed to set the script to use the HTTPS proxy server. I've been using proxy earlier and I was pretty aware of the http_proxy bash shell
variable thus I tried to use this one for the Secured HTTPS proxy, however the connection was failing and thanks to colleague Anatoliy I realized the whole problem is I'm trying to use http_proxy shell variable
which has to only be used for unencrypted Proxy servers and in this case the proxy server is over SSL encrypted HTTPS protocol so instead the right variable to use is:
 

https_proxy


The https_proxy var syntax, goes like this:

proxy_url='http-proxy-url.net:8080';
export https_proxy="$proxy_url"

how-to-set-https_proxy_url-on-linux-freebsd-openbsd-bsd-and-unix-from-terminal-console

Once the https_proxy variable is set  UNIX's wget non interactive download tool starts using the proxy_url variable set proxy and the downloads in my script works.

Hence to make the different version application archives download work out, I've used wget like so:
 

 wget –no-check-certificate –timeout=5 https://full-path-to-url.net/file.rar


For other BSD / HP-UX / SunOS UNIX Servers where  shells are different from Bourne Again (Bash) Shell, the http_proxy and  https_proxy variable might not be working.
In such cases if you have curl (command line tool) is available instead of wget to script downloads you can use something like:
 

 curl -O -1 -k –proxy http-proxy-url.net:8080 https://full-path-to-url.net/file.rar

The http_proxy and https_proxy variables works perfect also on Mac OS X, default bash shell, so Mac users enjoy.
For some bash users in some kind of firewall hardened environments like in my case, its handy to permanently set a proxy to all shell activities via auto login Linux / *unix scripts .bashrc or .bash_profile that saves the inconvenience to always
set the proxy so lynx and links, elinks text console browsers does work also anytime you login to shell.

Well that's it, my script enjoys proxying traffic 🙂
 

Increase tomcat MaxThreads values to resolve Tomcat timeout issues and sort

Friday, December 11th, 2015

Increase_Tomcat_MaxThreads_values_to_resolve_Tomcat_timeout-issues-and-sort

Thanks God, we have just completed (6 months) Migration few Tomcat and TomEE application servers for PG / PP and Scorpion instances from old environment to a new one for a customer.

Though the separate instances of the old environment are being migrated, the overall design of the Current Mode of Operations (CMO) as they use to call it in corporate World and the Future Mode of Operations (FMO) has differences.

The each of applications on old environment is configured to run in Tomcat failover cluster (2 tomcats on 2 separate machines with unique IP addresses are running) and Apache Reverse Proxy is being used with BalanceMember apache directive in order to drop requests to Tomcat cluster to Tomcat node1 and node2. On the new environment however by design the Tomcat cluster is removed and the application request has to be served by single Tomcat instance.

The migration completed fine and in the beginning in the first day (day 1) and day 2 since the environment went in Production and went through the so-called "GoLive", as called in Corporate World- which is a meathor for launching the application to be used as a production environment for customer, the customer reported TimeOut issues.

Some of the requests according to their report would took up to 4 minutes to serve, after a bit of investigation we found out, that though the environment was moved to one Tomcat the (number) amount of connections to application of end clients did not change, thus the timeouts were caused by default MaxThreads being reached and, we needed to to obviously raise that number. Here is the old Apache RP config where we had the 2 Tomcats between which the RP was load balancing:
 

BalancerMember ajp://10.10.10.5:11010 route=node1 connectiontimeout=10 ttl=60 retry=60
BalancerMember ajp://10.10.10.5:11010 route=node2 connectiontimeout=10 ttl=60 retry=60

ProxyPass / balancer://pool/ stickysession=JSESSIONID
ProxyPassReverse / balancer://pool/


As we needed a work around, we come to conclusion that we just need to increase Timeout on RP first so on Apache Reverse Proxy we placed following httpd.conf Virtualhost ProxyPass (directive) configs :


ProxyPass / ajp://10.10.10.5:11010/ keepalive=On timeout=30 connectiontimeout=30 retry=20
ProxyPassReverse / ajp://10.10.10.5:11010/

ProxyPass / ajp://10.10.10.5:11010/ keepalive=On timeout=30 connectiontimeout=30 retry=20
ProxyPassReverse / ajp://10.10.10.5:11010/


and following Apache Timeout directives options:


Timeout 300
KeepAlive On
MaxKeepAliveRequests 100
KeepAliveTimeout 15


Even though the developer tried to insist that the problem was in Reverse Proxy timeout config, they were wrong as I checked the RP logs and there was no "maximum connections reached" errors..

As you could guess what left to check was only Tomcat, after quick evaluation of server.xml, it turned out that the MaxThreads directive on old clustered Tomcats was omitted at all, meaning the default MaxThreads Tomcat value of 200 maximum connections were used, however this was not enough as the client was quering the application with about 350 connections / sec.

The solution was of course to raise the Maxthreads to 400 we were pretty lucky that we already had a good dedicated Linux machine where the application was hosted (16GB Ram, 2 CPUs x 2.67 Ghz), thus raising MaxThreads to 400 was not such a big deal.

Here is the final config we used to fix tomcat timeouts:
 

<Connector port="11010" address="10.10.10.80" protocol="AJP/1.3" redirectPort="8443" MaxThreads="400" connectionTimeout="300000" keepAliveTimeout="300000" debug="9" />


One note to make here is the debug="9" options to Connector directive was used to increase debug loglevel of Tomcat, and address="" is the local network IP on which Tomcat instance runs. As you see, we choose to use very high connectionTimeouts (because it is crucial, not to cut requests to applications due to timeouts) in case of application slowness.

We also suspected that there are some Oracle (ORA) database queries slowly served on the SQL backend, that might in future cause more app slowness, but this has to be checked seperately further in time as presently we were checking we did not have our Db person present.


No space left on device with free disk space / Why no space left on device while there is plenty of disk space on drive – Running out of Inodes

Tuesday, November 17th, 2015

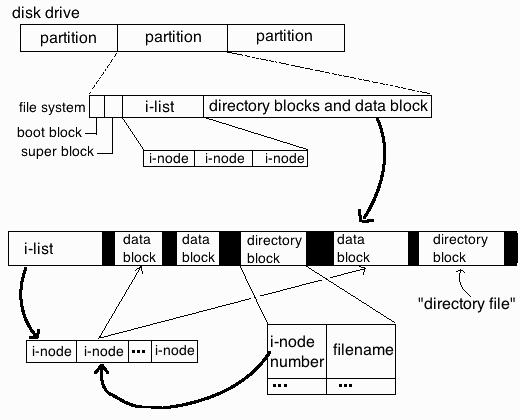
no_space_left-on-device-while-there-is-disk-space-running-out-of-file-inodes-unix_linux_file_system_diagram.gif


On one of the servers, I'm administrating the websites started showing some Mysql database table corrup errors like:


Table './database_name/site_news_list_com' is marked as crashed and last (automatic?) repair failed

The server is using Oracle MySQL server community stable edition on Debian GNU / Linux 6.0, so I first thought during work the server crashed either due to some bug issue in MySQL or it crashed due to some PHP cron job that did something messy. Thus to solve the crashed tables, tried using mysqlcheck tool which helped pretty fine, at many times whether there were database / table corruptions. I've run the following set of mysqlcheck commands with root (superuser) in a bash shell after logging in through SSH:

:

server:~# /usr/bin/mysqlcheck –defaults-extra-file=/etc/mysql/debian.cnf \–check –all-databases -u root -p`grep -i password /root/.my.cnf |sed -e 's#password=##g'`>> /var/log/cronwork.log
server:~# /usr/bin/mysqlcheck –defaults-extra-file=/etc/mysql/debian.cnf –analyze –all-databases -u root -p`grep -i password /root/.my.cnf |sed -e 's#password=##g'`>> /var/log/cronwork.log
server:~# /usr/bin/mysqlcheck –defaults-extra-file=/etc/mysql/debian.cnf \–auto-repair –optimize –all-databases -u root -p`grep -i password /root/.my.cnf |sed -e 's#password=##g'`>> /var/log/cronwork.log
server:~# /usr/bin/mysqlcheck –defaults-extra-file=/etc/mysql/debian.cnf \–optimize –all-databases -u root -p`grep -i password /root/.my.cnf |sed -e 's#password=##g'`>> /var/log/cronwork.log


In order for above commands to work, I've created the /root/.my.cnf containing my root (mysql CLI) mysql username and password, e.g. file has content like below:


[client]
user=root
password=MySecretPassword8821238


Btw a good note here is its generally a good idea (if you want to have consistent mysql databases) to automatically execute via a cron job 2 times a month, I've in root cronjob the following:


crontab -u root -l |grep -i mysqlcheck
04 06 5,10,15,20,25,1 * * /usr/bin/mysqlcheck –defaults-extra-file=/etc/mysql/debian.cnf \–check –all-databases –silent -u root -p`grep -i password /root/.my.cnf |sed -e 's#password=##g'`>> /var/log/cronwork.log 07 06 5,10,15,20,25,1 * * /usr/bin/mysqlcheck –defaults-extra-file=/etc/mysql/debian.cnf –analyze –all-databases –silent -u root -p`grep -i password /root/.my.cnf |sed -e 's#password=##g'`>> /var/log/cronwork.log 12 06 5,10,15,20,25,1 * * /usr/bin/mysqlcheck –defaults-extra-file=/etc/mysql/debian.cnf \–auto-repair –optimize –all-databases –silent -u root -p`grep -i password /root/.my.cnf |sed -e 's#password=##g'`>> /var/log/cronwork.log 17 06 5,10,15,20,25,1 * * /usr/bin/mysqlcheck –defaults-extra-file=/etc/mysql/debian.cnf \–optimize –all-databases –silent -u root -p`grep -i password /root/.my.cnf |sed -e 's#password=##g'`>> /var/log/cronwork.log


Strangely I got a lot of errors that some .MYI / .MYD .frm temp files, necessery for the mysql tables recovery can't be written inside /home/mysql/database_name

That was pretty weird and I thought there might be some issues with permissions, causing the inability to write, due to some bug or something so I went straight and checked /home/mysql/database_name permissions, e.g.::


server:/home/mysql/database_name# ls -ld soccerfame
drwx—— 2 mysql mysql 36864 Nov 17 12:00 soccerfame
server:/home/mysql/database_name# ls -al1|head -n 10
total 1979012
drwx—— 2 mysql mysql 36864 Nov 17 12:00 .
drwx—— 36 mysql mysql 4096 Nov 17 11:12 ..
-rw-rw—- 1 mysql mysql 8712 Nov 17 10:26 1_campaigns_diez.frm
-rw-rw—- 1 mysql mysql 14672 Jul 8 18:57 1_campaigns_diez.MYD
-rw-rw—- 1 mysql mysql 1024 Nov 17 11:38 1_campaigns_diez.MYI
-rw-rw—- 1 mysql mysql 8938 Nov 17 10:26 1_campaigns.frm
-rw-rw—- 1 mysql mysql 8738 Nov 17 10:26 1_campaigns_logs.frm
-rw-rw—- 1 mysql mysql 883404 Nov 16 22:01 1_campaigns_logs.MYD
-rw-rw—- 1 mysql mysql 330752 Nov 17 11:38 1_campaigns_logs.MYI


As seen from above output, all was perfect with permissions, so it should have been something else, so I decided to try to create a random file with touch command inside /home/mysql/database_name directory:


touch /home/mysql/database_name/somefile-to-test-writtability.txt touch: cannot touch ‘/scr1/data/somefile-to-test-writtability.txt‘: No space left on device


Then logically I thought the /home/mysql/ mounted ext4 partition got filled, because of crashed SQL database or a bug thus, checked with disk free command df whether there is enough space on server:

server:~# df -h
Filesystem Size Used Avail Use% Mounted on
/dev/md1 20G 7.6G 11G 42% /
udev 10M 0 10M 0% /dev
tmpfs 13G 1.3G 12G 10% /run
tmpfs 32G 0 32G 0% /dev/shm
tmpfs 5.0M 0 5.0M 0% /run/lock
tmpfs 32G 0 32G 0% /sys/fs/cgroup
/dev/md2 256G 134G 110G 55% /home

Well that's weird? Obviously only 55% of available disk space is used and available 134G which was more than enough so I got totally puzzled why, files can't be written.

Then very logically, I thought it might be that /home directory has remounted as read only, because the SSD memory disk on server is failing and checked for errors in dmesg, i.e.:


server:~# dmesg|grep -i error


Also checked how exactly was partition mounted, to check whether it is (RO) read-only:


server:~# mount -l|grep -i /home
/dev/md2 on /home type ext4 (rw,relatime,discard,data=ordered)


Now everything become even more weirder, as obviously the disk continued to be claiming no space left on device, while in reality there was plenty of disk space.

Then after running a quick research on the internet for the no space left on device with free disk space, I've come across this great superuser.com thread which let me realize the partition run out of inodes and that's why no new file inodes could be assigned and therefore, the linux kernel is refusing to write the file on ext4 partition.

For those who haven't heard of Linux Partition Inodes here is link to Wikipedia and a quick quote:


In a Unix-style file system, the inode is a data structure used to represent a filesystem object, which can be one of various things including a file or a directory. Each inode stores the attributes and disk block location(s) of the filesystem object's data.[1] Filesystem object attributes may include manipulation metadata (e.g. change,[2] access, modify time), as well as owner and permission data (e.g. group-id, user-id, permissions).[3]
Directories are lists of names assigned to inodes. The directory contains an entry for itself, its parent, and each of its children.


Once I understood it is the inodes, I checked how many of them are occupied with cmd:


server:~# df -i /home
Filesystem Inodes IUsed IFree IUse% Mounted on
/dev/md2 17006592 17006592 0 100% /home


You see, there were 0 (zero) free file inodes on server and that was the reason for no space left on device while there was actually free disk space

To clean up (free) some inodes on partition, first thing I did is to delete all old logs which were inside /home and files I positively know not to be necessery, then to find which directories allocating most innodes used:


server:~# find . -xdev -type f | cut -d "/" -f 2 | sort | uniq -c | sort -n


If you're on a regular old fashined IDE Hard Drive and not SSD or you have too much files inside this command will take really long …:

Therefore a better solution might be to frist:

a) Try to find root folders with large inodes count:

for i in /home/*; do echo $i; find $i |wc -l; done
Try to find specific folders:


You should get output like:


/home/new_website
606692
/home/common
73
/home/pcfreak
5661
/home/hipo
33
/home/blog
13570
/home/log
123
/home/lost+found
1

b) Then once you know the directory allocating most inodes, run the command again to see the sub-directories with most files (eating) partition innodes:


for i in /home/webservice/*; do echo $i; find $i |wc -l; done


One usual large folder which could free you some nodes is the linux source headers, but in my case it was simply a lot of tiny old logs being logged on the system for few years in the past without cleaning:

After deleting the log dirs and cache folder in my case /home/new_website/{log,cache}:

server:~# rm -rf /home/new_website/log/*
server:~# rm -rf /home/new_website/cache/*


a) Then, stopping Apache webserver to check prevent Apache to use MySQl databases while running database repair and restaring MySQL:
 

server:~# /etc/init.d/apache2 stop Restarting MySQL server
..
server:~# /etc/init.d/mysql restart
..


b) And re-issuing MySQL Check / Repair / Optimize database commands:


mysqlcheck –defaults-extra-file=/etc/mysql/debian.cnf \–check –all-databases -u root -p`grep -i password /root/.my.cnf |sed -e 's#password=##g'`>> /var/log/cronwork.log

mysqlcheck –defaults-extra-file=/etc/mysql/debian.cnf –analyze –all-databases -u root -p`grep -i password /root/.my.cnf |sed -e 's#password=##g'`>> /var/log/cronwork.log

mysqlcheck –defaults-extra-file=/etc/mysql/debian.cnf \–auto-repair –optimize –all-databases -u root -p`grep -i password /root/.my.cnf |sed -e 's#password=##g'`>> /var/log/cronwork.log

mysqlcheck –defaults-extra-file=/etc/mysql/debian.cnf \–optimize –all-databases -u root -p`grep -i password /root/.my.cnf |sed -e 's#password=##g'`>> /var/log/cronwork.log

c) And finally starting the Apache Webserver again:
 

server:~# /etc/init.d/apache2 start


Some innodse got freed up:
 

server:~# df -i /home Filesystem Inodes IUsed IFree IUse% Mounted on
/dev/md2 17006592 16797196 209396 99% /home


And hooray by God's Grace and with help of prayers of The most Holy Theotokos (Virgin) Mary, websites started again !

How to update macos from terminal / Check and update remotely Mac OS X software from console

Friday, October 23rd, 2015

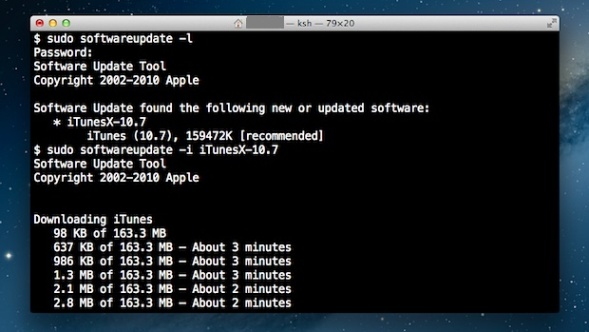
../files/how-to-update-mac-osx-notebook-from-terminalsoftware-update-command-line-mac-screnshot-1

If you happen to have to deal with Mac OS X (Apple) notebook or Desktop PC (Hackintosh) etc. and you’re sysadmin or console freak being pissed off Mac’s GUI App Store update interface and you want to “keep it simple stupid” (KISS) in an Debian Linux like apt-get manner then you can also use Mac’s console application (cli) terminal to do the updates manually from command line with:

softwareupdate

command.

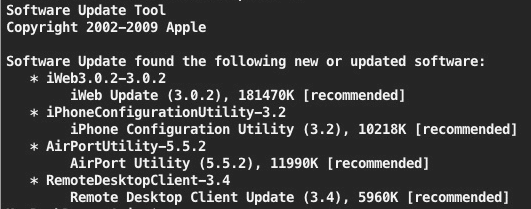
how-to-update-mac-osx-notebook-from-terminalsoftware-update-command-line-mac-screnshot

To get help about softwareupdate pass it on the -h flag:

softwareupdate -h

1. Get a list of available Mac OS updates

Though not a very likely scenario of course before installing it is always a wise thing to see what is being updated to make sure you will not upgrade something that you don’t want to.
This is done with:

softwareupdate -l

However in most cases you can simply skip this step as updating directly every package installed on the Mac with a new version from Apple will not affect your PC.
Anyways it is always a good idea to keep a backup image of your OS before proceeding with updates with let’s say Time Machine Mac OS backup app.

2. Install only recommended Updates from Apple store

softwareupdate -irv


Above will download all updates that are critical and thus a must to have in order to keep Mac OS security adequate.
Translated into Debian / Ubuntu Linux language, the command does pretty much the same as Linux’s:

apt-get –yes update

3. Install All Updates available from AppleStore

To install absolutely all updates provided by Apple’s package repositories run:

softwareupdate -iva

One note to make here is that always when you keep updating make sure your notebook is switched on to electricity grid otherwise if due to battery discharge it shutoffs during update your Mac will crash in a very crappy hard to recover state that might even cost you a complete re-install or a need to bring a PC to a Mac Store technical support guy so beware, you’re warned!

4. Installing all updates except Specific Softwares from Terminal

Often if you have a cracked software or a software whose GUI interface changed too much and you don’t want to upgrade it but an update is offered by Apple repos you can add the -i ingnore option:

softwareupdate -i [update_name(s)]

For example:

softwareupdate -i Safari-version-XXXX

5. View Mac OS Software Update History

The quickest way to see the update history is with System Information app, e.g.:

/Applications/Utilities/System Information.app

Check Windows load avarage command – Get CPU usage from Windows XP / 7 / 8 / 2012 server cmd prompt

Wednesday, August 19th, 2015

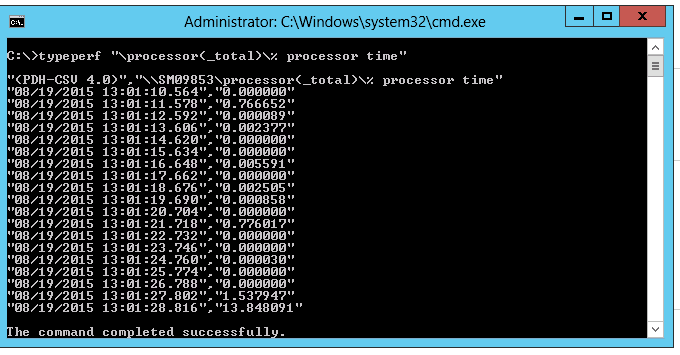
Check_Windows-load-avarage-command-Get_CPU_usage_from_Windows_XP-7-8-2003-2010-2012_server_cmd_prompt

If you used to be a long years Linux / UNIX sysadmin and you suddenly have to also admistrate a bunch of Windows hosts via RDP (Remote Desktop Protocol)  / Teamviewer etc. and you need to document The Load Avarage of a Windows XP / 7 / 8 servers but you're puzzled how to get an overall load avarage of Windows host via command in a UNIX way like with the good old uptime  Linux / BSD command e.g.

 ruth:$ uptime
 11:43  up 713 days 22:44,  1 user,  load average: 0.22, 0.17, 0.15

Then its time to you to get used to WMICWMIC extends WMI for operation from several command-line interfaces and through batch scripts. wmic is a wonderful command for Command addicted Linux guys and gives a lot of opportunities to query and conduct various sysadmin tasks from Windows command prompt.

To get an loadavarage with wmic use:
 

C:\>wmic cpu get loadpercentage
LoadPercentage
1


or
 

@for /f "skip=1" %p in ('wmic cpu get loadpercentage') do @echo %p%
1%
%


on Windows 7 / 8 and 10 as well Windows Server 2010 and Windows Server 2012 for more precise CPU loadavarage results, you can also use:
 

C:\> typeperf "\processor(_total)\% processor time"

"(PDH-CSV 4.0)","\\Win-Host\processor(_total)\% processor time"
"08/19/2015 12:52:53.343","0.002288"
"08/19/2015 12:52:54.357","0.000000"
"08/19/2015 12:52:55.371","0.000000"
"08/19/2015 12:52:56.385","0.000000"
"08/19/2015 12:52:57.399","0.000799"
"08/19/2015 12:52:58.413","0.000000"
"08/19/2015 12:52:59.427","0.000286"
"08/19/2015 12:53:00.441","0.000000"
"08/19/2015 12:53:01.455","0.000000"
"08/19/2015 12:53:02.469","0.008678"
"08/19/2015 12:53:03.483","0.000000"
"08/19/2015 12:53:04.497","0.002830"
"08/19/2015 12:53:05.511","0.000621"
"08/19/2015 12:53:06.525","0.768834"
"08/19/2015 12:53:07.539","0.000000"
"08/19/2015 12:53:08.553","1.538296"


Install simscan on Qmail for better Mail server performance and get around unexisting suid perl in newer Linux Debian / Ubuntu servers

Tuesday, August 18th, 2015

qmail-fixing-clamdscan-errors-and-qq-errors-qmail-binary-migration-few-things-to-check-outclamav_logo-installing-clamav-antivirus-to-scan-periodically-debian-server-websites-for-viruses

I've been stuck with qmail-scanner-queue for a while on each and every new Qmail Mail server installation, I've done, this time it was not different but as time evolves and Qmail and Qmail Scanner Wrapper are not regularly updated it is getting, harder and harder to make a fully functional Qmail on newer Linux server distribution releases.

I know many would argue QMAIL is already obsolete but still I have plenty of old servers running QMAIL whose migration might cause more troubles than just continuing to use QMAIL. Moreover QMAIL once set-upped works like a charm.

I've been recently experiencing severe issues with clamdscan errors and I tried to work around this with compiling and using a suid wrapper, however still the clamdscan errors continued and as qmail-scanner is not actively developed and it is much slower than simscan, I've finally decided to give simscan as a mean to fix the clamdscan errors and thanksfully this worked as a solution.

Here is what I did "rawly" to make simscan work on this install:
 

Make sure simscan is properly installed on Debian Linux 7 or Ubuntu servers and probably (should work) on other Deb based Linuxes by following below steps:
 

a) Configure simscan with following compile time options as root (superuser)

./configure \
–enable-user=qscand \
–enable-clamav \
–enable-clamdscan=/usr/local/bin/clamdscan \
–enable-custom-smtp-reject=y \
–enable-per-domain=y \
–enable-attach=y \
–enable-dropmsg=n \
–enable-spam=y \
–enable-spam-hits=5 \
–enable-spam-passthru=y \
–enable-qmail-queue=/var/qmail/bin/qmail-queue \
–enable-ripmime=/usr/local/bin/ripmime \
–enable-sigtool-path=/usr/local/bin/sigtool \
–enable-received=y


b) Compile it


 make && make install-strip

c) Fix any wrong permissions of simscan queue directory


chmod g+s /var/qmail/simscan/

chown -R qscand:qscand /var/qmail/simscan/
chmod -R 777 simscan/chown -R qscand:qscand simscan/
chown -R qscand:qscand simscan/

d) Add some additional simscan options (how simscan is how to perform scans)

The restart qmail to make mailserver start using simscan instead of qmail-scanner, run below command (again as root):

echo ":clam=yes,spam=yes,spam_hits=8.5,attach=.vbs:.lnk:.scr:.wsh:.hta:.pif" > /var/qmail/control/simcontrol


e) Run /var/qmail/bin/simscanmk in order to convert /var/qmail/control/simcontrol into the /var/qmail/control/simcontrol.cdb database

/var/qmail/bin/simscanmk
/var/qmail/bin/simscanmk -g

f) Modify /service/qmail-smtpd/run to set simscan to be default Antivirus Wrapper Scanner

vim /service/qmail-smtpd/run

I'm using thibs's run script so I've uncommented the line there:

QMAILQUEUE="$VQ/bin/simscan"

Below two lines should stay commented as qmail-scanner is no longer used:

##QMAILQUEUE="$VQ/bin/qmail-scanner-queue"
##QMAILQUEUE="$VQ/bin/qmail-scanner-queue.pl"
export QMAILQUEUE

qmailctl restart
* Stopping qmail-smtpdssl.
* Stopping qmail-smtpd.
* Sending qmail-send SIGTERM and restarting.
* Restarting qmail-smtpd.
* Restarting qmail-smtpdssl.

g) Test whether simscan is properly sending / receiving emails:

echo "Testing Email" >> /tmp/mailtest.txt
env QMAILQUEUE=/var/qmail/bin/simscan SIMSCAN_DEBUG=3 /var/qmail/bin/qmail-inject hipo@my-mailserver.com < /tmp/mailtest.txt

Besides that as I'm using qscand:qscand as a user for my overall Qmail Thibs install I had to also do:

chown -R qscand:qscand /var/qmail/simscan/
chmod -R 777 simscan/
chown -R qscand:qscand simscan/


It might be a good idea to also place that lines in /etc/rc.local to auto change permissions on Linux boot, just in case something wents wrong with permissions.

Yeah, I know 777 is unsecure but without this permissions, I was still getting errors, plus the server doesn't have any accounts except the administrator, so I do not worry other system users might sniff on email 🙂

h) Test whether Qmail mail server send / receives fine with simscan

After that I've used another mail server with mail command to test whether mail is received:
 

mail -s "testing email1234" hipo@new-configured-qmail-server.com
asdfadsf
.
Cc:

Then it is necessery to also install latest clamav daemon from source in my case that's on Debian GNU / Linux 7, because somehow the Debian shipped binary version of clamav 0.98.5+dfsg-0+deb7u2 does fail to scan any incoming or outgoing email with error:
 

clamdscan: corrupt or unknown clamd scanner error or memory/resource/perms problem – exit status -1/72057594037927935

So to fix it you will have to install clamav on Debian Linux from source.


Voilla, that's all finally it worked !

How to delete “Temporary Internet Files”/Content.IE5 with DEL and RD commands on Windows 7 / 8 folder contents – Clean Up Temporary files and folders to speed up and free disk space

Tuesday, February 3rd, 2015

7logo_clean-up-windows-commands-tips-and-tricks-how-to-clean-up-windows-pc-manuallyI
've been called urgently today by miss Jenia Pencheva who is the president of Christian Air Ticket Agency GoodFaithAir, her personal computer caused her quite a lot of headache, I've previously fixed it once and she was happy with that thus when she experienced problems she give me a call for remote IT support :).

She explahed her PC was unable to boot normally and in order to have some Windows she ended in Safe-Mode with Networking state. This problems caused her business losses as during PC in Safe mode the screen resolution even though with networking and she couldn't use the flight ticket ordering systems  to purchase her customers new tickets.  I've earlier installed TeamViewr on her PC so after Logging on the PC, I've immediately realized the Hard Disk was almost full (less than 1Giga free on C: Drive – where Windows install lived)

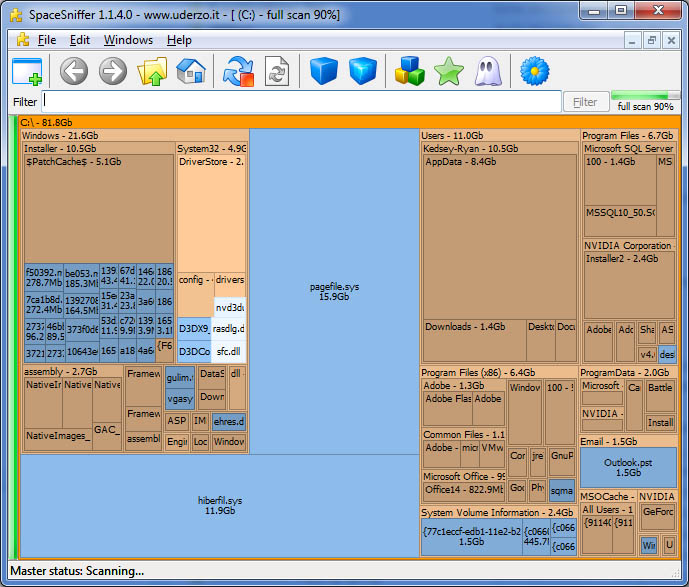
After a thorough investigation on which directory is occupying most of disk space (110GB) with a nice program called SpaceSniffer which is perfect for finding lost space on your hard disks, I've found System for ticket reservation Amadeus CRS (Computer Reservation System) was causing the disk full-full troubles.

spacesniff-visualize-disk-data-in-windows-nice-check-large-directories

I've found troubling directory  was:

C:Users\goodfaithair\AppData\Local\Microsoft\Windows\Temporary Internet Files\Content.IE5

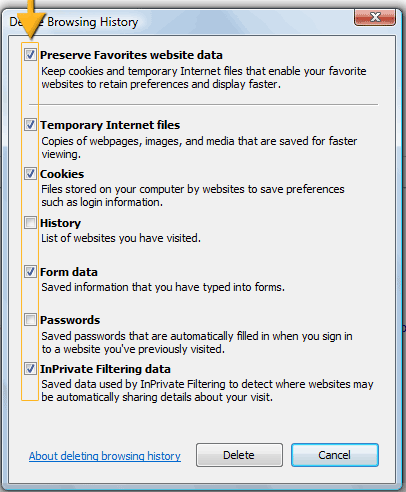
To solve it I first tried to Clean up Internet Explorer Cache (I've checked ticks Temporary Internet files, Cookies, History, Download History, Form Data, InPrivate Filtering Data).

clean-up-Microsoft-Internet-Explorer-browser-cache-IE-7-8-9-10-11

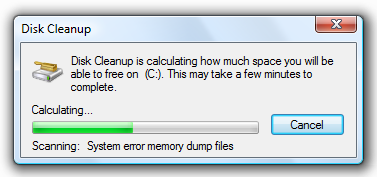
Then I used Microsoft Windows embedded clean manager (cleanmgr.exe) to run disk clean up, however Desk Clean Up managed to clear up only about 1Giga and on the computer HDD which is 150Gb still on Windows installation drive C: only 1.5GB were free.
diskcleanup-ms-windows-7-8-screenshot-free-disk-space-tool
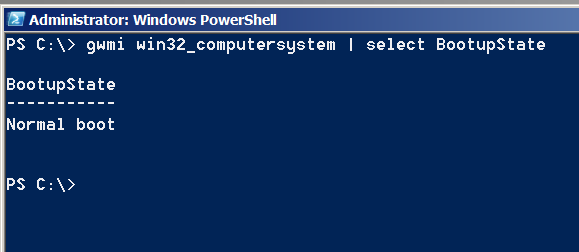
Besides that the system was having a second trouble as there were some failed updates (Computer was not shutdown properly but shutdown during Windows Update) and this was making the machine to enter Safe-Mode, I was fixing the system over TeamViewer session so after restart I had no way to see if Windows boots Normal or Safe-Mode after restart, thus to find out whether Windows was in Safe-Mode after another restart I've used below PowerShell one-liner script:

check-whether-windows-is-working-in-safe-mode-gwmi-powershell-screenshot

PS C:> gwmi win32_computersystem | select BootupState

BootupState
———–
Fail-safe with network boot

Note that possible return results from above command are:

Normal boot
Fail-safe boot
Fail-safe with network boot

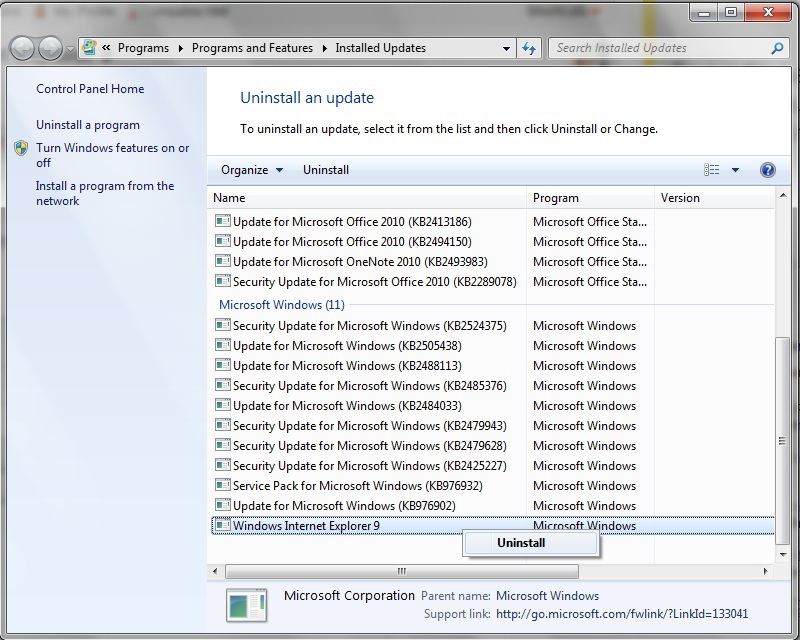
I've been struggling for a while (had to restart it multiple times) until finally I managed to make it boot in normal mode. Because PC was failing to apply some Windows Update, thus dropping by in Safe-Mode each time. To solve that I had to go and Delete two of the last Applied updates (KB2979xxxx files).
 

Control Panel ->  Program and Features -> View Installed Updates


MS-Windows-7-8-9-uninstall-updates-Patches-Control_Panel_screenshot_fix_unbootable_problems-because-updates
I've restarted and since I couldn't see the screen on Windows boot-time, I don't know what really happened but the PC booted again in Safe-Mode, and I thought the classical way to fix PC booting in Safe-Mode with SFC command will help:

C:> sfc /scannow

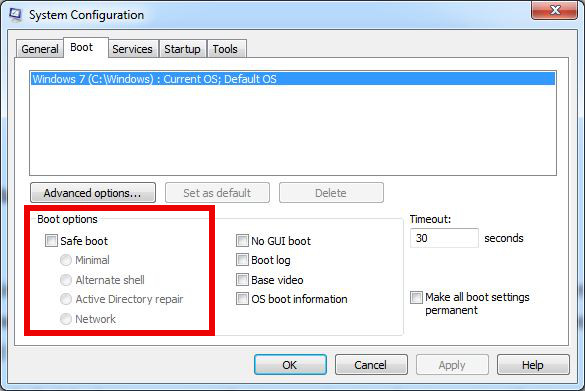
but for my surprise this helped not as the system continuously booted in Safe-Mode, to fix the Windows PC always booting to Safe-Mode, I had to change it running msconfig and unticking Safe Mode field

C:> msconfig

windows-always-booting-to-safe-mode-fix-howto-services-msc-screenshot

Then I tried to delete Temporary Internet Files with below DEL cmd line
 

C:> del "C\:Users\MyName\AppData\Local\Microsoft\Windows\Temporary Internet Files*.*"


To finally succeeding in manually delete huge Temporary Internet FilesContent.IE5 folder, I had to use good old RD (Remove Directory) command.


C:> RD "C:Users\username\AppData\Local\Microsoft\Windows\Temporary Internet Files\Content.IE5" /Q /S

I used also following dels command to delete other common locations where Windows stores temporary files

For those who like to batch DeletingTemporary Internet Files and most common Temp locations to be cleaned on Windows boot I recommend you schedule a start of (clean-temporary-internet-files-content_ie5_folder.bat) on every PC boot.

To Clean-up other common Temporary file locations that could take you disk space the command line way run in new Administarator privileged command prompt:
 

cls
cleanmgr /sageset:99
del /F /S /Q "%systemroot%temp*.*"
del /F /S /Q "%systemroot%Prefetch*.*"
del /F /S /Q "C:Documents and SettingsDefault UserLocal SettingsTemporary Internet FilesContent.IE5*.*"
del /F /S /Q "C:Documents and SettingsDefault UserLocal SettingsTemp*.*"
del /F /S /Q "C:Documents and SettingsDefault UserLocal SettingsHistory*.*"
 
del /F /S /Q "C:Documents and Settings%UserName%Local SettingsTemporary Internet FilesContent.IE5*.*"
del /F /S /Q "C:Documents and Settings%UserName%Local SettingsTemp*.*"
del /F /S /Q "C:Documents and Settings%UserName%Local SettingsHistory*.*"
 
del /F /S /Q "C:Documents and Settings%UserName%Local SettingsApplication DataTemp*.*"
del /F /S /Q "C:Documents and Settings%UserName%Local SettingsApplication DataTemporary Internet FilesContent.IE5
*.*"
 
del /F /S /Q "C:AppDataLocalMicrosoftWindowsHistory*. *"
del /F /S /Q "C:AppDataLocalMicrosoftWindowsTemporary Internet FilesContent.IE5*.*"
del /F /S /Q "C:AppDataLocalMicrosoftWindowsTemporary Internet FilesLowContent.IE5*.*"
del /F /S /Q "C:AppDataLocalMicrosoftWindowsTemporary Internet FilesTemporary Internet FilesContent.IE5*.*"
del /F /S /Q "C:AppDataLocalMicrosoftWindowsTemporary Internet FilesTemporary Internet FilesLowContent.IE5*.*"
 
del /F /S /Q "C:Users%UserName%AppDataLocalTemp*.*"
del /F /S /Q "C:Temp*.*"
del /F /S /Q "C:Users%UserName%AppDataLocalMicrosoftW indo wsTemporary Internet FilesLowContent.IE5*.*
del /F /S /Q "C:Users%UserName%AppDataLocalMicrosoftW indo wsHistory*.*
 
 
::Rem: No need to duplicate the following section for each registered User
del /F /S /Q "%homepath%Cookies*.*"
del /F /S /Q "%homepath%recent*.*"
del /F /S /Q "%homepath%Local Settingscookies*.*"
 
del /F /S /Q "%homepath%Local SettingsHistory*.*"
del /F /S /Q "%homepath%Local SettingsTemp*.*"
del /F /S /Q "%homepath%Local SettingsTemporary Internet FilesContent.IE5*.*"
 
cleanmgr /sagerun:99

Note that in some cases running above commands might left you loose some sensitive data and in case where Internet is slow cleaning temporary files, might have impact on surfing also you will loose your history so be sure you know what you're doing as you might loose sensitive data.

Finally I've run MalwareBytes to clean up the PC slowness caused by Spyware and other left Malware I've run MalwareBytes, RogueKiller, AdwCleaner, RKill, TDSSKiller in order and I found and removed few Malwares as well.

That's all, hope you learned something new. Enjoy!