Archive for the ‘Virtual Machines’ Category

How to Increase virtualbox Linux install machine VM .VDI hard disk size to free space on root partition – Move /usr to a new partition

Tuesday, October 10th, 2017

extend-vdi-virtual-machine-partition-with-virtualbox-howto-virtualbox-logo
 

How to Increse Hard Disk size of VirtualBox Virtual Machine .VDI file to Free Space on root Partition or Howto move /usr large partition to separate new partition?


I just wondered how to increase hard disk size of Virtualbox Virtual Machine image .VDI, because for some stupid reason I've created my initial hard disk size for Linux partition to be the default 10 Gigabytes.

The problem is the packages I need to have installed on the Virtual Machine which will be a testbed for future tests of a production website applications are taking up too much space, once installed so I'm left with no space
in /var/lib/mysql for the database import. So what can I do in that case is to simply free up disk space or Merge ROOT partition with another partition.

Since merging the partition is not a trivial job and would require me to have installable CD with the Linux distro (in my case that's Debian Linux) or have a bootable USB flash drive, I preferred second approach to problem e.g. to free up disk space on ROOT partition by creating a second partition and move the /usr folder to reside there.

Before that it is of course necessery to  have extended the .VDI file using VirtualBox, so more space than the default 10GB preconfigured are available, this is easily done on Windows OS as, VBox is provided with GUI clickable option to do it, but for who knows what reason that is not the case with Linux, so Linux users only option to increase VDI file is to manually run command part of the virtualbox package, that is not a hard task really but it requires some typing and basic knowledge on how to run commands in terminal.


To .VDI resize (extend), we first go to default location where VirtualBox stores its image .VDI files (by default as of moment of writting this article – this is ~/"VrtualBox VMs"  (or home directory of logged in user dir VirtualBox VMs), the command to use is VBoxManage


root@jericho:/home/hipo# cd VirtualBox VMs/
root@jericho:/home/hipo/VirtualBox VMs# ls
Debian 6  Debian 9  Windows 10
root@jericho:/home/hipo/VirtualBox VMs# cd Debian 6/
r
oot@jericho:/home/hipo/VirtualBox VMs/Debian 6# ls
Debian 6.vbox  Debian 6.vbox-prev  Debian 6.vdi  Logs  NewVirtualDisk1.vdi  Snapshots

root@jericho:/home/hipo/VirtualBox VMs/Debian 6# VBoxManage modifyhd Debian 6.vdi –resize 20000
0%…10%…20%…30%…40%…50%…60%…70%…80%…90%…100%
root@jericho:/home/hipo/VirtualBox VMs/Debian 6#


Above command does resize the 10GB default created partition for Linux, where I have installed Linux which was 99% full of data, because of the many packages I installed to 20GB size, to make it bigger just use the respective size, be it 30000 (for 30GB) or 100000 (for 100GB) etc.

Even though in this example VBoxManage virtual partition resize command was done for GNU / Linux Operating System, it can be done for any other Operating as well to resize the size of the Virtual .VDI file (Virtual Machine) partition, be it Windows 7 / 8 / 10 or the rest of Free Operating systems FreeBSD / OpenBSD / BSD that are installed in a VM etc.

Next Launch the Virtual Machine with VBox Server client Program and install there Gparted (GNU Parted), as we'll need it to create a new Hard Disk Partition:


$ VirtualBox


Inside virtualmachine's in gnome-terminal / xterm etc. depending on the graphical environment used do install with apt-get:


debian:# apt-get install –yes gparted


debian~:# gparted


Notice that gparted has to be ran as a root superuser.


Run GParted and create new EXT3 filesystem that is 10GB (the size of the new created partition).

If you have installed Debian to place all partitions under / (root directory /dev/sda1) then the fresh new partition to create should be
/dev/sda3, anyways just look closely in EXT3 and in your case if the partiition is named differently create according to proper partition /dev/ naming.

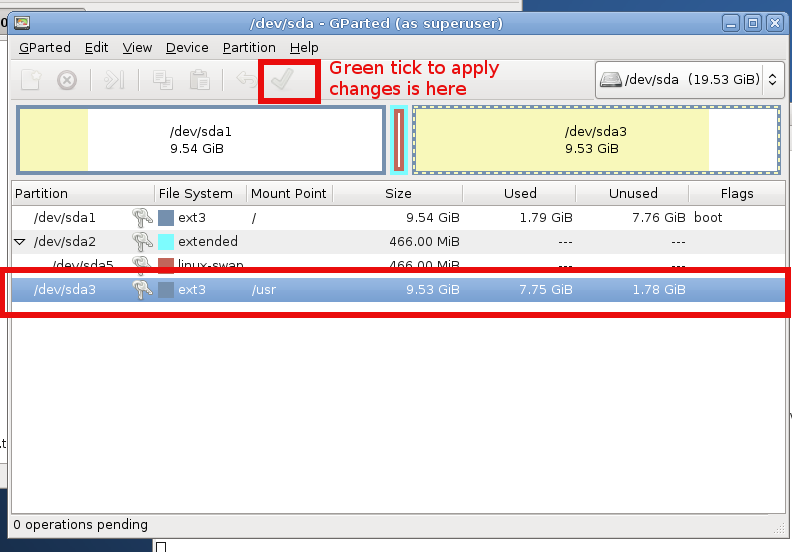
I'll not run into details on how to create the partition with GParted as the program interface is very self-explanatory, the only thing is to apply the update to create partition and the ext3 filesystem, that's being done
with a green tick:
gparted-create-ext3-partition-howto-linux

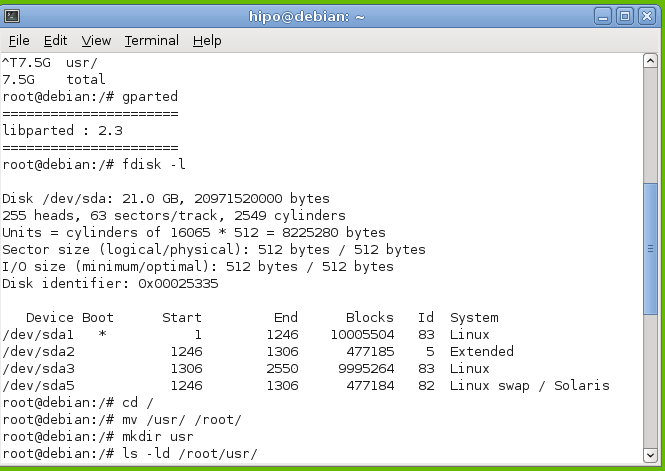
Next step is to check with fdisk whether, we have ext3 properly created  filesystem as we've done already with GPARTED:

Once we have the partition created with EXT3 filesystem, we're ready to move /usr temporary to other folder, I use usually /root for the move but you can create anywhere a new folder for that and move to there.

To move to /root directory run again in terminal:


debian:~# mv /usr /root
debian:~# mkdir /usr
 

howto-extend-root-filesystem-disk-space-linux-move-usr-folder-to-root-temporary-debian-gnu-linux


Note that during the move operations, your Desktop icons will become without (with broken) pictures and the default Debian background picture is to disappear, that's because the GUI environment will soon realize /usr/ libraries that're periodically reloaded in memory are missing and will be unable to reload them as it does in a cycle.

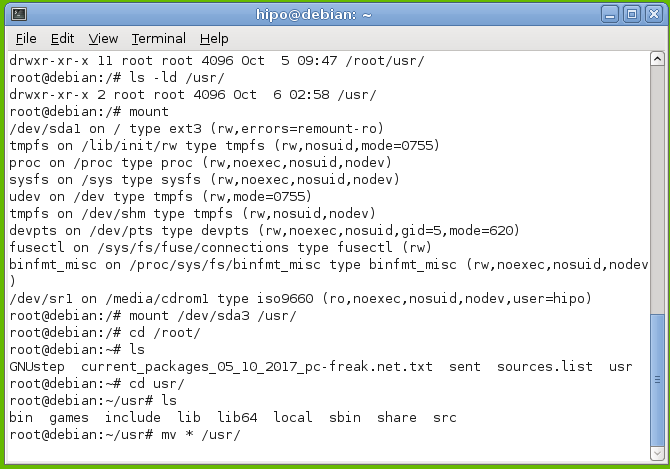
That should take a few minutes, so grab a coffee or if you're a smoker (hope not as smoking kills 🙂 ), in 5 / 10 minutes time depending on your computer / server configuration, it will be over, so we're ready to create new /usr dir and mount the  new partition:


debian:~# mount /dev/sda3 /usr
 

howto-extend-root-filesystem-disk-space-linux-move-usr-folder-to-root-temporary-debian-gnu-linux1


Now we check with mount command whether mount is fine:
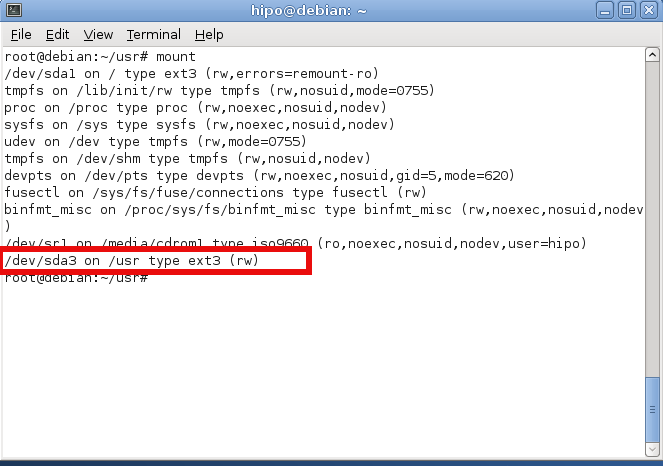
 

check-if-filesystem-is-properly-mounted-linux-debian-screenshot


Now  /dev/sda3 is mounted under /usr  and we have to move back /root/usr directory content back to the newly mounted /usr so we run command:
 

debian:~#  mv /root/usr/* /usr/*


Finally we need to create proper records for the new partition inside /etc/fstab (fstab –FileSystem Tab file – the file which describes instructs the Linux OS what partition to boot where, what)

HOW TO CHECK LINUX UUID FOR A PARTITION??

Before adding anything to /etc/fstab you need to check the UUID of /dev/sda3 (or whatever the partition is called), without proper UUID, the system might fail to boot.
So here is how to check the UUID we'll need for config:


hipo@debian:~$ /sbin/blkid /dev/sda3
/dev/sda3: UUID="2273db4b-3069-4f78-90fc-e7483c0305bd" SEC_TYPE="ext2" TYPE="ext3"

hipo@debian:~$ ls -al /dev/disk/by-uuid/
total 0
drwxr-xr-x 2 root root 100 Oct  6 05:16 .
drwxr-xr-x 6 root root 120 Oct  6 05:16 ..
lrwxrwxrwx 1 root root  10 Oct  6 05:16 2273db4b-3069-4f78-90fc-e7483c0305bd -> ../../sda3
lrwxrwxrwx 1 root root  10 Oct  6 05:16 b98d92cd-41aa-4e18-a474-9b8df445dbe5 -> ../../sda1
lrwxrwxrwx 1 root root  10 Oct  6 05:16 f27f7448-f200-4983-b54f-b9e5206f77ac -> ../../sda5

As you can see our /dev/sda3 UUID is 2273db4b-3069-4f78-90fc-e7483c0305bd

Further on lets view and edit /etc/fstab you can also download a copy of my Virtual Machine fstab here


debian:~# cat /etc/fstab

# /etc/fstab: static file system information.
#
# Use 'blkid' to print the universally unique identifier for a
# device; this may be used with UUID= as a more robust way to name devices
# that works even if disks are added and removed. See fstab(5).
#
# <file system> <mount point>   <type>  <options>       <dump>  <pass>
proc            /proc           proc    defaults        0       0
# / was on /dev/sda1 during installation
UUID=b98d92cd-41aa-4e18-a474-9b8df445dbe5 /               ext3    errors=remount-ro 0       1
# swap was on /dev/sda5 during installation
UUID=f27f7448-f200-4983-b54f-b9e5206f77ac none            swap    sw              0       0
/dev/scd0       /media/cdrom0   udf,iso9660 user,noauto     0       0
/dev/scd1       /media/cdrom1   udf,iso9660 user,noauto     0       0


We need to add following line to  /etc/fstab:
 

UUID=2273db4b-3069-4f78-90fc-e7483c0305bd    /usr        ext3 error=remount-ro    0    1


Open the file with your favourite text editor (gedit / nano / pico / vim / joe) etc.

debian:~# vim /etc/fstab


# /etc/fstab: static file system information.
#
# Use 'blkid' to print the universally unique identifier for a
# device; this may be used with UUID= as a more robust way to name devices
# that works even if disks are added and removed. See fstab(5).
#
# <file system> <mount point>   <type>  <options>       <dump>  <pass>
proc            /proc           proc    defaults        0       0
# / was on /dev/sda1 during installation
UUID=b98d92cd-41aa-4e18-a474-9b8df445dbe5 /               ext3    errors=remount-ro 0       1
# swap was on /dev/sda5 during installation
UUID=f27f7448-f200-4983-b54f-b9e5206f77ac none            swap    sw              0       0
/dev/scd0       /media/cdrom0   udf,iso9660 user,noauto     0       0
/dev/scd1       /media/cdrom1   udf,iso9660 user,noauto     0       0

UUID=2273db4b-3069-4f78-90fc-e7483c0305bd     /usr        ext3 error=remount-ro    0    1    

Basicly it should be possible to add (for historic reasons) also instead of UUID=2273db4b-3069-4f78-90fc-e7483c0305bd  /dev/sda3
So it looks like so but, the better practice is to use UUID line given.

Well that's all folks now /usr directory will contain all your heavy root partition (disk filling) libraries and files, so you can happily use /var/lib/mysql or /var/lib/postgresql /var/www to store your web application files and import your databases.

Big thanks to Ubuntu Forums article – How do I increase the hard disk size of the Virtual Machine article for inspiring this post.

Hope that helps anyone and thanks and other comments are always welcome ! 🙂

Windows XP multicore not detected after CPU update – XP Enable multicore after singlecore install

Friday, April 8th, 2016

windows-xp-add-multicore-with-command-after-multiple-cpu-not-detected
These days it is not common to install Windows XP however for some old unsupproted applications that still work on XP in many countries  in Africa, Asia, Europe and even America. Custom patched Windows XP is still heaveily used for some corporate businesses in accounting and on airports and other government institutions even to these day, I'm aware of Windows still heavily used especially in  Russia, Belarus,Ukraine, Kazakhstan, Armenia, Bulgaria etc.

Hence still there is plenty of softwares designed to work XP the good old Win XP and thus often XP needs to be emulated on VMs though officially not supported any longer  by Microsoft (its Support lifecycle End was for a last time on April 14, 2009).

Now I guess these days I guess nobody doesn't install and use Windows XP on a normal hardware PC Desktop / laptop but XP is continually installed on Virtual machine servers VMWare / VirtualBox.

Hence if you happen to have already migrated or installed some old Windows XP operating systems under VMWare for a corporate clients single core machine (no matter virtual or physical) and the client requires an update of hardware of the Virtual Machine you will be surprised that even though you add a second / third etc. core (new CPUs) the virtual machine hardware and restart the Windows XP installation.

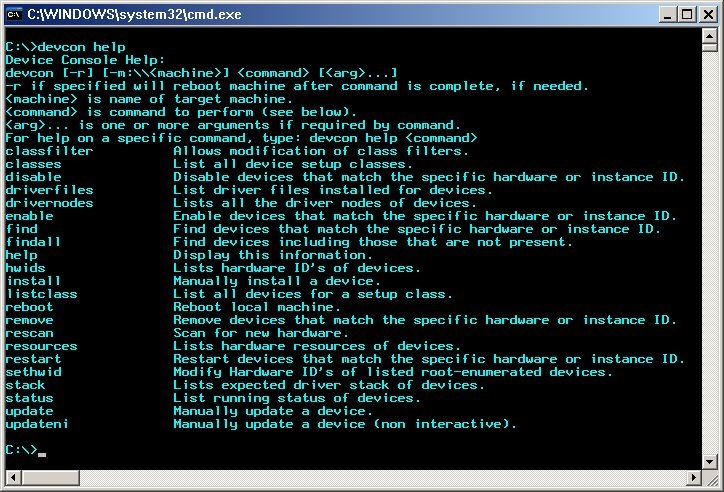
It seems XP is designed to remember the install time CPU model hardware so once the VM and doesn't have a way to update its HAL (Hardware Abstraction Layer) definitions if you install it in Virtualbox thus to make XP recognize the extra added CPU cores it is necessery to do a small hack with a devcon.exe utility downloadable from Microsoft site to do the trick

1. Download the command line devicemanager utility (devcon.exe) from Microsoft Development Network MSDN here.

Note that it will work only if you use the correct version depending whether XP is  (x86/x64) bit install so check it out from My Computer -> Properties.

windows-xp-multicore-not-detected-enable-add-multicore-after-singlecore-windows-xp-install-with-devcon-exe

2  Next. Execute the following 2 commands:

    devcon sethwid @ROOT\ACPI_HAL\0000 := +acpiapic_mp !acpiapic_up
    devcon update c:\windows\inf\hal.inf acpiapic_mp

devcon.exe will  let the automatic hardware detection find out the extra CPU (multicores) added.
Wait 'till you get prompted for a reboot.
Be brave Reboot! 🙂

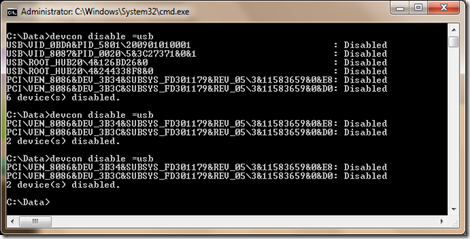
There is pretty much more fun useful things you can do with devcon.exe such as disabling USBs from command line,

DEVCON-command-DisableUSB_on-windows-xp-7-8-howto

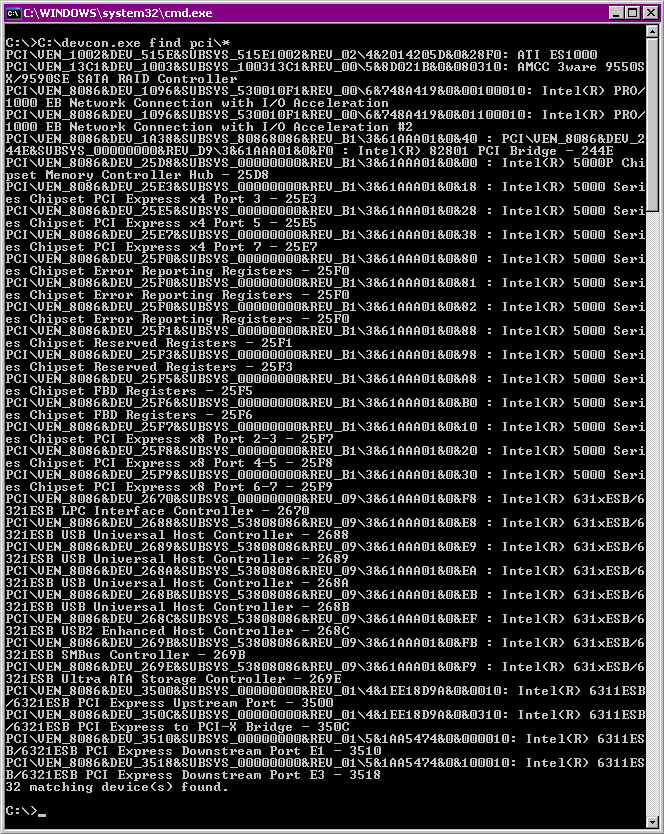
listing your PCI devices and so on:

devcon-windows-command-to-list-pci-devices-on-xp7-win8-win10

You should now see all cores, hooray cores will appear in Task Manager / System Information.

How to enable VirtualBox Windows XP FullScreen with VboxGuestAdditions.iso on Ubuntu 11.10 Linux

Tuesday, January 17th, 2012

Enable_VirtualBox_Windows_XP-fullscreen-with-vboxguest-additions-iso
Right after installing Windows XP inside VirtualBox, I've found out everything works fine except the screen. Even though pressing (Right CTRL + F) was changing the Windows XP running window to FullScreen the XP screen was taking only a part of the whole screen area, where almost half of the screen was visible as simply staying blank.

A bit of research and I found the issue is caused by missing VirtualBoxGuestAdditions .

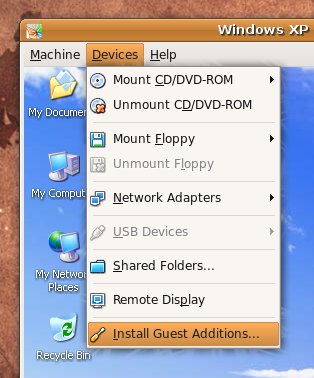
VBoxAdditions is a package which should be installed inside the VirtualBox by navigating to Devices -> Install Guest Additions

Virtualbox offers a download of a VboxGuestAdditions_4.1.2_Ubuntu.iso from url;
http://dlc.sun.edgesuite.net/virtualbox/4.1.2_Ubuntu/VBoxGuestAdditions_4.1.2_Ubuntu.iso, anyways this download fails since the URL is currently unavailable.

To fix this two ways are possible:

1. Download VBoxGuestAdditions.iso from here and put it in directory /usr/share/virtualbox , e.g.:

root@ubuntu:~# cd /usr/share/virtualbox
root@ubuntu:/usr/share/virtualbox# wget https://www.pc-freak.net/files/VBoxGuestAdditions.iso
...

2. Download and install virtualbox-guest-additions-iso_4.1.2-1_all.deb

root@ubuntu:~# wget https://www.pc-freak.net/files/virtualbox-guest-additions-iso_4.1.2-1_all.deb
...
root@ubuntu:~# dpkg -i virtualbox-guest-additions-iso_4.1.2-1_all.deb
...

Next to enable and install guest additions once again use menus:

Devices -> Install Guest Additions

VirtualBox Install Guest Additions Ubuntu Screenshot

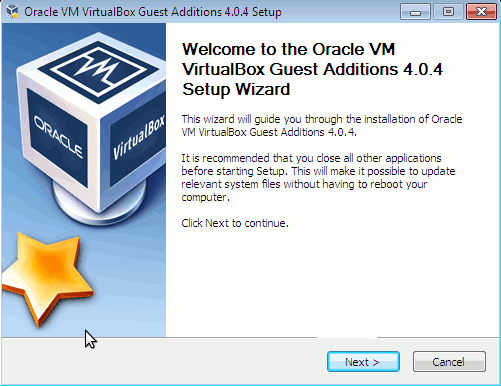
The screen to appear next will be similar to:

VBox guest Additions windows Ubuntu

Further on follow the few dialogs to complete the installations and integration of Guest Additions and restart the Virtual machine and hooray the Windows will appear in Full screen in VirtualBox ! 😉

Resolving “nf_conntrack: table full, dropping packet.” flood message in dmesg Linux kernel log

Wednesday, March 28th, 2012

nf_conntrack_table_full_dropping_packet
On many busy servers, you might encounter in /var/log/syslog or dmesg kernel log messages like

nf_conntrack: table full, dropping packet

to appear repeatingly:

[1737157.057528] nf_conntrack: table full, dropping packet.
[1737157.160357] nf_conntrack: table full, dropping packet.
[1737157.260534] nf_conntrack: table full, dropping packet.
[1737157.361837] nf_conntrack: table full, dropping packet.
[1737157.462305] nf_conntrack: table full, dropping packet.
[1737157.564270] nf_conntrack: table full, dropping packet.
[1737157.666836] nf_conntrack: table full, dropping packet.
[1737157.767348] nf_conntrack: table full, dropping packet.
[1737157.868338] nf_conntrack: table full, dropping packet.
[1737157.969828] nf_conntrack: table full, dropping packet.
[1737157.969928] nf_conntrack: table full, dropping packet
[1737157.989828] nf_conntrack: table full, dropping packet
[1737162.214084] __ratelimit: 83 callbacks suppressed

There are two type of servers, I've encountered this message on:

1. Xen OpenVZ / VPS (Virtual Private Servers)
2. ISPs – Internet Providers with heavy traffic NAT network routers
 

I. What is the meaning of nf_conntrack: table full dropping packet error message

In short, this message is received because the nf_conntrack kernel maximum number assigned value gets reached.
The common reason for that is a heavy traffic passing by the server or very often a DoS or DDoS (Distributed Denial of Service) attack. Sometimes encountering the err is a result of a bad server planning (incorrect data about expected traffic load by a company/companeis) or simply a sys admin error…

– Checking the current maximum nf_conntrack value assigned on host:

linux:~# cat /proc/sys/net/ipv4/netfilter/ip_conntrack_max
65536

– Alternative way to check the current kernel values for nf_conntrack is through:

linux:~# /sbin/sysctl -a|grep -i nf_conntrack_max
error: permission denied on key 'net.ipv4.route.flush'
net.netfilter.nf_conntrack_max = 65536
error: permission denied on key 'net.ipv6.route.flush'
net.nf_conntrack_max = 65536

– Check the current sysctl nf_conntrack active connections

To check present connection tracking opened on a system:

:

linux:~# /sbin/sysctl net.netfilter.nf_conntrack_count
net.netfilter.nf_conntrack_count = 12742

The shown connections are assigned dynamicly on each new succesful TCP / IP NAT-ted connection. Btw, on a systems that work normally without the dmesg log being flooded with the message, the output of lsmod is:

linux:~# /sbin/lsmod | egrep 'ip_tables|conntrack'
ip_tables 9899 1 iptable_filter
x_tables 14175 1 ip_tables

On servers which are encountering nf_conntrack: table full, dropping packet error, you can see, when issuing lsmod, extra modules related to nf_conntrack are shown as loaded:

linux:~# /sbin/lsmod | egrep 'ip_tables|conntrack'
nf_conntrack_ipv4 10346 3 iptable_nat,nf_nat
nf_conntrack 60975 4 ipt_MASQUERADE,iptable_nat,nf_nat,nf_conntrack_ipv4
nf_defrag_ipv4 1073 1 nf_conntrack_ipv4
ip_tables 9899 2 iptable_nat,iptable_filter
x_tables 14175 3 ipt_MASQUERADE,iptable_nat,ip_tables


II. Remove completely nf_conntrack support if it is not really necessery

It is a good practice to limit or try to omit completely use of any iptables NAT rules to prevent yourself from ending with flooding your kernel log with the messages and respectively stop your system from dropping connections.

Another option is to completely remove any modules related to nf_conntrack, iptables_nat and nf_nat.
To remove nf_conntrack support from the Linux kernel, if for instance the system is not used for Network Address Translation use:

/sbin/rmmod iptable_nat
/sbin/rmmod ipt_MASQUERADE
/sbin/rmmod rmmod nf_nat
/sbin/rmmod rmmod nf_conntrack_ipv4
/sbin/rmmod nf_conntrack
/sbin/rmmod nf_defrag_ipv4

Once the modules are removed, be sure to not use iptables -t nat .. rules. Even attempt to list, if there are any NAT related rules with iptables -t nat -L -n will force the kernel to load the nf_conntrack modules again.

Btw nf_conntrack: table full, dropping packet. message is observable across all GNU / Linux distributions, so this is not some kind of local distribution bug or Linux kernel (distro) customization.
 

III. Fixing the nf_conntrack … dropping packets error

– One temporary, fix if you need to keep your iptables NAT rules is:

linux:~# sysctl -w net.netfilter.nf_conntrack_max=131072

I say temporary, because raising the nf_conntrack_max doesn't guarantee, things will get smoothly from now on.
However on many not so heavily traffic loaded servers just raising the net.netfilter.nf_conntrack_max=131072 to a high enough value will be enough to resolve the hassle.

– Increasing the size of nf_conntrack hash-table

The Hash table hashsize value, which stores lists of conntrack-entries should be increased propertionally, whenever net.netfilter.nf_conntrack_max is raised.

linux:~# echo 32768 > /sys/module/nf_conntrack/parameters/hashsize
The rule to calculate the right value to set is:
hashsize = nf_conntrack_max / 4

– To permanently store the made changes ;a) put into /etc/sysctl.conf:

linux:~# echo 'net.netfilter.nf_conntrack_count = 131072' >> /etc/sysctl.conf
linux:~# /sbin/sysct -p

b) put in /etc/rc.local (before the exit 0 line):

echo 32768 > /sys/module/nf_conntrack/parameters/hashsize

Note: Be careful with this variable, according to my experience raising it to too high value (especially on XEN patched kernels) could freeze the system.
Also raising the value to a too high number can freeze a regular Linux server running on old hardware.

– For the diagnosis of nf_conntrack stuff there is ;

/proc/sys/net/netfilter kernel memory stored directory. There you can find some values dynamically stored which gives info concerning nf_conntrack operations in "real time":

linux:~# cd /proc/sys/net/netfilter
linux:/proc/sys/net/netfilter# ls -al nf_log/

total 0
dr-xr-xr-x 0 root root 0 Mar 23 23:02 ./
dr-xr-xr-x 0 root root 0 Mar 23 23:02 ../
-rw-r--r-- 1 root root 0 Mar 23 23:02 0
-rw-r--r-- 1 root root 0 Mar 23 23:02 1
-rw-r--r-- 1 root root 0 Mar 23 23:02 10
-rw-r--r-- 1 root root 0 Mar 23 23:02 11
-rw-r--r-- 1 root root 0 Mar 23 23:02 12
-rw-r--r-- 1 root root 0 Mar 23 23:02 2
-rw-r--r-- 1 root root 0 Mar 23 23:02 3
-rw-r--r-- 1 root root 0 Mar 23 23:02 4
-rw-r--r-- 1 root root 0 Mar 23 23:02 5
-rw-r--r-- 1 root root 0 Mar 23 23:02 6
-rw-r--r-- 1 root root 0 Mar 23 23:02 7
-rw-r--r-- 1 root root 0 Mar 23 23:02 8
-rw-r--r-- 1 root root 0 Mar 23 23:02 9


IV. Decreasing other nf_conntrack NAT time-out values to prevent server against DoS attacks

Generally, the default value for nf_conntrack_* time-outs are (unnecessery) large.
Therefore, for large flows of traffic even if you increase nf_conntrack_max, still shorty you can get a nf_conntrack overflow table resulting in dropping server connections. To make this not happen, check and decrease the other nf_conntrack timeout connection tracking values:

linux:~# sysctl -a | grep conntrack | grep timeout
net.netfilter.nf_conntrack_generic_timeout = 600
net.netfilter.nf_conntrack_tcp_timeout_syn_sent = 120
net.netfilter.nf_conntrack_tcp_timeout_syn_recv = 60
net.netfilter.nf_conntrack_tcp_timeout_established = 432000
net.netfilter.nf_conntrack_tcp_timeout_fin_wait = 120
net.netfilter.nf_conntrack_tcp_timeout_close_wait = 60
net.netfilter.nf_conntrack_tcp_timeout_last_ack = 30
net.netfilter.nf_conntrack_tcp_timeout_time_wait = 120
net.netfilter.nf_conntrack_tcp_timeout_close = 10
net.netfilter.nf_conntrack_tcp_timeout_max_retrans = 300
net.netfilter.nf_conntrack_tcp_timeout_unacknowledged = 300
net.netfilter.nf_conntrack_udp_timeout = 30
net.netfilter.nf_conntrack_udp_timeout_stream = 180
net.netfilter.nf_conntrack_icmp_timeout = 30
net.netfilter.nf_conntrack_events_retry_timeout = 15
net.ipv4.netfilter.ip_conntrack_generic_timeout = 600
net.ipv4.netfilter.ip_conntrack_tcp_timeout_syn_sent = 120
net.ipv4.netfilter.ip_conntrack_tcp_timeout_syn_sent2 = 120
net.ipv4.netfilter.ip_conntrack_tcp_timeout_syn_recv = 60
net.ipv4.netfilter.ip_conntrack_tcp_timeout_established = 432000
net.ipv4.netfilter.ip_conntrack_tcp_timeout_fin_wait = 120
net.ipv4.netfilter.ip_conntrack_tcp_timeout_close_wait = 60
net.ipv4.netfilter.ip_conntrack_tcp_timeout_last_ack = 30
net.ipv4.netfilter.ip_conntrack_tcp_timeout_time_wait = 120
net.ipv4.netfilter.ip_conntrack_tcp_timeout_close = 10
net.ipv4.netfilter.ip_conntrack_tcp_timeout_max_retrans = 300
net.ipv4.netfilter.ip_conntrack_udp_timeout = 30
net.ipv4.netfilter.ip_conntrack_udp_timeout_stream = 180
net.ipv4.netfilter.ip_conntrack_icmp_timeout = 30

All the timeouts are in seconds. net.netfilter.nf_conntrack_generic_timeout as you see is quite high – 600 secs = (10 minutes).
This kind of value means any NAT-ted connection not responding can stay hanging for 10 minutes!

The value net.netfilter.nf_conntrack_tcp_timeout_established = 432000 is quite high too (5 days!)
If this values, are not lowered the server will be an easy target for anyone who would like to flood it with excessive connections, once this happens the server will quick reach even the raised up value for net.nf_conntrack_max and the initial connection dropping will re-occur again …

With all said, to prevent the server from malicious users, situated behind the NAT plaguing you with Denial of Service attacks:

Lower net.ipv4.netfilter.ip_conntrack_generic_timeout to 60 – 120 seconds and net.ipv4.netfilter.ip_conntrack_tcp_timeout_established to stmh. like 54000

linux:~# sysctl -w net.ipv4.netfilter.ip_conntrack_generic_timeout = 120
linux:~# sysctl -w net.ipv4.netfilter.ip_conntrack_tcp_timeout_established = 54000

This timeout should work fine on the router without creating interruptions for regular NAT users. After changing the values and monitoring for at least few days make the changes permanent by adding them to /etc/sysctl.conf

linux:~# echo 'net.ipv4.netfilter.ip_conntrack_generic_timeout = 120' >> /etc/sysctl.conf
linux:~# echo 'net.ipv4.netfilter.ip_conntrack_tcp_timeout_established = 54000' >> /etc/sysctl.conf

Migrate VMWare Linux Virtual Machine to Virtualbox – Convert VMware .VMX to .OVF (Open Virtual Format)

Monday, June 2nd, 2014

migrate_vmware-virtual-machine-toto-virtualbox-vmx-to-ovf-migration

VMWare Virtual Machines are usually stored in OVA Format  which is bundle of OVF(Open Virtualization Format) and in multiple *.VMDK files.
Though other Virtual Machines are supposed to also support these "open virtualization format", different VM vendors implement and support it differently, therefore though in theory VirtualBox and QEMU are said to support OVA Format. Attempts to import such usually will fail. In this little article I will explain how VMWare stored (exported) VirtualMachine machine can be succesfully imported to VirtualBox.
 

1. Locate where is Virtualbox .vmx files from Window search or via dir command

I'm a console guy, so I prefer looking for VMWare's .vmx from command line:
 

C:\Users\GGEORGI7> cd c:\ C:\> dir /s *.vmx


Volume in drive C is PC COE
Volume Serial Number is XXXX-XXXX

Directory of C:\Users\ggeorgi7\Documents\Virtual Machines\Debian 7

06/02/14 11:06 AM 2,687 Debian 7.vmx
05/28/14 15:44 PM 370 Debian 7.vmxf
2 File(s) 3,057 bytes


2. Switch to wherever the VMWare virtualmachine .vmx file is located


C:\> cd \Users\ggeorgi7\Documents\Virtual Machines\Debian 7
 

N.B. !Make sure the VMWare Virtualmachine is Shutdown (if it is Suspended converted file will not be properly implemented inside VirtualBox!). Whether the migrated virtualhost is suspended, launch VMWare, restore its state and Shut it down properly before starting migration with ovftool.
 

3. Remove Vmware-tools, Reset Display settings and Input D (before exporting to OVF) in VMWare

a) Remove vmware-tools

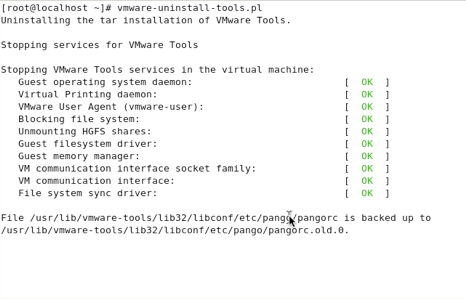
Vmware-tools kernel modules and stuff compiled specific for VMWare are no longer needed and might pose issues, thus it is always a good idea if previously installed in VMWare to wipe them out with cmd:

vmware-uninstall-tools.pl

uninstall-vmware-tools-linux-screenshot-migrating-vmware-to-virtualbox
b) Reset Display Device and Input Devices

Inside VMWare virtual machine Linux host, before shutting it down run:

mv /etc/X11/xorg.conf /etc/X11/xorg.conf.vmware

c) Remove Incomptable devices

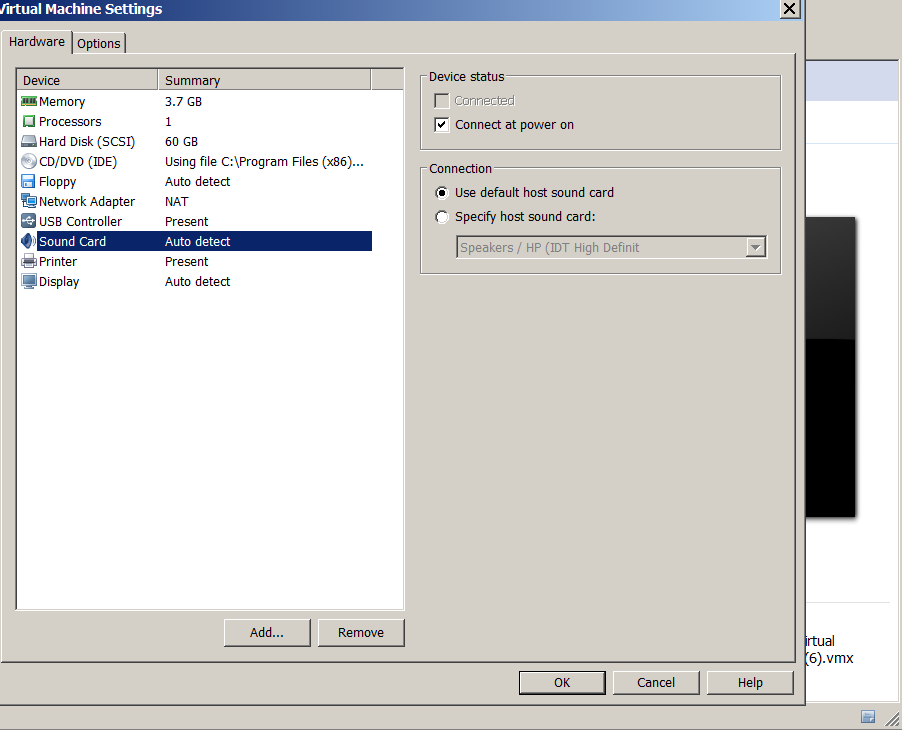
To prevent issues with sound – its necessary to remove VMWare device created for soundcard, in order to let VirtualBox create its soundcard device on 1st boot after migration. To do so click on Virtual Machine and from context menu click Settings then in  Hardware tab select Sound Card and Remove:
 

Settings -> Hardware -> Sound Card (Click Remove)

vmware-migration-remove-soundcard-to-make-work-sound-work-in-virtualbox


4. Make a Clone (Backup) of Virtual Machine

Its always a good idea to create backup of VMWare VM to be migrated just in case something goes wrong during migration, so you have a way to step back to the already working one. Once files are copied it might be a good idea to use use some archiver like PeaZip or 7-Zip to save some disk space.
 

mkdir SomeFolder
copy Path_To_Virtual_Machine Folder_for_Backup_Virtual_Machine


In my case this was


mkdir \Temp\VMWare-machine-backup
C:\>copy "C:\Users\ggeorgi7\Documents\Virtual Machines\Debian 7"\ c:\Temp\VM
ware-machine-backup

Restoring later VMWare VirtualMachines in case of some failure is done by simply copying backuped files to VMWare Working Directory folder

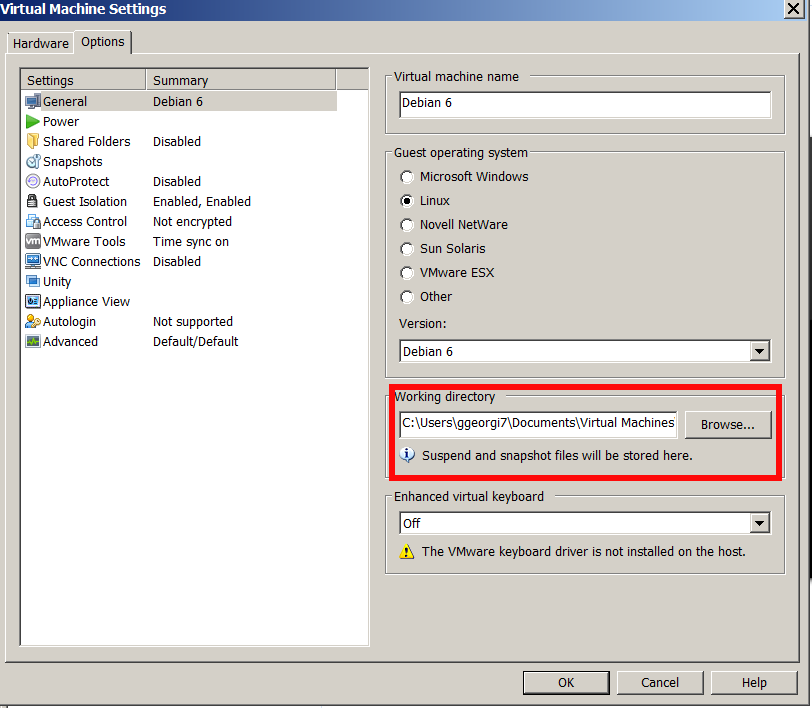
In case if Wondering

Where is stored VMWare Virtual Machines?


Check in:
 

VM -> Settings -> Options


vmware-working-directory-folder-where-are-stored-vmware-virtualmachines

5. Use VMWare ovftool.exe to convert .VMX to Open Virtualization Format (.OVF)


Though export from .VMX to .OVF it can be also done from VMWare GUI from:
 

File -> Export to OVF

Anyways I think it is better to do it via OVFTool console tool:

The most common location for  VMWare Workstation is:
 

C:\Program Files (x86)\Vmware\Vmware Workstation\OVFTool


For VMware Player it is:

C:\Program Files (x86)\Vmware\Vmware Player\OVFTool

Very important thing to mention here is you have to be cautious, Never to run together VMWare and VirtualBox.
!! Before proceeding to next OVTool .vmx to .ovf migration Shutdown the VirtualMachine and as a best practice close VMware completely.

cd Location-directory-ofOVFTool
ovftool.exe Path-folder-to_VMVM_file.vmx Path-folder_to_VM_exportVM_file_export.ovf

C:\> cd "\Program Files (x86)\VMware\VMware Workstation"\OVFTool
C:\Program Files (x86)\VMware\VMware Workstation\OVFTool>ovftool.exe "\Users\ggeorgi7\Documents\Virtual Machines\Debian 7\Debian 7.vmx" C:\Users\ggeorg i7\vmware-debian-export.ovf


vmware-ovftool-convert-vmware-linux-virtual-machine-to-virtualbox


Convertion will take about 30 minutes on a normal computer hardware lets say (Dual Core PC 2Ghz with 4 Gb of RAM).
If you get a “failed to open disk” error during convertion, its likely that the virtual machine is still running or wasn’t shut down properly – boot the virtual machine and perform a shut down.

6. Launch VirtualBox, Install Guest Additions to enable Copy / Paste and USB support in Virtual Machine

After the process completes, you can boot the virtual machine. If you haven't earlier uninstalled vmware-tools  uninstall VMware Tools, and install VirtualBox’s Guest Additions (in order to allow Copy / Paste between VirtualBox and guess OS).
 

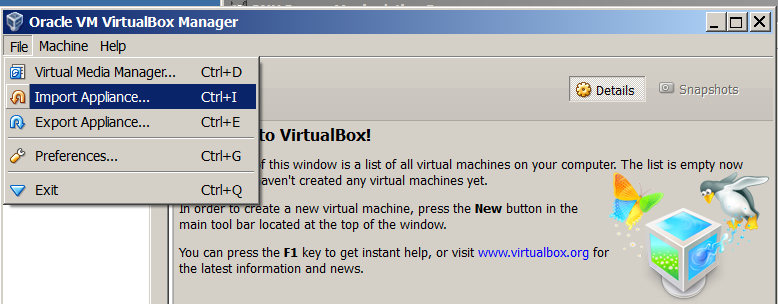
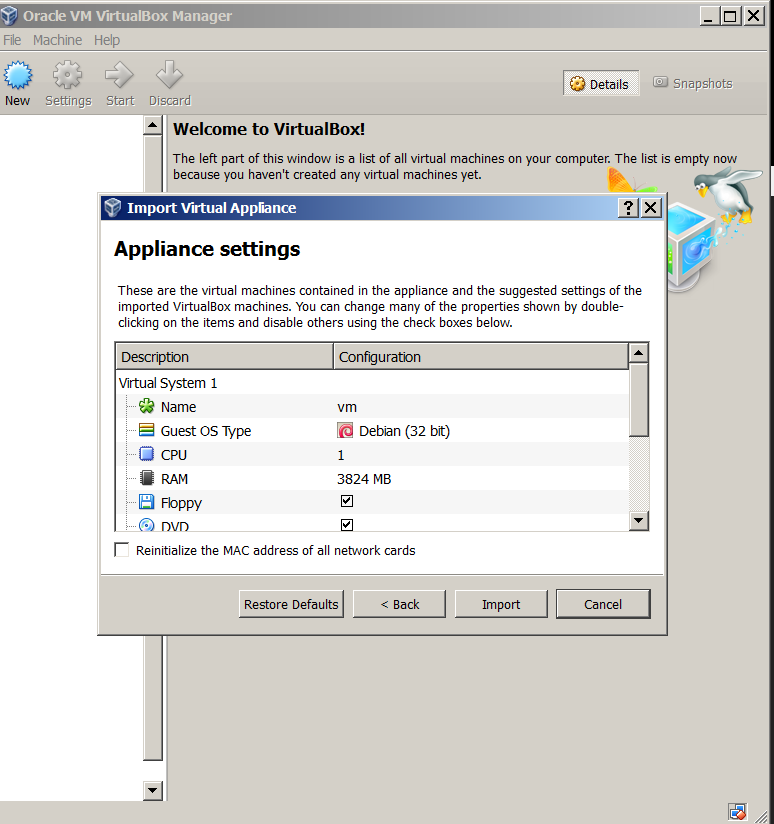
7. Launch VirtualBox and Import exported .OVF

Once Virtual Machine is exported, to import it into VirtualBox, launch VirtualBox and choose:
 

File -> Import Appliance


virtualbox-import-vmware-old-virtual-machine-to-new-linux import vmware appliance

virtualbox-import-vmware-previously-installed-virtual-machine-linux import appliance virtualbox
 

What is VT-x (Intel Virtualization) and AMD V (AMD Virtualization)

Wednesday, June 4th, 2014

what-is-vt-x-inel-amd-virtualization-amd-v
As I'm lately educating myself in field of Virtualziation and Virtual Machines, the interesting question poped up What is Virtualization on a Hardware Level and what are Intel's and AMD technologies supporting it?


  • Intel Virtualialization (Vt-x)

Is Intel's hardware assistance for processors running virtualization platforms. Intel's Virtualization for short is know as VT-x. Intel VT-x extensions are probably the best recognized extensions, adding migration, priority and memory handling capabilities to a wide range of Intel processors.
Intel VT includes series of extensions for hardware virtualization adding virtualization support to Intel chipsets, so that Virtual Machines could assign specific I/O Devices. Intel VT includes a series of extensions for hardware virtualization Intel Virtualization is better described here.
 

  • AMD-V (AMD virtualization)


Is a set of hardware extensions for the X86 processor architecture. Advanced Micro Dynamics (AMD) designed the extensions to perform repetitive tasks normally performed by software and improve resource use and virtual machine (VM) performance. Early virtualization efforts relied on software emulation to replace hardware functionality. But software emulation can be a slow and inefficient process. Because many virtualization tasks were handled through software, VM behavior and resource control were often poor, resulting in unacceptable VM performance on the server. AMD Virtualization (AMD-V) technology was first announced in 2004 and added to AMD's Pacifica 64-bit x86 processor designs. By 2006, AMD's Athlon 64 X2 and Athlon 64 FX processors appeared with AMD-V technology, and today, the technology is available on Turion 64 X2, second- and third-generation Opteron, Phenom and Phenom II processors. Just like with Intel Virtualization AMD-V Technology enables extra hardware support for assignment of specifics I/O on per virtualized OS. AMD V Virtualization is described more thoroughly here


Windows: VMWare Start / Stop from command line stop-vmware.bat / start-vmware.bat script

Wednesday, June 4th, 2014

vmware_start-stop-from-command-line-on-windows-os-bat-script
I'm experimenting with different Virtual Machines these days, because often running VMWare together with other Virtual Machines (like VirtualBox) might be causing crashes or VM instability – hence it is always best to have VMWare completely stopped. Unfortunately VMWare keeps running a number of respawning processes (vmnat.exe, vmnetdhcp.exe, vmware-authd.exe, vmware-usbarbitrator64.exe) which cannot be killed from Task Manager with Process KillEnd Tree option. Thus to make this services stop it is necessery run from cmd.exe (which is Run as Administrator):
 

NET STOP "VMware Workstation Server"
NET STOP "VMware USB Arbitration service"
NET STOP "VMware NAT Service"
NET STOP "VMware DHCP Service"
NET STOP "VMware Authorization Service"

If you will be doing regular START / STOP of VMWare on Windows servers it will be handy to create a little batch script stop-vmware.bat containing:
 

@ECHO OFF
NET STOP "VMware Workstation Server"
NET STOP "VMware USB Arbitration service"
NET STOP "VMware NAT Service"
NET STOP "VMware DHCP Service"
NET STOP "VMware Authorization Service"


Later whether it is necessery to start VMWare from Windows command line execute above services in reverse order (to prevent from getting warnings or errors on vmware dependent services.

NET START "VMware Authorization Service"
NET START "VMware DHCP Service"
NET START "VMware NAT Service"
NET START "VMware USB Arbitration service"
NET START "VMware Workstation Server"

To script it as a start script create file start-vmware.bat with:
 

NET START "VMware Authorization Service"
NET START "VMware DHCP Service"
NET START "VMware NAT Service"
NET START "VMware USB Arbitration service"
NET START "VMware Workstation Server"


Of course it is possible to also stop / start VMWare from GUI's Windows Services interface by righclicking on services with VMWare names and selecting "Start" / "Stop".

Installing Virtualbox Guest Additions Vboxadditions on CentOS 7, Fedora 19 / 20 and RHEL 6.5 / 5.10 on Windows host

Thursday, July 17th, 2014

Virtualbox_guest_additions-on-centos-7-howto-virtualbox-logo
If you decided to use Redhat based Linux distribution inside Virtualbox Virtual Machine on Windows 7 / 8, first thing to do right after installing the Linux guest OS is to install Virtualbox Guest Additions. Earlier I've blogged How to enable virtualbox VM Windows XP fullscreen mode on Virtualbox running on Ubuntu now I need it vice versa a Linux OS living inside Virtual Machine running on top of Windows 7 Enterprise. need to enable Full-screen mode. Another reason why Vboxadditions should be installed right after Linux install is complete is for performance reasons and better integration between host OS and guest OS. Virtualbox Guest Additions enables mouse's copy / paste functions to work between Win and Virtualized Linux as well as enables arbitrary screen resolutions (resizing VM guest window) etc. On Windows versions of Virtualbox to install Vbox Guest Additions it is no longer necessery to download and mount a separate vbox-guest-additions ISO file, this is handled by Virtualbox itself.

The steps described here for installation of VirtualBox Guest Additions are tested and prooved as working on current latest CentOS 6.5, however they should be working (with or without minor modifications) in rest of RPM based Linux distributions

Fedora 20, 19, 18, 17, 16, 15, 14, 13, 12, CentOS 6.5, 6.4, 6.3, 6.2, 6.1, 6.0, 5.10 and Redhat Enterprise Linux (RHEL) 6.5, 6.4, 6.3, 6.2, 6.1, 6, 5.10 VirtualBox version installed on Windows 7 host is 4.3.14 build.


Devices -> Drag'n'Drop (Bidirectional)

Devices -> Share Clipboard (Bidirectional)


1. Installing VirtualBox GuestAdditions on CentOS 7, Redhat, Fedora

a) become superuser

su root
[root@centos~:]#

b) Mount Virtualbox provided Guest additions into virtual cdrom /dev/cdrom

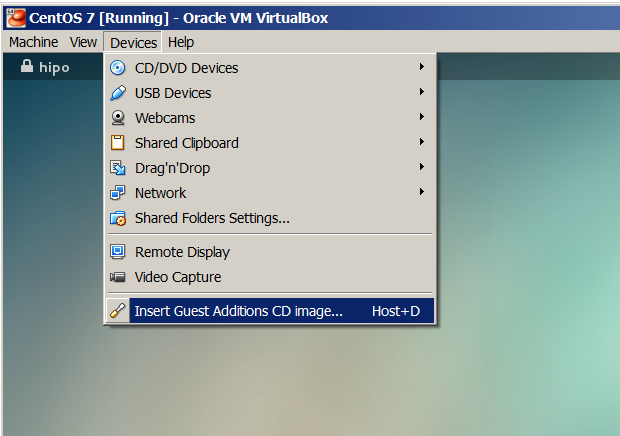
From VirtualBox click on
 

Devices -> Install Guest Additions

centos7-install-guest-additions-cd-screenshot-microsoft-windows-virtualbox

mkdir /media/VirtualBoxGuestAdditions
mount -r /dev/cdrom /media/VirtualBoxGuestAdditions

c) Update to the latest Linux kernel with yum

yum -y update kernel*

Then to boot up into the updated kernel – restart the system

shutdown -r now


d) Install Kernel headers bzip dkms bzip2

yum install -y gcc kernel-devel kernel-headers dkms make bzip2 perl

If you're installing VirtualBox Guest Additions on CentOS 6 or RHEL 5, you will have to install also below 2 rpms:
 

## CentOS 6 and Red Hat (RHEL) 5 ##
rpm -Uvh http://dl.fedoraproject.org/pub/epel/6/i386/epel-release-6-8.noarch.rpm
 
## CentOS 5 and Red Hat (RHEL) 5 ##
rpm -Uvh http://dl.fedoraproject.org/pub/epel/5/i386/epel-release-5-4.noarch.rpm


e) export KERN_DIR to just installed kernel source


For CentOS 7 export following KERN_DIR


## Current running kernel on Fedora, CentOS 7 and Red Hat (RHEL) 7 ##
KERN_DIR=/usr/src/kernels/`uname -r`
export KERN_DIR

For older CentOS and RHEL 5 export
## Current running kernel on CentOS 5 and Red Hat (RHEL) 5 ##

KERN_DIR=/usr/src/kernels/`uname -r`-`uname -m`
export KERN_DIR

f) Download VBoxAdditions 4.3.14 iso from Virtualbox website

I've made mirror of VBoxGuestAdditions_4.3.14.iso for download here:
 

mkdir /usr/share/virtualbox
cd /usr/share/virtualbox

wget http://dlc.sun.com.edgesuite.net/virtualbox/4.3.14/VBoxGuestAdditions_4.3.14.iso

g) Mount the iso
 

mount -t iso9660 VBoxGuestAdditions_4.3.14.iso /media/VirtualBoxGuestAdditions/


h) Compile and Install Virtualbox GuestAdditions kernel modules
For both 32-bit and 64-bit systems run one and the same shell script:

cd /media/VirtualBoxGuestAdditions
./VBoxLinuxAdditions.run

Verifying archive integrity… All good.
Uncompressing VirtualBox 4.3.14_RC1 Guest Additions for Linux…………
VirtualBox Guest Additions installer
Removing installed version 4.3.14_RC1 of VirtualBox Guest Additions…
Copying additional installer modules …
Installing additional modules …
Removing existing VirtualBox non-DKMS kernel modules       [  OK  ]
Building the VirtualBox Guest Additions kernel modules
Building the main Guest Additions module                   [  OK  ]
Building the shared folder support module                  [  OK  ]
Building the OpenGL support module                         [  OK  ]
Doing non-kernel setup of the Guest Additions              [  OK  ]
You should restart your guest to make sure the new modules are actually used

Installing the Window System drivers
Installing X.Org Server 1.15 modules                       [  OK  ]
Setting up the Window System to use the Guest Additions    [  OK  ]
You may need to restart the hal service and the Window System (or just restart
the guest system) to enable the Guest Additions.

Installing graphics libraries and desktop services componen[  OK  ]

l) Restart the CentOS Virtual Machine
 

reboot

Now get a beer and celebrate the full-screen / USB / Webcamera enabled support ! 🙂

This article is possible thanks to earlier article called Virtualbox guest additions on Fedora CentOS and Redhat.

http://www.if-not-true-then-false.com/2010/install-virtualbox-guest-additions-on-fedora-centos-red-hat-rhel/


Linux: Virtualbox shared folder – how to share files from host to guest OS in Virtualbox

Monday, June 9th, 2014

add-shared-folder-in-virtualbox-linux-virtual-machine-on-top-of-windows-howto

If you just installed Debian / Ubuntu / CentOS Linux on top of Windows inside Virtualbox Virtual Machine and you're wondering how to Share files between Windows Host Operating System and Guest Operating System (Linux), here is how:

1. First make sure Virtualbox guest additions are installed

Besides installing Virtualbox guest additions which will enable you to resize VBox Window / enable copy paste between guest and host OS it is useful to have also Virtualbox extension packs which allows your Virtual Machine to be accessed remote via Remote Desktop Protocol (RDP) – the so called VRDP

2. From Virtualbox VM select folder on Windows hsot which will be shared

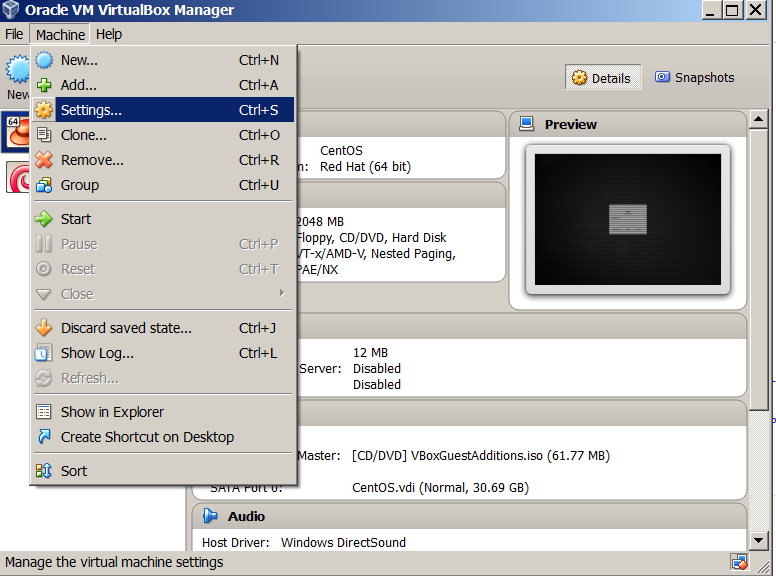
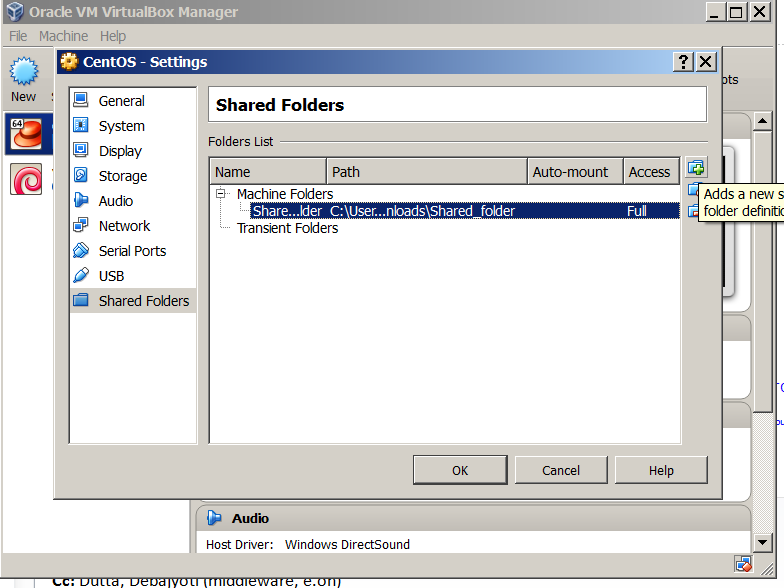
Selection of which Win folder to mount in Vbox is done via Virtualbox menus:
 

Machine -> Settings -> Shared Folder

virtualbox-windows-linux-guest-OS-how-to-shared_folder-screenshot2

virtualbox-windows-linux-guest-OS-how-to-shared_folder-screenshot

3. Launch Linux Virtual Machine and use mount command to mount shared folder

I like the practice of creating a new folder inside c:UsersgeorgiDownloadsShared_folder

Then fire up gnome-terminal / xterm whatever terminal you like and to mount shared folder inside emulated Linux issue:

mount -t vboxsf -o rw Shared_folder /mnt/Shared_folder/


This will mount Shared_folder in rw (read / write) mode, if you prefer to only mount Virtualbox Shared_folder for reading:

mount -t vboxsf -o ro Shared_folder /mnt/Shared_folder/

4. Configure Virtualbox Shared Folder to auto mount in Linux via fstab

As we all know automating mounts in Linux is done by adding line in /etc/fstab to automate Vbox Shared_Folder mount add new line to fstab like:
 

Shared_folder         /mnt/Shared_folder         vboxsf  defaults,rw    0 0

This will auto-mount in vbox shared folder read / write mode, to auto-mount it in read only mode:

Shared_folder         /mnt/Shared_folder         vboxsf  defaults,ro    0 0

  If you added it to /etc/fstab (and you didn't mount Shared Folder manually before), run

mount -a

to make Linux system re-read auto-mounts defined in fstab
 

The new mounted folder will appear in whenever said to be mounted. Enjoy 🙂


Create local network between virtual machines in Virtualbox VM – Add local LAN between Linux Virtual Machines

Wednesday, June 11th, 2014

add-virtualbox-virtual-machines-inside-local-network-create-internal-LAN-local-net-linux-windows

I want to do test MySQL Cluster following MySQL Cluster Install Guide for that purpose, I've installed 2 version of CentOS 6.5 inside Virtualbox and I wanted to make the 2 Linux hosts reachable inside a local LAN network, I consulted some colleagues who adviced me to configure two Linux hosts to use Bridget Adapter Virtualbox networking (Network configuration in Virtualbox is done on a Virtual Machine basis from):
 

Devices -> Network Settings

(Attached to: Bridged Adapter)

Note!: that by default Cable Connected (tick) is not selected so when imposing changes on Network – tick should be set)
After Specifying Attached to be Bridged Adapter to make CentOS linux refresh network settings run in gnome-terminal:

[root@centos ~]# dhclient eth0

However CentOS failed to grab itself DHCP IP address.
Thus I tried to assign manually IP addresses with ifconfig, hoping that at least this would work, e.g.:

on CentOS VM 1:

/sbin/ifconfig eth0 192.168.10.1 netmask 255.255.255.0

on CentOS VM 2:

/sbin/ifconfig eth1 192.168.10.2 netmask 255.255.255.0

To test whether there is connection between the 2 VM hosts tried ping-ing 192.168.10.2 (from 192.168.10.1) and tested with telnet if I can access remotely SSH (protocol), from CentOS VM2 1 to CentOS VM2 and vice versa, i.e.:

[root@centos ~]# telnet 192.168.10.2 22


Trying 192.168.10.2…
telnet: connect to address 192.168.10.2: No route to host

Then after checking other options and already knowing by using VBox NAT network option I had access to the internet, I tried to attach a standard local IP addresses to both Linux-es as Virtual interfaces (e.g eth0:1), .e.g:

On Linux VM 1:

/sbin/ifconfig eth0:0 192.168.10.1 netmask 255.255.255.0

On Linux VM 2:

/sbin/ifconfig eth1:0 192.168.10.2 netmask 255.255.255.0

Then to test again used telnet

[root@centos ~]# telnet 192.168.10.2 22

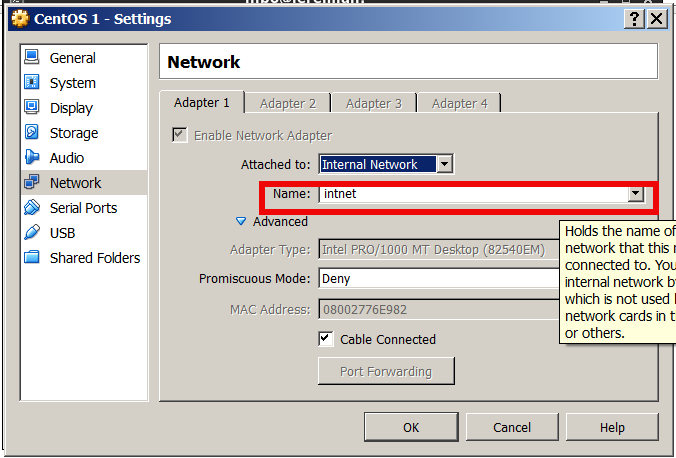
Then I found Virtualbox has a special Internal Networking support

to choose in Attached to drop down menu. According to Internal Networking Virtualbox instructions to put two Virtual Machine hosts inside an Internal network they should be both set in Internal network with identical name.
P. S. It is explicitly stated that using Internal Network will enable access between Guest Virtual Machines OS, but hosts will not have access to the Internet (which in my case doesn't really mattered as I needed the two Linux VMs just as a testbed)

virtualbox-create-internal-local-network-between-guest-host-Linux-Windows1

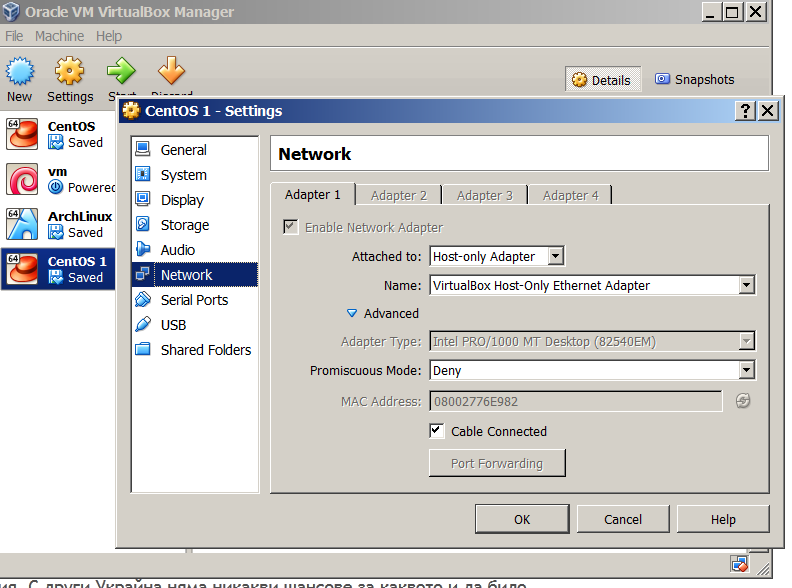
I tried this option but it doesn't work for me for some reason, after some time of research online on how to create local LAN network between 2 Virtual Machines luckily I decided to test all available Virtualbox Networking choices and noticed Host-only adapter.

Selecting Host-only Adapter and using terminal to re-fetch IP address over dhcp:

virtualbox-connect-in-local-lan-network-linux-and-windows-servers-hosts-only-adapter

On CentOS VM1

dhclient eht0

On CentOS VM2

dhclient eth1

assigned me two adjoining IPs – (192.168.56.101 and 192.168.56.102).

Connection between the 2 IPs 192.168.56.101 and 192.168.56.102 on TCP and UDP and ICMP protocol works, now all left is to install MySQL cluster on both nodes.