Posts Tagged ‘CentOS’

Remote Desktop client – Remmina, Connect Remote to MS Windows VNC hosts from Linux

Friday, May 31st, 2013

remmina remote connet to windows linux vnc client logo

If you're system administrator, who use Linux as Desktop. You surely want to check out Remmina – The GTK+ Remote Desktop Client.

As far as I tested among all VNC Linux clients I know Remmina is definitely the one of choice in terms of Interface simplicity / stability and remote connection level of responsibility.

Before finding out about Remmina existence, I tried xtightvncviewer, xvnc4viewer, gvncviewer, gtkvncviewer. xtightvncviewer, xvncviewer and gvncviewer are more for console geeks and hence either they lack GUI interface or user interface looks terrible.

GTKVncViewer's interface is also not bad but still not со nice as Remmina's.

gtkvncviewer Debian GNU Linux Wheezy screenshot Linux VNC simple client

As you see in above shot, gtkvncviewer lacks any configuration. The only thing it can do is connect to remote host and you have option to configure nothing related how remote connection will respond, what type of Resolution to use etc.

I know of of no other Linux VNC Clients that has configurability and GUI interface of Remmina.


As of time of writting Remmina is at stable version 1.0 and supports following Remote connection protocols:

  • VNC
  • VNC
  • RDP
  • RDPF
  • RDPS
  • SFTP
  • SSH

Remmina is available across mostly all Linux mainstream distributions:

To install Remmina on Debian / Ubuntu and deb derivatives:

debian:~# apt-get –yes install remmina
….

On Redhats (Fedora, CentOS, RHEL – RPM based Linuxes) install via:

[root@centos ~]# yum –yes install remmina

Below are few screenshots of Remmina:

Remmina Linux remote vnc connect best software gui frontend screenshot

Linux VNC best VNC connect tool Remmina preferences screenshot

One of best Remmina feature is it supports Tabbing just like in Firefox. You can open a number of Remote VNC connects to different Windows hosts and manage them all by switching from tab to tab.

Remmina best vnc linux desktop client screenshot with tabs / What is best VNC client for Linux

How to keep track of All User accounts executed commands, highest CPU consumers and user times on Linux

Tuesday, February 5th, 2013

Linux accounting keeping an eye on all user run commands time accounting find cpu eaters

For people interested into statistics of how Linux existing users are spending, there log in times and what kind of commands each of users is executing, take a look at acct
acct is existing on all mainstream Linux distributions is a great sysadmin tool. acct is a great tool whether you have a system where a multitude of users you don't trust has to be monitored. It is an absolutely must have for anyone willing to run, lets say  experimental honeypot or  free shell host. acct is useful for paranoid sysadmins who like to always knows what there users are running as well as in situation where some of users is suspected to be a potential cracker trying to root the host.

Below is description of acct package on Debian:

# apt-cache show acct| grep -i description -A 8
Description: The GNU Accounting utilities for process and login accounting
 GNU Accounting Utilities is a set of utilities which reports and summarizes
 data about user connect times and process execution statistics.
 .
 "Login accounting" provides summaries of system resource usage based on connect
 time, and "process accounting" provides summaries based on the commands
 executed on the system.
 .
 The 'last' command is provided by the sysvinit package and not included here.

To start using acct, just install it with usual:

# apt-get install --yes acct

(Whether on Debian / Ubuntu Linux);

On Fedora, CentOS and RHEL and other RPM based Linuxes issue;

yum --y install psacct

On deb based Linux distributions, whether acct collects statistics is controlled via:

/etc/default/acct

# cat /etc/default/acct
# Defaults for acct

# If you want to keep acct installed, but not started automatically, set this
# variable to 0. Because /etc/cron.daily/acct calls the initscript daily, it is
# not sufficient to stop acct once after booting if your machine remains up.
ACCT_ENABLE="1"

# Amount of days that the logs are kept.
ACCT_LOGGING="30"

After installed to start collecting user "process accounting" data run acct via init script;

# /etc/init.d/acct start
Turning on process accounting, file set to '/var/log/account/pacct'.
Done..

The file gathering info on system usage, CPU load, user ran commands /var/log/account/psacct is a binary and unreadable tailing it with tail -f .

On CentOS / Fedora Linux to Enable acct account statistics gathering in future boot and from present moment on do;

# chkconfig psacct on
# /etc/init.d/psacct start

1. Find out all commands executed by Linux user account (lastcomm)

Once user accounting is running to get information of every command ever executed on user shell use lastcomm cmd. For example:

# lastcomm hipo

bash              F    hipo     pts/1      0.00 secs Tue Feb  5 00:20
bash              F    hipo     pts/1      0.03 secs Tue Feb  5 00:20
sed                    hipo     pts/1      0.00 secs Tue Feb  5 00:20
bash              F    hipo     pts/1      0.00 secs Tue Feb  5 00:20
uname                  hipo     pts/1      0.00 secs Tue Feb  5 00:20
bash              F    hipo     pts/1      0.00 secs Tue Feb  5 00:20
dircolors              hipo     pts/1      0.00 secs Tue Feb  5 00:20
bash              F    hipo     pts/1      0.00 secs Tue Feb  5 00:20
uname                  hipo     pts/1      0.00 secs Tue Feb  5 00:20
bash              F    hipo     pts/1      0.00 secs Tue Feb  5 00:20
ls                     hipo     pts/1      0.00 secs Tue Feb  5 00:20
bash              F    hipo     pts/1      0.00 secs Tue Feb  5 00:20
bash              F    hipo     pts/1      0.03 secs Tue Feb  5 00:20
sed                    hipo     pts/1      0.00 secs Tue Feb  5 00:20
bash              F    hipo     pts/1      0.00 secs Tue Feb  5 00:20
uname                  hipo     pts/1      0.00 secs Tue Feb  5 00:20
bash              F    hipo     pts/1      0.00 secs Tue Feb  5 00:20
id                     hipo     pts/1      0.00 secs Tue Feb  5 00:20
mesg                   hipo     pts/1      0.00 secs Tue Feb  5 00:20
verse                  hipo     pts/1      0.00 secs Tue Feb  5 00:20
cowrand                hipo     pts/1      0.00 secs Tue Feb  5 00:20
cowsay                 hipo     pts/1      0.03 secs Tue Feb  5 00:20
cowrand           F    hipo     pts/1      0.00 secs Tue Feb  5 00:20
head                   hipo     pts/1      0.00 secs Tue Feb  5 00:20
tail                   hipo     pts/1      0.00 secs Tue Feb  5 00:20
head                   hipo     pts/1      0.00 secs Tue Feb  5 00:20
ls                     hipo     pts/1      0.00 secs Tue Feb  5 00:20
cowrand           F    hipo     pts/1      0.00 secs Tue Feb  5 00:20
awk                    hipo     pts/1      0.00 secs Tue Feb  5 00:20
wc                     hipo     pts/1      0.00 secs Tue Feb  5 00:20
ls                     hipo     pts/1      0.00 secs Tue Feb  5 00:20

A lot of the initial commands shown to run on pts/1 is not actual commands, by the user but are just stuff run on user login time via /etc/bash.bashrc, /etc/profile, ~/.bashrc. ~/.bash_profile.

lastcomm displayed output from 2nd column is a special flag giving more information on how and for what purpose command was executed. In above output
F
– indicates the command run after a fork.
X – is returned if a command exit with SIGTERM (kill signal)
D – in case of generated command core dump (D is good one to look for whether checking a suspicious user profile, as it is so common exploits use core dumping to get root superuser access)
S – means the command is run with superuser privileges (this one you will see usually whether inspecting user profile of a cracker who run exploit using core dump – a lot of Ds followed by some shell code to run as superuser)

2. Get statistics on CPU use time of services (daemons) and user accounts

psacct is very handy, whether you have CPU server overloads and you have difficulty finding out what are the "CPU hungry processes". To get those use summarized accounting information tool;

# sa -m
                                     2619      31.06re       0.54cp         0avio      2907k
root                                 2448      30.19re       0.52cp         0avio      2817k
www-data                               33       0.06re       0.02cp         0avio      3687k
hipo                                   72       0.15re       0.01cp         0avio      6217k
qscand                                 11       0.36re       0.00cp         0avio      5326k
vpopmail                               48       0.25re       0.00cp         0avio      1486k
qmails                                  6       0.00re       0.00cp         0avio       968k
sshd                                    1       0.04re       0.00cp         0avio     12632k

-m (prints user summary).

3. Find all system users running certain commands

Another good use of lastcomm command is to grep over all users executed command for precise commands of interest. One very good use case is if you catch a system abuser running certain exploit or DoS tool on the host and you want to make sure no-one else on the system doesn't try running it.

# lastcomm ls
ls                     www-data __         0.00 secs Tue Feb  5 00:40
ls                     www-data __         0.00 secs Tue Feb  5 00:30
ls                     hipo     pts/7      0.00 secs Tue Feb  5 00:20
ls                     hipo     pts/1      0.00 secs Tue Feb  5 00:20
ls                     www-data __         0.00 secs Tue Feb  5 00:20
ls                     root     pts/0      0.00 secs Tue Feb  5 00:10
ls                     www-data __         0.00 secs Tue Feb  5 00:10
 

4. Get statistics of most active system users in hours

There is one tool called ac, which is similar in what it does to last command, just like last it uses /var/log/wtmp binary log file to get its user login times stats . The difference is ac provides more and better structured user login time length info.

Its very useful if you want to have idea, which user spends most time connected to host.

$ ac -p
    sic                                  4.86
    hipo                                 4.80
    root                                25.80
    play                                 0.02

To get general info on how much overall hours all existing users spend doing stuff on node;

$ ac total 35.61

To know which days from the month users were most active:

$ ac -d
Feb 1 total 14.54
Feb 2 total 0.97
Feb 3 total 12.47
Feb 4 total 5.96
Today total 1.73

Adding Teamviewer to auto start on Linux GNOME login

Friday, February 1st, 2013

Administrating Linux via graphical interface is not common, however sometimes it is necessery. There are plenty of ways to remotely administrate with GUI Linux. You can connect to remote Xserver and launch X session via xinit, connect via (Gnome Display Manager) GDM, use nomachine NX server / client (if you're on slow connection line) or use the good old Teamviewer.

As Teamviewer works pretty well on both Windows and Linux in last times I like using teamviewer as a standard. It is freeware and it often disconnects with the annoying Trial message, but in general for managing something quick on remote desktop it is nice.

To use teamviewer, you need to have it installed on the Linux host via deb or rpm:

Whether on Debian / Ubuntu use:


# wget http://www.teamviewer.com/download/version_8x/teamviewer_linux_x64.deb
.....
# dpkg -i teamviewer_linux_x64.deb
...
....


On Fedora, CentOS, RHEL run:

# wget -q http://www.teamviewer.com/download/teamviewer_linux.rpm
# rpm -Uvh teamviewer_linux.rpm
.....

Once package is installed teamviewer is installed in /opt/teamviewer/* there is a tiny wrapper run script in /usr/bin/teamviewer – evoking TeamViewer to be run via wine emulation.

Hence to make TeamViewer start on certain user GNOME login the script has to run on GNOME user login session.
In both GNOME 2 and GNOME 3 what is run on user login is managed through gnome-session-properties thus /usr/bin/teamviewer has to be set to run through gnome-session-properties (to run it press ALT+F2 or type it directly in gnome-terminal)

user@linux:~$ gnome-session-properties

A window like in below screenshot pops up and from there Add TeamViewer.

Adding Teamviewer to auto start on Linux Debian Fedora CentOS GNOME non privileged user

To be able to later connect via a Remote host with another TeamViewer peer launch TeamViewer and configure permanent password through menus:

Extras -> Options -> Security

teamviewer extras options security configuring teamviewier permanent password for ID

All left is to write down your Teamviewer Remote Connect ID and permanent set password

Teamviewer remote connect ID screnshot Linux

After next succesful GNOME login teamviewer will just pop-up. Enjoy

Linux: Convert recursively files content from WINDOWS-CP1251 to Unicode UTF-8 with recode and iconv

Wednesday, January 9th, 2013


Linux How to make mass file convert of charset windows CP1251 toutf8 and to other encodings

Some time ago I've written a tiny article, explaining how converting of HTML or TEXT file content inside file can be converted with iconv.

Just recently, I've made mirror of a whole website with its directory structure with wget cmd. The website to be mirrored was encoded with charset Windows-1251 (which is now a bit obsolete and not very recommended to use), where my Apache Webserver to which I mirrored is configured by default to deliver file content (.html, txt, js, css …) in newer and more standard (universal cyrillic) compliant UTF-8 encoding. Thus opening in browser from my website, the website was delivered in UTF-8, whether the file content itself was with encoding Windows CP-1251; Thus I ended up seeing a lot of monkey unreadable characters instead of Slavonic letters. To deal with the inconvenience, I've used one liner script that converts all Windows-1251 charset files to UTF-8. This triggered me writting this little post, hoping the info might be useful to others in a similar situation to mine:

1. Make Mass file charset / encoding convertion with recode

On most Linux hosts, recode is probably not installed. If you're on Debian / Ubuntu Linux install it with apt;

apt-get install --yes recode

It is also installable from default repositories on Fedora, RHEL, CentOS with:


yum -y install recode

Here is recode description taken from man page:

NAME
       recode – converts files between character sets

find . -name "*.html" -exec recode WINDOWS-1251..UTF-8 {} \;

If you have few file extensions whose chracter encoding needs to be converted lets say .html, .htm and .php use cmd:

find . -name "*.html" -o -name '*.htm' -o -name '*.php' -exec recode WINDOWS-1251..UTF-8 {} \;

Btw I just recently learned how one can look for few, file extensions with find under one liner the argument to pass is -o -name '*.file-extension', as you can see from  example, you can look for as  many different file extensions as you like with one find search command.

After completing the convertion, I've remembered that earlier I've also used iconv on a couple of occasions to convert from Cyrillic CP-1251 to Cyrillic UTF-8, thus for those who prefer to complete convertion with iconv here is an alternative a bit longer method using for cycle + mv and iconv.

2. Mass file convertion with iconv

for i in $(find . -name "*.html" -print); do
iconv -f WINDOWS-1251 -t UTF-8 $i > $i.utf-8;
mv $i $i.bak;
mv $i.utf-8 $i;
done

As you see in above line of code, there are two occurances of move command as one is backupping all .html files and second mv overwrites with files with converted encoding. For any other files different from .html, just change in cmd find . -iname '*.html' to whatever file extension.

How to find fastest RPM ( yum ) mirror on Fedora, CentOS and RHEL Linux

Wednesday, November 14th, 2012

Something very useful Fedora or RHEL users in terms is to configure YUM, download from quickest network speed package repository. On RHEL and Fedora developers made it be a piece of cake.

All you have to do is run command:

[root@centos]# yum install yum-fastestmirror


That's it the package installs one python script which, takes care of finding the closest RPM repository for your distro as well as check among a list of RPM mirrors which one is fastest and has lesser hosts ( hops ) to your system. It is pretty much like Debian's netselect (the tool on Debian which finds nearast fastest deb repository), except it is much simplistic. Once yum-fastestmirror package is installed you don't need to do nothing else, the script is loaded as a YUM plugin so it does all work on finding closest repository by itself. The list of all mirrors, among yum-fastestmirror will evaluate is: [root@centos ]# grep -i host /etc/yum/pluginconf.d/fastestmirror.conf
hostfilepath=/var/cache/yum/timedhosts.txt
maxhostfileage=10
[root@centos ]# wc -l /var/cache/yum/timedhosts.txt 50 /var/cache/yum/timedhosts.txt

The whole list of RPM package mirrors as of time of writing as taken from CentOS 5.6 is here

Boost local network performance (Increase network thoroughput) by enabling Jumbo Frames on GNU / Linux

Saturday, March 10th, 2012

Jumbo Frames boost local network performance in GNU / Linux

So what is Jumbo Frames? and why, when and how it can increase the network thoroughput on Linux?

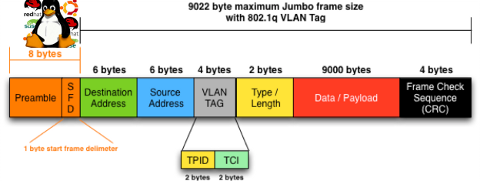
Jumbo Frames are Ethernet frames with more than 1500 bytes of payload. They can carry up to 9000 bytes of payload. Many Gigabit switches and network cards supports them.
Jumbo frames is a networking standard for many educational networks like AARNET. Unfortunately most commercial ISPs doesn't support them and therefore enabling Jumbo frames will rarely increase bandwidth thoroughput for information transfers over the internet.
Hopefully in the years to come with the constant increase of bandwidths and betterment of connectivity, jumbo frames package transfers will be supported by most ISPs as well.
Jumbo frames network support is just great for is small local – home networks and company / corporation office intranets.

Thus enabling Jumbo Frame is absolutely essential for "local" ethernet networks, where large file transfers occur frequently. Such networks are networks where, there is often a Video or Audio streaming with high quality like HD quality on servers running File Sharing services like Samba, local FTP sites,Webservers etc.

One other advantage of enabling jumbo frames is reduce of general server overhead and decrease in CPU load / (CPU usage), when transferring large or enormous sized files.Therefore having jumbo frames enabled on office network routers with GNU / Linux or any other *nix OS is vital.

Jumbo Frames traffic is supported in GNU / Linux kernel since version 2.6.17+ in earlier 2.4.x it was possible through external third party kernel patches.

1. Manually increase MTU to 9000 with ifconfig to enable Jumbo frames

debian:~# /sbin/ifconfig eth0 mtu 9000

The default MTU on most GNU / Linux (if not all) is 1500, to check the default set MTU with ifconfig:

linux:~# /sbin/ifconfig eth0|grep -i mtu
UP BROADCAST MULTICAST MTU:1500 Metric:1

To take advantage of Jumbo Frames, all that has to be done is increase the default Maximum Transmission Unit from 1500 to 9000

For those who don't know MTU is the largest physical packet size that can be transferred over the network. MTU is measured by default in bytes. If a information has to be transferred over the network which exceeds the lets say 1500 MTU (bytes), it will be chopped and transferred in few packs each of 1500 size.

MTUs differ on different netework topologies. Just for info here are the few main MTUs for main network types existing today:
 

  • 16 MBit/Sec Token Ring – default MTU (17914)
  • 4 Mbits/Sec Token Ring – default MTU (4464)
  • FDDI – default MTU (4352)
  • Ethernet – def MTU (1500)
  • IEEE 802.3/802.2 standard – def MTU (1492)
  • X.25 (dial up etc.) – def MTU (576)
  • Jumbo Frames – def max MTU (9000)

Setting the MTU packet frames to 9000 to enable Jumbo Frames is done with:

linux:~# /sbin/ifconfig eth0 mtu 9000

If the command returns nothing, this most likely means now the server can communicate on eth0 with MTUs of each 9000 and therefore the network thoroughput will be better. In other case, if the network card driver or card is not a gigabit one the cmd will return error:

SIOCSIFMTU: Invalid argument

2. Enabling Jumbo Frames on Debian / Ubuntu etc. "the Debian way"

a.) Jumbo Frames on ethernet interfaces with static IP address assigned Edit /etc/network/interfaces and you should have for each of the interfaces you would like to set the Jumbo Frames, records similar to:

Raising the MTU to 9000 if for one time can be done again manually with ifconfig

debian:~# /sbin/ifconfig eth0 mtu 9000

iface eth0 inet static
address 192.168.0.5
network 192.168.0.0
gateway 192.168.0.254
netmask 255.255.255.0
mtu 9000

For each of the interfaces (eth1, eth2 etc.), add a chunk similar to one above changing the changing the IPs, Gateway and Netmask.

If the server is with two gigabit cards (eth0, eth1) supporting Jumbo frames add to /etc/network/interfaces :

iface eth0 inet static
address 192.168.0.5
network 192.168.0.0
gateway 192.168.0.254
netmask 255.255.255.0
mtu 9000

iface eth1 inet static
address 192.168.0.6
network 192.168.0.0
gateway 192.168.0.254
netmask 255.255.255.0
mtu 9000

b.) Jumbo Frames on ethernet interfaces with dynamic IP obtained via DHCP

Again in /etc/network/interfaces put:

auto eth0
iface eth0 inet dhcp
post-up /sbin/ifconfig eth0 mtu 9000

3. Setting Jumbo Frames on Fedora / CentOS / RHEL "the Redhat way"

Enabling jumbo frames on all Gigabit lan interfaces (eth0, eth1, eth2 …) in Fedora / CentOS / RHEL is done through files:
 

  • /etc/sysconfig/network-script/ifcfg-eth0
  • /etc/sysconfig/network-script/ifcfg-eth1

etc. …
append in each one at the end of the respective config:

MTU=9000

[root@fedora ~]# echo 'MTU=9000' >> /etc/sysconfig/network-scripts/ifcfg-eth


a quick way to set Maximum Transmission Unit to 9000 for all network interfaces on on Redhat based distros is by executing the following loop:

[root@centos ~]# for i in $(echo /etc/sysconfig/network-scripts/ifcfg-eth*); do \echo 'MTU=9000' >> $i
done

P.S.: Be sure that all your interfaces are supporting MTU=9000, otherwise increase while the MTU setting is set will return SIOCSIFMTU: Invalid argument err.
The above loop is to be used only, in case you have a group of identical machines with Lan Cards supporting Gigabit networks and loaded kernel drivers supporting MTU up to 9000.

Some Intel and Realtek Gigabit cards supports only a maximum MTU of 7000, 7500 etc., so if you own a card like this check what is the max MTU the card supports and set it in the lan device configuration.
If increasing the MTU is done on remote server through SSH connection, be extremely cautious as restarting the network might leave your server inaccessible.

To check if each of the server interfaces are "Gigabit ready":

[root@centos ~]# /sbin/ethtool eth0|grep -i 1000BaseT
1000baseT/Half 1000baseT/Full

If you're 100% sure there will be no troubles with enabling MTU > 1500, initiate a network reload:

[root@centos ~]# /etc/init.d/network restart
...

4. Enable Jumbo Frames on Slackware Linux

To list the ethernet devices and check they are Gigabit ones issue:

bash-4.1# lspci | grep [Ee]ther
0c:00.0 Ethernet controller: D-Link System Inc Gigabit Ethernet Adapter (rev 11)
0c:01.0 Ethernet controller: D-Link System Inc Gigabit Ethernet Adapter (rev 11)

Setting up jumbo frames on Slackware Linux has two ways; the slackware way and the "universal" Linux way:

a.) the Slackware way

On Slackware Linux, all kind of network configurations are done in /etc/rc.d/rc.inet1.conf

Usual config for eth0 and eth1 interfaces looks like so:

# Config information for eth0:
IPADDR[0]="10.10.0.1"
NETMASK[0]="255.255.255.0"
USE_DHCP[0]=""
DHCP_HOSTNAME[1]=""
# Config information for eth1:
IPADDR[1]="10.1.1.1"
NETMASK[1]="255.255.255.0"
USE_DHCP[1]=""
DHCP_HOSTNAME[1]=""

To raise the MTU to 9000, the variables MTU[0]="9000" and MTU[1]="9000" has to be included after each interface config block, e.g.:

# Config information for eth0:
IPADDR[0]="172.16.1.1"
NETMASK[0]="255.255.255.0"
USE_DHCP[0]=""
DHCP_HOSTNAME[1]=""
MTU[0]="9000"
# Config information for eth1:
IPADDR[1]="10.1.1.1"
NETMASK[1]="255.255.255.0"
USE_DHCP[1]=""
DHCP_HOSTNAME[1]=""
MTU[1]="9000"

bash-4.1# /etc/rc.d/rc.inet1 restart
...

b.) The "Universal" Linux way

This way is working on most if not all Linux distributions.
Insert in /etc/rc.local:

/sbin/ifconfig eth0 mtu 9000 up
/sbin/ifconfig eth1 mtu 9000 up

5. Check if Jumbo Frames are properly enabled

There are at least two ways to display the MTU settings for eths.

a.) Using grepping the MTU from ifconfig

linux:~# /sbin/ifconfig eth0|grep -i mtu
UP BROADCAST MULTICAST MTU:9000 Metric:1
linux:~# /sbin/ifconfig eth1|grep -i mtu
UP BROADCAST MULTICAST MTU:9000 Metric:1

b.) Using ip command from iproute2 package to get MTU

linux:~# ip route get 192.168.2.134
local 192.168.2.134 dev lo src 192.168.2.134
cache mtu 9000 advmss 1460 hoplimit 64

linux:~# ip route show dev wlan0
192.168.2.0/24 proto kernel scope link src 192.168.2.134
default via 192.168.2.1

You see MTU is now set to 9000, so the two server lans, are now able to communicate with increased network thoroughput.
Enjoy the accelerated network transfers 😉


Recommended logrorate practices on heavy loaded (busy) Apache Linux servers

Wednesday, March 7th, 2012

Apache logrotate Debian good configuration for heavy loaded servers

If you are sys admin of Apache Webserver running on Debian Linux relying on logrorate to rorate logs, you might want to change the default way logroration is done.

Little changes in the way Apache log files are served on busy servers can have positive outcomes on the overall way the server CPU units burden. A good logrotation strategy can also prevent your server from occasional extra overheads or downtimes.

The way Debian GNU / Linux process logs is well planned for small servers, however the default logroration Apache routine doesn't fit well for servers which process millions of client requests each day.

I happen to administrate, few servers which are constantly under a heavy load and have occasionally overload troubles because of Debian's logrorate default mechanism.

To cope with the situation I have made few modifications to /etc/logrorate.d/apache2 and decided to share it here hoping, this might help you too.

1. Rotate Apache acccess.log log file daily instead of weekly

On Debian Apache's logrorate script is in /etc/logrotate.d/apache2

The default file content will be like so like so:

debian:~# cat /etc/logrotate.d/apache2
/var/log/apache2/*.log {
weekly
missingok
rotate 52
size 1G
compress
delaycompress
notifempty
create 640 root adm
sharedscripts
postrotate
if [ -f "`. /etc/apache2/envvars ; echo ${APACHE_PID_FILE:-/var/run/apache2.pid}`" ]; then
/etc/init.d/apache2 reload > /dev/null
fi
endscript
}

To change the rotation from weekly to daily change:

weekly

to

#weekly

2. Disable access.log log file gzip compression

By default apache2 logrotate script is tuned ot make compression of rotated file (exmpl: copy access.log to access.log.1 and gzip it, copy access.log to access.log.2 and gzip it etc.). On servers where logs are many gigabytes, once logrotate initiates its scheduled work it will have to compress an enormous log record of apache requests. On very busy Apache servers from my experience, just for a day the log could grow up to approximately 8 / 10 Gigabytes.
I'm sure there are more busy servers out there, which log files are growing to over 100GB for just a single day.
Gzipping a 100GB file piece takes an enormous load on the CPU, as well as often takes long time. When this logrotation gzipping occurs at a moment where the servers CPU cores are already heavy loaded from Apache serving HTTP requests, Apache server becomes inaccessible to most of the clients.
Then for end clients various oddities are experienced, for example Apache dropped connection errors, webserver returning empty pages, or simply inability to respond to the client browser.
Sometimes as a result of the overload, even secure shell connection to SSHD to the server is impossible …

To prevent your server from this roration overloads remove logrorate's default access.log gzipping by commenting:

compress

to

#comment

3. Change maximum log roration by logrorate to be up to 30

By default logrorate is configured to create and keep up to 52 rotated and gzipped access.log files, changing this to a lower number is a good practice (in my view), in cases where log files grow daily to 10 or more GBs. Doing so will save a lot of disk space and reduce the chance the hard disk gets filled in because of the multiple rorated ungzipped enormous access.log files.

To tune the default keep max rorated logs to 30, change:

rotate 52

to rotate 30

The way logrorate's apache log processing on RHEL / CentOS Linux is working better on high load servers, by default on CentOS logrorate is not configured to do log gzipping at all.

Here is the default /etc/logrorate.d/httpd script for
CentOS release 5.6 (Final)

[hipo@centos httpd]$ cat /etc/logrotate.d/httpd /var/log/httpd/*log {
missingok
notifempty
sharedscripts
postrotate
/bin/kill -HUP `cat /var/run/httpd.pid 2>/dev/null` 2> /dev/null || true
endscript
}


Enabling Active FTP connections on CentOS 5.5

Tuesday, January 4th, 2011

If you experience problems with making your CentoOS 5.5 work with active ftp connections , e.g. every connection you make to the FTP needs to be in a passive mode or the file transfer or FTP directory listing doesn’t initialize at all, here is how you can solve it:

Edit the file /etc/sysconfig/iptables-config and change their the line:

IPTABLES_MODULES="ip_conntrack_netbios_ns"

to look like:

IPTABLES_MODULES=”ip_conntrack_netbios_ns ip_nat_ftp ip_conntrack_ftp”

Adding the two modules ip_nat_ftp and ip_conntrack_ftp will instruct the CentOS’s /etc/init.d/iptables firewall rules to initialize the kernel modules ip_nat_ftp and ip_conntrack_ftp

This modules solves problems with Active FTP not working caused by a host running behind a firewall router or behind a NAT.

This will hopefully resolve your issues with Active FTP not working on CentOS.

If loading this two kernel modules doesn’t solve the issues and you’re running vsftpd FTP server, then it’s likely that the Active FTP non-working problems are caused by your VSFTPD configuration.

If that’s the case something that might help is setting in /etc/vsftpd/vsftpd.conf the following variables:

pasv_enable=NO
pasv_promiscuous=YES

Of course as a final step you will need to restart the iptables firewall:

[root@centos: ~]# /etc/init.d/iptables restart
Flushing firewall rules: [ OK ]
Setting chains to policy ACCEPT: filter [ OK ]
Unloading iptables modules: [ OK ]
Applying iptables firewall rules: [ OK ]
Loading additional iptables modules: ip_conntrack_netbios_ns
ip_nat_ftp ip_conntrack_ftp [ OK ]

As you can see the two modules ip_nat_ftp and ip_conntrack_ftp are now loaded as additional modules.
Moreover if you have also modified your vsftpd.conf you need to restart the vsftpd via the init script:

[root@centos: ~]# /etc/init.d/vsftpd restart
Shutting down vsftpd: [ OK ]
Starting vsftpd for vsftpd: [ OK ]

If adding this two modules and adding this two extra variables in vsftpd configuration doesn’t help with making your FTP server to work in Active FTP mode , it’s very likely that the whole troubles comes from the firewall configuration, so an edit of /etc/sysconfig/iptables would be necessary;

To find out if the firewall is the source of the FTP not able to enter active mode, stop your firewall for a while by issuing the cmd:

[root@centos:~]# /etc/init.d/iptables stop

If iptables is the source of thepassive ftp troubles, an iptables rules similar to this should make your firewall allow active ftp connections;

*filter :INPUT ACCEPT [0:0]
:FORWARD ACCEPT [0:0]
:OUTPUT ACCEPT
[0:0] -A INPUT -i lo -j ACCEPT -A INPUT -d 127.0.0.0/255.0.0.0 -i ! lo -j REJECT –reject-with icmp-port-unreachable
-A INPUT -m state –state RELATED,ESTABLISHED -j ACCEPT
-A INPUT -p tcp -m tcp –dport 80 -j ACCEPT
-A INPUT -p tcp -m state –state NEW -m tcp –dport 44444 -j ACCEPT
-A INPUT -p tcp -m state –state NEW -m tcp –dport 21 -j ACCEPT -A INPUT -p icmp -m icmp –icmp-type 8 -j ACCEPT
-A INPUT -j REJECT –reject-with icmp-port-unreachable -A FORWARD -j REJECT –reject-with icmp-port-unreachable
-A OUTPUT -j ACCEPT -A OUTPUT -p tcp -m tcp –dport 21 -m state –state ESTABLISHED,RELATED -j ACCEPT


How to Secure Apache on FreeBSD and CentOS against Range: header DoS attack (affecting Apache 1.3/2.x)

Thursday, June 30th, 2011

How to Secure Apache webserver on FreeBSD and CentOS against Range: header Denial of Service attack

Recently has become publicly known for the serious hole found in all Apache webserver versions 1.3.x and 2.0.x and 2.2.x. The info is to be found inside the security CVE-2011-3192 https://issues.apache.org/bugzilla/show_bug.cgi?id=51714

Apache remote denial of service is already publicly cirtuculating, since about a week and is probably to be used even more heavily in the 3 months to come. The exploit can be obtained from exploit-db.com a mirror copy of #Apache httpd Remote Denial of Service (memory exhaustion) is for download here

The DoS script is known in the wild under the name killapache.pl
killapache.pl PoC depends on perl ForkManager and thus in order to be properly run on FreeBSD, its necessery to install p5-Parallel-ForkManager bsd port :

freebsd# cd /usr/ports/devel/p5-Parallel-ForkManager
freebsd# make install && make install clean
...

Here is an example of the exploit running against an Apache webserver host.

freebsd# perl httpd_dos.pl www.targethost.com 50
host seems vuln
ATTACKING www.targethost.com [using 50 forks]
:pPpPpppPpPPppPpppPp
ATTACKING www.targethost.com [using 50 forks]
:pPpPpppPpPPppPpppPp
...

In about 30 seconds to 1 minute time the DoS attack with only 50 simultaneous connections is capable of overloading any vulnerable Apache server.

It causes the webserver to consume all the machine memory and memory swap and consequently makes the server to crash in most cases.
During the Denial of Service attack is in action access the websites hosted on the webserver becomes either hell slow or completely absent.

The DoS attack is quite a shock as it is based on an Apache range problem which started in year 2007.

Today, Debian has issued a new versions of Apache deb package for Debian 5 Lenny and Debian 6, the new packages are said to have fixed the issue.

I assume that Ubuntu and most of the rest Debian distrubtions will have the apache's range header DoS patched versions either today or in the coming few days.
Therefore work around the issue on debian based servers can easily be done with the usual apt-get update && apt-get upgrade

On other Linux systems as well as FreeBSD there are work arounds pointed out, which can be implemented to close temporary the Apache DoS hole.

1. Limiting large number of range requests

The first suggested solution is to limit the lenght of range header requests Apache can serve. To implement this work raround its necessery to put at the end of httpd.conf config:

# Drop the Range header when more than 5 ranges.
# CVE-2011-3192
SetEnvIf Range (?:,.*?){5,5} bad-range=1
RequestHeader unset Range env=bad-range
# We always drop Request-Range; as this is a legacy
# dating back to MSIE3 and Netscape 2 and 3.
RequestHeader unset Request-Range
# optional logging.
CustomLog logs/range-CVE-2011-3192.log common env=bad-range
CustomLog logs/range-CVE-2011-3192.log common env=bad-req-range

2. Reject Range requests for more than 5 ranges in Range: header

Once again to implement this work around paste in Apache config file:

This DoS solution is not recommended (in my view), as it uses mod_rewrite to implement th efix and might be additionally another open window for DoS attack as mod_rewrite is generally CPU consuming.

# Reject request when more than 5 ranges in the Range: header.
# CVE-2011-3192
#
RewriteEngine on
RewriteCond %{HTTP:range} !(bytes=[^,]+(,[^,]+){0,4}$|^$)
# RewriteCond %{HTTP:request-range} !(bytes=[^,]+(?:,[^,]+){0,4}$|^$)
RewriteRule .* - [F]

# We always drop Request-Range; as this is a legacy
# dating back to MSIE3 and Netscape 2 and 3.
RequestHeader unset Request-Range

3. Limit the size of Range request fields to few hundreds
To do so put in httpd.conf:

LimitRequestFieldSize 200

4. Dis-allow completely Range headers: via mod_headers Apache module

In httpd.conf put:

RequestHeader unset Range
RequestHeader unset Request-Range

This work around could create problems on some websites, which are made in a way that the Request-Range is used.

5. Deploy a tiny Apache module to count the number of Range Requests and drop connections in case of high number of Range: requests

This solution in my view is the best one, I've tested it and I can confirm on FreeBSD works like a charm.
To secure FreeBSD host Apache, against the Range Request: DoS using mod_rangecnt, one can literally follow the methodology explained in mod_rangecnt.c header:

freebsd# wget http://people.apache.org/~dirkx/mod_rangecnt.c
..
# compile the mod_rangecnt modulefreebsd# /usr/local/sbin/apxs -c mod_rangecnt.c
...
# install mod_rangecnt module to Apachefreebsd# /usr/local/sbin/apxs -i -a mod_rangecnt.la
...

Finally to load the newly installed mod_rangecnt, Apache restart is required:

freebsd# /usr/local/etc/rc.d/apache2 restart
...

I've tested the module on i386 FreeBSD install, so I can't confirm this steps works fine on 64 bit FreeBSD install, I would be glad if I can hear from someone if mod_rangecnt is properly compiled and installed fine also on 6 bit BSD arch.

Deploying the mod_rangecnt.c Range: Header to prevent against the Apache DoS on 64 bit x86_amd64 CentOS 5.6 Final is also done without any pitfalls.

[root@centos ~]# uname -a;
Linux centos 2.6.18-194.11.3.el5 #1 SMP Mon Aug 30 16:19:16 EDT 2010 x86_64 x86_64 x86_64 GNU/Linux
[root@centos ~]# /usr/sbin/apxs -c mod_rangecnt.c
...
/usr/lib64/apr-1/build/libtool --silent --mode=link gcc -o mod_rangecnt.la -rpath /usr/lib64/httpd/modules -module -avoid-version mod_rangecnt.lo
[root@centos ~]# /usr/sbin/apxs -i -a mod_rangecnt.la
...
Libraries have been installed in: /usr/lib64/httpd/modules
...
[root@centos ~]# /etc/init.d/httpd configtest
Syntax OK
[root@centos ~]# /etc/init.d/httpd restart
Stopping httpd: [ OK ]
Starting httpd: [ OK ]

After applying the mod_rangecnt patch if all is fine the memory exhaustion perl DoS script's output should be like so:

freebsd# perl httpd_dos.pl www.patched-apache-host.com 50
Host does not seem vulnerable

All of the above pointed work-arounds are only a temporary solution to these Grave Apache DoS byterange vulnerability , a few days after the original vulnerability emerged and some of the up-pointed work arounds were pointed. There was information, that still, there are ways that the vulnerability can be exploited.
Hopefully in the coming few weeks Apache dev team should be ready with rock solid work around to the severe problem.

In 2 years duration these is the second serious Apache Denial of Service vulnerability after before a one and a half year the so called Slowloris Denial of Service attack was capable to DoS most of the Apache installations on the Net.

Slowloris, has never received the publicity of the Range Header DoS as it was not that critical as the mod_range, however this is a good indicator that the code quality of Apache is slowly decreasing and might need a serious security evaluation.