Posts Tagged ‘change’

Monitoring Windows hosts with Nagios on Debian GNU/Linux

Tuesday, August 30th, 2011

Nagios logo install and configure nagios to monitor Windows hosts with on Debian GNU/Linux

In this article in short, I’ll explain how I configured Nagios on a Debian GNU/Linux release (Squeeze 6) to monitor a couple of Windows hosts running inside a local network. Now let’s start.

1. Install necessery nagios debian packages

apt-get install nagios-images nagios-nrpe-plugin nagios-nrpe-server nagios-plugins nagios-plugins-basic nagios-plugins-standard
nagios3 nagios3-cgi nagios3-common nagios3-core

2. Edit /etc/nagios-plugins/config/nt.cfg

In the File substitute:

define command { command_name check_nt command_line /usr/lib/nagios/plugins/check_nt -H '$HOSTADDRESS$' -v '$ARG1$' }

With:

define command {
command_name check_nt
command_line /usr/lib/nagios/plugins/check_nt -H '$HOSTADDRESS$' -p 12489 -v $ARG1$ $ARG2$
}

3. Modify nrpe.cfg to put in allowd hoss to connect to the Nagions nrpe server

vim /etc/nagios/nrpe.cfg

Lookup inside for nagios’s configuration directive:

allowed_hosts=127.0.0.1

In order to allow more hosts to report to the nagios nrpe daemon, change the value to let’s say:

allowed_hosts=127.0.0.1,192.168.1.4,192.168.1.5,192.168.1.6

This config allows the three IPs 192.168.1.4-6 to be able to report for nrpe.

For the changes to nrpe server to take effect, it has to be restrarted.

debian:~# /etc/init.d/nagios-nrpe-server restart

Further on some configurations needs to be properly done on the nrpe agent Windows hosts in this case 192.168.1.4,192.168.1.5,192.168.1.6

4. Install the nsclient++ on all Windows hosts which CPU, Disk, Temperature and services has to be monitored

Download the agent from http://sourceforge.net/projects/nscplus and launch the installer, click twice on it and follow the installation screens. Its necessery that during installation the agent has the NRPE protocol enabled. After the installation is complete one needs to modify the NSC.ini
By default many of nsclient++ tracking modules are not enabled in NSC.ini, thus its necessery that the following DLLs get activated in the conf:

FileLogger.dll
CheckSystem.dll
CheckDisk.dll
NSClientListener.dll
SysTray.dll
CheckEventLog.dll
CheckHelpers.dll

Another requirement is to instruct the nsclient++ angent to have access to the Linux installed nagios server again with adding it to the allowed_hosts config variable:

allowed_hosts=192.168.1.1

In my case the Nagios runs on Debian Lenny (Squeeze) 6 and possess the IP address of 192.168.1.1
To test the intalled windows nsclient++ agents are properly installed a simple telnet connection from the Linux host is enough:

5. Create necessery configuration for the nagios Linux server to include all the Windows hosts which will be monitored

There is a window.cfg template file located in /usr/share/doc/nagios3-common/examples/template-object/windows.cfg on Debian.

The file is a good start point for creating a conf file to be understand by nagios and used to periodically refresh information about the status of the Windows hosts.

Thus it’s a good idea to copy the file to nagios3 config directory:

debian:~# mkdir /etc/nagios3/objects
debian:~# cp -rpf /usr/share/doc/nagios3-common/examples/template-object/windows.cfg /etc/nagios3/objects/windows.cfg

A sample windows.cfg content, (which works for me fine) and monitor a couple of Windows nodes running MS-SQL service and IIS and makes sure the services are up and running are:

define host{
use windows-server ; Inherit default values from a template
host_name Windows1 ; The name we're giving to this host
alias Iready Server ; A longer name associated with the host
address 192.168.1.4 ; IP address of the host
}
define host{
use windows-server ; Inherit default values from a template
host_name Windows2 ; The name we're giving to this host
alias Iready Server ; A longer name associated with the host
address 192.168.1.4 ; IP address of the host
}
define hostgroup{
hostgroup_name windows-servers ; The name of the hostgroup
alias Windows Servers ; Long name of the group
}
define hostgroup{
hostgroup_name IIS
alias IIS Servers
members Windows1,Windows2
}
define hostgroup{
hostgroup_name MSSQL
alias MSSQL Servers
members Windows1,Windows2
}
define service{
use generic-service
host_name Windows1
service_description NSClient++ Version
check_command check_nt!CLIENTVERSION
}
define service{ use generic-service
host_name Windows1
service_description Uptime
check_command check_nt!UPTIME
}
define service{ use generic-service
host_name Windows1
service_description CPU Load
check_command check_nt!CPULOAD!-l 5,80,90
}
define service{
use generic-service
host_name Windows1
service_description Memory Usage
check_command check_nt!MEMUSE!-w 80 -c 90
define service{
use generic-service
host_name Windows1
service_description C: Drive Space
check_command check_nt!USEDDISKSPACE!-l c -w 80 -c 90
}
define service{
use generic-service
host_name Windows1
service_description W3SVC
check_command check_nt!SERVICESTATE!-d SHOWALL -l W3SVC
}
define service{
use generic-service
host_name Windows1
service_description Explorer
check_command check_nt!PROCSTATE!-d SHOWALL -l Explorer.exe
}
define service{
use generic-service
host_name Windows2
service_description NSClient++ Version
check_command check_nt!CLIENTVERSION
}
define service{ use generic-service
host_name Windows2
service_description Uptime
check_command check_nt!UPTIME
}
define service{ use generic-service
host_name Windows2
service_description CPU Load
check_command check_nt!CPULOAD!-l 5,80,90
}
define service{
use generic-service
host_name Windows2
service_description Memory Usage
check_command check_nt!MEMUSE!-w 80 -c 90
define service{
use generic-service
host_name Windows2
service_description C: Drive Space
check_command check_nt!USEDDISKSPACE!-l c -w 80 -c 90
}
define service{
use generic-service
host_name Windows2
service_description W3SVC
check_command check_nt!SERVICESTATE!-d SHOWALL -l W3SVC
}
define service{
use generic-service
host_name Windows2
service_description Explorer
check_command check_nt!PROCSTATE!-d SHOWALL -l Explorer.exe
}
define service{ use generic-service
host_name Windows1
service_description SQL port Check
check_command check_tcp!1433
}
define service{
use generic-service
host_name Windows2
service_description SQL port Check
check_command check_tcp!1433
}
The above config, can easily be extended for more hosts, or if necessery easily setup to track more services in nagios web frontend.
6. Test if connectivity to the nsclient++ agent port is available from the Linux server

debian:~# telnet 192.168.58.6 12489
Trying 192.168.58.6...
Connected to 192.168.58.6.
Escape character is '^]'.
asd
ERROR: Invalid password.

Another good idea is to launch on the Windows host the NSClient++ (system tray) , e.g.:

Start, All Programs, NSClient++, Start NSClient++ (system tray).

Test Nagios configuration from the Linux host running nagios and nrpe daemons to check if the check_nt, can succesfully authenticate and retrieve data generated from the nsclient++ on the Windows host:

debian:~# /usr/lib/nagios/plugins/check_nt -H 192.168.1.5 -p 12489 -v CPULOAD -w 80 -c 90 -l 5,80,90,10,80,90

If everything is okay and the remote Windows system 192.168.1.5 has properly configured and running NSClient++ the above command should return an output like:

CPU Load 1% (5 min average) 1% (10 min average) | '5 min avg Load'=1%;80;90;0;100 '10 min avg Load'=1%;80;90;0;100

In case of the command returns:

could not fetch information from server

instead this means that probably there is some kind of problem with authentication or handshake of the Linux host’s nagios check_nt to the Windows server’s running on 12489.

This is sometimes caused by misconfigured NSC.ini file, however in other occasions this error is caused by misconfigured Windows Firewall or because the NSClient++ is not running with Administrator user.

By the way important note to make about Windows 2008r2 is that if NSClient++ is running there it’s absolutely required to Login with Windows Administrator and run the NSClient++ /start , if it’s run through the Run As Adminsitrator with an admin privileged user the aforementioned error might appear, so be careful.
I’ve experienced this error myself and it took me about 40 minutes to find that I have to run it directly with Administrator user after logging as Administrator.

7. Create nagios web iface Apache configuration

nagios debian pachage is shipped with a config which is suitable to be set debian:~# cp -rpf /usr/share/doc/nagios3-common/examples/apache2.conf /etc/apache2/sites-avalable/nagios
debian:~# ln -sf /etc/apache2/sites-available/nagios /etc/apache2/sites-enabled/nagios

The /etc/apache2/sites-available/nagios can easily be configured to work on Virtualhost, to do so the above copied file need to be wrapped inside a VirtualHost directive. For that put in the beginning of the file;

<VirtualHost *:80>

and in the end of the file:

<VirtualHost *:80>

8. Restart nagios server and Apache for the new settings to take effect

debian:~# /etc/init.d/apache2 restart
...
debian:~# /etc/init.d/nagios3 restart

If some custom configuration about tracking the Debian Linux nagios host running services needs to be made, its also helpful for one to check in /etc/nagios3/conf.d

Well that’s mostly what I had to do to make the Nagios3 server to keep track of a small Windows network on Debian GNU/Linux Squeeze 6, hope this small article helps. Cheers 😉
How to make NAT enable hosts in a local network to access the internet, create port forwarding to local IPs behind the router using iptables

Tuesday, August 23rd, 2011

I’m bulding new iptables firewall on one Linux server. The Debian GNU/Linux is required to act as firewall do Network Adress Translation for a small network of office PCs as well as forward some of the inbound ports to hosts from the local network located behind the router.

The local network besides the router had an IP addressing in the class C network e.g. (192.168.1.1-255)

First I procceded and enabled the Network Address Translation via the Linux kernel variable:

linux:~# sysctl -w net.ipv4.ip_forward=1
linux:~# echo 'net.ipv4.ip_forward=1' >> /etc/sysctl.conf

Initially I even forgot to switch on the net.ipv4.ip_forward to 1 (by default this value is set to 0) – GNU/Linux’s default network behaviour is not predetermined to act as network router.
However, since I haven’t configured Network Address Translation for quite some time it completely slipped my mind!

Anyways next the actual iptables rule which makes NAT possible I used is:

linux:~# /sbin/iptables -t nat -A POSTROUTING -s 192.168.1.0/24 ! -d 192.168.1.0/24 -j SNAT --to-source xxx.xxx.xxx.xxx

Whether xxx.xxx.xxx.xxx is the External IP address assigned to the router on eth0

With this very simple rules now Network the local network is capable of accessing the Internet withotu problem.

It’s a good time to say that still many system administrators, still erroneously use MASQUERADE rules instead of SNAT .
IP MASQUERADING is an ancestry from ipchains and these days should be completely abandonded, especially where no often change of primary IP address to access the internet is made.
For dial-ups or other kind of networking, where the IP addresses are often changed still IP MASQUERADING might be a good idea though.

My next goal was to make the Linux router to do port forwarding of Traffic which arrives on port 80 to a IIS server assigned with a local IP address of 192.168.1.5
I did the webserver (port 80), port forwarding from IP xxx.xxx.xxx.xxx to 192.168.1.5 with the iptables rule:

linux:~# /sbin/iptables -t nat -A PREROUTING -d xxx.xxx.xxx.xxx/32 -p tcp -m tcp --dport 80 -j DNAT --to-destination 192.168.1.5:80

There was a requirement to do port forwarding for a Windows remote Desktop running on standard port 3389 from the router to the internal Windows IP address running the IIS webserver, however the company required me to only allow access to the rdesktop 3389 port to certain real IP addresses.
Initially I thought about using the above PREROUTING rule which makes the port redirection to the IIS server and only change port 80 to port 3389 , and then use filter table INPUT chain rules like:

/sbin/iptables -A INPUT -s xx1.xx2.xx3.xx4,1xx,2xx,3xx,4xx,xxx.xxx.xxx.xxx -p tcp -m tcp --dport 3389 -j ACCEPT/sbin/iptables -A INPUT -p tcp -m tcp --dport 3389 -j REJECT --reject-with icmp-port-unreachable
32

However this did not work out, so I decided to give a try to do the same within the filter table using the FORWARD chain, like so:

FORWARD/sbin/iptables -A FORWARD -p tcp -m tcp -s xx1.xx2.xx3.xx4,1xx,2xx,3xx,4xx,xxx.xxx.xxx.xxx -p tcp -m tcp --dport 3389 -j ACCEPT
/sbin/iptables -A FORWARD -p tcp -m tcp --dport 3389 -j REJECT --reject-with icmp-port-unreachable

Adding this rules did not added any filtering to the forwarded remote desktop port. I suspected that somehow probably my above PREROUTING nat rules are read before any other rules and therefore automatically allows any IP address to port fortward traffic.
I’ve checked the iptables documentation and it seems my guess was partially right.

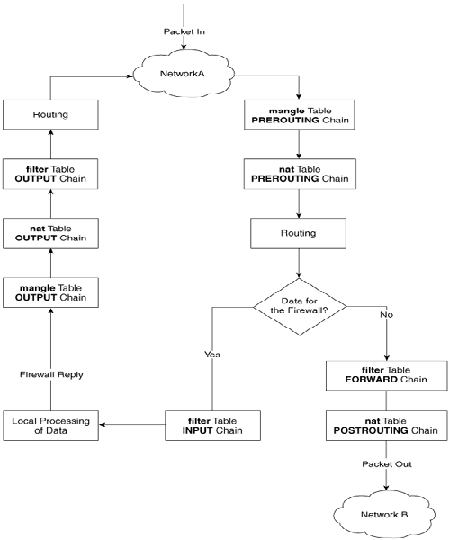
When some kind of network traffic enters the iptables firewall it first goes through the PREROUTING channel and then the traffic flows in a certain order.
iptables packet flow diagram

The iptables network packets flow is clearly seen in above’s diagram a thorough looks gives a very good idea on how packet is being processed by iptables

Finally as I couldn’t think about a good solution on how to only filter the port redirected traffic, which always firstly entered in the POSTROUTING chain, I’ve consulted with the guys in irc.freenode.net in #Netfilter.

I’m quite thanksful as a guy nicknamed Olipro has given me a pretty good picture on the port forwarding POSTROUTING problem and has provided me with a very logical easy and great fix.
He suggested that I only do port forwarding for certain IP addresses instead of allowing all IP addresses and then lookup for a way to allow only some of them and filter the rest.

The iptables rule to restrict the incoming traffic to the remote desktop forwarded port 3389 to few only allowed IP addresses looks like so:

linux:~# /sbin/iptables -t nat -A PREROUTING -d xxx.xxx.xxx.xxx/32 -s xx1.xx2.xx3.xx4,1xx,2xx,3xx,4xx,xxx.xxx.xxx.xxx -p tcp -m tcp –dport 3389 -j DNAT –to-destination 192.168.1.5:3389

Now the three sample IPs passed xx1.xx2.xx3.xx4,1xx,2xx,3xx,4xx,xxx.xxx.xxx.xxx has added to port forward traffic on 3389 to 192.168.1.5

By the way I did not know that newer versions of iptables support passing by multiple IP addresses to the –source or –destination IP. This is really great feature I’ve learned from the good guys from #Netfilter. However one should be careful when using the multiple IPs with -s or -d, it’s really important that the passed consequent IPs has no space between the , delimiter.

Now that’s all my task is completed. All computerse inside the Network 192.168.1.1-255 on the Linux router freely can access the Internet, all IPs are also capable to access the IIS server located behind the NAT as well as only certain IPs are capable of accessing to the IIS remote desktop.
Hope the article helps somebody 😉

Automatic blog posts tagging in wordpress blog 3.1 with (auto-tags) / wp plugin to increase Search Engine ranking

Monday, April 4th, 2011

There are plenty of articles, on how to increase search engine ranking in wordpress and I’m sure this article might be not that interesting but still I thought it might be nice to mention about this 3 wordpress plugins Auto-Tags, SEO Slugs and Platinium SEO Pack which will help you increase your traffic.

Let me say a few words for each of the 3 plugins:

1. Auto-tags
Below is the description of the plugin directly taken from the plugin website http://wordpress.org/extend/plugins/auto-tag/

This plugin uses the Yahoo.com and tagthe.net APIs to find the most relevant keywords
from the content of your post, and then adds them as tags.
New for version 0.2: an options page allows to choose how many tags are
retrieved from each service The tag adding is fully automatic,
so if you're using a plugin like feedwordpress to display RSS feeds
on your blog as posts, everything will get done as the feed
posts are published. No user intervention necessary!

Here are the installation instructions for auto-tags:

debian:~# cd /var/www/blog/wp-content/plugins
debian:/var/www/wp-content/plugins:# wget https://www.pc-freak.net/files/auto-tag.0.4.6.zip
100%[================================>] 14,325 45.3K/s in 0.3s

2011-04-04 12:30:17 (45.3 KB/s) – `auto-tag.0.4.6.zip’ saved [14325/14325]
debian:/var/www/wp-content/plugins:# unzip auto-tag.0.4.6.zip

In the above example my wordpress installation is in /var/www/blog/ , if your wordpress is installed in another directory location change to the respective directory.

To activate the Plugin go to:

Plugins -> Auto Tags
Press over Activate to activate the plugin.

To configure the Auto-tags plugin navigate to:

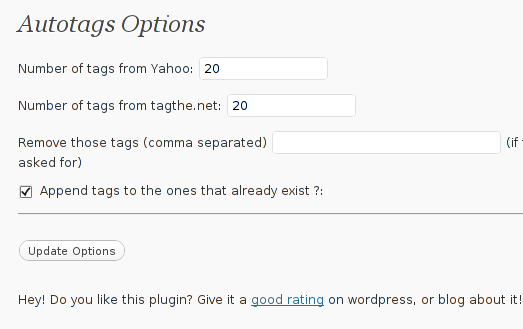
Settings -> Auto tags plugin

Auto tags Screen options

Therein you can configure the number of post tags to be retrieved from Yahoo, tagthe.net. The settings also allows you to disable certain tags you don’t want to appear in your post tags from the field, Remove those tags (comma separated)

The plugin also has an option called Append tags to the ones that already exist which on my wordpress 3.1 installation doesn’t work

After ending up your desired configuration simply press the Update Options button.

Now each time you type a new post in your wordpress blog, a tags related to the post will automatically be included.
Based on this tags Search engines will easily find content that relates to your blog tags and thus your page indexing will get better.

Change mc (midnight commander) editor to mcedit / How to make mcedit default editor for mc once again / Change Debian Default editor the correct way

Monday, March 22nd, 2010

I’m considering to use mc (midnight commander) to review some dozens of source files in php/css and Java. However currently on my Debian Lenny I have configured vim to be the default editor in the system. The way I’ve setupped my vim to be the default editor is not really canonical, I mean I did it through $EDITOR variable in my /root/.bashrc and my ~/.bashrc file. In other words I have:

export VISUAL='vim'
export EDITOR='vim'

in my .bashrc files.
Though the correct way to do that is actually either by:

hipo@noah:~# update-alternatives --config editor

or through by linking /etc/alternatives/editor to your vim for instance:

hipo@noah:~# rm -f /etc/alternatives/editor
hipo@noah:~# ln -sf /usr/bin/vim /etc/alternatives/editor

As a result of my non-canonical ways to do things on the Debian as whenever I tried opening files with midnight commander (mc), files ended opening with vim.
I have to note that really sux a lot and therefore I hurried up to change mc’s behaviour back to normal.
Here is how:

While in mc press F9 and go to the Options menu, then navigate to Configuration
Now tick on the text reading: use internal edIt
afterwards it might be also a good idea to select Save Setup from the Options in order to save changed settings for future use.

A quick way to change picture background with the Gimp

Wednesday, September 23rd, 2009

I wanted to change the background of a picture of a Russian Orthodox Cross I’ve downloaded from the net. After some time spend experimenting and reading a couple of articles online I did it :).
Here is how:
1. Open an Image in Gimp through the File -> Open as Layers menu.2. Use Fuzzy Select tool to select regions based on color of the image you'd like to change the background.3. Open a new File in Gimp via New -> File menus.4. Select again the window containing the image you selected with the Fuzzy Tool and press Ctrl+X.5. Now go again to the newly opened picture and use the: Bucket Fill Tool with some selected color to select thenew background for the future image.6. Now after having a background color already selected use Ctrl+V to paste your previous selection Well congrats, you should now be having the good old image on a shiny new background.END—–

How to change stored password in Mozilla Thunderbird

Thursday, October 1st, 2009

Everytime I have to delete a wrong stored password in Thunderbird
I have to google in order to find the exact location of where
was the menu that allows me to delete the stupid wrongly typed
password. Therefore I decided to blog it just to make it easier
for me while looking for the dumb menu again and again.
Here is how to navigate to the stored password dialog:
Go to:Edit -> Preferences -> Privacy – Passwords -> Edit Saved PasswordsCheers!END—–