Posts Tagged ‘smtp’

Create Linux High Availability Load Balancer Cluster with Keepalived and Haproxy on Linux

Tuesday, March 15th, 2022

keepalived-logo-linux

Configuring a Linux HA (High Availibiltiy) for an Application with Haproxy is already used across many Websites on the Internet and serious corporations that has a crucial infrastructure has long time
adopted and used keepalived to provide High Availability Application level Clustering.
Usually companies choose to use HA Clusters with Haproxy with Pacemaker and Corosync cluster tools.
However one common used alternative solution if you don't have the oportunity to bring up a High availability cluster with Pacemaker / Corosync / pcs (Pacemaker Configuration System) due to fact machines you need to configure the cluster on are not Physical but VMWare Virtual Machines which couldn't not have configured a separate Admin Lans and Heartbeat Lan as we usually do on a Pacemaker Cluster due to the fact the 5 Ethernet LAN Card Interfaces of the VMWare Hypervisor hosts are configured as a BOND (e.g. all the incoming traffic to the VMWare vSphere  HV is received on one Virtual Bond interface).

I assume you have 2 separate vSphere Hypervisor Physical Machines in separate Racks and separate switches hosting the two VMs.
For the article, I'll call the two brand new brought Virtual Machines with some installation automation software such as Terraform or Ansible – vm-server1 and vm-server2 which would have configured some recent version of Linux.

In that scenario to have a High Avaiability for the VMs on Application level and assure at least one of the two is available at a time if one gets broken due toe malfunction of the HV, a Network connectivity issue, or because the VM OS has crashed.
Then one relatively easily solution is to use keepalived and configurea single High Availability Virtual IP (VIP) Address, i.e. 10.10.10.1, which would float among two VMs using keepalived so at a time at least one of the two VMs would be reachable on the Network.
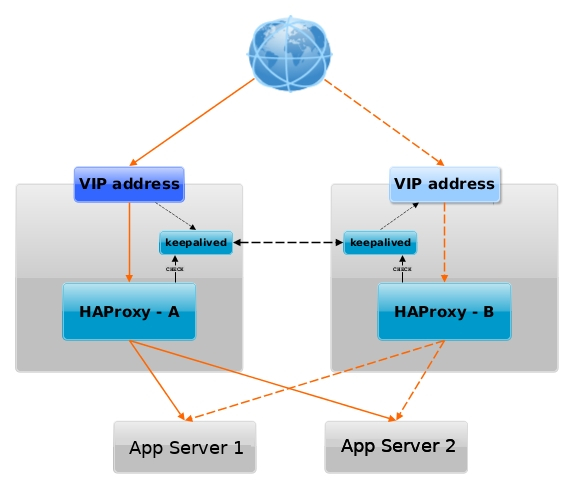
haproxy_keepalived-vip-ip-diagram-linux

Having a VIP IP is quite a common solution in corporate world, as it makes it pretty easy to add F5 Load Balancer in front of the keepalived cluster setup to have a 3 Level of security isolation, which usually consists of:

1. Physical (access to the hardware or Virtualization hosts)
2. System Access (The mechanism to access the system login credetials users / passes, proxies, entry servers leading to DMZ-ed network)
3. Application Level (access to different programs behind L2 and data based on the specific identity of the individual user,
special Secondary UserID,  Factor authentication, biometrics etc.)


1. Install keepalived and haproxy on machines

Depending on the type of Linux OS:

On both machines
 

[root@server1:~]# yum install -y keepalived haproxy

If you have to install keepalived / haproxy on Debian / Ubuntu and other Deb based Linux distros

[root@server1:~]# apt install keepalived haproxy –yes

2. Configure haproxy (haproxy.cfg) on both server1 and server2


Create some /etc/haproxy/haproxy.cfg configuration


[root@server1:~]vim /etc/haproxy/haproxy.cfg

#———————————————————————
# Global settings
#———————————————————————
global
    log          127.0.0.1 local6 debug
    chroot       /var/lib/haproxy
    pidfile      /run/haproxy.pid
    stats socket /var/lib/haproxy/haproxy.sock mode 0600 level admin 
    maxconn      4000
    user         haproxy
    group        haproxy
    daemon
    #debug
    #quiet

#———————————————————————
# common defaults that all the 'listen' and 'backend' sections will
# use if not designated in their block
#———————————————————————
defaults
    mode        tcp
    log         global
#    option      dontlognull
#    option      httpclose
#    option      httplog
#    option      forwardfor
    option      redispatch
    option      log-health-checks
    timeout connect 10000 # default 10 second time out if a backend is not found
    timeout client 300000
    timeout server 300000
    maxconn     60000
    retries     3

#———————————————————————
# round robin balancing between the various backends
#———————————————————————

listen FRONTEND_APPNAME1
        bind 10.10.10.1:15000
        mode tcp
        option tcplog
#        #log global
        log-format [%t]\ %ci:%cp\ %bi:%bp\ %b/%s:%sp\ %Tw/%Tc/%Tt\ %B\ %ts\ %ac/%fc/%bc/%sc/%rc\ %sq/%bq
        balance roundrobin
        timeout client 350000
        timeout server 350000
        timeout connect 35000
        server app-server1 10.10.10.55:30000 weight 1 check port 68888
        server app-server2 10.10.10.55:30000 weight 2 check port 68888

listen FRONTEND_APPNAME2
        bind 10.10.10.1:15000
        mode tcp
        option tcplog
        #log global
        log-format [%t]\ %ci:%cp\ %bi:%bp\ %b/%s:%sp\ %Tw/%Tc/%Tt\ %B\ %ts\ %ac/%fc/%bc/%sc/%rc\ %sq/%bq
        balance roundrobin
        timeout client 350000
        timeout server 350000
        timeout connect 35000
        server app-server1 10.10.10.55:30000 weight 5
        server app-server2 10.10.10.55:30000 weight 5 


You can get a copy of above haproxy.cfg configuration here.
Once configured roll it on.

[root@server1:~]#  systemctl start haproxy
 
[root@server1:~]# ps -ef|grep -i hapro
root      285047       1  0 Mar07 ?        00:00:00 /usr/sbin/haproxy -Ws -f /etc/haproxy/haproxy.cfg -p /run/haproxy.pid
haproxy   285050  285047  0 Mar07 ?        00:00:26 /usr/sbin/haproxy -Ws -f /etc/haproxy/haproxy.cfg -p /run/haproxy.pid

Bring up the haproxy also on server2 machine, by placing same configuration and starting up the proxy.
 

[root@server1:~]vim /etc/haproxy/haproxy.cfg


3. Configure keepalived on both servers

We'll be configuring 2 nodes with keepalived even though if necessery this can be easily extended and you can add more nodes.
First we make a copy of the original or existing server configuration keepalived.conf (just in case we need it later on or if you already had something other configured manually by someone – that could be so on inherited servers by other sysadmin)
 

[root@server1:~]# mv /etc/keepalived/keepalived.conf /etc/keepalived/keepalived.conf.orig
[root@server2:~]# mv /etc/keepalived/keepalived.conf /etc/keepalived/keepalived.conf.orig

a. Configure keepalived to serve as a MASTER Node


[root@server1:~]# vim /etc/keepalived/keepalived.conf

Master Node
global_defs {
  router_id server1-fqdn # The hostname of this host.
  
  enable_script_security
  # Synchro of the state of the connections between the LBs on the eth0 interface
   lvs_sync_daemon eth0
 
notification_email {
        linuxadmin@notify-domain.com     # Email address for notifications 
    }
 notification_email_from keepalived@server1-fqdn        # The from address for the notifications
    smtp_server 127.0.0.1                       # SMTP server address
    smtp_connect_timeout 15
}

vrrp_script haproxy {
  script "killall -0 haproxy"
  interval 2
  weight 2
  user root
}

vrrp_instance LB_VIP_QA {
  virtual_router_id 50
  advert_int 1
  priority 51

  state MASTER
  interface eth0
  smtp_alert          # Enable Notifications Via Email
  
  authentication {
              auth_type PASS
              auth_pass testp141

    }
### Commented because running on VM on VMWare
##    unicast_src_ip 10.44.192.134 # Private IP address of master
##    unicast_peer {
##        10.44.192.135           # Private IP address of the backup haproxy
##   }

#        }
# master node with higher priority preferred node for Virtual IP if both keepalived up
###  priority 51
###  state MASTER
###  interface eth0
  virtual_ipaddress {
     10.10.10.1 dev eth0 # The virtual IP address that will be shared between MASTER and BACKUP
  }
  track_script {
      haproxy
  }
}


 To dowload a copy of the Master keepalived.conf configuration click here

Below are few interesting configuration variables, worthy to mention few words on, most of them are obvious by their names but for more clarity I'll also give a list here with short description of each:


  • vrrp_instance – defines an individual instance of the VRRP protocol running on an interface.
  • state – defines the initial state that the instance should start in (i.e. MASTER / SLAVE )state –
  • interface – defines the interface that VRRP runs on.
  • virtual_router_id – should be unique value per Keepalived Node (otherwise slave master won't function properly)
  • priority – the advertised priority, the higher the priority the more important the respective configured keepalived node is.
  • advert_int – specifies the frequency that advertisements are sent at (1 second, in this case).
  • authentication – specifies the information necessary for servers participating in VRRP to authenticate with each other. In this case, a simple password is defined.
    only the first eight (8) characters will be used as described in  to note is Important thing
    man keepalived.conf – keepalived.conf variables documentation !!! Nota Bene !!! – Password set on each node should match for nodes to be able to authenticate !
  • virtual_ipaddress – defines the IP addresses (there can be multiple) that VRRP is responsible for.
  • notification_email – the notification email to which Alerts will be send in case if keepalived on 1 node is stopped (e.g. the MASTER node switches from host 1 to 2)
  • notification_email_from – email address sender from where email will originte
    ! NB ! In order for notification_email to be working you need to have configured MTA or Mail Relay (set to local MTA) to another SMTP – e.g. have configured something like Postfix, Qmail or Postfix

b. Configure keepalived to serve as a SLAVE Node

[root@server1:~]vim /etc/keepalived/keepalived.conf
 

#Slave keepalived
global_defs {
  router_id server2-fqdn # The hostname of this host!

  enable_script_security
  # Synchro of the state of the connections between the LBs on the eth0 interface
  lvs_sync_daemon eth0
 
notification_email {
        linuxadmin@notify-host.com     # Email address for notifications
    }
 notification_email_from keepalived@server2-fqdn        # The from address for the notifications
    smtp_server 127.0.0.1                       # SMTP server address
    smtp_connect_timeout 15
}

vrrp_script haproxy {
  script "killall -0 haproxy"
  interval 2
  weight 2
  user root
}

vrrp_instance LB_VIP_QA {
  virtual_router_id 50
  advert_int 1
  priority 50

  state BACKUP
  interface eth0
  smtp_alert          # Enable Notifications Via Email

authentication {
              auth_type PASS
              auth_pass testp141
}
### Commented because running on VM on VMWare    
##    unicast_src_ip 10.10.192.135 # Private IP address of master
##    unicast_peer {
##        10.10.192.134         # Private IP address of the backup haproxy
##   }

###  priority 50
###  state BACKUP
###  interface eth0
  virtual_ipaddress {
     10.10.10.1 dev eth0 # The virtual IP address that will be shared betwee MASTER and BACKUP.
  }
  track_script {
    haproxy
  }
}


Download the keepalived.conf slave config here


c. Set required sysctl parameters for haproxy to work as expected
 

[root@server1:~]vim /etc/sysctl.conf
#Haproxy config
# haproxy
net.core.somaxconn=65535
net.ipv4.ip_local_port_range = 1024 65000
net.ipv4.ip_nonlocal_bind = 1
net.ipv4.tcp_tw_reuse = 1
net.ipv4.tcp_max_syn_backlog = 10240
net.ipv4.tcp_max_tw_buckets = 400000
net.ipv4.tcp_max_orphans = 60000
net.ipv4.tcp_synack_retries = 3

4. Test Keepalived keepalived.conf configuration syntax is OK


[root@server1:~]keepalived –config-test
(/etc/keepalived/keepalived.conf: Line 7) Unknown keyword 'lvs_sync_daemon_interface'
(/etc/keepalived/keepalived.conf: Line 21) Unable to set default user for vrrp script haproxy – removing
(/etc/keepalived/keepalived.conf: Line 31) (LB_VIP_QA) Specifying lvs_sync_daemon_interface against a vrrp is deprecated.
(/etc/keepalived/keepalived.conf: Line 31)              Please use global lvs_sync_daemon
(/etc/keepalived/keepalived.conf: Line 35) Truncating auth_pass to 8 characters
(/etc/keepalived/keepalived.conf: Line 50) (LB_VIP_QA) track script haproxy not found, ignoring…

I've experienced this error because first time I've configured keepalived, I did not mention the user with which the vrrp script haproxy should run,
in prior versions of keepalived, leaving the field empty did automatically assumed you have the user with which the vrrp script runs to be set to root
as of RHELs keepalived-2.1.5-6.el8.x86_64, i've been using however this is no longer so and thus in prior configuration as you can see I've
set the user in respective section to root.
The error Unknown keyword 'lvs_sync_daemon_interface'
is also easily fixable by just substituting the lvs_sync_daemon_interface and lvs_sync_daemon and reloading
keepalived etc.

Once keepalived is started and you can see the process on both machines running in process list.

[root@server1:~]ps -ef |grep -i keepalived
root     1190884       1  0 18:50 ?        00:00:00 /usr/sbin/keepalived -D
root     1190885 1190884  0 18:50 ?        00:00:00 /usr/sbin/keepalived -D

Next step is to check the keepalived statuses as well as /var/log/keepalived.log

If everything is configured as expected on both keepalived on first node you should see one is master and one is slave either in the status or the log

[root@server1:~]#systemctl restart keepalived


[root@server1:~]systemctl status keepalived|grep -i state
Mar 14 18:59:02 server1-fqdn Keepalived_vrrp[1192003]: (LB_VIP_QA) Entering MASTER STATE

[root@server1:~]systemctl status keepalived

● keepalived.service – LVS and VRRP High Availability Monitor
   Loaded: loaded (/usr/lib/systemd/system/keepalived.service; enabled; vendor preset: disabled)
   Active: inactive (dead) since Mon 2022-03-14 18:15:51 CET; 32min ago
  Process: 1187587 ExecStart=/usr/sbin/keepalived $KEEPALIVED_OPTIONS (code=exited, status=0/SUCCESS)
 Main PID: 1187589 (code=exited, status=0/SUCCESS)

Mar 14 18:15:04 server1lb-fqdn Keepalived_vrrp[1187590]: Sending gratuitous ARP on eth0 for 10.44.192.142
Mar 14 18:15:50 server1lb-fqdn systemd[1]: Stopping LVS and VRRP High Availability Monitor…
Mar 14 18:15:50 server1lb-fqdn Keepalived[1187589]: Stopping
Mar 14 18:15:50 server1lb-fqdn Keepalived_vrrp[1187590]: (LB_VIP_QA) sent 0 priority
Mar 14 18:15:50 server1lb-fqdn Keepalived_vrrp[1187590]: (LB_VIP_QA) removing VIPs.
Mar 14 18:15:51 server1lb-fqdn Keepalived_vrrp[1187590]: Stopped – used 0.002007 user time, 0.016303 system time
Mar 14 18:15:51 server1lb-fqdn Keepalived[1187589]: CPU usage (self/children) user: 0.000000/0.038715 system: 0.001061/0.166434
Mar 14 18:15:51 server1lb-fqdn Keepalived[1187589]: Stopped Keepalived v2.1.5 (07/13,2020)
Mar 14 18:15:51 server1lb-fqdn systemd[1]: keepalived.service: Succeeded.
Mar 14 18:15:51 server1lb-fqdn systemd[1]: Stopped LVS and VRRP High Availability Monitor

[root@server2:~]systemctl status keepalived|grep -i state
Mar 14 18:59:02 server2-fqdn Keepalived_vrrp[297368]: (LB_VIP_QA) Entering BACKUP STATE

[root@server1:~]# grep -i state /var/log/keepalived.log
Mar 14 18:59:02 server1lb-fqdn Keepalived_vrrp[297368]: (LB_VIP_QA) Entering MASTER STATE
 

a. Fix Keepalived SECURITY VIOLATION – scripts are being executed but script_security not enabled.
 

When configurating keepalived for a first time we have faced the following strange error inside keepalived status inside keepalived.log 
 

Feb 23 14:28:41 server1 Keepalived_vrrp[945478]: SECURITY VIOLATION – scripts are being executed but script_security not enabled.


To fix keepalived SECURITY VIOLATION error:

Add to /etc/keepalived/keepalived.conf on the keepalived node hosts
inside 

global_defs {}

After chunk
 

enable_script_security

include

# Synchro of the state of the connections between the LBs on the eth0 interface
  lvs_sync_daemon_interface eth0


5. Prepare rsyslog configuration and Inlcude additional keepalived options
to force keepalived log into /var/log/keepalived.log

To force keepalived log into /var/log/keepalived.log on RHEL 8 / CentOS and other Redhat Package Manager (RPM) Linux distributions

[root@server1:~]# vim /etc/rsyslog.d/48_keepalived.conf

#2022/02/02: HAProxy logs to local6, save the messages
local7.*                                                /var/log/keepalived.log
if ($programname == 'Keepalived') then -/var/log/keepalived.log
if ($programname == 'Keepalived_vrrp') then -/var/log/keepalived.log
& stop

[root@server:~]# touch /var/log/keepalived.log

Reload rsyslog to load new config
 

[root@server:~]# systemctl restart rsyslog
[root@server:~]# systemctl status rsyslog


rsyslog.service – System Logging Service
   Loaded: loaded (/usr/lib/systemd/system/rsyslog.service; enabled; vendor preset: enabled)
  Drop-In: /etc/systemd/system/rsyslog.service.d
           └─rsyslog-service.conf
   Active: active (running) since Mon 2022-03-07 13:34:38 CET; 1 weeks 0 days ago
     Docs: man:rsyslogd(8)

           https://www.rsyslog.com/doc/
 Main PID: 269574 (rsyslogd)
    Tasks: 6 (limit: 100914)
   Memory: 5.1M
   CGroup: /system.slice/rsyslog.service
           └─269574 /usr/sbin/rsyslogd -n

Mar 15 08:15:16 server1lb-fqdn rsyslogd[269574]: — MARK —
Mar 15 08:35:16 server1lb-fqdn rsyslogd[269574]: — MARK —
Mar 15 08:55:16 server1lb-fqdn rsyslogd[269574]: — MARK —


If once keepalived is loaded but you still have no log written inside /var/log/keepalived.log

[root@server1:~]# vim /etc/sysconfig/keepalived
 KEEPALIVED_OPTIONS="-D -S 7"

[root@server2:~]# vim /etc/sysconfig/keepalived
 KEEPALIVED_OPTIONS="-D -S 7"

[root@server1:~]# systemctl restart keepalived.service
[root@server1:~]#  systemctl status keepalived

● keepalived.service – LVS and VRRP High Availability Monitor
   Loaded: loaded (/usr/lib/systemd/system/keepalived.service; enabled; vendor preset: disabled)
   Active: active (running) since Thu 2022-02-24 12:12:20 CET; 2 weeks 4 days ago
 Main PID: 1030501 (keepalived)
    Tasks: 2 (limit: 100914)
   Memory: 1.8M
   CGroup: /system.slice/keepalived.service
           ├─1030501 /usr/sbin/keepalived -D
           └─1030502 /usr/sbin/keepalived -D

Warning: Journal has been rotated since unit was started. Log output is incomplete or unavailable.

[root@server2:~]# systemctl restart keepalived.service
[root@server2:~]# systemctl status keepalived

6. Monitoring VRRP traffic of the two keepaliveds with tcpdump
 

Once both keepalived are up and running a good thing is to check the VRRP protocol traffic keeps fluently on both machines.
Keepalived VRRP keeps communicating over the TCP / IP Port 112 thus you can simply snoop TCP tracffic on its protocol.
 

[root@server1:~]# tcpdump proto 112

tcpdump: verbose output suppressed, use -v or -vv for full protocol decode
listening on eth0, link-type EN10MB (Ethernet), capture size 262144 bytes
11:08:07.356187 IP server1lb-fqdn > vrrp.mcast.net: VRRPv2, Advertisement, vrid 50, prio 53, authtype simple, intvl 1s, length 20
11:08:08.356297 IP server1lb-fqdn > vrrp.mcast.net: VRRPv2, Advertisement, vrid 50, prio 53, authtype simple, intvl 1s, length 20
11:08:09.356408 IP server1lb-fqdn > vrrp.mcast.net: VRRPv2, Advertisement, vrid 50, prio 53, authtype simple, intvl 1s, length 20
11:08:10.356511 IP server1lb-fqdn > vrrp.mcast.net: VRRPv2, Advertisement, vrid 50, prio 53, authtype simple, intvl 1s, length 20
11:08:11.356655 IP server1lb-fqdn > vrrp.mcast.net: VRRPv2, Advertisement, vrid 50, prio 53, authtype simple, intvl 1s, length 20

[root@server2:~]# tcpdump proto 112

tcpdump: verbose output suppressed, use -v or -vv for full protocol decode
​listening on eth0, link-type EN10MB (Ethernet), capture size 262144 bytes
11:08:07.356187 IP server1lb-fqdn > vrrp.mcast.net: VRRPv2, Advertisement, vrid 50, prio 53, authtype simple, intvl 1s, length 20
11:08:08.356297 IP server1lb-fqdn > vrrp.mcast.net: VRRPv2, Advertisement, vrid 50, prio 53, authtype simple, intvl 1s, length 20
11:08:09.356408 IP server1lb-fqdn > vrrp.mcast.net: VRRPv2, Advertisement, vrid 50, prio 53, authtype simple, intvl 1s, length 20
11:08:10.356511 IP server1lb-fqdn > vrrp.mcast.net: VRRPv2, Advertisement, vrid 50, prio 53, authtype simple, intvl 1s, length 20
11:08:11.356655 IP server1lb-fqdn > vrrp.mcast.net: VRRPv2, Advertisement, vrid 50, prio 53, authtype simple, intvl 1s, length 20

As you can see the VRRP traffic on the network is originating only from server1lb-fqdn, this is so because host server1lb-fqdn is the keepalived configured master node.

It is possible to spoof the password configured to authenticate between two nodes, thus if you're bringing up keepalived service cluster make sure your security is tight at best the machines should be in a special local LAN DMZ, do not configure DMZ on the internet !!! 🙂 Or if you eventually decide to configure keepalived in between remote hosts, make sure you somehow use encrypted VPN or SSH tunnels to tunnel the VRRP traffic.

[root@server1:~]tcpdump proto 112 -vv
tcpdump: listening on eth0, link-type EN10MB (Ethernet), capture size 262144 bytes
11:36:25.530772 IP (tos 0xc0, ttl 255, id 59838, offset 0, flags [none], proto VRRP (112), length 40)
    server1lb-fqdn > vrrp.mcast.net: vrrp server1lb-fqdn > vrrp.mcast.net: VRRPv2, Advertisement, vrid 50, prio 53, authtype simple, intvl 1s, length 20, addrs: VIPIP_QA auth "testp431"
11:36:26.530874 IP (tos 0xc0, ttl 255, id 59839, offset 0, flags [none], proto VRRP (112), length 40)
    server1lb-fqdn > vrrp.mcast.net: vrrp server1lb-fqdn > vrrp.mcast.net: VRRPv2, Advertisement, vrid 50, prio 53, authtype simple, intvl 1s, length 20, addrs: VIPIP_QA auth "testp431"

Lets also check what floating IP is configured on the machines:

[root@server1:~]# ip -brief address show
lo               UNKNOWN        127.0.0.1/8 
eth0             UP             10.10.10.5/26 10.10.10.1/32 

The 10.10.10.5 IP is the main IP set on LAN interface eth0, 10.10.10.1 is the floating IP which as you can see is currently set by keepalived to listen on first node.

[root@server2:~]# ip -brief address show |grep -i 10.10.10.1

An empty output is returned as floating IP is currently configured on server1

To double assure ourselves the IP is assigned on correct machine, lets ping it and check the IP assigned MAC  currently belongs to which machine.
 

[root@server2:~]# ping 10.10.10.1
PING 10.10.10.1 (10.10.10.1) 56(84) bytes of data.
64 bytes from 10.10.10.1: icmp_seq=1 ttl=64 time=0.526 ms
^C
— 10.10.10.1 ping statistics —
1 packets transmitted, 1 received, 0% packet loss, time 0ms
rtt min/avg/max/mdev = 0.526/0.526/0.526/0.000 ms

[root@server2:~]# arp -an |grep -i 10.44.192.142
? (10.10.10.1) at 00:48:54:91:83:7d [ether] on eth0
[root@server2:~]# ip a s|grep -i 00:48:54:91:83:7d
[root@server2:~]# 

As you can see from below output MAC is not found in configured IPs on server2.
 

[root@server1-fqdn:~]# /sbin/ip a s|grep -i 00:48:54:91:83:7d -B1 -A1
 eth0: <BROADCAST,MULTICAST,UP,LOWER_UP> mtu 1500 qdisc mq state UP group default qlen 1000
    link/ether 00:48:54:91:83:7d brd ff:ff:ff:ff:ff:ff
inet 10.10.10.1/26 brd 10.10.1.191 scope global noprefixroute eth0

Pretty much expected MAC is on keepalived node server1.


7. Testing keepalived on server1 and server2 maachines VIP floating IP really works
 

To test the overall configuration just created, you should stop keeaplived on the Master node and in meantime keep an eye on Slave node (server2), whether it can figure out the Master node is gone and switch its
state BACKUP to save MASTER. By changing the secondary (Slave) keepalived to master the floating IP: 10.10.10.1 will be brought up by the scripts on server2.

Lets assume that something went wrong with server1 VM host, for example the machine crashed due to service overload, DDoS or simply a kernel bug or whatever reason.
To simulate that we simply have to stop keepalived, then the broadcasted information on VRRP TCP/IP proto port 112 will be no longer available and keepalived on node server2, once
unable to communicate to server1 should chnage itself to state MASTER.

[root@server1:~]# systemctl stop keepalived
[root@server1:~]# systemctl status keepalived

● keepalived.service – LVS and VRRP High Availability Monitor
   Loaded: loaded (/usr/lib/systemd/system/keepalived.service; enabled; vendor preset: disabled)
   Active: inactive (dead) since Tue 2022-03-15 12:11:33 CET; 3s ago
  Process: 1192001 ExecStart=/usr/sbin/keepalived $KEEPALIVED_OPTIONS (code=exited, status=0/SUCCESS)
 Main PID: 1192002 (code=exited, status=0/SUCCESS)

Mar 14 18:59:07 server1lb-fqdn Keepalived_vrrp[1192003]: Sending gratuitous ARP on eth0 for 10.10.10.1
Mar 15 12:11:32 server1lb-fqdn systemd[1]: Stopping LVS and VRRP High Availability Monitor…
Mar 15 12:11:32 server1lb-fqdn Keepalived[1192002]: Stopping
Mar 15 12:11:32 server1lb-fqdn Keepalived_vrrp[1192003]: (LB_VIP_QA) sent 0 priority
Mar 15 12:11:32 server1lb-fqdn Keepalived_vrrp[1192003]: (LB_VIP_QA) removing VIPs.
Mar 15 12:11:33 server1lb-fqdn Keepalived_vrrp[1192003]: Stopped – used 2.145252 user time, 15.513454 system time
Mar 15 12:11:33 server1lb-fqdn Keepalived[1192002]: CPU usage (self/children) user: 0.000000/44.555362 system: 0.001151/170.118126
Mar 15 12:11:33 server1lb-fqdn Keepalived[1192002]: Stopped Keepalived v2.1.5 (07/13,2020)
Mar 15 12:11:33 server1lb-fqdn systemd[1]: keepalived.service: Succeeded.
Mar 15 12:11:33 server1lb-fqdn systemd[1]: Stopped LVS and VRRP High Availability Monitor.


On keepalived off, you will get also a notification Email on the Receipt Email configured from keepalived.conf from the working keepalived node with a simple message like:

=> VRRP Instance is no longer owning VRRP VIPs <=

Once keepalived is back up you will get another notification like:

=> VRRP Instance is now owning VRRP VIPs <=

[root@server2:~]# systemctl status keepalived
● keepalived.service – LVS and VRRP High Availability Monitor
   Loaded: loaded (/usr/lib/systemd/system/keepalived.service; enabled; vendor preset: disabled)
   Active: active (running) since Mon 2022-03-14 18:13:52 CET; 17h ago
  Process: 297366 ExecStart=/usr/sbin/keepalived $KEEPALIVED_OPTIONS (code=exited, status=0/SUCCESS)
 Main PID: 297367 (keepalived)
    Tasks: 2 (limit: 100914)
   Memory: 2.1M
   CGroup: /system.slice/keepalived.service
           ├─297367 /usr/sbin/keepalived -D -S 7
           └─297368 /usr/sbin/keepalived -D -S 7

Mar 15 12:11:33 server2lb-fqdn Keepalived_vrrp[297368]: Sending gratuitous ARP on eth0 for 10.10.10.1
Mar 15 12:11:33 server2lb-fqdn Keepalived_vrrp[297368]: Remote SMTP server [127.0.0.1]:25 connected.
Mar 15 12:11:33 server2lb-fqdn Keepalived_vrrp[297368]: SMTP alert successfully sent.
Mar 15 12:11:38 server2lb-fqdn Keepalived_vrrp[297368]: (LB_VIP_QA) Sending/queueing gratuitous ARPs on eth0 for 10.10.10.1
Mar 15 12:11:38 server2lb-fqdn Keepalived_vrrp[297368]: Sending gratuitous ARP on eth0 for 10.10.10.1

[root@server2:~]#  ip addr show|grep -i 10.10.10.1
    inet 10.10.10.1/32 scope global eth0
    

As you see the VIP is now set on server2, just like expected – that's OK, everything works as expected. If the IP did not move double check the keepalived.conf on both nodes for errors or misconfigurations.

To recover the initial order of things so server1 is MASTER and server2 SLAVE host, we just have to switch on the keepalived on server1 machine.

[root@server1:~]# systemctl start keepalived

The automatic change of server1 to MASTER node and respective move of the VIP IP is done because of the higher priority (of importance we previously configured on server1 in keepalived.conf).
 

What we learned?
 

So what we learned in  this article?
We have seen how to easily install and configure a High Availability Load balancer with Keepalived with single floating VIP IP address with 1 MASTER and 1 SLAVE host and a Haproxy example config with few frontends / App backends. We have seen how the config can be tested for potential errors and how we can monitor whether the VRRP2 network traffic flows between nodes and how to potentially debug it further if necessery.
Further on rawly explained some of the keepalived configurations but as keepalived can do pretty much more,for anyone seriously willing to deal with keepalived on a daily basis or just fine tune some already existing ones, you better read closely its manual page "man keepalived.conf" as well as the official Redhat Linux documentation page on setting up a Linux cluster with Keepalived (Be prepare for a small nightmare as the documentation of it seems to be a bit chaotic, and even I would say partly missing or opening questions on what does the developers did meant – not strange considering the havoc that is pretty much as everywhere these days.)

Finally once keepalived hosts are prepared, it was shown how to test the keepalived application cluster and Floating IP does move between nodes in case if one of the 2 keepalived nodes is inaccessible.

The same logic can be repeated multiple times and if necessery you can set multiple VIPs to expand the HA reachable IPs solution.
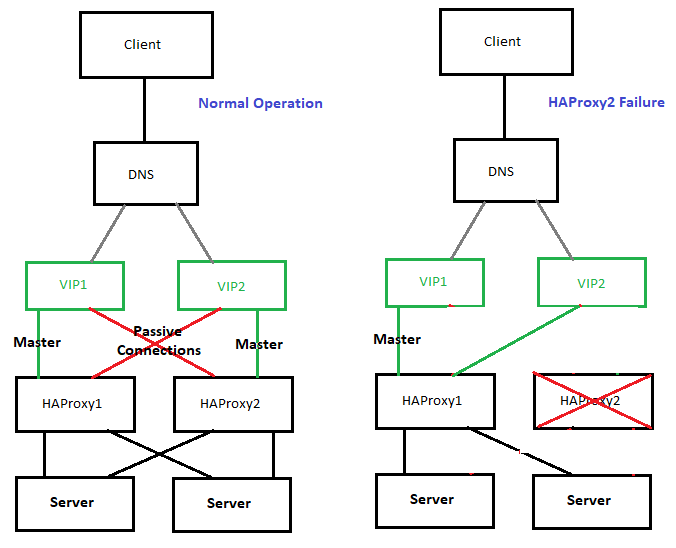
high-availability-with-two-vips-example-diagram

The presented idea is with haproxy forward Proxy server to proxy requests towards Application backend (servince machines), however if you need to set another set of server on the flow to  process HTML / XHTML / PHP / Perl / Python  programming code, with some common Webserver setup ( Nginx / Apache / Tomcat / JBOSS) and enable SSL Secure certificate with lets say Letsencrypt, this can be relatively easily done. If you want to implement letsencrypt and a webserver check this redundant SSL Load Balancing with haproxy & keepalived article.

That's all folks, hope you enjoyed.
If you need to configure keepalived Cluster or a consultancy write your query here 🙂

Hack: Using ssh / curl or wget to test TCP port connection state to remote SSH, DNS, SMTP, MySQL or any other listening service in PCI environment servers

Wednesday, December 30th, 2020

using-curl-ssh-wget-to-test-tcp-port-opened-or-closed-for-web-mysql-smtp-or-any-other-linstener-in-pci-linux-logo

If you work on PCI high security environment servers in isolated local networks where each package installed on the Linux / Unix system is of importance it is pretty common that some basic stuff are not there in most cases it is considered a security hole to even have a simple telnet installed on the system. I do have experience with such environments myself and thus it is pretty daunting stuff so in best case you can use something like a simple ssh client if you're lucky and the CentOS / Redhat / Suse Linux whatever distro has openssh-client package installed.
If you're lucky to have the ssh onboard you can use telnet in same manner as netcat or the swiss army knife (nmap) network mapper tool to test whether remote service TCP / port is opened or not. As often this is useful, if you don't have access to the CISCO / Juniper or other (networ) / firewall equipment which is setting the boundaries and security port restrictions between networks and servers.

Below is example on how to use ssh client to test port connectivity to lets say the Internet, i.e.  Google / Yahoo search engines.
 

[root@pciserver: /home ]# ssh -oConnectTimeout=3 -v google.com -p 23
OpenSSH_7.9p1 Debian-10+deb10u2, OpenSSL 1.1.1g  21 Apr 2020
debug1: Connecting to google.com [172.217.169.206] port 23.
debug1: connect to address 172.217.169.206 port 23: Connection timed out
debug1: Connecting to google.com [2a00:1450:4017:80b::200e] port 23.
debug1: connect to address 2a00:1450:4017:80b::200e port 23: Cannot assign requested address
ssh: connect to host google.com port 23: Cannot assign requested address
root@pcfreak:/var/www/images# ssh -oConnectTimeout=3 -v google.com -p 80
OpenSSH_7.9p1 Debian-10+deb10u2, OpenSSL 1.1.1g  21 Apr 2020
debug1: Connecting to google.com [172.217.169.206] port 80.
debug1: connect to address 172.217.169.206 port 80: Connection timed out
debug1: Connecting to google.com [2a00:1450:4017:807::200e] port 80.
debug1: connect to address 2a00:1450:4017:807::200e port 80: Cannot assign requested address
ssh: connect to host google.com port 80: Cannot assign requested address
root@pcfreak:/var/www/images# ssh google.com -p 80
ssh_exchange_identification: Connection closed by remote host
root@pcfreak:/var/www/images# ssh google.com -p 80 -v -oConnectTimeout=3
OpenSSH_7.9p1 Debian-10+deb10u2, OpenSSL 1.1.1g  21 Apr 2020
debug1: Connecting to google.com [172.217.169.206] port 80.
debug1: connect to address 172.217.169.206 port 80: Connection timed out
debug1: Connecting to google.com [2a00:1450:4017:80b::200e] port 80.
debug1: connect to address 2a00:1450:4017:80b::200e port 80: Cannot assign requested address
ssh: connect to host google.com port 80: Cannot assign requested address
root@pcfreak:/var/www/images# ssh google.com -p 80 -v -oConnectTimeout=5
OpenSSH_7.9p1 Debian-10+deb10u2, OpenSSL 1.1.1g  21 Apr 2020
debug1: Connecting to google.com [142.250.184.142] port 80.
debug1: connect to address 142.250.184.142 port 80: Connection timed out
debug1: Connecting to google.com [2a00:1450:4017:80c::200e] port 80.
debug1: connect to address 2a00:1450:4017:80c::200e port 80: Cannot assign requested address
ssh: connect to host google.com port 80: Cannot assign requested address
root@pcfreak:/var/www/images# ssh google.com -p 80 -v
OpenSSH_7.9p1 Debian-10+deb10u2, OpenSSL 1.1.1g  21 Apr 2020
debug1: Connecting to google.com [172.217.169.206] port 80.
debug1: Connection established.
debug1: identity file /root/.ssh/id_rsa type 0
debug1: identity file /root/.ssh/id_rsa-cert type -1
debug1: identity file /root/.ssh/id_dsa type -1
debug1: identity file /root/.ssh/id_dsa-cert type -1
debug1: identity file /root/.ssh/id_ecdsa type -1
debug1: identity file /root/.ssh/id_ecdsa-cert type -1
debug1: identity file /root/.ssh/id_ed25519 type -1
debug1: identity file /root/.ssh/id_ed25519-cert type -1
debug1: identity file /root/.ssh/id_xmss type -1
debug1: identity file /root/.ssh/id_xmss-cert type -1
debug1: Local version string SSH-2.0-OpenSSH_7.9p1 Debian-10+deb10u2
debug1: ssh_exchange_identification: HTTP/1.0 400 Bad Request


debug1: ssh_exchange_identification: Content-Type: text/html; charset=UTF-8


debug1: ssh_exchange_identification: Referrer-Policy: no-referrer


debug1: ssh_exchange_identification: Content-Length: 1555


debug1: ssh_exchange_identification: Date: Wed, 30 Dec 2020 14:13:25 GMT


debug1: ssh_exchange_identification:


debug1: ssh_exchange_identification: <!DOCTYPE html>

debug1: ssh_exchange_identification: <html lang=en>

debug1: ssh_exchange_identification:   <meta charset=utf-8>

debug1: ssh_exchange_identification:   <meta name=viewport content="initial-scale=1, minimum-scale=1, width=device-width">

debug1: ssh_exchange_identification:   <title>Error 400 (Bad Request)!!1</title>

debug1: ssh_exchange_identification:   <style>

debug1: ssh_exchange_identification:     *{margin:0;padding:0}html,code{font:15px/22px arial,sans-serif}html{background:#fff;color:#222;padding:15px}body{margin:7% auto 0;max-width:390px;min-height:180px;padding:30px 0 15px}* > body{background:url(//www.google.com/images/errors/robot.png) 10
debug1: ssh_exchange_identification: 0% 5px no-repeat;padding-right:205px}p{margin:11px 0 22px;overflow:hidden}ins{color:#777;text-decoration:none}a img{border:0}@media screen and (max-width:772px){body{background:none;margin-top:0;max-width:none;padding-right:0}}#logo{background:url(//www.g
debug1: ssh_exchange_identification: oogle.com/images/branding/googlelogo/1x/googlelogo_color_150x54dp.png) no-repeat;margin-left:-5px}@media only screen and (min-resolution:192dpi){#logo{background:url(//www.google.com/images/branding/googlelogo/2x/googlelogo_color_150x54dp.png) no-repeat 0
debug1: ssh_exchange_identification: % 0%/100% 100%;-moz-border-image:url(//www.google.com/images/branding/googlelogo/2x/googlelogo_color_150x54dp.png) 0}}@media only screen and (-webkit-min-device-pixel-ratio:2){#logo{background:url(//www.google.com/images/branding/googlelogo/2x/googlelogo_
debug1: ssh_exchange_identification: color_150x54dp.png) no-repeat;-webkit-background-size:100% 100%}}#logo{display:inline-block;height:54px;width:150px}

debug1: ssh_exchange_identification:   </style>

debug1: ssh_exchange_identification:   <a href=//www.google.com/><span id=logo aria-label=Google></span></a>

debug1: ssh_exchange_identification:   <p><b>400.</b> <ins>That\342\200\231s an error.</ins>

debug1: ssh_exchange_identification:   <p>Your client has issued a malformed or illegal request.  <ins>That\342\200\231s all we know.</ins>

ssh_exchange_identification: Connection closed by remote host


Here is another example on how to test remote host whether a certain service such as DNS (bind) or telnetd is enabled and listening on remote local network  IP with ssh

[root@pciserver: /home ]# ssh 192.168.1.200 -p 53 -v -oConnectTimeout=5
OpenSSH_7.9p1 Debian-10+deb10u2, OpenSSL 1.1.1g  21 Apr 2020
debug1: Connecting to 192.168.1.200 [192.168.1.200] port 53.
debug1: connect to address 192.168.1.200 port 53: Connection timed out
ssh: connect to host 192.168.1.200 port 53: Connection timed out

[root@server: /home ]# ssh 192.168.1.200 -p 23 -v -oConnectTimeout=5
OpenSSH_7.9p1 Debian-10+deb10u2, OpenSSL 1.1.1g  21 Apr 2020
debug1: Connecting to 192.168.1.200 [192.168.1.200] port 23.
debug1: connect to address 192.168.1.200 port 23: Connection timed out
ssh: connect to host 192.168.1.200 port 23: Connection timed out


But what if Linux server you have tow work on is so paranoid that you even the ssh client is absent? Well you can use anything else that is capable of doing a connectivity to remote port such as wget or curl. Some web servers or application servers usually have wget or curl as it is integral part for some local shell scripts doing various operation needed for proper services functioning or simply to test locally a local or remote listener services, if that's the case we can use curl to connect and get output of a remote service simulating a normal telnet connection like this:

host:~# curl -vv 'telnet://remote-server-host5:22'
* About to connect() to remote-server-host5 port 22 (#0)
*   Trying 10.52.67.21… connected
* Connected to aflpvz625 (10.52.67.21) port 22 (#0)
SSH-2.0-OpenSSH_5.3

Now lets test whether we can connect remotely to a local net remote IP's Qmail mail server with curls telnet simulation mode:

host:~#  curl -vv 'telnet://192.168.0.200:25'
* Expire in 0 ms for 6 (transfer 0x56066e5ab900)
*   Trying 192.168.0.200…
* TCP_NODELAY set
* Expire in 200 ms for 4 (transfer 0x56066e5ab900)
* Connected to 192.168.0.200 (192.168.0.200) port 25 (#0)
220 This is Mail Pc-Freak.NET ESMTP

Fine it works, lets now test whether a remote server who has MySQL listener service on standard MySQL port TCP 3306 is reachable with curl

host:~#  curl -vv 'telnet://192.168.0.200:3306'
* Expire in 0 ms for 6 (transfer 0x5601fafae900)
*   Trying 192.168.0.200…
* TCP_NODELAY set
* Expire in 200 ms for 4 (transfer 0x5601fafae900)
* Connected to 192.168.0.200 (192.168.0.200) port 3306 (#0)
Warning: Binary output can mess up your terminal. Use "–output -" to tell
Warning: curl to output it to your terminal anyway, or consider "–output
Warning: <FILE>" to save to a file.
* Failed writing body (0 != 107)
* Closing connection 0
root@pcfreak:/var/www/images#  curl -vv 'telnet://192.168.0.200:3306'
* Expire in 0 ms for 6 (transfer 0x5598ad008900)
*   Trying 192.168.0.200…
* TCP_NODELAY set
* Expire in 200 ms for 4 (transfer 0x5598ad008900)
* Connected to 192.168.0.200 (192.168.0.200) port 3306 (#0)
Warning: Binary output can mess up your terminal. Use "–output -" to tell
Warning: curl to output it to your terminal anyway, or consider "–output
Warning: <FILE>" to save to a file.
* Failed writing body (0 != 107)
* Closing connection 0

As you can see the remote connection is returning binary data which is unknown to a standard telnet terminal thus to get the output received we need to pass curl suggested arguments.

host:~#  curl -vv 'telnet://192.168.0.200:3306' –output –
* Expire in 0 ms for 6 (transfer 0x55b205c02900)
*   Trying 192.168.0.200…
* TCP_NODELAY set
* Expire in 200 ms for 4 (transfer 0x55b205c02900)
* Connected to 192.168.0.200 (192.168.0.200) port 3306 (#0)
g


The curl trick used to troubleshoot remote port to remote host from a Windows OS host which does not have telnet installed by default but have curl instead.

Also When troubleshooting vSphere Replication, it is often necessary to troubleshoot port connectivity as common Windows utilities are not available.
As Curl is available in the VMware vCenter Server Appliance command line interface.

On servers where curl is not there but you have wget is installed you can use it also to test a remote port


# wget -vv -O /dev/null http://google.com:554 –timeout=5
–2020-12-30 16:54:22–  http://google.com:554/
Resolving google.com (google.com)… 172.217.169.206, 2a00:1450:4017:80b::200e
Connecting to google.com (google.com)|172.217.169.206|:554… failed: Connection timed out.
Connecting to google.com (google.com)|2a00:1450:4017:80b::200e|:554… failed: Cannot assign requested address.
Retrying.

–2020-12-30 16:54:28–  (try: 2)  http://google.com:554/
Connecting to google.com (google.com)|172.217.169.206|:554… ^C

As evident from output the port 554 is filtered in google which is pretty normal.

If curl or wget is not there either as a final alternative you can either install some perl, ruby, python or bash script etc. that can opens a remote socket to the remote IP.

How to check version of most used mail servers Postfix / Qmail / Exim / Sendmail

Wednesday, October 14th, 2020

How to check version of a Linux host's installed Mail server?

Most used mail servers Postfix / Qmail / Exim / Sendmail and usually you have to do a dpkg -l / rpm -qa or whatever package manager to get the package version. But sometimes the package is built to have a different naming convention from the actual installed MTA.

As recently I had to check on a Linux host what kind of version was the installed and used one to the SMTP, below is how to find conrete versions of Postfix / Qmail / Exim / Sendmail.
If none of the 4 is installed and something more cryptic like ssmtp is installed if another one is installed perhaps the best way would be to check with lsof -i :25 command and see  what process has binded and listens on TCP port 25.

mail-server-lsof-linux-screenshot-qmail-vpopmail


1. How to check Postfix exact mail server version

mail-server-exim-check-lsof-screenshot

Once you can find Postfix is the Network listening MTA, you might think you can simply use postfix -v however, but no …
Unlike many other applications, Postfix has no -v or –versions switch. But you can get the version information easily by using the postconf command as shown below:

root@server :~# postconf mail_version

postfix-show-version-postconf-linux

Other approach is to dump all postfix configuration settings (this is useful to get more info on how postfix is configured) and explicitly grep for the version.
 How to check version of a Linux host's installeded webserver?

root@server :~# postconf -d | grep mail_version


2. How to check Exim MTA running version ?

root@exim-mail :/ # exim -bV
Exim version 4.72 #1 built 13-Jul-2010 21:54:55
Copyright (c) University of Cambridge, 1995 – 2007
Berkeley DB: Sleepycat Software: Berkeley DB 4.3.29: (September 19, 2009)
Support for: crypteq iconv() Perl OpenSSL move_frozen_messages Content_Scanning DKIM Old_Demime
Lookups: lsearch wildlsearch nwildlsearch iplsearch cdb dbm dbmnz
Authenticators: cram_md5 plaintext spa
Routers: accept dnslookup ipliteral manualroute queryprogram redirect
Transports: appendfile/maildir/mailstore/mbx autoreply lmtp pipe smtp
Size of off_t: 8
OpenSSL compile-time version: OpenSSL 0.9.8e-fips-rhel5 01 Jul 2008
OpenSSL runtime version: OpenSSL 0.9.8e-fips-rhel5 01 Jul 2008
Configuration file is /etc/exim.conf

how-to-get-exim-version-on-gnu-linux-screenshot


3. How to check Sendmail Mail Transport Agent exact Mail version ?

Though sendmail is rarely used this days and it usually works mostly on obsolete old scrap hosts
or in some old fashioned conservative organizations such as Banks and Payment services providers, you might need to invertise it, just like the configuration m4 format complexity with its annoying macros, getting the version is also not straight forward:

# sendmail -d0.4 -bv root | grep Version
Version 8.14.4

Above commands should be working on most Linux distributions such as Debian / Ubuntu / Fedora / CentOS / SuSE and other Linux derivatives
 

4. How to check Qmail MTA version?

This is a bit of complicated question, as Qmail's base has not been significantly changed for years.
The latest published qmail package is qmail-1.03.tar.gz.  1.03 was released in 1998, Qmail is famous for its unbreakable security. The author of qmail  Daniel J. Bernstein is famous for writting Qmail to make the work installation and configuration of SMTP simple as of the time of writting sendmail was the defacto standard and sendmail was hard to configure.
Also sendmail was famous for a set of Security holes that got a lot of Sendmail MTA's on the Net got hacked. Thus the QMAIL was written as a more security-aware mail transport agent.

In contrast to sendmail, qmail has a modular architecture composed of mutually untrusting components; for instance, the SMTP listener component of qmail runs with different credentials from the queue manager or the SMTP sender. qmail was also implemented with a security-aware replacement to the C standard library, and as a result has not been vulnerable to stack and heap overflows, format string attacks, or temporary file race conditions.

The core qmail package has not been updated for many years. New features were initially provided by third party patches, from which the most important at the time were brought together in a single meta-patch set called netqmail.

The current version of netqmail is at 1.06 netqmail-1.06.tar.gz as of year 2020.

One possible way to get some info about installed qmail or components is to use the documentation look up command apropos

qmail:~# apropos qmail


or check the manual or at worst check for the installation source files that the person that installed the qmail used 🙂

A fun fact about qmail few might know is D. Bernstein offered in 1997 a US$500 reward for the first person to publish a verifiable security hole in the latest version of the software, for many years till 2005 no hole was found security researcher Georgi Guninski found an integer overflow in qmail. On 64-bit platforms, in default configurations with sufficient virtual memory, the delivery of huge amounts of data to certain qmail components may allow remote code execution. Bernstein disputes that this is a practical attack, arguing that no real-world deployment of qmail would be susceptible. Configuration of resource limits for qmail components mitigates the vulnerability.

On November 1, 2007, Bernstein raised the reward to US$1000. At a slide presentation the following day, Bernstein stated that there were 4 "known bugs" in the ten-year-old qmail-1.03, none of which were "security holes." He characterized the bug found by Guninski as a "potential overflow of an unchecked counter." "Fortunately, counter growth was limited by memory and thus by configuration, but this was pure luck.

5. Quick way to check the type of Mail server installed on Debian based Linux that doesn't have telnet installed


As you know simple telnet localhost 25 or a simple ps -ef could reveal at most times general information on the installed server. However there is another way to do it using package manager. by using embedded bash shell type type command like so:
 

# type -p sendmail |
xargs dpkg -S

type-x-bash-command-to-find-out-email-server-version-on-linux

Another hacky way to check whether exim, postfix or sendmail SMTP is installed is with:

hipo@freak:~$ echo $(man sendmail)| grep "exim"|wc -l
1
hipo@freak:~$ echo $(man sendmail)| grep "postfix"|wc -l
0
hipo@freak:~$ echo $(man sendmail)| grep "sendmail"|wc -l
0

I guess there are nice hacks and ways to get versions, so if you're aware of any please share with me.
Enjoy !

Get daily E-Mail Reports statistics on postfix Linux mail server

Tuesday, July 14th, 2020

https://www.pc-freak.net/images/Postfix-email-server-logo.svg-1

I've had today a task at work to monitor a postfix mail send and received emails (MAIL FROM / RPCT TO) and get out a simple statistics on what kind of emails are coming and going out from the Postfix SMTP on a server?

Below is shortly explained how I did it plus you will learn how you can use something more advanced to get server mail count, delivery status, errors etc. daily.
 

1. Using a simple script to process /var/log/messages

For that I made a small script to do the trick, the script simply checks mail delivery logged information from /var/log/maillog process a bit sort and logs in a separate log daily.

#!/bin/sh
# Process /var/log/maillog extract from= and to= mails sort
# And log mails to $LOGF
# Author Georgi Georgiev 14.07.2020

DATE_FORM=$(date +'%m_%d_%y_%H_%M_%S_%h_%m');
LOG='/home/gge/mail_from_to-mails';
LOGF="$LOG.$DATE_FORM.log";
CUR_DATE=$(date +'%m_%d_%y_%T');
echo "Processing /var/log/maillog";
echo "Processing /var/log/maillog" > $LOGF;
echo >>$LOGF
echo "!!! $CUR_DATE # Sent MAIL FROM: addresses: !!!" >> $LOGF;
grep -E 'from=' /var/log/maillog|sed -e 's#=# #g'|awk '{ print $8 }'|sed -e 's#<# #g' -e 's#># #g' -e 's#\,##'|sort -rn|uniq >> $LOGF;

echo "!!! $CUR_DATE # Receive RCPT TO: addresses !!!" >>$LOGF;
grep -E 'to=' /var/log/maillog|sed -e 's#=# #g'|awk '{ print $8 }'|sed -e 's#<# #g' -e 's#># #g' -e 's#\,##'|sort -rn|uniq >> $LOGF;


You can get a copy of the mail_from_to_collect_mails_postfix.sh script here.

I've set the script to run via a crond scheduled job once early in the mornthing and I'll leave it like that for 5 days or so to get a good idea on what are the mailboxes that are receiving incoming mail.

The cron I've set to use is as follows:

# crontab -u root -l 
05 03 * * *     sh /home/gge/mail_from_to.sh >/dev/null 2>&1


This will be necessery later for a Email Server planned migration to relay its mail via another MTA host.


2. Getting More Robust Postifx Mail Statistics from logs


My little script is of course far from best solution to get postfix mail statistics from logs.

If you want something more professional and you need to have a daily report on what mails sent to mail server and mails sent from the MTA to give you information about the Email delivery queue status, number of successful and failed emails from a mail sender / recipient and a whole bunch of useful info you can use something more advanced such as pflogsumm perl script to get daily / weekly monthly mail delivery statistics.

What can pflogsumm do for you ?


Pflogsumm is a log analyzer/summarizer for the Postfix MTA. It is
designed to provide an overview of Postfix activity, with just enough
detail to give the administrator a “heads up” for potential trouble
spots and fixing any SMTP and email related issues.

Pflogsumm generates summaries and, in some cases, detailed reports of
mail server traffic volumes rejected and bounced email and server
warnings, errors, and panics.

At the time of writting this article it is living on jimsun.linxnet.com just in case if pflogsumm.pl's official download location disappears at some time in future here is pflogsumm-1.1.3.tar.gz mirror stored on www.pc-freak.net

– Install pflogsumm

Use of pflogsumm is pretty straight forward, you download unarchive the script to some location such as /usr/local/bin/pflogsumm.pl  add the script executable flag and you run it to create a Postfix Mail Log statistics report for you

wget http://jimsun.linxnet.com/downloads/pflogsumm-1.1.3.tar.gz -O /usr/local/src/pflogsumm-1.1.3.tar.gz


# mkdir -p /usr/local/src/
# cd /usr/local/src/
# tar -zxvf pflogsumm-1.1.3.tar.gz
# cd pflogsumm-1.1.3/

# mv /usr/local/pflogsumm-1.1.3/pflogsumm.pl /usr/local/bin/pflogsumm
# chmod a+x /usr/local/bin/pflogsumm


That's all, assuming you have perl installed on the system with some standard modules, we're now good to go: 

To give it a test report to the command line:

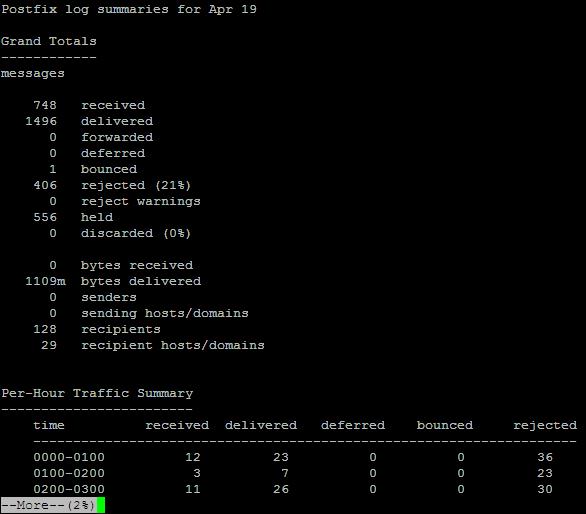
# /usr/local/bin/pflogsumm -d today /var/log/maillog

pflogsumm-log-summary-screenshot-linux-received-forwarded-bounced-rejected

To generate mail server use report and launch to some email of choice do:

# /usr/local/bin/pflogsumm -d today /var/log/maillog | mail -s Mailstats your-mail@your-domain.com


To make pflogsumm report everyday various interesting stuff such as (message deferrals, message bounce, details, smtp delivery failures, fatal errors, recipients by message size etc. add some cronjob like below to the server:

# /usr/sbin/pflogsumm -d yesterday /var/log/maillog | mail -s Mailstats | mail -s Mailstats your-mail@your-domain.com

If you need a GUI graphical mail monitoring in a Web Browser, you will need to install a webserver with a perl / cgi support,  RRDTools and MailGraph.

linux-monitoring-mail-server-with-mailgraph.cgi

Install Sendmail mail server on Debian GNU / Linux

Sunday, March 31st, 2013

Installing sendmail on Debian Linux is something not so common these days. As sendmail has been overshadowed by his competitors Exim and Postfix. By default Debian Linux comes with Exim (light) installed as Exim is tiny and perfectly suitable for dealing with small and mid-sized SMTP needs. The reason why sendmail has been moved out by its competitors over the last 15 years is sendmail configuration is one big hell and besides that sendmail has been well known for its many security remote exploit holes – making it a famous target for crackers. Well anyways in some cases sendmail is necessary to install especially if you have a client which wants to have it set up. In this short article I will show how very basic sendmail installation on Debian host is done.

 blackstar:~# apt-get install sendmail-bin sensible-mda

Reading package lists… Done
Building dependency tree      
Reading state information… Done

The following extra packages will be installed:
  sendmail-base sendmail-cf sensible-mda
Suggested packages:
  sendmail-doc logcheck resolvconf sasl2-bin
The following packages will be REMOVED:
  exim4 exim4-base exim4-config exim4-daemon-light sa-exim task-mail-server
The following NEW packages will be installed:
  sendmail-base sendmail-bin sendmail-cf
0 upgraded, 3 newly installed, 6 to remove and 26 not upgraded.
Need to get 1,626 kB of archives.
After this operation, 592 kB disk space will be freed.
Do you want to continue [Y/n]? Y
Get:1 http://ftp.bg.debian.org/debian/ wheezy/main sendmail-base all 8.14.4-2.1 [362 kB]
Get:2 http://ftp.bg.debian.org/debian/ wheezy/main sendmail-cf all 8.14.4-2.1 [300 kB]
Get:3 http://ftp.bg.debian.org/debian/ wheezy/main sendmail-bin i386 8.14.4-2.1 [964 kB]
Fetched 1,626 kB in 0s (3,057 kB/s)  
(Reading database … 199577 files and directories currently installed.)
Removing task-mail-server …
Selecting previously unselected package sendmail-base.
(Reading database … 199577 files and directories currently installed.)
Unpacking sendmail-base (from …/sendmail-base_8.14.4-2.1_all.deb) …
Selecting previously unselected package sendmail-cf.
Unpacking sendmail-cf (from …/sendmail-cf_8.14.4-2.1_all.deb) …
Processing triggers for man-db …
(Reading database … 199939 files and directories currently installed.)
Removing sa-exim …
[….] Reloading exim4 configuration files:invoke-rc.d: initscript exim4, action "reload" failed.
dpkg: exim4-config: dependency problems, but removing anyway as you requested:
 exim4-base depends on exim4-config (>= 4.30) | exim4-config-2; however:
  Package exim4-config is to be removed.
  Package exim4-config-2 is not installed.
  Package exim4-config which provides exim4-config-2 is to be removed.
 exim4-base depends on exim4-config (>= 4.30) | exim4-config-2; however:
  Package exim4-config is to be removed.
  Package exim4-config-2 is not installed.
  Package exim4-config which provides exim4-config-2 is to be removed.

Removing exim4-config …
dpkg: exim4-daemon-light: dependency problems, but removing anyway as you requested:
 exim4 depends on exim4-daemon-light | exim4-daemon-heavy | exim4-daemon-custom; however:
  Package exim4-daemon-light is to be removed.
  Package exim4-daemon-heavy is not installed.
  Package exim4-daemon-custom is not installed.
 bsd-mailx depends on default-mta | mail-transport-agent; however:
  Package default-mta is not installed.
  Package exim4-daemon-light which provides default-mta is to be removed.
  Package mail-transport-agent is not installed.
  Package exim4-daemon-light which provides mail-transport-agent is to be removed.

Removing exim4-daemon-light …
[ ok ] Stopping MTA:.
ALERT: exim paniclog /var/log/exim4/paniclog has non-zero size, mail system possibly broken
dpkg: exim4-base: dependency problems, but removing anyway as you requested:
 exim4 depends on exim4-base (>= 4.80).

Removing exim4-base …
Processing triggers for man-db …
Selecting previously unselected package sendmail-bin.
(Reading database … 199786 files and directories currently installed.)
Unpacking sendmail-bin (from …/sendmail-bin_8.14.4-2.1_i386.deb) …
Processing triggers for man-db …
Setting up sendmail-base (8.14.4-2.1) …
adduser: Warning: The home directory `/var/lib/sendmail' does not belong to the user you are currently creating.
Setting up sendmail-cf (8.14.4-2.1) …
Setting up sendmail-bin (8.14.4-2.1) …
update-rc.d: warning: default stop runlevel arguments (0 1 6) do not match sendmail Default-Stop values (1)
update-alternatives: using /usr/lib/sm.bin/sendmail to provide /usr/sbin/sendmail-mta (sendmail-mta) in auto mode
update-alternatives: using /usr/lib/sm.bin/sendmail to provide /usr/sbin/sendmail-msp (sendmail-msp) in auto mode
update-alternatives: warning: not replacing /usr/share/man/man8/sendmail.8.gz with a link

You are doing a new install, or have erased /etc/mail/sendmail.mc.
If you've accidentaly erased /etc/mail/sendmail.mc, check /var/backups.

I am creating a safe, default sendmail.mc for you and you can
run sendmailconfig later if you need to change the defaults.

[ ok ] Stopping Mail Transport Agent (MTA): sendmail.
Updating sendmail environment …
Validating configuration.
Writing configuration to /etc/mail/sendmail.conf.
Writing /etc/cron.d/sendmail.
Could not open /etc/mail/databases(No such file or directory), creating it.
Could not open /etc/mail/sendmail.mc(No such file or directory)
Reading configuration from /etc/mail/sendmail.conf.
Validating configuration.
Writing configuration to /etc/mail/sendmail.conf.
Writing /etc/cron.d/sendmail.
Turning off Host Status collection
Could not open /etc/mail/databases(No such file or directory), creating it.
Reading configuration from /etc/mail/sendmail.conf.
Validating configuration.
Creating /etc/mail/databases…

Checking filesystem, this may take some time – it will not hang!
  …   Done.
 
Checking for installed MDAs…
Adding link for newly extant program (mail.local)
Adding link for newly extant program (procmail)
sasl2-bin not installed, not configuring sendmail support.

To enable sendmail SASL2 support at a later date, invoke "/usr/share/sendmail/update_auth"

 
Creating/Updating SSL(for TLS) information
Creating /etc/mail/tls/starttls.m4…
Creating SSL certificates for sendmail.
Generating DSA parameters, 2048 bit long prime
This could take some time
…+………………..+.+..+..+++
..+.+………….+.++++++++++++++++++++++++++++++*
Generating RSA private key, 2048 bit long modulus
………………..+++
…………………+++
e is 65537 (0x10001)

*** *** *** WARNING *** WARNING *** WARNING *** WARNING *** *** ***

Everything you need to support STARTTLS (encrypted mail transmission
and user authentication via certificates) is installed and configured
but is *NOT* being used.

To enable sendmail to use STARTTLS, you need to:
1) Add this line to /etc/mail/sendmail.mc and optionally
   to /etc/mail/submit.mc:
  include(`/etc/mail/tls/starttls.m4')dnl
2) Run sendmailconfig
3) Restart sendmail

 
Updating /etc/hosts.allow, adding "sendmail: all".

Please edit /etc/hosts.allow and check the rules location to
make sure your security measures have not been overridden –
it is common to move the sendmail:all line to the *end* of
the file, so your more selective rules take precedence.
Checking {sendmail,submit}.mc and related databases…
Reading configuration from /etc/mail/sendmail.conf.
Validating configuration.
Creating /etc/mail/databases…
Reading configuration from /etc/mail/sendmail.conf.
Validating configuration.
Creating /etc/mail/databases…
Reading configuration from /etc/mail/sendmail.conf.
Validating configuration.
Creating /etc/mail/Makefile…
Reading configuration from /etc/mail/sendmail.conf.
Validating configuration.
Writing configuration to /etc/mail/sendmail.conf.
Writing /etc/cron.d/sendmail.
Disabling HOST statistics file(/var/lib/sendmail/host_status).
Creating /etc/mail/sendmail.cf…
*** ERROR: FEATURE() should be before MAILER()
*** MAILER(`local') must appear after FEATURE(`always_add_domain')*** ERROR: FEATURE() should be before MAILER()
*** MAILER(`local') must appear after FEATURE(`allmasquerade')*** ERROR: FEATURE() should be before MAILER()
 
Creating /etc/mail/submit.cf…
Informational: confCR_FILE file empty: /etc/mail/relay-domains
Warning: confCT_FILE source file not found: /etc/mail/trusted-users
 it was created
Informational: confCT_FILE file empty: /etc/mail/trusted-users
Warning: confCW_FILE source file not found: /etc/mail/local-host-names
 it was created
Warning: access_db source file not found: /etc/mail/access
 it was created
Updating /etc/mail/access…
Linking /etc/aliases to /etc/mail/aliases
Updating /etc/mail/aliases…

WARNING: local host name (blackstar) is not qualified; see cf/README: WHO AM I?
/etc/mail/aliases: 13 aliases, longest 10 bytes, 145 bytes total
 
Warning: 3 database(s) sources
    were not found, (but were created)
    please investigate.
 
Warning: These messages were issued while creating sendmail.cf
    make sure they are benign before starting sendmail!
 
Errors in generating sendmail.cf
*** ERROR: FEATURE() should be before MAILER()
*** MAILER(`local') must appear after FEATURE(`always_add_domain')*** ERROR: FEATURE() should be before MAILER()
*** MAILER(`local') must appear after FEATURE(`allmasquerade')*** ERROR: FEATURE() should be before MAILER()
 
[ ok ] Starting Mail Transport Agent (MTA): sendmail.
(Reading database … 199837 files and directories currently installed.)
Removing exim4 …
 

Right after packages gets installed it is good idea to get rid of any remains of previous exim SMTP install, run;

blackstar:~# dpkg --purge exim4
blackstar:~# dpkg --purge exim4-base
blackstar:~# dpkg --purge exim4-config
blackstar:~# dpkg --purge exim4-daemon-light
blackstar:~# dpkg --purge sa-exim

blackstar:~# grep -i sendmail /etc/passwd
smmta:x:121:128:Mail Transfer Agent,,,:/var/lib/sendmail:/bin/false
smmsp:x:124:129:Mail Submission Program,,,:/var/lib/sendmail:/bin/false
blackstar:~# grep -i -E "smmta|smmsp" /etc/passwd
smmta:x:121:128:Mail Transfer Agent,,,:/var/lib/sendmail:/bin/false
smmsp:x:124:129:Mail Submission Program,,,:/var/lib/sendmail:/bin/false

Sendmail install does create two new users smmta and smmsp in /etc/passwd and /etc/group

As you see from earlier apt-get output sendmail is provided on Debian via 4 packs:

root@blackstar:~# dpkg -l |grep -i sendmail
ii  libmail-sendmail-perl                0.79.16-1                          all          Send email from a perl script
ii  sendmail-base                        8.14.4-2.1                         all          powerful, efficient, and scalable Mail Transport Agent
ii  sendmail-bin                         8.14.4-2.1                         i386         powerful, efficient, and scalable Mail Transport Agent
ii  sendmail-cf                          8.14.4-2.1                         all          powerful, efficient, and scalable Mail Transport Agent

libmail-sendmail-perl installs a perl module (class)  /usr/share/perl5/Mail/Sendmail.pm.

sendmail-bin contains main sendmail components binary files, cron bindings related to sendmail, some manual pages and creates structure necessary for sendmail to process email queue. sendmail-cf provides a multitude of sendmail configurations in macroses and few documentation files on the macros configuration. All sendmail configuration macros are stored in /usr/share/sendmail/* – there are pleny of .m4 configs so for people who never installed sendmail it is really confusing.

sendmail-base package contains some bindings on how to to log rotate sendmail log files, few more sendmail binaries who deal with sendmail architecture, few files whether sendmail is run via PPP or DHCP connection, some documentation and example files. Sendmail documentation is installed in /usr/share/doc/sendmail*,  unfortunately documentation there is scarce so for extended documentation it is good to check Sendmail's Official site

To check if sendmail is running you should have it visible  in the list of running processes;

root@blackstar:~# ps xa|grep sendmail|grep -v grep
  468 ?        Ss     0:00 sendmail: MTA: accepting connections        

Further on it should be accepting connections on localhost / 25, i.e.

root@blackstar:~# telnet localhost 25
Trying ::1...
Trying 127.0.0.1...
Connected to localhost.
Escape character is '^]'.
220 blackstar ESMTP Sendmail 8.14.4/8.14.4/Debian-2.1; Sat, 30 Mar 2013 19:09:47 +0200; (No UCE/UBE) logging access from: localhost(OK)-localhost [127.0.0.1] ^]
telnet> quit


Sendmail's configuration is being generated using a macro file using a macro processor via m4 command. There are few files, used as a basis for generation the final m4 most important of course is /etc/mail/sendmail.mc and sendmail.cf  –  /etc/mail/sendmail.cf, sendmail.mc after processed with the mambo-jambo with m4 generates the complex and about 15 times larger by size sendmail.cf.
All configs related to generating files instructing how sendmail will operate are stored in /etc/mail;

blackstar:~#  ls -1
access
access.db
address.resolve
aliases
aliases.db
databases
helpfile
local-host-names
m4
Makefile
peers
sasl
sendmail.cf
sendmail.cf.errors
sendmail.conf
sendmail.mc
service.switch
service.switch-nodns
smrsh
spamassassin
submit.cf
submit.mc
tls

sendmail.cf.errors
– contains errors during processing of macros config files.


root@blackstar:/etc/mail# cat sendmail.cf.errors
*** ERROR: FEATURE() should be before MAILER()
*** MAILER(`local') must appear after FEATURE(`always_add_domain')*** ERROR: FEATURE() should be before MAILER()
*** MAILER(`local') must appear after FEATURE(`allmasquerade')*** ERROR: FEATURE() should be before MAILER()

This errors, are not fatal as sendmail.cf is there and sendmail is from now on ready to send mails via localhost.

To check if sendmail delivers mails onwards, use mail cmd;
 

hipo@blackstar:~$ mail -s "testing" test@www.pc-freak.net
this is a simple test email
Do you get it?
.
Cc:

To see all is fine with mail delivery check out /var/log/mail.log

blackstar:~# tail -f /var/log/mail/log
Mar 30 21:23:05 blackstar sm-msp-queue[1495]: unable to qualify my own domain name (blackstar) -- using short name
Mar 30 21:23:09 blackstar sm-mta[1499]: STARTTLS=client, relay=mail.www.pc-freak.net., version=TLSv1/SSLv3, verify=FAIL, cipher=AES256-SHA, bits=256/256
Mar 30 21:23:11 blackstar sm-mta[1524]: r2UJN8x2001524: localhost [127.0.0.1] did not issue MAIL/EXPN/VRFY/ETRN during connection to MTA-v4
Mar 30 21:23:13 blackstar sm-mta[1499]: r2UJKwqR001412: to=<hipo@www.pc-freak.net>, ctladdr=<root@blackstar> (0/0), delay=00:02:15, xdelay=00:00:10, mailer=esmtp, pri=210313, relay=mail.www.pc-freak.net. [83.228.93.76], dsn=2.0.0, stat=Sent (ok 1364671405 qp 7492)
Mar 30 21:24:28 blackstar sendmail[1532]: My unqualified host name (blackstar) unknown; sleeping for retry
Mar 30 21:27:16 blackstar sendmail[1633]: My unqualified host name (blackstar) unknown; sleeping for retry

As you see there is an error in mail.log
 

blackstar sendmail[1532]: My unqualified host name (blackstar) unknown; sleeping for retry


This is because blackstar is not assigned as a a host recognized to 127.0.0.1 in /etc/hosts. To solve it on my host I had to change /etc/hosts which looked like so:

blackstar:~# cat /etc/hosts
127.0.0.1    localhost
127.0.1.1    blackstar
# The following lines are desirable for IPv6 capable hosts
::1     localhost ip6-localhost ip6-loopback
ff02::1 ip6-allnodes
ff02::2 ip6-allrouters

to

blackstar:~# vim /etc/hosts

127.0.0.1    localhost localhost.localdomain blackstar
127.0.1.1    blackstar

# The following lines are desirable for IPv6 capable hosts
::1     localhost ip6-localhost ip6-loopback
ff02::1 ip6-allnodes
ff02::2 ip6-allrouters


Then restart sendmail to reread /etc/hosts
 

root@blackstar:/etc/mail# /etc/init.d/sendmail restart
[ ok ] Restarting Mail Transport Agent (MTA): sendmail.


How to configure Exim to relay mail to remote SMTP server on Debian and Ubuntu

Wednesday, August 24th, 2011

I’m required to do some mail relaying on a Debian Linux host which should use a remote mail server to relay its mails.
Until so far I’ve had not much experience with exim as I prefer using qmail, whever a mail server is needed. However since now only a relaying was necessery and exim is the default installed MTA on Debian, I’ve decided to use exim to take care of the SMTP mail relaying.
After a bit of reading it happened configuring exim to relay via remote SMTP server is more than easy!

All I had to do is run the command:

debian-relay:~# dpkg-reconfigure exim4-config

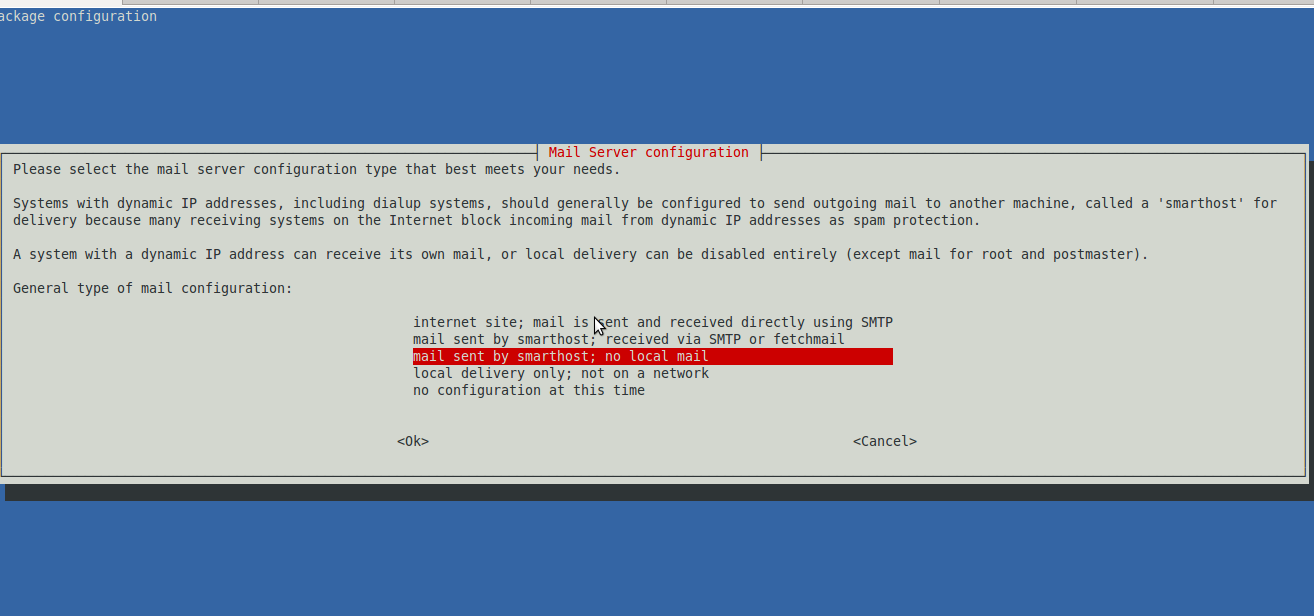
Next in the Ncruses interface to appear:

Debian Exim relay smtp config screenshot

I had to choose the option:

mail sent by smarthost; no local mail

Next a dialog appears asking for:
System mail name:
Therein it’s necessery to type in the hostname of the remote SMTP to be used for mail relay.
Next dialog asks for:
IP-addresses to listen on for incoming SMTP connections:
and I left it with 127.0.0.1 however if exim is supposed to be visible from external network one might decide to put in real IP address there.

Pressing OK leads to the next dialog:
 Other destinations for which mail is accepted: 
I decided to leave this blank as I don’t want to accept mail for any destinations.
Next pane reads:
Visible domain name for local users:
I’ve typed inside my smtp relay server e.g.:
smtp.myrelaymail.com

Further comes:
IP address or host name of the outgoing smarthost:
There once again I typed my mail relay host smtp.relaymail.com

The next config screen is:
Keep number of DNS-queries minimal (Dial-on-Demand)?
On any modern Linux host the default answer of No is fine.
Following prompt asked if I want to:
Split configuration into small files?
I’ve decided not to tamper with it and choosed No
Afterwards mail relaying works like a charm thx God 😉

How to change Exim mail server hostname on Debian Linux

Tuesday, March 19th, 2013

If you have to configure Exim mail server to act as RELAY Forwarding SMTP through another mail server and nomatter, you set up in dpkg-reconfigure exim4-config command a hostname still connecting to localhost port 25 shows a hostname identical as configured hostname for server. You will have to explicitly instruct exim to desired hostname like so:

debian:~# cp -rpf /etc/exim4/exim4.conf.template /etc/exim4/exim4.conf

Then edit /etc/exim4/exim4.conf

Add somewhere in beginning of config file

primary_hostname = DESIRED_HOSTNAME.COM

To make exim load new settings, restart SMTP:

debian:~# /etc/init.d/exim4 restart

Stopping MTA for restart: exim4_listener.
Restarting MTA: exim4.
 

debian:~# telnet localhost 25
Trying 127.0.0.1...
Connected to localhost.
Escape character is '^]'.
220 DESIRED_HOSTNAME.COM ESMTP Exim 4.72 Tue, 19 Mar 2013 19:02:52 +0000
^]
telnet> quit
Connection closed.