Posts Tagged ‘current version’

How to check version of most used mail servers Postfix / Qmail / Exim / Sendmail

Wednesday, October 14th, 2020

How to check version of a Linux host's installed Mail server?

Most used mail servers Postfix / Qmail / Exim / Sendmail and usually you have to do a dpkg -l / rpm -qa or whatever package manager to get the package version. But sometimes the package is built to have a different naming convention from the actual installed MTA.

As recently I had to check on a Linux host what kind of version was the installed and used one to the SMTP, below is how to find conrete versions of Postfix / Qmail / Exim / Sendmail.
If none of the 4 is installed and something more cryptic like ssmtp is installed if another one is installed perhaps the best way would be to check with lsof -i :25 command and see  what process has binded and listens on TCP port 25.

mail-server-lsof-linux-screenshot-qmail-vpopmail


1. How to check Postfix exact mail server version

mail-server-exim-check-lsof-screenshot

Once you can find Postfix is the Network listening MTA, you might think you can simply use postfix -v however, but no …
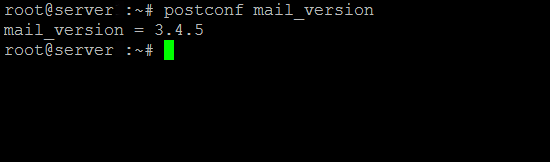
Unlike many other applications, Postfix has no -v or –versions switch. But you can get the version information easily by using the postconf command as shown below:

root@server :~# postconf mail_version

postfix-show-version-postconf-linux

Other approach is to dump all postfix configuration settings (this is useful to get more info on how postfix is configured) and explicitly grep for the version.
 How to check version of a Linux host's installeded webserver?

root@server :~# postconf -d | grep mail_version


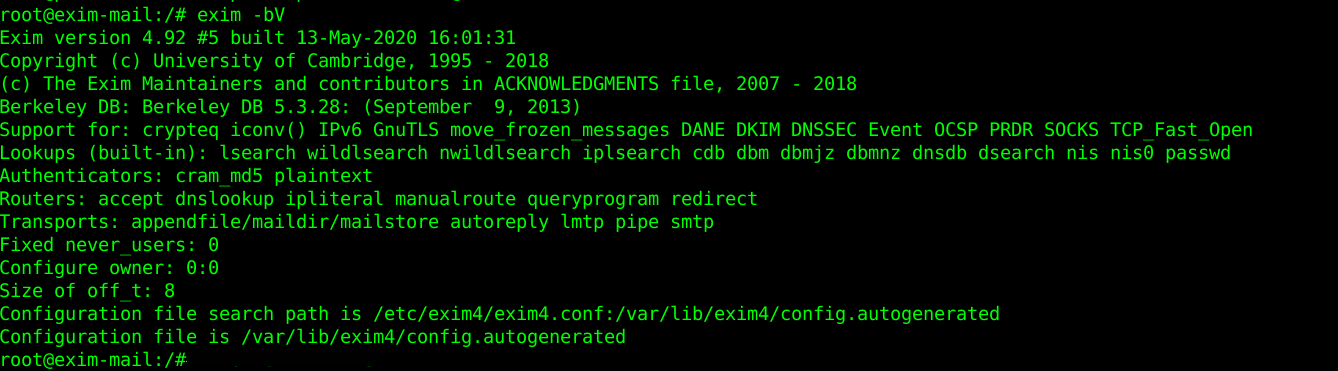
2. How to check Exim MTA running version ?

root@exim-mail :/ # exim -bV
Exim version 4.72 #1 built 13-Jul-2010 21:54:55
Copyright (c) University of Cambridge, 1995 – 2007
Berkeley DB: Sleepycat Software: Berkeley DB 4.3.29: (September 19, 2009)
Support for: crypteq iconv() Perl OpenSSL move_frozen_messages Content_Scanning DKIM Old_Demime
Lookups: lsearch wildlsearch nwildlsearch iplsearch cdb dbm dbmnz
Authenticators: cram_md5 plaintext spa
Routers: accept dnslookup ipliteral manualroute queryprogram redirect
Transports: appendfile/maildir/mailstore/mbx autoreply lmtp pipe smtp
Size of off_t: 8
OpenSSL compile-time version: OpenSSL 0.9.8e-fips-rhel5 01 Jul 2008
OpenSSL runtime version: OpenSSL 0.9.8e-fips-rhel5 01 Jul 2008
Configuration file is /etc/exim.conf

how-to-get-exim-version-on-gnu-linux-screenshot


3. How to check Sendmail Mail Transport Agent exact Mail version ?

Though sendmail is rarely used this days and it usually works mostly on obsolete old scrap hosts
or in some old fashioned conservative organizations such as Banks and Payment services providers, you might need to invertise it, just like the configuration m4 format complexity with its annoying macros, getting the version is also not straight forward:

# sendmail -d0.4 -bv root | grep Version
Version 8.14.4

Above commands should be working on most Linux distributions such as Debian / Ubuntu / Fedora / CentOS / SuSE and other Linux derivatives
 

4. How to check Qmail MTA version?

This is a bit of complicated question, as Qmail's base has not been significantly changed for years.
The latest published qmail package is qmail-1.03.tar.gz.  1.03 was released in 1998, Qmail is famous for its unbreakable security. The author of qmail  Daniel J. Bernstein is famous for writting Qmail to make the work installation and configuration of SMTP simple as of the time of writting sendmail was the defacto standard and sendmail was hard to configure.
Also sendmail was famous for a set of Security holes that got a lot of Sendmail MTA's on the Net got hacked. Thus the QMAIL was written as a more security-aware mail transport agent.

In contrast to sendmail, qmail has a modular architecture composed of mutually untrusting components; for instance, the SMTP listener component of qmail runs with different credentials from the queue manager or the SMTP sender. qmail was also implemented with a security-aware replacement to the C standard library, and as a result has not been vulnerable to stack and heap overflows, format string attacks, or temporary file race conditions.

The core qmail package has not been updated for many years. New features were initially provided by third party patches, from which the most important at the time were brought together in a single meta-patch set called netqmail.

The current version of netqmail is at 1.06 netqmail-1.06.tar.gz as of year 2020.

One possible way to get some info about installed qmail or components is to use the documentation look up command apropos

qmail:~# apropos qmail


or check the manual or at worst check for the installation source files that the person that installed the qmail used 🙂

A fun fact about qmail few might know is D. Bernstein offered in 1997 a US$500 reward for the first person to publish a verifiable security hole in the latest version of the software, for many years till 2005 no hole was found security researcher Georgi Guninski found an integer overflow in qmail. On 64-bit platforms, in default configurations with sufficient virtual memory, the delivery of huge amounts of data to certain qmail components may allow remote code execution. Bernstein disputes that this is a practical attack, arguing that no real-world deployment of qmail would be susceptible. Configuration of resource limits for qmail components mitigates the vulnerability.

On November 1, 2007, Bernstein raised the reward to US$1000. At a slide presentation the following day, Bernstein stated that there were 4 "known bugs" in the ten-year-old qmail-1.03, none of which were "security holes." He characterized the bug found by Guninski as a "potential overflow of an unchecked counter." "Fortunately, counter growth was limited by memory and thus by configuration, but this was pure luck.

5. Quick way to check the type of Mail server installed on Debian based Linux that doesn't have telnet installed


As you know simple telnet localhost 25 or a simple ps -ef could reveal at most times general information on the installed server. However there is another way to do it using package manager. by using embedded bash shell type type command like so:
 

# type -p sendmail |
xargs dpkg -S

type-x-bash-command-to-find-out-email-server-version-on-linux

Another hacky way to check whether exim, postfix or sendmail SMTP is installed is with:

hipo@freak:~$ echo $(man sendmail)| grep "exim"|wc -l
1
hipo@freak:~$ echo $(man sendmail)| grep "postfix"|wc -l
0
hipo@freak:~$ echo $(man sendmail)| grep "sendmail"|wc -l
0

I guess there are nice hacks and ways to get versions, so if you're aware of any please share with me.
Enjoy !

How to downgrade package with apt-get on Debian / Ubuntu / Mint Linux

Thursday, October 19th, 2017

how-to-downgrade-debian-package-to-an-older-version-debian_package-box


How can I downgrade a debian package to an older version with apt-get?

Downgrading a package in Debian is not frequently required but sometimes it is a must lets say a package you just upgraded fails to communicate properly to an application, in my case that's Ejabberd server which was working pretty well with Yaxim, Bruno or Xabber Mobile android application clients, unfortunately right after periodic apt-get upgrades I do with apt due to security upgrade of deb package ejabberd=2.1.10-4+deb7u1 to ejabberd=2.1.10-4+deb7u2 it messed up and even though it worked fine with Desktop clients such as Gajim and Pidgin, there was no Android application on my Phone with Android 4.4 which was able to communicate properly with the TLS encrypted Jabber server so my only option was to downgrade back to ejabberd=2.1.10-4+deb7u1.

I looked through duckduckgo.com a short URL is (ddg.gg) but I couldn't find the old deb file to downgrade so I was in a situation …

 Then I duckduck goed (I've recently stopped using Google as Google is collecting too much data and sharing with NSA) and I found following instructions on downgrade

——— 

If you have the version number, or the target release, apt-get supports choosing a particular version or target release. More details can be found on manual page of apt-get. It can also be accessed from terminal by typing man apt-get

sudo apt-get install <package-name>=<package-version-number> OR

sudo apt-get -t=<target release> install <package-name>

is the command to be run. This can be used to down-grade a package to a specific version.

It has been helpfully pointed out in the comments that

    apt-cache showpkg <package-name> – lists all available versions. (h/t Sparhawk)
    apt-mark hold <package-name> "holds" – the package at the current version, preventing automatic upgrades. (h/t Luís de Sousa )


In other words All I had to do is as root superuser is:
 

apt-get install «pkg»=«version»

OR

aptitude install «pkg»=«version»

Where «pkg» is the name of the package, and «version» is the version number.


So I just issued following cmd:

root@pcfreak:~# apt-get install ejabberd=2.1.10-4+deb7u1
Четене на списъците с пакети… Готово
Изграждане на дървото със зависимости       
Четене на информацията за състоянието… Готово
Предложени пакети:
  libunix-syslog-perl
Следните НОВИ пакети ще бъдат инсталирани:
  ejabberd
0 актуализирани, 1 нови инсталирани, 0 за премахване и 3 без промяна.
Необходимо е да се изтеглят 1795 kB архиви.
След тази операция ще бъде използвано 3699 kB допълнително дисково пространство.
Изт:1 http://ftp.uk.debian.org/debian/ wheezy/main ejabberd amd64 2.1.10-4+deb7u1 [1795 kB]


P.S. Sorry for the cyrillic for those who can't read it but it is standard messages that Debian does in package install time.

Analogously you can do it for any other newer package that upgraded, later on to prevent further security updates of the package you will have to put the package on hold, that's as easy as running:
 

root@pcfreak:~# aptitude hold ejabberd
No packages will be installed, upgraded, or removed.
0 packages upgraded, 0 newly installed, 0 to remove and 4 not upgraded.
Need to get 0 B of archives. After unpacking 0 B will be used.


Windows: command to show CPU info, PC Motherboard serial number and BIOS details

Wednesday, March 2nd, 2016

windows-command-to-show-motherboard-bios-and-cpu-serials-and-specific-info-with-wmic

Getting CPU information, RAM info and other various hardware specifics on Windows from the GUI interface is pretty trivial from Computer -> Properties
even more specifics could be obtained using third party Windows software such as CPU-Z

Perhaps there are plenty of many other ones to get and log info about hardware on PC or notebook system, but for Windwos sysadmins especially ones who are too much in love with command prompt way of behaving and ones who needs to automatizate server deployment processes with BATCH (.BAT)  scripts getting quickly info about hardware on freshly installed remote host Win server with no any additional hardware info tools, you'll be happy to know there are command line tools you can use to get extra hardware information on Windows PC / server:

The most popular tool available to present you with some basic hardware info is of course systeminfo


C:\> systeminfo

Host Name:                 REMHOST
OS Name:                   Microsoft Windows Server 2012 R2 Standard
OS Version:                6.3.9600 N/A Build 9600
OS Manufacturer:           Microsoft Corporation
OS Configuration:          Member Server
OS Build Type:             Multiprocessor Free
Registered Owner:          Registrar
Registered Organization:   Registrar
Product ID:                00XXX-X0000-00000-XX235
Original Install Date:     17/02/2016, 11:38:39
System Boot Time:          18/02/2016, 14:16:48
System Manufacturer:       VMware, Inc.
System Model:              VMware Virtual Platform
System Type:               x64-based PC
Processor(s):              1 Processor(s) Installed.
                           [01]: Intel64 Family 6 Model 45 Stepping 7 GenuineInt
el ~2600 Mhz
BIOS Version:              Phoenix Technologies LTD 6.00, 11/06/2014
Windows Directory:         C:\Windows
System Directory:          C:\Windows\system32
Boot Device:               \Device\HarddiskVolume1
System Locale:             de;German (Germany)
Input Locale:              de;German (Germany)
Time Zone:                 (UTC+01:00) Amsterdam, Berlin, Bern, Rome, Stockholm,
 Vienna
Total Physical Memory:     4,095 MB
Available Physical Memory: 2,395 MB
Virtual Memory: Max Size:  10,239 MB
Virtual Memory: Available: 8,681 MB
Virtual Memory: In Use:    1,558 MB
Page File Location(s):     C:\pagefile.sys
Domain:                    dom1.domain.com
Logon Server:              \\DOM
Hotfix(s):                 148 Hotfix(s) Installed.
                           [01]: KB2894852
                           [02]: KB2894856
                           [03]: KB2918614
                           [04]: KB2919355
…..


Now though systeminfo's hardware details and installed Windows KBXXXXX OS Hotfix patches are getting lists the command does not provide you with info about  system’s BIOS, thus to get this info you'll have to use also wmic (Windows Management Instrumentation Command).


So What Is WMIC?

WMIC extends WMI for operation from several command-line interfaces and through batch scripts. Before WMIC, you used WMI-based applications (such as SMS), the WMI Scripting API, or tools such as CIM Studio to manage WMI-enabled computers. Without a firm grasp on a programming language such as C++ or a scripting language such as VBScript and a basic understanding of the WMI namespace, do-it-yourself systems management with WMI was difficult. WMIC changes this situation by giving you a powerful, user-friendly interface to the WMI namespace.

WMIC is more intuitive than WMI, in large part because of aliases. Aliases take simple commands that you enter at the command line, then act upon the WMI namespace in a predefined way, such as constructing a complex WMI Query Language (WQL) command from a simple WMIC alias Get command. Thus, aliases act as friendly syntax intermediaries between you and the namespace. For example, when you run a simple WMIC command such as

Here is how to wmic to get PC Motherboard serial numbers, CPU and BIOS details:


C:\> wmic bios get name,serialnumber,version


Above will print  name if your BIOS, current version and it’s serial number if there is any.

If you need to get more info about the specific Motherboard installed on host:


C:\> wmic csproduct get name,identifyingnumber,uuid


This command will show motherboard modification and it’s UUID

If you want to quickly get what is Windows running hardware CPU clock speed
 

C:\> wmic cpu get name,CurrentClockSpeed,MaxClockSpeed


Also if you have turbo boost CPUs above command will help you find what’s the Max Clock Speed your system is capable of for the current hardware configuration.

If you do have dynamic clock speed running, then add this line, will refresh and monitor the Clock speed every 1 second.
 

C:\> wmic cpu get name,CurrentClockSpeed,MaxClockSpeed /every:1

Actually wmic is a great tool

How to download books from Books Google with Google Book Download stand alone program and Greasemonkey with Google Books Downloader script

Thursday, February 7th, 2013

If you are student or just a researcher, you already know most of the good books you can find are on books.google.com. Google Books's is nice, but not all browsers support it well. Older mobile phones has big troubles with it, plus it is always nice to have a stored copy of book on your PC for later review or just to refresh your memory on books previously read.

Thus if you get to task to download Books from Google a quick research reveals few programs claiming to support downloading Books from Google in PDF;

1. Google Books Download standalone application for Windows and Mac OS X

Google Books Download is said to support Save of Google books in PDF, JPEG or PNG format.
This program works good whether you need to extract only certain book pages, however with complete books it often hangs. Other problem is it is  proprietary software, (freeware), so pages book pages it downloads in PDF had a big red color stamp complaining the program is trial.
There is a cracked version available on Piratebay.se's website. But as Piratebay is filtered from here. To test it I had to google it via piratebay proxy: –  with "piratebay  google books download"
.


Google Books Download
, standalone app from Piratebay is at current version 3.1.308.
As you can see from screenshot Google Book Download has two modes of work, one is;
Download Manually
– This is used for manual download a pages from a complete book and converting them to PDF.
Download Automatically – Is purposed to download a complete book from books.google.com and converting it to PDF. Downloading a complete copy of book using this mode is sometimes, hanging, plus it is really, really slow. The reason is each of the pages from the Book is first scanned using OCR (Optical Character Recognition) technology page by page and later after all pages are downloaded in pictures, they're converted to 1 PDF file.

Because Download Automatically loops at certain pages, this makes Google Books Download almost useless for people looking to store a full copy of books on Books.Google.com ….

2. Downloading PDFs from books.google.com with Firefox Greasemonkey and Google Book Downloaderjavascript

a. Install GreaseMonkey Firefox add-on

If you never before heard of Greasemonkey is a Mozilla Firefox Extension that allows users to install scripts that make on-the-fly changes to web page content after or before the page is loaded in the browser (also known as augmented browsing).

b. Install Google book downloader GreaseMonkey javascript

After a FF restart, you're ready to download any book from Books.Google.com.
To use it open the book you want to download and on the left upper corner you will see a Download this book button, press it and the book will be scanned in OCR and saved in PNG picture format. Below is a screenshot showing a sample book to download from books.google.com;

how to download book from google in firefox web browser screenshot


After each book page is succesfully download in page on the left pane you get a download status;

google book download firefox screenshot pictures - Scythian Monks download - how to download books to pictures from Google books on Windows XP, Windows 8

You should keep in mind that the download links of Google Book pages, will have a time expiry, so if you don't hurry up to save the pictures for later use soon links will become inaccessible and showing as broken from Google – I'm not sure how much exactly is google's max expiry time set of links but I guess it should be something 5-10 mins.

The pages of PDF, gets fetched as pictures one by one so it takes 20 secs or so to get all links to pages. Since Google Books Downloader only provides links to PDF pages it is necessery to either save each of the pictures manually (quite a lot of effort) or Install and use lets say DownThemAll! FF download extension. Using DownThemAll does not completely automates picture downloads, as you need to manually select all pictures for downloading, but at least selecting pages saves some time. To download all book pages with DownThemAll click with right mouse button on the left pane where links to pictures appears and choose download with DownThemAll!. After that tick on all links pointing to books.google.com……. to make them have the green tick as shown in below screenshot;

Once you have all PNGs saved on the PC you need to then convert them to unified PDF file. One way to do this is using ImageMagick's convert command line tool.
To do so install imagemagick for Windows downloading Win binaries from here
There are a bunch of binaries you will need to install named like ImageMagick-*-x86-static.exe

Run cmd.exe, change dir (cd) to folder where the just download book is saved in PNG and issue:


C:\Downloads> convert *.png pdf/my-book-from-pictures.pdf

Adding a nice advanced text editor to make wordpress wp-admin have Microsoft Word like edit functionality

Friday, September 16th, 2011

By the default wordpress does not have support for changing the exact font, therefore copying and pasting a text made in Open Office or MS Word often places in the Post or Page wp edit fonts different from the default one set for articles.
Hence some articles after being published on a wordpress blog show up with improper font and the only way to fix that is to change the font first in Open Office and then copy back to wordpress instead of simply being able to change the font from within the wordpress article.

To get around this problem, there is a nice plugin fckeditor-for-wordpress-plugin which aids wordpress with an awesome Word like edit functionalities.
, downhload location for FCKEdit for WordPress is here

Here is a screenshot of the extra nice functionality the FCKEditor for wordpress providces.

FCKEDitor for wordpress extra functionality screenshot

Installing the plugin is like installing any other wordpress plugin and comes easily to:

debian:/~# cd /var/www/blog/wp-content/plugins
debian:/plugins# wget http://downloads.wordpress.org/plugin/fckeditor-for-wordpress-plugin.3.3.1.zip
...
debian:/plugins# unzip fckeditor-for-wordpress-plugin.3.3.1.zip
...
debian:/plugins# cd fckeditor-for-wordpress-plugin/

And further enabling the plugin from:

Plugins -> Inactive -> (Dean's FCKEditor For WordPress) Enable

fckeditor for wordpress will replace the default wordpress editor TinyMCE straight after being enabled.
 I’ve done also a mirror of the current version as of time of writting of this article, one can  download the fckeditor for wordpress mirrored here 
Now really file editting inside wordpress admin panel is way easier and convenient 😉 Cheers

Two wordpress plugins to accelerate wordpress opening times and decrease server load time

Thursday, September 22nd, 2011

A Comparison of wordpress webpage responce with and without wp dbcache

A combination of two wordpress caching plugins (Hyper Cache and Db Cachesignificantly improves the access times of a wordpress based blogs and websites.

Installing the two websites has drastically improved my blog opening times, so in my view having the two plugins on every wordpress install out there is a must! 🙂
The plugins installation is straight forward, here is how I installed them.

1. Installing Hyper Cache on WordPress

To install Hyper Cache all I had to do is download and enable the plugin, the plugin doesn’t require any configuration. I always love it when I don’t have to bother with reading configuration options and pondering for some 20 minutes on the plugin features, so in that perspective Hyper Cache in my view is a good alternative to WordPress Super Cache

Besides that WordPress Super Cache was having issues when enabled on few wordpress based websites I manage these days. For comparison Hyper Cache worked just great on all wordpress install I tried the plugin so far.

To install all I had to do is download the plugin unzip and enable it:

a. Download and unzip it

debian:/var/www/blog# wget http://downloads.wordpress.org/plugin/hyper-cache.zip
...
debian:/var/www/blog# cd wp-content/plugins
debian:/var/www/blog/wp-content/plugins# unzip hyper-cache.zip

b. Enable Hyper Cache plugin

To enable the plugin follow to standard plugin location;

Plugins -> Inactive -> Hyper Cache (Enable)

To enable the plugin follow to standard plugin location;

Plugins -> Inactive -> Hyper Cache (Enable)


A  mirror of current version of hyper-cache.zip plugin is here 

2. Installing Wodpress Db Cache

What Db Cache, does it does caching of last queries made to MySQL for specified time, so if the query has to be refetched again from wordpress’s php frontend the queries results are fetched straight for the memory. This decreases the load towards the MySQL server and increases the webpages loading time.

As the plugin page suggests it’s way faster than other html caching-plugins like WP-Cache  or WP Super Cache

However, I think its still slower than using a combination of WP Super Cache’s alternative Hyper Cache  and  Db Cache . Combining this two could rise the webpage opening times according to some statisticonline at best cases up to 830% !! 😉 Let me proceed with how I did the install of  Db Cache .

a. Download and Install Db Cache


debian:/var/www/blog/wp-content/plugins# wget http://downloads.wordpress.org/plugin/db-cache.0.6.zip

...

debian:/var/www/blog/wp-content/plugins# unzip db-cache.0.6.zip


b. Enable the plugin 


Plugins -> Inactive -> Db Cache (Enable)


c. Make sure the permissions for Db Cache are correct

On Debian to enable Db Cache, the permissions should be changed for Apache to have a read/write permissions to plugin directory, on Debian to fix the permissions I used the commands:

debian:/var/www/blog# chown www-data:www-data wp-content

debian:/var/www/blog# chown -R www-data:www-data wp-content/plugins/db-cache

On other GNU/Linux distributions the above commands (user and group) www-data:www-data, should be set to whatever user/group Apache is running with, on Slackware this would be nobody:nobody, on CentOS and RHEL it would be apache:apache.

Finally to enable Db Cache go to

Settings -> Db Cache -> (Tick Enable) -> Save

I’ve also made a mirror of Db Cache plugin here

Enjoy the speed boost 😉

How to crack password protected rar and 7z files on GNU / Linux

Friday, October 7th, 2011

break / crack password protected rar, zip archives on Linux and FreeBSD rarcrcack

RarCrack is able to crack rar and 7z archive files protected by password on Linux.
The program is currently at release version 0.2, so its far from perfection, but at least it can break rars.

RarCrack is currently installable on most Linux distributions only from source, to install on a random Linux distro, download and make && make install . RarCrack’s official site is here, I’ve mirrored the current version of RarCrack for download here . To install rarcrack from source using the mirrored version:

linux:~# wget https://www.pc-freak.net/files/rarcrack-0.2.tar.bz2
...
linux:~# tar -jxvvf rarcrack-0.2.tar.bz2
linux:~# cd rarcrack-0.2
linux:~/rarcrack-0.2# make
...
linux:~/rarcrack-0.2# make install
...

On FreeBSD, rarcrack is available and installable via the ports tree, to install on FreeBSD:

freebsd# cd /usr/ports/security/rarcrack
freebsd# make && make install
...

To use RarCrack to crack rar, zip or 7z archive file:

freebsd% rarcrack rar_file_protected_with_password.rar --type rar

The argument –type rar is optional, in most archives RarCrack should detect the archive automatically. The –type option could also take the arguments of rar and 7z .

I’ve created a sample rar file protected with password linux_then_and_now.png.rar . The archive linux_then_and_now.png contains a graphic file illustrating the linux growth in use in computers, mobiles and servers. linux_then_and_now.png.rar is protected with the sample password parola

RarCrack also supports threads (a simultaneous instance spawned copies of the program). Using threads speeds up the process of cracking and thus using the –threads is generally a good idea. Hence a good way to use rarcrack with the –threads option is:

freebsd% rarcrack linux_then_and_now.png.rar --threads 8 --type rar
RarCrack! 0.2 by David Zoltan Kedves (kedazo@gmail.com)
INFO: the specified archive type: rar
INFO: cracking linux_then_and_now.png.rar, status file: linux_then_and_now.png.rar.xml
Probing: '0i' [24 pwds/sec]
Probing: '1v' [25 pwds/sec]

RarCrack‘s source archive also comes with three sample archive files (rar, 7z and zip) protected with passwords for the sake of testing the tool.
One downside of RarCrack is its extremely slow in breaking the passwords on my Lenovo notebook – dual core 1.8ghz with 2g ram it was able to brute force only 20-25 passwords per second.
This means cracking a normal password of 6 symbols will take at least 5 hours.
RarCrack is also said to support cracking zip passwords, but my tests to crack password protected zip file did not bring good results and even one of the tests ended with a segmentation fault.

To test how rarcrack performs with password protected zip files and hence compare if it is superior or inferior to fcrackzip, I used the fcrackzip’s sample pass protected zip noradi.zip

hipo@noah:~$ rarcrack --threads 8 noradi.zip --type zip
2 by David Zoltan Kedves (kedazo@gmail.com)
INFO: the specified archive type: zip
INFO: cracking noradi.zip, status file: noradi.zip.xml
Probing: 'hP' [386 pwds/sec]
Probing: 'At' [385 pwds/sec]
Probing: 'ST' [380 pwds/sec]

As you can see in above’s command output, the zip password cracking rate of approximately 380 passwords per second is a bit quicker, but still slower than fcrackzip.

RarCrack seg faults if cracking a pass protected zip is passed on without specifying the –type zip command arguments:

linux:~$ rarcrack --threads 8 noradi.zip
RarCrack! 0.2 by David Zoltan Kedves (kedazo@gmail.com)
Segmentation fault

While talking about cracking protected rar and zip archives with password, its worthy to mention creating a password protected archive with Gnome Desktop on Linux and FreeBSD is very easy.

To create the password protected archive in Gnome graphic environment:

a. Point the cursor to the file you want to archive with password

Gnome pointing file properties drop down menu

b. Press on Other Options and fill in the password in the pwd dialog

Linux protect rar with password on Gnome Desktop

I think as of time of writting, no GUI frontend interface for neither RarCrack or FcrackZip is available. Lets hope some good guy from the community will take the time to write extension for Gnome to allow us to crack rar and zip from a nice GUI interface.