Posts Tagged ‘server services’

Ansible Quick Start Cheatsheet for Linux admins and DevOps engineers

Wednesday, October 24th, 2018

ansible-quick-start-cheetsheet-ansible-logo

Ansible is widely used (Configuration management, deployment, and task execution system) nowadays for mass service depoyments on multiple servers and Clustered environments like, Kubernetes clusters (with multiple pods replicas) virtual swarms running XEN / IPKVM virtualization hosting multiple nodes etc. .

Ansible can be used to configure or deploy GNU / Linux tools and services such as Apache / Squid / Nginx / MySQL / PostgreSQL. etc. It is pretty much like Puppet (server / services lifecycle management) tool , except its less-complecated to start with makes it often a choose as a tool for mass deployment (devops) automation.

Ansible is used for multi-node deployments and remote-task execution on group of servers, the big pro of it it does all its stuff over simple SSH on the remote nodes (servers) and does not require extra services or listening daemons like with Puppet. It combined with Docker containerization is used very much for later deploying later on inside Cloud environments such as Amazon AWS / Google Cloud Platform / SAP HANA / OpenStack etc.

Ansible-Architechture-What-Is-Ansible-Edureka

0. Instaling ansible on Debian / Ubuntu Linux


Ansible is a python script and because of that depends heavily on python so to make it running, you will need to have a working python installed on local and remote servers.

Ansible is as easy to install as running the apt cmd:


# apt-get install –yes ansible
 

The following additional packages will be installed:
  ieee-data python-jinja2 python-kerberos python-markupsafe python-netaddr python-paramiko python-selinux python-xmltodict python-yaml
Suggested packages:
  sshpass python-jinja2-doc ipython python-netaddr-docs python-gssapi
Recommended packages:
  python-winrm
The following NEW packages will be installed:
  ansible ieee-data python-jinja2 python-kerberos python-markupsafe python-netaddr python-paramiko python-selinux python-xmltodict python-yaml
0 upgraded, 10 newly installed, 0 to remove and 1 not upgraded.
Need to get 3,413 kB of archives.
After this operation, 22.8 MB of additional disk space will be used.

apt-get install –yes sshpass


Installing Ansible on Fedora Linux is done with:


# dnf install ansible –yes sshpass


On CentOS to install:
 

# yum install ansible –yes sshpass

sshpass needs to be installed only if you plan to use ssh password prompt authentication with ansible.

Ansible is also installable via python-pip tool, if you need to install a specific version of ansible you have to use it instead, the package is available as an installable package on most linux distros.

Ansible has a lot of pros and cons and there are multiple articles already written on people for and against it in favour of Chef or Puppet As I recently started learning Ansible. The most important thing to know about Ansible is though many of the things can be done directly using a simple command line, the tool is planned for remote installing of server services using a specially prepared .yaml format configuration files. The power of Ansible comes of the use of Ansible Playbooks which are yaml scripts that tells ansible how to do its activities step by step on remote server. In this article, I'm giving a quick cheat sheet to start quickly with it.
 

1. Remote commands execution with Ansible
 

First thing to do to start with it is to add the desired hostnames ansible will operate with it can be done either globally (if you have a number of remote nodes) to deploy stuff periodically by using /etc/ansible/hosts or use a custom host script for each and every ansible custom scripts developed.

a. Ansible main config files

A common ansible /etc/ansible/hosts definition looks something like that:


# cat /etc/ansible/hosts
[mysqldb]
10.69.2.185
10.69.2.186
[master]
10.69.2.181
[slave]
10.69.2.187
[db-servers]
10.69.2.181
10.69.2.187
[squid]
10.69.2.184

Host to execute on can be also provided via a shell variable $ANSIBLE_HOSTS
b) is remote hosts reachable / execute commands on all remote host

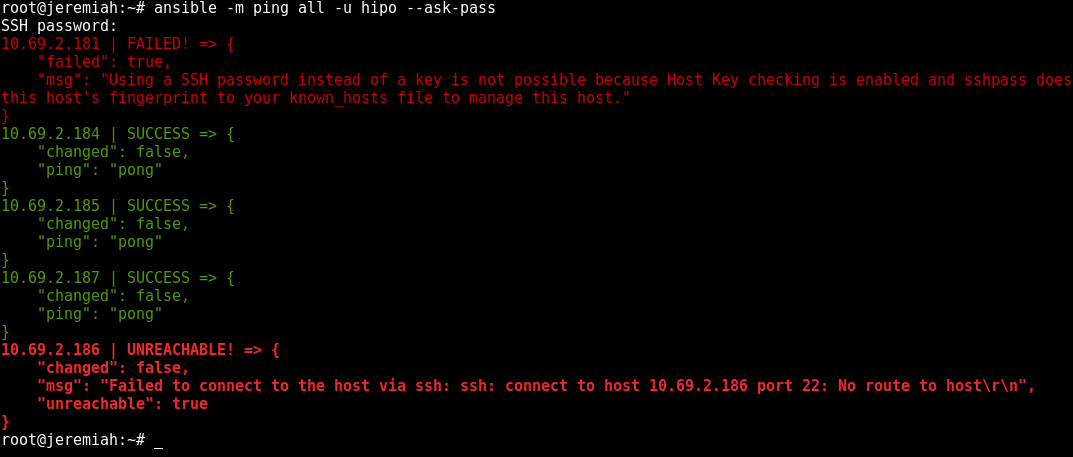
To test whether hour hosts are properly configure from /etc/ansible/hosts you can ping all defined hosts with:


ansible all -m ping

ansible-check-hosts-ping-command-screenshot

This makes ansible try to remote to remote hosts (if you have properly configured SSH public key authorization) the command should return success statuses on every host.


ansible all -a "ifconfig -a"


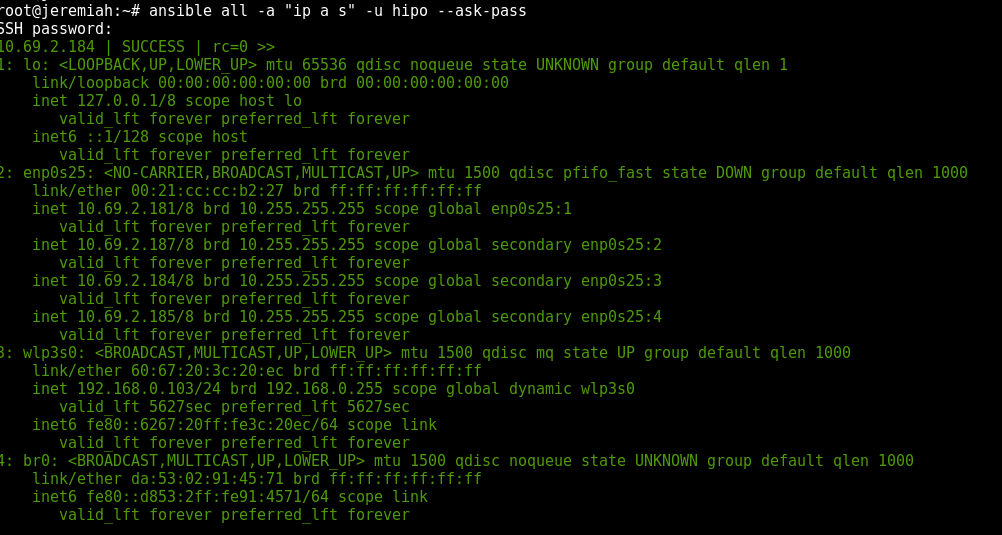
If you don't have SSH keys configured you can also authenticate with an argument (assuming) all hosts are configured with same password with:


ansible all –ask-pass -a "ip all show" -u hipo –ask-pass

ansible-show-ips-ip-a-command-screenshot-linux

If you have configured group of hosts via hosts file you can also run certain commands on just a certain host group, like so:


ansible <host-group> -a <command>

It is a good idea to always check /etc/ansible/ansible.cfg which is the system global (main red ansible config file).

c) List defined host groups
 

ansible localhost -m debug -a 'var=groups.keys()'
ansible localhost -m debug -a 'var=groups'

d) Searching remote server variables


# Search remote server variables
ansible localhost -m setup -a 'filter=*ipv4*'


ansible localhost -m setup -a 'filter=ansible_domain'


ansible all -m setup -a 'filter=ansible_domain'


# uninstall package on RPM based distros
ansible centos -s -m yum -a "name=telnet state=absent"
# uninstall package on APT distro
ansible localhost -s -m apt -a "name=telnet state=absent"


2. Debugging – Listing information about remote hosts (facts) and state of a host


# All facts for one host
ansible -m setup
  # Only ansible fact for one host
ansible
-m setup -a 'filter=ansible_eth*'
# Only facter facts but for all hosts
ansible all -m setup -a 'filter=facter_*'


To Save outputted information per-host in separate files in lets say ~/ansible/host_facts


ansible all -m setup –tree ~/ansible/host_facts


3. Playing with Playbooks deployment scripts


a) Syntax Check of a playbook yaml


ansible-playbook –syntax-check


b) Run General Infos about a playbook such as get what a playbook would do on remote hosts (tasks to run) and list-hosts defined for a playbook (like above pinging).


ansible-playbook –list-hosts
ansible-playbook
–list-tasks


To get the idea about what an yaml playbook looks like, here is example from official ansible docs, that deploys on remote defined hosts a simple Apache webserver.


– hosts: webservers
  vars:
    http_port: 80
    max_clients: 200
  remote_user: root
  tasks:
  – name: ensure apache is at the latest version
    yum:
      name: httpd
      state: latest
  – name: write the apache config file
    template:
      src: /srv/httpd.j2
      dest: /etc/httpd.conf
    notify:
    – restart apache
  – name: ensure apache is running
    service:
      name: httpd
      state: started
  handlers:
    – name: restart apache
      service:
        name: httpd
        state: restarted

To give it a quick try save the file as webserver.yml and give it a run via ansible-playbook command
 

ansible-playbook -s playbooks/webserver.yml


The -s option instructs ansible to run play on remote server with super user (root) privileges.

The power of ansible is its modules, which are constantly growing over time a complete set of Ansible supported modules is in its official documenation.

Ansible-running-playbook-Commands-Task-script-Successful-output-1024x536

There is a lot of things to say about playbooks, just to give the brief they have there own language like a  templates, tasks, handlers, a playbook could have one or multiple plays inside (for instance instructions for deployment of one or more services).

The downsides of playbooks are they're so hard to write from scratch and edit, because yaml syntaxing is much more stricter than a normal oldschool sysadmin configuration file.
I've stucked with problems with modifying and writting .yaml files and I should say the community in #ansible in irc.freenode.net was very helpful to help me debug the obscure errors.

yamllint (The YAML Linter tool) comes handy at times, when facing yaml syntax errors, to use it install via apt:
 

# apt-get install –yes yamllint


a) Running ansible in "dry mode" just show what ansible might do but not change anything
 

ansible-playbook playbooks/PLAYBOOK_NAME.yml –check


b) Running playbook with different users and separate SSH keys


ansible-playbook playbooks/your_playbook.yml –user ansible-user
 
ansible -m ping hosts –private-key=~/.ssh/keys/custom_id_rsa -u centos


c) Running ansible playbook only for certain hostnames part of a bigger host group


ansible-playbook playbooks/PLAYBOOK_NAME.yml –limit "host1,host2,host3"


d) Run Ansible on remote hosts in parallel

To run in raw of 10 hosts in parallel
 

# Run 10 hosts parallel
ansible-playbook <File.yaml> -f 10            


e) Passing variables to .yaml scripts using commandline

Ansible has ability to pre-define variables from .yml playbooks. This variables later can be passed from shell cli, here is an example:

# Example of variable substitution pass from command line the var in varsubsts.yaml if present is defined / replaced ansible-playbook playbooks/varsubst.yaml –extra-vars "myhosts=localhost gather=yes pkg=telnet"


4. Ansible Galaxy (A Docker Hub) like large repository with playbook (script) files


Ansible Galaxy has about 10000 active users which are contributing ansible automation playbooks in fields such as Development / Networking / Cloud / Monitoring / Database / Web / Security etc.

To install from ansible galaxy use ansible-galaxy

# install from galaxy the geerlingguy mysql playbook
ansible-galaxy install geerlingguy.mysql


The available packages you can use as a template for your purpose are not so much as with Puppet as Ansible is younger and not corporate supported like Puppet, anyhow they are a lot and does cover most basic sysadmin needs for mass deployments, besides there are plenty of other unofficial yaml ansible scripts in various github repos.

Auto restart Apache on High server load (bash shell script) – Fixing Apache server temporal overload issues

Saturday, March 24th, 2012

auto-restart-apache-on-high-load-bash-shell-script-fixing-apache-temporal-overload-issues

I've written a tiny script to check and restart, Apache if the server encounters, extremely high load avarage like for instance more than (>25). Below is an example of a server reaching a very high load avarage:;

server~:# uptime
13:46:59 up 2 days, 18:54, 1 user, load average: 58.09, 59.08, 60.05
load average: 0.09, 0.08, 0.08

Sometimes high load avarage is not a problem, as the server might have a very powerful hardware. A high load numbers is not always an indicator for a serious problems. Some 16 CPU dual core (2.18 Ghz) machine with 16GB of ram could probably work normally with a high load avarage like in the example. Anyhow as most servers are not so powerful having such a high load avarage, makes the machine hardly do its job routine.

In my specific, case one of our Debian Linux servers is periodically reaching to a very high load level numbers. When this happens the Apache webserver is often incapable to serve its incoming requests and starts lagging for clients. The only work-around is to stop the Apache server for a couple of seconds (10 or 20 seconds) and then start it again once the load avarage has dropped to less than "3".

If this temporary fix is not applied on time, the server load gets increased exponentially until all the server services (ssh, ftp … whatever) stop responding normally to requests and the server completely hangs …

Often this server overloads, are occuring at night time so I'm not logged in on the server and one such unexpected overload makes the server unreachable for hours.
To get around the sudden high periodic load avarage server increase, I've written a tiny bash script to monitor, the server load avarage and initiate an Apache server stop and start with a few seconds delay in between.

#!/bin/sh
# script to check server for extremely high load and restart Apache if the condition is matched
check=`cat /proc/loadavg | sed 's/\./ /' | awk '{print $1}'`
# define max load avarage when script is triggered
max_load='25'
# log file
high_load_log='/var/log/apache_high_load_restart.log';
# location of inidex.php to overwrite with temporary message
index_php_loc='/home/site/www/index.php';
# location to Apache init script
apache_init='/etc/init.d/apache2';
#
site_maintenance_msg="Site Maintenance in progress - We will be back online in a minute";
if [ $check -gt "$max_load" ]; then>
#25 is load average on 5 minutes
cp -rpf $index_php_loc $index_php_loc.bak_ap
echo "$site_maintenance_msg" > $index_php_loc
sleep 15;
if [ $check -gt "$max_load" ]; then
$apache_init stop
sleep 5;
$apache_init restart
echo "$(date) : Apache Restart due to excessive load | $check |" >> $high_load_log;
cp -rpf $index_php_loc.bak_ap $index_php_loc
fi
fi

The idea of the script is partially based on a forum thread – Auto Restart Apache on High Loadhttp://www.webhostingtalk.com/showthread.php?t=971304Here is a link to my restart_apache_on_high_load.sh script

The script is written in a way that it makes two "if" condition check ups, to assure 100% there is a constant high load avarage and not just a temporal 5 seconds load avarage jump. Once the first if is matched, the script first tries to reduce the server load by overwritting a the index.php, index.html script of the website with a one stating the server is ongoing a maintenance operations.
Temporary stopping the index page, often reduces the load in 10 seconds of time, so the second if case is not necessery at all. Sometimes, however this first "if" condition cannot decrease enough the load and the server load continues to stay too high, then the script second if comes to play and makes apache to be completely stopped via Apache init script do 2 secs delay and launch the apache server again.

The script also logs about, the load avarage encountered, while the server was overloaded and Apache webserver was restarted, so later I can check what time the server overload occured.
To make the script periodically run, I've scheduled the script to launch every 5 minutes as a cron job with the following cron:

# restart Apache if load is higher than 25
*/5 * * * * /usr/sbin/restart_apache_on_high_load.sh >/dev/null 2>&1

I have also another system which is running FreeBSD 7_2, which is having the same overload server problems as with the Linux host.
Copying the auto restart apache on high load script on FreeBSD didn't work out of the box. So I rewrote a little chunk of the script to make it running on the FreeBSD host. Hence, if you would like to auto restart Apache or any other service on FreeBSD server get /usr/sbin/restart_apache_on_high_load_freebsd.sh my script and set it on cron on your BSD.

This script is just a temporary work around, however as its obvious that the frequency of the high overload will be rising with time and we will need to buy new server hardware to solve permanently the issues, anyways, until this happens the script does a great job 🙂

I'm aware there is also alternative way to auto restart Apache webserver on high server loads through using monit utility for monitoring services on a Unix system. However as I didn't wanted to bother to run extra services in the background I decided to rather use the up presented script.

Interesting info to know is Apache module mod_overload exists – which can be used for checking load average. Using this module once load avarage is over a certain number apache can stop in its preforked processes current serving request, I've never tested it myself so I don't know how usable it is. As of time of writting it is in early stage version 0.2.2
If someone, have tried it and is happy with it on a busy hosting servers, please share with me if it is stable enough?

What is Vertical scaling and Horizontal scaling – Vertical and Horizontal hardware / services scaling

Friday, June 13th, 2014

horizontal-vs-vertical-scaling-vertical-and-horizontal-scaling-explained-diagram

If you're coming from a small or middle-sized company to a corporations like HP or IBM probably you will not a clear defined idea on the 2 types (2 dimensions) of system Scaling (Horizontal and Vertical scaling). I know from my pesronal experience that in small companies – all needed is to guarantee a model for as less probels as possible without too much of defining things and with much less planning. Other thing is being a sysadmin in middle-sized companies, often doesn't give you opportunity to discuss issues to solve with other admins but you have to deal as "one man (machine) for all" and thus often to solve office server and services tasks you do some custom solution.
hence for novice system administrators probably it will be probably unclear what is the difference between Horizontal and Vertical Scaling?

horizontal-vertical-scaling-scale-up-and-scale-out-server-infrastructure-diagram


Vertical Scaling (scale vertically or scale up) :- adding more resources(CPU/RAM/DISK) to your server (database or application server is still remains one).
Vertical Scaling is much more used in small and middle-sized companies and in applications and products of middle-range. Very common example for Virtual Scaling nowdays is to buy an expensive hardware and use it as a Virtual Machine hypervisor (VMWare ESX). Where a database is involved using Vertical Scaling without use of multiple virtual machines might be not the best solution, as even though hardware might suffice (creation of database locks might impose problems). Reasons to scale vertically include increasing IOPS (Input / Ouput Operations), increasing CPU/RAM capacity, and increasing disk capacity.
Because Vertical Scaling usually means upgrade of server hardware – whenever an improved performance is targeted, even though if Virtualization is used, the risk for downtimes with it is much higher than whenever horizontal scaling.

Horizontal Scaling (scale horizontally or scale out):- adding more processing units (phyiscal machine) to your server (infrastructure be it application web/server or database).
Horizontal scaling, means increasing  the number of nodes in the cluster, reduces the responsibilities of each member node by spreading the keyspace wider and providing additional end-points for client connections. The capacity of each individual node does not change, but its load is decreased (because load is distributed between separate server nodes). Reasons to scale horizontally include increasing I/O concurrency, reducing the load on existing nodes, and increasing disk capacity.
Horizontal Scaling has been historically much more used for high level of computing and for application and services. The Internet and particular web services gave a boom of Horizontal Scaling use, most companies nowadays that provide well known web services like Google (Gmail, Youtube), Yahoo, Facebook, Ebay, Amazon etc. are using heavily horizontal scaling. Horizontal Scaling is a must use technology – whenever a high availability of (server) services are required.

Fixing Shellshock new critical remote bash shell exploitable vulnerability on Debian / Ubuntu / CentOS / RHEL / Fedora / OpenSuSE and Slackware

Friday, October 10th, 2014

Bash-ShellShock-remote-exploitable-Vulnerability-affecting-Linux-Mac-OSX-and-BSD-fixing-shellshock-bash-vulnerability-debian-redhat-fedora-centos-ubuntu-slackware-and-opensuse
If you still haven’t heard about the ShellShock Bash (Bourne Again) shell remote exploit vulnerability and you admin some Linux server, you will definitely have to read seriously about it. ShellShock Bash Vulnerabily has become public on Sept 24 and is described in details here.

The vulnerability allows remote malicious attacker to execute arbitrary code under certain conditions, by passing strings of code following environment variable assignments. Affected are most of bash versions starting with bash 1.14 to bash 4.3.
Even if you have patched there are some reports, there are other bash shell flaws in the way bash handles shell variables, so probably in the coming month there will be even more patches to follow.

Affected bash flaw OS-es are Linux, Mac OS and BSDs;

• Some DHCP clients

• OpenSSL servers that use ForceCommand capability in (Webserver config)

• Apache Webservers that use CGi Scripts through mod_cgi and mod_cgid as well as cgis written in bash or launching bash subshells

• Network exposed services that use bash somehow

Even though there is patch there are futher reports claiming patch ineffective from both Google developers and RedHat devs, they say there are other flaws in how batch handles variables which lead to same remote code execution.

There are a couple of online testing tools already to test whether your website or certain script from a website is vulnerable to bash remote code executions, one of the few online remote bash vulnerability scanner is here and here. Also a good usable resource to test whether your webserver is vulnerable to ShellShock remote attack is found on ShellShocker.Net.

As there are plenty of non-standard custom written scripts probably online and there is not too much publicity about the problem and most admins are lazy the vulnerability will stay unpatched for a really long time and we’re about to see more and more exploit tools circulating in the script kiddies irc botnets.

Fixing bash Shellcode remote vulnerability on Debian 5.0 Lenny.

Follow the article suggesting how to fix the remote exploitable bash following few steps on older unsupported Debian 4.0 / 3.0 (Potato) etc. – here.

Fixing the bash shellcode vulnerability on Debian 6.0 Squeeze. For those who never heard since April 2014, there is a A Debian LTS (Long Term Support) repository. To fix in Debian 6.0 use the LTS package repository, like described in following article.

If you have issues patching your Debian Wheezy 6.0 Linux bash, it might be because you already have a newer installed version of bash and apt-get is refusing to overwrite it with an older version which is provided by Debian LTS repos. The quickest and surest way to fix it is to do literally the following:


vim /etc/apt/sources.list

Paste inside to use the following LTS repositories:

deb http://http.debian.net/debian/ squeeze main contrib non-free
deb-src http://http.debian.net/debian/ squeeze main contrib non-free
deb http://security.debian.org/ squeeze/updates main contrib non-free
deb-src http://security.debian.org/ squeeze/updates main contrib non-free
deb http://http.debian.net/debian squeeze-lts main contrib non-free
deb-src http://http.debian.net/debian squeeze-lts main contrib non-free

Further on to check the available installable deb package versions with apt-get, issue:


apt-cache showpkg bash
...
...
Provides:
4.1-3+deb6u2 -
4.1-3 -
Reverse Provides:

As you see there are two installable versions of bash one from default Debian 6.0 repos 4.1-3 and the second one 4.1-3+deb6u2, another way to check the possible alternative installable versions when more than one version of a package is available is with:


apt-cache policy bash
...
*** 4.1-3+deb6u2 0
500 http://http.debian.net/debian/ squeeze-lts/main amd64 Packages
100 /var/lib/dpkg/status
4.1-3 0
500 http://http.debian.net/debian/ squeeze/main amd64 Packages

Then to install the LTS bash version on Debian 6.0 run:


apt-get install bash=4.1-3+deb6u2

Patching Ubuntu Linux supported version against shellcode bash vulnerability:
A security notice addressing Bash vulnerability in Ubuntus is in Ubuntu Security Notice (USN) here
USNs are a way Ubuntu discloses packages affected by a security issues, thus Ubuntu users should try to keep frequently an eye on Ubuntu Security Notices

apt-get update
apt-get install bash

Patching Bash Shellcode vulnerability on EOL (End of Life) versions of Ubuntu:

mkdir -p /usr/local/src/dist && cd /usr/local/src/dist
wget http://ftpmirror.gnu.org/bash/bash-4.3.tar.gz.sig
wget http://ftpmirror.gnu.org/bash/bash-4.3.tar.gz
wget http://tiswww.case.edu/php/chet/gpgkey.asc
gpg --import gpgkey.asc
gpg --verify bash-4.3.tar.gz.sig
cd ..
tar xzvf dist/bash-4.3.tar.gz
cd bash-4.3
mkdir patches && cd patches
wget -r --no-parent --accept "bash43-*" -nH -nd
ftp.heanet.ie/mirrors/gnu/bash/bash-4.3-patches/ # Use a local mirror
echo *sig | xargs -n 1 gpg --verify --quiet # see note 2

cd ..
echo patches/bash43-0?? | xargs -n 1 patch -p0 -i # see note 3 below

./configure --prefix=/usr --bindir=/bin
--docdir=/usr/share/doc/bash-4.3
--without-bash-malloc
--with-installed-readline

make
make test && make install

To solve bash vuln in recent Slackware Linux:

slackpkg update
slackpkg upgrade bash

For old Slacks, either download a patched version of bash or download the source for current installed package and apply the respective patch for the shellcode vulnerability.
There is also a GitHub project “ShellShock” Proof of Concept code demonstrating – https://github.com/mubix/shellshocker-pocs
There are also non-confirmed speculations for bash vulnerability bug to impact also:

Speculations:(Non-confirmed possibly vulnerable common server services):

• XMPP(ejabberd)

• Mailman

• MySQL

• NFS

• Bind9

• Procmail

• Exim

• Juniper Google Search

• Cisco Gear

• CUPS

• Postfix

• Qmail

Fixing ShellShock bash vulnerability on supported versions of CentOS, Redhat, Fedora

In supported versions of CentOS where EOL has not reached:

yum –y install bash

In Redhat, Fedoras recent releases to patch:

yum update bash

To upgrade the bash vulnerability in OpenSUSE:

zipper patch –cve=CVE-2014-7187

Shellcode is worser vulnerability than recent SSL severe vulnerability Hearbleed. According to Redhat and other sources this new bash vulnerability is already actively exploited in the wild and probably even worms are crawling the net stealing passwords, data and building IRC botnets for remote control and UDP flooding.

Debian Linux: Installing and monitoring servers with Icanga (Nagios fork soft)

Monday, June 3rd, 2013

icinga-monitoring-processes-and-servers-linux-logo

There is plenty of software for monitoring how server performs and whether servers are correctly up and running. There is probably no Debian Linux admin who didn't already worked or at least tried Nagios and Mointor to monitor and notify whether server is unreachable or how server services operate. Nagios and Munin are play well together to prevent possible upcoming problems with Web / Db / E-mail services or get notify whether they are completely inaccessible. One similar "next-generation" and less known software is Icanga.
The reason, why to use Icinga  instead of Nagios is  more features a list of what does Icinga supports more than Nagios is on its site here
I recently heard of it and decided to try it myself. To try Icanga I followed Icanga's install tutorial on Wiki.Icanga.Org here
In Debian Wheezy, Icinga is already part of official repositories so installing it like in Squeeze and Lenny does not require use of external Debian BackPorts repositories.

1. Install Icinga pre-requirement packages

debian:# apt-get --yes install php5 php5-cli php-pear php5-xmlrpc php5-xsl php5-gd php5-ldap php5-mysql

2. Install Icanga-web package

debian:~# apt-get --yes install icinga-web

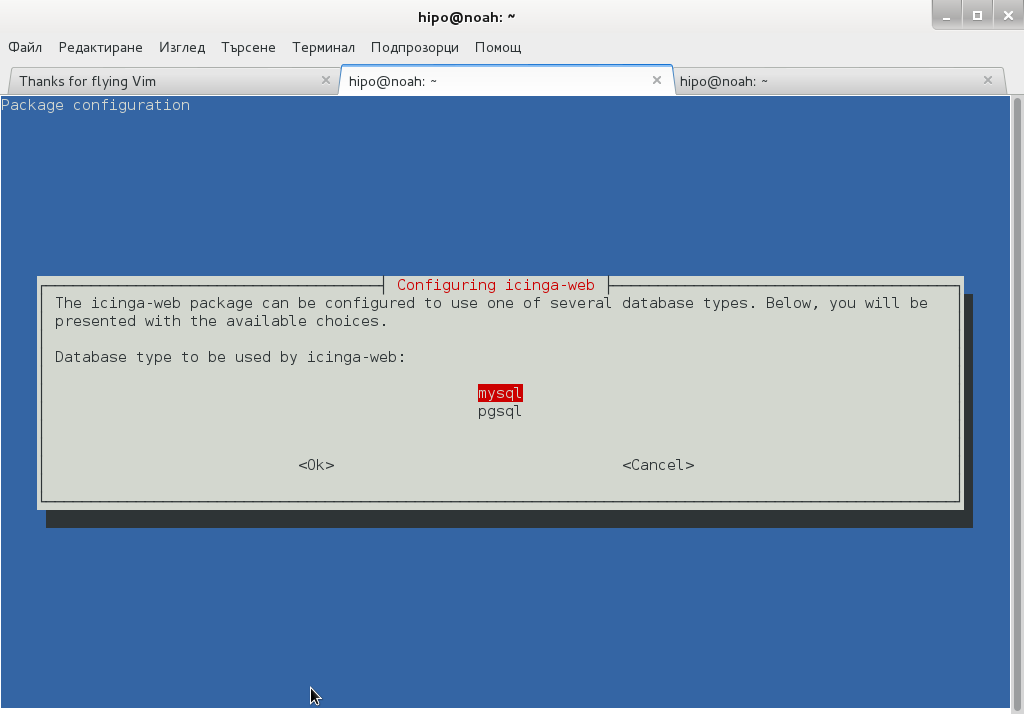
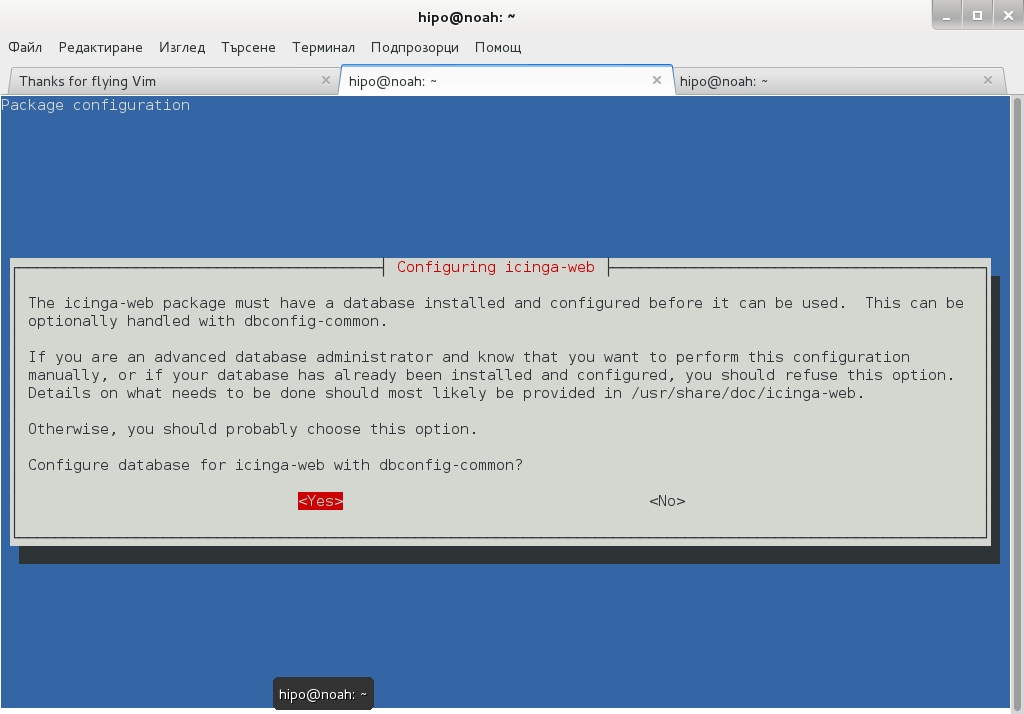
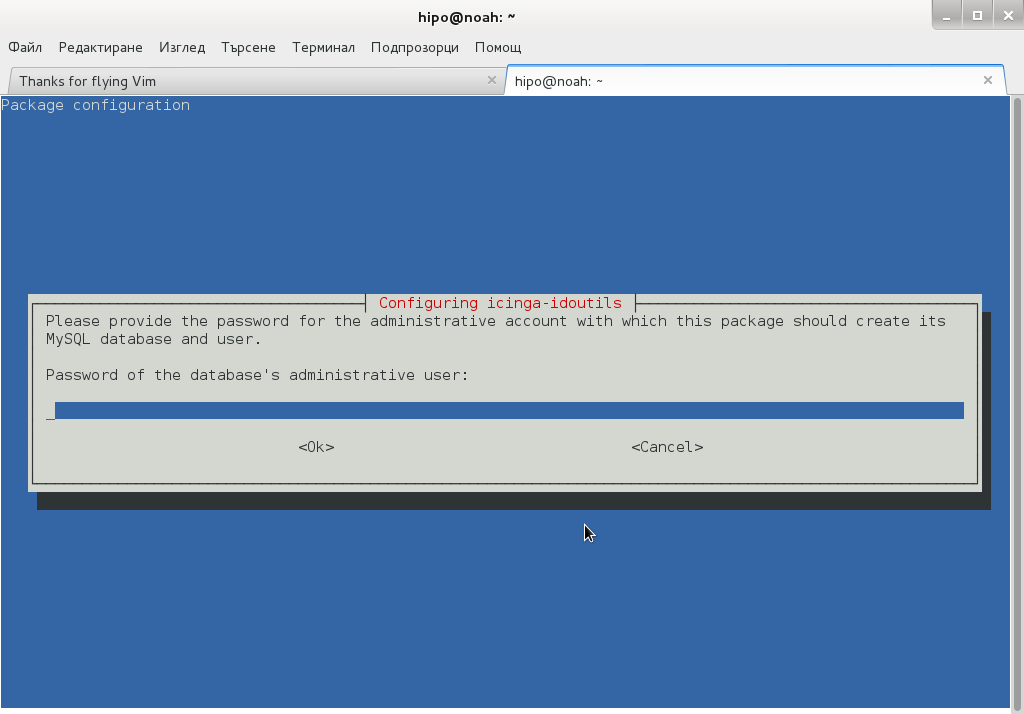
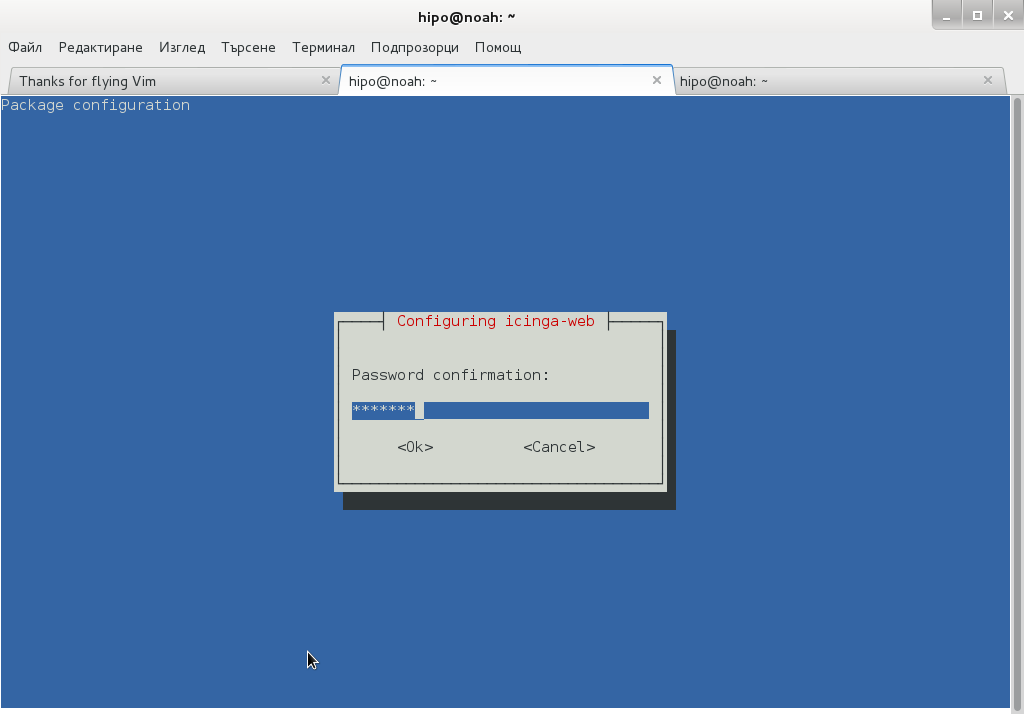
Here you will be prompted a number of times to answer few dialog questions important for security, as well as fill in MySQL server root user / password as well as SQL password that will icinga_web mySQL user use.

icinga-choosing-database-type

configuring-icinga-web-debian-linux-configuring-database-shot

debian-config-screenshot-configuring-icinga-idoutils

icinga-password-confirmation-debian-linux
….

Setting up icinga-idoutils (1.7.1-6) …
dbconfig-common: writing config to /etc/dbconfig-common/icinga-idoutils.conf
granting access to database icinga for icinga-idoutils@localhost: success.
verifying access for icinga-idoutils@localhost: success.
creating database icinga: success.
verifying database icinga exists: success.
populating database via sql…  done.
dbconfig-common: flushing administrative password
Setting up icinga-web (1.7.1+dfsg2-6) …
dbconfig-common: writing config to /etc/dbconfig-common/icinga-web.conf

Creating config file /etc/dbconfig-common/icinga-web.conf with new version
granting access to database icinga_web for icinga_web@localhost: success.
verifying access for icinga_web@localhost: success.
creating database icinga_web: success.
verifying database icinga_web exists: success.
populating database via sql…  done.
dbconfig-common: flushing administrative password

Creating config file /etc/icinga-web/conf.d/database-web.xml with new version
database config successful: /etc/icinga-web/conf.d/database-web.xml

Creating config file /etc/icinga-web/conf.d/database-ido.xml with new version
database config successful: /etc/icinga-web/conf.d/database-ido.xml
enabling config for webserver apache2…
Enabling module rewrite.
To activate the new configuration, you need to run:
  service apache2 restart
`/etc/apache2/conf.d/icinga-web.conf' -> `../../icinga-web/apache2.conf'
[ ok ] Reloading web server config: apache2 not running.
root password updates successfully!
Basedir: /usr Cachedir: /var/cache/icinga-web
Cache already purged!

3. Enable Apache mod_rewrite


debian:~# a2enmod rewrite
debian:~# /etc/init.d/apache2 restart


4. Icinga documentation files

Some key hints on Enabling some more nice Icinga features are mentioned in Icinga README files, check out, all docs files included with Icinga separate packs are into:
 

debian:~# ls -ld *icinga*/
drwxr-xr-x 3 root root 4096 Jun  3 10:48 icinga-common/
drwxr-xr-x 3 root root 4096 Jun  3 10:48 icinga-core/
drwxr-xr-x 3 root root 4096 Jun  3 10:48 icinga-idoutils/
drwxr-xr-x 2 root root 4096 Jun  3 10:48 icinga-web/

debian:~# less /usr/share/doc/icinga-web/README.Debian debian:~# less /usr/share/doc/icinga-idoutils/README.Debian

5. Configuring Icinga

Icinga configurations are separated in two directories:

debian:~# ls -ld *icinga*

drwxr-xr-x 4 root root 4096 Jun  3 10:50 icinga
drwxr-xr-x 3 root root 4096 Jun  3 11:07 icinga-web

>

etc/icinga/ – (contains configurations files for on exact icinga backend server behavior)


/etc/icinga-web – (contains all kind of Icinga Apache configurations)
Main configuration worthy to look in after install is /etc/icinga/icinga.cfg.

6. Accessing newly installed Icinga via web

To access just installed Icinga, open in browser URL – htp://localhost/icinga-web

icinga web login screen in browser debian gnu linux

logged in inside Icinga / Icinga web view and control frontend


7. Monitoring host services with Icinga (NRPE)

As fork of Nagios. Icinga has similar modular architecture and uses number of external plugins to Monitor external host services list of existing plugins is on Icinga's wiki here.
Just like Nagios Icinga supports NRPE protocol (Nagios Remote Plugin Executor). To setup NRPE, nrpe plugin from nagios is used (nagios-nrpe-server). 

To install NRPE on any of the nodes to be tracked;
debian: ~# apt-get install –yes nagios-nrpe-server

 Then to configure NRPE edit /etc/nagios/nrpe_local.cfg


Once NRPE is supported in Icinga, you can install on Windows or Linux hosts NRPE clients like in Nagios to report on server processes state and easily monitor if server disk space / load or service is in critical state.

How to make VPN PPTP (Point to Point Tunnel) Server on Debian Wheezy GNU / Linux

Thursday, September 5th, 2013

VPN pptp server linux debian logo

Creating VPN server for allowing users to connect is as early practice as the internet was used over Dial-Up modems. PPTP Connections were useful for separating user accounts traffic and easily keeping an eye on who connects to a server via phone line. Besides that VPN tunnels allows the user to connect to every possible running service locally on the server, meaning whether a user opens a VPN (PoPTOP) connection to the VPN server there is no need for port forwarding to local running server services.

Other advantages of plain VPN connection is it is a good way to grant access of Remote host not belonging to a network to have access to a distant local network using the internet as well as it is ultra easy to configure and use.
Even better PPTP is supported by virtually almost any modern operating system including all versions of Microsoft Windows.

As connection between client -> server is insecure and only password is transferred securily there is no complexity of SSL Certificate generation and Exchange like for instance whether configuring to use OpenVPN tunnel, IPsec or L2TP+IPsec.

Besides the many upmentioned advantages, there are some disadvantages of PPTP as it is unsecurely transferring data between VPN Client and VPN server.

After this short intro, here is how easy is to configure PPTP.

1. Install pptpd deb package

apt-get install pptpd

2. Edit /etc/pptpd.conf

vim /etc/pptpd.conf

Place near end of file:

localip 10.10.10.1
remoteip 10.0.10.2-250

localip variable sets local VPN server main IP and remoteip sets range of IPs in which VPN clients will be assigned IPs. As you see clients IPs will be assigned from;
10.0.10.2 to 10.0.10.250 .

Some other reasonable values for localip and remoteip are:

localip 192.168.1.6
remoteip 192.168.1.150-183,192.168.1.244


As you see it is possible to set only a set of few ranges of IP in class C network to be assigned new IPs on connect to PPTPD server.


3. Modify /etc/ppp/pptpd-options configuration

ms-dns 8.8.8.8
ms-dns 8.8.4.4
nobsdcomp
noipx
mtu 1490
mru 1490

I prefer setting Google's Public DNS for VPN clients use (ms-dns 8.8.8.8 … etc.), as they are often more reliable than provided ones by ISPs, however others might be happier with custom ones as they might be quicker to resolve.

4. Edit chap-secrets to place client authentication usernames and passwords

File should look something like:

# Secrets for authentication using CHAP
# client           server         secret                          IP addresses
internet pptpd qwerty

For multiple VPN users just add all user usernames and passwords. If you want to assign certain username IPs from above pre-selected range put write it too.

5. Restart PPTPD server script

/etc/init.d/pptpd restart
Restarting PPTP:
Stopping PPTP: pptpd.
Starting PPTP Daemon pptpd.

By default PPTP server listens for network connections via port 1723. If server launches properly port 1723 should be listening for connections.

netstat -etna|grep -i 1723
tcp       0           0          0.0.0.0:1723                  0.0.0.0:*               LISTEN       0        32810

6. Enable VPN server access to all nodes on local network

Enabling PPTP Client to access the whole network is tricky and very bad security practice especially if VPN server is not behind DMZ. Anyways allowing a client to all local network computers is often needed. This is done via;

enabling IP Forwarding

To do so add in /etc/sysctl.conf

net.ipv4.ip_forward=1

i.e. exec:

echo 'net.ipv4.ip_forward=1' >> /etc/sysctl.conf

sysctl -p

That's all now PPTP is ready to accept connections. I will not get into details how to configure VPN PPTP Connection from Windows host as this is an easy task and there are plenty of good tutorials online.
Cheers 😉

How to fix “imapd-ssl: Maximum connection limit reached for ::ffff:xxx.xxx.xxx.xxx” imapd-ssl error

Saturday, May 28th, 2011

One of the mail server clients is running into issues with secured SSL IMAP connections ( he has to use a multiple email accounts on the same computer).
I was informed that part of the email addresses are working correctly, however the newly created ones were failing to authenticate even though all the Outlook Express email configuration was correct as well as the username and password typed in were a real existing credentials on the vpopmail server.

Initially I thought, something is wrong with his newly configured emails but it seems all the settings were perfectly correct!

After a lot of wondering what might be wrong I was dumb enough not to check my imap log files.

After checking in my /var/log/mail.log which is the default log file I’ve configured for vpopmail and some of my qmail server services, I found the following error repeating again and again:

imapd-ssl: Maximum connection limit reached for ::ffff:xxx.xxx.xxx.xxx" imapd-ssl error

where xxx.xxx.xxx.xxx was the email user computer IP address.

This issues was caused by one of my configuration settings in the imapd-ssl and imap config file:

/usr/lib/courier-imap/etc/imapd

In /usr/lib/courier-imap/etc/imapd there is a config segment called
Maximum number of connections to accept from the same IP address

Right below this commented text is the variable:

MAXPERIP=4

As you can see it seems I used some very low value for the maximum number of connections from one and the same IP address.
I suppose my logic to set such a low value was my desire to protect the IMAP server from Denial of Service attacks, however 4 is really too low and causes problem, thus to solve the mail connection issues for the user I raised the MAXPERIP value to 50:

MAXPERIP=50

Now to force the new imapd and imapd-ssl services to reload it’s config I did a restart of the courier-imap, like so:

debian:~# /etc/init.d/courier-imap restart

That’s all now the error is gone and the client could easily configure up to 50 mailbox accounts on his PC 🙂

How to install and configure NTP Server (ntpd) to synchronize Linux server clock over the Internet on CentOS, RHEL, Fedora

Thursday, February 9th, 2012

Every now and then I have to work on servers running CentOS or Fedora Linux. Very typical problem that I observe on many servers which I have to inherit is the previous administrator did not know about the existence of NTP (Network Time Protocol) or forgot to install the ntpd server. As a consequence the many installed server services did not have a correct clock and at some specific cases this caused issues for web applications running on the server or any CMS installed etc.

The NTP Daemon is existing in GNU / linux since the early days of Linux and it served quite well so far. The NTP protocol has been used since the early days of the internet and for centuries is a standard protocol for BSD UNIX.

ntp is available in I believe all Linux distributions directly as a precompiled binary and can be installed on Fedora, CentOS with:

[root@centos ~]# yum install ntp

ntpd synchronizes the server clock with one of the /etc/ntp.conf defined RedHat NTP list

server 0.rhel.pool.ntp.org
server 1.rhel.pool.ntp.org
server 2.rhel.pool.ntp.org

To Synchronize manually the server system clock the ntp CentOS rpm package contains a tool called ntpdate :
Hence its a good practice to use ntpdate to synchronize the local server time with a internet server, the way I prefer to do this is via a government owned ntp server time.nist.gov, e.g.

[root@centos ~]# ntpdate time.nist.gov
8 Feb 14:21:03 ntpdate[9855]: adjust time server 192.43.244.18 offset -0.003770 sec

Alternatively if you prefer to use one of the redhat servers use:

[root@centos ~]# ntpdate 0.rhel.pool.ntp.org
8 Feb 14:20:41 ntpdate[9841]: adjust time server 72.26.198.240 offset 0.005671 sec

Now as the system time is set to a correct time via the ntp server, the ntp server is to be launched:

[root@centos ~]# /etc/init.d/ntpd start
...

To permanently enable the ntpd service to start up in boot time issue also:

[root@centos ~]# chkconfig ntpd on

Using chkconfig and /etc/init.d/ntpd cmds, makes the ntp server to run permanently via the ntpd daemon:

[root@centos ~]# ps ax |grep -i ntp
29861 ? SLs 0:00 ntpd -u ntp:ntp -p /var/run/ntpd.pid -g

If you prefer to synchronize periodically the system clock instead of running permanently a network server listening (for increased security), you should omit the above chkconfig ntpd on and /etc/init.d/ntpd start commands and instead set in root crontab the time to get synchronize lets say every 30 minutes, like so:

[root@centos ~]# echo '30 * * * * root /sbin/ntpd -q -u ntp:ntp' > /etc/cron.d/ntpd

The time synchronization via crontab can be also done using the ntpdate cmd. For example if you want to synchronize the server system clock with a network server every 5 minutes:

[root@centos ~]# crontab -u root -e

And paste inside:

*/5 * * * * /sbin/ntpdate time.nist.gov 2>1 > /dev/null

ntp package is equipped with ntpq Standard NTP Query Program. To get very basic stats for the running ntpd daemon use:

[root@centos ~]# ntpq -p
remote refid st t when poll reach delay offset jitter
======================================================
B1-66ER.matrix. 192.43.244.18 2 u 47 64 17 149.280 41.455 11.297
*ponderosa.piney 209.51.161.238 2 u 27 64 37 126.933 32.149 8.382
www2.bitvector. 132.163.4.103 2 u 1 64 37 202.433 12.994 13.999
LOCAL(0) .LOCL. 10 l 24 64 37 0.000 0.000 0.001

The remote field shows the servers to which currently the ntpd service is connected. This IPs are the servers which ntp uses to synchronize the local system server clock. when field shows when last the system was synchronized by the remote time server and the rest is statistical info about connection quality etc.

If the ntp server is to be run in daemon mode (ntpd to be running in the background). Its a good idea to allow ntp connections from the local network and filter incoming connections to port num 123 in /etc/sysconfig/iptables :

-A INPUT -s 192.168.1.0/24 -m state --state NEW -p udp --dport 123 -j ACCEPT
-A INPUT -s 127.0.0.1 -m state --state NEW -p udp --dport 123 -j ACCEPT
-A INPUT -s 0.0.0.0 -m state --state NEW -p udp --dport 123 -j DROP

Restrictions on which IPs can be connected to the ntp server can also be implied on a ntpd level through /etc/ntp.conf. For example if you would like to add the local network IPs range 192.168.0.1/24 to access ntpd, in ntpd.conf should be added policy:

# Hosts on local network are less restricted.
restrict 192.168.0.1 mask 255.255.255.0 nomodify notrap

To deny all access to any machine to the ntpd server add in /etc/ntp.conf:

restrict default ignore

After making any changes to ntp.conf , a server restart is required to load the new config settings, e.g.:

[root@centos ~]# /sbin/service ntpd restart

In most cases I think it is better to imply restrictions on a iptables (firewall) level instead of bothering change the default ntp.conf

Once ntpd is running as daemon, the server listens for UDP connections on udp port 123, to see it use:

[root@centos ~]# netstat -tulpn|grep -i ntp
udp 0 0 10.10.10.123:123 0.0.0.0:* 29861/ntpd
udp 0 0 80.95.28.179:123 0.0.0.0:* 29861/ntpd
udp 0 0 127.0.0.1:123 0.0.0.0:* 29861/ntpd
udp 0 0 0.0.0.0:123 0.0.0.0:* 29861/ntpd