Posts Tagged ‘null’

Monitor cluster heartbeat lines IP reahability via ping ICMP protocol with Zabbix

Wednesday, April 12th, 2023

https://pc-freak.net/images/zabbix-monitoring-icmp-ping-on-application-crm-clusters-with-userparameter-script-howto

Say you're having an haproxy load balancer cluster with two or more nodes and you are running the servers inside some complex organizational hybrid complex network that is a combination of a local DMZ lans, many switches, dedicated connectivity lines and every now and then it happens for the network to mysteriously go down. Usually simply setting monitoring on the network devices CISCO itself or the smart switches used is enough to give you an overview on what's going on but if haproxy is in the middle of the end application servers and in front of other Load balancers and network equipment sometimes it might happen that due to failure of a network equipment / routing issues or other strange unexpected reasons one of the 2 nodes connectivity might fail down via the configured dedicated additional Heartbeat lines that are usually configured in order to keep away the haproxy CRM Resource Manager cluster thus ending it up in a split brain scenarios.

Assuming that this is the case like it is with us you would definitely want to keep an eye on the connectivity of Connect Line1 and Connect Line2 inside some monitoring software like zabbix. As our company main monitoring software used to monitor our infrastructure is Zabbix in this little article, I'll briefly explain how to configre the network connectivity status change from haproxy node1 and haproxy node2 Load balancer cluster to be monitored via a simple ICMP ping echo checks.

Of course the easies way to configure an ICMP monitor via Zabbix is using EnableRemoteCommands=1 inside /etc/zabbix/zabbix-agentd.conf but if your infrastructure should be of High Security and PCI perhaps this options is prohibited to be used on the servers. This is why to achieve still the ICMP ping checks with EnableRemoteCommands=0 a separate simple bash user parameter script could be used. Read further to find out one way ICMP monitoring with a useparameter script can be achieved with Zabbix.


1. Create the userparameter check for heartbeat lines

root@haproxy1 zabbix_agentd.d]# cat userparameter_check_heartbeat_lines.conf
UserParameter=heartbeat.check,\
/etc/zabbix/scripts/check_heartbeat_lines.sh

root@haproxy2 zabbix_agentd.d]# cat userparameter_check_heartbeat_lines.conf
UserParameter=heartbeat.check,\
/etc/zabbix/scripts/check_heartbeat_lines.sh

2. Create check_heartbeat_lines.sh script which will be actually checking connectivity with simple ping

root@haproxy1 zabbix_agentd.d]# cat /etc/zabbix/scripts/check_heartbeat_lines.sh
#!/bin/bash
hb1=haproxy2-lb1
hb2=haproxy2-lb2
if ping -c 1 $hb1  &> /dev/null
then
  echo "$hb1 1"
else
  echo "$hb1 0"
fi
if ping -c 1 $hb2  &> /dev/null
then
  echo "$hb2 1"
else
  echo "$hb2 0"
fi

[root@haproxy1 zabbix_agentd.d]#

root@haproxy2 zabbix_agentd.d]# cat /etc/zabbix/scripts/check_heartbeat_lines.sh
#!/bin/bash
hb1=haproxy1-hb1
hb2=haproxy1-hb2
if ping -c 1 $hb1  &> /dev/null
then
  echo "$hb1 1"
else
  echo "$hb1 0"
fi
if ping -c 1 $hb2  &> /dev/null
then
  echo "$hb2 1"
else
  echo "$hb2 0"
fi

[root@haproxy2 zabbix_agentd.d]#


3. Test script heartbeat lines first time

Each of the nodes from the cluster are properly pingable via ICMP protocol

The script has to be run on both haproxy1 and haproxy2 Cluster (load) balancer nodes

[root@haproxy-hb1 zabbix_agentd.d]# /etc/zabbix/scripts/check_heartbeat_lines.sh
haproxy2-hb1 1
haproxy2-hb2 1

[root@haproxy-hb2 zabbix_agentd.d]# /etc/zabbix/scripts/check_heartbeat_lines.sh
haproxy1-hb1 1
haproxy1-hb2 1


The status of 1 returned by the script should be considered remote defined haproxy node is reachable / 0 means ping command does not return any ICMP status pings back.

4. Restart the zabbix-agent on both cluster node machines that will be conducting the ICMP ping check

[root@haproxy zabbix_agentd.d]# systemctl restart zabbix-agentd
[root@haproxy zabbix_agentd.d]# systemctl status zabbix-agentd

[root@haproxy zabbix_agentd.d]# tail -n 100 /var/log/zabbix_agentd.log


5. Create Item to process the userparam script

Create Item as follows:
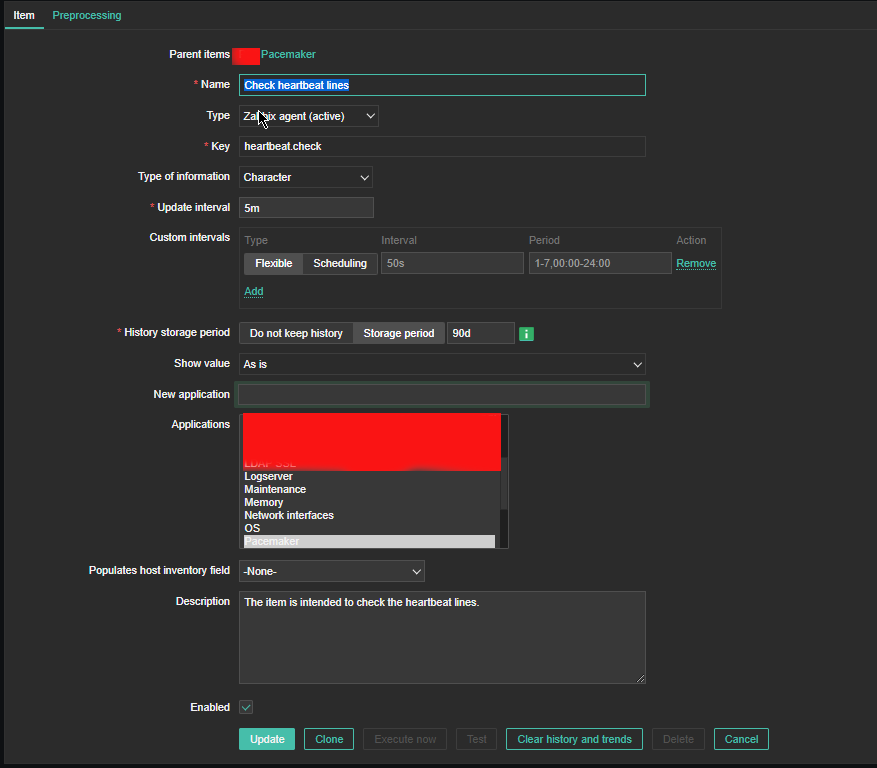
6. Create the Dependent Item required
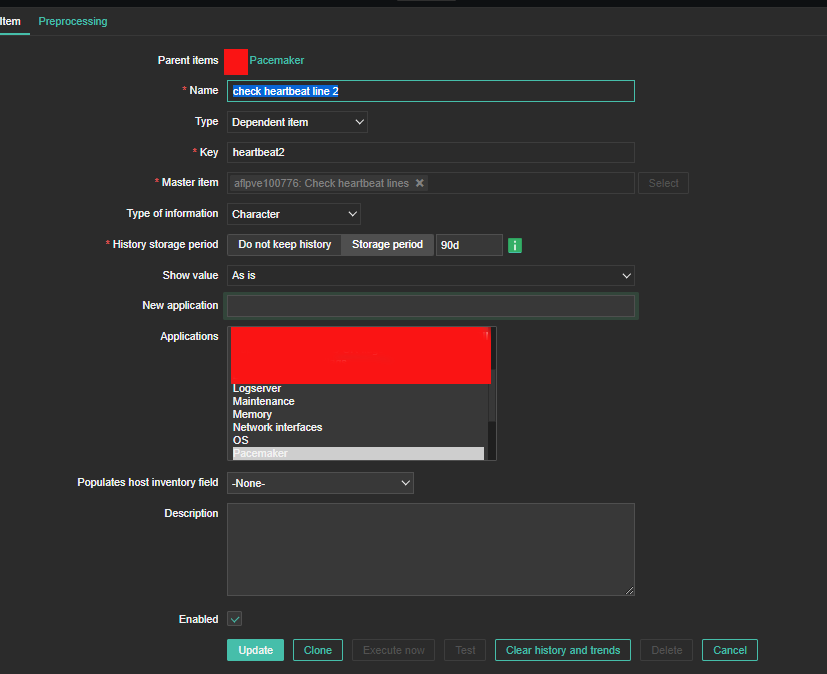
 

zabbix-heartbeat-check-screenshots/heartbeat-line1-preprocessing

For processing you need to put the following simple regular expression

Name: Regular Expression
Parameters: hb1(\s+)(\d+)
Custom on fail: \2

zabbix-heartbeat-check-screenshots/heartbeat-line2-preprocessing1

zabbix-heartbeat-check-screenshots/heartbeat-lines-triggers


7. Create triggers that will be generating the Alert

Create the required triggers as well
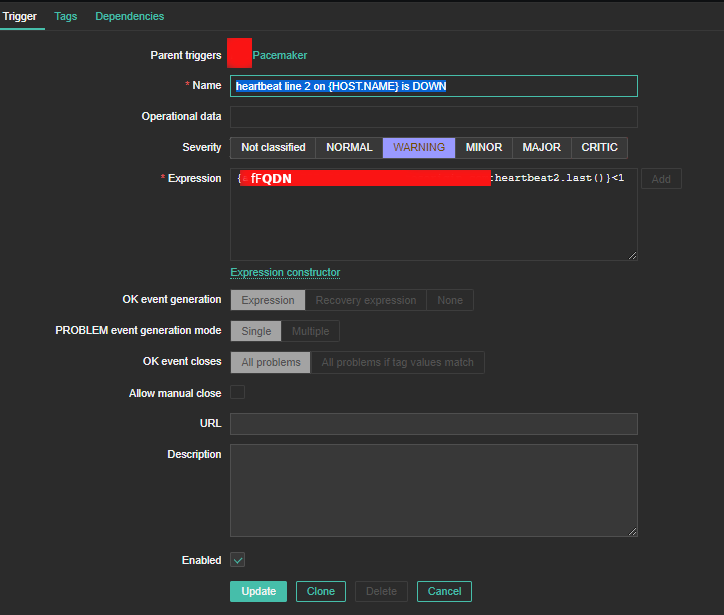
zabbix-heartbeat-check-screenshots/heartbeat2-line
Main thing to configure here in Zabbix is below expression

Expression: {FQDN:heartbeat2.last()}<1
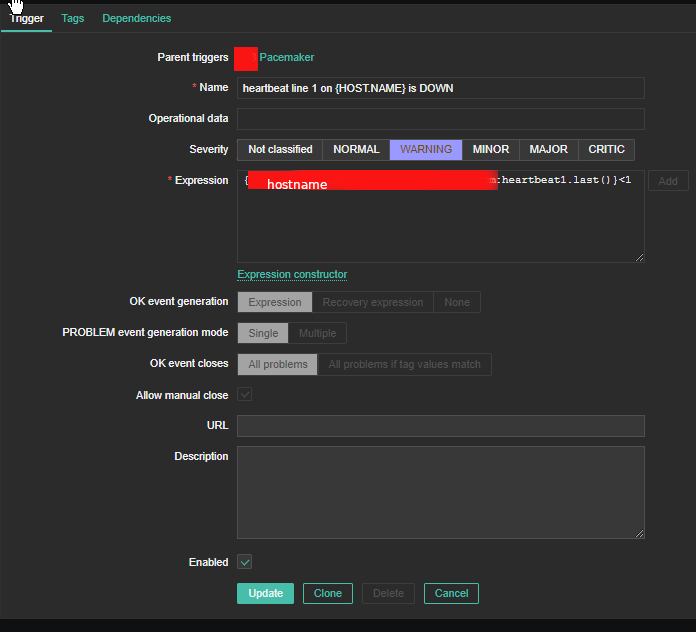
triggers_heartbeat1

You can further configure Zabbix Alerts to mail yourself or send via Slack / MatterMost or Teams alarms in case of problems.

MySQL SSL Configure Howto – How to Make MySQL communication secured

Wednesday, January 15th, 2014

mysql-over-ssl-how-to-configure-logo how to configure ssl on mysql server

Recently I've been asked How to make communication to MySQL database encrypted. The question was raised by a fellow developer who works on developing a Desktop standalone application in Delphi Programming Language with DevArt an (SQL Connection Component capable to connect Delphi applications to multiple databases like MySQL, Oracle, PostgreSQL, Interbase, Firebird etc.

Communicating in Secured form to MySQL database is not common task to do, as MySQL usually communicates to applications hosted on same server or applications to communicate to MySQL are in secured DMZ or administrated via phpMyAdmin web interface.

MySQL supports encrypted connections to itself using Secure Socket Layer (SSL) encryption. Setting up MySQL db to be communicated encrypted is a must for standalone Desktop applications which has to extract / insert data via remote SQL.
Configuring SQL to support communicated queries encrpytion is supported by default and easily configured on most standard Linux version distributions (Debian, RHEL, Fedora) with no need to recompile it.
1. Generate SSL Certificates

$ mkdir /etc/mysql-ssl && cd mysql-ssl

# Create CA certificate
$ openssl genrsa 2048 > ca-key.pem
$ openssl req -new -x509 -nodes -days 3600 \
         -key ca-key.pem -out ca-cert.pem

Create server certificate, remove passphrase, and sign it
server-cert.pem is public key, server-key.pem is private key
$ openssl req -newkey rsa:2048 -days 3600 \
         -nodes -keyout server-key.pem -out server-req.pem

$ openssl rsa -in server-key.pem -out server-key.pem
$ openssl x509 -req -in server-req.pem -days 3600 \
         -CA ca-cert.pem -CAkey ca-key.pem -set_serial 01 -out server-cert.pem

Create client certificate, remove passphrase, and sign it
client-cert.pem is public key and client-key.pem is private key
$ openssl req -newkey rsa:2048 -days 3600 \
         -nodes -keyout client-key.pem -out client-req.pem

$ openssl rsa -in client-key.pem -out client-key.pem
$ openssl x509 -req -in client-req.pem -days 3600 \
         -CA ca-cert.pem -CAkey ca-key.pem -set_serial 01 -out client-cert.pem

After generating the certificates, verify them:

$ openssl verify -CAfile ca-cert.pem server-cert.pem client-cert.pem
 

2. Add SSL support variables to my.cnf

Once SSL key pair files are generated in order to active SSL encryption support in MySQL server, add to (/etc/my.cnf,  /etc/mysql/my.cnf, /usr/local/etc/my.cnf … ) or wherever config is depending on distro

# SSL
ssl-ca=/etc/mysql-ssl/ca-cert.pem
ssl-cert=/etc/mysql-ssl/server-cert.pem
ssl-key=/etc/mysql-ssl/server-key.pem

3. Restart MySQL server

/etc/init.d/mysqld restart
...

4. Create SQL user to require SSL login

Create new user with access to database;

GRANT ALL ON Sql_User_DB.* TO Sql_User@localhost;
FLUSH PRIVILEGES;

To create administrator privileges user:

GRANT ALL PRIVILEGES ON *.* TO ‘ssluser’@'%’ IDENTIFIED BY ‘pass’ REQUIRE SSL;
FLUSH PRIVILEGES;

5. Test SSL Connection with MySQL CLI client or with few lines of PHP

To use mysql cli for testing whether SSL connection works:

$ mysql -u ssluser -p'pass' –ssl-ca /etc/mysql-ssl/client-cert.pem –ssl-cert /etc/mysql-ssl/client-key.pem

Once connected to MySQL to verify SSL connection works fine:

mysql> SHOW STATUS LIKE 'Ssl_Cipher';
 +---------------+--------------------+
| Variable_name | Value              |
 +---------------+--------------------+
| Ssl_cipher    | DHE-RSA-AES256-SHA |
+---------------+--------------------+

If you get this output this means MySQL SSL Connection is working as should.

Alternative way is to use test-mysqli-ssl.php script to test availability to mysql over SSL.

$conn=mysqli_init();
mysqli_ssl_set($conn, '/etc/mysql-ssl/client-key.pem', '/etc/mysql-ssl/client-cert.pem', NULL, NULL, NULL);
if (!mysqli_real_connect($conn, '127.0.0.1', 'ssluser', 'pass')) { die(); }
$res = mysqli_query($conn, 'SHOW STATUS like "Ssl_cipher"');
print_r(mysqli_fetch_row($res));
mysqli_close($conn);

Note: Change username password according to your user / pass before using the script

That's all now you have mysql communicating queries data over SSL


How to fix wordpress blog sudden redirection to present post problem

Wednesday, December 22nd, 2010

My blog’s index has suddenly started redirecting to my last post. That was rather strange, since I haven’t done anything special, all I did before the problem occured was a change in wordpress wp-admin to my latest post.

There in I changed the post Visibility from Public to Private

Right after this my blog’s home started redirecting to the blog post where the changes was made.

This was really strange, so I reverted back the changes in Post’s Publish Visibility to the default setting.
Though the change the redirect to the latest post by accessing my www.pc-freak.net/blog/ was still there.

I tried completely wiping out the post by sending it to Trash and issuing the same post again, but now things became even worser.

Accessing my blog was opening 404 not found error message . Everything seemed fine in wordpress admin and therefore I suspected the redirect is being applied from info read in my wordpress database in MySQL.

A bit of investigation prooved my guess was correct, for some reason a record was made to the MySQL blog database in table wp_redirection_items.

The incorrect redirection wihtin the database looked like so:

| 4 | /blog/ | 0 | 2 | 0 | 0000-00-00 00:00:00 | 2 | enabled | url | 301 | /blog/how-to-change-from-default-main-menu-to-other-text-in-joomla/ | url | NULL |

Removing the incorrect redirect was kind of easy and came to simply issuing:

mysql> delete from wp_redirection_items where id='3';
Query OK, 1 row affected (0.00 sec)

This fixed the redirection issue and opening my blog main page started correctly opening the main page again! 🙂

How to fix Thinkpad R61i trackpoint (mouse pointer) hang ups in GNU / Linux

Wednesday, February 1st, 2012

Earlier I've blogged on How to Work Around periodically occuring TrackPoint Thinkpad R61 issues on GNU / Linux . Actually I thought the fix I suggested there is working but I was wrong as the problems with the trackpoint reappeared at twice or thrice a day.

My suggested fix was the use of one script that does periodically change the trackpoint speed and sensitivity to certain numbers.

The fix script to the trackpoint hanging issue is here

Originally I wrote the script has to be set to execute through crontab on a periods like:

0,30 * * * * /usr/sbin/restart_trackpoint.sh >/dev/null 2>&1

Actually the correct values for the crontab if you use my restart_trackpoint.sh script are:

0,5,10,15,20,25,30,35,40,45,50,55,58 * * * * /usr/sbin/restart_trackpoint.sh >/dev/null 2>&3

ig it has to be set the script is issued every 5 minutes to minimize the possibility for the Thinkpad trackpoint hang up issue.

One other thing that helps if trackpoint stucks is setting in /etc/rc.local is psmouse module to load with resetafter= parameter:

echo '/sbin/rmmod psmouse; /sbin/modprobe psmouse resetafter=30' >> /etc/rc.local


How to protect Munin Web statistics with password on GNU / Linux

Thursday, October 27th, 2011

I just installed munin to track in web the performance of few Debian servers. I’ve configured munin to open via a Virtualhosts in Apache. As its always wise to protect any statistics data about the server from the unwanted possible security violators, I decided to protect Munin with Apache .htaccess.

The munin htmldir output dir is configured to be in /var/www/munin, hence I protected my munin with password by:

1. Creating .htaccess file in /var/www/munin with following content

AuthUserFile /etc/apache2/.munin_htpasswd
AuthGroupFile /dev/null
AuthName EnterPassword
AuthType Basic

require user admin

2. Creating /etc/apache2/.munin_htpasswd with htpasswd (htaccess password generator cmd)

debian:/var/www/munin# htpasswd -c /etc/apache2/.munin_htpasswd admin
New password:
Re-type new password:
Adding password for user admin

Another important thing I had to do is set my VirtualHost file to be configured with AllowOverride All , if AllowOverride All is missing the .htaccess and .htpasswd are not red at all.
Afterwards munin is protected with password, and when my virtualdomain where munin lays e.g. http://munin.mydomain.com is accessed the .htpasswd password dialog pops up 😉