Posts Tagged ‘information’

Linux: basic system CPU, Disk and Network resource monitoring via phpsysinfo lightweight script

Wednesday, June 18th, 2014

phpsysinfo-logo-simple-way-to-web-monitor-windows-linux-server-cpu-disk-network-resources

There are plenty of GNU / Linux softwares to monitor server performance (hard disk space, network and CPU load) and general hardware health both text based for SSH console) and from web.

Just to name a few for console precious tools, such are:

And for web based Linux / Windows server monitoring my favourite tools are:

phpsysinfo is yet another web based Linux monitoring software for small companies or home router use it is perfect for people who don't want to spend time learning how to configure complicated and robust multiple server monitoring software like Nagios or Icanga.

phpsysinfo is quick and dirty way to monitor system uptime, network, disk and memory usage, get information on CPU model, attached IDEs, SCSI devices and PCIs from the web and is perfect for Linux servers already running Apache and PHP.

1. Installing PHPSysInfo on Debian, Ubuntu and deb derivative Linux-es

PHPSysInfo is very convenient and could be prefered instead of above tools for the reason it is available by default in Debian and Ubuntu package repositories and installable via apt-get and it doesn't require any further configuration, to roll it you install you place a config and you forget it.
 

 # apt-cache show phpsysinfo |grep -i desc -A 2

Description: PHP based host information
 phpSysInfo is a PHP script that displays information about the
 host being accessed.


Installation is a piece of cake:

# apt-get install --yes phpsysinfo

Add phpsysinfo directives to /etc/apache2/conf.d/phpsysinfo.conf to make it accessible via default set Apache vhost domain under /phpsysinfo

Paste in root console:
 

cat > /etc/apache2/conf.d/phpsysinfo.conf <<-EOF
Alias /phpsysinfo /usr/share/phpsysinfo
<Location /phpsysinfo>
 Options None
 Order deny,allow
 Deny from all
 #Allow from localhost
 #Allow from 192.168.56.2
 Allow from all
</Location>
EOF


Above config will allow access to /phpsysinfo from any IP on the Internet, this could be a security hole, thus it is always better to either protect it with access .htaccess password login or allow it only from certain IPs, from which you will access it with something like:

Allow from 192.168.2.100

Then restart Apache server:

# /etc/init.d/apache2 restart


To access phpsysinfo monitoring gathered statistics, access it in a browser http://defaultdomain.com/phpsysinfo/

phpsysinfo_on_debian_ubuntu_linux-screenshot-quick-and-dirty-web-monitoring-for-windows-and-linux-os

2. Installing PHPSysinfo on CentOS, Fedora and RHEL Linux
 

Download and untar

# cd /var/www/html
# wget https://github.com/phpsysinfo/phpsysinfo/archive/v3.1.13.tar.gz
# tar -zxvf phpsysinfo-3.1.13.tar.gz
# ln -sf phpsysinfo-3.1.13 phpsysinfo
# mv phpsysinfo.ini.new phpsysinfo.ini


Install php php-xml and php-mbstring RPM packages
 

yum -y install php php-xml php-mbstring
...

Start Apache web service

[root@ephraim html]# /etc/init.d/httpd restart

[root@ephraim html]# ps ax |grep -i http
 8816 ?        Ss     0:00 /usr/sbin/httpd
 8819 ?        S      0:00 /usr/sbin/httpd

phpsysinfo-install-on-centos-rhel-fedora-linux-simple-monitoring

As PhpSysInfo is written in PHP it is also possible to install phpsysinfo on Windows.

phpsysinfo is not the only available simple monitoring server performance remotely tool, if you're looking for a little bit extended information and a better visualization interface alternative to phpsysinfo take a look at linux-dash.

In context of web monitoring other 2 web PHP script tools useful in remote server monitoring are:

OpenStatus – A simple and effective resource and status monitoring script for multiple servers.
LookingGlass – User-friendly PHP Looking Glass (Web interface to use Host (Nslookup), Ping, Mtr – Matt Traceroute)

Monitoring CPU load and memory usage on Mac OS X command line (Terminal)

Thursday, July 3rd, 2014

macosx-server-screenshot-server-assistant-apple-tool
You might be stunned to find out Mac OS X has a server variant called Mac OS X server. For the usual admin having to administer a Mac OS X based server is something rarely to do, however it might happen some day, and besides that nowadays Mac OS X has about 10% percentage share of PC desktop and laptops used on the Internet (data collected from w3cschools log files). Thus cause it is among popular OSes, it very possible sooner or later as a sysadmin you will have to troubleshoot issues on at least Mac OS X notebook. Mac has plenty of instruments to debug OS issues as it is UNIX (BSD) based

Mac OS X has already a GUI tool called Activity Monitor (existing in Mac OS 10.3 onwards) in earlier verions, there was tool called Process Viewer and CPU Monitor.

To start Activity Monitor open Finder and launch it via:

Applications -> Utilities -> Activity Monitor

As a Linux guy, I like to use command line and there Mac OS X is equipped with a good arsenal of tools to check CPU load and Memory. Mac OS X comes with sar – (system activity reporter), top (process monitor) and vm_stat (virtual memory statistics) command – these ones are equivalent of Linux's sar (from sysstats package), top and Linux vmstat (report virtual memory statistics).

1. Check out Mac OS X HDD Input / Output statistics
 

$ sar -d -f ~/output.sar

20:43:18   device    r+w/s    blks/s
New Disk: [disk0] IODeviceTree:/PCI0@0/RP06@1C,5/SSD0@0/PRT0@0/PMP@0/@0:0
New Disk: [disk1] IOService:/IOResources/IOHDIXController/IOHDIXHDDriveOutKernel@1/IODiskImageBlockStorageDeviceOutKernel/IOBlockStorageDriver/Apple UDIF, только для чтения, сжатый (zlib)
New Disk: [disk2] IOService:/IOResources/IOHDIXController/IOHDIXHDDriveOutKernel@3/IODiskImageBlockStorageDeviceOutKernel/IOBlockStorageDriver/Apple UDIF, только для чтения, сжатый (bzip2)
New Disk: [disk3] IOService:/IOResources/IOHDIXController/IOHDIXHDDriveOutKernel@4/IODiskImageBlockStorageDeviceOutKernel/IOBlockStorageDriver/Apple UDIF, только для чтения, сжатый (bzip2)
New Disk: [disk4] IOService:/IOResources/IOHDIXController/IOHDIXHDDriveOutKernel@6/IODiskImageBlockStorageDeviceOutKernel/IOBlockStorageDriver/Apple UDIF, только для чтения, сжатый (zlib)
20:43:28   disk0        7        312
20:43:28   disk1        0          0
20:43:28   disk2        0          0
20:43:28   disk3        0          0
20:43:28   disk4        0          0
20:43:38   disk0       12        251
20:43:38   disk1        0          

2. Checking Mac OS X CPU Load from terminal

To check Load from Mac OS command line use:
 

$ sar -o ~/output.sar 10 10

That gathers 10 sets of metrics at 10 second intervals. You can then extract useful information from the output file (even while it's still running), this will get you cpu load on Mac OS system spitting stats every 10 seconds.


21:22:33  %usr  %nice   %sys   %idle
21:22:43    7      0      2     90
21:22:53    8      0      3     89
21:23:03   11      0      4     85
21:23:13    9      0      3     88
21:23:23    9      0      3     88
21:23:33    7      0      3     90
21:23:43   10      0      3     87
21:23:53   10      0      4     85
21:24:03   10      0      5     85
21:24:13    8      0      3     88
Average:      8      0      3     87   


3. Checking Free memory on  Mac OS X

Use this obscure one liner to free -m Linux memory command like output from Mac terminal

$ vm_stat | perl -ne '/page size of (d+)/ and $size=$1; /Pagess+([^:]+)[^d]+(d+)/ and printf("%-16s % 16.2f Min", "$1:", $2 * $size / 1048576);'
 

free: 43.38 Mi
active: 1762.00 Mi
inactive: 1676.91 Mi
speculative: 3.29 Mi
wired down: 609.38 Mi
copy-on-write: 29431.01 Mi
zero filled: 4687689.80 Mi
reactivated: 30288.86 Mi


To show inactive memory in Gigabytes every 10 seconds

$ vm_stat 10 | awk 'NR>2 {gsub("K","000");print ($1+$4)/256000}'

1.70532
1.70455
1.70389
1.6904


It is also possible to get memory statistics on Mac PC running top in non-interactive mode and grepping it from output:

$ top -l 1 | head -n 10 | grep PhysMem | sed 's/, /n /g'


PhysMem: 599M wired, 1735M active, 1712M inactive, 4046M used, 47M free.


4. Quick command to get Kernel / how many CPUs, available memory and load avarage on Mac OS X

From y. 2003 onwards of Mac OS have hostinfo(host information) command, providing admin with quick way to get System Info on Mac OS

$ hostinfo


Mach kernel version:
Darwin Kernel Version 12.5.0: Sun Sep 29 13:33:47 PDT 2013; root:xnu-2050.48.12~1/RELEASE_X86_64
Kernel configured for up to 4 processors.
2 processors are physically available.
4 processors are logically available.
Processor type: i486 (Intel 80486)
Processors active: 0 1 2 3
Primary memory available: 4.00 gigabytes
Default processor set: 98 tasks, 621 threads, 4 processors
Load average: 1.63, Mach factor: 2.54


If you need more verbose information on system hardware and resources, check out system_profiler. As the manual describes it, system_profiler(reports system hardware and software configuration.) cmd:

$ system_profiler Here is a link to output file generated by system_prifler


StatusNet – Start your own hosted microblogging twitter like social network on Debian GNU / Linux

Monday, July 14th, 2014

build-your-own-microblogging-service-like-twitter-on-debian-linux-Status.net-logo
I like experimenting with free and open source projects providing social networking capabilities like twitter and facebook. Historically I have run my own social network with Elgg – Open Source Social Network Engine. I had a very positive impression from Elgg as a social engine as, there are plenty of plugins and one can use Elgg to run free alternative to very basic equivalent of facebook, problem with Elgg I had however is if is not all the time monitored it quickly fills up with spam and besides that I found it to be still buggy and not easy to update.
The other social network free software I heard of isBuddyPress which I recently installed with Multisite (MuSite) enabled.

Since BuddyPress is WordPress based and it supports all the nice wordpress plugins, my impression is social networking based on wordpress behaves much more stable and since there is Akismet for WordPress, the amount of spammer registrations is much lower than with Elgg.

Recently I started blogging much more actively and I realized everyday I learn and read too much interesting articles and I don't log them anywhere and thought I need a way besides twitter to keep flashy notes of what I'm doing reading, learning in a short notes. I don't want to use Twitter on purpose, because I don't want to improve twitter's site SEO with adding my own stuff on their website but I want to keep my notes on my own local hosted server.

As I didn't wanted to loose time with Complexity of Elgg anymore and wanted to try to something new and I know the open source microblogging social network (Twitter Equivalent) – identi.ca runs StatusNet – Free and Open Source Social software. StatusNet is well known under the motto of "Decentralized Twitter"

screenshot-status-net-microblogging-twitter-like-free-software-network

I took the time to grab it and install it to my home brew machine www.pc-freak.net. If you haven't seen StatusNet so far – you can check out demo of my installation here – registration is not freely opened because, i don't want spammers to break in, however if you want to give a try drop me a mail or comment below and I will open access for you ..

There is no native statusnet package for Debian Linux (as I'm running Debian) so to install it, I've grabbed statusnet.

To install StatusNet, everything was pretty straight forward and literally following instructionsf rom INSTALL file, i.e.:

# status.example.com maps to /var/www/status/
cd /var/www/status/
wget http://status.net/statusnet-0.9.6.tar.gz
tar -xzf statusnet-0.9.6.tar.gz --strip-components=1
rm statusnet-0.9.6.tar.gz
cd ..
chgrp www-data status/
chmod g+w status/
cd status/
chmod a+w avatar/ background/ file/

mysqladmin -u "root" -p "sql-root-password" create statusnet
mysql -u root -p
GRANT ALL on statusnet.* TO 'statusnetuser'@'localhost' IDENTIFIED BY 'statusnet-secret-password';

To Change default behaviour of URls to be more SEO friendly and not to show .php in URL (e.g. add so called fancy URLs – described in INSTALL):

cp htaccess.sample .htaccess


Then had to configure a VirtualHost under a subdomain http://statusnet.yourdomain.com/install.php or you can alternatively install and access it in browser via http://your-domain.com/status/install.php

An important note to open here is you have to set the URLs via which status.net will be accessed further before proceeding with the install, if you will be using HTTPS here is time to configure it and test it before proceeding with install …  Just be warned that if you don't set the URLs properly now and try to modify them further you will get a lot of issues hard to solve which will cost you a lot of time and nervee ..

If you want to enable twitter bridging in Statusnet you will need to get Twitter consumer and secret keys, to get that you have to create new application on https://dev.twitter.com/apps afterwards you will be taken to a page containing Consumer Key & Consumer Secret string.
StatusNet installation will auto generate config.php, you can further edit it manually with text editor. Content of my current statusnet config.php is here.

Most important options to change are:

$config['daemon']['user'] = 'www-data';
$config['daemon']['group'] = 'www-data';

www-data is user with which Apache is running by default on Debian Linux.

$config['site']['profile'] = 'private';

By default Status.Net will be set to run as private – e.g. it will be fitted for priv. use – messages posted will not publicly be visible. Here the possible options to choose between are:

$config['site']['profile'] = 'private';
$config['site']['profile'] = 'community';
$config['site']['profile'] = 'singleuser';
$config['site']['profile'] = 'public';

singleuser is pretty self explanatory, setting public option will open registration for any user on the internet – probably your network will quickly be filled with spam – so beware with this option. community will make statusnet publicly visible but, registration will only possible via use creation / invitation to join the network from admin.

vi /var/www/status/config.php
$config['site']['fancy'] = true;

Then to enable twitter to statusnet bridge add to config.php

vi /var/www/status/config.php

addPlugin('TwitterBridge');
$config['twitter']['enabled'] = true;
$config['twitterimport']['enabled'] = true;
$config['avatar']['path'] = '/avatar';
$config['twitter']['consumer_key'] = 'XXXXXXXX';
$config['twitter']['consumer_secret'] = 'XXXXXXXX';
# disable sharing location by default
$config['location']['sharedefault'] = 'false';

Notice, I decided to disable statusnet sharedefault folder, because i don't have a lot of free space to provide to users. If you want to let users be allowed to share files (you the space for that), you might want to set a maximum quote of uploaded files (to prevent your webserver from being DoSed – for example by too many huge uploads), here is some reasonable settings:
 

$config['attachments']['file_quota'] = 7000000;
$config['attachments']['thumb_width'] = 400;
$config['attachments']['thumb_height'] = 300;


If you want to get the best out of performance of your new statusnet microblogging service, after each modification of config.php be sure to run:


php scripts/checkschema.php

Running checkschema.php is also useful, to check whether adding new plugins to check whether plugin will not throw an error.

Here is some extra useful config.php plugins to enable:
 

addPlugin('Gravatar', array());
#addPlugin('Textile');
addPlugin('InfiniteScroll');
addPlugin('Realtime');
addPlugin('Blog');
addPlugin('SiteNoticeInSidebar');
addPlugin('WikiHashtags');
addPlugin('SubMirror');
addPlugin('LinkPreview');
addPlugin('Blacklist');


If you expect to have quickly growing base of users it is recommended to also check out whether your MySQL is tuned with mysqltuner and optimize it for performance

Another useful think you would like to do is to increased the number of Statusnet avatars in the 'following' – 'followers' – 'groups' sections on my profile page by editing

lib/groupminilist.php

and

lib/profileminilist.php

line 36 in both files.
To get the full list of possible variables that can be set in config.php run in terminal:

 php scripts/setconfig.php -a

If you happen to encounter some oddities and issues with StatusNet after installation, this is most likely to some PHP hardering on compile time or some PHP.ini functions disabled for security or some missing component to install which is described as a prerequirement in statusnet INSTALL file

to debug the issues enable statusnet logging by adding in config.php

$config['site']['logdebug'] = true;
$config['site']['logfile'] = '/var/log/statusnet.log';

By default logs produced will be quite verbose and there will be plenty of information you will probably not need and will lead to a lot of "noise", to get around this, there is the LogFilter Plugin for some reasonable logging use in config.php:

addPlugin('LogFilter', array( 'priority' => array(LOG_ERR => true,
LOG_INFO => true,
LOG_DEBUG => false),
'regex' => array('/About to push/i' => false,
'/twitter/i' => false,
'/Successfully handled item/i' => false)
));

If you want tokeep log of statusnet it is a good idea to rorate logs periodically to keep them from growing too big, to do this create in /etc/logrotate.d new files /etc/logrotate.d/statusnet with following content:

/var/log/statusnet/*.log {
daily
missingok
rotate 7
compress
delaycompress
notifempty
create 770 www-data www-data
sharedscripts
postrotate
/path/to/statusnet/scripts/stopdaemons.sh > /dev/null
/path/to/statusnet/scripts/startdaemons.sh > /dev/null
endscript
}

You will probably want to to add new Links, next to StatusNet main navigation links for logged in users, this is possible by adding new line to

lib/primarynav.php

and

lib/secondarynav.php

You will have to add a PHP context like:

 $this->action->menuItem('https://www.pc-freak.net/blog/',
                              _m('MENU','Pc-Freak.Net Blog'),
                              _('A pC Freak Blog'),
                              false,
                              'nav_pcfreak');

Once you're done with installation, make sure you change permissions or move install.php from /var/www/status, otherwise someone might overwrite your config.php and mess your installation …

chmod 000 /var/www/status/install.php There is plenty of other things to do with StatusNet (Support for communication with Jabber XMPP protocol, notification via SMS etc. There are also some plugins to add more statusnet functionality.


Enjoy micro blogging ! 🙂

Can you swim after communion? – What is better not to do after receiving the holy sacraments

Tuesday, July 29th, 2014

is-it-allowed-to-swim-after-holy-communion
I took the sacraments this Sunday, and as we're on a holiday and we go to swimming daily. I never swim eucharist in my wife, so a logical came is it allowed to swim after receiving the holy sacraments?

I've googled around to see for an answer but it seems from what I find there is no official plain answer telling whether swimming is allowed or not after communion.

As there is no official church position on this question, this question is solved privately with your priest (spiritual father), if you have such, if not you can do it according to your own conscious.

I've red there are some priests who say, the best practice is not to swim after communion at least 9 hours after holy communion.

For monks the question to swim or not after receiving the holy sacraments is clearly answered as monks are not allowed to go to a beach / undress or wear a swimwear. The reason for that swimming could turn to pleasing the flesh and even a passion in some cases.

otec_Georgi_Jeglarci_communion_chalice_holy-potir

For layman swimming is allowed, but it is dangerous to swim for the only reason, one can hurt himself during swimming and there might be bleeding and it is well known rule to try to follow not to have bleeding or open wounds during communion. Of course in some cases for old people who believe and take the holy blood and flesh of the Lord Jesus Christ with permanent open wounds this rule cannot be observed and with such there might be exceptions. But the general rule for healthy people to follow is to preserve themselves from bleeding after receiving holy communion.
Also an interesting thing that is good to observe after communion is not to take haircut on the same day, cut nails and even it is recommended to not take shower the same day.
The reason to generally try to not wash the body is because the blessing and renewal of the body by the holy spirit which is received in form of Christ's blood and flesh is bathing us and we don't want to wash out this blessing.

Christ-giving-holy-sacraments-to-holy-apostle-Paul

Of course to shower or not after communion is a personal decision. Also the one of the reasons not to haircut on same day as holy communion is it is usual to get a shower after haircut and it is better not to do that. No bleeding on the same day as communion is because we physically receive holy Christ's body and flesh and his holy gifts run through all our body including in the blood and we don't want to have to waste and "spill" this grace through bleeding.
Also on day of receiving holy sacraments it is church rule not to kiss, not to spit and walking barefoot (for the danger that you can hurt yourself and have a blood spill).

lastsupper-holy-orthodox-icon-what-to-do-after-holy-communion

If for some reason you fall and bleed the proper way to deal with the situation is to burn the tissue with the blood.

The number 9 hours to wait is significant in that it reminds us of the hours our Lord Jesus Christ spent to pay our debts with his holy blood and thus grant us salvation. This is the way of the cross starting from 9:00 AM – 6:00 PM, the trial, crucifixion, death, and laying in the tomb took a total of 9 hours.
Also trying consedering not to spit, not chew chewing gum, wash, take shower and kiss is important as it is a mean of watchfulness and as Christians we have to be watchful, at least some minor time after being allowed to re-join the Holy Body of Christ through the holy sacraments gifts in Church.

If you're bringing to communion your kids it is a different story and you can be less vigilent to obseve all this, as it is impossible to know what a kid could do.
It should be known except spitting, right after receiving the holy communion all is not a must observe rules but it is good ones to follow.

Most of the information of this post is based on Coptic Oriental Orthodox forum with questions and answers on wha it is better not to do after communion, anyways as we Eastern Orthodox Chrsitians are so close in faith to Copts, the answers there are true for us too.

How to password encrypt / decrypt files on Linux to keep and pass your data private

Thursday, August 7th, 2014

how-to-password-protect-encrypt-decrypt-files-linux-tux-logo.png
If you have a sensitive data like a scan copy of your ID card, Driving License, Birth Certificate, Marriage Certificate or some revolutionary business / idea or technology and you want to transfer that over some kind of network lets say Internet vie some public unencrypted e-mail service like (Gmail.com / Yahoo Mail / Mail.com / (Bulgarian Mail Abv.bg)) etc. you will certainly want to transfer the file in encrypted form to prevent, someone sniffing your Network or someone having administrative permissions to servers of free mail where your mail data is stored.

Transferring your files in encrypted form become very important these days especially after recent Edward Snowden disclosures about American Mass Surveilance program PRISM – for those who didn't yet hear of PRISM (this is a American of America's NSA – National Security Agency aiming to sniff and log everyone's information transferred in digital form via the Internet and even Mobile Phone conversations)…

First step to mitigate surveilance is to use fully free software (100% free software) OS distribution like Trisquel GNU / Linux.
Second is to encrypt to use encryption –  the process of transforming information (referred to as plaintext) using an algorithm (called cipher) to make it unreadable to anyone except those possessing special knowledge, usually referred to as a key.
There are many ways to encrypt your data on Linux and to later decrpyt it, I've earlier blogged about encryping files with GPG and OpenSSL on Linux, however encryption with GPG and OpenSSL is newer as concept than the old-school way to encrypt files on UNIX with crypt command which in Linux is replaced by mcrypt command.

mcrypt is provided by mcrypt package by default on most if not all Linux distributions, however mcrypt is not installed by default so to start using it you have to install it first.

1. Install mcrypt on Debian / Ubuntu / Mint (deb based) Linux

apt-get install –yes mcrypt


2. Install mcrypt on Fedora / CentOS rest of RPM bases Linux

yum -y install libmcrypt


3. Encrypting file with mcrypt

To get a list with all supported algorithms by mcrypt:
 

mcrypt –list
cast-128 (16): cbc cfb ctr ecb ncfb nofb ofb
gost (32): cbc cfb ctr ecb ncfb nofb ofb
rijndael-128 (32): cbc cfb ctr ecb ncfb nofb ofb
twofish (32): cbc cfb ctr ecb ncfb nofb ofb
arcfour (256): stream
cast-256 (32): cbc cfb ctr ecb ncfb nofb ofb
loki97 (32): cbc cfb ctr ecb ncfb nofb ofb
rijndael-192 (32): cbc cfb ctr ecb ncfb nofb ofb
saferplus (32): cbc cfb ctr ecb ncfb nofb ofb
wake (32): stream
blowfish-compat (56): cbc cfb ctr ecb ncfb nofb ofb
des (8): cbc cfb ctr ecb ncfb nofb ofb
rijndael-256 (32): cbc cfb ctr ecb ncfb nofb ofb
serpent (32): cbc cfb ctr ecb ncfb nofb ofb
xtea (16): cbc cfb ctr ecb ncfb nofb ofb
blowfish (56): cbc cfb ctr ecb ncfb nofb ofb
enigma (13): stream
rc2 (128): cbc cfb ctr ecb ncfb nofb ofb
tripledes (24): cbc cfb ctr ecb ncfb nofb ofb


mcrypt < File-To-Crypt.PDF > File-To-Crypt.PDF.cpy


Enter the passphrase (maximum of 512 characters)
Please use a combination of upper and lower case letters and numbers.
Enter passphrase:
Enter passphrase:


If crypt is invoked to create the encrypted file without OS redirects (< >), i.e.:
 

mcrypt -a blowfish File-To-Crypt.PDF

Please use a combination of upper and lower case letters and numbers.
Enter passphrase:
Enter passphrase:

File File-To-Crypt was encrypted.


mcrypt outputs encrypted file in .nc extension and the new file and file default mode of 0600 (read write only for root user) are set, while new file keeps the modification date of the original.


4. Decrypting file with mcrypt

Decryption of files is done mdecrypt

mdecrypt File-To-Crypt.PDF.cpy
 

Enter passphrase:
File File-To-Crypt.PDF.cpy was decrypted.

To make mcrypt behave in a certain way when invoked modify ~/.mcryptrd

mcrypt is also available as a module for php5 (php5-mcrypt).

Trip to Troyan Bulgaria and Troyan Monastery – Third monastery by size in Bulgaria

Tuesday, August 12th, 2014

Troan Monastery Church - Trip to Troyan Monastery from 16th century Bulgaria - 3rd monastery by size in Bulgaria
This weekend I went with my wife for a Trip To Troyan monastery from Sofia – bus ticket currently costs 12 lv (6 euro) and the distance is rawly 160 km.

Troyan is a remarkable mountain city situated in the center (heart) of Bulgaria, famous with being one of the main places where opposition and preparation for the Turkish Bulgarian war occured. Troyan monastery situated near Oreshaka village was one of the places where the idea of liberation of Bulgaria originated. Troyan was often visited by the remarkable revolutionaries and greatest Bulgarian heroes of all times like Vasil Levski and Hristo Botev.

Troyan Monastery - ancient orthodox monastery in Bulgaria from 16th century

Here in Troyan there was existing one of the many secret commitees in period (1869 – 1876) – Central Secret Revolutionary Committee (BRCK – as widely known in Bulgaria), creation of this commitee become reality thanks to the Deacon Vasil Levsky who saw there is no awakened Bulgarians to fight for national freedom.
Efforts of CSRC later lead to Liberation of Bulgarian from 500 years Bulgarians being under the yoke of Turkish Slavery.

Eco path in the steps of the Apostle of Freedom Vasil Levsky Bulgaria

Our first impressions from Troyan were quite negative, the bus station looks post communistic and a little bit like a horror movie, near the bus station there was a lot of criminal looking gipsies.
Just 5 minutes walk from there is a small beautiful park with children playground, what impressed me most in the park is a bush cutted in the form of ancient amphora and next to the park is the city center surrounded by a river Beli Osym, all from the city center you can see the beatiful mountains all around. There are two historical museums filled with archaelogical remains from early ages, national dresses, weapons from the Liberation war, explanation with chunks of history and Bulgarian national heroes connected to Troyan, there are beautiful expoisitions on how locals used to live through the ages museums, famous paintings original of local artistsBulgaria is a unique country, because of it combines outstanding nature and rich history remains of which is well preserved and standing firm testifying about the Bulgaria glorious past.

Entrance door of The Troyan Monastery - Troianska sveta obitel uspenie Bogorodichno

After taking a walk in the city center, we went to a local city bus station to take a bus to Oreshaka village – at the end of which is located Troyan Monastery. His Beuaitutide Patriarch Maxim who passed away 98 years old was born in Oreshaka village and become monk in Troyan monastery and was a brother of Troan monastery. Currently his holy body is buried in the monastery which is titled "The Dormition of the most Holy Theotokos".  One can feel the place is graceful even from reaching near Oreshaka village, the near view is also stunningly beautiful. The bus from Troyan has a bus stop right in front of the monastery and is cheap (costed only 1.90 lv per person 0.80 euro cents). Bus to the monastery travels 4 times a day, so it was convenient to reach the monastery.
Oreshaka and Troyan region is well famous since ancient times with its skillful craftsman and all kind of crafts developing.

Tryoan monastery mamut and lion - monuments from ancient God creation

Near the monastery there is small chapel from which the monastery started, the history of Troyan monastery, all revives around the miraculous icon of Holy Theotokos (Troeruchica – The Tree Handed Virgin).

Miracle making icon in Troyan Monastery Holy Virgin (Theotokos) Troeruchica - Tree Handed

The monastery story revives around this icon, a monk from holy Mount Athos was travelling to Vlashko (nowadays situated in Carpathians – Romania near border with Moldova), on his way he heard about a hermit with his pupil living near Oreshaka region and spend some time in fasting and prayer with the hermit local people heard about the miracle making icon and come from near and distant regions to venerate the Holy Virgin and pray. When the time come and he decided to move further in his trip to Vlashko he put the icon on his settled horse, made the sign of the cross and walked after few steps the horse stumbled and break his leg, in this event the monk understand it is not God's will to travel and he returned back to the hermit. After spending some time with the hermit, he settled again his horse but on exactly the same place the horse fall again – in that the monk understood this happens because the icon wants to stay on that place. The hermit offered to the monk that he stay there and they service God together, but traveling monk rejected, he venerated the holy icon for a last time and continued his travel to Vlashko. A small brotherhood formed by God's providence near the hermit and they decided to make a small wooden Church for Troeruchica and started servicing God there. This is how Troyan monastery started in the XVI century. The Glory of the Holy icon of Virgin Mary (Troeruchica) quickly spread all around enslaved Bulgarian lands and people come from all regions to pray to the Virgin to cure them, grant them good fortune, good health, solve spritual and family problems … The notes over the last 400 years shows that everyone that come with faith and prayed in front of the Virgin icon found confort, healing, numb started talking, deaf started hearing, paralytics walked.

Sveta_Bogorodica-Troeruchica-Holy-Theotokos-miracle-making-icon-Troyan

Monastery chronicles say that thanks to the Theotokos Troeruruchica in year 1837 the icon saved the locals from the black death which was taking its toll in the region, nobody that came to the monastery to ask for protection from the plague didn't suffered plague, everyone that decided to stay in the monastery during the plague survived, even though people from all around were coming to confess and take the sacraments, no one in the monastery wasn't infected by plague.

We arrived in Troyan Monastery around 16:30 and by arriving were hospitally accepted by our marriage godfather Galin and his sister Denica and were threated with fresh watermelon and even 50 grams of Bulgarian traditional drink Rakia. They're currently painting walls in the monastery dining room in 18:00 we had the blessing to attend the evening Church service. The service was deep and unique experience that moves you to the Kingdom of heaven. After the Church service we went to nearby Mehana Kaizer (Old Bulgarian Dining Inn – Krychma whole made to look in Old Bulgarian Style – there is plenty of traditional food to choose and food was super delicious 🙂

kaizer-krychma-traditional-inn-pub-near-Troyan-monastery

On Sunday 10.08.2014 we were for the Holy Liturgy service and after that we walked through the monastic Church and saw near the Church the bell tower and next to it the old monks monastic graveyard. We visited also the museum of the monastery which contains various religious use objects dating back from year 1700+, old  craftmen instruments, old icons, potirs, priest clothes, old coins from all around the world and Bulgaria. There was a lot of information about historical facts regarding the monastery brotherhood, as well as some chronicles and documents explaining participation of the monastery in the fight for national freedom of Bulgaria. The musem is made of two rooms one of which was the same room where the Apostle of Freedom Vasil Levsky – one can see there the exact hiding place which Vasil Levsky was using to sleep secretly – the hiding place looks like a normal wardrobe.

Scyth saint Nicolas near Troan Monastery Oreshaka Bulgaria - revolutionary city led to freedom of Bulgaria

After seeing the museum, we went to see the monastic Scyth – "Saint Nicola", which was used earlier by the monks, whenever they wanted to have period of seclusion to raise their spiritual life. The Scyth has a large Church in honor of Saint Nicolas, most likely this Church was visited by people from the village, in times when Christians in Bulgaria was forbidden to attend Church services by Turkish Empire – and this is why it was build in such a secluded place. Near the scyth is the grave of a famous rebel for Bulgarian Freedom, and there is a cave with a spring.

Graveyard and skeleton of haidut - rebel Velko fighter for Bulgarian freedom Schyth near Troyan Monastery

Then we walked back the road to Troan Monastery and near the monastery, we went to see workshop of a carpenter lady who makes wooden ornaments for Churches in the region and the monastery.

The lady give us some herbs as a blessing. We had the chance to also take the blessing from the current Abbot Biship Sionij who was earlier rector of Sofia's Seminary Saint "John of Rila".

Monitoring Disk use, CPU Load, Memory use and Network in one console ncurses interface – Glance

Thursday, August 14th, 2014

monitoring-disk-use-memory-cpu-load-and-network-in-one-common-interfaces-with-glances-Linux-BSD-UNIX
If you're Linux / UNIX / BSD system administrator you already have experience with basic admin's system monitoring:

  •     CPU load
  •     OS Name/Kernel version
  •     System load avarage and Uptime
  •     Disk and Network Input/Output I/O operations by interface
  •     Process statistics / Top loading processes etc.
  •     Memory / SWAP usage and free memory
  •     Mounted partitions


Such info is provided by command line tools such as:

top, df, free, sensors, ifconfig, iotop, hddtemp, mount, nfsstat, nfsiostat, dstat, uptime, nethogs iptraf

etc.

There are plenty of others advanced tools also Web based server monitoring visualization  tools, such as Monit, Icanga, PHPSysInfo, Cacti which provide you statistics on computer hardware and network utilization

So far so good, if you already are used to convenience of web *NIX based monitoring but you don't want to put load on the servers with such and you're lazy to write custom scripts that show most important monitoring information – necessery for daily system administration monitoring and prevention from downtimes and tracking bottlenecks you will be glad to hear about Glances
 

Glances is a free (LGPL) cross-platform curses-based monitoring tool which aims to present a maximum of information in a minimum of space, ideally to fit in a classical 80×24 terminal or higher to have additionnal information. Glances can adapt dynamically the displayed information depending on the terminal size. It can also work in a client/server mode for remote monitoring.


1. Installing Glances curses-based monitoring tool on Debian 7 / Ubuntu 13+ / Mint  Linux

We have to install python-pip (python package installer tool) to later install Glances

apt-get install –yes 'python-dev' 'python-jinja2' 'python-psutil'
                        'python-setuptools' 'hddtemp' 'python-pip' 'lm-sensors'


Before proceeding to install Glances to make Thermal sensors working (if supported by hardware) run:


 sensors-detect

Glances is written in Python and uses psutil library to obtain monitoring statistic values, thus it is necessery to install few more Python libraries:

pip install 'batinfo' 'pysensors'

If you're about to use pip – Python package installer tool, behind a proxy server use instead:
 

pip install –proxy=http://your-proxy-host.com:8080 'batinfo' 'pysensors'

Then install Glances script itself again using pip
 

pip install 'Glances'

Downloading/unpacking Glances
  Downloading Glances-2.0.1.tar.gz (3.3Mb): 3.3Mb downloaded
  Running setup.py egg_info for package Glances
    
Downloading/unpacking psutil>=2.0.0 (from Glances)
  Downloading psutil-2.1.1.tar.gz (216Kb): 216Kb downloaded
  Running setup.py egg_info for package psutil

Successfully installed Glances psutil


Then run glances from terminal
 

glances -t 3

-t 3 option tells glances to refresh collected statistics every 3 seconds

glances-console-monitoring-tool-every-systemad-ministrator-should-know-and-use-show-memory-disk-cpu-mount-point-statistics-in-common-shared-screen-linux-freebsd-unix


2. Installing Glances monitoring console tool on CentOS / RHEL / Fedora / Scientific Linux

Installing glances on CentOS 7 / Fedora and rest of RPM based distributions can be done by adding external RPM repositories, cause glances is not available in default yum repositories.

To enable Extra-packages repositories:
 

rpm -ivh http://dl.fedoraproject.org/pub/epel/6/x86_64/epel-release-6-8.noarch.rpm


Then update yum to include new repository's packages into package list and install python-pip and python-devel rpms
 

yum update
yum install python-pip python-devel


Glances-console-server-stateScreenhot-on-CentOS-Linux-monitoring-in-ncurses-Linux-BSD

There is also FreeBSD port to install Glances on FreeBSD:
 

cd /usr/sysutils/py-glances
make install


Enjoy 🙂 !


How to query LDAP (Windows Domain Controller) directory entries from Linux – ldapsearch common searche examples

Tuesday, November 18th, 2014

active-directory-logo
If you have a hybrid network of Windows servers and computers in Active Directory (AD) Domain Names and Linux hosts hosting various Java / PHP / Python applications like many of the middle and big companies (organization) have, sooner or later you will have to deploy an application which uses some some user authentication from the Linux host to Windows Domain Controller, you will end up in need to be able to query the AD, which is using LDAP (Lightweight Directory Access Protocol) to store the AD user credentials and tons of other information important for proper Active Directory operations.

LDAP is a key industry standard for storing and accessing distributed directory information services over Internet Protocol (IP). LDAP is great for sharing of information about users, systems, networks, services, and applications throughout the network. The corporate world nowadays would have been impossible without LDAP.
As of time of writting latest RFC  (Resource for Comment) 4511 document describes industrial specification of LDAP version 3.0 and therefore this is the most often used and implemented version.

LDAP protocol supports generally following operations:

Adding, Delete, Bind (Authenticate to LDAP server), Delete Search and Compare, Modify and Modify DN (Distringuished Name)
Deleting recordsh

On Linux to retrieve / locate AD entries, there is ldapsearch  command which opens connection to LDAP host server port, with set username and password. ldapsearch tool makes its search based on a filter.

To have make and modify queries in LDAP from GNU / Linux you will have to have installed ldap-utils on Debian, i.e.:

apt-get –yes install ldap-utils


to have ldapseach, ldapmodify, ldapsearch ldappasswd on CentOS / Redhat Linux, you need openldap-clients.x86_64

yum -y install openldap-clients.x86_64

Returned result from ldapsearch clients will be returned in LDIF format (LDAP Data Interchange format).

ldapsearch basic format is like thsi:

ldapsearch [optional_options] [optional_search_filter] [optional_list_of_attributes]

ldapsearch could query (LDAP – ADs) in unencrypted form simple LDAP, encrypted form with SSL certificate (LDAPs) or through LDAP with STARTTLS.
Logically most organizations nowadays are using LDAPs, as it offers the highest level of security. Unencrypted LDAP servers listen usually on
port 389, LDAPs communicates on port 636 once an SSL handshake is made between client and server and LDAP with STARTTLS communicates on standard port 389.

Here is 3 examples of common  ldapsearch queries

1. Return all entries in LDAP server
 

ldapsearch -D "cn=directory manager" -w secret -p 389 -h ldap.your-organization.org -b "dc=your-organization,dc=com" -s sub "(objectclass=*)"


"objectclass=*" is a serch filter matching all entries in the directory (time and size limits on output limit set for the server will take affect)

2. Searching the Root DSE Entry

root DSE is special entry containing list of all suffixes supported by local Directory Server. Getting root DSE is done with  base of "", a search scope of base, and a filter of "objectclass=*"

ldapsearch -D "cn=directory manager" -w secret_pass -p 389 -h ldaps.your-organization.org  -b "dc=your-organization,dc=com" -s sub "cn=babs jensen"


3. Searching Directory Server Schema Entry

LDAP server stores all directory server schema in special entry cn=schema.
schema entry contains information on every object class and attribute defined for the Directory Server. Command to searches  contents of the cn=schema entry is:
 

ldapsearch -D "cn=directory manager" -w secret_pass -p 389 -h ldaps.your-organization.org -b "cn=schema" -s base "objectclass=*"


4. Check whether cn=My-Account1 account is working and enabled

ldapsearch -H ldaps://ldaps.your-organization.org -b o=my-org,c=bg -s sub -D cn=My-Account1,ou=users,ou=ABC,o=my-org,c=ABC -W '(&(cn=My-Acount1)(objectclass=my-org-Account))'


5. check all members of cn=MY_ADMINISTRATION


ldapsearch -H ldaps://ldaps.your-organization.org -b o=my-org,c=bg -s sub -D cn=My-Account1,ou=users,ou=ABC,o=my-org,c=ABC -W '(&(cn=MY_ADMINISTRATION)(member=*))'


6. check all members of all groups belonging to user
 

ldapsearch -H ldaps://ldaps.your-organization.org -b ou=ABC,ou=ABC1,ou=ABC2,ou=groups,ou=ABC,o=my-org,c=ABC -s sub -D cn=My-Account1,ou=users,ou=ABC,o=my-org,c=ABC -W '(cn=*)'
 

Whether ldapsearch queries are to be common and scripted or just for simplification of readability of query to LDAP it is useful to use LDAP_BASEDN – a query search base. By setting search base you can further omit in query -b

export LDAP_BASEDN="dc=your-organization,dc=com"
ldapsearch -D "cn=directory manager" -w secret_pass -p 389 -h ldap.your-organization.org "cn=labs jordan"

In Linux LDAP's open-source implementation is called OpenLDAP.
On Linux LDAP protocol can be easily integrated / used in combination with FTP servers (such as proftpd), DNS servers, Mail Servers (Courier), Samba servers, Radius (IP Telephony), sudo, as well as most programming languages such as PHP, Python etc.

How to improve your web browser security – Better securing your personal identity privacy on the Net

Monday, August 2nd, 2010

improve-browser-security-howto-improve-firefox-chrome-security
Nowadays internet privacy has become a taboo. Many people do understand how vital is it to protect your privacy online.
Unfortunately not much has done much in order to improve their state of security whilst on the net.
In this article you’re about to find out how trusted and secure is the browsing in the Internet and next to it you will find some possibleways and thoughts how you can improve your personal privacy and the amount of information your browser reveals about your (habits, interestest, and, lifestyle) while surfing online.
There are a lot of private information that can leak through a simple web serarch, let’s say you decide to search for some kind of sickness and it’s treatment.. just few minutes later the paid advertisement popping up will be showing up targetting ads related to your previous sickness google search.
This is tiny bit of information your browser reveals, however there is much much more. So let me give you a few more examples:
Let’s say you visit a website with an Adobe Flash browser player enabled. It’s very likely that the website will have flash advertisement this popular this day. If that is the scenario it’s very likely that the flash application is built to use тхе so called flash cookies supported.
You might have never heard about flash cookies but anyways this one of cookies are one of the most malicious cookies ever invented.
One of the main reason they’re so dubious is the fact THEY NEVER EXPIRE!
Though as with normal cookies flash cookies are used for storing user details, let’s say your profile details or settings concerning your youtube video player etc. and this sound nice, market guys use the same features to track what you do online.
Using flash cookies for instance everybody who cratefted a specific adobe flash page is able to list your flash cookies stored browser history!
To partly setup the behaviour of your Flash player and change the defailt flash player settings for good use the flashplayer settings manager

It’s really odd that the only way to configure flash is to configure it via adobe’s webpage this is much sneaky since, God only knows what kind of information as well probably your whole flash browser history and flash cookies is being sent Adobe for later analysis.
Moreover the flash player is a propriatary software and this makes it even more likely to have included some extra spying software and stuff alike ..

To see all the stored information by flash about a websites you have visited check out:

flashplayer settings manager

Honestly I was quite shocked when I saw many websites I have visited for the rest 1.5+ year listed.

From hence since we know how “evil” flash storage manager cookies are, one sure step to increase your browser privacy is to periodically get rid of Flash Storage (Flash Cookies).
To achieve periodical flash cookies wipe out on Linux, below I provide you with a tiny .tcsh script which is tested and is working on Debian and Ubuntu. Get rid of Local Flash Storage shell script for Linux
(Stores data of the websites you have visited using your browser flash player)

To check your general Browser security The Electronic Frontier Foundation has developed a special website to test your browser anonymity visit penoptickclick.eff.org and click the > TEST ME button

In my case all my installed browser plugins were listed as well many information related to what kind of browser I use the version on the architecture I’m running on etc. etc.
Thereafter navigate to about:config and set the variable dom.storage.enabled to false . This will completely disable the DOM cookies which by the way never expire!
DOM cookies aren’t so widely used yet but still it’s possible that some websites online has stareted using them, since they’re completely junky and bad designed for instance DOM a cookie can contant up to (100KB) of information. then it’s best that you disable them completely.
Another recommendable thing to disable on your Iceweasel / Firefox that will tighten up your security is the keyword.enabled variable click twice on it and assure yourself it reads false
Disabling it will prevent the google word suggest to appear each time you type something in Google search box, albeit not every character you type will be sent to Google.

Also a really nice worthy reading is the article explaining dom cookies
Take some time and read it to get a better idea on DOM cookies what they are and why you don’t want them.
Likewise take a look at Flash Cookie Forensics for a bit more insight on the flash cookies

After reading the article about flash cookies, I came to the conclusion that maybe it’s best that they’re completely enabled. Anyways if they’re disabled then many websites won’t work properly which is something we don’t want.
It’s rather strange that the only available way to control your flash and disable the flash cookies is via Flashplayer Web Based Setting Manager
Since it’s “Web Based Manager” and it is hosted on Adobe’s web site this probably means that everything you do through it gets logged by Adobe, not so nice (neither secure) heh ..

It’s recommended also to install and configure the following list of extra Firefox plugins to ensure a bit more Anonimity while surfing on the Internet.

  • Adblock Plus
  • AntiSocial
  • BeeFree
  • Beef Taco
  • BetterPrivacy
  • DownloadHelper
  • Download Statusbar
  • Live HTTP Headers
  • No FB Tracking
  • NoScript
  • RefControl

Now configure AdBlock plus to work with EasyPrivacy+EasyList (by default it works only with EasyList).
To subscribe for ABP EasyPrivacy click here

BeeFree Mozilla Addon .
Is under the GNU GPL license and it helps you defend a bit more your privacy. It’s advantage use is to prevent search engines from knowing which links from their search results is most probably for you to check. Looks like a promising and great stuff
It is said in the add-on website that as a side effect of using the plugin it will probably increase your browser speed.
This post has highly adopted information from the Bulgarian Article by Anton Zinoviev, 2010 About your web browser and the inviolability of your personal life
Big thanks to Anton Zinoviev for the time and effort taken to research on the topic of browser security and write this wonderful thoroughful article.
To configure the BeeFree Firefox security tightening browser addon you will have to type in your browser URL address bar once again
about:config
Now you will have to look up for the following browser config keys:

extensions.beefree.websites.default.header.accept-charset.action
a
Set it’s value to be 2 e.g. extensions.beefree.websites.default.header.accept-charset.action = 2
Now look for the key value extensions.beefree.websites.default.header.accept-charset.value.text and set it’s value to:
*/*
Changing the extensions.beefree.websites.default.header.accept-charset.action = */* will make BeeFree compatible to some securing anti spam programs.
Last thing to do to complete the BeeFree configuration create the key value extensions.beefree.website.generic.header.useragent.action
To create this one press on a random key the last mouse button and select New -> Integer
The value for the newly created extensions.beefree.website.generic.header.useragent.action should be set to 4
Creating this key will instruct beefree to protect your browser from revealing it’s browser version variable.
Interesting to say each restart of the browser will make BeeFree to select a random Firefox Linux or Windows version, dependant of the OS type you use.

The AntiSocial addon will prevent your browser from revealing information to Facebook about your personal interests. It blocks the facebook elements which are being embedded to your browser by some websites.

No FB Tracking stops facebook of keeping an eye on you through the buttons “I like”. Using this buttons facebook can track you even if you’re not logged in or registered in the social network.

Installing all this plugins would take you time but considering the privacy is invaluable time shouldn’t be a concern of you.
Also some of the plugins like NoScript make take some time until you’re used to it but it’s worth to learn using it.
BetterPrivacy is able and will delete all flash cookies when your browser exits, this will prevent that some sites pry on you through the shitty flash cookies technology, this type of cookies NEVER EXPIRE! Hard to swallow but a fact …

In Linux this plugin is reported to work correctly however, in Windows there are dubious reports about it.
This is just a brief overview about how to improve your browsing privacy and therefore general personal data security, there is plenty much already red and said on topic, however I hope this could be some kind of basis for my dear reader for a later research on the topic.

Monitoring MySQL server queries and debunning performance (slow query) issues with native MySQL commands and with mtop, mytop

Thursday, May 10th, 2012

If you're a Linux server administrator running MySQL server, you need to troubleshoot performance and bottleneck issues with the SQL database every now and then. In this article, I will pinpoint few methods to debug basic issues with MySQL database servers.

1. Troubleshooting MySQL database queries with native SQL commands

a)One way to debug errors and get general statistics is by logging in with mysql cli and check the mysql server status:

# mysql -u root -p
mysql> SHOW STATUS;
+-----------------------------------+------------+
| Variable_name | Value |
+-----------------------------------+------------+
| Aborted_clients | 1132 |
| Aborted_connects | 58 |
| Binlog_cache_disk_use | 185 |
| Binlog_cache_use | 2542 |
| Bytes_received | 115 |
.....
.....
| Com_xa_start | 0 |
| Compression | OFF |
| Connections | 150000 |
| Created_tmp_disk_tables | 0 |
| Created_tmp_files | 221 |
| Created_tmp_tables | 1 |
| Delayed_errors | 0 |
| Delayed_insert_threads | 0 |
| Delayed_writes | 0 |
| Flush_commands | 1 |
.....
.....
| Handler_write | 132 |
| Innodb_page_size | 16384 |
| Innodb_pages_created | 6204 |
| Innodb_pages_read | 8859 |
| Innodb_pages_written | 21931 |
.....
.....
| Slave_running | OFF |
| Slow_launch_threads | 0 |
| Slow_queries | 0 |
| Sort_merge_passes | 0 |
| Sort_range | 0 |
| Sort_rows | 0 |
| Sort_scan | 0 |
| Table_locks_immediate | 4065218 |
| Table_locks_waited | 196 |
| Tc_log_max_pages_used | 0 |
| Tc_log_page_size | 0 |
| Tc_log_page_waits | 0 |
| Threads_cached | 51 |
| Threads_connected | 1 |
| Threads_created | 52 |
| Threads_running | 1 |
| Uptime | 334856 |
+-----------------------------------+------------+
225 rows in set (0.00 sec)

SHOW STATUS; command gives plenty of useful info, however it is not showing the exact list of queries currently processed by the SQL server. Therefore sometimes it is exactly a stucked (slow queries) execution, you need to debug in order to fix a lagging SQL. One way to track this slow queries is via enabling mysql slow-query.log. Anyways enabling the slow-query requires a MySQL server restart and some critical productive database servers are not so easy to restart and the SQL slow queries have to be tracked "on the fly" so to say.
Therefore, to check the exact (slow) queries processed by the SQL server (without restarting it), do
 

mysql> SHOW processlist;
+——+——+—————+——+———+——+————–+——————————————————————————————————+
| Id | User | Host | db | Command | Time | State | Info |
+——+——+—————+——+———+——+————–+——————————————————————————————————+
| 609 | root | localhost | blog | Sleep | 5 | | NULL |
| 1258 | root | localhost | NULL | Sleep | 85 | | NULL |
| 1308 | root | localhost | NULL | Query | 0 | NULL | show processlist |
| 1310 | blog | pcfreak:64033 | blog | Query | 0 | Sending data | SELECT comment_author, comment_author_url, comment_content, comment_post_ID, comment_ID, comment_aut |
+——+——+—————+——+———+——+————–+——————————————————————————————————+
4 rows in set (0.00 sec)
mysql>

SHOW processlist gives a good view on what is happening inside the SQL.

To get more complete information on SQL query threads use the full extra option:

mysql> SHOW full processlist;

This gives pretty full info on running threads, but unfortunately it is annoying to re-run the command again and again – constantly to press UP Arrow + Enter keys.

Hence it is useful to get the same command output, refresh periodically every few seconds. This is possible by running it through the watch command:

debian:~# watch "'show processlist' | mysql -u root -p'secret_password'"

watch will run SHOW processlist every 2 secs (this is default watch refresh time, for other timing use watch -n 1, watch -n 10 etc. etc.

The produced output will be similar to:

Every 2.0s: echo 'show processlist' | mysql -u root -p'secret_password' Thu May 10 17:24:19 2012

Id User Host db Command Time State Info
609 root localhost blog Sleep 3 NULL1258 root localhost NULL Sleep 649 NULL1542 blog pcfreak:64981 blog Query 0 Copying to tmp table \
SELECT p.ID, p.post_title, p.post_content,p.post_excerpt, p.pos
t_date, p.comment_count, count(t_r.o
1543 root localhost NULL Query 0 NULL show processlist

Though this "hack" is one of the possible ways to get some interactivity on what is happening inside SQL server databases and tables table. for administering hundred or thousand SQL servers running dozens of queries per second – monitor their behaviour few times aday using mytop or mtop is times easier.

Though, the names of the two tools are quite similar and I used to think both tools are one and the same, actually they're not but both are suitable for monitoring sql database execution in real time.

As a sys admin, I've used mytop and mtop, on almost each Linux server with MySQL server installed.
Both tools has helped me many times in debugging oddities with sql servers. Therefore my personal view is mytop and mtop should be along with the Linux sysadmin most useful command tools outfit, still I'm sure many administrators still haven't heard about this nice goodies.

1. Installing mytop on Debian, Ubuntu and other deb based GNU / Linux-es

mytop is available for easy install on Debian and across all debian / ubuntu and deb derivative distributions via apt.

Here is info obtained with apt-cache show

debian:~# apt-cache show mytop|grep -i description -A 3
Description: top like query monitor for MySQL
Mytop is a console-based tool for monitoring queries and the performance
of MySQL. It supports version 3.22.x, 3.23.x, 4.x and 5.x servers.
It's written in Perl and support connections using TCP/IP and UNIX sockets.

Installing the tool is done with the trivial:

debian:~# apt-get --yes install mytop
....

mtop used to be available for apt-get-ting in Debian Lenny and prior Debian releases but in Squeeze onwards, only mytop is included (probably due to some licensing incompitabilities with mtop??).

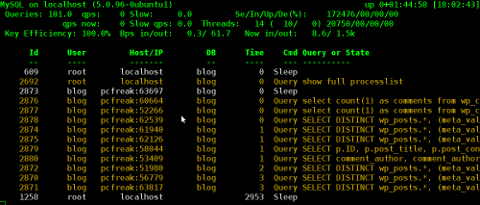
For those curious on how mtop / mytop works – both are perl scripts written to periodically connects to the SQL server and run commands similar to SHOW FULL PROCESSLIST;. Then, the output is parsed and displayed to the user.

Here how mytop running, looks like:

MyTOP showing queries running on Ubuntu 8.04 Linux - Debugging interactively top like MySQL

2. Installing mytop on RHEL and CentOS

By default in RHEL and CentOS and probably other RedHat based Linux-es, there is neither mtop nor mytop available in package repositories. Hence installing the tools on those is only available from 3rd parties. As of time of writting an rpm builds for RHEL and CentOS, as well as (universal rpm distros) src.rpm package is available on http://pkgs.repoforge.org/mytop/. For the sake of preservation – if in future those RPMs disappear, I made a mirror of mytop rpm's here

Mytop rpm builds depend on a package perl(Term::ReadKey), my attempt to install it on CentOS 5.6, returned following err:

[root@cenots ~]# rpm -ivh mytop-1.4-2.el5.rf.noarch.rpm
warning: mytop-1.4-2.el5.rf.noarch.rpm: Header V3 DSA signature: NOKEY, key ID 6b8d79e6
error: Failed dependencies:
perl(Term::ReadKey) is needed by mytop-1.4-2.el5.rf.noarch

The perl(Term::ReadKey package is not available in CentOS 5.6 and (probably other centos releases default repositories so I had to google perl(Term::ReadKey) I found it on http://rpm.pbone.net/ package repository, the exact url to the rpm dependency as of time of writting this post is:

ftp://ftp.pbone.net/mirror/yum.trixbox.org/centos/5/old/perl-Term-ReadKey-2.30-2.rf.i386.rpm

Quickest, way to install it is:

[root@centos ~]# rpm -ivh ftp://ftp.pbone.net/mirror/yum.trixbox.org/centos/5/old/perl-Term-ReadKey-2.30-2.rf.i386.rpmRetrieving ftp://ftp.pbone.net/mirror/yum.trixbox.org/centos/5/old/perl-Term-ReadKey-2.30-2.rf.i386.rpmPreparing... ########################################### [100%]
1:perl-Term-ReadKey ########################################### [100%]

This time mytop, install went fine:

[root@centos ~]# rpm -ivh mytop-1.4-2.el5.rf.noarch.rpm
warning: mytop-1.4-2.el5.rf.noarch.rpm: Header V3 DSA signature: NOKEY, key ID 6b8d79e6
Preparing... ########################################### [100%]
1:mytop ########################################### [100%]

To use it further, it is the usual syntax:

mytop -u username -p 'secret_password' -d database

CentOS Linux MyTOP MySQL query benchmark screenshot - vpopmail query

3. Installing mytop and mtop on FreeBSD and other BSDs

To debug the running SQL queries in a MySQL server running on FreeBSD, one could use both mytop and mtop – both are installable via ports:

a) To install mtop exec:

freebsd# cd /usr/ports/sysutils/mtop
freebsd# make install clean
....

b) To install mytop exec:

freebsd# cd /usr/ports/databases/mytop
freebsd# make install clean
....

I personally prefer to use mtop on FreeBSD, because once run it runs prompts the user to interactively type in the user/pass

freebsd# mtop

Then mtop prompts the user with "interactive" dialog screen to type in user and pass:

Mtop interactive type in username and password screenshot on FreeBSD 7.2

It is pretty annoying, same mtop like syntax don't show user/pass prompt:

freebsd# mytop
Cannot connect to MySQL server. Please check the:

* database you specified "test" (default is "test")
* username you specified "root" (default is "root")
* password you specified "" (default is "")
* hostname you specified "localhost" (default is "localhost")
* port you specified "3306" (default is 3306)
* socket you specified "" (default is "")
The options my be specified on the command-line or in a ~/.mytop
config file. See the manual (perldoc mytop) for details.
Here's the exact error from DBI. It might help you debug:
Unknown database 'test'

The correct syntax to run mytop instead is:

freebsd# mytop -u root -p 'secret_password' -d 'blog'

Or the longer more descriptive:

freebsd# mytop --user root --pass 'secret_password' --database 'blog'

By the way if you take a look at mytop's manual you will notice a tiny error in documentation, where the three options –user, –pass and –database are wrongly said to be used as -user, -pass, -database:

freebsd# mytop -user root -pass 'secret_password' -database 'blog'
Cannot connect to MySQL server. Please check the:

* database you specified "atabase" (default is "test")
* username you specified "ser" (default is "root")
* password you specified "ass" (default is "")
* hostname you specified "localhost" (default is "localhost")
* port you specified "3306" (default is 3306)
* socket you specified "" (default is "")a
...
Access denied for user 'ser'@'localhost' (using password: YES)

Actually it is interesting mytop, precededed historically mtop.
mtop was later written (probably based on mytop), to run on FreeBSD OS by a famous MySQL (IT) spec — Jeremy Zawodny .
Anyone who has to do frequent MySQL administration tasks, should already heard Zawodny's name.
For those who haven't, Jeremy used to be a head database administrators and developer in Yahoo! Inc. some few years ago.
His website contains plenty of interesting thoughts and writtings on MySQL server and database management