Posts Tagged ‘information’
Tuesday, March 29th, 2016 
Sometimes when you have some inherited Windows / Linux OS servers or Desktops, it is useful to be aware what is the Operating System install date. Usually the install date of the OS is closely to the date of purchase of the system this is especially true for Windows but not necessery true for Liunx based installs.
Knowing the install date is useful especially if you're not sure how outdated is a certain operating system. Knowing how long ago a current installation was performed could give you some hints on whether to create a re-install plans in order to keep system security up2date and could give you an idea whether the system is prone to some common errors of the time of installation or security flaws.
1. Check out how old is Windows install?
Finding out the age of WIndows installation can be performed across almost all NT 4.0 based Windowses and onwards, getting Winblows install date is obtained same way on both Windows XP / Vista/ 7 and 8.
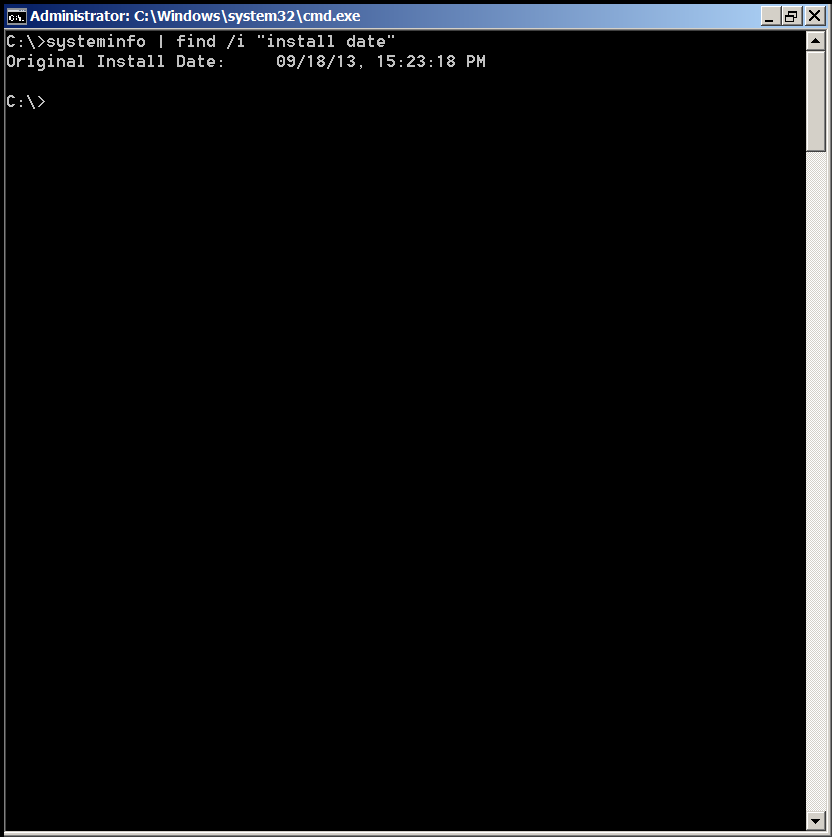
Besides many useful things such as detailed information about the configuration of your PC / notebook systeminfo could also provide you with install date, to do so just run from command line (cmd.exe).
C:\Users\hipo> systeminfo | find /i "install date"
Original Install Date: 09/18/13, 15:23:18 PM
If you need to get the initial Windows system install date however it might be much better to use WMIC command to get the info:
C:\Users\hipo>WMIC OS GET installdate
InstallDate
20130918152318.000000+180
The only downside of using WMIC as you can see is it provides the Windows OS install date in a raw unparsed format, but for scripters that's great.
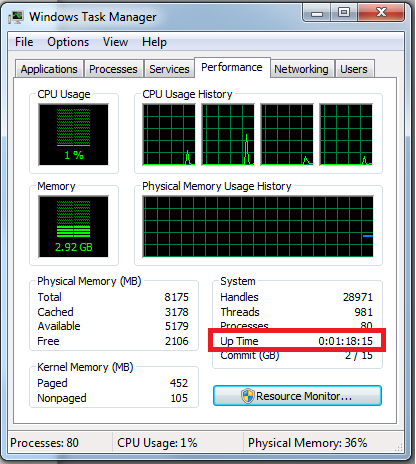
2. Check WIndows Installed and Uinstalled software and uptime from command line
One common other thing next to Windows install date is what is the Windows uptime, the easiest way to get that is to run Task Manager in command line run taskmgr
For those who want to get the uptime from windows command line for scripting purposes, this can be done again with systeminfo cmd, i.e.:
C:\> systeminfo | find "System Boot Time:"
System Boot Time: 03/29/16, 08:48:59 AM

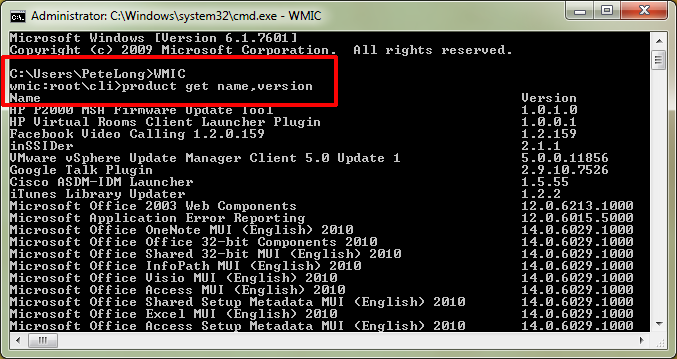
Other helpful Windows command liners you might want to find out about is getting all the Uninstalled and Installed programs from command line this again is done with WMIC
C:\> wmic /OUTPUT:my_software.txt product get name
Alternative way to get a full list of installed software on Windows OS is to use Microsoft/SysInternals psinfo command:
C:\> psinfo -s > software.txt
C:\> psinfo -s -c > software.csv
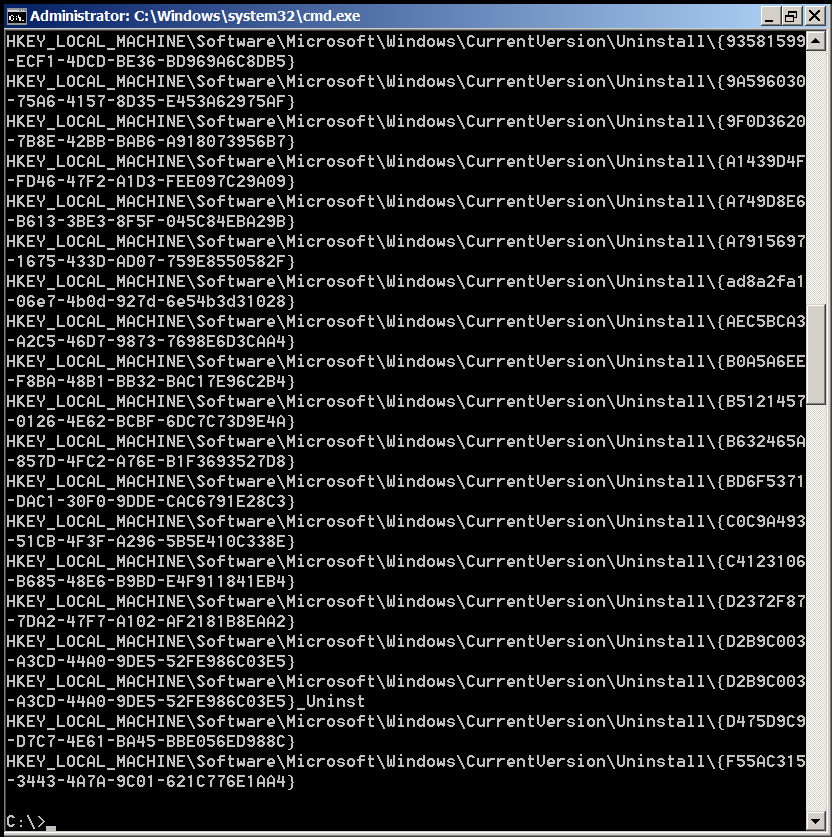
If you need to get a complete list of Uinstalled Software using command line (e.g. for batch scripting) purposes, you can query that from Windows registry, like so:
C:\>reg query HKEY_LOCAL_MACHINE\Software\Microsoft\Windows\CurrentVersion\Uninstall
Command Output will be something like on below shot:
Well that's all folks 🙂
Tags: check install date and time windows, check install programs command windows, check uninstall programs command win, Check Windows Linux Operating System, Check Windows Operating System, command check uptime windows, common, exe, information, installation, installed programs windows command, line, need, run, scripting, system security, uninstall software windows get, windows command, WMIC
Posted in Curious Facts, Everyday Life, Remote System Administration, System Administration, Various, Windows | No Comments »
Wednesday, March 2nd, 2016 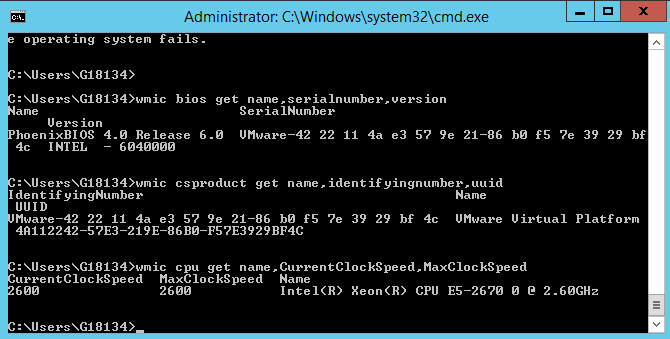
Getting CPU information, RAM info and other various hardware specifics on Windows from the GUI interface is pretty trivial from Computer -> Properties
even more specifics could be obtained using third party Windows software such as CPU-Z
Perhaps there are plenty of many other ones to get and log info about hardware on PC or notebook system, but for Windwos sysadmins especially ones who are too much in love with command prompt way of behaving and ones who needs to automatizate server deployment processes with BATCH (.BAT) scripts getting quickly info about hardware on freshly installed remote host Win server with no any additional hardware info tools, you'll be happy to know there are command line tools you can use to get extra hardware information on Windows PC / server:
The most popular tool available to present you with some basic hardware info is of course systeminfo
C:\> systeminfo
Host Name: REMHOST
OS Name: Microsoft Windows Server 2012 R2 Standard
OS Version: 6.3.9600 N/A Build 9600
OS Manufacturer: Microsoft Corporation
OS Configuration: Member Server
OS Build Type: Multiprocessor Free
Registered Owner: Registrar
Registered Organization: Registrar
Product ID: 00XXX-X0000-00000-XX235
Original Install Date: 17/02/2016, 11:38:39
System Boot Time: 18/02/2016, 14:16:48
System Manufacturer: VMware, Inc.
System Model: VMware Virtual Platform
System Type: x64-based PC
Processor(s): 1 Processor(s) Installed.
[01]: Intel64 Family 6 Model 45 Stepping 7 GenuineInt
el ~2600 Mhz
BIOS Version: Phoenix Technologies LTD 6.00, 11/06/2014
Windows Directory: C:\Windows
System Directory: C:\Windows\system32
Boot Device: \Device\HarddiskVolume1
System Locale: de;German (Germany)
Input Locale: de;German (Germany)
Time Zone: (UTC+01:00) Amsterdam, Berlin, Bern, Rome, Stockholm,
Vienna
Total Physical Memory: 4,095 MB
Available Physical Memory: 2,395 MB
Virtual Memory: Max Size: 10,239 MB
Virtual Memory: Available: 8,681 MB
Virtual Memory: In Use: 1,558 MB
Page File Location(s): C:\pagefile.sys
Domain: dom1.domain.com
Logon Server: \\DOM
Hotfix(s): 148 Hotfix(s) Installed.
[01]: KB2894852
[02]: KB2894856
[03]: KB2918614
[04]: KB2919355
…..
Now though systeminfo's hardware details and installed Windows KBXXXXX OS Hotfix patches are getting lists the command does not provide you with info about system’s BIOS, thus to get this info you'll have to use also wmic (Windows Management Instrumentation Command).
So What Is WMIC?
WMIC extends WMI for operation from several command-line interfaces and through batch scripts. Before WMIC, you used WMI-based applications (such as SMS), the WMI Scripting API, or tools such as CIM Studio to manage WMI-enabled computers. Without a firm grasp on a programming language such as C++ or a scripting language such as VBScript and a basic understanding of the WMI namespace, do-it-yourself systems management with WMI was difficult. WMIC changes this situation by giving you a powerful, user-friendly interface to the WMI namespace.
WMIC is more intuitive than WMI, in large part because of aliases. Aliases take simple commands that you enter at the command line, then act upon the WMI namespace in a predefined way, such as constructing a complex WMI Query Language (WQL) command from a simple WMIC alias Get command. Thus, aliases act as friendly syntax intermediaries between you and the namespace. For example, when you run a simple WMIC command such as
Here is how to wmic to get PC Motherboard serial numbers, CPU and BIOS details:
C:\> wmic bios get name,serialnumber,version
Above will print name if your BIOS, current version and it’s serial number if there is any.
If you need to get more info about the specific Motherboard installed on host:
C:\> wmic csproduct get name,identifyingnumber,uuid
This command will show motherboard modification and it’s UUID
If you want to quickly get what is Windows running hardware CPU clock speed
C:\> wmic cpu get name,CurrentClockSpeed,MaxClockSpeed
Also if you have turbo boost CPUs above command will help you find what’s the Max Clock Speed your system is capable of for the current hardware configuration.
If you do have dynamic clock speed running, then add this line, will refresh and monitor the Clock speed every 1 second.
C:\> wmic cpu get name,CurrentClockSpeed,MaxClockSpeed /every:1
Actually wmic is a great tool
Tags: bios, command line tools, command line utility, CPU, current version, host name, information, Logon Server, Max Clock Speed, name, running, second, system, System Directory, System Manufacturer, System Model, Time Zone, UUID, Windows, Windows Directory, Windows Management Instrumentation Command, WMIC
Posted in Remote System Administration, System Administration, Various, Windows | No Comments »
Monday, February 15th, 2016 
I really love sysstat and as a console maniac I tend to install it on every server however by default there is some <b>sysstat</b> tuning once installed to make it work, for those unfamiliar with <i>sysstat</i> I warmly recommend to check, it here is in short the package description:<br /><br />
server:~# apt-cache show sysstat|grep -i desc -A 15
Description: system performance tools for Linux
The sysstat package contains the following system performance tools:
– sar: collects and reports system activity information;
– iostat: reports CPU utilization and disk I/O statistics;
– mpstat: reports global and per-processor statistics;
– pidstat: reports statistics for Linux tasks (processes);
– sadf: displays data collected by sar in various formats;
– nfsiostat: reports I/O statistics for network filesystems;
– cifsiostat: reports I/O statistics for CIFS filesystems.
.
The statistics reported by sar deal with I/O transfer rates,
paging activity, process-related activities, interrupts,
network activity, memory and swap space utilization, CPU
utilization, kernel activities and TTY statistics, among
others. Both UP and SMP machines are fully supported.
Homepage: http://pagesperso-orange.fr/sebastien.godard/
If you happen to install sysstat on a Debian / Ubuntu server with:
server:~# apt-get install –yes sysstat
, and you try to get some statistics with sar command but you get some ugly error output from:
server:~# sar Cannot open /var/log/sysstat/sa20: No such file or directory
And you wonder how to resolve it and to be able to have the server log in text databases periodically the nice sar stats load avarages – %idle, %iowait, %system, %nice, %user, then to FIX that Cannot open /var/log/sysstat/sa20: No such file or directory
You need to:
server:~# vim /etc/default/sysstat
By Default value you will find out sysstat stats it is disabled, e.g.:
ENABLED="false"
Switch the value to "true"
ENABLED="true"
Then restart sysstat init script with:
server:~# /etc/init.d/sysstat restart
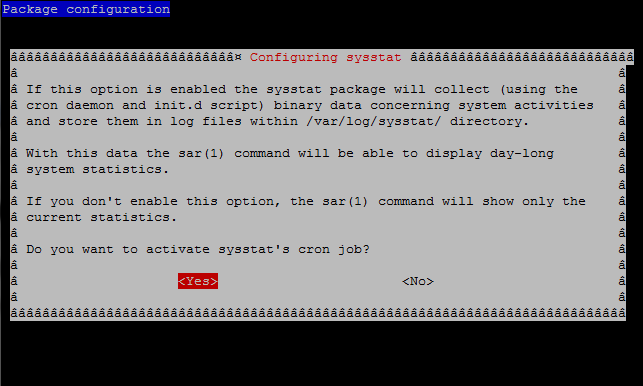
However for those who prefer to do things from menu Ncurses interfaces and are not familiar with Vi Improved, the easiest way is to run dpkg reconfigure of the sysstat:
server:~# dpkg –reconfigure
root@server:/# sar
Linux 2.6.32-5-amd64 (pcfreak) 15.02.2016 _x86_64_ (2 CPU)
0,00,01 CPU %user %nice %system %iowait %steal %idle
0,15,01 all 24,32 0,54 3,10 0,62 0,00 71,42
1,15,01 all 18,69 0,53 2,10 0,48 0,00 78,20
10,05,01 all 22,13 0,54 2,81 0,51 0,00 74,01
10,15,01 all 17,14 0,53 2,44 0,40 0,00 79,49
10,25,01 all 24,03 0,63 2,93 0,45 0,00 71,97
10,35,01 all 18,88 0,54 2,44 1,08 0,00 77,07
10,45,01 all 25,60 0,54 3,33 0,74 0,00 69,79
10,55,01 all 36,78 0,78 4,44 0,89 0,00 57,10
16,05,01 all 27,10 0,54 3,43 1,14 0,00 67,79
Well that's it now sysstat error resolved, text reporting stats data works again, Hooray! 🙂
Tags: databases, debian linux, Debian Ubuntu Linux, directory, file, Howto Fix, information, init script, log, network filesystems, package description, root server, sysstat, var
Posted in Everyday Life, Linux, Linux and FreeBSD Desktop, Monitoring, Performance Tuning, Remote System Administration, System Administration, Various | No Comments »
Friday, November 6th, 2015 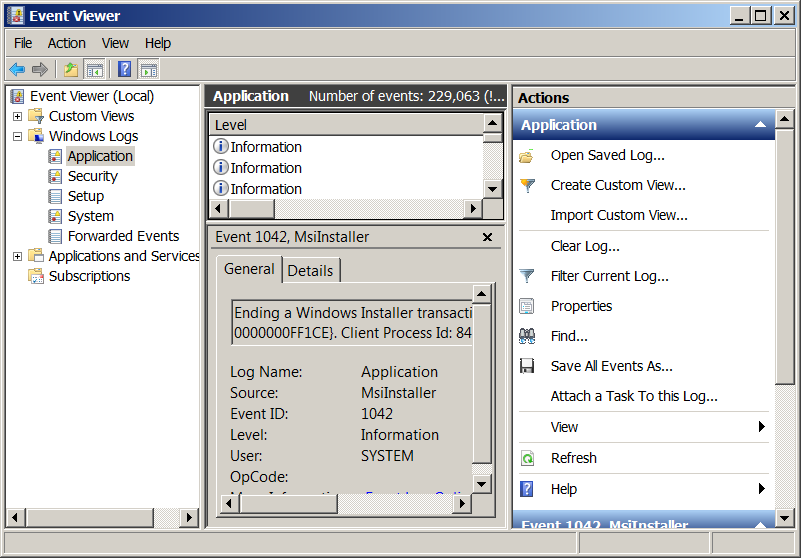
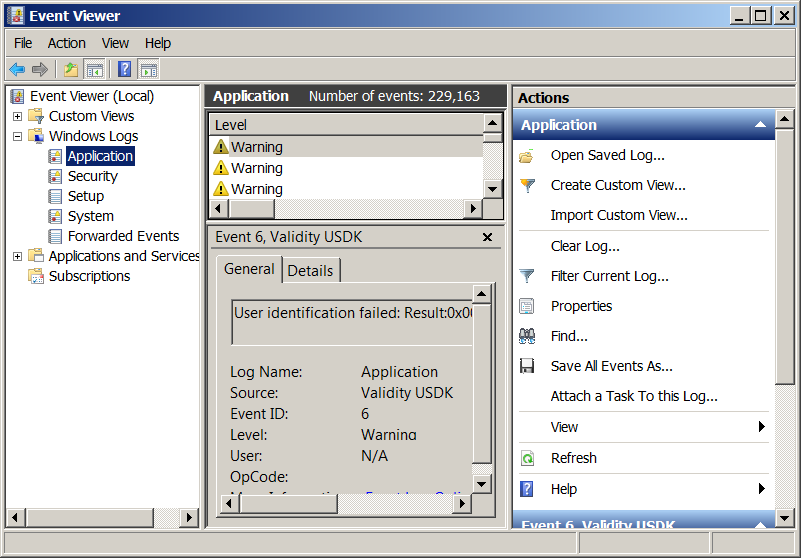
If you’re a sysadmin which needs to deal with Microsoft Windows servers locally or remotely via Remote Desktop RDP client (MSTSC.EXE) or inside a Windows Domain Controller, you will have to frequently debug Windows isseus or Application caused errors by reviewing debug information stored in Event Logs.
Event Viewer is a precious tool to debug often errors with missing libraries or failing programs on Windows boot and thus on M$ Windows it is the Swiss Army knife of sysadmin.
However as staring Event Viewer using the GUI menus, takes a lot of step and looses you time, e.g., you have to navigate to menus:
1. Start button Picture of the Start button
2. clicking Control Panel
3. clicking System and Security
4. clicking Administrative Tools
5.then double-clicking Event Viewer.
6. Granting Administrator permission required If you’re prompted for an administrator password or confirmation
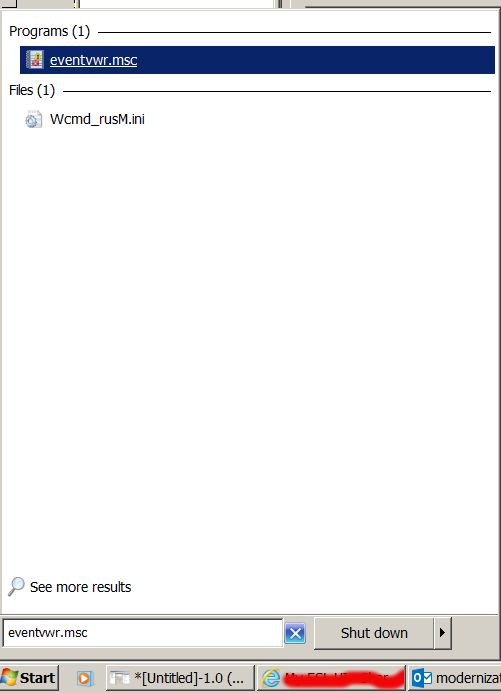
It is much handier to just start it with a shortcut:
Press Windows (Button) + R
– To invoke run prompt
and type:
eventvwr.msc
In case if you’re running eventvwr.msc to connect to remote Windows Server run from command prompt (cmd.exe):
eventvwr.msc /computer=OTHER_Computer_Name
Tags: administrator password, command prompt, confirmation, deal, Event Logs, Event Viewer, exe, Granting Administrator, GUI, How to, information, lot, microsoft windows, MSTSC, run, running, Start, sysadmin, time, Windows Domain Controller, windows server
Posted in Curious Facts, Everyday Life, System Administration, Various, Windows | No Comments »
Friday, September 2nd, 2011 
One of the QMAIL server installs, I have installed very long time ago. I've been notified by clients, that the certificate of the mail server has expired and therefore I had to quickly renew the certificate.
This qmail installation, SSL certificates were located in /var/qmail/control under the names servercert.key and cervercert.pem
Renewing the certificates with a new self signed ones is pretty straight forward, to renew them I had to issue the following commands:
1. Generate servercert encoded key with 1024 bit encoding
debian:~# cd /var/qmail/control

debian:/var/qmail/control# openssl genrsa -des3 -out servercert.key.enc 1024

Generating RSA private key, 1024 bit long modulus

...........++++++

.........++++++

e is 65537 (0x10001)

Enter pass phrase for servercert.key.enc:

Verifying - Enter pass phrase for servercert.key.enc:
In the Enter pass phrase for servercert.key.enc I typed twice my encoded key password, any password is good, here though using a stronger one is better.
2. Generate the servercert.key file
debian:/var/qmail/control# openssl rsa -in servercert.key.enc -out servercert.key

Enter pass phrase for servercert.key.enc:

writing RSA key
3. Generate the certificate request
debian:/var/qmail/control# openssl req -new -key servercert.key -out servercert.csr

debian:/var/qmail/control# openssl rsa -in servercert.key.enc -out servercert.key

Enter pass phrase for servercert.key.enc:writing RSA key

root@soccerfame:/var/qmail/control# openssl req -new -key servercert.key -out servercert.csr

You are about to be asked to enter information that will be incorporated

into your certificate request.

What you are about to enter is what is called a Distinguished Name or a DN.

There are quite a few fields but you can leave some blank

For some fields there will be a default value,

If you enter '.', the field will be left blank.

-----

Country Name (2 letter code) [AU]:UK

State or Province Name (full name) [Some-State]:London

Locality Name (eg, city) []:London

Organization Name (eg, company) [Internet Widgits Pty Ltd]:My Company

Organizational Unit Name (eg, section) []:My Org

Common Name (eg, YOUR name) []:

Email Address []:admin@adminmail.com
Please enter the following 'extra' attributes
to be sent with your certificate request
A challenge password []:
An optional company name []:
In the above prompts its necessery to fill in the company name and location, as each of the prompts clearly states.
4. Sign the just generated certificate request
debian:/var/qmail/control# openssl x509 -req -days 9999 -in servercert.csr -signkey servercert.key -out servercert.crt
Notice the option -days 9999 this option instructs the newly generated self signed certificate to be valid for 9999 days which is quite a long time, the reason why the previous generated self signed certificate expired was that it was built for only 365 days
5. Fix the newly generated servercert.pem permissions
debian:~# cd /var/qmail/control

debian:/var/qmail/control# chmod 640 servercert.pem

debian:/var/qmail/control# chown vpopmail:vchkpw servercert.pem

debian:/var/qmail/control# cp -f servercert.pem clientcert.pem

debian:/var/qmail/control# chown root:qmail clientcert.pem

debian:/var/qmail/control# chmod 640 clientcert.pem
Finally to load the new certificate, restart of qmail is required:
6. Restart qmail server
debian:/var/qmail/control# qmailctl restart

Restarting qmail:

* Stopping qmail-smtpd.

* Sending qmail-send SIGTERM and restarting.

* Restarting qmail-smtpd.
Test the newly installed certificate
To test the newly installed SSL certificate use the following commands:
debian:~# openssl s_client -crlf -connect localhost:465 -quiet

depth=0 /C=UK/ST=London/L=London/O=My Org/OU=My Company/emailAddress=admin@adminmail.com

verify error:num=18:self signed certificate

verify return:1

...

debian:~# openssl s_client -starttls smtp -crlf -connect localhost:25 -quiet

depth=0 /C=UK/ST=London/L=London/O=My Org/OU=My Company/emailAddress=admin@adminmail.com

verify error:num=18:self signed certificate

verify return:1

250 AUTH LOGIN PLAIN CRAM-MD5

...
If an error is returned like 32943:error:140770FC:SSL routines:SSL23_GET_SERVER_HELLO:unknown protocol:s23_clnt.c:607: this means that SSL variable in the qmail-smtpdssl/run script is set to 0.
To solve this error, change SSL=0 to SSL=1 in /var/qmail/supervise/qmail-smtpdssl/run and do qmailctl restart
The error verify return:1 displayed is perfectly fine and it's more of a warning than an error as it just reports the certificate is self signed.
Tags: bit, certificate, certificate request, Certificates, client, com, control, csr, csropenssl, des3, Distinguished, distinguished name, dn, file, genrsa, How to, information, installation, key, key file, keyroot, localhost, long time, mail server, modulus, nam, openssl, option, password, pem, phrase, private key, province name, qmail installation, qmailctl, request, Restart, rocks, root, RSA, self, soccerfame, time, toaster, var
Posted in Linux, Qmail, System Administration, Various | 2 Comments »
Monday, June 11th, 2012 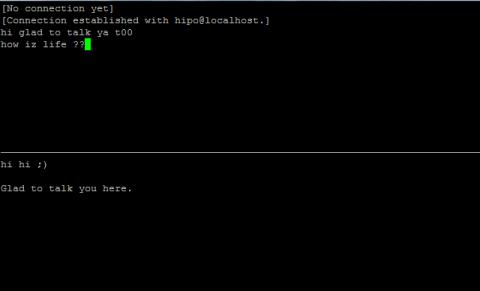
After writting in previous article on how talk be used to handle interactive chat console sessions on FreeBSD, I thought of dropping a few lines on how same is done on Debian, so here is how:
1.; Install talk and talkd
noah:/home/hipo# apt-get --yes install talk talkd

Reading package lists... Done

Building dependency tree

Reading state information... Done

The following NEW packages will be installed:

talk talkd

0 upgraded, 2 newly installed, 0 to remove and 93 not upgraded.

Need to get 19.0 kB/42.3 kB of archives.

After this operation, 201 kB of additional disk space will be used.

Get:1 http://ftp.nl.debian.org/debian/ stable/main talkd amd64 0.17-14 [19.0 kB]

Fetched 19.0 kB in 0s (67.1 kB/s)

Selecting previously deselected package talk.

(Reading database ... 90%

Unpacking talk (from .../talk_0.17-14_amd64.deb) ...

Selecting previously deselected package talkd.

Unpacking talkd (from .../talkd_0.17-14_amd64.deb) ...

Processing triggers for man-db ...

Setting up talk (0.17-14) ...

update-alternatives: using /usr/bin/netkit-ntalk to provide /usr/bin/talk (talk) in auto mode.

Setting up talkd (0.17-14) ...
2.;; Check and make sure talk and ntalkd lines are present in /etc/inetd.conf
noah:/home/hipo# grep -i talk /etc/inetd.conf

#:BSD: Shell, login, exec and talk are BSD protocols.

talk dgram udp wait nobody.tty /usr/sbin/in.talkd in.talkd

ntalk dgram udp wait nobody.tty /usr/sbin/in.ntalkd in.ntalkd
Now you probably wonder why are there two lines in /etc/inetd.conf for ))
in.talkd and in.ntald
in.talkd daemon's aim is to deliver talk sessions between logged in users on one Linux host with few logged in users willing to talk to each other locally;;
Wheter in.ntalkd is designed to serve interactive user talks between the host where in.ntalkd is installed and remote systems ruwhich have the talk client program installed. Of course in order for remote talks to work properly the firewall (if such has to be modified to allow in.ntalkd chats. I've never used in.ntalkd and on most machines having in.ntald hanging around from inetd, could be a potential security hole so, for people not planning to initiate remote TALKs between Unix / Linux / BSD hosts on a network it is a good practice the ntalkd line seen above in inetd.conf to be commented out ::;
noah:/home/hipo# grep -i talk /etc/inetd.conf

#:BSD: Shell, login, exec and talk are BSD protocols.

talk dgram udp wait nobody.tty /usr/sbin/in.talkd in.talkd

#ntalk dgram udp wait nobody.tty /usr/sbin/in.ntalkd in.ntalkd
3.;;; Restart openbsd-inetd init script and talk is ready to use
noah:~# /etc/init.d/openbsd-inetd restart

* Restarting internet superserver inetd
Onwards to use talk between two users the syntax is same like on other BSD, as a matter of fact TALK – console / terminal interactive chat originally was developed for the 4.2BSD UNIX release ;; the Linux code is a port of this BSD talk and not rewrite from scratch.
Using talk between two logged in users on pts/1 (lets say user test) and tty1 (user logged as root) is done with:
noah:~$ tty

noah:~$ talk root@localhost tty1

/dev/pts/1
On tty1 the user has to have enabled Talk sessions request, by default this behaviour in Debian and probably other Debian based Linuxes (Ubuntu) for instance is configured to have talks disabled, i,e ,,,
root@noah:~# mesg

is n
Enabling it on root console is done with:
root@noah:~# mesg y
Once enabled the root will be able to see the TALK service requests on tty1 otherwise, the user gets nothing. With enabled messaging the root user will get on his tty:
Message from TalkDaemon@his_machine...

talk: connection requested by your_name@your_machine.

talk: respond with: talk your_name@your_machine
So on the root console to reply back to talk chat request:
noah:~$ talk hipo@localhost
Tags: aim, Auto, auto mode, building, configured, confnoah, daemon, deb, debian gnu, dependency, dependency tree, dgram, Disk, disk space, DoneBuilding, Draft, exec, Fetched, freebsd, gnu linux, inetd, information, Install, Installing, interactive user, localhost, login, mesg, network, noah, nobody, ntalk, ntalkd, operation, package, protocols, reading database, reading package, request, root, root user, sbin, sessions, Shell, shell login, state information, tree, tty, wait, work, writting
Posted in Curious Facts, Everyday Life, Linux, Various | No Comments »
Tuesday, October 4th, 2011 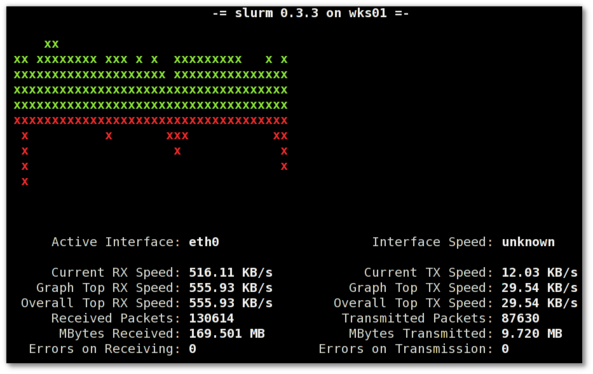
saidar is a text based ncurses program to display live statistics about general system health.
It displays in one refreshable screen (similar to top) statistics about server state of:
CPU, Load, Memory, Swap, Network, I/O disk operations
Besides that saidar supports a ncurses console colors, which makes it more funny to look at.
Saidar extracts the statistics for system state based on libgstrap cross platform statistics library about pc system health.
On Debian, Ubuntu, Fedora, CentOS Linuxes saider is available for install straight from distribution repositories.
On Debian and Ubuntu saidar is installed with cmd:
debian:~# apt-get install saidar

...
On CentOS and Fedora saidar is bundled as a part of statgrab-tools rpm package.
Installing it on 64 bit CentOS with yum is with command:
[root@centos ~]# yum install statgrab-tools.x86_64
Saidar is also available on FreeBSD as a part of the /usr/ports/devel/libgstrab, hence to use on my FreeBSD I had to install the libgstrab port:
freebsd# cd /usr/ports/devel/libstatgrab

freebsd# make install clean
Here is saidar running on my Desktop Debian on Thinkpad in color output:
debian:~# saidar -c
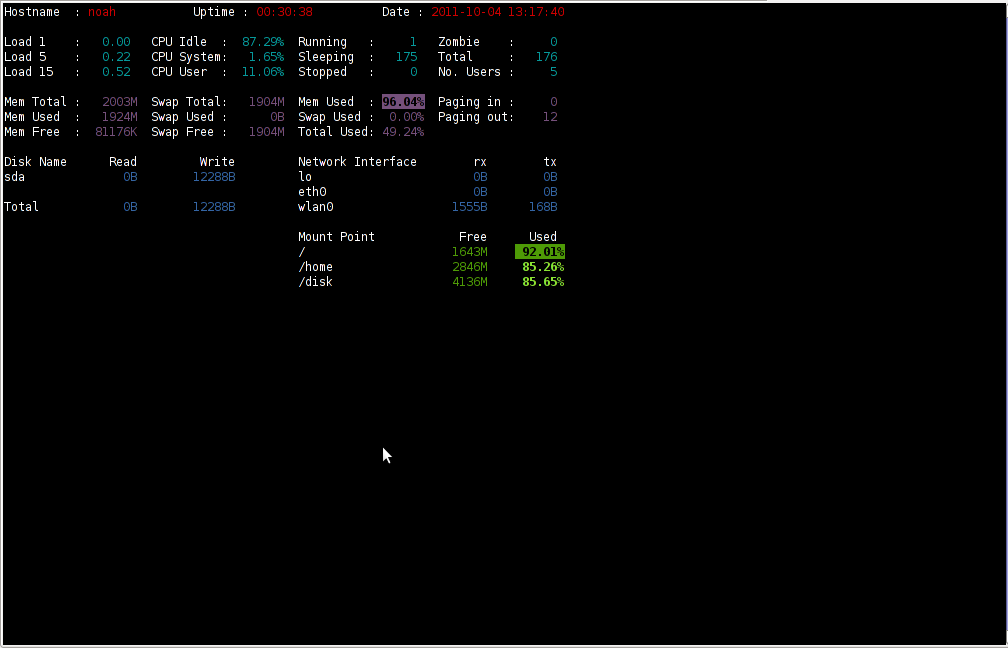
I've seen many people, who use various shell scripts to output system monitoring information, this scripts however are often written to just run without efficiency in mind and they put some let's say 1% extra load on the system CPU. This is not the case with saidar which is written in C and hence the program is optimized well for what it does.
Update: Next to saidar I recommend you check out Slurm (Real Time Network Interface Monitor) it can visualizes network interface traffic using ascii graph such as on top of the article. On Debian and Ubuntu Slurm is available and easily installable via simple:
apt-get install –yes slurm
Tags: CentOS, cleanHere, cpu load, cross platform, Desktop, desktop system, Disk, disk operations, distribution, extracts, fedora, freebsd, health, information, libgstrab, libgstrap, Linux, Load, load memory, memory, Monitor General Server Desktop, package, platform, ports, repositories, root, rpm, saidar, saider, screen, server desktop, server state, Shell, shell scripts, Slurm Real Time Network Interface Monitor, statistics library, system cpu, system health, text, thinkpad, Ubuntu, use, yum
Posted in FreeBSD, Linux, Monitoring, Networking, System Administration | 1 Comment »
Friday, March 18th, 2011 
By default most Apache running Linux servers on the Internet are configured to use with the mpm prefork apache module
Historically prefork apache module is the predecessor of the worker module therefore it's believed to be a way more tested and reliable, if you need a critical reliable webserver configuration.
However from my experience by so far with the Apache MPM Worker I can boldly say that many of the rumors concerning the unreliabity of apache2-mpm-worker are just myths.
The old way Apache handles connections e.g. the mod prefork is the well known way that high amount of the daemons on Linux and BSD are still realying on.
When prefork is a used by Apache, every new TCP/IP connection arriving at your Linux server on the Apache configured port let's say on port 80 is being served by Apache in a way that the Apache process (mother process) parent does fork a new Apache parent copy in order to serve the new request.
Thus by using the prefork Apache needs to fork new process (if it doesn't have already an empty forked one waiting for connections) and serve the HTTP request of the new client, after the request of the client is completed the newly forked Apache usually dies (even though it again depends on the way the Apache server is configured via the Apache configuration – apache2.conf / httpd.conf etc.).
Now you can imagine how slow and memory consuming it is that all the time the parent Apache process spawns new processes, kills old ones etc. in order to fulfill the client requests.
Now just to compare the Apace mpm prefork does not use the old forking way, but relies on a few Apache processes which handles all the requests without constantly being destroyed and recreated like with the prefork module.
This saves operations and system resources, threaded programming has already been proven to be more efficient way to handle tasks and is heavily adopted in GUI programming for instance in Microsoft Windows, Mac OS X, Linux Gnome, KDE etc.
There is plenty of information and statistical data which compares Apache running with prefork and respectively worker modules online.
As the goal of this article is not to went in depths with this kind of information I would not say more on it but let you explore online a bit more about them in case if you're interested.
The purpose of this article is to explain in short how to substitute the Apache2-MPM-Prefork and how your server performance could benefit out of the use of Apache2-MPM-Worker.
On Debian the default Apache process serving module in Apache 1.3x,Apache 2.0x and 2.2x is prefork thus the installation of apache2-mpm-worker is not "a standard way" to install Apache
Deciding to swith from the default Debian apache-mpm-prefork to apache-mpm-worker is quite a serious and responsible decision and in some cases might cause troubles, if you have decided to follow my article be sure to consider all the possible negative consequences of switching to the apache worker !
Now after having said a bunch of info which might be not necessary with the experienced system admin I'll continue on with the steps to install the apache2-mpm-worker.
1. Install the apache2-mpm-worker
debian:~# apt-get install apache2-mpm-worker php5-cgi

Reading state information... Done

The following packages were automatically installed and are no longer required:

The following packages will be REMOVED apache2-mpm-prefork libapache2-mod-php5

The following NEW packages will be installed apache2-mpm-worker

0 upgraded, 1 newly installed, 2 to remove and 46 not upgraded.

Need to get 0B/259kB of archives.After this operation, 6193kB disk space will be freed.
As you can notice in below's text confirmation which will appear you will have to remove the apache2-mpm-prefork and the apache2-mpm-worker modules before you can proceed to install the apache2-mpm-prefork.
You might ask yourself if I remove my installed libphp how would I be able to use my Apache with my PHP based websites? And why does the apt package manager requires the libapache2-mod-php5 to get removed.
The explanation is simple apache2-mpm-worker is not thread safe, in other words scripts which does use the php fork(); function would not work correctly with the Apache worker module and will probably be leading to PHP and Apache crashes.
Therefore in order to install the apache mod worker it's necessary that no libapache2-mod-php5 is existent on the system.
In order to have a PHP installed on the server again you will have to use the php5-cgi deb package, this is the reason in the above apt-get command I'm also requesting apt to install the php5-cgi package next to apache2-mpm-worker.
2. Enable the cgi and cgid apache modules
debian:~# a2enmod cgi

debian:~# a2enmod cgid
3. Activate the mod_actions apache modules
debian:~# cd /etc/apache2/mods-enabled

debian:~# ln -sf ../mods-available/actions.load

debian:~# ln -sf ../mods-available/actions.conf
4. Add configuration options in order to enable mod worker to use the newly installed php5-cgi
Edit /etc/apache2/mods-available/actions.conf vim, mcedit or nano (e.g. your editor of choice and add inside:
<IfModule mod_actions.c>
Action application/x-httpd-php /cgi-bin/php5
</IfModule>
After completing all the above instructions, you might also need to edit your /etc/apache2/apache2.conf to tune up, how your Apache mpm worker will serve client requests.
Configuring the <IfModule mpm_worker_module> in apache2.conf is necessary to optimize your newly installed mpm_worker module for performance.
5. Configure the mod_worker_module in apache2.conf One example configuration for the mod worker is:
<IfModule mpm_worker_module>

StartServers 2

MaxClients 150

MinSpareThreads 25

MaxSpareThreads 75

ThreadsPerChild 25

MaxRequestsPerChild 0

</IfModule>
Consider the fact that this configuration is just a sample and it's in no means configured for serving Apache requests for high load Apache servers and you need to further play with the values to have a good results on your server.
6. Check that all is fine with your Apache configurations and no syntax errors are encountered
debian:~# /usr/sbin/apache2ctl -t

Syntax OK
If you get something different from Syntax OK track the error and fix it before you're ready to restart the Apache server.
7. Now restart the Apache server
debian:~# /etc/init.d/apache2 restart
All should run fine and hopefully your PHP scripts should be interpreted just fine through the php5-cgi instead of the libapache2-mod-php5.
Using the /usr/bin/php5-cgi will increase with some percentage your server CPU load but on other hand will drasticly decrease the Webserver memory consumption.
That's quite logical because the libapache2-mod-hp5 is loaded once during apache server whether a new instance of /usr/bin/php5-cgi is invoked during each of Apache requests via the mod worker.
There is one serious security flow coming with php5-cgi, DoS against a server processing scripts through php5-cgi is much easier to be achieved.
An example for a denial attack which could affect a website running with mod worker and php5-cgi, could be simulated from a simple user with a web browser which holds up the f5 or ctrl + r browser page refresh buttons.
In that case whenever php5-cgi is used the CPU load would rise drastic, one possible solution to this denial of service issues is by installing and using libapache2-mod-evasive like so:
8. Install libapache2-mod-evasive
debian:~# apt-get install libapache2-mod-evasive
The Apache mod evasive module is a nice apache module to minimize HTTP DoS and brute force attacks.
Now with mod worker through the php5-cgi, your apache should start serving requests more efficiently than before.
For some performance reasons some might even want to try out the fastcgi with the worker to boost the Apache performance but as I have never tried that I can't say how reliable a a mod worker with a fastcgi would be.
N.B. ! If you have some specific php configurations within /etc/php5/apache2/php.ini you will have to set them also in /etc/php5/cgi/php.ini before you proceed with the above instructions to install Apache otherwise your PHP scripts might not work as expected.
Mod worker is also capable to work with the standard mod php5 Apache module, but if you decide to go this route you will have to recompile your PHP lib manually from source as in Debian this option is not possible with the default php library.
This installation worked fine on Debian Lenny but suppose the same installation should work fine on Debian Squeeze as well as Debian testing/unstable.
Feedback on the afore-described mod worker installation is very welcome!
Tags: Activate, amount, apache configuration, apache mod worker speed up, apache module, apache performance, apache processes, apache server, apache2, boost apache performance, BSD, cause, cgi, cgid, client, client requests, configured, configured port, connection, consuming, consumption, copy, daemons, fine, Gnome, historically, HTTP, httpd, information, installation, instance, libapache, linux server, linux servers, memory consumption, mpm, myths, new processes, package, php, php5, predecessor, request, server memory, speed up apache, speed up apache debian, Speeding up Apache through apache2-mpm-worker and php5-cgi on Debian / How to improve Apache performance and decrease server memory consumption, system resources, tcp ip connection, time, unreliabity
Posted in Linux, System Administration, Various, Web and CMS | 12 Comments »
Wednesday, April 24th, 2013

I had to travel from Sofia to Minsk to be a guest to my beloved girlfriend Svetlana, thus I needed as cheap ticket as possible to reach there. Sofia Minsk is not very common destination especially in Winter, Spring and Summer, because Summer Tourist season is not still opened. I checked for all possibilities to reach the capital of Belarus. Since Bulgaria is in European Union and Belarus is in alliance with Russia and Ukraine. Bulgarian and rest of EU citizens need to issue VISA for Belarus, just like Belarusian citizens needs to have VISA for their summer holidays in Bulgaria.
In order to reach Belarus, I first needed Приглашение / Priglashenie (Invitation) from Belarusian citizen. My beloved girlfriend Svetlana issued one for me and sent it via Belarusian Post Services. In order for VISA to come over post it took about 12 working days. Once I had the Invitation in my hands I had to go to Belarusian Embassy, bring invitation, fill up some documents and pay VISA taxes which as of time of writing this post costs 60 EUR for issuing one person private VISA.
Application of Priglashenie I received over post looks like in picture below:
 To have the VISA issued I had to bring my "Red" International (Foreign) Passport to Belarusian Embassy together with Recent Photos of mine. In Russian Embassy in Bulgaria photo is made and paid directly in Embassy with Belarusian Embassy this is not so, so I had to manually take new photo and bring those photo to embassy, I learned that first time I was in Embassy.
Photos had to be in special format (size) a bit different from the standard for accepted for most International VISA photos – at least this is what I was told in Studio where I went to make Photos. A note to make here is Belarus has only one embassy in Bulgaria located in Sofia and as far as I researched though Russia and Belarus are in union it is not possible to issue Belarusian VISA in Russian Embassy in city of Varna or Plovdiv.
Once photos were ready I bring them together with my Passport and had to leave them in Embassy. My visa was issued to be maximum of 90 days but unfortunately I could make it only for 45 days, because my International Passport is expiring in August and there is a rule that you cannot have the VISA issued for date longer than 3 months until Foreign Passport Expires. You can find website of Belarusian Embassy in Bulgaria here. Application form to print and fill in and hand in Belarusian Embassy for request of VISA is here.
Contact information of Belarusian Embassy in Bulgaria is:
Postal Address of the Embassy:
1505, Sofia, area «Reduta», «Nikola Karadjov» str. Building 3
Phone: (+359 2) 971 95 28, 971 71 31
Phone/Fax: (+359 2) 973 31 00
e-mail: bulgaria@mfa.gov.by
To issue me VISA I had to leave my Foreign Passport in Embassy and took it back after about 1 week and half (10 days or so). Issued VISA is not on a separate Application like VISAs for Dubai for Example but is directly sticked inside Passport;
 I had my VISA issued for 45 days starting from 1 of April (as filled in app. form), ending in 15 of May.
Once having the VISA, the next question come what will be best way to travel from Bulgaria to Belarus. I did quite a research on this topic until decide with what to travel. There are 3 variants (bus, train or airplane). Distance between Belarus capital Minsk and my hometown Dobrich is only 1508 KM. Sofia is a bit far so distance Between two capitals is 1870 KM.
I call to check for bus price as I saw on the Internet some offers to travel with bus and though it seemed to be most cheap about 250 euro (two way ticket) after calling the agency contact found on the net, they told me this bus line is closed (probably working only in Summer because of the bigger number of Belarusian tourists travelling to BG). Option with train was also impossible for the reason Train line
Black Sea Coast -> Minsk operates only in Summer for months . (June – August).
Hence the only way to ravel left was by plain. I checked on Plain tickets and some recommendations on cheap ways to travel to from European Union to Belarus.
My first idea was to fly from Sofia to Lithuania Capital Vilnius and from there to take bus to Minsk as bus goes to Minsk for 3 hours or so. I checked low cost flights from Wizzair as I always try to fly with them for their cheap prices but unfortunately they don't have destination Sofia -> Vilnius. I checked other companies for same destination and found only tickets from LuftHansa, the ticket however was too expensive and I had to change two airplanes something I very much wanted to avoid, cause I hate so much the airport Laggage checks / Scanning moment. Two way ticket to Vilnius costed about 400 EUR with taxes and included a flight trhrough Vienna airport or through Germany and included few hours waiting on airports which doesn't sound well at all. I checked then the variant to fly to Kiev but again it was very expensive plus Ukraine is not in EU and thus I didn't wanted to risk. Though officially as I've red Bulgarians are permitted to travel and stay in Ukraine without VISA for 90 days period I didn't wanted to try my luck. Other option was to fly from Sofia to Minsk using 1 airplane change in Vienna or Moscow. I contacted airport in Moscow to ask whether I can fly Sofia -> Moscow -> Minsk with my Belarusian Visa but unfortunately to fly through Moscow Scheremetyevo I need a transit VISA which costs some money and moreover Scheremetyevo is enormous airport and I guessed it will be hard for me to orientate there and will bring me too much stress. Third variant which I liked best was to Fly from Sofia -> Warsaw and from there travel by bus to Bus Station Dworec Zahodnyi (West Warsaw Bus Station) and travel with Bus international line Warsaw -> Minsk. I decided to stop on this option and reserved fly ticket Sofia -> Warsaw. Flight date was 20th of Apr 14:40, ticket reserved with Polish Airlines (LOT).
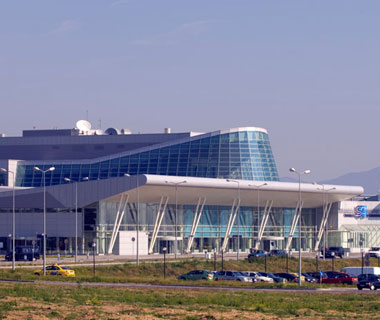
Departure was from Sofia Terminal 2 – in Sofia we have two terminals (The Old one Terminal 1 and new one Terminal 2). All times I flight so far from Sofia airport was from Terminal 1 so this time it was my first time from the bigger and much newer and modern Terminal 2.
My dear friend Mitko (Nomen), leave me by his car to airport and then I checked-in.

I could bring up to 20 KG with me, ticket costed 326 EUR because I reserved it a bit late (8 days before flight), moreover Sofia -> Warsaw is not very common flight destination from Bulgaria, as not much of Bulgarian citizens live in Poland.

The ticket included also a meal and cold-drinks so this also added a bit to high ticket price. Flight was on a very little airplane and though scheduled for 14:40, flight was late and we were in plain about 14:50 and airplane take off around 15:00. By the way the airplane was the smallest one I ever traveled with so far with, very very small one. I think the pilot was quite professional or the reason was the small plane size but anyways the landing was amazingly smooth. In Warsaw the airport is maybe a bit bigger than Terminal 2 but in general it was easy to orientate take luggage and go out very quickly. The luggage come quite quickly I had to wait for it only few minutes. Then I went directly to bus station and rided on BUS number 175 (there is second possibility to take bus 188) both go to Dworec Centralni Avtogara (Central Bus Station). According to prior instructions I red on the internet it was said to go to bus station Pomnik Lotnika. I tried with this but unfortunately the information to go down on Pomnik Lotnika and took bus 523 is obsolete now. And in order to reach Dw. Zahodny you need to go directly to Dw. Centralni with bus nr. 188 or 175 and then go through a subway on left side and wait on bus station for bus nr. 123 or 125 (not sure the exact nr.). Then Dw. Zahodnyi is only 6 / 7 stops away, I asked some people in English and thanksfully some Polish speak English or at least I can partially understand what they say because their language is close to Russian and Bulgarian. BTW it is very interesting for me as I can understand plenty of what is written on small shops in bus etc. On Dworec Zahodniy Avtogara stop after going down from bus I had to take left direction and in 2 minutes walk it is the West bus Station. There I asked on information if they can give me information whether there is bus Warsaw -> Minsk. The man in kiosk was not speaking English but fortunately he speaks Russian, so I was able to understand I should go out of bus station and stay on the left Pilon waiting for Bus Warsaw -> Minsk. Bus came in 18:30 just like written on the Internet the Bus company was called "Ð’Ð¸Ð·Ð¸Ñ‚Ð¢ÑƒÑ€Ñ / VisitTurs". I had 1 hr and half to wait for it cause was little earlier on Bus Station. The Platform Nr. Bus stopped is Platform 10.
Just for info for otheres who like to catch such bus on the Internet I read there are bus-es traveling to Minsk every Wednesday, Friday, Saturday and Sunday in times varying from 18:30 / 19:00 / and 21:00. While waiting for the bus I meet two ppl from Kazakhstan waiting for another bus for Vilnius and had a good chat with them about situation in Kazakhstan and Bulgaria. I took also a quick meal – from bus station on price even cheaper than Bulgaria (about 2.5 leva – 1.25 euro). In bus all was fine, they took my luggage I placed myself and waited to issue me ticket. I didn't have Zloty (The Polish currency) in me and only euro and at first the bus driver was not happy with that but then he agreed I pay in euro so all went fine. The bus had 2 or 3 quick 15 minutes Rests. Overall travel with Bus from Warsaw Minsk took about 10 hrs, because of some delay and while checking documents on Belarusian Border. As it is normal with crossing Borders by Bus they checked our documents twice once on Polish Border and then on Belarusian one. After crossing Belarusian Border, right after entering the Border Control Police man give me a tiny application form to fill in with information about my stay in Belarus. As well as I had to go to one small kiosk to create Insurance for me (Insurance for month costs 12 EURO). Making the policy took only few minutes, then we had to go down from Bus with our laggage and we waited on a queue with rest of Belarusians to check our documents. This took about 40-50 minutes. Thanksfully all went normal we were back in bus around 3:00 and arrived in Minsk about 07:00. I didn't have Belarusian Rubles (RBL) so I had to change to take a taxi. I asked one person with my bad Belarusian, where from there is a Change Bureau and on my way to it met another Belarusian who was calling for people looking for transportation to some street in Minsk. I spoke a bit with me and offered to change my EURO, changed me 20 euro for 200 000 B. RBL. He was kind enough to call for me a Taxi. He said I should wait for his friend who will bring me to the address I was looking for. I went to a car which was not officially a taxi but just a guy who will bring me to the destionation. In 25 minutes time was to address ul. Kalinovskogo, Dom (block) 93, apr. 43. Here in Belarus all was new for me. My first impressions were Traffic Lights which were unusually thin if compared to ones we have in Bulgaria and rest of EU.

On my way to address I was impressed by a big magnificient Orthodox Church in construction.

I was also striked that everywhere all advertisements and everything was in cyrillic. Some in Russian and some in Belarusian Language. Something noticable was also the street was very clean, the construction of most of Buildings were in style of communist countries with (Panel Blocks) just like it used to be in BG when we had communism.

Тhough newer constructions looked very modern and very much imitated constructions from Western Europe.

Something else noticable is here they continued building using (Block Panels) many buildings as I can see some buildings still in construction. It was clear that the city has good infrastructure (transportation system), much better than one I expected as well the country has a functional economy. Bus-es seem like very much a copy of Bus-es in Holland, actually a lot of the things I saw in Minsk seem like copying Holland and Germany.

On my way I saw plenty of University buildings, clear sign that education in Belarus meaning education here is on good high level. The most impressing building I saw so far is the building of Minsk National Library.

Unquestionably this is amazing construction, I had the opportunity on my first day when in Belarus go there and see the old books stored. Amazingly there are books ancient books starting from 10th century onwards. Most of the books were Church books, Ancient Gospels, Faith Codexes plenty of artifacts. There were of coursesome books remains from communism. Something noticable in Minsk is the amount of policy probably in number of times more than in countries in European Union. Since I'm few days already in Belarus I had the chance to see Minsk's Metro which is probably one of city's attractions. In general the Metro was quite cool, there are plenty of communist slogans and statues remains but it looks normal and almost modern.
The feeling in Metro Station is very industrial, as even from going inside the Metro Subway there is a thin smell of machine oil 🙂

The metro is accessed by using electronic access card similar to old bank (tape cards). Using Metro and bus inside Minsk is very easy. The city is a strange combination of modern culture with communist spirit remains. Though the city is enormous (2 000 000 million population), all seems very relaxed compared to Bulgaria for instance. As far as I interacted with people, I can say people are kind and helpful and very hospitable. A lot of people in Minsk as far as I can see are religious and civilized. Though I've heard people talk about information eclipse in Belarus, I've seen plenty of people who dress very modern like in western countries. I've seen plenty using E-books, Pads and various tech gadgets so it seems technological development of Belarus is on a normal European level. In general what I see here seems much better than what I expected priorly. There is plenty of more things to write which I will probably do in coming days. So far I hope this little article will help someone who needs basic information on traveling from Sofia to Minsk.
It is curious that Bulgarian and Belarusian people have common root as Pre-historic Bulgarians used to be one nation with Pre-Historic Belarusian. Similarity is visible even to now as there are plenty of common words matching or very similar between Bulgarian and Belarusian. More over later from 9th to 12th century Bulgariaused to be Empire and spread near to territory of Belarus. Similarity between Bulgarians and Belarusians is also visible even in country flag colors and country names Bul-garia (ar) / Bel-arus (ar). Even on a country flag level we share the same colors (white / green / red) in different order.

Bulgaria National Flag

Belarus National flag
As a conclusion I should say Belarus and Minsk looks like a lovely normal modern country no matter the bad rumors we hear on the news that they're communist or ruled by a (Dictator) President Lukashenko. Oh one last thing, if you're in Belarus try to avoid to speak bad things or jokes for Lukashenko. As far as I heard there is plenty of tab devices virtually everywhere. Speaking against Lukashenko or the government might lead you to problems with Militia (Police) or even send you in Jail 🙂
Tags: Belarusian Embassy, beloved girlfriend, Bus Station Dworec Zahodnyi West Warsaw Bus Station, capital of belarus, cheap ticket, country flag, european union, holidays in bulgaria, information, international visa, Moscow Scheremetyevo, passport, plenty, plovdiv, private visa, russian embassy, sofia bulgaria, spring and summer, summer holidays, travel, VISA, warsaw, western europe
Posted in Business Management, Everyday Life, Various | 3 Comments »
Thursday, March 25th, 2010 I faced the task of generating official Validated SSL Certificates by in mydaily duties as a System Administrator at cadiaholding.com . Though generating self-signedSSL certificate is comparatively easy task. It was a pain in the ass setting Apache version 2.2.9-10+lenny6to correctly serve pages through https:// protocol over openssl version 0.9.8g-15+lenny6.I’ll try to go through the whole process of Generating the certificate in order to help some other Debianusers out there to face less setbacks in such a simple task as installing a Trusted SSL Certificate issued(bought) by RapidSSL. Even though this article will mostly deal with SSL certificate issued by RapidSSL,it should be not a problem to apply this methodogy with Verisign or some of the other Geotrust issuedSecure Socket Layer certificates.
In generating the Validated certficate I used enom which is a domain name,ssl certificates, email and hosting company whole-saler.
Fron emon’s website after logging in and using the web interface, there are two major things required to fill inin order to issue your Trusted SSL certificate.
1. Fill in in a form a CSR file, this is usually generated on the Linux server using the openssl.
To issue the CSR file required by Enom use the following commands:
a. First we generate an DES3 RSA encrypted key which we will use next to generate the opeensl CSR file required by ENOM.
debian:~# /usr/bin/openssl genrsa -des3 -out www.domain.com.key 2048

Enter pass phrase for www.domain.com.key:
You’ll be required to fill in a pass-phrase that will be later be required to fill in before Apache servers starts or restarts,so make sure you fill something you either remember or you keep the password stored in a file.
You have to change also the www.domain.com.key in accordance with your domain name.
Now as we already have a proper generated DES3 RSA key afterwards it’s necessery to generate the CSR file with the openssl command line frontend.
So here is how:
debian:~# /usr/bin/openssl req -new -key /home/hipo/www.domain.com.key -out /home/hipo/www.domain.com.csr
Again in the above example change all the paths and file names as you wish.
It’s necessery that the end user fill in a number of questions related to the Certificate Signing Request.
Herein I’ll list what kind of prompts will emerge after executing the above command:
Enter pass phrase for /home/hipo/www.domain.com.key:

You are about to be asked to enter information that will be incorporated

into your certificate request.

What you are about to enter is what is called a Distinguished Name or a DN.

There are quite a few fields but you can leave some blank

For some fields there will be a default value,

If you enter '.', the field will be left blank.

-----

Country Name (2 letter code) [AU]:

State or Province Name (full name) [Some-State]:

Locality Name (eg, city) []:

Organization Name (eg, company) [Internet Widgits Pty Ltd]:

Organizational Unit Name (eg, section) []:

Common Name (eg, YOUR name) []:

Email Address []:

Please enter the following 'extra' attributes

to be sent with your certificate request

A challenge password []:

An optional company name []:
Note that you’ll hav eto fill in the pass phrase previously entered during the generation of the www.domain.com.key file.
In case if you’d like to read more thoroughly on the subject of howto create a Certificate Signing Request or (CSR) as we called it on multiple times, you can read About Certificate Signing Request (CSR) Generation Instructions – Apache SSL more in depth here
2. Hopefully following the above instructions you’ll now have a file named www.domain.csrJust open the www.domain.scr and copy paste it’s content to the ENOM website CSR * webform.
3. Further on select your Webserver type on Enom’s website:In our case we have to select Apache + ApacheSSL
4. What follows next is filling in your company contact information This is also required for proper certificate generation, you have to think twice before you fill in this data, take a note this can’t be changed later on without issuing a brand SSL new certificate.
Apart from the 3 major above requirements to fill in Enom there are some few more radio buttons to use to make some selections according to your personal preferences, however I won’t take time to dig in that and I’ll leave this to you.
After all the above is fulfilled you’ll have to submit your certificate details and choose an email address to which you will receive in a minute a RapidSSL Certificate Request Confirmation
Following a link from the email, will show you some basic information about the certificate about to be generated. That’s your final chance to cancel the issued Trusted Certificated.
If you’re absolutely sure the information about to enter the certificate is correct then you’ll have to follow a link and approve the certificate.
You’ll be informed that you’ll receive your certificate either through Certifier website (e.g. Enom’s website) or via another email.
I thought it’s more probable I receive it via email but anyways I was wrong. More thank 4 hours has passed since the certificate was issued and is available via Enom’s interface but I haven’t received nothing on my mail.
Therefore my friendly advice is to check about your brand new shiny Trusted Certificate on Emom’s website. I had mine ready in about 10 minutes after the CSR was issued.
Assuming that you’ve succesfully obtained the SSL Trusted certificate from RapidSSL what follows is setting up the certificate.
Initially I tried using documentation from RapidSSL website called Installing your SSL Certificate / Web Server Certificate / Secure Server Certificate from RapidSSL.com
I tried to configure one of my Virtualhost as shown in their example inserting in my /etc/apache/sites-available/www.domain.com file, few directives within the VirtualHost something like the shown below
SSLEngine on

# domain.com.crt cointains the Trusted SSL certificate generated and obtained by you from RapidSSL

SSLCertificateFile /etc/apache2/ssl/www.domain.com.crt

# www.domain.com.key contains the file used to generate the CSR file as described earlier in this post

SSLCertificateKeyFile /etc/apache2/ssl/www.domain.com.key
It is also possible insetad of using the SSLCertificateFile and SSLCertificateKeyFile directvies directives in Apache config to use:
Another alternative is to use
SSLCertificateFile /etc/ssl/certs/your-domain-name.crt
SSLCertificateKeyFile /etc/ssl/certs/your-domain-name.key
SSLCACertificateFile /etc/ssl/certs/gd_bundle.crt
The key file is the one generated earlier on the server and handed to the SSL regisrar, the files:
your-domain-name.crt and gd_bundle.crt files are provided by RapidSSL or from whatever SSL registrater the SSL was purchased.
After trying the above configuration and restarting apache with:
/etc/init.d/apache2 restart
Apache failed to start, it might be helpful to somebody out there the error I had in my apache error.log:
The error.log red the following:
[warn] RSA server certificate is a CA certificate (BasicConstraints: CA == TRUE !?)
After some 30 minutes or an hour of Googling on the error I came to the conclusion that the error is caused, becauseApache is supposed to work with .PEM files instead of the classical .CRT and .KEY files asnormally approached in most of the other Unix operating systems.
It took me a bit more of reading on the internet to find out that actually the .pem files so widely adopted in Debian simply contain both the www.domain.com.key file and the www.domain.com.crt key simply pasted one after another, this I also observed from the default Apache self-signed certificate that I believe comes with debian /etc/apache2/ssl/apache.pem .
So I copied both the content of my www.domain.com.key and www.domain.com.crt and store it in one file:
/etc/apache2/ssl/www.domain.com.pem
Also the following configuration:
SSLEngine on

SSLCertificateFile /etc/apache2/ssl/www.domain.com.pem
had to go in your
/etc/apache2/sites-enabled/www.domain.com
Last thing that’s left is to restart your Apache;
/etc/init.d/apache2 restart
Apache will prompt you for your certificate password entered by you during the www.domain.com.key generation. Type your password and with a bit of luck and hopefully with God’s help you’ll be having a Trusted Certificate on your webserver.
Last step is to check if the certificate is okay accessing your domain https://www.domain.com.
Well this is the end of the article, hope you enjoy.If you do please leave your comments, any corrections are also welcomed 🙂
Tags: administrator, apache servers, apache version, apache2, certficate, certificate, Certificates, com, company, contact, csr, DES, des3, domain, domain name, email, emon, enom, file, generation, geotrust, hipo, Hopefully, hosting company, howto, information, key, key file, lenny, linux server, methodogy, multiple times, necessery, official, openssl, pain in the ass, password, phrase, rapidssl, RSA, setbacks, socket layer, ssl certificate, system administrator, usr bin, verisign, web interface, whole saler, www
Posted in Computer Security, System Administration, Web and CMS | 30 Comments »


