Posts Tagged ‘manager’

How to find out which processes are causing a hard disk I/O overhead in GNU/Linux

Wednesday, September 28th, 2011

iotop monitor hard disk io bottlenecks linux
To find out which programs are causing the most read/write overhead on a Linux server one can use iotop

Here is the description of iotop – simple top-like I/O monitor, taken from its manpage.

iotop does precisely the same as the classic linux top but for hard disk IN/OUT operations.

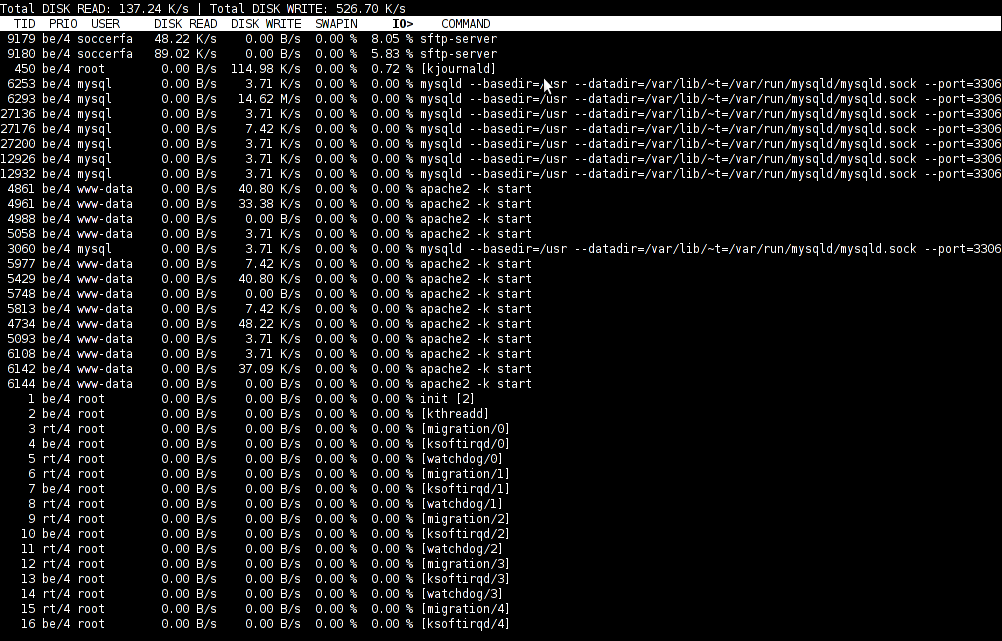
To check the overhead caused by some daemon on the system or some random processes launching iotop without any arguments is enough;

debian:~# iotop

The main overview of iostat statistics, are the:

Total DISK READ: xx.xx MB/s | Total DISK WRITE: xx.xx K/s
If launching iotop, shows a huge numbers and the server is facing performance drop downs, its a symptom for hdd i/o overheads.
iotop is available for Debian and Ubuntu as a standard package part of the distros repositories. On RHEL based Linuxes unfortunately, its not available as RPM.

While talking about keeping an eye on hard disk utilization and disk i/o’s as bottleneck and a possible pitfall to cause a server performance down, it’s worthy to mention about another really great tool, which I use on every single server I administrate. For all those unfamiliar I’m talking about dstat

dstat is a – versatile tool for generating system resource statistics as the description on top of the manual states. dstat is great for people who want to have iostat, vmstat and ifstat in one single program.
dstat is nowdays available on most Linux distributions ready to be installed from the respective distro package manager. I’ve used it and I can confirm tt is installable via a deb/rpm package on Fedora, CentOS, Debian and Ubuntu linuces.

Here is how the tool in action looks like:

dstat Linux hdd load stats screenshot

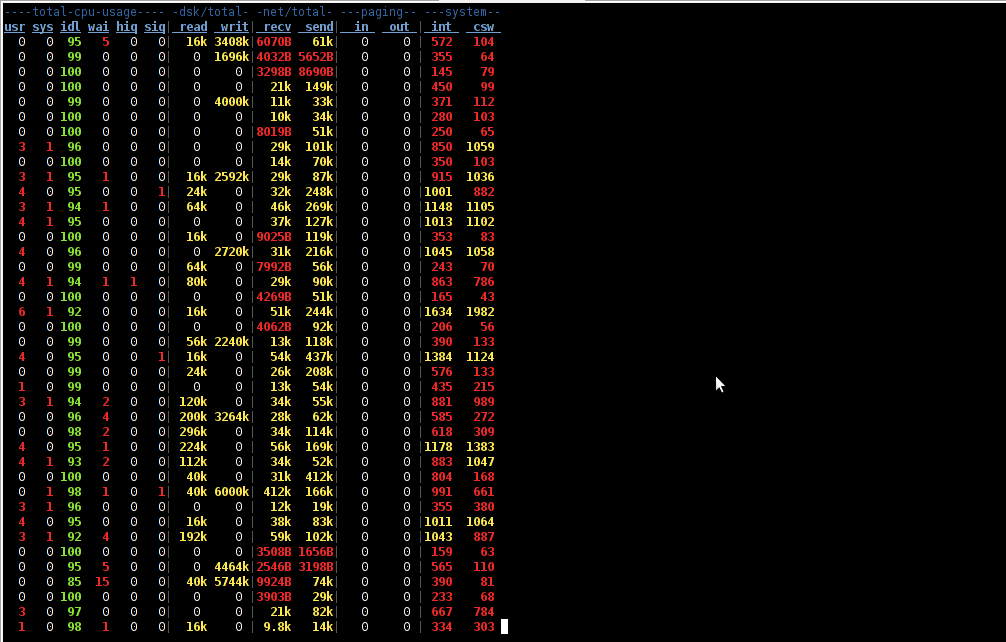
The most interesting things from all the dstat cmd output are read, writ and recv, send , they give a good general overview on hard drive performance and if tracked can reveal if the hdd disk/writes are a bottleneck to create server performance issues.
Another handy tool in tracking hdd i/o problems is iostat its a tool however more suitable for the hard core admins as the tool statistics output is not easily readable.

In case if you need to periodically grasp data about disks read/write operations you will definitely want to look at collectl i/o benchmarking tool .Unfortunately collect is not included as a packaget for most linux distributions except in Fedora. Besides its capabilities to report on servers disk usage, collect is also capable to show brief stats on cpu, network.

Collectl looks really promosing and even seems to be in active development the latest tool release is from May 2011. It even supports NVidia’s GPU monitoring 😉 In short what collectl does is very similar to sysstat which by the way also has some possibilities to track disk reads in time.  collectl’s website praises the tool, much and says that in most machines the extra load the tool would add to a system to generate reports on cpu, disk and disk io is < 0.1%.  I couldn’t find any data online on how much sysstat (sar) extra loads a system. It will be interesting if some of someone concluded some testing and can tell which of the two puts less load on a system.

How to install Skype on 64 bit Ubuntu (amd64) architecture

Sunday, July 17th, 2011

It seems Skype has troubles installing on 64 bit Ubuntu via Ubuntu’s Graphical Package Install manager which in Ubuntu 11.04 is called (Ubuntu Software Center)

During my attempt to take advantage of the nice GUI apt frontend, I encontered the error:
Wrong Architecture amd64

And Skype install failed, as you see in below’s picture (which you might be unable to read since it’s stating the error in Bulgarian 😉

error Ubuntu 11.04 Skype Install error in architecture amd64

The error is quite understandable, since the Skype deb package which tried to install was built for the i386 architecture.
Since the Software Center was not intelligent enough to work around the issue, I finally fixed it myself using the good old apt-get in terminal, like so:

root@ubuntu:~# apt-get install skype
...

apt did not even complain that the package had a different architecture for i386 and installed skype without any errors as well Skype worked immediately even though the arthictural difference.
This is probably because even though it’s a amd64 Ubuntu it has a kernel module loaded to support i386 binaries 😉
Now my sister can enjoy her skype on the shiny Ubuntu 😉

How to install Nvidia GeForce FX 5500 on Ubuntu 11.04

Tuesday, July 19th, 2011

Nvidia Tux GeForce GNU / Linux

Yesterday I was at a friend of mine who has recently installed Ubuntu 11.04 to his already oldish Desktop computer.

The system was 1.4Ghz (amd) with 512 RAM and some kind of Dell Trinitron 19 inch monitor
Even though he tried hard to make his NVIDIA GeForce FX 5500 ‘s drive to work properly with Ubuntu Natty Narwhal, he just has messed it even more.
As I always like helping people and I’m joyful for people who want to migrate to Linux, I took some time to make his NVIDIA GeForce work with this Ubuntu release.

First I tried to make it work by using some of the official NVIDIA Linux drivers located on nvidia.com following some online tutorial for Ubuntu claiming that it works but actually it didn’t, so finally after a bit of experimentation I found a way to make this video card work.
Here is how:

1. Install the following Ubuntu packages

root@ubuntu:~# apt-get install nouveau-firmware nvidia-173 nvidia-173-kernel-source
nvidia-cg-toolkit nvidia-common nvidia-current nvidia-glx-173 nvidia-settings
...

2. Load in the kernel and set to be auto loaded on boot nvidia’s driver kernel module nvidia-173

root@ubuntu:~# depmod -a;
root@ubutnu:~# modprobe nvidia-173
root@ubuntu:~# echo nvidia-173 >> /etc/modules

3. Stop temporary (Gnome dipsplay manager) gdm

root@ubuntu:~# service gdm stop
...

4. Use nvidia-xconfig to generate a working version of /etc/X11/xorg.conf for Nvidia

root@ubuntu:~# nvidia-xconfig
..

nvidia-xconfig will generate new /etc/X11/xorg.conf configuration corresponding to the Nvidia GeForce Fx 5500 and will move the old xorg.conf to xorg.conf.backup.

5. Start the gdm manager to be running again

root@ubuntu:~# service gdm start
...

Now the Xserver will start in a terrible mode of 640×480, probably because Ubuntu was unable to define correct VerticalSync and HorizontalSync for the 19 inch Dell Trinitron monitor or for some other weird reason, to fix this it’s quite easy though.
The fix to the NVIDIA GeForce 5500 running in 640×480 mode is done straigh via Gnome menus.

6. Use Gnome’s System -> Preferences -> Monitors to set raise up the Xserver resolution

Navigate to Gnome’s menus:

System -> Preferences -> Monitors

Gnome System Preferences Monitors Nvidia GeForce 5500 Ubuntu

Here you will have to select more appropriate resolution and a different refresh rate, which in my case was 1024×768 and further on to store the settings press the Apply button.

One oddity here was that according to the Monitor Preferences the refresh rate was running on 54 Hz which I don’t believe was the case as I guess it’s some kind of Gnome or Ubuntu bug. I changed the 54 Hz Refresh Rate to 50 Hz as using the 54 Hz refresh rate as the screen had a minor vibrations observable if one takes a thorough look on the screen.

Setting the NVIDIA GeForce 5500 driver to work with 50 Hz Refresh Rate in Gnome loooked like the Windows’s 85 Hz RR and looked quite nice so I left it this way.

Finally to test the newly installed driver 3D acceleration I used glxgears.

7. Install glxgears in order to be able to test that 3D acceleration on Nvidia works fine

root@ubuntu:~# apt-get install mesa-utils

After installing mesa-utils which nowdays contains glxgears executable one needs to execute the glxgears binary.

root@ubuntu:~# glxgears

Immediately after a window containing the glxgears should popup on the screen, like shown in below screenshot
Benchmark 3d Acceleration Linu glxgears

glxgears showed 3d acceleration works fine as the performance for 3d rendering shown was quite good and therefore 3D acceleration was running fine.

And that was it now the video works like and my friends, can enjoy the fun to have a generally virus Free OS 😉

How to fix wicd 1.7.0+ds1-5 Connection Failed: Bad Password on Ubuntu 10.10 (Maverick Merkaaat)

Tuesday, May 3rd, 2011

I’ve been struggling with fixing a nasty error with wicd network manager for about 2 hours.
The exact error message I faced was:

Connection Failed: Bad Password

The issue occured after some suggested updates from the Ubuntu graphical update tool.
The wireless network to which it was connected was a WPA-PSK (WPA2) Passphrase authentication.
The network key was properly typed in and was working well on another system so the error Connection Failed: Bad Password made no sense.

There was nothing unusual in /var/log/wicd/wicd.log , that made me even more curious about what might be causing the error.After a lot of try outs and a lot of readings and tests I finally got the cause of the weird Bad Password errors produced by wicd

Weirdly enought, somehow the Ubuntu package update tool has installed the default gnome network-manager package.
The installed network-manager package has mismatched somehow the way wicd connects to wireless networks and as a cause the wpa_supplicant binary was not properly invoked.

As a consequence of the network-manager being present on the system the wpa_supplicant process which made the exact connection to the wireless network was not launching in, the exact wpa_supplicant invocation missing was:

wpa_supplicant -B -i wlan0 -c /var/lib/wicd/configurations/0022b0aa424a -D wext

Luckily the solution to the notebook wireless device unable to connect to the Wireless network was simple.

All I had to do is completely remove all occurance of network-manager packages installed on the Ubuntu system, by issuing the commands:

ubuntu:~# apt-get remove --yes network-manager
ubuntu:~# dpkg --purge network-manager-pptp-gnome network-manager-pptp network-manager

The reason for issuing the a dpkg –purge command was my desire to completely get rid of all kind of network-manager related configurations.

Now after re-connecting with wicd wireless manager, it worked fine 😉

Upgrade Ubuntu from 9.04 to latest Ubuntu

Friday, April 1st, 2011

Updating a version of Ubuntu version 9.04 to the latest stable release is actually very simple and BORING.

It takes some long time and a lot of clicking, however eventually, the upgrade to the latest Ubuntu will be at hand.
The whole upgrade philosophy to Upgrade an outdated Ubuntu distribution to the newest supported stable Ubuntu release is in a consequentual number of release to release upgrades.

Let’s say you’re running Ubuntu 9.04 (Jaunty Jackalope and) you want to upgrade to Ubuntu 11.10 TLS
then you will have to to the following step by step upgrades;

Upgrade Ubuntu from;

  • Ubuntu 9.04 to Ubuntu 9.10
  • Ubuntu 9.10 to Ubuntu 10.04
  • Ubuntu 10.04 to Ubuntu 10.10
  • Ubuntu 10.10 to Ubuntu 11.04
  • Ubuntu 11.04 to Ubuntu 11.11

Now let’s start upgrading …
1. Upgrade Ubuntu 9.04 to Ubuntu 9.10

Press Alt+F2 and type:

update-manager -d

Update Manager Ubuntu

Press the Run Button afterwards to launch the command.
You will be prompted for your Linux administrator password, so type it in.

Next the command will launch the Update Manager . The update manager will show you all the available updates.

The Update Manager will show you the update options, it should say something like:

New distribution release ‘9.10’ is available

update manager ubuntu 9.10

Click Over the Update button and wait.

The Ubuntu update will went by by few steps:

1. Preparing Updates
2. Setting new software channels
3. Getting new packages
4. Installing the updates
5. Cleaning up
6. Restarting the computer

You will see further on a screen reading “Support for some applications ended”, on that screen simply press the Close button.

Further on you will be prompted with a windows reading:

Do you want to start the upgrade? You have to click over Start Upgrade button to finally begin with the upgrade process.
Getting new packages screen Ubuntu Update procedure

Now a prompt window will appearing asking you to reboot the system, when the prompt appears click over:

Restart Now

After the upgrade the new release of Ubuntu 9.10 will start booting up, and you will see a screen similar to the picture below:

Ubuntu 9.10 boot screen

Now as you have updated from Ubuntu 9.04 next step is to upgrade to Ubuntu 10.04

Now guess what you will have to upgrade the trivial quick update procedures once again.

Once again launch the Ubuntu Update Manager

System -> Administration -> Update Manager Now as you have updated from Ubuntu 9.04 next step is to upgrade to Ubuntu 10.04 (LTS – Lucid Lynx)

Now guess what you will have to upgrade the trivial quick update procedures once again.

Once again launch the Ubuntu Update Manager

System -> Administration -> Update Manager

Now follow the above described procedure with update-manager -d

After repeating the few trivial steps you will have Ubuntu 10.04 LTS on your Desktop

Further on complete the trivial update steps with the update-manager to update to Ubuntu release 10.10 (Maverick Meerkat).

After having succesfully upgraded to version 10.10, now repeat the boring update procedures described in the beginning of the article to update to Ubuntu 11.04

Now as you should be with Ubuntu 11.04, upgrade once again with update-manager to Ubuntu 11.04 (Natty Narwhal).

And ast a last, once again with the update-manager -d update following the instructions to Ubuntu 11.10.

I’m pretty sure this is one of my most boring articles ever …
It’s interesting fact that I learn once from a friend of mine about the Ubuntu distribution. The Ubuntu distribution has it’s versioning based on months and year whether a version is out for instance Ubuntu 9.04 means this Ubuntu release is released on (Month 04 (April), year 2009)), Ubuntu 11.10 Means this distribution is released in (year 2011, month 10 (October)).