Posts Tagged ‘syntax’
Friday, February 12th, 2016 
If you don't much care about logging in logs from which domain / hostnames requests to webserver originate and you want to boost up the Apache Webserver performance a bit especially on a heavy loaded Websites, where no need for stuff like Webalizer, Awstats etc. , e.g. you're using GoogleAnalytics to already track requests (beware as sometimes GoogleAnalytics could be missing requests to your webserver, so having some kind of LogAnalyzer software on server is always a plus). But anyways accepting that many of us already trust GoogleAnalytitcs.
Then a great tuning option to use in default domain configuration or in multiple VirtualHosts config is:
HostnameLookups off
If you want to make the HostnameLookups off as a default behaviour to all your virtualhosts on Debian / Ubuntu / CentOS / SuSE / RHEL distro virtualhosts add either to default config /etc/apache2/sites-enabled/000-default (on Deb based Linuxes) or (on RPM based ones), add directive to /etc/httpd/httpd.conf
For self-hosted websites (if run your own small hosting) or for a home situated webservers with up to 20-50 websites it is also a useful optimization tip to include in /etc/hosts file all the IPs of sites with respective domain names following the normal syntax of /etc/hosts, e.g. in my own /etc/hosts, I have stuff like:
pcfreak:~$ cat /etc/hosts
127.0.0.1 localhost localhost.localdomain
127.0.1.1 pcfreak.www.pc-freak.net pcfreak mail.www.pc-freak.net
192.168.0.14 new-pcfreak
219.22.88.70 fw
212.36.0.70 ftp.bg.debian.org
212.211.132.32 security.debian.org
83.228.93.76 pcfreak.biz www.pc-freak.net www.pc-freak.net
# for wordpress plugins
216.58.209.3 gstatic.com
91.225.248.129 www.linkedin.com
74.50.119.198 www.blogtopsites.com
94.31.29.40 static.addtoany.com
216.58.209.202 fonts.googleapis.com
216.58.209.14 www.google-analytics.com
216.58.209.14 feeds.feedburner.com
93.184.220.241 wprp.zemanta.com
199.30.80.32 stumbleupon.com
156.154.168.17 stumbleupon.com
2.18.89.251 platform.linkedin.com
# The following lines are desirable for IPv6 capable hosts
# … etc. put IPs and hostnames following above syntax
As you see from above commented section for wordpress plugins, I've included some common websites used by WordPress enabled plugins to prevent my own hosting server to query DNS server every time. The normal way the Linux / Unix works is it first checks in /etc/hosts and only if the hostname is not defined there then it queries the DNS caching server in my case this is a local DJBDNS cache server, however defining the hosts in /etc/hosts saves a lot of milisecons on every request and often if multiple hosts are defined could save (decrease site opening for end users) with seconds.
Well now use some website speed testing plugin like Yslow, Firebug Fiddler or HTTPWatch
Tags: default behaviour, end users, hosts file, net, org, performance increase, stuff, syntax, website speed, wordpress plugins
Posted in Curious Facts, Everyday Life, Linux, Networking, Performance Tuning, Remote System Administration, System Administration, Various, Web and CMS, Wordpress | No Comments »
Monday, May 12th, 2014 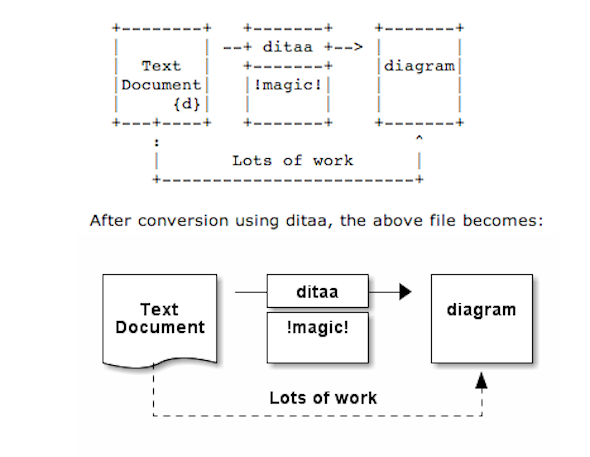
As part of my passion for ASCII art, I've found another interesting tool useful to ASCII art maniacs like me, the tool is called ditta and is able to convert manually drawn ASCII art diagrams to graphics, below is tool description from my debian apt-cache as well as a screenshot:
apt-cache show ditaa|grep -i ditaa -A 4
Package: ditaa
Priority: optional
Section: graphics
Installed-Size: 164
Maintainer: David Paleino <dapal@debian.org>
—
Filename: pool/main/d/ditaa/ditaa_0.9+ds1-2_all.deb
Size: 107270
MD5sum: 05ec52d9274b954b053f1835ca5d7a7f
SHA1: 792d91d05fff2a2a19c0ebce317351d138436c18
SHA256: c4319d32e7918aab782e2f38cdad745bc9023f9f09a999033d983095ee4f70d5
—
DiTAA is a small command-line utility that can convert diagrams drawn using
ASCII art ("drawings" that contain characters that resemble lines, like | /
and -), into proper bitmap graphics.
.
DiTAA also uses special markup syntax to increase the possibilities of shapes
and symbols that can be rendered.
Homepage: http://ditaa.org
To install ditaa on Debian and Ubuntu Linux:
debian:~# apt-get install --yes ditaa

...
Ditaa text diagram to Graphics converter is also available in Fedora Linux and in Source RPMs to be used on Redhat Based RPM distributions.
To install in most of RPM based Linuxes:
[root@fedora:~]# yum install -y ditaa
…
For most people probably Ditta will not be of any value except as a PoC and of a Hack value just like Ditaa's home page suggests. Nomatter that Ditta is cool but has just 2 drawback it doesn't understand non-latin characters i.e. Cyrillic and requires Java Virtual Machine .. but if you're a real geek you will do the sacrifice to install a whole bunch of the heavy java for the sake of some oldschool fun 🙂 Being written in Java makes Ditta multi-platform, but you will need a Java VM version of at least 1.6 (it doesn't work with Java 1.5).
The format Ditta understands is close to HTML
<ditaa [optional parameters]>

... (some ditaa-code) ...

</ditaa>
There are also special tags understood by Ditta which are automatically turned into shaped graphical buttons and forms.
Not all shape selector tags are documented on the ditaa site. A quick source scan revealed:
| tag | Description |
| {c} | decision(Choice) |
| {d} | document |
| {io} | input/output, parallelogram |
| {mo} | manual operation |
| {o} | ellipse, circle |
| {s} | storage |
| {tr} | trapezoid (looks like an inverted {mo} ) |
Here is an example Ditta code
<ditaa round noedgesep right>
+--------+   +-------+    +-------+
|        | --+ ditaa +--> |       |
|  Text  |   +-------+    |diagram|
|Document|   |!magic!|    |       |
|     {d}|   |  c478 |    |       |
+---+----+   +-------+    +-------+
:                         ^
|       Lots of work      :
+-------------------------+
</ditaa>
This Ditta code will generate following picture:
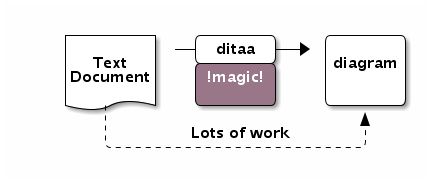
To learn more on ditta please check Ditaa's Project homepage on Sourceforge
Many thanks to Cybercity's 30 Cool Open Source Software of 2013 for inspiring this post.
Tags: Ascii, bitmap, bunch, close, command line utility, Cool Open Source Software, Debian, diagram, doesn, Graphics, input output, Java, java virtual machine, need, org, passion, picture, platform, possibilities, site, syntax, tool, utility
Posted in Curious Facts, Entertainment, Everyday Life, Various | 1 Comment »
Thursday, January 22nd, 2015 
I'm responsbile for a project environment made up of 3 components which is occasionally dying. Here is a short raw overview of environment
- Apache Reverse Proxy (entry door to app server)
- Tomcat Server with an Application enabling web access
- A Java Standalone application using SQLite database
The Tomcat and Java Standalone application is running on top of Windows 2008 RC2 Standard, the overall environment is becoming inacessible periodically and in order to solve that the customer decided to implement a daily Windows server reboot in my opinion this is very bad approach as it is much better to just set an auto reboot of each of components using few tiny batch scripts and Windows Taskmgr, however as the customer is king and decided to implement the reboot its their own thing.
However even fter the daily server reboot was set once a week or so the application was becoming inaccessible and a Tomcat server restart was necessery as a fix.
Finally as a work-around to the issue, I've proposed the logical thing to automatically restart Tomcat once a day early in morning, here is how Tomcat auto Restart was implemented on the Win server:
1. Check out the name of running Tomcat service
First thing is to use the sc command to find out the Tomcat application name:
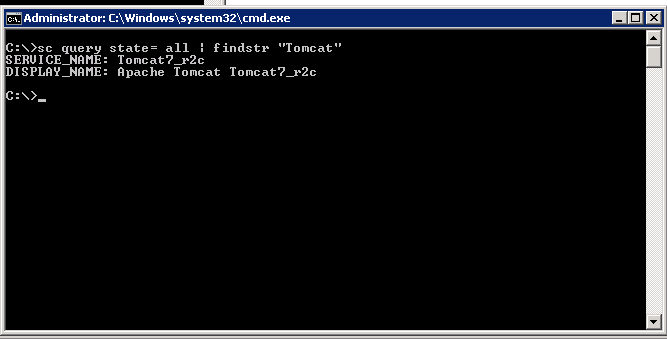
C:UsersGeorgi>sc query state= all| findstr "Tomcat"
SERVICE_NAME: Tomcat7_r2c
DISPLAY_NAME: Apache Tomcat Tomcat7_r2c
C:UsersGeorgi>
2. Create bat script to stop and start Tomcat service
Press keyboard Win-button + R, start notepad type inside:
@echo off
sc stop Tomcat7_r2c && sc start Tomcat7_r2c
(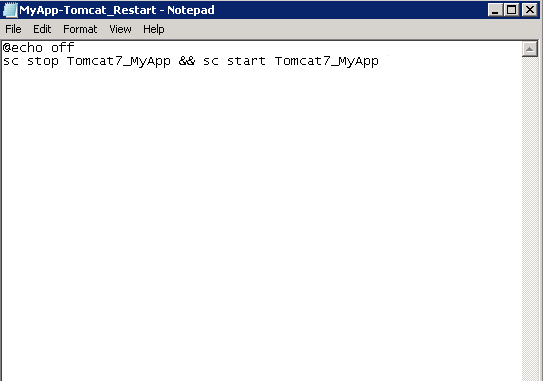
Don't be confused from screenshot that I have Tomcat7_MyApp instead of Tomcat7_r2c, but I made screenshot in hurry for another app.
Save the file, somewhere (preferrably) in application folder/bin/ it is best to save it once with bat extension MyApp-Tomcat_Restart.bat and once as MyApp-Tomcat_Restart.xml (XML format file is later needed for import to Task Scheduler which understands .XMLs). The .bat file is good to have because it is useful to somtimes restart Tomcat manually by running it (in case of some sudden Tomcat Appserver occurs even though the auto-restart script).
3. Create new Task using command line (cmd.exe)
Task can be created also from command line using following syntax:
schtasks /Create [/S [/U [/P [ ]]]]
/XML <xmlfile> /TN <taskname>
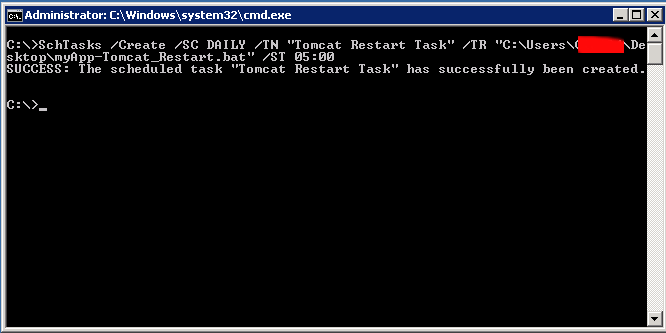
Simple way to create a new Windows task is shown in below command, it will set my Tomcat Restart script to run everyday in 05:00 early morning when no employees are using the system:
schTasks /Create /SC DAILY /TN "My Task" /TR "C:UsersGeorgiDesktopmyApp-Tomcat_Restart.bat" /ST 05:00
SUCCESS: The scheduled task "Tomcat Restart Task" has successfully been created.
4. Create / Import new Windows "Cron" job
Alternative way is to use Task Scheduler GUI frontend and create new (Basic Task) or import just created script
To run Windows Task Scheduler from comamnd line :
Taskschd.msc
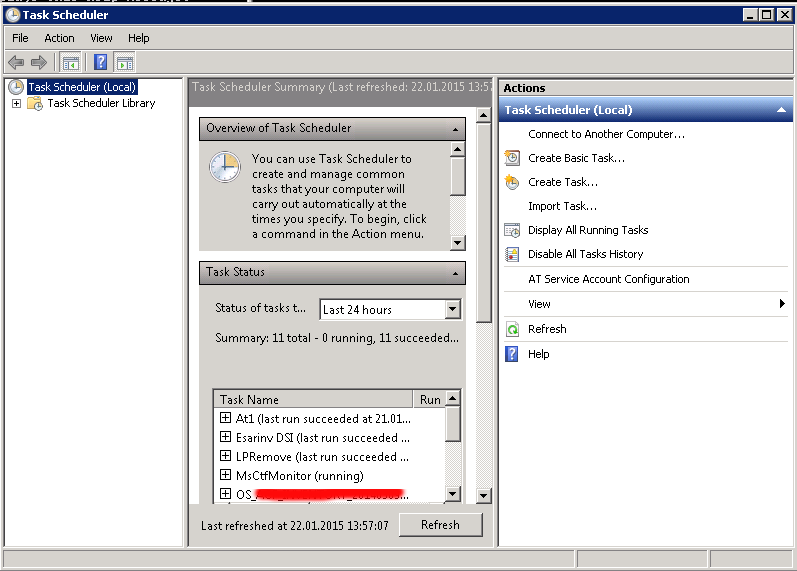
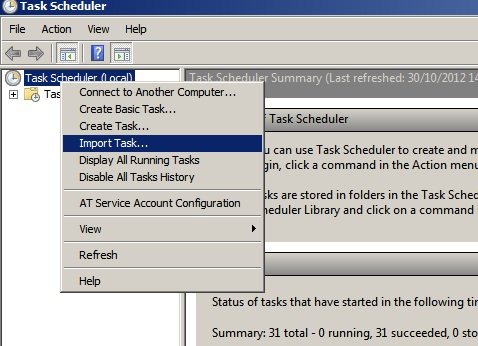
To import already existing .XML formatted file for Task scheduler, right click on the Task Scheduler (Local) and select Import task
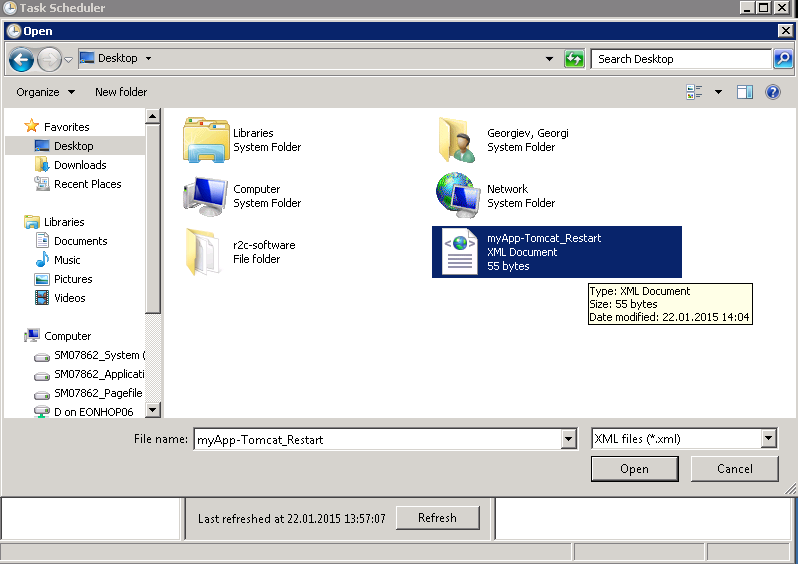
Import the myApp-Tomcat_Restart.XML previously created file
Adjust settings to suit your needs, but what change atleast:
- the path to the myApp-Tomcat_Restart.bat file in Actions tab
- the Local User account with which script will be running (administrator) in General tab
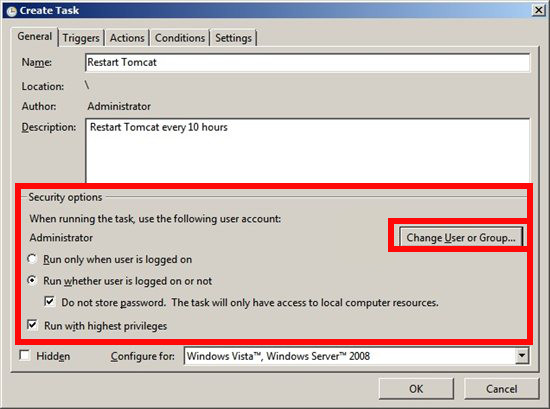
After making all changes you will be prompted for server Administrator account password
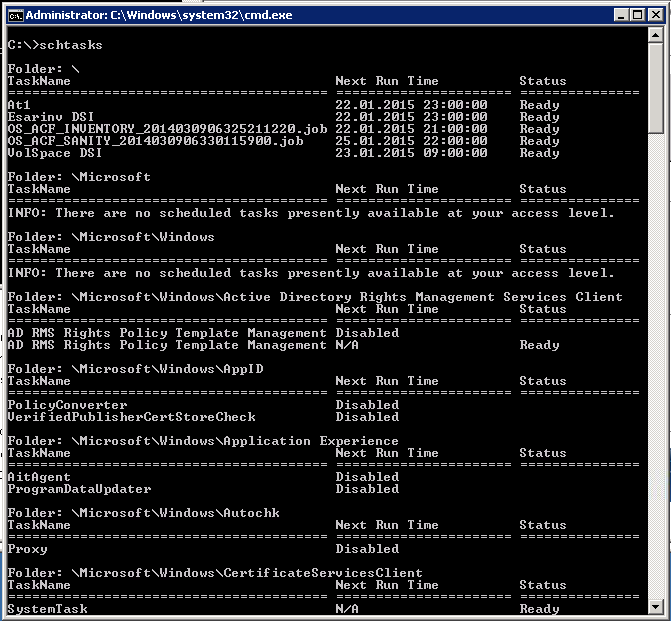
5. check existing Win Cron job from command line
To see the configured (Scheduled Tasks) in command line mode with a command:
Schtasks.exe
The command is Windows equivalent to UNIX / Linux's crontab, e.g.:
crontab -u root -l
6. Delete existing Windows Task Job from Command line
If you happen to need to delete just created task or any other task from command line (Assuming that you know the previously created task name), use cmd:
C:>schtasks /Delete /TN "Tomcat Restart Task"
WARNING: Are you sure you want to remove the task "Tomcat Restart Task" (Y/N)? y
SUCCESS: The scheduled task "Tomcat Restart Task" was successfully deleted.
Task completed, Tomcat will auto-restart on Windows host at your scheduled time. Feedback is mostly welcome 🙂
Enjoy
Tags: Apache Tomcat Tomcat7_r2c, auto reboot, command, community, Create Import, customer, Delete, door, environment, job, line, opinion, scripts, state, syntax, thing, Tomcat Restart Task, Windows Taskmgr
Posted in Everyday Life, System Administration, Various, Web and CMS, Windows | 2 Comments »
Tuesday, February 4th, 2014 
For my daily system administration job I have to login to many SuSE Linux servers and do various configugration edits.
The systems are configured in different ways and the only text editors available across all servers I can use are VI and VIM (VI Improved).
As I usually had to edit configuration files and scripts and I'm on SSH color terminal its rather annoying that on some of the servers opening a file with VIM is not displayed with SYNTAX HIGHLIGHTING. Not having syntax highlighting is ugly and makes editting ugly and unreadable.
Thus it is useful to enable VI syntax highlighting straight into the file being editted. I suspect many novice sysadmins might not know how to turn syntax highlighting in vi so here is how.
Turn Syntax Highlighting in VIM
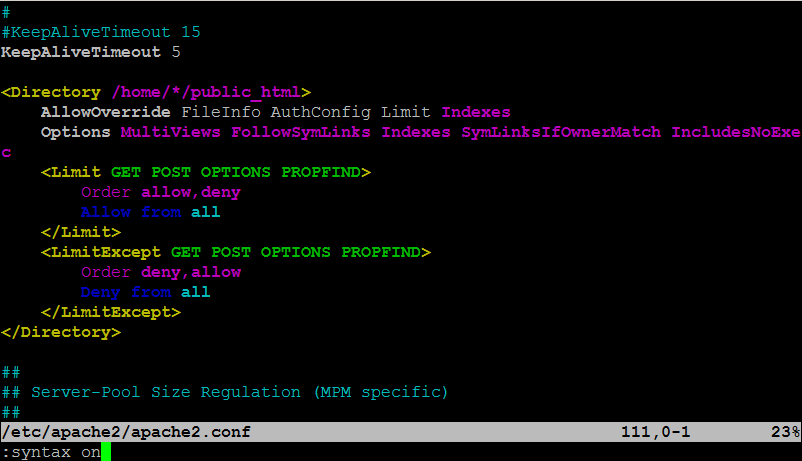
1. Open file with vim lets say Apache configuration
# vim /etc/apache2/apache2.conf
2. Press (Esc) Escape and ":" from kbd and then type in syntax on
:syntax on
To Turn On / Off VI Syntax Highlighting permanent add ":syntax on"
into ~/.vimrc
~/.vimrc file is red automatically on VIM start, so right after :syntax on is appended in it on relaunch vim will start showing colorfully.
Enjoy ! 🙂
Tags: code, conf, configuration files, configured, editor, editting, file, howto, indent, Press Esc Escape, servers, syntax, sysadmins, system administration, text editors, turn, Turn Syntax Highlighting, vim, www
Posted in Everyday Life, System Administration, Various | 1 Comment »
Saturday, March 23rd, 2013 As a system administrator, sometimes is necessary to do basic plain text processing for various sysadmin tasks. One very common task I do to remove empty lines in file. There are plenty of ways to do it i.e. – with grep, sed, awk, bash, perl etc.
1. Deleting empty file lines with sed
The most standard way to do it is with sed, as sed was written to do in shell quick regexp. Here is how;
sed '/^\s*$/d' file_with_empty_lines.txt > output_no_empty_lines.txt
2. Deleting empty file lines with awk
It is less of writting with awk, but I always forget the syntax and thus I like more sed, anyways here is how with awk;
cat file_with_empty_lines.txt | awk 'NF' >

output_no_empty_lines.txt
3. Deleting empty lines with grep
Grep regular expression can be used. Here is grep cmd to cut off empty lines from file;
grep -v '^\s*$' file_with_empty_lines.txt >

output_no_empty_lines.txt
4. Delete empty files with vi / vim text editor
Open vi / vim text editor
$ vim
Press Esc+: and if empty lines doesn't have empty space characters use command
g/^$/d
Whether, empty lines contain " " – space characters (which are not visible in most text editors), use vi cmd:
g/^ $/d
Tags: empty space, grep, Linux, Perl, regexp, regular expression, Shell, space characters, syntax, system administrator, text editors, vim text editor, writting
Posted in Linux, Programming, System Administration, Various | No Comments »
Wednesday, March 30th, 2011 Listing all table names from a MySQL database is a very easy and trivial task that every sql or system administrator out there is aware of.
However excluding certain table names from a whole list of tables belonging to a database is not that commonly used and therefore I believe many people have no clue how to do it when they have to.
Today for one of my sql backup scripts it was necessary that certain tables from a database to be excluded from the whole list of tables for a database I’m backupping.
My example database has the sample name exampledatabase and usually I do list all the table contents from that database with the well known command:
mysql> SHOW tables from exampledatabase;
However as my desire was to exclude certain tables from the list (preferrably with a certain SQL query) I had to ask around in irc.freenode.net for some hints on a ways to achieve my exclude table goals.
I was adviced by some people in #mysql that what I need to achieve my goal is the information_schema mysql structure, which is available since MySQL version 5.0.
After a bit of look around in the information_schema and the respective documentation on mysql.com, thanksfully I could comprehend the idea behind the information_schema, though to be honest the first time I saw the documentation it was completly foggy on how to use this information_schema;
It seems using the information_schema is very easy and is not much different from your normal queries syntax used to do trivial operations in the mysql server.
If you wonder just like I did what is mysql’s information_schema go and use the information_schema database (which I believe is a virtual database that is stored in the system memory).
For instance:
mysql> use information_schema;

Database changed

mysql> show tables

+---------------------------------------+

| Tables_in_information_schema |

+---------------------------------------+

| CHARACTER_SETS |

| COLLATIONS |

| COLLATION_CHARACTER_SET_APPLICABILITY |

| COLUMNS |

| COLUMN_PRIVILEGES |

| KEY_COLUMN_USAGE |

| PROFILING |

| ROUTINES |

| SCHEMATA |

| SCHEMA_PRIVILEGES |

| STATISTICS |

| TABLES |

| TABLE_CONSTRAINTS |

| TABLE_PRIVILEGES |

| TRIGGERS |

| USER_PRIVILEGES |

| VIEWS |

+---------------------------------------+

17 rows in set (0.00 sec)
To get a general view on what each of the tables in the information_schema database contains I used the normal SELECT command for example
mysql> select * from TABLES limit 10;
I used the limit clause in order to prevent being overfilled with data, where I could still see the table fields name to get general and few lines of the table to get an idea what kind of information the TABLES table contains.
If you haven’t got any ecperience with using the information_schema I would advice you do follow my example select and look around through all the listed tables in the information_schema database
That will also give you a few hints about the exact way the MySQL works and comprehends it’s contained data structures.
In short information_schema virtual database and it’s existing tables provides a very thorough information and if you’re an SQL admin you certainly want to look over it every now and then.
A bit of playing with it lead me to a command which is actually a good substitute for the normal SHOW TABLES; mysql command.
To achieve a SHOW TABLES from exampledatabase via the information_schema info structure you can for example issue:
select TABLE_NAME from TABLES where TABLE_SCHEMA='exampledatabase';
Now as I’ve said a few words about information_schema let me go back to the main topic of this small article, which is How to exclude table names from a SHOW tables list
Here is how exclude a number of tables from a complete list of tables belonging to a database:
select TABLE_NAME from TABLES where TABLE_SCHEMA='exampledatabase'

AND TABLE_NAME not in

('mysql_table1_to_exlude_from_list', 'mysql_table2_to_exclude_from_list', 'table3_to_exclude');
In this example the above mysql command will list all the tables content belonging to exampledatabase and instruct the MySQL server not to list the table names with names mysql_table1_to_exlude_from_list, mysql_table2_to_exclude_from_list, table3_to_exclude
If you need to exclude more tables from your mysql table listing just add some more tables after the …’table3_to_exclude’, ‘new_table4_to_exclude’,’etc..’);
Of course this example can easily be adopted to a MySQL backup script which requires the exclusion of certain tables from a backed up database.
An example on how you can use the above table exclude command straight from the bash shell would be:
debian:~# echo "use information_schema; select TABLE_NAME from TABLES where

TABLE_SCHEMA='exampledatabase' AND TABLE_NAME not in

('mysql_table1_to_exlude_from_list', 'mysql_table2_to_exclude_from_list', 'table3_to_exclude',);"

| mysql -u root -p
Now this little bash one-liner can easily be customized to a backup script to create backups of a certain databases with a certain tables (e.g. with excluded number of tables) from the backup.
It’s seriously a pity that by default the mysqldump command does not have an option for a certain tables exclude while making a database dump.
I’ve saw the mysqldump exclude option, being suggested somewhere online as a future feature of mysqldump, I’ve also seen it being reported in the mysql.com’s bug database, I truly hope in the upcoming releases we will see the exclude option to appear as a possible mysqldump argument.
Tags: backup scripts, by using information_schema, character, clue, COLLATION, COLLATIONS, COLUMN, com, CONSTRAINTS, desire, example database, exlude, goal, How to, in MySQL, information, instance, limit, list and exclude table names from a database, Listing, mysql database, mysql server, preferrably, Privileges, queries, schema, SETS, show, sql query, structure, syntax, system administrator, system memory, TABLE, table contents, table names, time, trivial task, Usage, virtual database
Posted in Linux, MySQL, Programming, System Administration | 2 Comments »
Sunday, November 5th, 2006 Today we first met Habib (a colleague from Holland College I study in). We took a newspaper and searched for him a living place. We called from one bulphone to some of the newspaper advertisements but was not able to find any suitable living place for the price he could afford (60 or 70 leva). After that we went to a coffee place called “Central”. Then we went to Mino’s coffee and stayed and talked for 3 or 4 hours with Habib mainly about Bangladej.He told us about different specific things in Bangladej, like for example he explained us the attitude of people to a local people who are musicians (I forgot the exact Bangla’s name of ‘em), he told us Bangla’s people will probably think of us we’re musicians if we go to Bangladej. He said the people appreciate this people as fortune and the musicians live on the hospitality of the people. I went home checked something on the servers. It seems there is a new RC release of clamav 0.90rc2. I installed the new release and tested it but it seemed it has some problems with the clamd.conf’s syntax and I’ve uninstalled the 0.90rc2 and installed the old one which is 0.88.5. Praise God I’m spiritually okay. I’m going to have a sleep now but I’ll first read a little (The Bible). Blessings in the name of Jesus Christ 🙂 !
Tags: advertisements, attitude, Bangla, bible, bible blessings, blog, blog entry, bulphone, Central, Clamav, clamd, coffee place, colleague, conf, fortune, habib, holland, holland college, home, hospitality, jesus christ, ldquo, leva, Mino, musicians, name, name of jesus, new release, place, Praise, praise god, read, rsquo, sleep, something, syntax
Posted in Everyday Life | No Comments »
Thursday, December 8th, 2011 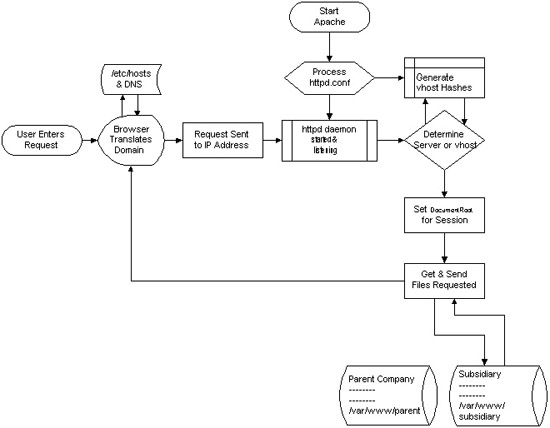
I decided to start this post with this picture I found on onlamp.com article called “Simplify Your Life with Apache VirtualHosts .I put it here because I thing it illustrates quite well Apache’s webserver internal processes. The picture gives also a good clue when Virtual Hosts gets loaded, anways I’ll go back to the main topic of this article, hoping the above picture gives some more insight on how Apache works.;
Here is how to list all the enabled virtualhosts in Apache on Debian GNU / Linux serving pages:
server:~# /usr/sbin/ apache2ctl -S

VirtualHost configuration:

wildcard NameVirtualHosts and _default_ servers:

*:* is a NameVirtualHost

default server exampleserver1.com (/etc/apache2/sites-enabled/000-default:2)

port * namevhost exampleserver2.com (/etc/apache2/sites-enabled/000-default

port * namevhost exampleserver3.com (/etc/apache2/sites-enabled/exampleserver3.com:1)

port * namevhost exampleserver4.com (/etc/apache2/sites-enabled/exampleserver4.com:1)

...

Syntax OK
The line *:* is a NameVirtualHost, means the Apache VirtualHosts module will be able to use Virtualhosts listening on any IP address (configured on the host), on any port configured for the respective Virtualhost to listen on.
The next output line:
port * namevhost exampleserver2.com (/etc/apache2/sites-enabled/000-default
Shows requests to the domain on any port will be accepted (port *) by the webserver as well as indicates the <VirtualHost> in the file /etc/apache2/sites-enabled/000-default:2 is defined on line 2 (e.g. :2).
To see the same all enabled VirtualHosts on FreeBSD the command to be issued is:
freebsd# pcfreak# /usr/local/sbin/httpd -S VirtualHost configuration:

wildcard NameVirtualHosts and _default_ servers:

*:80 is a NameVirtualHost

default server www.pc-freak.net (/usr/local/etc/apache2/httpd.conf:1218)

port 80 namevhost www.pc-freak.net (/usr/local/etc/apache2/httpd.conf:1218)

port 80 namevhost pcfreak.afraid.org (/usr/local/etc/apache2/httpd.conf:1353)

...

Syntax OK
On Fedora and the other Redhat Linux distributions, the apache2ctl -S should be displaying the enabled Virtualhosts.
One might wonder, what might be the reason for someone to want to check the VirtualHosts which are loaded by the Apache server, since this could be also checked if one reviews Apache / Apache2’s config file. Well the main advantage is that checking directly into the file might sometimes take more time, especially if the file contains thousands of similar named virtual host domains. Another time using the -S option is better would be if some enabled VirtualHost in a config file seems to not be accessible. Checking directly if Apache has properly loaded the VirtualHost directives ensures, there is no problem with loading the VirtualHost. Another scenario is if there are multiple Apache config files / installs located on the system and you’re unsure which one to check for the exact list of Virtual domains loaded.
Tags: apache, apache2, clue, com, config, configured, ctl, debian gnu, default port, default server, exampleserver, file, freak, freebsd, gnu linux, host, hosts, insight, ip address, life, Linux, lt, namevhost, NameVirtualHosts, onlamp, option, pcfreak, quot, reason, sbin, server pc, servers, someone, syntax, time, topic, Virtual, virtual hosts, Virtualhost, virtualhost configuration, VirtualHosts
Posted in Linux, System Administration | No Comments »
Tuesday, May 31st, 2011 This content editor is really awesome compared to the default editor TinyMCE. If you want to have an options rich content editor for Joomla, then this is the one for you 🙂
download JCE Content Editor here
After installing the JCE Joomla content editor in order to enable it as a default editor you need to go to the following location:
Site -> Global Configuration -> Default WYSIWYG Editor
There place on Editor TinyMCE and change it with Editor – JCE
Now go to edit some article, and you will see the difference in the editor 🙂
7. Add gallery Joomla capabilities with sigplus (Image Gallery Plus) and Very Simple Image Gallery
sigplus Image Gallery Plus is a straightforward way to add image or photo galleries to a Joomla article with a simple syntax. It takes a matter of minutes to set up a gallery but those who are looking for a powerful gallery solution will not be disappointed either: sigplus is suitable for both beginner and advanced users.
Tags: beginner, capabilities, Configuration, content, content editor, default editor, download, EditorThere, gallery, Global, global configuration, Image, image gallery, JCE, location, location site, matter, matter of minutes, nbsp, order, photo, photo galleries, place, Plus, site, solution, syntax, TinyMCE, way, WYSIWYG
Posted in Joomla, Various, Web and CMS | 1 Comment »


