Posts Tagged ‘partition’

Resize KVM .img QCOW Image file and Create new LVM partition and ext4 filesystem inside KVM Virtual Machine

Friday, November 10th, 2023

LVM-add-space-to-RHEL-Linux-on-KVM_Virtual_machine-howto

Part of migration project for a customer I'm working on is migration of a couple of KVM based Guest virtual machine servers. The old machines has a backup solution stratetegy using IBM's TSM and the new Machines should use the Cheaper solution adopted by the Customer company using the CommVault backup solution (an enterprise software thath is used for data backup and recovery not only to local Tape Library / Data blobs on central backup servers infra but also in Cloud infrastructure.

To install the CommVault software on the Redhat Linux-es, the official install documentation (prepared by the team who prepared the CommVault) infrastructure for the customer recommends to have a separate partition for the CommVault backups under /opt directory  (/opt/commvault) and the partition should be as a minumum at least 10 Gigabytes of size. 

Unfortunately on our new prepared KVM VM guest machines, it was forgotten to have the separate /opt of 10GB prepared in advanced. And we ended up with Virtual Machines that has a / (root directory) of 68GB size and a separate /var and /home LVM parititons. Thus to correct the issues it was required to find a way to add another separate LVM partition inside the KVM VirtualMachine.img (QCOW Image file). 

This seemed to be an easy task at first as that might be possible with simple .img partition mount with losetup command kpartx and simple lvreduce command in some way such as

# mount /dev/loop0 /mnt/test/

# kpartx -a /dev/loop0
# kpartx -l /dev/loop0
# ls -al /dev/mapper/*

… 

# lvreduce 

etc. however unfortunately kpartx though not returning error did not provided the new /dev/mapper devices to be used with LVM tools and this approach seems to not be possible on RHEL 8.8 as the kpartx couldn't list.


A colleague of mine Mr. Paskalev suggested that we can perhaps try to mount the partition with default KVM tool to mount .img partitions which is guestmount but unfortunately
with a command like:
 

# guestmount -a /kvm/VM.img -i –rw /mnt/test/

But unfortunately this mounted the filesystem in fuse filesystem and the LVM /dev/mapper of the VM can't be seen so we decided to abondon this method.

After some pondering with Dimitar Paskalev and Dimitar Hristov, thanks to joint efforts we found the way to do it, below are the steps we followed to succeed in creating new LVM ext4 partition required.
One would wonder how many system
 

1. Check enough space is available on the HV machine


The VMs are held under /kvm so in this case:

[root@hypervisor-host ~]# df -h|grep -i /kvm
/dev/mapper/vg00-vmprivate  206G   27G  169G  14% /kvm


2. Shutdown the running VM and make sure it is stopped
 

[root@hypervisor-host ~]# virsh shutdown vm-host


[root@hypervisor-host ~]# virsh list –all
 Id   Name       State
————————–
 4    lpdkv01f   running
 5    vm-host   shut off


3. Check current Space status of VM


[root@hypervisor-host ~]# qemu-img info /kvm/vm-host.img       
image: /kvm/vm-host.img
file format: qcow2
virtual size: 100 GiB (107374182400 bytes)
disk size: 8.62 GiB
cluster_size: 65536
Format specific information:
    compat: 1.1
    compression type: zlib
    lazy refcounts: true
    refcount bits: 16
    corrupt: false
    extended l2: false


4. Resize (extend VM) with whatever size you want    
 

[root@hypervisor-host ~]# qemu-img resize /kvm/vm-host.img +10G


5. Start VM    
 

[root@hypervisor-host ~]# virsh start vm-host


7. Check the LVM and block devices on HVs (not necessery but good for an overview)
 

[root@hypervisor-host ~]# pvs
  PV         VG   Fmt  Attr PSize   PFree 
  /dev/sda2  vg00 lvm2 a–  277.87g 19.87g
  
[root@hypervisor-host ~]# vgs
  VG   #PV #LV #SN Attr   VSize   VFree 
  vg00   1  11   0 wz–n- 277.87g 19.87g


[root@hypervisor-host ~]# lsblk 
NAME               MAJ:MIN RM   SIZE RO TYPE MOUNTPOINT
sda                  8:0    0 278.9G  0 disk 
├─sda1               8:1    0     1G  0 part /boot
└─sda2               8:2    0 277.9G  0 part 
  ├─vg00-root      253:0    0    15G  0 lvm  /
  ├─vg00-swap      253:1    0     1G  0 lvm  [SWAP]
  ├─vg00-var       253:2    0     5G  0 lvm  /var
  ├─vg00-spool     253:3    0     2G  0 lvm  /var/spool
  ├─vg00-audit     253:4    0     3G  0 lvm  /var/log/audit
  ├─vg00-opt       253:5    0     2G  0 lvm  /opt
  ├─vg00-home      253:6    0     5G  0 lvm  /home
  ├─vg00-tmp       253:7    0     5G  0 lvm  /tmp
  ├─vg00-log       253:8    0     5G  0 lvm  /var/log
  ├─vg00-cache     253:9    0     5G  0 lvm  /var/cache
  └─vg00-vmprivate 253:10   0   210G  0 lvm  /vmprivate

  
8 . Check logical volumes on Hypervisor host
 

[root@hypervisor-host ~]# lvdisplay 
  — Logical volume —
  LV Path                /dev/vg00/swap
  LV Name                swap
  VG Name                vg00
  LV UUID                3tNa0n-HDVw-dLvl-EC06-c1Ex-9jlf-XAObKm
  LV Write Access        read/write
  LV Creation host, time hypervisor-host, 2023-08-07 13:47:45 +0200
  LV Status              available
  # open                 2
  LV Size                1.00 GiB
  Current LE             256
  Segments               1
  Allocation             inherit
  Read ahead sectors     auto
  – currently set to     8192
  Block device           253:1
   
  — Logical volume —
  LV Path                /dev/vg00/var
  LV Name                var
  VG Name                vg00
  LV UUID                JBerim-fxVv-jU10-nDmd-figw-4jVA-8IYdxU
  LV Write Access        read/write
  LV Creation host, time hypervisor-host, 2023-08-07 13:47:45 +0200
  LV Status              available
  # open                 1
  LV Size                5.00 GiB
  Current LE             1280
  Segments               1
  Allocation             inherit
  Read ahead sectors     auto
  – currently set to     8192
  Block device           253:2
   
  — Logical volume —
  LV Path                /dev/vg00/spool
  LV Name                spool
  VG Name                vg00
  LV UUID                nFlmp2-iXg1-tFxc-FKaI-o1dA-PO70-5Ve0M9
  LV Write Access        read/write
  LV Creation host, time hypervisor-host, 2023-08-07 13:47:45 +0200
  LV Status              available
  # open                 1
  LV Size                2.00 GiB
  Current LE             512
  Segments               1
  Allocation             inherit
  Read ahead sectors     auto
  – currently set to     8192
  Block device           253:3
   
  — Logical volume —
  LV Path                /dev/vg00/audit
  LV Name                audit
  VG Name                vg00
  LV UUID                e6H2OC-vjKS-mPlp-JOmY-VqDZ-ITte-0M3npX
  LV Write Access        read/write
  LV Creation host, time hypervisor-host, 2023-08-07 13:47:46 +0200
  LV Status              available
  # open                 1
  LV Size                3.00 GiB
  Current LE             768
  Segments               1
  Allocation             inherit
  Read ahead sectors     auto
  – currently set to     8192
  Block device           253:4
   
  — Logical volume —
  LV Path                /dev/vg00/opt
  LV Name                opt
  VG Name                vg00
  LV UUID                oqUR0e-MtT1-hwWd-MhhP-M2Y4-AbRo-Kx7yEG
  LV Write Access        read/write
  LV Creation host, time hypervisor-host, 2023-08-07 13:47:46 +0200
  LV Status              available
  # open                 1
  LV Size                2.00 GiB
  Current LE             512
  Segments               1
  Allocation             inherit
  Read ahead sectors     auto
  – currently set to     8192
  Block device           253:5
   
  — Logical volume —
  LV Path                /dev/vg00/home
  LV Name                home
  VG Name                vg00
  LV UUID                ehdsH7-okS3-gPGk-H1Mb-AlI7-JOEt-DmuKnN
  LV Write Access        read/write
  LV Creation host, time hypervisor-host, 2023-08-07 13:47:47 +0200
  LV Status              available
  # open                 1
  LV Size                5.00 GiB
  Current LE             1280
  Segments               1
  Allocation             inherit
  Read ahead sectors     auto
  – currently set to     8192
  Block device           253:6
   
  — Logical volume —
  LV Path                /dev/vg00/tmp
  LV Name                tmp
  VG Name                vg00
  LV UUID                brntSX-IZcm-RKz2-CP5C-Pp00-1fA6-WlA7lD
  LV Write Access        read/write
  LV Creation host, time hypervisor-host, 2023-08-07 13:47:47 +0200
  LV Status              available
  # open                 1
  LV Size                5.00 GiB
  Current LE             1280
  Segments               1
  Allocation             inherit
  Read ahead sectors     auto
  – currently set to     8192
  Block device           253:7
   
  — Logical volume —
  LV Path                /dev/vg00/log
  LV Name                log
  VG Name                vg00
  LV UUID                ZerDyL-birP-Pwck-yvFj-yEpn-XKsn-sxpvWY
  LV Write Access        read/write
  LV Creation host, time hypervisor-host, 2023-08-07 13:47:47 +0200
  LV Status              available
  # open                 1
  LV Size                5.00 GiB
  Current LE             1280
  Segments               1
  Allocation             inherit
  Read ahead sectors     auto
  – currently set to     8192
  Block device           253:8
   
  — Logical volume —
  LV Path                /dev/vg00/cache
  LV Name                cache
  VG Name                vg00
  LV UUID                bPPfzQ-s4fH-4kdT-LPyp-5N20-JQTB-Y2PrAG
  LV Write Access        read/write
  LV Creation host, time hypervisor-host, 2023-08-07 13:47:48 +0200
  LV Status              available
  # open                 1
  LV Size                5.00 GiB
  Current LE             1280
  Segments               1
  Allocation             inherit
  Read ahead sectors     auto
  – currently set to     8192
  Block device           253:9
   
  — Logical volume —
  LV Path                /dev/vg00/root
  LV Name                root
  VG Name                vg00
  LV UUID                mZr3p3-52R3-JSr5-HgGh-oQX1-B8f5-cRmaIL
  LV Write Access        read/write
  LV Creation host, time hypervisor-host, 2023-08-07 13:47:48 +0200
  LV Status              available
  # open                 1
  LV Size                15.00 GiB
  Current LE             3840
  Segments               1
  Allocation             inherit
  Read ahead sectors     auto
  – currently set to     8192
  Block device           253:0
   
  — Logical volume —
  LV Path                /dev/vg00/vmprivate
  LV Name                vmprivate
  VG Name                vg00
  LV UUID                LxNRWV-le3h-KIng-pUFD-hc7M-39Gm-jhF2Aj
  LV Write Access        read/write
  LV Creation host, time hypervisor-host, 2023-09-18 11:54:19 +0200
  LV Status              available
  # open                 1
  LV Size                210.00 GiB
  Current LE             53760
  Segments               1
  Allocation             inherit
  Read ahead sectors     auto
  – currently set to     8192
  Block device           253:10

9. Check Hypervisor existing partitions and space
 

[root@hypervisor-host ~]# fdisk -l
Disk /dev/sda: 278.9 GiB, 299439751168 bytes, 584843264 sectors
Units: sectors of 1 * 512 = 512 bytes
Sector size (logical/physical): 512 bytes / 512 bytes
I/O size (minimum/optimal): 512 bytes / 512 bytes
Disklabel type: dos
Disk identifier: 0x0581e6e2

Device     Boot   Start       End   Sectors   Size Id Type
/dev/sda1  *       2048   2099199   2097152     1G 83 Linux
/dev/sda2       2099200 584843263 582744064 277.9G 8e Linux LVM


Disk /dev/mapper/vg00-root: 15 GiB, 16106127360 bytes, 31457280 sectors
Units: sectors of 1 * 512 = 512 bytes
Sector size (logical/physical): 512 bytes / 512 bytes
I/O size (minimum/optimal): 512 bytes / 512 bytes


Disk /dev/mapper/vg00-swap: 1 GiB, 1073741824 bytes, 2097152 sectors
Units: sectors of 1 * 512 = 512 bytes
Sector size (logical/physical): 512 bytes / 512 bytes
I/O size (minimum/optimal): 512 bytes / 512 bytes


Disk /dev/mapper/vg00-var: 5 GiB, 5368709120 bytes, 10485760 sectors
Units: sectors of 1 * 512 = 512 bytes
Sector size (logical/physical): 512 bytes / 512 bytes
I/O size (minimum/optimal): 512 bytes / 512 bytes


Disk /dev/mapper/vg00-spool: 2 GiB, 2147483648 bytes, 4194304 sectors
Units: sectors of 1 * 512 = 512 bytes
Sector size (logical/physical): 512 bytes / 512 bytes
I/O size (minimum/optimal): 512 bytes / 512 bytes


Disk /dev/mapper/vg00-audit: 3 GiB, 3221225472 bytes, 6291456 sectors
Units: sectors of 1 * 512 = 512 bytes
Sector size (logical/physical): 512 bytes / 512 bytes
I/O size (minimum/optimal): 512 bytes / 512 bytes


Disk /dev/mapper/vg00-opt: 2 GiB, 2147483648 bytes, 4194304 sectors
Units: sectors of 1 * 512 = 512 bytes
Sector size (logical/physical): 512 bytes / 512 bytes
I/O size (minimum/optimal): 512 bytes / 512 bytes


Disk /dev/mapper/vg00-home: 5 GiB, 5368709120 bytes, 10485760 sectors
Units: sectors of 1 * 512 = 512 bytes
Sector size (logical/physical): 512 bytes / 512 bytes
I/O size (minimum/optimal): 512 bytes / 512 bytes


Disk /dev/mapper/vg00-tmp: 5 GiB, 5368709120 bytes, 10485760 sectors
Units: sectors of 1 * 512 = 512 bytes
Sector size (logical/physical): 512 bytes / 512 bytes
I/O size (minimum/optimal): 512 bytes / 512 bytes


Disk /dev/mapper/vg00-log: 5 GiB, 5368709120 bytes, 10485760 sectors
Units: sectors of 1 * 512 = 512 bytes
Sector size (logical/physical): 512 bytes / 512 bytes
I/O size (minimum/optimal): 512 bytes / 512 bytes


Disk /dev/mapper/vg00-cache: 5 GiB, 5368709120 bytes, 10485760 sectors
Units: sectors of 1 * 512 = 512 bytes
Sector size (logical/physical): 512 bytes / 512 bytes
I/O size (minimum/optimal): 512 bytes / 512 bytes


Disk /dev/mapper/vg00-vmprivate: 210 GiB, 225485783040 bytes, 440401920 sectors
Units: sectors of 1 * 512 = 512 bytes
Sector size (logical/physical): 512 bytes / 512 bytes
I/O size (minimum/optimal): 512 bytes / 512 bytes


10. List block devices on VM
 

[root@vm-host ~]# lsblk 
NAME               MAJ:MIN RM  SIZE RO TYPE MOUNTPOINT
sr0                 11:0    1 1024M  0 rom  
vda                252:0    0  100G  0 disk 
├─vda1             252:1    0    1G  0 part /boot
├─vda2             252:2    0   88G  0 part 
│ ├─vg00-root      253:0    0   68G  0 lvm  /
│ ├─vg00-home      253:2    0   10G  0 lvm  /home
│ └─vg00-var       253:3    0   10G  0 lvm  /var
├─vda3             252:3    0    1G  0 part [SWAP]
└─vda4             252:4    0   10G  0 part 


11. Create new LVM partition with fdisk or cfdisk
 

If there is no cfdisk new resized space with qemu-img could be setup with a fdisk, though I personally always prefer to use cfdisk

[root@vm-host ~]# fdisk /dev/vda
# > p (print)
# > m (manfile)
# > n
# … follow on screen instructions to select start and end blocks
# > t (change partition type)
# > select and set to 8e
# > w (write changes)

[root@vm-host ~]# cfdisk /dev/vda


Setup new partition from Free space as [ primary ] partition and Choose to be of type LVM


12. List partitions to make sure new LVM partition is present
 

[root@vm-host ~]# fdisk -l
Disk /dev/vda: 100 GiB, 107374182400 bytes, 209715200 sectors
Units: sectors of 1 * 512 = 512 bytes
Sector size (logical/physical): 512 bytes / 512 bytes
I/O size (minimum/optimal): 512 bytes / 512 bytes
Disklabel type: dos
Disk identifier: 0xe7b2d9fd

Device     Boot     Start       End   Sectors Size Id Type
/dev/vda1  *         2048   2099199   2097152   1G 83 Linux
/dev/vda2         2099200 186646527 184547328  88G 8e Linux LVM
/dev/vda3       186646528 188743679   2097152   1G 82 Linux swap / Solaris
/dev/vda4       188743680 209715199  20971520  10G 8e Linux LVM

The extra added 10 Giga is seen under /dev/vda4.
  — Physical volume —
  PV Name               /dev/vda4
  VG Name               vg01
  PV Size               10.00 GiB / not usable 4.00 MiB
  Allocatable           yes (but full)
  PE Size               4.00 MiB
  Total PE              2559
  Free PE               0
  Allocated PE          2559
  PV UUID               yvMX8a-sEka-NLA7-53Zj-fFdZ-Jd2K-r0Db1z
   
  — Physical volume —
  PV Name               /dev/vda2
  VG Name               vg00
  PV Size               <88.00 GiB / not usable 3.00 MiB
  Allocatable           yes (but full)
  PE Size               4.00 MiB
  Total PE              22527
  Free PE               0
  Allocated PE          22527
  PV UUID               i4UpGr-h9Cd-iKBu-KqEI-15vK-CGc1-DwRPj8
   
[root@vm-host ~]# 


13. List LVM Physical Volumes
 

[root@vm-host ~]# pvdisplay 
  — Physical volume —
  PV Name               /dev/vda2
  VG Name               vg00
  PV Size               <88.00 GiB / not usable 3.00 MiB
  Allocatable           yes (but full)
  PE Size               4.00 MiB
  Total PE              22527
  Free PE               0
  Allocated PE          22527
  PV UUID               i4UpGr-h9Cd-iKBu-KqEI-15vK-CGc1-DwRPj8


  Notice the /dev/vda4 is not seen in pvdisplay (Physical Volume display command) because not created yet, so lets create it.
 

14. Initialize new Physical Volume to be available for use by LVM
 

[root@vm-host ~]# pvcreate /dev/vda4


15. Inform the OS for partition table changes
 

If partprobe is not available as command on the host, below obscure command should do the trick.
 

[root@vm-host ~]# echo "- – -" | tee /sys/class/scsi_host/host*/scan

However usually, better to use partprobe to inform the Operating System of partition table changes

[root@vm-host ~]# partprobe


16. Use lsblk again to see the new /dev/vda4 LVM is listed into "vda" root block device
 

[root@vm-host ~]# 
[root@vm-host ~]# lsblk
NAME          MAJ:MIN RM  SIZE RO TYPE MOUNTPOINT
sr0            11:0    1 1024M  0 rom  
vda           252:0    0  100G  0 disk 
├─vda1        252:1    0    1G  0 part /boot
├─vda2        252:2    0   88G  0 part 
│ ├─vg00-root 253:0    0   68G  0 lvm  /
│ ├─vg00-home 253:1    0   10G  0 lvm  /home
│ └─vg00-var  253:2    0   10G  0 lvm  /var
├─vda3        252:3    0    1G  0 part [SWAP]
└─vda4        252:4    0   10G  0 part 
[root@vm-host ~]# 


17. Create new Volume Group (VG) on /dev/vda4 block device
 

Before creating a new VG, list what kind of VG is on the machine to be sure the new created one will not be already present.
 

[root@vm-host ~]# vgdisplay 
  — Volume group —
  VG Name               vg00
  System ID             
  Format                lvm2
  Metadata Areas        1
  Metadata Sequence No  4
  VG Access             read/write
  VG Status             resizable
  MAX LV                0
  Cur LV                3
  Open LV               3
  Max PV                0
  Cur PV                1
  Act PV                1
  VG Size               <88.00 GiB
  PE Size               4.00 MiB
  Total PE              22527
  Alloc PE / Size       22527 / <88.00 GiB
  Free  PE / Size       0 / 0   
  VG UUID               oyo1oY-saSm-0IKk-gZnf-Knwz-utO7-Aw8c60

vg00 is existing only, so we can use vg01 as a Volume Group name for the new volume group where the fresh 10GB LVM partition will lay

[root@vm-host ~]# vgcreate vg01 /dev/vda4
  Volume group "vg01" successfully created


18. Create new Logical Volume (LV) and extend it to occupy the full space available on Volume Group vg01


[root@vm-host ~]# lvcreate -n commvault -l 100%FREE vg01
  Logical volume "commvault" created.

  An alternative way to create the same LV is by running:

lvcreate -n commvault -L 10G vg01


19. Relist block devices with lsblk to make sure the new created Logical Volume commvault is really present and seen, in case of it missing re-run again partprobe cmd
 

[root@vm-host ~]# lsblk 
NAME               MAJ:MIN RM  SIZE RO TYPE MOUNTPOINT
sr0                 11:0    1 1024M  0 rom  
vda                252:0    0  100G  0 disk 
├─vda1             252:1    0    1G  0 part /boot
├─vda2             252:2    0   88G  0 part 
│ ├─vg00-root      253:0    0   68G  0 lvm  /
│ ├─vg00-home      253:1    0   10G  0 lvm  /home
│ └─vg00-var       253:2    0   10G  0 lvm  /var
├─vda3             252:3    0    1G  0 part [SWAP]
└─vda4             252:4    0   10G  0 part 
  └─vg01-commvault 253:3    0   10G  0 lvm  


As it is not mounted yet, the VG will be not seen in df free space but will be seen as a volume group with vgdispaly
 

[root@vm-host ~]# df -h
Filesystem                  Size  Used Avail Use% Mounted on
devtmpfs                    2.8G     0  2.8G   0% /dev
tmpfs                       2.8G   33M  2.8G   2% /dev/shm
tmpfs                       2.8G   17M  2.8G   1% /run
tmpfs                       2.8G     0  2.8G   0% /sys/fs/cgroup
/dev/mapper/vg00-root        67G  2.4G   61G   4% /
/dev/mapper/vg00-var        9.8G 1021M  8.3G  11% /var
/dev/mapper/vg00-home       9.8G   24K  9.3G   1% /home
/dev/vda1                   974M  242M  665M  27% /boot
tmpfs                       569M     0  569M   0% /run/user/0


[root@vm-host ~]# vgdisplay 
  — Volume group —
  VG Name               vg01
  System ID             
  Format                lvm2
  Metadata Areas        1
  Metadata Sequence No  2
  VG Access             read/write
  VG Status             resizable
  MAX LV                0
  Cur LV                1
  Open LV               0
  Max PV                0
  Cur PV                1
  Act PV                1
  VG Size               <10.00 GiB
  PE Size               4.00 MiB
  Total PE              2559
  Alloc PE / Size       2559 / <10.00 GiB
  Free  PE / Size       0 / 0   
  VG UUID               nYP0tv-IbFw-fBVT-slBB-H1hF-jD0h-pE3V0S
   
  — Volume group —
  VG Name               vg00
  System ID             
  Format                lvm2
  Metadata Areas        1
  Metadata Sequence No  4
  VG Access             read/write
  VG Status             resizable
  MAX LV                0
  Cur LV                3
  Open LV               3
  Max PV                0
  Cur PV                1
  Act PV                1
  VG Size               <88.00 GiB
  PE Size               4.00 MiB
  Total PE              22527
  Alloc PE / Size       22527 / <88.00 GiB
  Free  PE / Size       0 / 0   
  VG UUID               oyo1oY-saSm-0IKk-gZnf-Snwz-utO7-Aw8c60


20. Create new ext4 filesystem on the just created vg01-commvault   
 

[root@vm-host ~]# mkfs.ext4 /dev/mapper/vg01-commvault 

[root@vm-host ~]# mkfs.ext4 /dev/mapper/vg01-commvault 
mke2fs 1.45.6 (20-Mar-2020)
Discarding device blocks: done                            
Creating filesystem with 2620416 4k blocks and 655360 inodes
Filesystem UUID: 1491d8b1-2497-40fe-bc40-5faa6a2b2644
Superblock backups stored on blocks: 
        32768, 98304, 163840, 229376, 294912, 819200, 884736, 1605632

Allocating group tables: done                            
Writing inode tables: done                            
Creating journal (16384 blocks): done
Writing superblocks and filesystem accounting information: done 


21. Mount vg01-commvault into /opt directory
 

[root@vm-host ~]# mkdir -p /opt/

[root@vm-host ~]# mount /dev/mapper/vg01-commvault /opt/


22. Check mount is present on VM guest OS
 

[root@vm-host ~]# mount|grep -i /opt
/dev/mapper/vg01-commvault on /opt type ext4 (rw,relatime)
[root@vm-host ~]# 

[root@vm-host ~]# df -h|grep -i opt
/dev/mapper/vg01-commvault  9.8G   24K  9.3G   1% /opt
[root@vm-host ~]# 
 

23. Add vg01-commvault to be auto mounted via /etc/fstab on next Virtual Machine reboot
 

[root@vm-host ~]# echo '/dev/mapper/vg01-commvault /opt         ext4            defaults        1        2' >> /etc/fstab

[root@vm-host ~]# rpm -ivh commvault-fs.Instance001-11.0.0-80.240.0.3589820.240.4083067.el8.x86_64.rpm

[root@vm-host ~]# systemctl status commvault
● commvault.Instance001.service – commvault Service
   Loaded: loaded (/etc/systemd/system/commvault.Instance001.service; enabled; vendor preset: disabled)
   Active: active (running) since Fri 2023-11-10 15:13:59 CET; 27s ago
  Process: 9972 ExecStart=/opt/commvault/Base/Galaxy start direct -focus Instance001 (code=exited, status=0/SUCCESS)
    Tasks: 54
   Memory: 155.5M
   CGroup: /system.slice/commvault.Instance001.service
           ├─10132 /opt/commvault/Base/cvlaunchd
           ├─10133 /opt/commvault/Base/cvd
           ├─10135 /opt/commvault/Base/cvfwd
           └─10137 /opt/commvault/Base/ClMgrS

Nov 10 15:13:57 vm-host.ffm.de.int.atosorigin.com systemd[1]: Starting commvault Service…
Nov 10 15:13:58 vm-host.ffm.de.int.atosorigin.com Galaxy[9972]: Cleaning up /opt/commvault/Base/Temp …
Nov 10 15:13:58 vm-host.ffm.de.int.atosorigin.com Galaxy[9972]: Starting Commvault services for Instance001 …
Nov 10 15:13:59 vm-host.ffm.de.int.atosorigin.com Galaxy[9972]: [22B blob data]
Nov 10 15:13:59 vm-host.ffm.de.int.atosorigin.com systemd[1]: Started commvault Service.
[root@vm-host ~]# 


24. Install Commvault backup client RPM in new mounted LVM under /opt

[root@vm-host ~]#  rpm -ivh commvault.rpm

How to disable Windows pagefile.sys and hiberfil.sys to temporary or permamently save disk space if space is critically low

Monday, March 28th, 2022

howto-pagefile-hiberfil.sys-remove-reduce-increase-increase-size-windows-logo

Sometimes you have to work with Windows 7 / 8 / 10 PCs  etc. that has a very small partition C:\
drive or othertimes due to whatever the disk got filled up with time and has only few megabytes left
and this totally broke up the windows performance as Windows OS becomes terribly sluggish and even
simple things as opening Internet Browser (Chrome / Firefox / Opera ) or Windows Explorer stones the PC performance.

You might of course try to use something like Spacesniffer tool (a great tool to find lost data space on PC s short description on it is found in my previous article how to
delete temporary Internet Files and Folders to to speed up and free disk space
 ) or use CCleaner to clean up a bit the pc.
Sometimes this is not enough though or it is not possible to do at all the main
partition disk C:\ is anyhow too much low (only 30-50MB are available on HDD) or the Physical or Virtual Machine containing the OS is filled with important data
and you couldn't risk to remove anything including Internet Temporary files, browsing cookies … whatever.

Lets say you are the fate chosen guy as sysadmin to face this uneasy situation and have no easy
way to add disk space from another present free space partition or could not add a new SATA hard drive
SSD drive, what should you do?
 

The solution wipe off pagefile.sys and hiberfil.sys

Usually every Windows installation has a pagefile.sys and hiberfil.sys.

  • pagefile.sys – is the default file that is used as a swap file, immediately once the machine runs out of memory. For Unix / Linux users better understanding pagefile.sys is the equivallent of Linux's swap partition. Of course as the pagefile is in a file and not in separate partition the swapping in Windows is perhaps generally worse than in Linux.
  • hiberfil.sys – is used to store data from the machine on machine Hibernation (for those who use the feature)


Pagefile.sys which depending on the configured RAM memory on the OS could takes up up to 5 – 8 GB, there hanging around doing nothing but just occupying space. Thus a temporary workaround that could free you some space even though it will degrade performance and on servers and production machines this is not a good solution on just user machines, where you temporary need to free space any other important task you can free up space
by seriously reducing the preconfigured default size of pagefile.sys (which usually is 1.5 times the active memory on the OS – hence if you have 4GB you would have a 6Gigabytes of pagefile.sys).

Other possibility especially on laptop and movable devices running Win OS is to disable hiberfil.sys, read below how this is done.


The temporary solution here is to simply free space by either reducing the pagefile.sys or completely disabling it


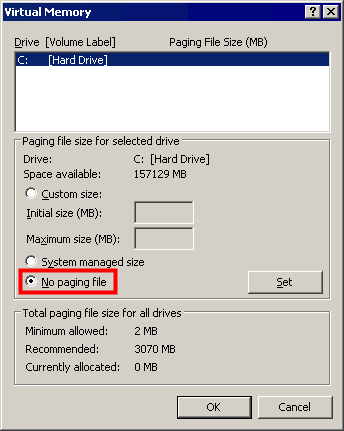
1. Disable pagefile.sys on Windows XP, Windows 7 / 8 / 10 / 11


The GUI interface to disable pagefile across all NT based Windows OS-es is quite similar, the only difference is newer versions of Windows has slightly more options.


1.1 Disable pagefile on Windows XP


Quickest way is to find pagefile.sys settings from GUI menus

1. Computer (My Computer) – right click mouse
2. Properties (System Preperties will appear)
3. Advanced (tab) 
4. Settings
5. Advanced (tab)
6. Change button

windows-xp-pagefile-disable-screenshot

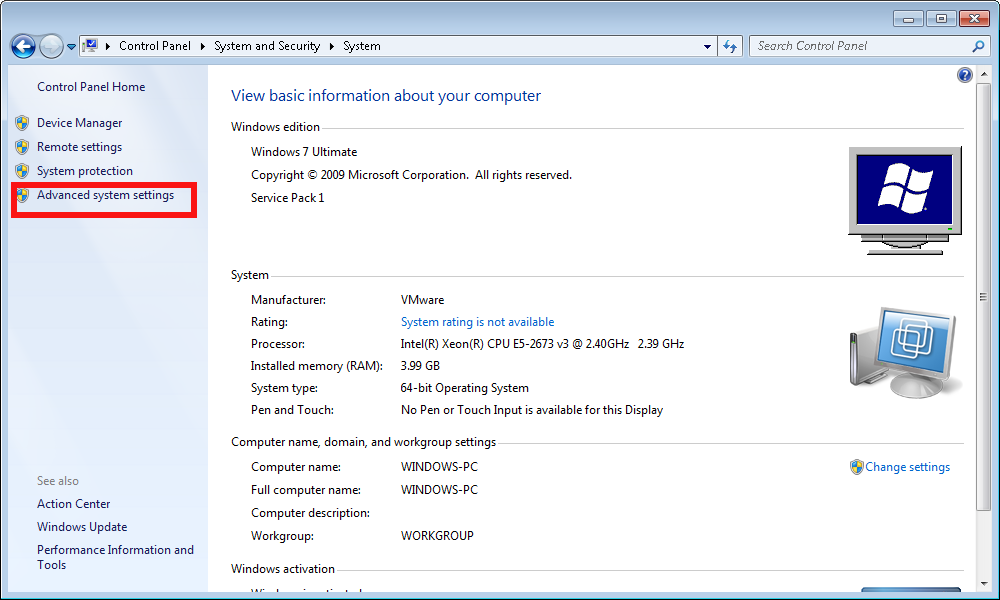
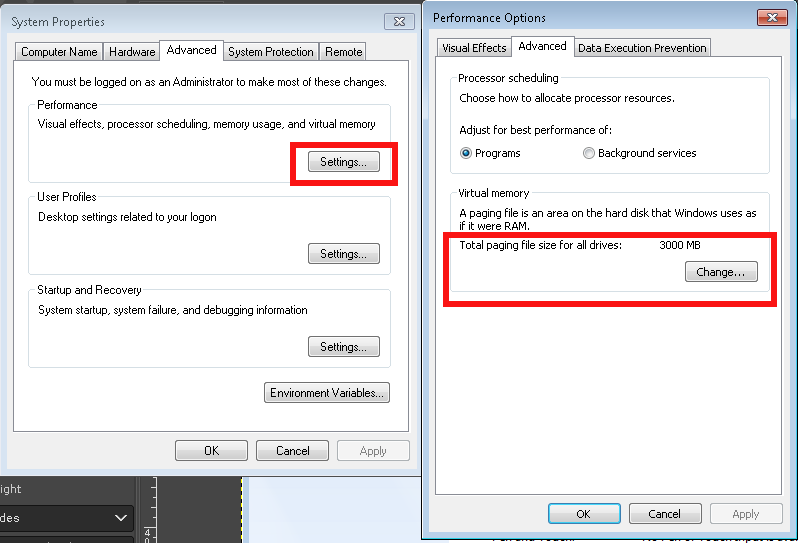
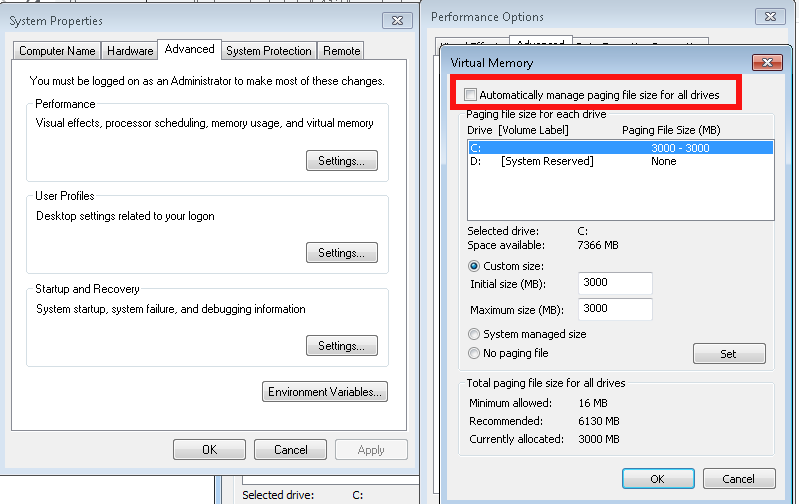
1.2 Disable pagefile on Windows 7


advanced-system-settings-control-panel-system-and-security-screenshot

windows-system-properties-screenshot-properties-advanced-change-Virtual-memory-pagefile-screenshot

system-properties-performance-options
 

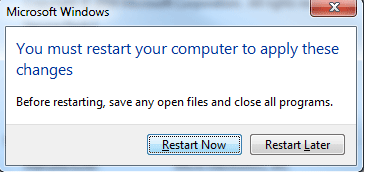
Once applied you'll be required to reboot the PC

How-to-turn-off-Virtual-Memory-Paging_File-in-Windows-7-restart


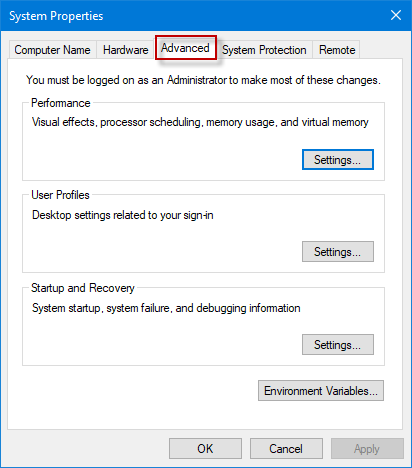
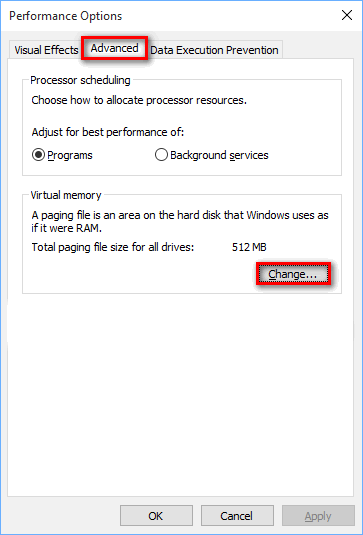
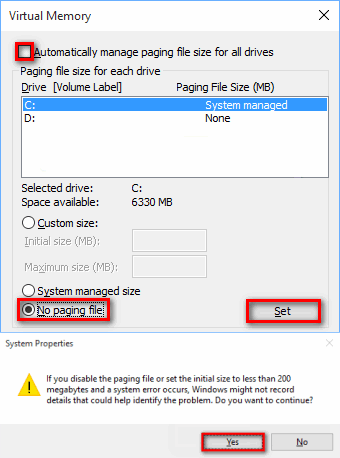
1.3 Disable Increase / Decrease pagefile.sys on Windows 10 / Win 11
 

open-system-properties-advanced-win10

win10-performance-options-menu-screenshot

configure-virtual-memory-win-10-screenshot


1.4 Make Windows clear pagefile.sys on shutdown

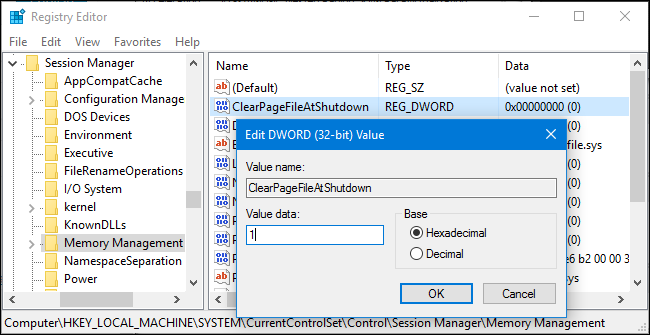
On home PCs it might be useful thing to clear up ( nullify) pagefile.sys on shutdown, that could save you some disk space on every reboot, until file continuously grows to its configured Maximum.

Run

regedit

Modify registry key at location


HKEY_LOCAL_MACHINE\SYSTEM\CurrentControlSet\Control\Session Manager\Memory Management

windows-clean-up-pagefile-sys-file-on-shutdown-or-reboot-registry-editor-value-screenshot

You can apply the value also via a registry file you can get the Enable Clearpagefile at shutdown here .reg.
 

2. Manipulating pagefile.sys size and file delete from command line with wmic tool 

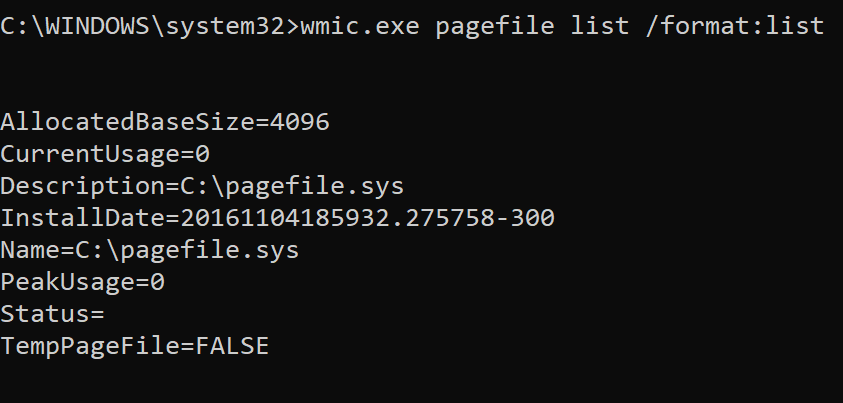
For scripting purposes you might want to use the wmic pagefile which can do increase / decrase or delete the file without GUI, that is very helpful if you have to admin a Windows Domain (Active Directory)
 

[hipo.WINDOWS-PC] ➤ wmic pagefile /?

PAGEFILE – Virtual memory file swapping management.

HINT: BNF for Alias usage.
(<alias> [WMIObject] | [] | [] ) [].

USAGE:

PAGEFILE ASSOC []
PAGEFILE CREATE <assign list>
PAGEFILE DELETE
PAGEFILE GET [] []
PAGEFILE LIST [] []


[hipo.WINDOWS-PC] ➤ wmic pagefile
AllocatedBaseSize  Caption          CurrentUsage  Description      InstallDate                Name             PeakUsage  Status  TempPageFile
4709               C:\pagefile.sys  499           C:\pagefile.sys  20200912061902.938000+180  C:\pagefile.sys  525                FALSE


[hipo.WINDOWS-PC] ➤ wmic pagefile list /format:list

AllocatedBaseSize=4709
CurrentUsage=499
Description=C:\pagefile.sys
InstallDate=20200912061902.938000+180
Name=C:\pagefile.sys
PeakUsage=525
Status=
TempPageFile=FALSE

wmic-pagefile-command-line-tool-for-windows-default-output-screenshot


  • To change the Initial Size or Maximum Size of Pagefile use:
     

➤ wmic pagefileset where name="C:\\pagefile.sys" set InitialSize=2048,MaximumSize=2048

  • To move the pagefile / change location of pagefile to less occupied disk drive partition (i.e. D:\ drive)


    Sometimes you might have multiple drives on the PC and some of them might be having multitudes of gigabytes while main drive C:\ could be fully occupied due to initial install bad drive organization, in that case a good work arount to save you space so you can work normally with the server is just to temporary or permanently move pagefile to another drive.

wmic pagefileset where name="D:\\pagefile.sys" set InitialSize=2048,MaximumSize=2048


!! CONSIDER !!! 

That if you have the option to move the pagefile.sys for best performance it is advicable to place the file inside another physical disk, preferrably a Solid State Drive one, SATA disks are too slow and reduced Input / Output disk operations will lead to degraded performance, if there is lack of memory (i.e. pagefile.sys is actively open read and wrote in).
 

  • To delete pagefile.sys 
     

➤ wmic pagefileset where name="C:\\pagefile.sys" delete


If for some reason you prefer to not use wmic but simple del command you can delete pagefile.sys also by:

Removing file default "Hidden" and "system" file attributes – set for security reasons as the file is a system file usually not touched by user. This will save you from "permission denied" errors:
 

➤ attrib -s -h %systemdrive%\pagefile.sys


Delete the file:
 

➤ del /a /q %systemdrive%\pagefile.sys


3. Disable hibernation on Windows 7 / 8 and Win 10 / 11

Disabling hibernation file hiberfil.sys can also free up some space, especially if the hibernation has been actively used before and the file is written with data. Of course, that is more common on notebooks.
Windows hibernation has significantly improved over time though i didn't have very pleasant experience in the past and I prefer to disable it just in case.
 

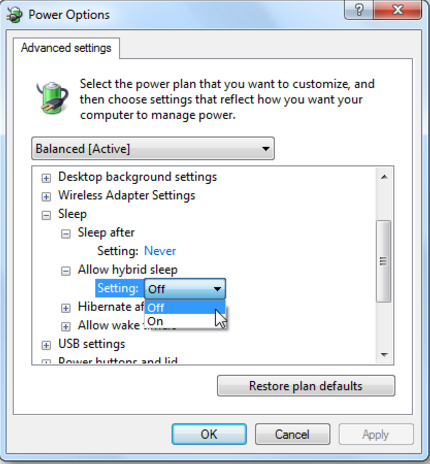
3.1 Disable Windows 7 / 8 / 10 / 11 hibernation from GUI 

Disable it through:

Control Panel -> All Control Panel Items -> Power Options -> Edit Plan Settings -> Change advanced power settings


 like shown in below screenshot:

Windqows-power-options-Advanced-settings-Allow-Hybrid-sleep-option-menu-screenshot


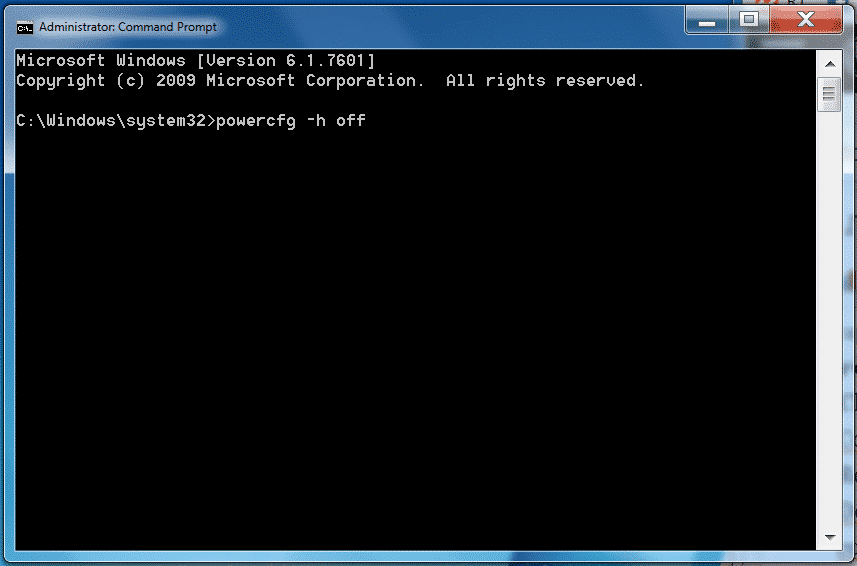
3.2 Disable Windows 7 / 8 / 10 / 11 hibernation from command line

Disable hibernation Is done in the same way through the powercfg.exe command, to disable it
if you're cut of disk space and you want to save space from it:

run as Administrator in Command Line Windows (cmd.exe)
 

powercfg.exe /hibernate off

If you later need to switch on hibernation
 

powercfg.exe /hibernate on


disable-hiberfile-windows-screenshot

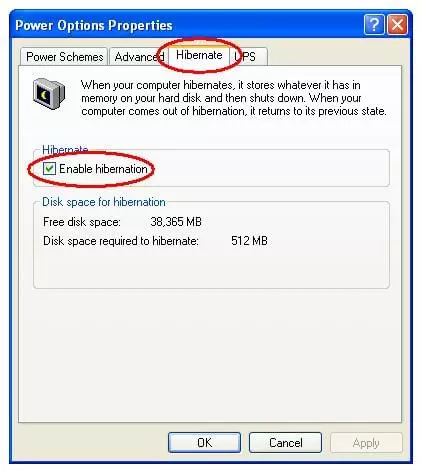
3.3 Disable Windows hibernation on legacy Windows XP

On XP to disable hibernation open

1. Power Options Properties
2. Select Hibernate
3. Select Enable Hibernation to clear the checkbox and disable Hibernation mode. 
4. Select OK to apply the change.

Close the Power Options Properties box. 

enable-disable-hibernate-windows-xp-menu-screenshot

To sum it up

We have learned some basics on Windows swapping and hibernation and i've tried to give some insight on how thiese files if misconfigured could lead to degraded Win OS performance. In any case using SSD as of 2022 to store both files is a best practice for machines that has plenty of memory always try to completely disable / remove the files. It was shown how  to manage pagefile.sys and hiberfil.sys across Windows Operating Systems different versions both from GUI and via command line as well as how you can configure pagefile.sys to be cleared up on pc reboot.
 

How to check Linux OS install date / How long ago was Linux installed

Sunday, October 22nd, 2017

If you're sysadmin who inherited a few hundreds of Linux machines from a previous admin and you're in process of investigating how things were configured by the previous administrator one of the crucial things to find out might be

How Long ago was Linux installed?

Here is how to check the Linux OS install date.

The universal way nomatter the Linux distribution is to use fullowing command:


root@pcfreak:~# tune2fs -l /dev/sda1 | grep 'Filesystem created:'
Filesystem created:       Thu Sep  6 21:44:22 2012


Above command assumes the Linux's root partition / is installed on /dev/sda1 however if your case is different, e.g. the primary root partition is installed on /dev/sda2 or /dev/sdb1 / dev/sdb2 etc. just place the right first partition into the command.

If primary install root partition is /dev/sdb1 for example:
 

root@pcfreak:~# tune2fs -l /dev/sdb1 | grep 'Filesystem created:'


To find out what is the root partition of the Linux server installed use fdisk command:


root@pcfreak:~# fdisk -l


Disk /dev/sda: 465,8 GiB, 500107862016 bytes, 976773168 sectors
Units: sectors of 1 * 512 = 512 bytes
Sector size (logical/physical): 512 bytes / 512 bytes
I/O size (minimum/optimal): 512 bytes / 512 bytes
Disklabel type: dos
Disk identifier: 0x00051eda

Device     Boot     Start       End   Sectors   Size Id Type
/dev/sda1  *         2048 965193727 965191680 460,2G 83 Linux
/dev/sda2       965195774 976771071  11575298   5,5G  5 Extended
/dev/sda5       965195776 976771071  11575296   5,5G 82 Linux swap / Solaris

Disk /dev/sdb: 111,8 GiB, 120034123776 bytes, 234441648 sectors
Units: sectors of 1 * 512 = 512 bytes
Sector size (logical/physical): 512 bytes / 512 bytes
I/O size (minimum/optimal): 512 bytes / 512 bytes
Disklabel type: dos
Disk identifier: 0x00000000


Other ways to check the Linux OS install date on Debian / Ubuntu / Mint etc. deb. based GNU / Linux


Deban based Linux distributions do create an initial /var/log/installer directory containing various install information such as hardware-summary, partition, initial installed deb packages, exact version of Linux distribution, and the way it was installed either it was installed from an ISO image, or it was network install etc.


root@pcfreak:~# ls -al /var/log/installer/
total 1228
drwxr-xr-x  3 root root   4096 sep  6  2012 ./
drwxr-xr-x 72 root root  12288 окт 22 06:26 ../
drwxr-xr-x  2 root root   4096 sep  6  2012 cdebconf/
-rw-r–r–  1 root root  17691 sep  6  2012 hardware-summary
-rw-r–r–  1 root root    163 sep  6  2012 lsb-release
-rw——-  1 root root 779983 sep  6  2012 partman
-rw-r–r–  1 root root  51640 sep  6  2012 status
-rw——-  1 root root 363674 sep  6  2012 syslog


If those directory is missing was wiped out by the previous administrator, to clear up traces of his previous work before he left job another possible way to find out exact install date is to check timestamp of /lost+found directory;
 

root@pcfreak:~# ls -ld /lost+found/
drwx—— 2 root root 16384 sep  6  2012 /lost+found//


Check OS Linux install date on (Fedora, CentOS, Scientific Linux, Oracle and other Redhat RPM based Distros)


[root@centos: ~]# rpm -qi basesystem
Name        : basesystem
Version     : 10.0
Release     : 7.el7
Architecture: noarch
Install Date: Mon 02 May 2016 19:20:58 BST
Group       : System Environment/Base
Size        : 0
License     : Public Domain
Signature   : RSA/SHA256, Tue 01 Apr 2014 14:23:16 BST, Key ID     199e2f91fd431d51
Source RPM  : basesystem-10.0-7.el7.src.rpm
Build Date  : Fri 27 Dec 2013 17:22:15 GMT
Build Host  : ppc-015.build.eng.bos.redhat.com
Relocations : (not relocatable)
Packager    : Red Hat, Inc. <http://bugzilla.redhat.com/bugzilla>
Vendor      : Red Hat, Inc.
Summary     : The skeleton package which defines a simple Red Hat Enterprise Linux system
Description :
Basesystem defines the components of a basic Red Hat Enterprise Linux
system (for example, the package installation order to use during
bootstrapping). Basesystem should be in every installation of a system,
and it should never be removed.


How to fully recover deleted files on ext3 Debian Linux partition – undelete files from ext3 filesystems with ext3grep

Monday, March 7th, 2011

In order to recover fully data by mistake or on purpose deleted on Debian GNU/Linux there is a tool called ext3grep which is able to completely recover data by innodes.

Recovering the deleted files data is very easy and can be done via some livecd after installing the ext3grep tool.

In my case I used the Back Track Linux distribution to recover my data. Recovery is still in process and it appears all or at least most of my data is about to be recovered.

For the recovery procedure all necessary is an external partition in ext3 or ext3 where the recovered data from the ext3 device can be stored.

My partition was about 20GB and since I had no external hard dive to store the data to I used the sshfs to mount remotely a hard drive via the networking using the sshfs program to make the ssh mount for more see my previous post Howto mount remote server ssh filesystem using sshfs

The Backtrack livecd linux security distribution is missing the ext3grep tool thus I had to first install the tool after booting the livecd on the notebook to succeed in that it was necessary to install the e2fslibs-dev package through the command:

debian:~# apt-get install e2fslibs-dev

Further on I've downloaded the latest version of the ext3grep and untarred the archive and compiled it with the commands:

debian:~# ./configure && make && make install
Then I used the simple commands:

debian:~# cd /mnt/res
debian:~# ext3grep --restore-all /dev/sda8

to launch the recovery.
Where in the above commands /mnt/res is the mountpoint location where I wanted to have all my data recovered and the /dev/sda8 is the device from which I wanted to recover my data.

It takes a bit long until the recovery is completed and with 20 gigabytes of data about 5, 6 hours might be necessary for the data to be recovered but the main point is it recovers.

How to disable GNOME popup notification in Debian Wheezy Linux

Friday, August 2nd, 2013

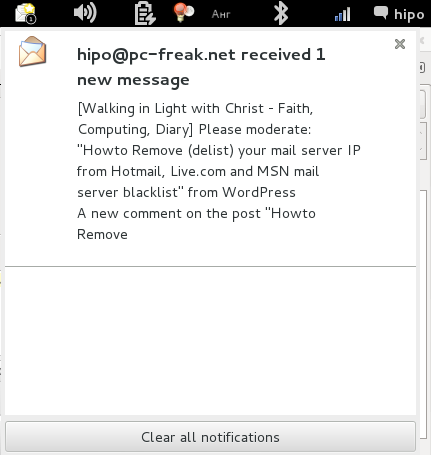
how to disable remove GNOME 2 / 3 popup e mail notification Debian Ubuntu Linux screenshot

I found it very annoying to have a pop-up notification every time I receive a new email it is just pointless there especially, when I already use Thunderbird (IceDove) to fetch my email via pop3. This pop-up notification though planned to be useful messes with my Desktop and breaks the habit on how I'm used to old GNOME interface…. I remember same popup notification was present on older Fedora releases (back in time when I used Fedora Linux for my Desktop).

disable Gnome popup notification new email Debian GNU Linux Wheezy 7 screenshot

My logical guess was in order to disable popup notification in GNOME 3 I had to tamper with gconf-editor. In gconf-editor config database there is:

Apps -> Notification daemon

Problem it is not possible to turn it off. Only available change options are:

default-sound, popup_location, sound_enabled, and theme

After some time of try / fail attempts I found the solution on linuxquestions forum, its quite raw solution but it works, all I had to do is change permissions of /usr/lib/notification-daemon/notification-daemon;

debian:~# chmod 0000 /usr/lib/notification-daemon/notification-daemon

Another thing that is handy to disable is POP UP Window with warning that you have low disk space on Hard Drive.

The warinng for Disk space is very annoying and popups up on every GNOME boot. Actually the hard drive with Low disk space is and old mounted partition in NTFS and I only use it to read data.

Here is how to disable HDD Notification Warnings in GNOME:

debian:~# chmod 0000 /usr/lib/gnome-disk-utility/gdu-notification-daemon

How to solve “Incorrect key file for table ‘/tmp/#sql_9315.MYI’; try to repair it” mysql start up error

Saturday, April 28th, 2012

When a server hard disk scape gets filled its common that Apache returns empty (no content) pages…
This just happened in one server I administer. To restore the normal server operation I freed some space by deleting old obsolete backups.
Actually the whole reasons for this mess was an enormous backup files, which on the last monthly backup overfilled the disk empty space.

Though, I freed about 400GB of space on the the root filesystem and on a first glimpse the system had plenty of free hard drive space, still restarting the MySQL server refused to start up properly and spit error:

Incorrect key file for table '/tmp/#sql_9315.MYI'; try to repair it" mysql start up error

Besides that there have been corrupted (crashed) tables, which reported next to above error.
Checking in /tmp/#sql_9315.MYI, I couldn't see any MYI – (MyISAM) format file. A quick google look up revealed that this error is caused by not enough disk space. This was puzzling as I can see both /var and / partitions had plenty of space so this shouldn't be a problem. Also manally creating the file /tmp/#sql_9315.MYI with:

server:~# touch /tmp/#sql_9315.MYI

Didn't help it, though the file created fine. Anyways a bit of a closer examination I've noticed a /tmp filesystem mounted besides with the other file system mounts ????
You can guess my great amazement to find this 1 Megabyte only /tmp filesystem hanging on the server mounted on the server.

I didn't mounted this 1 Megabyte filesystem, so it was either an intruder or some kind of "weird" bug…
I digged in Googling to see, if I can find more on the error and found actually the whole mess with this 1 mb mounted /tmp partition is caused by, just recently introduced Debian init script /etc/init.d/mountoverflowtmp.
It seems this script was introduced in Debian newer releases. mountoverflowtmp is some kind of emergency script, which is triggered in case if the root filesystem/ space gets filled.
The script has only two options:

# /etc/init.d/mountoverflowtmp
Usage: mountoverflowtmp [start|stop]

Once started what it does it remounts the /tmp to be 1 megabyte in size and stops its execution like it never run. Well maybe, the developers had something in mind with introducing this script I will not argue. What I should complain though is the script design is completely broken. Once the script gets "activated" and does its job. This 1MB mount stays like this, even if hard disk space is freed on the root partition – / ….

Hence to cope with this unhandy situation, once I had freed disk space on the root partition for some reason mountoverflowtmp stop option was not working,
So I had to initiate "hard" unmount:

server:~# mount -l /tmp

Also as I had a bunch of crashed tables and to fix them, also issued on each of the broken tables reported on /etc/init.d/mysql start start-up.

server:~# mysql -u root -p
mysql> use Database_Name;
mysql> repair table Table_Name extended;
....

Then to finally solve the stupid Incorrect key file for table '/tmp/#sql_XXYYZZ33444.MYI'; try to repair it error, I had to restart once again the SQL server:

Stopping MySQL database server: mysqld.
Starting MySQL database server: mysqld.
Checking for corrupt, not cleanly closed and upgrade needing tables..
root@server:/etc/init.d#

Tadadadadam!, SQL now loads and works back as before!

How to mount NTFS Windows XP filesystem on FreeBSD, NetBSD, OpenBSD

Friday, May 11th, 2012

Mounting NTFS hdd partitions on FreeBSD logo picture

A friend of mine bring home a Seagate External Hard Disk Drive using USB 3 as a communication media. I needed to attach the hard disk to my FreeBSD router to transfer him some data, the External HDD is formatted to use NTFS as a main file partition and hence to make the file transfers I had to somehow mount the NTFS partition on the HDD.

FreeBSD and other BSDs, just like Linux does not have embedded NTFS file system mount support.
In order to add an external write support for the plugged hdd NTFS I looked in the ports tree:

freebsd# cd /usr/ports
freebsd# make search name='ntfs'
Port: fusefs-ntfs-2010.10.2
Path: /usr/ports/sysutils/fusefs-ntfs
Info: Mount NTFS partitions (read/write) and disk images
Maint: ports@FreeBSD.org
B-deps: fusefs-libs-2.7.4 libiconv-1.13.1_1 libtool-2.4 libublio-20070103 pkg-config-0.25_1
R-deps: fusefs-kmod-0.3.9.p1.20080208_7 fusefs-libs-2.7.4 libiconv-1.13.1_1 libublio-20070103 pkg-config-0.25_1
WWW: http://www.tuxera.com/community/

Port: ntfsprogs-2.0.0_1
Path: /usr/ports/sysutils/ntfsprogs
Info: Utilities and library to manipulate NTFS partitions
Maint: ports@FreeBSD.org
B-deps: fusefs-libs-2.7.4 libiconv-1.13.1_1 libublio-20070103 pkg-config-0.25_1
R-deps: libublio-20070103 pkg-config-0.25_1
WWW: http://www.linux-ntfs.org/
freebs# cd sysutils/fusefs-ntfs/
freebsd# ls
Makefile distinfo files/ pkg-descr pkg-plist
freebsd# cat pkg-descr
The ntfs-3g driver is an open source, freely available read/write NTFS
driver, which provides safe and fast handling of the Windows XP, Windows
Server 2003 and Windows 2000 filesystems. Almost the full POSIX filesystem
functionality is supported, the major exceptions are changing the file
ownerships and the access rights.
WWW: http://www.tuxera.com/community/

Using ntfs-3g I managed to succeed mounting the NTFS on my old PC running FreeBSD ver. 7_2

1. Installing fuserfs-ntfs support on BSD

Before I can use ntfs-3g, to mount the paritition, I had to install fuserfs-ntfs bsd port, with:

freebsd# cd /usr/ports/sysutils/fusefs-ntfs
freebsd# make install clean
.....

I was curious if ntfsprogs provides other utilities to do the ntfs mount but whilst trying to install it I realized it is already installed as a dependency package to fusefs-ntfs.

fusefs-ntfs package provides a number of utilities for creating, mounting, fixing and doing various manipulations with Microsoft NTFS filesystems.

Here is a list of all the executable utilities helpful in NTFS fs management:

freebsd# pkg_info -L fusefs-ntfs\* | grep -E "/bin/|/sbin|README"
/usr/local/bin/lowntfs-3g
/usr/local/bin/ntfs-3g
/usr/local/bin/ntfs-3g.probe
/usr/local/bin/ntfs-3g.secaudit
/usr/local/bin/ntfs-3g.usermap
/usr/local/bin/ntfscat
/usr/local/bin/ntfscluster
/usr/local/bin/ntfscmp
/usr/local/bin/ntfsfix
/usr/local/bin/ntfsinfo
/usr/local/bin/ntfsls
/usr/local/sbin/mkntfs
/usr/local/sbin/ntfsclone
/usr/local/sbin/ntfscp
/usr/local/sbin/ntfslabel
/usr/local/sbin/ntfsresize
/usr/local/sbin/ntfsundelete
/usr/local/share/doc/ntfs-3g/README
/usr/local/share/doc/ntfs-3g/README.FreeBSD

The README and README.FreeBSD are wonderful, reading for those who want to get more in depth knowledge on using the up-listed utilities.

One utility, worthy to mention, I have used in the past is ntfsfix. ntfsfix resolve issues with NTFS partitions which were not unmounted on system shutdown (electricity outage), system hang up etc.

2. Start fusefs (ntfs) and configure it to auto load on system boot

Once fuserfs-ntfs is installed, if its necessery ntfs fs mounts to be permanently supported on the BSD system add fusefs_enable="YES" to /etc/rc.conf(the FreeBSD services auto load conf).

freebsd# echo 'fusefs_enable="YES"' >> /etc/rc.conf

One note to make here is that you need to have also dbus_enable="YES" and hald_enable="YES" in /etc/rc.conf, not having this two in rc.conf will prevent fusefs to start properly. Do a quick grep to make sure this two variables are enabled:

Afterwards fsusefs load up script should be run:

freebsd# /usr/local/etc/rc.d/fusefs start
Starting fusefs.

Another alternative way to load ntfs support on the BSD host is to directly load fuse.ko kernel module:

freebsd# /sbin/kldload fuse.ko

3. Mounting the NTFS partition

In my case, the Seagate hard drive was detected as da0, where the NTFS partition was detected as s1 (da0s1):

freebsd# dmesg|grep -i da0
da0 at umass-sim0 bus 0 target 0 lun 0
da0: Fixed Direct Access SCSI-4 device
da0: 40.000MB/s transfers
da0: 953869MB (1953525164 512 byte sectors: 255H 63S/T 121601C)br />GEOM_LABEL: Label for provider da0s1 is ntfs/Expansion Drive.
GEOM_LABEL: Label for provider da0s1 is ntfs/Expansion Drive.

Therefore further to mount it one can use mount_ntfs (to quickly mount in read only mode) or ntfs-3g for (read / write mode):

If you need to just quickly mount a disk drive to copy some data and umount it with no need for writting to the NTFS partition do;

freebsd# /sbin/mount_ntfs /dev/ad0s1 /mnt/disk

Note that mount_ntfs command is a native BSD command and have nothing to do with ntfs-3g. Therefore using it to mount NTFS is not the same as mounting it via ntfs-3g cmd

freebsd# /usr/local/bin/ntfs-3g -o rw /dev/da0s1 /mnt/disk/

Something, I've noticed while using ntfs-3g is, it fails to properly exit even when the ntfs-3g shell execution is over:

freebsd# ps ax |grep -i ntfs|grep -v grep
18892 ?? Is 0:00.00 /usr/local/bin/ntfs-3g -o rw /dev/da0s1 /mnt/disk/

I dunno if this is some kind of ntfs-3g bug or feature specific to all versions of FreeBSD or it is something local to FBSD 7.2

Thought ntfs-3g, keeps appearing in process list, praise God as of time of writting NTFS support on FreeBSD prooved to be stable.
Read / Write disk operations to the NTFS I tested it with works great. Just about 5 years ago I still remember write mode was still experimental. Now it seems NTFS mounts can be used with no hassle even on production machines.

4. Auto mounting NTFS partition on FreeBSD system boot

There are two approaches towards 'the problem' I can think of.
The better way to auto mount on boot (in my view) is through /etc/fstab use

If /etc/fstab + ntfs-3g is to be used, you will however change the default /sbin/mount_ntfs command to point to /usr/local/bin/ntfs-3g, i.e.:

freebsd# mv /sbin/mount_ntfs /sbin/mount_ntfs.orig
freebsd# ln -s /usr/local/bin/ntfs-3g /sbin/mount_ntfs

Then to mount /dev/da0s1 via /etc/fstab add line:

/dev/ad0s1 /mnt/disk ntfs rw,late 0 0

To not bother with text editor run:

freebsd# echo '/dev/ad0s1 /mnt/disk ntfs rw,late 0 0' >> /etc/fstab

I've red in posts in freebsd forums, there is also a way to use ntfs-3g for mounting partitions, without substituting the original bsd /sbin/mount_ntfs, the exact commands suggested to be used with no need to prior mv /sbin/mount_ntfs to /sbin/mount_ntfs.orig and link it to ntfs is:

/dev/ad0s1 /disk ntfs rw,mountprog=/usr/local/bin/ntfs-3g,late 0 0

For any other NTFS partitions, for instance /dev/ad0s2, /dev/ad2s1 etc. simply change the parititon name and mount points.

The second alternative to adding the NTFS to auto mount is through /etc/rc.local. /etc/rc.local content will be executed very late in system boot. :

echo '/usr/local/bin/ntfs-3g -o rw /dev/da0s1' >> /etc/rc.local

One disadvanage of using /etc/rc.local for mounting the partition is the hanging ntfs-3g in proc list:

freebsd# ps ax |grep -i ntfs|grep -v grep
18892 ?? Is 0:00.00 /usr/local/bin/ntfs-3g -o rw /dev/da0s1 /mnt/disk/

Though, I haven't tested it yet. Using the same methodology should be perfectly working on PC-BSD, DragonFlyBSD, NetBSD and OpenBSD.
I will be glad if someone who runs any of the other BSDs can confirm, following this instructions works fine on these BSDs too.

The end of the work week :)

Friday, February 1st, 2008

One more week passed without serious server problems. Yesterday after upgrade to debian 4.0rc2 with

apt-get dist-upgrade and reboot the pc-freak box became unbootable.

I wasn’t able to fix it until today because the machine’s box seemed not to read cds well.The problem was consisted of this that after the boot process of the linux kernel has started the machine the boot up was interrupted with a message saying
/sbin/init is missing

and I was dropped to a busybox without being able to read nothing from my filesystem.Thankfully nomen came to Dobrich for the weekend and today he bring me his cdrom-drive I booted with the debian.

Using Debian’s linux rescue I mounted the partition to check what’s wrong. I suspected something is terribly wrong with the lilo’s conf.

Looking closely to it I saw it’s the lilo conf file it was setupped to load a initrd for the older kernel. changing the line to thenew initrd in /etc/lilo.conf and rereading the lilo; /sbin/lilo -C; /sbin/lilo;

fixed the mess and pc-freak booted succesfully! 🙂

Yesterday I had to do something kinky. It was requested from a client to have access to a mysql service of one of the company servers,the problem was that the client didn’t have static IP so I didn’t have a good way to put into the current firewall.

Everytime the adsl they use got restarted a new absolutely random IP from all the BTC IP ranges was assigned.

The solution was to make a port redirect to a non-standard mysql port (XXXXX) which pointed to the standard 3306 service. I had to tell the firewall not to check the coming IPs on the non-standard port (XXXXX) against the 3306 service fwall rules.

Thanks to the help of a guy inirc.freenode.net #iptables jengelh I figured out the solution.

To complete the requested task it was needed to mark all packagescoming into port (XXXXX) using the iptables mangle option and to add a rule to ACCEPT all marked packages.

The rules looked like this

/sbin/iptables -t mangle -A PREROUTING -p tcp –dport XXXXX -j MARK –set-mark 123456/sbin/iptables -t nat -A PREROUTING -d EXTERNAL_IP -i eth0 -p tcp –dport XXXXX -j DNAT –to-destination EXTERNAL_IP:3306

/sbin/iptables -t filter -A INPUT -p tcp –dport 3306 -m mark –mark 123456 -j ACCEPT .

Something I wondered a bit was should /proc/sys/net/ipv4/ip_forward in order for the above redirect to be working, in case you’re wondering too well it doesn’t 🙂 The working week was a sort of quiteful no serious problems with servers and work no serious problems at school (although I see me and my collegues become more and more unserious) at studying. My grand parentsdecided to make me a gift and give me money to buy a laptop and I’m pretty happy for this 🙂 All that is left is to choose a good machine with hardware supported both by FreeBSD and Linux.

END—–

How to debug mod_rewrite .htaccess problems with RewriteLog / Solve mod_rewrite broken redirects

Friday, September 30th, 2011

Its common thing that CMS systems and many developers custom .htaccess cause issues where websites depending on mod_rewrite fails to work properly. Most common issues are broken redirects or mod_rewrite rules, which behave differently among the different mod_rewrite versions which comes with different versions of Apache.

Everytime there are such problems its necessery that mod_rewrite’s RewriteLog functionality is used.
Even though the RewriteLog mod_rewrite config variable is well described on httpd.apache.org , I decided to drop a little post here as I’m pretty sure many novice admins might not know about RewriteLog config var and might benefit of this small article.
Enabling mod_rewrite requests logging of requests to the webserver and process via mod_rewrite rules is being done either via the specific website .htaccess (located in the site’s root directory) or via httpd.conf, apache2.conf etc. depending on the Linux / BSD linux distribution Apache config file naming is used.

To enable RewriteLog near the end of the Apache configuration file its necessery to place the variables in apache conf:

1. Edit RewriteLog and place following variables:

RewriteLogLevel 9
RewriteLog /var/log/rewrite.log

RewriteLogLevel does define the level of logging that should get logged in /var/log/rewrite.log
The higher the RewriteLogLevel number defined the more debugging related to mod_rewrite requests processing gets logged.
RewriteLogLevel 9 is actually the highest loglevel that can be. Setting the RewriteLogLevel to 0 will instruct mod_rewrite to stop logging. In many cases a RewriteLogLevel of 3 is also enough to debug most of the redirect issues, however I prefer to see more, so almost always I use RewriteLogLevel of 9.

2. Create /var/log/rewrite.log and set writtable permissions

a. Create /var/log/rewrite.log

freebsd# touch /var/log/rewrite.log

b. Set writtable permissons

Either chown the file to the user with which the Apache server is running, or chmod it to permissions of 777.

On FreeBSD, chown permissions to allow webserver to write in file, should be:

freebsd# chown www:www /var/log/rewrite.log

On Debian and alike distros:

debian:~# chown www-data:www-data /var/log/rewrite.log

On CentOS, Fedora etc.:

[root@centos ~]# chown httpd:httpd /var/log/rewrite.log

On any other distribution, you don’t want to bother to check the uid:gid, the permissions can be set with chmod 777, e.g.:

linux# chmod 777 /var/log/rewrite.log

Next after RewriteLog is in conf to make configs active the usual webserver restart is required.

To restart Apache On FreeBSD:

freebsd# /usr/local/etc/rc.d/apache2 restart
...

To restart Apache on Debian and derivatives:

debian:~# /etc/init.d/apache2 restart
...

On Fedora and derivive distros:

[root@fedora ~]# /etc/init.d/httpd restart
...

Its common error to forget to set proper permissions to /var/log/rewrite.log this has puzzled me many times, when enabling RewriteLog’s logging.

Another important note is when debugging for mod_rewrite is enabled, one forgets to disable logging and after a while if the /var/log partition is placed on a small partition or is on an old server with less space often the RewriteLog fills in the disk quickly and might create website downtimes. Hence always make sure RewriteLog is disabled after work rewrite debugging is no longer needed.

The way I use to disable it is by commenting it in conf like so:

#RewriteLogLevel 9
#RewriteLog /var/log/rewrite.log

Finally to check, what the mod_rewrite processor is doing on the fly its handy to use the well known tail -f

linux# tail -f /var/log/rewrite.log

A bunch of time in watching the requests, should be enough to point to the exact problem causing broken redirects or general website malfunction.
Cheers 😉