Posts Tagged ‘mess’

How to filter dhcp traffic between two networks running separate DHCP servers to prevent IP assignment issues and MAC duplicate addresses

Tuesday, February 8th, 2022

how-to-filter-dhcp-traffic-2-networks-running-2-separate-dhcpd-servers-to-prevent-ip-assignment-conflicts-linux
Tracking the Problem of MAC duplicates on Linux routers
 

If you have two networks that see each other and they're not separated in VLANs but see each other sharing a common netmask lets say 255.255.254.0 or 255.255.252.0, it might happend that there are 2 dhcp servers for example (isc-dhcp-server running on 192.168.1.1 and dhcpd running on 192.168.0.1 can broadcast their services to both LANs 192.168.1.0.1/24 (netmask 255.255.255.0) and Local Net LAN 192.168.1.1/24. The result out of this is that some devices might pick up their IP address via DHCP from the wrong dhcp server.

Normally if you have a fully controlled little or middle class home or office network (10 – 15 electronic devices nodes) connecting to the LAN in a mixed moth some are connected via one of the Networks via connected Wifi to 192.168.1.0/22 others are LANned and using static IP adddresses and traffic is routed among two ISPs and each network can see the other network, there is always a possibility of things to go wrong. This is what happened to me so this is how this post was born.

The best practice from my experience so far is to define each and every computer / phone / laptop host joining the network and hence later easily monitor what is going on the network with something like iptraf-ng / nethogs  / iperf – described in prior  how to check internet spepeed from console and in check server internet connectivity speed with speedtest-cliiftop / nload or for more complex stuff wireshark or even a simple tcpdump. No matter the tools network monitoring is only part on solving network issues. A very must have thing in a controlled network infrastructure is defining every machine part of it to easily monitor later with the monitoring tools. Defining each and every host on the Hybrid computer networks makes administering the network much easier task and  tracking irregularities on time is much more likely. 

Since I have such a hybrid network here hosting a couple of XEN virtual machines with Linux, Windows 7 and Windows 10, together with Mac OS X laptops as well as MacBook Air notebooks, I have followed this route and tried to define each and every host based on its MAC address to pick it up from the correct DHCP1 server  192.168.1.1 (that is distributing IPs for Internet Provider 1 (ISP 1), that is mostly few computers attached UTP LAN cables via LiteWave LS105G Gigabit Switch as well from DHCP2 – used only to assigns IPs to servers and a a single Wi-Fi Access point configured to route incoming clients via 192.168.0.1 Linux NAT gateway server.

To filter out the unwanted IPs from the DHCPD not to propagate I've so far used a little trick to  Deny DHCP MAC Address for unwanted clients and not send IP offer for them.

To give you more understanding,  I have to clear it up I don't want to have automatic IP assignments from DHCP2 / LAN2 to DHCP1 / LAN1 because (i don't want machines on DHCP1 to end up with IP like 192.168.0.50 or DHCP2 (to have 192.168.1.80), as such a wrong IP delegation could potentially lead to MAC duplicates IP conflicts. MAC Duplicate IP wrong assignments for those older or who have been part of administrating large ISP network infrastructures  makes the network communication unstable for no apparent reason and nodes partially unreachable at times or full time …

However it seems in the 21-st century which is the century of strangeness / computer madness in the 2022, technology advanced so much that it has massively started to break up some good old well known sysadmin standards well documented in the RFCs I know of my youth, such as that every electronic equipment manufactured Vendor should have a Vendor Assigned Hardware MAC Address binded to it that will never change (after all that was the idea of MAC addresses wasn't it !). 
Many mobile devices nowadays however, in the developers attempts to make more sophisticated software and Increase Anonimity on the Net and Security, use a technique called  MAC Address randomization (mostly used by hackers / script kiddies of the early days of computers) for their Wi-Fi Net Adapter OS / driver controlled interfaces for the sake of increased security (the so called Private WiFi Addresses). If a sysadmin 10-15 years ago has seen that he might probably resign his profession and turn to farming or agriculture plant growing, but in the age of digitalization and "cloud computing", this break up of common developed network standards starts to become the 'new normal' standard.

I did not suspected there might be a MAC address oddities, since I spare very little time on administering the the network. This was so till recently when I accidently checked the arp table with:

Hypervisor:~# arp -an
192.168.1.99     5c:89:b5:f2:e8:d8      (Unknown)
192.168.1.99    00:15:3e:d3:8f:76       (Unknown)

..


and consequently did a network MAC Address ARP Scan with arp-scan (if you never used this little nifty hacker tool I warmly recommend it !!!)
If you don't have it installed it is available in debian based linuces from default repos to install

Hypervisor:~# apt-get install –yes arp-scan


It is also available on CentOS / Fedora / Redhat and other RPM distros via:

Hypervisor:~# yum install -y arp-scan


Hypervisor:~# arp-scan –interface=eth1 192.168.1.0/24

192.168.1.19    00:16:3e:0f:48:05       Xensource, Inc.
192.168.1.22    00:16:3e:04:11:1c       Xensource, Inc.
192.168.1.31    00:15:3e:bb:45:45       Xensource, Inc.
192.168.1.38    00:15:3e:59:96:8e       Xensource, Inc.
192.168.1.34    00:15:3e:d3:8f:77       Xensource, Inc.
192.168.1.60    8c:89:b5:f2:e8:d8       Micro-Star INT'L CO., LTD
192.168.1.99     5c:89:b5:f2:e8:d8      (Unknown)
192.168.1.99    00:15:3e:d3:8f:76       (Unknown)

192.168.x.91     02:a0:xx:xx:d6:64        (Unknown)
192.168.x.91     02:a0:xx:xx:d6:64        (Unknown)  (DUP: 2)

N.B. !. I found it helpful to check all available interfaces on my Linux NAT router host.

As you see the scan revealed, a whole bunch of MAC address mess duplicated MAC hanging around, destroying my network topology every now and then 
So far so good, the MAC duplicates and strangely hanging around MAC addresses issue, was solved relatively easily with enabling below set of systctl kernel variables.
 

1. Fixing Linux ARP common well known Problems through disabling arp_announce / arp_ignore / send_redirects kernel variables disablement


Linux answers ARP requests on wrong and unassociated interfaces per default. This leads to the following two problems:

ARP requests for the loopback alias address are answered on the HW interfaces (even if NOARP on lo0:1 is set). Since loopback aliases are required for DSR (Direct Server Return) setups this problem is very common (but easy to fix fortunately).

If the machine is connected twice to the same switch (e.g. with eth0 and eth1) eth2 may answer ARP requests for the address on eth1 and vice versa in a race condition manner (confusing almost everything).

This can be prevented by specific arp kernel settings. Take a look here for additional information about the nature of the problem (and other solutions): ARP flux.

To fix that generally (and reboot safe) we  include the following lines into


Hypervisor:~# cp -rpf /etc/sysctl.conf /etc/sysctl.conf_bak_07-feb-2022
Hypervisor:~# cat >> /etc/sysctl.conf

# LVS tuning
net.ipv4.conf.lo.arp_ignore=1
net.ipv4.conf.lo.arp_announce=2
net.ipv4.conf.all.arp_ignore=1
net.ipv4.conf.all.arp_announce=2

net.ipv4.conf.all.send_redirects=0
net.ipv4.conf.eth0.send_redirects=0
net.ipv4.conf.eth1.send_redirects=0
net.ipv4.conf.default.send_redirects=0

Press CTRL + D simultaneusly to Write out up-pasted vars.


To read more on Load Balancer using direct routing and on LVS and the arp problem here


2. Digging further the IP conflict / dulicate MAC Problems

Even after this arp tunings (because I do have my Hypervisor 2 LAN interfaces connected to 1 switch) did not resolved the issues and still my Wireless Connected devices via network 192.168.1.1/24 (ISP2) were randomly assigned the wrong range IPs 192.168.0.XXX/24 as well as the wrong gateway 192.168.0.1 (ISP1).
After thinking thoroughfully for hours and checking the network status with various tools and thanks to the fact that my wife has a MacBook Air that was always complaining that the IP it tried to assign from the DHCP was already taken, i"ve realized, something is wrong with DHCP assignment.
Since she owns a IPhone 10 with iOS and this two devices are from the same vendor e.g. Apple Inc. And Apple's products have been having strange DHCP assignment issues from my experience for quite some time, I've thought initially problems are caused by software on Apple's devices.
I turned to be partially right after expecting the logs of DHCP server on the Linux host (ISP1) finding that the phone of my wife takes IP in 192.168.0.XXX, insetad of IP from 192.168.1.1 (which has is a combined Nokia Router with 2.4Ghz and 5Ghz Wi-Fi and LAN router provided by ISP2 in that case Vivacom). That was really puzzling since for me it was completely logical thta the iDevices must check for DHCP address directly on the Network of the router to whom, they're connecting. Guess my suprise when I realized that instead of that the iDevices does listen to the network on a wide network range scan for any DHCPs reachable baesd on the advertised (i assume via broadcast) address traffic and try to connect and take the IP to the IP of the DHCP which responds faster !!!! Of course the Vivacom Chineese produced Nokia router responded DHCP requests and advertised much slower, than my Linux NAT gateway on ISP1 and because of that the Iphone and iOS and even freshest versions of Android devices do take the IP from the DHCP that responds faster, even if that router is not on a C class network (that's invasive isn't it??). What was even more puzzling was the automatic MAC Randomization of Wifi devices trying to connect to my ISP1 configured DHCPD and this of course trespassed any static MAC addresses filtering, I already had established there.

Anyways there was also a good think out of tthat intermixed exercise 🙂 While playing around with the Gigabit network router of vivacom I found a cozy feature SCHEDULEDING TURNING OFF and ON the WIFI ACCESS POINT  – a very useful feature to adopt, to stop wasting extra energy and lower a bit of radiation is to set a swtich off WIFI AP from 12:30 – 06:30 which are the common sleeping hours or something like that.
 

3. What is MAC Randomization and where and how it is configured across different main operating systems as of year 2022?

Depending on the operating system of your device, MAC randomization will be available either by default on most modern mobile OSes or with possibility to have it switched on:

  • Android Q: Enabled by default 
  • Android P: Available as a developer option, disabled by default
  • iOS 14: Available as a user option, disabled by default
  • Windows 10: Available as an option in two ways – random for all networks or random for a specific network

Lately I don't have much time to play around with mobile devices, and I do not my own a luxury mobile phone so, the fact this ne Androids have this MAC randomization was unknown to me just until I ended a small mess, based on my poor configured networks due to my tight time constrains nowadays.

Finding out about the new security feature of MAC Randomization, on all Android based phones (my mother's Nokia smartphone and my dad's phone, disabled the feature ASAP:


4. Disable MAC Wi-Fi Ethernet device Randomization on Android

MAC Randomization creates a random MAC address when joining a Wi-Fi network for the first time or after “forgetting” and rejoining a Wi-Fi network. It Generates a new random MAC address after 24 hours of last connection.

Disabling MAC Randomization on your devices. It is done on a per SSID basis so you can turn off the randomization, but allow it to function for hotspots outside of your home.

  1. Open the Settings app
  2. Select Network and Internet
  3. Select WiFi
  4. Connect to your home wireless network
  5. Tap the gear icon next to the current WiFi connection
  6. Select Advanced
  7. Select Privacy
  8. Select "Use device MAC"
     

5. Disabling MAC Randomization on MAC iOS, iPhone, iPad, iPod

To Disable MAC Randomization on iOS Devices:

Open the Settings on your iPhone, iPad, or iPod, then tap Wi-Fi or WLAN


  1. Tap the information button next to your network
  2. Turn off Private Address
  3. Re-join the network


Of course next I've collected their phone Wi-Fi adapters and made sure the included dhcp MAC deny rules in /etc/dhcp/dhcpd.conf are at place.

The effect of the MAC Randomization for my Network was terrible constant and strange issues with my routings and networks, which I always thought are caused by the openxen hypervisor Virtualization VM bugs etc.

That continued for some months now, and the weird thing was the issues always started when I tried to update my Operating system to the latest packetset, do a reboot to load up the new piece of software / libraries etc. and plus it happened very occasionally and their was no obvious reason for it.


6. How to completely filter dhcp traffic between two network router hosts
IP 192.168.0.1 / 192.168.1.1 to stop 2 or more configured DHCP servers
on separate networks see each other

To prevent IP mess at DHCP2 server side (which btw is ISC DHCP server, taking care for IP assignment only for the Servers on the network running on Debian 11 Linux), further on I had to filter out any DHCP UDP traffic with iptables completely.
To prevent incorrect route assignments assuming that you have 2 networks and 2 routers that are configurred to do Network Address Translation (NAT)-ing Router 1: 192.168.0.1, Router 2: 192.168.1.1.

You have to filter out UDP Protocol data on Port 67 and 68 from the respective source and destination addresses.

In firewall rules configuration files on your Linux you need to have some rules as:

# filter outgoing dhcp traffic from 192.168.1.1 to 192.168.0.1
-A INPUT -p udp -m udp –dport 67:68 -s 192.168.1.1 -d 192.168.0.1 -j DROP
-A OUTPUT -p udp -m udp –dport 67:68 -s 192.168.1.1 -d 192.168.0.1 -j DROP
-A FORWARD -p udp -m udp –dport 67:68 -s 192.168.1.1 -d 192.168.0.1 -j DROP

-A INPUT -p udp -m udp –dport 67:68 -s 192.168.0.1 -d 192.168.1.1 -j DROP
-A OUTPUT -p udp -m udp –dport 67:68 -s 192.168.0.1 -d 192.168.1.1 -j DROP
-A FORWARD -p udp -m udp –dport 67:68 -s 192.168.0.1 -d 192.168.1.1 -j DROP

-A INPUT -p udp -m udp –sport 67:68 -s 192.168.1.1 -d 192.168.0.1 -j DROP
-A OUTPUT -p udp -m udp –sport 67:68 -s 192.168.1.1 -d 192.168.0.1 -j DROP
-A FORWARD -p udp -m udp –sport 67:68 -s 192.168.1.1 -d 192.168.0.1 -j DROP


You can download also filter_dhcp_traffic.sh with above rules from here


Applying this rules, any traffic of DHCP between 2 routers is prohibited and devices from Net: 192.168.1.1-255 will no longer wrongly get assinged IP addresses from Network range: 192.168.0.1-255 as it happened to me.


7. Filter out DHCP traffic based on MAC completely on Linux with arptables

If even after disabling MAC randomization on all devices on the network, and you know physically all the connecting devices on the Network, if you still see some weird MAC addresses, originating from a wrongly configured ISP traffic router host or whatever, then it is time to just filter them out with arptables.

## drop traffic prevent mac duplicates due to vivacom and bergon placed in same network – 255.255.255.252
dchp1-server:~# arptables -A INPUT –source-mac 70:e2:83:12:44:11 -j DROP


To list arptables configured on Linux host

dchp1-server:~# arptables –list -n


If you want to be paranoid sysadmin you can implement a MAC address protection with arptables by only allowing a single set of MAC Addr / IPs and dropping the rest.

dchp1-server:~# arptables -A INPUT –source-mac 70:e2:84:13:45:11 -j ACCEPT
dchp1-server:~# arptables -A INPUT  –source-mac 70:e2:84:13:45:12 -j ACCEPT


dchp1-server:~# arptables -L –line-numbers
Chain INPUT (policy ACCEPT)
1 -j DROP –src-mac 70:e2:84:13:45:11
2 -j DROP –src-mac 70:e2:84:13:45:12

Once MACs you like are accepted you can set the INPUT chain policy to DROP as so:

dchp1-server:~# arptables -P INPUT DROP


If you later need to temporary, clean up the rules inside arptables on any filtered hosts flush all rules inside INPUT chain, like that
 

dchp1-server:~#  arptables -t INPUT -F

How to disable ACPI on productive Linux servers to decrease kernel panics and increase CPU fan lifespan

Tuesday, May 15th, 2012

Linux TUX ACPI logo / Tux Hates ACPI logohttps://www.pc-freak.net/images/linux_tux_acpi_logo-tux-hates-acpi.png

Why would anyone disable ACPI support on a server machine??
Well  ACPI support kernel loaded code is just another piece of code constantly being present in the memory,  that makes the probability for a fatal memory mess up leading to  a fatal bug resulting in system crash (kernel panic) more likely.

Many computers ship with buggy or out of specifications ACPI firmware which can cause a severe oddities on a brand new bought piece of comp equipment.

One such oddity related to ACPI motherboard support problems is if you notice your machine randomly powering off or failing to boot with a brand new Linux installed on it.

Another reason to switch off ACPI code will would to be prevent the CPU FAN rotation from being kernel controlled.

If the kernel controls the CPU fan on  high CPU heat up it will instruct the fan to rotate quickly and on low system loads it will bring back the fan to loose speed.
 This frequent switch of FAN from high speed to low speed  increases the probability for a short fan damage due to frequent changes of fan speed. Such a fan damage leads often to  system outage due to fan failure to rotate properly.

Therefore in my view it is better ACPI support is switched off completely on  servers. On some servers ACPI is useful as it can be used to track CPU temperature with embedded motherboard sensors with lm_sensors or any piece of hardwre vendor specific software provided. On many machines, however lm_sensors will not properly recognize the integrated CPU temperature sensors and hence ACPI is mostly useless.

There are 3 ways to disable fully or partially ACPI support.

- One is to disable it straight for BIOS (best way IMHO)
- Disable via GRUB or LILO passing a kernel parameter
- Partial ACPI off-ing - /disabling the software that controls the CPU fan/

1. Disable ACPI in BIOS level

Press DEL, F1, F2, F10 or whatever the enter bios key combination is go through all the different menus (depending on the vios BENDOR) and make sure every occurance of ACPI is set to off / disable whatever it is called.

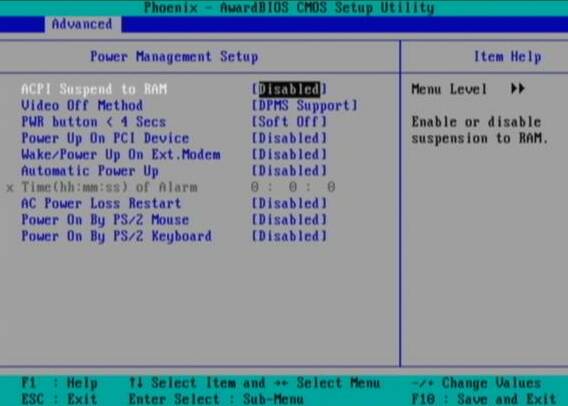
Below is a screenshot of menus with ACPI stuff on a motherboard equipped with Phoenix AwardBIOS:

BIOS ACPI Disable power Off Phoenix BIOS

This is the in my opinon best and safest way to disable ACPI power saving, Unfortunately some newer PCs lack the functionality to disable ACPI; (probably due to the crazy "green" policy the whole world is nowdays mad of).

If that's the case with you, thanksfully there is a "software way" to disable ACPI via passing kernel options via GRUB and LILO boot loaders.

2. Disabling ACPI support on kernel boot level through GRUB boot loader config

There is a tiny difference in command to pass in order to disable  ACPI depending on the Linux installed  GRUB ver. 1.x or GRUB 2.x.

a) In GRUB 0.99 (GRUB version 1)

Edit file /etc/grub/menu.lst or /etc/grub/grub.conf (location differs across Linux distribution). Therein append:

acpi=off

to the end of kernel command line.

Here is an example of a kernel command line with ACPI not disabled (example taken from CentOS server grub.conf):

[root@centos ~]# grep -i title -A 4 /etc/grub/grub.conf
title Red Hat Enterprise Linux Server (2.6.18-36.el5)
root (hd0,0)
kernel /vmlinuz-2.6.18-36.el5 ro root=/dev/VolGroup00/LogVol00 console=ttyS0,115200n8
initrd /initrd-2.6.18-36.el5.img

The edited version of the file with acpi=off included should look like so:

title Red Hat Enterprise Linux Server (2.6.18-36.el5)
root (hd0,0)
kernel /vmlinuz-2.6.18-36.el5 ro root=/dev/VolGroup00/LogVol00 console=ttyS0,115200n8 acpi=off
initrd /initrd-2.6.18-36.el5.img

The kernel option root=/dev/VolGroup00/LogVol00 means the the server is configured to use LVM (Logical Volume Manager).

b) Disabling ACPI on GRUB version 1.99 +

This version is by default installed on newer Ubuntu and Debian Linux-es.

In grub 1.99 on latest Debian Squeeze, the file to edit is located in /boot/grub/grub.cfg. The file is more messy than with its predecessor menu.lst (grub 0.99).
Thanks God there is no need to directly edit the file (though this is possible), but on newer Linuces (as of time of writting the post), there is another simplied grub config file /etc/grub/config

Hence to add the acpi=off to 1.99 open /etc/grub/config find the line reading:

GRUB_CMDLINE_LINUX_DEFAULT="quiet"

and append the "acpi=off" option, e.g. the line has to change to:

GRUB_CMDLINE_LINUX_DEFAULT="quiet acpi=off"

On some servers it might be better to also disable APIC along with ACPI:

Just in case you don't know what is the difference between ACPI and APIC, here is a short explanation:

ACPI = Advanced Configuration and Power Interface

APIC = Advanced Programmable Interrupt Controllers

ACPI is the system that controls your dynamic speed fans, the power button behavior, sleep states, etc.

APIC is the replacement for the old PIC chip that used to come imbedded on motherboards that allowed you to setup interrupts for your soundcard, ide controllers, etc.

Hence on some machines experiencing still problems with even ACPI switched off, it is helpful  to disable the APIC support too, by using:

acpi=off noapic noacpi

Anyways, while doing the changes, be very very cautious or you might end up with un-boot-able server. Don't blame me if this happens :); be sure you have a backup option if server doesn't boot.

To assure faultless kernel boot, GRUB has ability to be configured to automatically load up a second kernel if 1st one fails to boot, if you need that read the grub documentation on that.

To load up the kernel with the new setting, give it a restart:

[root@centos ~]# shutdown -r now
....

3. Disable ACPI support on kernel boot time on Slackware or other Linuxes still booting kernel with LILO

Still, some Linux distros like Slackware, decided to keep the old way and use LILO (LInux LOader) as a default boot loader.

Disabling ACPI support in LILO is done through /etc/lilo.conf

By default in /etc/lilo.conf, there is a line:

append= acpi=on

it should be changed to:

append= acpi=off

Next to load up the new acpi disabled setting, lilo has to be reloaded:

slackware:~# /sbin/lilo -c /etc/lilo.conf
....

Finally a reboot is required:

slackware:~# reboot
....

(If you don't have a physical access or someone near the server you better not 🙂 )

4. Disable ACPI fan control support on a running Linux server without restart

This is the most secure work-around, to disabling the ACPI control over the machine CPU fan, however it has a downside that still the ACPI code will be loaded in the kernel and could cause kernel issues possibly in the long run – lets say the machine has uptime of more than 2 years…

The acpi support on a user level  is controlled by acpid or haldaemon (depending on the Linux distro), hence to disable the fan control on servers this services has to be switched off:

a) disabling ACPI on Debian and deb based Linux-es

As of time of writting on Debian Linux servers acpid (Advanced Configuration and Power Interface event daemon) is there to control how power management will be handled. To disable it stop it as a service (if running):

debian:~# /etc/init.d/acpid stop

To permanently remove acpid from boot up on system boot disable it with update-rc.d:

debian:~# update-rc.d acpid disable 2 3 4 5
update-rc.d: using dependency based boot sequencing
insserv: Script iptables is broken: incomplete LSB comment.
insserv: missing `Required-Start:' entry: please add even if empty.
insserv: warning: current start runlevel(s) (empty) of script `acpid' overwrites defaults (2 3 4 5).
insserv: warning: current stop runlevel(s) (2 3 4 5) of script `acpid' overwrites defaults (empty).
insserv: missing `Required-Start:' entry: please add even if empty.

b) disabling ACPI on RHEL, Fedora and other Redhat-s (also known as RedHacks 🙂 )

I'm not sure if this is safe,as many newer rpm based server system services,  might not work properly with haldaemon disabled.

Anyways you can give it a try if when it is stopped there are issues just bring it up again.

[root@rhel ~]# /etc/init.d/haldaemon stop

If all is fine with the haldaemon switched off (hope so), you can completely disable it to load on start up with:

[root@centos ~]# /sbin/chkconfig --level 2 3 4 5 haldaemon off

Disabling ACPI could increase a bit your server bills, but same time decrease losses from downtimes, so I guess it worths its costs 🙂


How to solve “Incorrect key file for table ‘/tmp/#sql_9315.MYI’; try to repair it” mysql start up error

Saturday, April 28th, 2012

When a server hard disk scape gets filled its common that Apache returns empty (no content) pages…
This just happened in one server I administer. To restore the normal server operation I freed some space by deleting old obsolete backups.
Actually the whole reasons for this mess was an enormous backup files, which on the last monthly backup overfilled the disk empty space.

Though, I freed about 400GB of space on the the root filesystem and on a first glimpse the system had plenty of free hard drive space, still restarting the MySQL server refused to start up properly and spit error:

Incorrect key file for table '/tmp/#sql_9315.MYI'; try to repair it" mysql start up error

Besides that there have been corrupted (crashed) tables, which reported next to above error.
Checking in /tmp/#sql_9315.MYI, I couldn't see any MYI – (MyISAM) format file. A quick google look up revealed that this error is caused by not enough disk space. This was puzzling as I can see both /var and / partitions had plenty of space so this shouldn't be a problem. Also manally creating the file /tmp/#sql_9315.MYI with:

server:~# touch /tmp/#sql_9315.MYI

Didn't help it, though the file created fine. Anyways a bit of a closer examination I've noticed a /tmp filesystem mounted besides with the other file system mounts ????
You can guess my great amazement to find this 1 Megabyte only /tmp filesystem hanging on the server mounted on the server.

I didn't mounted this 1 Megabyte filesystem, so it was either an intruder or some kind of "weird" bug…
I digged in Googling to see, if I can find more on the error and found actually the whole mess with this 1 mb mounted /tmp partition is caused by, just recently introduced Debian init script /etc/init.d/mountoverflowtmp.
It seems this script was introduced in Debian newer releases. mountoverflowtmp is some kind of emergency script, which is triggered in case if the root filesystem/ space gets filled.
The script has only two options:

# /etc/init.d/mountoverflowtmp
Usage: mountoverflowtmp [start|stop]

Once started what it does it remounts the /tmp to be 1 megabyte in size and stops its execution like it never run. Well maybe, the developers had something in mind with introducing this script I will not argue. What I should complain though is the script design is completely broken. Once the script gets "activated" and does its job. This 1MB mount stays like this, even if hard disk space is freed on the root partition – / ….

Hence to cope with this unhandy situation, once I had freed disk space on the root partition for some reason mountoverflowtmp stop option was not working,
So I had to initiate "hard" unmount:

server:~# mount -l /tmp

Also as I had a bunch of crashed tables and to fix them, also issued on each of the broken tables reported on /etc/init.d/mysql start start-up.

server:~# mysql -u root -p
mysql> use Database_Name;
mysql> repair table Table_Name extended;
....

Then to finally solve the stupid Incorrect key file for table '/tmp/#sql_XXYYZZ33444.MYI'; try to repair it error, I had to restart once again the SQL server:

Stopping MySQL database server: mysqld.
Starting MySQL database server: mysqld.
Checking for corrupt, not cleanly closed and upgrade needing tables..
root@server:/etc/init.d#

Tadadadadam!, SQL now loads and works back as before!

How to convert file content encoded in windows-cp1251 charset to UTF-8 (with iconv) to be delivered properly encoded to browsing end clients

Wednesday, May 16th, 2012

windows-cp1251 bulgarian to UTF-8 / Encoding Communication Decoding Communication Funny Picture

I have a bunch of old html files all encoded in the historically obsolete Windows-cp1251. Windows-CP1251 used to be common used 7 years ago and therefore still big portions of the web content in Bulgarian / Russian Cyrillic is still transferred to the end users in this encoding.

This was just before the "UTF-8 revolution", where massively people started using UTF-8,
Well it was clear the specific national country text encoding standards will quickly be moved by to UTF-8 – Universal Encoding format which abbreviation stands for (Unicode Transformation Format).

Though UTF-8 was clear to be "the future", many web developers mostly because of their incompetency or using an old sources of learning how to writen in HTML continued to use windows-cp1251 in HTMLs. I'm even convinced, there are still developers out there who are writting websites for Bulgarian / Russian / Macedonian customers using obsolete encodings …

The smarter developers of those accustomed to windows-cp1251, KOI-8R etc. etc., were using the meta tag to specify the type of charset of the web page content with:

<meta http-equiv="content-type" content="text/html;charset=windows-cp1251">

or

<meta http-equiv="content-type" content="text/html;charset=koi-8r">

Anyhow, still many devs even didn't placed the windows-cp1251 in the head of the HTML …

The result for the system administrator is always a mess – a lot of webpages that are showing like unreadable signs and tons of unhappy customers.
As always the system administrator is considered responsible, for the programmer mistakes :). So instead of programmers fix their bad cooking, the admin has to fix it all!

One quick work around me as admin has applied to failing to display pages in Cyrillic using the Windows-cp1251 character encoding was to force windows-cp1251 as a default encoding for the whole virtualhost or Apache directory with Apache directives like:

<VirtualHost *:80>
ServerAdmin some_user@some_host.com
DocumentRoot /var/www/html
AddDefaultCharset windows-cp1251
ServerName the_host_name.com
ServerAlias www.the_host_name.com
....
....
<Directory>
AddDefaultCharset windows-cp1251
>/Directory>
</VirtualHost>

Though this mostly would, work there are some occasions, where only a particular html files from all the content served by Apache is encoded in windows-cp1251, if most of the content is already written in UTF-8, this could be a big issues as you cannot just change the UTF-8 globally to windows-cp1251, just because few pages are written in archaic encoding….
Since most of the content is displayed to the client by Apache (as prior explained) just fine, only particular htmls lets's ay single.html, single2.html etc. etc. are displayed with some question marks or some non-human readable "hieroglyphs".

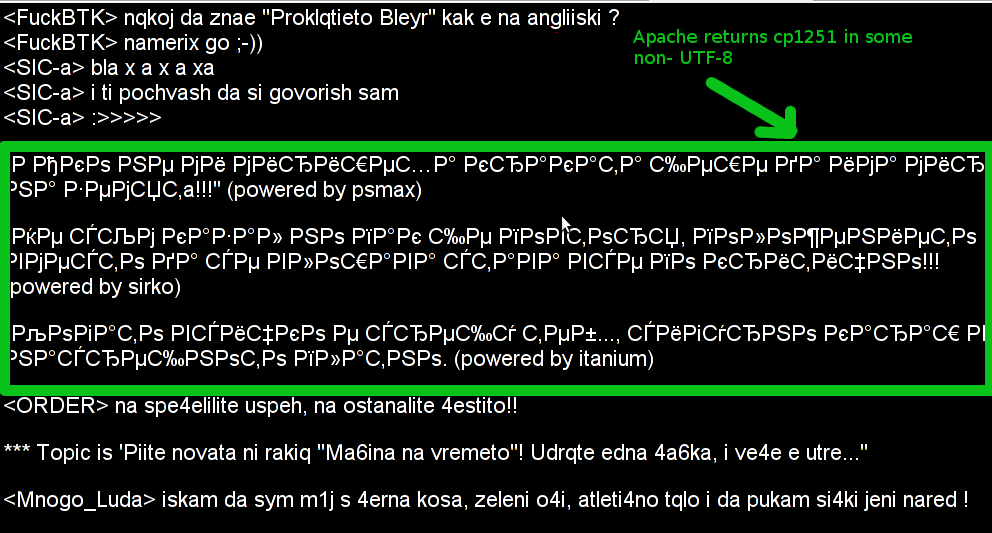
Below is a screenshot from two pages returned to my browser in wrongly set htmls charset:

Improper Windows CP1251 encoding with Apache set to serve UTF-8 encoding questiomarks

Improper Windows CP1251 delivered page in UTF-8 browser view

Apache returns cp1251 in some non-UTF8 wrong encoding (webserver improperly served cyrillic encoding)

Improperly served encoding CP1251 delivered by Apache in non-utf-8 encoding

When this kind of issues occur, the only solution is to simply login to the server and use iconv command to convert all files returning unreadable content from whatever the non UTF-8 encoding is lets say in my case Bulgarian typeset of cp1251 to UTF-8

Here is how the iconv command to convert between windows-cp1251 to utf-8 the two sample files named single1.html and single2.html

server:/web# /usr/bin/iconv -f WINDOWS-1251 -t UTF-8 single1.html > single1.html.utf8
server:/web# mv single1.html single1.html.bak;
server:/web# mv single1.html.utf8 single1.html
server:/web# /usr/bin/iconv -f WINDOWS-1251 -t UTF-8 single2.html > single2.html.utf8
server:/web# mv single2.html single2.html.bak;
server:/web# mv single2.html.utf8 single2.html

I always, make copies of the original cp1251 encoded files (as you see mv single1.html single1.html.bak), because if something goes wrong with convertion I can easily revert back.

If there are 10 files with consequential numbers naming they can be converted using a short for loop, like so:

server:/web# for i $(seq 1 10); do
/usr/bin/iconv -f WINDOWS-1251 -t UTF-8 single$i.html > single$i.html.utf8;mv single$i.html single$i.html.bak
mv single$i.html.utf8 single$i.html
done

Just as earlier mentioned if single1.html, single2.html … has in the html <head>:

<meta http-equiv="Content-Type" content="text/html; charset=windows-1251">

You should open, each of the files in question and wipe out the line either by hand or use sed to wipe it in one loop if it has to be done for lets say 10 files named (single{1..10})

server:/web# for i in $(seq 1 10); do
sed '/<meta http-equiv="Content-Type" content="text\/html; charset=windows-1251>/d' single$i.txt > single$i.txt.new;
mv single$i.txt single$i.txt.bak;
mv single$i.txt.new single$i.txt

Well now,

Fixing QMAIL mail server SMTP auto-configure issues in Thunderbird and other mail IMAP / POP3 mobile clients

Friday, July 13th, 2012

One of the QMAIL mail servers, setup-uped on a Debian host has been creating some auto configuration issues. Every-time a new mail user tries to use the embedded Thunderbird client auto configuration, the auto config fails leaving the client unable to use his Mailbox through POP3 or IMAP protocols.

Since about 2 years Thunderbird and many other modern pop3 and imap mail desktop and mobile clients are by default using the auto configuration and hence it was unthinkable to manually change settings for new clients with the QMAIl install; Besides that most of the Office users are always confused, whether they have to manually change SMTP or POP3 host for a server.

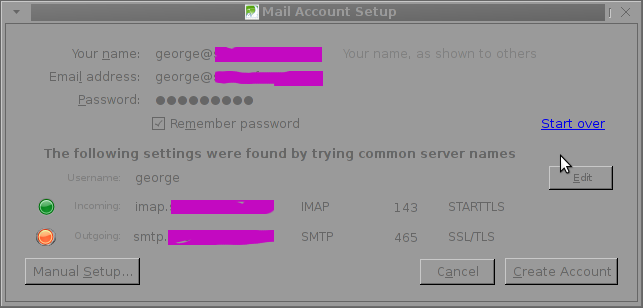
Below is a screenshot displaying the warning during email auto-configuration:

Thunderbird new Mail account setup auto config warning SMTP not OKThe orange color in the button for the newly auto-detected smtp.mail-domain.com indicates, something is not right with the SMTP host.
Obviously, something was wrong with smtp.mail-domain.com, hence I checked where smtp.mail.domain.com resolves with host command. What I found was actually smtp.mail-domain.com Active ( A ) DNS records was pointing to an IP address, our company previously used for the mail server. At present time the correct mail server host name is mx.mail-domain.com and the QMAIL installation on mx.soccerfame.com is configured to be the actual SMTP server.

By default Thunderbird and many other POP3, IMAP mail clients, however automatically assume the default SMTP host for a mail server is to be configured under a host name smtp.mail-domain.com. This is really strange, especially when the primary MX record for mail-domain.com domain is pointing to mx.mail-domain.com, e.g.:

qmail:~# host -t MX mail-domain.com
soccerfame.com mail is handled by 10 mx.mail-domain.com.
soccerfame.com mail is handled by 20 mail.mail-domain.com.
soccerfame.com mail is handled by 30 mail-domain.com.

The whole warning was caused due to the fact mx.mail-domain.com was resolving to an IP like xxx.xxx.xxx.xxx, whether smtp.mail-domain.com was resolving to yyy.yyy.yyy.yyy

Both xxx.xxx.xxx.xxx and yyy.yyy.yyy.yyy hosts were configured to have a different qmail SMTP host i.e.:

The server under IP xxx.xxx.xxx.xxx – (mx.mail-domain.com) was configured in /var/qmail/control/me to be mx.mail-domain.com and the other old one yyy.yyy.yyy.yyy – (mail.mail-domain.com) had (mail.mail-domain.com) in /var/qmail/control/me

As smtp.mail-domain.com was actually being still resolved to mail.mail-domain.com, the EMAILs were improperly trying to be sent with a configured DNS hostname of smtp.mail-domain.com, where the actual one on the server was mail.mail-domain

It took, me about an hour of pondering what is causing the oddities until I got the here explained issue. As the DNS recors for the domain the sample mail-domain.com were handled by Godaddy, to fix the mess, I logged in to Godaddy and;

a) deleted – DNS record for smtp.mail-domain.com.
b) Created new CNAME record for smtp.mail-domain.com to be a domain alias for mx.soccerfame.com

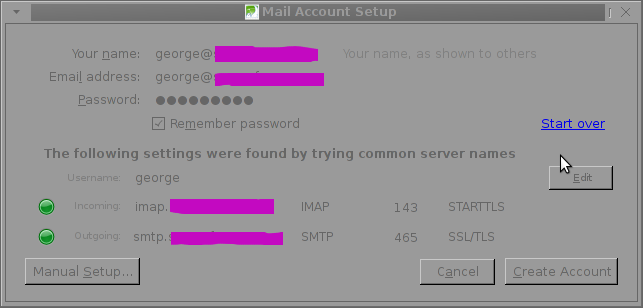
A few minutes, afterwards I tried configuring once again the same email account in Thunderbird and this time both imap.mail-domain.com and smtp.mail-domain.com turned green; indicating everything is configured fine.

To be 100% sure all is working fine I first fetched, all email via the IMAP protocol without hassles and onwards sent a test email to my Gmail account; thanksfully the sent email was delivered to Gmail indicating both Get Mail and Send Mail functions worked now fine.

Thunderbird icedove new mail account setup auto config Okay
 

Thanks to God I’m in Arnhem the Netherlands! :)

Tuesday, August 26th, 2008

I had 3 days trip with bus with my girl classmate (Ina). We traveled using the union-ivkoni bus lines. As a wholebeing on the road with bus for 3 days in order to reach some destination is pretty killing. We started the historicaltravel from Kavarna to Sofia and then at 2 o’clock we catched the bus Sofia -> Utrecht. There was big delays in the Serbianand the Hungarian borders. On all the other boarders we and our luggage weren’t checked. We had a bunch of stops on a oil stations.And I have to note everything in the oil stations in europe is pretty expensive. For example one sanwdich costs somwehere aroundalmost 4EU!. I and Ina came at Utrecht at around 6 o’clock and went to the Utrecht’s train station where we took two tickets to Arnhem.At 7 we were at Arnhem and went to the bus station. Originally we expected that there are gonna be welcoming students there and HAN university buses traveling from there to Vivare and the other accommodation places, unfortunately this was not the case. We were absolutely alone at an unknown country again I prayed to God in Jesus name to help me find a way to fix this mess. I went to search for Mobile SIM card, at the end after 20 minutes of walk I asked a police officer near the train station and he told me about a bookstore where I can find mobile SIM cards. I took two of them one for Ina and one for me. I took the T-Mobile mobile. I heard that the prices of conversations between the Bulgarian GSM operator Globul and T-Mobile are cheaper so I decided to give it a try. We called Koko (A College Colleague, who is gonna study HRQM just like me and is going to continue as a 3rd year student in Arnhem Business School, he came instantly in 20 minutes or so with another Bulgarian guy who already studied a year in Arnhem (Drago). Drago didn’t helped much with the traveling bags. But Kaloyan helped a lot. Today I feel the grace of God so real. I pray that he keep me and guide me in the same way in the future too. Another thing to note is that the living room that Vivare selected for me or should I say God make it be for me is just perfect. It has a toilet (!big plus!, a terrace, аsink, a nice bed, A Buro, a lamp and a chair. The room number is with ID K. 111. I think 111 stays for the Holy Trinity (The Father, The Son and The Holy Spirit) to Whom is and be the Glory the worship and power now and Forever and Ever, Amen!) I forgot to mention that I blocked my mobile telephone while trying to make the T-mobile SIM card work with my Motorola C115, luckily God has thought for this too. It seems Koko has one Mobile apartus he didn’t need right now so he gave it on a good will to me. Again what I can say Our Lord is an awesome God. Now I’m pretty tired and I’m going to bed. I have to mention Arnhem is excitingly charmful city and I really like it, also I’m impressed by the Dutch guys with which I had any work until now.Well for final I can only say: ” I screamed to the Lord and he heard my prayer and delivered me from evil”! Glory to you Lord of Hosts! Amen !END—–

6 days in sickness

Friday, August 10th, 2007

My physical health was quite not good during the last 6 / 7 days. Today it was a quiet day.I haven’t prayed seriously for few days but I can’t. Since my life looks like going nowhere.There is almost nothing in this town which keeps me still. I went to the Old Dobrich inMino’s coffee. But after a little argue and being a little rude to a girl I leavedthis awful mess. This guys are not a good company/match for me. It seems I don’t have friendsexcept Lily. Well I hope at least I haven’t builded all the time for nothing.Thanks Goodness that at least at work there isn’t a lot of work so I’m in a period of recovery.The world is going mad. I’m starting to scare my self. Seems like, life is created to be livednot to think about it’s purpose.END—–

In Rusalka a.k.a. Marmayed and Shabla Camping

Monday, September 3rd, 2007

I spend the weekend with Megi, Niki and Nomen in Rusalka (we beached there), although there was no sun at allthe water was warm and it was good experience (this happened in the late evening). In 06:00 or 07:00 o’clock.We decided to go to Tulenovo’s caves and stay there and make a wood fire. But the caves were already taken by others.So in the end we went to Shablenska Tuzla. We stretch the 2 tents and fired a firewood on the beach and started having a supper, unfortunately a rain started and we have to gather the 2 tents and the food and go to the car. We waited to see ifthe rain would stop but it was raining and we went to a near family hotel where Mitko, Megi and Niki slept into a room and slept in the car (this is the first time I have to sleep in a car). In the morning we went to the beach I stayed out of the sea because there was wind and I was scared of getting sick again. Around 12:30 we were in Dobrich. So this is how most of the weekend passed in the night we went to my Grandma and Grandpa’s (Peace be upon him) village with my father and we stayed there for 30 minutes or so. During the weekend I successfully made a binary upgrade of my xorg 6.9 -> 7.2 (it was a full mess), it took me 2 days! As usual the upgrades under FBSD are a real nightmare. Speaking about faith I’m not sure what do I believe anymore I still hope that God would fix my health issues, but I’m tired of waiting really :[ The bad thing about the weekend was that one more time I felt like not being on my right place. I realized soon that I can’t hear the voice of God. And currently I’m praying that God would give me this ability. But ofcourse only time will show.END—–

The end of the work week :)

Friday, February 1st, 2008

One more week passed without serious server problems. Yesterday after upgrade to debian 4.0rc2 with

apt-get dist-upgrade and reboot the pc-freak box became unbootable.

I wasn’t able to fix it until today because the machine’s box seemed not to read cds well.The problem was consisted of this that after the boot process of the linux kernel has started the machine the boot up was interrupted with a message saying
/sbin/init is missing

and I was dropped to a busybox without being able to read nothing from my filesystem.Thankfully nomen came to Dobrich for the weekend and today he bring me his cdrom-drive I booted with the debian.

Using Debian’s linux rescue I mounted the partition to check what’s wrong. I suspected something is terribly wrong with the lilo’s conf.

Looking closely to it I saw it’s the lilo conf file it was setupped to load a initrd for the older kernel. changing the line to thenew initrd in /etc/lilo.conf and rereading the lilo; /sbin/lilo -C; /sbin/lilo;

fixed the mess and pc-freak booted succesfully! 🙂

Yesterday I had to do something kinky. It was requested from a client to have access to a mysql service of one of the company servers,the problem was that the client didn’t have static IP so I didn’t have a good way to put into the current firewall.

Everytime the adsl they use got restarted a new absolutely random IP from all the BTC IP ranges was assigned.

The solution was to make a port redirect to a non-standard mysql port (XXXXX) which pointed to the standard 3306 service. I had to tell the firewall not to check the coming IPs on the non-standard port (XXXXX) against the 3306 service fwall rules.

Thanks to the help of a guy inirc.freenode.net #iptables jengelh I figured out the solution.

To complete the requested task it was needed to mark all packagescoming into port (XXXXX) using the iptables mangle option and to add a rule to ACCEPT all marked packages.

The rules looked like this

/sbin/iptables -t mangle -A PREROUTING -p tcp –dport XXXXX -j MARK –set-mark 123456/sbin/iptables -t nat -A PREROUTING -d EXTERNAL_IP -i eth0 -p tcp –dport XXXXX -j DNAT –to-destination EXTERNAL_IP:3306

/sbin/iptables -t filter -A INPUT -p tcp –dport 3306 -m mark –mark 123456 -j ACCEPT .

Something I wondered a bit was should /proc/sys/net/ipv4/ip_forward in order for the above redirect to be working, in case you’re wondering too well it doesn’t 🙂 The working week was a sort of quiteful no serious problems with servers and work no serious problems at school (although I see me and my collegues become more and more unserious) at studying. My grand parentsdecided to make me a gift and give me money to buy a laptop and I’m pretty happy for this 🙂 All that is left is to choose a good machine with hardware supported both by FreeBSD and Linux.

END—–

How to exclude files on copy (cp) on GNU / Linux / Linux copy and exclude files and directories (cp -r) exclusion

Saturday, March 3rd, 2012

I've recently had to make a copy of one /usr/local/nginx directory under /usr/local/nginx-bak, in order to have a working copy of nginx, just in case if during my nginx update to new version from source mess ups.

I did not check the size of /usr/local/nginx , so just run the usual:

nginx:~# cp -rpf /usr/local/nginx /usr/local/nginx-bak
...

Execution took more than 20 seconds, so I check the size and figured out /usr/local/nginx/logs has grown to 120 gigabytes.

I didn't wanted to extra load the production server with copying thousands of gigabytes so I asked myself if this is possible with normal Linux copy (cp) command?. I checked cp manual e.g. man cp, but there is no argument like –exclude or something.

Even though the cp command exclude feature is not implemented by default there are a couple of ways to copy a directory with exclusion of subdirectories of files on G / Linux.

Here are the 3 major ones:

1. Copy directory recursively and exclude sub-directories or files with GNU tar

Maybe the quickest way to copy and exclude directories is through a littke 'hack' with GNU tar nginx:~# mkdir /usr/local/nginx-new;
nginx:~# cd /usr/local/nginx#
nginx:/usr/local/nginx# tar cvf - \. --exclude=/usr/local/nginx/logs/* \
| (cd /usr/local/nginx-new; tar -xvf - )

Copying that way however is slow, in my case it fits me perfectly but for copying large chunks of data it is better not to use pipe and instead use regular tar operation + mv

# cd /source_directory
# tar cvf test.tar --exclude=dir_to_exclude/*\--exclude=dir_to_exclude1/* . \
# mv test.tar /destination_directory
# cd /destination# tar xvf test.tar

2. Copy folder recursively excluding some directories with rsync

P>eople who has experience with rsync , already know how invaluable this tool is. Rsync can completely be used as for substitute=de.a# rsync -av –exclude='path1/to/exclude' –exclude='path2/to/exclude' source destination

This example, can also be used as a solution to my copy nginx and exclude logs directory casus like so:

nginx:~# rsync -av --exclude='/usr/local/nginx/logs/' /usr/local/nginx/ /usr/local/nginx-new

As you can see for yourself, this is a way more readable for the tar, however it will not work on servers, where rsync is not installed and it is unusable if you have to do operations as a regular users on such for that case surely the GNU tar hack is more 'portable' across systems.
rsync has also Windows version and therefore, the same methodology should be working on MS Windows and good for batch scripting.
I've not tested it myself, yet as I've never used rsync on Windows, if someone has tried and it works pls drop me a short msg in comments.
3. Copy directory and exclude sub directories and files with find

Find in collaboration with cp can also be used to exclude certain directories while copying. Actually this method is better than the GNU tar hack and surely more efficient. For machines, where rsync is not installed it is just a perfect way to copy files from location to location, while excluding some directories, here is an example use of find and cp, for the above nginx case:

nginx:~# cd /usr/local/nginx
nginx:~# mkdir /usr/local/nginx
nginx:/usr/local/nginx# find . -type d \( ! -name logs \) -print -exec cp -rpf '{}' /usr/local/nginx-bak \;

This will find all directories inside /usr/local/nginx with find command print them on the screen, then execute recursive copy over each found directory and copy to /usr/local/nginx-bak

This example will work fine in the nginx case because /usr/local/nginx does not contain any files but only sub-directories. In other occwhere the directory does contain some files besides sub-directories the files had to also be copied e.g.:

# for i in $(ls -l | egrep -v '^d'); do\
cp -rpf $i /destination/directory

This will copy the files from source directory (for instance /usr/local/nginx/my_file.txt, /usr/local/nginx/my_file1.txt etc.), which doesn't belong to a subdirectory.

The cmd expression:

# ls -l | egrep -v '^d'

Lists only the files while excluding all the directories and in a for loop each of the files is copied to /destination/directory

If someone has better ideas, please share with me 🙂