Posts Tagged ‘access’

Scanning ports with netcat “nc” command on Linux and UNIX / Checking for firewall filtering between source and destination with nc

Friday, September 6th, 2019

scanning-ports-with-netcat-nc-command-on-Linux-and-UNIX-checking-for-firewall-filtering-between-source-destination-host-with-netcat

Netcat ( nc ) is one of that tools, that is well known in the hacker (script kiddie) communities, but little underestimated in the sysadmin world, due to the fact nmap (network mapper) – the network exploratoin and security auditing tool has become like the standard penetration testing TCP / UDP port tool
 

nc is feature-rich network debugging and investigation tool with tons of built-in capabilities for reading from and writing to network connections using TCP or UDP.

Its Plethora of features includes port listening, port scanning & Transferring files due to which it is often used by Hackers and PenTesters as Backdoor. Netcat was written by a guy we know as the Hobbit <hobbit@avian.org>.

For a start-up and middle sized companies if nmap is missing on server usually it is okay to install it without risking to open a huge security hole, however in Corporate world, due to security policies often nmap is not found on the servers but netcat (nc) is present on the servers so you have to learn, if you haven't so to use netcat for the usual IP range port scans, if you're so used to nmap.

There are different implementations of Netcat, whether historically netcat was UNIX (BSD) program with a latest release of March 1996. The Linux version of NC is GNU Netcat (official source here) and is POSIX compatible. The other netcat in Free Software OS-es is OpenBSD's netcat whose ported version is also used in FreeBSD. Mac OS X also comes with default prebundled netcat on its Mac OS X from OS X version (10.13) onwards, on older OS X-es it is installable via MacPorts package repo, even FreeDOS has a port of it called NTOOL.

The (Swiss Army Knife of Embedded Linux) busybox includes a default leightweight version of netcat and Solaris has the OpenBSD netcat version bundled.

A cryptography enabled version fork exists that supports that supports integrated transport encryption capabilities called Cryptcat.

The Nmap suite also has included rewritten version of GNU Netcat named Ncat, featuring new possibilities such as "Connection Brokering", TCP/UDP Redirection, SOCKS4 client and server support, ability to "Chain" Ncat processes, HTTP CONNECT proxying (and proxy chaining), SSL connect/listen support and IP address/connection filtering. Just like Nmap, Ncat is cross-platform.

In this small article I'll very briefly explain on basic netcat – known as the TCP Army knife tool port scanning for an IP range of UDP / TCP ports.


1. Scanning for TCP opened / filtered ports remote Linux / Windows server


Everyone knows scanning of a port is possible with a simple telnet request towards the host, e.g.:

telnet SMTP.EMAIL-HOST.COM 25


The most basic netcat use that does the same is achiavable with:


$ nc SMTP.EMAIL-HOST.COM 25
220 jeremiah ESMTP Exim 4.92 Thu, 05 Sep 2019 20:39:41 +0300


Beside scanning the remote port, using netcat interactively as pointing in above example, if connecting to HTTP Web services, you can request remote side to return a webpage by sending a false referer, source host and headers, this is also easy doable with curl / wget and lynx but doing it with netcat just like with telnet could be fun, here is for example how to request an INDEX page with spoofed HTTP headers.
 

nc Web-Host.COM 25
GET / HTTP/1.1
Host: spoofedhost.com
Referrer: mypage.com
User-Agent: my-spoofed-browser


2. Performing a standard HTTP request with netcat


To do so just pype the content with a standard bash integrated printf function with the included end of line (the unix one is \n but to be OS independent it is better to use r\n  – the end of line complition character for Windows.


printf "GET /index.html HTTP/1.0\r\nHost: www.pc-freak.net\r\n\r\n" | nc www.pc-freak.net 80


3. Scanning a range of opened / filtered UDP ports


To scan for lets say opened remote system services on the very common important ports opened from UDP port 25 till, 1195 – more specifically for:

  • UDP Bind Port 53
  • Time protocol Port (37)
  • TFTP (69)
  • Kerberos (88)
  • NTP 123
  • Netbios (137,138,139)
  • SNMP (161)
  • LDAP 389
  • Microsoft-DS (Samba 445)
  • Route BGP (52)
  • LDAPS (639)
  • openvpn (1194)


nc -vzu 192.168.0.1 25 1195


UDP tests will show opened, if no some kind of firewall blocking, the -z flag is given to scan only for remote listening daemons without sending any data to them.


4. Port Scanning TCP listening ports with Netcat


As prior said using netcat to scan for remote opened HTTP Web Server on port 80 an FTP on Port 23 or a Socks Proxy or MySQL Database on 3306 / PostgreSQL DB on TCP 5432 is very rare case scenario.

Below is example to scan a Local network situated IP for TCP open ports from port 1 till 7000.


# nc -v -n -z -w 5 192.168.1.2 1-7000

           nc: connect to host.example.com 80 (tcp) failed: Connection refused
           nc: connect to host.example.com 20 (tcp) failed: Connection refused
           Connection to host.example.com port [tcp/ssh] succeeded!
           nc: connect to host.example.com 23 (tcp) failed: Connection refused


Be informed that scanning with netcat is much more slower, than nmap, so specifying smaller range of ports is always a good idea to reduce annoying waiting …


The -w flag is used to set a timeout to remote connection, usually on a local network situated machines the timeout could be low -w 1 but for machines across different Data Centers (let say one in Berlin and one in Seattle), use as a minimum -w 5.

If you expect remote service to be responsive (as it should always be), it is a nice idea to use netcat with a low timeout (-w) value of 1 below is example:
 

netcat -v -z -n -w 1 scanned-hosts 1-1023


5. Port scanning range of IP addresses with netcat


If you have used Nmap you know scanning for a network range is as simple as running something like nmap -sP -P0 192.168.0.* (to scan from IP range 1-255 map -sP -P0 192.168.0.1-150 (to scan from local IPs ending in 1-150) or giving the network mask of the scanned network, e.g. nmap -sF 192.168.0.1/24 – for more examples please check my previous article Checking port security on Linux with nmap (examples).

But what if nmap is not there and want to check a bunch 10 Splunk servers (software for searching, monitoring, and analyzing machine-generated big data, via a Web-style interface.), with netcat to find, whether the default Splunk connection port 9997 is opened or not:


for i in `seq 1 10`; do nc -z -w 5 -vv splunk0$i.server-domain.com 9997; done


6. Checking whether UDP port traffic is allowed to destination server


Assuring you have access on Source traffic (service) Host A  and Host B (remote destination server where a daemon will be set-upped to listen on UDP port and no firewall in the middle Network router or no traffic control and filtering software HUB is preventing the sent UDP proto traffic, lets say an ntpd will be running on its standard 123 port there is done so:

– On host B (the remote machine which will be running ntpd and should be listening on port 123), run netcat to listen for connections


# nc -l -u -p 123
Listening on [0.0.0.0] (family 2, port 123)


Make sure there is no ntpd service actively running on the server, if so stop it with /etc/init.d/ntpd stop
and run above command. The command should run as superuser as UDP port 123 is from the so called low ports from 1-1024 and binding services on such requires root privileges.

– On Host A (UDP traffic send host


nc -uv remote-server-host 123


netcat-linux-udp-connection-succeeded

If the remote port is not reachable due to some kind of network filtering, you will get "connection refused".
An important note to make is on some newer Linux distributions netcat might be silently trying to connect by default using IPV6, bringing false positives of filtered ports due to that. Thus it is generally a good idea, to make sure you're connecting to IPV6


$ nc -uv -4 remote-server-host 123


Another note to make here is netcat's UDP connection takes 2-3 seconds, so make sure you wait at least 4-8 seconds for a very distant located hosts that are accessed over a multitude of routers.
 

7. Checking whether TCP port traffic allowed to DST remote server


To listen for TCP connections on a specified location (external Internet IP or hostname), it is analogous to listening for UDP connections.

Here is for example how to bind and listen for TCP connections on all available Interface IPs (localhost, eth0, eth1, eth2 etc.)
 

nc -lv 0.0.0.0 12345


Then on client host test the connection with


nc -vv 192.168.0.103 12345
Connection to 192.168.0.103 12345 port [tcp/*] succeeded!


8. Proxying traffic with netcat


Another famous hackers use of Netcat is its proxying possibility, to proxy anything towards a third party application with UNIX so any content returned be printed out on the listening nc spawned daemon like process.
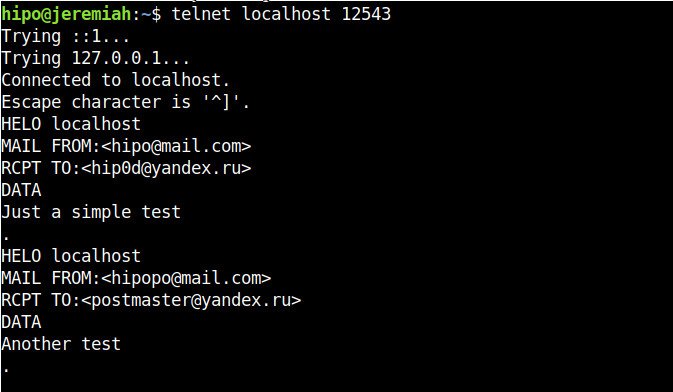
For example one application is traffic SMTP (Mail traffic) with netcat, below is example of how to proxy traffic from Host B -> Host C (in that case the yandex current mail server mx.yandex.ru)

linux-srv:~# nc -l 12543 | nc mx.yandex.ru 25


Now go to Host A or any host that has TCP/IP protocol access to port 12543 on proxy-host Host B (linux-srv) and connect to it on 12543 with another netcat or telnet.

to make netcat keep connecting to yandex.ru MX (Mail Exchange) server you can run it in a small never ending bash shell while loop, like so:


linux-srv:~# while :; do nc -l 12543 | nc mx.yandex.ru 25; done


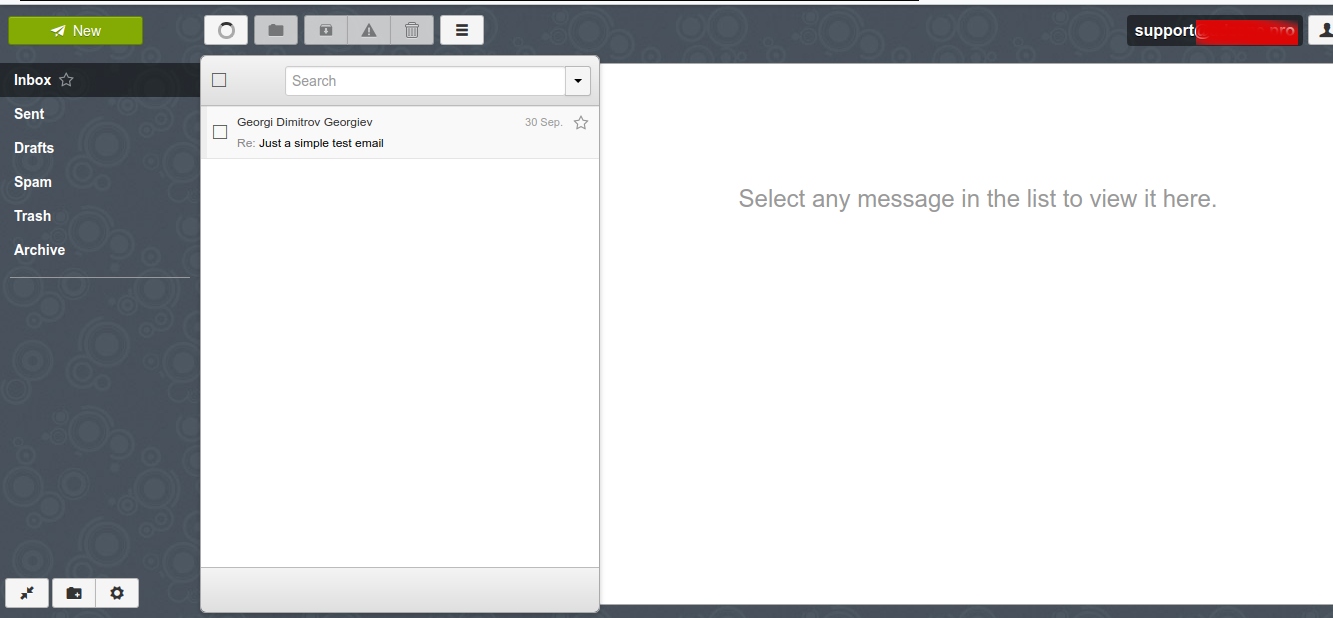
 Below are screenshots of a connection handshake between Host B (linux-srv) proxy host and Host A (the end client connecting) and Host C (mx.yandex.ru).

host-B-running-as-a-proxy-daemon-towards-Host-C-yandex-mail-exchange-server


Host B netcat as a (Proxy)

Host-A-Linux-client-connection-handshake-to-proxy-server-with-netcat
that is possible in combination of UNIX and named pipes (for more on Named pipes check my previous article simple linux logging with named pipes), here is how to run a single netcat version to proxy any traffic in a similar way as the good old tinyproxy.

On Proxy host create the pipe and pass the incoming traffic towards google.com and write back any output received back in the named pipe.
 

# mkfifo backpipe
# nc -l 8080 0<backpipe | nc www.google.com 80 1>backpipe

Other useful netcat proxy set-up is to simulate a network connectivity failures.

For instance, if server:port on TCP 1080 is the normal host application would connect to, you can to set up a forward proxy from port 2080 with

    nc -L server:1080 2080

then set-up and run the application to connect to localhost:2080 (nc proxy port)

    /path/to/application_bin –server=localhost –port=2080

Now application is connected to localhost:2080, which is forwarded to server:1080 through netcat. To simulate a network connectivity failure, just kill the netcat proxy and check the logs of application_bin.

Using netcat as a bind shell (make any local program / process listen and deliver via nc)


netcat can be used to make any local program that can receive input and send output to a server, this use is perhaps little known by the junior sysadmin, but a favourite use of l337 h4x0rs who use it to spawn shells on remote servers or to make connect back shell. The option to do so is -e

-e – option spawns the executable with its input and output redirected via network socket.

One of the most famous use of binding a local OS program to listen and receive / send content is by
making netcat as a bind server for local /bin/bash shell.

Here is how

nc -l -p 4321 -e /bin/sh


If necessery specify the bind hostname after -l. Then from any client connect to 4321 (and if it is opened) you will gain a shell with the user with which above netcat command was run. Note that many modern distribution versions such as Debian / Fedora / SuSE Linux's netcat binary is compiled without the -e option (this works only when compiled with -DGAPING_SECURITY_HOLE), removal in this distros is because option is potentially opening a security hole on the system.

If you're interested further on few of the methods how modern hackers bind new backdoor shell or connect back shell, check out Spawning real tty shells article.


For more complex things you might want to check also socat (SOcket CAT) – multipurpose relay for bidirectional data transfer under Linux.
socat is a great Linux Linux / UNIX TCP port forwarder tool similar holding the same spirit and functionality of netcat plus many, many more.
 

On some of the many other UNIX operating systems that are lacking netcat or nc / netcat commands can't be invoked a similar utilitiesthat should be checked for and used instead are:

ncat, pnetcat, socat, sock, socket, sbd

To use nmap's ncat to spawn a shell for example that allows up to 3 connections and listens for connects only from 192.168.0.0/24 network on port 8081:

ncat –exec "/bin/bash" –max-conns 3 –allow 192.168.0.0/24 -l 8081 –keep-open


9. Copying files over network with netcat


Another good hack often used by hackers to copy files between 2 servers Server1 and Server2 who doesn't have any kind of FTP / SCP / SFTP / SSH / SVN / GIT or any kind of Web copy support service – i.e. servers only used as a Database systems that are behind a paranoid sysadmin firewall is copying files between two servers with netcat.

On Server2 (the Machine on which you want to store the file)
 

nc -lp 2323 > files-archive-to-copy.tar.gz


On server1 (the Machine from where file is copied) run:
 

nc -w 5 server2.example.com 2323 < files-archive-to-copy.tar.gz


Note that the downside of such transfers with netcat is data transferred is unencrypted so any one with even a simple network sniffer or packet analyzier such as iptraf or tcpdump could capture the file, so make sure the file doesn't contain sensitive data such as passwords.

Copying partition images like that is perhaps best way to get disk images from a big server onto a NAS (when you can't plug the NAS into the server).
 

10. Copying piped archived directory files with netcat


On computer A:

export ARIBTRARY_PORT=3232
nc -l $ARBITRARY_PORT | tar vzxf –

On Computer B:

tar vzcf – files_or_directories | nc computer_a $ARBITRARY_PORT


11. Creating a one page webserver with netcat and ncat


As netcat could listen to port and print content of a file, it can be set-up with a bit of bash shell scripting to serve
as a one page webserver, or even combined with some perl scripting and bash to create a multi-serve page webserver if needed.

To make netact serve a page to any connected client run in a screen / tmux session following code:


while true; do nc -l -p 80 -q 1 < somepage.html; done


Another interesting fun example if you have installed ncat (is a small web server that connects current time on server on connect).
 

ncat -lkp 8080 –sh-exec 'echo -ne "HTTP/1.0 200 OK\r\n\r\nThe date is "; date;'


12. Cloning Hard disk partitions with netcat


rsync is a common tool used to clone hard disk partitions over network. However if rsync is not installed on a server and netcat is there you can use it instead, lets say we want to clone /dev/sdb
from Server1 to Server2 assuming (Server1 has a configured working Local or Internet connection).


On Server2 run:
 

nc -l -p 4321 | dd of=/dev/sdb


Following on Server2 to start the Partition / HDD cloning process run


dd if=/dev/sdb | nc 192.168.0.88 4321


Where 192.168.0.88 is the IP address listen configured on Server2 (in case you don't know it, check the listening IP to access with /sbin/ifconfig).

Next you have to wait for some short or long time depending on the partiiton or Hard drive, number of files / directories and allocated disk / partition size.

To clone /dev/sda (a main partiiton) from Server1 to Server2 first requirement is that it is not mounted, thus to have it unmounted on a system assuming you have physical access to the host, you can boot some LiveCD Linux distribution such as Knoppix Live CD on Server1, manually set-up networking with ifconfig or grab an IP via DHCP from the central DHCP server and repeat above example.


Happy netcating 🙂

Howto Configure Linux shell Prompt / Setup custom Terminal show Prompt using default shell variables PS1, PS2, PS3, PS4

Tuesday, August 27th, 2019

how-to-configure-lunux-bsd-shell-prompt-ps1-howto-make-your-terminal-console-shell-nice-and-shiny-1

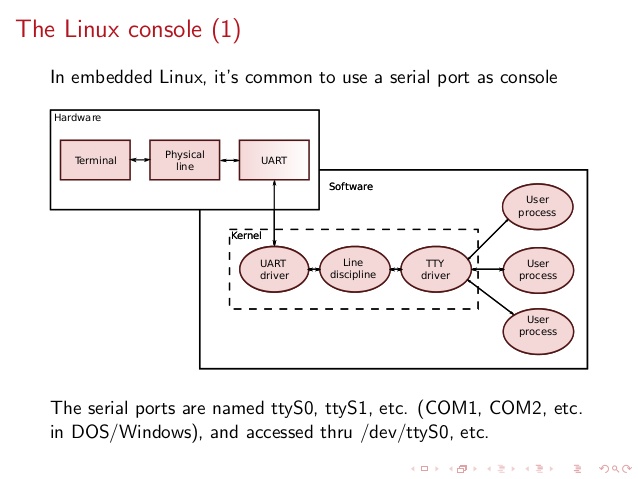
System Console, Command Operation Console  or Terminal is a Physical device for text (command) input from keyboard, getting the command output and monitoring the status of a shell or programs I/O operations generated traditionally with attached screen. With the development of Computers, physical consoles has become emulated and the input output is translated on the monitor usually via a data transfer  protocol historically mostly over TCP/IP connection to remote IP with telnet or rsh, but due to security limitations Consoles are now accessed over data (encrypted) network protocols with SHA2 / MD5 cryptography algorithm enabled such as over SSH (Secure Shell) network protocol..
The ancestors of physical consoles which in the past were just a Terminal (Monitoring / Monitor device attached to a MainFrame system computer).

Mainframe-physical-terminal-monitor-Old-Computer

What is Physical Console
A classical TTY (TeleTYpewriter) device looked like so and served the purpose of being just a communication and display deivce, whether in reality the actual computing and storage tape devices were in a separate room and communicating to Terminal.

mainframe-super-computer-computing-tape-machine
TTYs are still present in  modern UNIX like GNU / Linux distrubions OSes and the BSD berkley 4.4 code based FreeBSD / NetBSD / OpenBSD if you have installed the OS on a physical computer in FreeBSD and Solaris / SunOS there is also tty command. TTY utility in *nix writes the name of the terminal attached to standard input to standard output, in Linux there is a GNU remake of same program part called GNU tty of coreutils package (try man tty) for more.

The physical console is recognizable in Linux as it is indicated with other tree letters pts – (pseudo terminal device) standing for a terminal device which is emulated by an other program (example: xterm, screen, or ssh are such programs). A pts is the slave part of a pts is pseudo there is no separate binary program for it but it is dynamically allocated in memory.
PTS is also called Line consle in Cisco Switches / Router devices, VTY is the physical Serial Console connected on your Cisco device and the network connection emulation to network device is creates with a virtual console session VTL (Virtual Terminal Line). In freebsd the actual /dev/pts* /dev/tty* temporary devices on the OS are slightly different and have naming such as /dev/ttys001.
But the existence of tty and pts emulator is not enough for communicating interrupts to Kernel and UserLand binaries of the Linux / BSD OS, thus to send the commands on top of it is running a System Shell as CSH / TSH / TCSH or BASH which is usually the first program set to run after user logs in over ptty or pseudo tty virtual terminal.

linux-tty-terminal-explained-brief-intro-to-linux-device-drivers-20-638


Setting the Bash Prompt in Terminal / Console on GNU / Linux

Bash has system environments to control multiple of variables, which are usually visible with env command, one important variable to change in the past was for example USER / USERNAME which was red by IRC Chat clients  such as BitchX / irssi and could be displayed publicly so if not changed to a separate value, one could have known your Linux login username by simple /whois query to the Nickname in question (if no inetd / xinetd service was running on the Linux box and usually inetd was not running).

Below is my custom set USER / USERNAME to separate

hipo@pcfreak:~$ env|grep USER
USERNAME=Attitude
USER=Attitude

There is plenty of variables to  tune email such as MAIL store directory, terminal used TERM, EDITOR etc. but there are some
variables that are not visible with env query as they're not globally available for all users but just for the single user, to show this ones you need to use declare command instead, to get a full list of All Single and System Wide defined variables and functions type declare in the bash shell, for readability, below is last 10 returned results:


hipo@pcfreak:~$ declare | tail -10
{
    local quoted=${1//\'/\'\\\'\'};
    printf "'%s'" "$quoted"
}
quote_readline ()
{
    local quoted;
    _quote_readline_by_ref "$1" ret;
    printf %s "$ret"
}


PS1 is present there virtually on any modern Linux distribution and is installed through user home's directory $HOME/.bashrc , ~/.profile or .bash_profile or System Wide globally for all existing users in /etc/passwd (password database file) from /etc/bash.bashrc
In Debian / Ubuntu / Mint GNU / Linux this system variable is set in user home's .bashrc but in Fedora / RHEL Linux distro,
PS1 is configured from /home/username/.bash_profile to find out where PS1 is located for ur user:

cd ~
grep -Rli PS1 .bash*

Here is one more example:

hipo@pcfreak:~$ declare|grep -i PS1|head -1
PS1='\[\e]0;\u@\h: \w\a\]${debian_chroot:+($debian_chroot)}\u@\h:\w\$ '
 

hipo@pcfreak:~$ grep PS1 /etc/bash.bashrc
[ -z “$PS1” ] && return
# but only if not SUDOing and have SUDO_PS1 set; then assume smart user.
if ! [ -n “${SUDO_USER}” -a -n “${SUDO_PS1}” ]; then
  PS1='${debian_chroot:+($debian_chroot)}\u@\h:\w\$ '


Getting current logged in user shell configured PS1 variable can be done with echo:

hipo@pcfreak:~$ echo $PS1
\[\e]0;\u@\h: \w\a\]${debian_chroot:+($debian_chroot)}\u@\h:\w\$

So lets observe a little bit the meaning of this obscure line of (code) instructions code which are understood by BASH when being red from PS1 var to do so, I'll give a list of meaning of main understood commands, each of which is defined with \.

The ${debian_chroot} shell variable is defined from /etc/bash.bashrc

Easiest way to change PS1 is to export the string you like with the arguments like so:


root@linux:/home/hipo# export PS1='My-Custom_Server-Name# '
My-Custom_Server-Name# echo $PS1
My-Custom_Server-Name#


  •     \a : an ASCII bell character (07)
  •     \d : the date in “Weekday Month Date” format (e.g., “Tue May 26”)
  •     \D{format} : the format is passed to strftime(3) and the result is inserted into the prompt string; an empty format results in a locale-specific time representation. The braces are required
  •     \e : an ASCII escape character (033)
  •     \h : the hostname up to the first ‘.’
  •     \H : the hostname
  •     \j : the number of jobs currently managed by the shell
  •     \l : the basename of the shell's terminal device name
  •     \n : newline
  •     \r : carriage return
  •     \s : the name of the shell, the basename of $0 (the portion following the final slash)
  •     \t : the current time in 24-hour HH:MM:SS format
  •     \T : the current time in 12-hour HH:MM:SS format
  •     \@ : the current time in 12-hour am/pm format
  •     \A : the current time in 24-hour HH:MM format
  •     \u : the username of the current user
  •     \v : the version of bash (e.g., 2.00)
  •     \V : the release of bash, version + patch level (e.g., 2.00.0)
  •     \w : the current working directory, with $HOME abbreviated with a tilde
  •     \W : the basename of the current working directory, with $HOME abbreviated with a tilde
  •     \! : the history number of this command
  •     \# : the command number of this command
  •     \$ : if the effective UID is 0, a #, otherwise a $
  •     \nnn : the character corresponding to the octal number nnn
  •     \\ : a backslash
  •     \[ : begin a sequence of non-printing characters, which could be used to embed a terminal control sequence into the prompt
  •     \] : end a sequence of non-printing characters

The default's PS1 set prompt on Debian Linux is:
 

echo $PS1
\[\e]0;\u@\h: \w\a\]${debian_chroot:+($debian_chroot)}\u@\h:\w\$


As you can see \u (print username) \h (print hostname)  and \W (basename of current working dir) or \w (print $HOME/current working dir)
are the most essential, the rest are bell character, escape character etc.

A very good way to make your life easier and learn the abbreviations / generate exactly the PS1 PROMPT you want to have is with Easy Bash PS1 Generator Web Utility
with which you can just click over buttons that are capable to produce all of the PS1 codes.
 

1. How to show current hour:minute:seconds / print full date in Prompt Shell (PS)


Here is an example with setting the Bash Shell prompt  to include also the current time in format hour:minute:seconds (very useful if you're executing commands on a critical servers and you run commands in some kind of virtual terminal like screen or tmux.
 

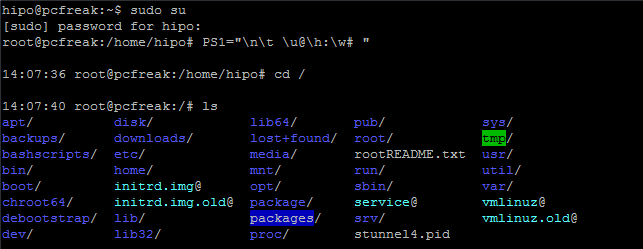
root@pcfreak:~# PS1="\n\t \u@\h:\w# "
14:03:51 root@pcfreak:/home#


PS1-how-to-setup-date-time-hour-minutes-and-seconds-in-bash-shell-prompt


export PS1='\u@\H \D{%Y-%m-%d %H:%M;%S%z}] \W ] \$ '


export-PS1-Linux-set-full-date-time-clock-prompt-screenshot-console


Make superuser appear in RED color (adding PS1 prompt custom color for a User)
 

root@pcfreak:~$  PS1="\\[$(tput setaf 1)\\]\\u@\\h:\\w #\\[$(tput sgr0)\\]"


how-to-change-colors-in-bash-prompt-shell-on-linux-shell-environment

In above example the Shell Prompt Color changed is changed for administrator (root) to shebang symbol # in red, green, yellow and blue for the sake to show you how it is done, however this example can be adapted for any user on the system. Setting different coloring for users is very handy if you have to administer Mail Server service like Qmail or other Application that consists of multiple small ones of multiple daemons such as qmail + vpopmail + clamd + mysql etc. Under such circumstances, coloring each of the users in different color like in the example for debugging is very useful.

Coloring the PS1 system prompt on Linux to different color has been a standard practice in Linux Server environments running Redhat Enterprise Linux (RHEL) and SuSE Enterprise Linux and some Desktop distributions such as Mint Linux.

To make The Root prompt Red colored only for system super user (root) on any Linux distribution
, add the following to /etc/bashrc, e.g.

vim /etc/bashrc


# If id command returns zero, you've root access.
if [ $(id -u) -eq 0 ];
then # you are root, set red colour prompt
  PS1="\\[$(tput setaf 1)\\]\\u@\\h:\\w #\\[$(tput sgr0)\\]"
else # normal
  PS1="[\\u@\\h:\\w] $"
fi


2. How to make the prompt of a System user appear Green


Add to ~/.bashrc  following line


PS1="\\[$(tput setaf 2)\\]\\u@\\h:\\w #\\[$(tput sgr0)\\]"


3. Print New line, username@hostname, base PTY, shell level, history (number), newline and full working directory $PWD


export PS1='\n[\u@\h \l:$SHLVL:\!]\n$PWD\$ '


4. Showing the numbert of jobs the shell is currently managing.


This is useful if you run and switch with fg / bg (foreground / background) commands
to switch between jobs and forget some old job.


export PS1='\u@\H \D{%Y-%m-%d %H:%M;%S%z}] \W \$]'


Multi Lines Prompt / Make very colorful Shell prompt full of stats info

PS1="\n\[\033[35m\]\$(/bin/date)\n\[\033[32m\]\w\n\[\033[1;31m\]\u@\h: \[\033[1;34m\]\$(/usr/bin/tty | /bin/sed -e ‘s:/dev/::’): \[\033[1;36m\]\$(/bin/ls -1 | /usr/bin/wc -l | /bin/sed ‘s: ::g’) files \[\033[1;33m\]\$(/bin/ls -lah | /bin/grep -m 1 total | /bin/sed ‘s/total //’)b\[\033[0m\] -> \[\033[0m\]"


prompt-show-how-many-files-and-virtual-pts-ps1-linux
 

5. Set color change on command failure


If you have a broken command or the command ended with non zero output with some kind of bad nasty message and you want to make, that more appearing making it red heighlighted, here is how:


PROMPT_COMMAND='PS1="\[\033[0;33m\][\!]\`if [[ \$? = “0” ]]; then echo “\\[\\033[32m\\]”; else echo “\\[\\033[31m\\]”; fi\`[\u.\h: \`if [[ `pwd|wc -c|tr -d ” “` > 18 ]]; then echo “\\W”; else echo “\\w”; fi\`]\$\[\033[0m\] “; echo -ne “\033]0;`hostname -s`:`pwd`\007"'


6. Other beautiful PS1 Color Prompts with statistics


PS1="\n\[\e[32;1m\](\[\e[37;1m\]\u\[\e[32;1m\])-(\[\e[37;1m\]jobs:\j\[\e[32;1m\])-(\[\e[37;1m\]\w\[\e[32;1m\])\n(\[\[\e[37;1m\]! \!\[\e[32;1m\])-> \[\e[0m\]"


another-very-beuatiful-bash-colorful-prompt


7. Add Muliple Colors to Same Shell prompt


function prompt { local BLUE="\[\033[0;34m\]” local DARK_BLUE=”\[\033[1;34m\]” local RED=”\[\033[0;31m\]” local DARK_RED=”\[\033[1;31m\]” local NO_COLOR=”\[\033[0m\]” case $TERM in xterm*|rxvt*) TITLEBAR=’\[\033]0;\u@\h:\w\007\]’ ;; *) TITLEBAR=”” ;; esac PS1=”\u@\h [\t]> ” PS1=”${TITLEBAR}\ $BLUE\u@\h $RED[\t]>$NO_COLOR " PS2='continue-> ' PS4='$0.$LINENO+ ' }

colorful-prompt-blue-and-red-linux-console-PS1
 

8. Setting / Change Shell background Color


changing-background-color-of-bash-shell-prompt-linux


export PS1="\[$(tput bold)$(tput setb 4)$(tput setaf 7)\]\u@\h:\w $ \[$(tput sgr0)\]"


tput Color Capabilities:

  • tput setab [1-7] – Set a background color using ANSI escape
  • tput setb [1-7] – Set a background color
  • tput setaf [1-7] – Set a foreground color using ANSI escape
  • tput setf [1-7] – Set a foreground color

tput Text Mode Capabilities:

  • tput bold – Set bold mode
  • tput dim – turn on half-bright mode
  • tput smul – begin underline mode
  • tput rmul – exit underline mode
  • tput rev – Turn on reverse mode
  • tput smso – Enter standout mode (bold on rxvt)
  • tput rmso – Exit standout mode
  • tput sgr0 – Turn off all attributes

Color Code for tput:

  • 0 – Black
  • 1 – Red
  • 2 – Green
  • 3 – Yellow
  • 4 – Blue
  • 5 – Magenta
  • 6 – Cyan
  • 7 – White


9. Howto Use bash shell function inside PS1 variable

If you administrate Apache or other HTTPD servers or any other server whose processes are forked and do raise drastically at times to keep an eye while actively working on the server.


function httpdcount { ps aux | grep apache2 | grep -v grep | wc -l } export PS1="\u@\h [`httpdcount`]> "

10. PS2, PS3, PS4 little known variables
 

I'll not get much into detail to PS2, PS3, PS4 but will mention them as perhaps many people are not even aware they exist.
They're rarely used in the daily system administrator's work but useful for Shell scripting purposes of Dev Ops and Shell Scripting Guru Programmers.

  • PS2 – Continuation interactive prompt

A very long unix command can be broken down to multiple line by giving \ at the end of the line. The default interactive prompt for a multi-line command is “> “.  Let us change this default behavior to display “continue->” by using PS2 environment variable as shown below.

hipo@db-host :~$ myisamchk –silent –force –fast –update-state \
> –key_buffer_size=512M –sort_buffer_size=512M \
> –read_buffer_size=4M –write_buffer_size=4M \
> /var/lib/mysql/bugs/*.MYI
[Note: This uses the default “>” for continuation prompt]

  • PS3 – Prompt used by “select” inside shell script (usefulif you write scripts with user prompts)


  • PS4 – Used by “set -x” to prefix tracing output
    The PS4 shell variable defines the prompt that gets displayed.

You can find  example with script demonstrating PS2, PS3, PS4 use via small shell scripts in thegeekstuff's article Take control of PS1, PS2, PS3, PS4 read it here


Summary


In this article, I've shortly reviewed on what is a TTY, how it evolved into Pseudo TTY and how it relates to current shells which are the interface communicating with the modern UNIX like Operating systems's userland and kernel.
Also it was reviewed shortly how the current definitions of shell variables could be viewed with declare cmd. Also I went through on how to display the PS1 variable and  on how to modify PS1 and make the prompt different statistics and monitoring parameters straight into the command shell. I've shown some common PS1 strings that report on current date hour, minute, seconds, modify the coloring of the bash prompt shell, show processes count, and some PS1 examples were given that combines beuatiful shell coloring as well as how the Prompt background color can be changed.
Finally was shown how a combination of commands can be executed by exporting to PS1 to update process counf of Apache on every shell prompt iteration.
Other shell goodies are mostly welcome


Check weather forecast from console (terminal) on GNU / Linux and FreeBSD howto

Friday, August 23rd, 2019

how to get weather forecast prognosis from command line text terminal / console on Linux and FreeBSD

Doing everything in Linux console / terminal is a question perhaps every Linux / BSD hacker wants to do as Graphical user interface and using web search or using Graphical Environment plugins is an unneded complexity + googling or duckduckgoing for weather to check your next vacation destination city has been more and more of a terrible experience (for me) as I'm not a big fan of using the OS in a GUI.
In that manner of thoughts, as a Linux console geek and hard core ASCII art fan. I was recently happy to find that  possible to check weather forecast in tty console or Linux terminal in a beautiful ascii art way easily through a Web wttr.in service – a web application weather forecast service that supports displaying the current and few days in future, weather forecast either in browser as a plain text or from the command line by simply accessing it with your favourite web access / transfer tool such as;
wget / curl or any of your favourite text browser elinks / lynx / w3m or if on *BSDs use fetch command.


Install Curl data transfer tool if it is not already


Wget is installed by default across most Linux distributions and fetch is present by default on BSDs, displaying it in text browser would perhaps be never used but if you decide to give it a try maybe try with elinks (to get colorful output), w3m and lynx will display a black and white results.

In case if you miss curl, install it:

On Debian distro


aptitude install -y curl


or Fedora

yum install -y curl


Of course to use wttr.in as it is Internet based Weather Forecast service the minimum you need to have is to have Internet connection to your Linux / BSD desktop computer.

Text based Weather Forecast Web App currently supports:

display the current weather as well as a 3-day weather forecast, split into morning, noon, evening and night

  • Temperature is displayed for morning, noon, evening and night (includes temperature range, wind speed and direction, viewing distance, precipitation amount and probability)
  • Provide results for Weather based on City / town / village location
  • Supports display of Moon Phases Forecast in calendar days
  • Supports multilingual names (Bulgarian Phonetic cyrillic / Russian and other exotic UTF-8 encodings such as Chineese and Japanese),  50+ languages are currently supported
  • Has ability for prognosis for hostname (domain) location based on an its IP GeoIP location on the Globe
  • Geographical locations / landmarks such as Lakes / Mountains etc. can be easily queried
  • Query results metrics could be configured, e.g. USCS units or EU and rest of world accepted ones (SI) metric
  • Displayed result could be either in ANSI (if from terminal / console / HTML if queried from browser or in PNG – if needed)


Where wttr.in could be useful ?

The best applications use, I can think of are for server (shell) / perl scripting automation purposes, it could be useful especially in TOO HOT, TOO, COLD, TOO WET location in Small and Middle sized Data Centers Green Energy (Sun Panel) Parks / Wind Energy situated Linux monitoring hosts to track possible problems of overheats or overcolding of servers due to abnormal excessive temperatures such as the ones we experienced this summer here All across in Europe or in too Cold DC locations such as heat locations Deserts in African Countries, Saudi Arabia or Chukotka or Siberia in Russia.
Other application is as a backup option to other normal Weather report services by PHP or Python scripts that fetch data, from multiple places.
Of course since this is a third party controlled service, the downtime is due to excessive connection requests, the service could get flooded and stopped working, but I guess for any Commercial use, wttr.in creator Igor Chubin would be happy to sell a specific crafted service for any end user candidates.


Here is few examples of the beautiful returned ASCII art formatted output of wttr.in.
 

1. Getting a three days Weather Forecast prognosis for city / town location

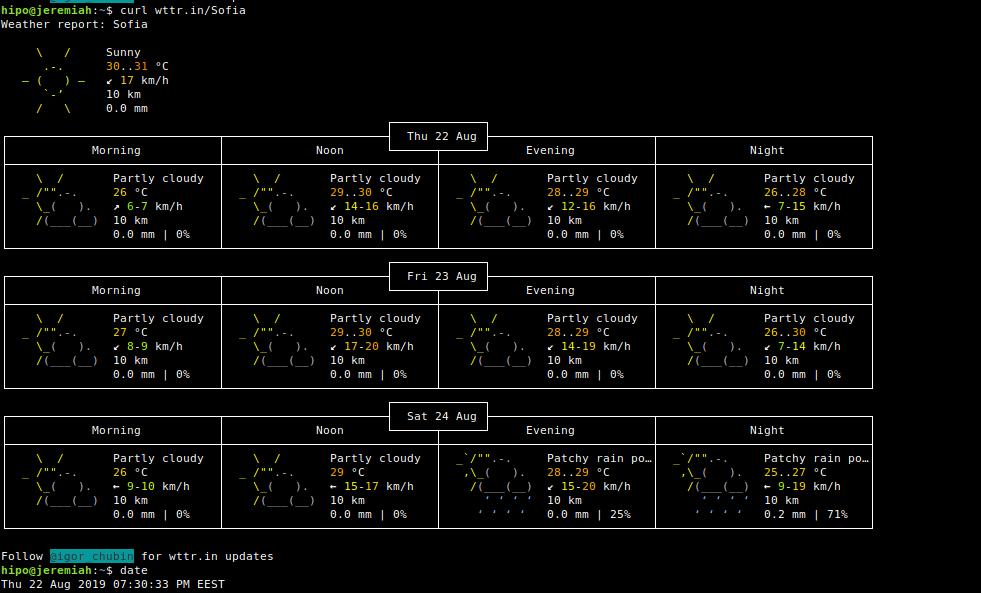
To get what is current weather in my current city of Living, Sofia Bulgaria just pass the city to the URL address

curl http://wttr.in/Sofia

text-console-wttr.in-Weather-forecast-Sofia-for-Linux


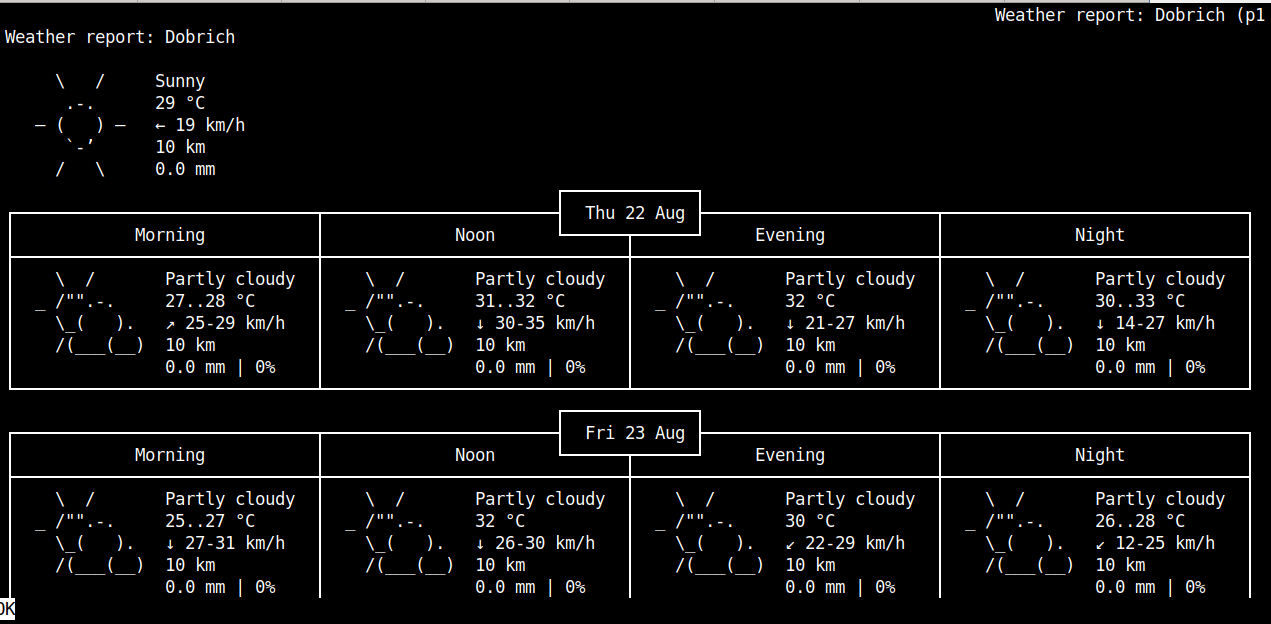
links http://wttr.in/Dobrich


curl-Linux-show--Dobrich-Weather-forecast-in-lynx-text-browser


Default links (Linux) www text browser produces ugly black and white

2. Displaying Weather forecast with wget


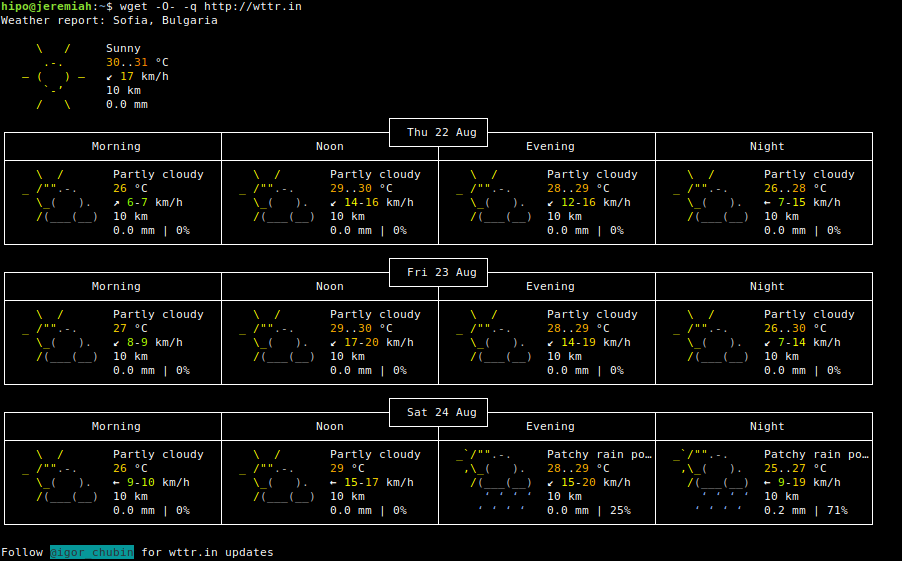
wget -O- -q http://wttr.in


getting-weather-forecast-on-linux-terminal-console-with-wget-command

If you're lazy you can even omit the http:// as wget will look for HyperText Transmission Protocol by itself


wget -O- -q wttr.in


3. Getting Forecast results for a Tourist Destination


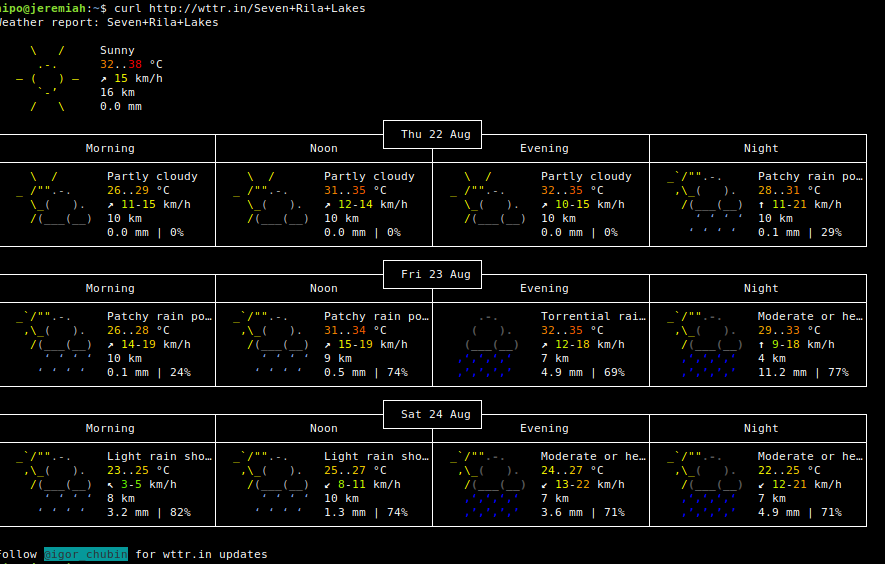
Lets get the weather forecast for the popular tourist Bulgarian destination of the Seven Rila Lakes (near Rila Monastery), situated in the Rila Mountain BG.


curl http://wttr.in/Seven+Rila+Lakes


Console-terminal-Weather-forecast-Linux-Seven-Rila-Lakes


4. Display Forecast for a specific server IP


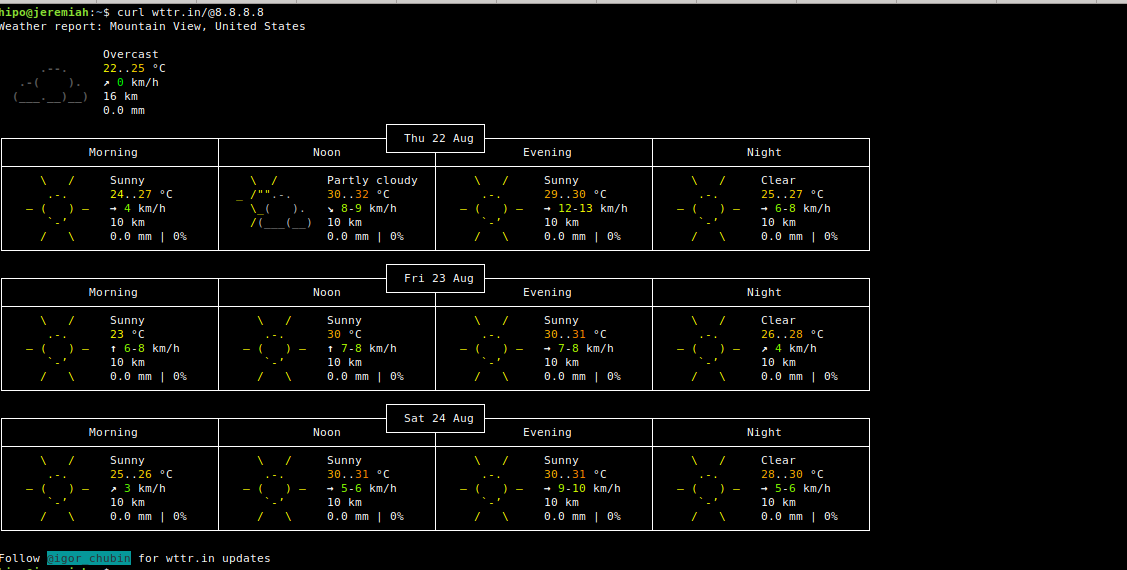
Displaying information on specific server IP address current situated in GeoIP database, of course could be not really true, as the IP could be just a Load Balancer a router that does NAT to some internal DMZ-ed location server, but anyways it is a cool feature.

Lets get information on what is the weather on Google Global's Public DNS server IP 8.8.8.8 so commonly used to guarantee a Windows and Linux Desktop client machines Internet connectivity.
 

curl wttr.in/@8.8.8.8


wttr.in-Linux-text--forecast-service-curl-screenshot Google Public DNS location weather forecast

5. Download PNG image picture from wttr.in service


Lets say you want to get a 3 days standard Weather forecast for the popular Black Sea Resort town in Bulgaria Pomorie (a beautiful sea city which has even a functioning 5 Monks Monastery Pomorie Monastery situated near sea coast)


curl http://wttr.in/Pomorie.png


–2019-08-22 20:15:51–  http://wttr.in/Pomorie.png
Resolving wttr.in (wttr.in)… 5.9.243.187
Connecting to wttr.in (wttr.in)|5.9.243.187|:80… connected.
HTTP request sent, awaiting response… 200 OK
Length: 42617 (42K) [image/png]
Saving to: ‘Pomorie.png’

Pomorie.png                                     100%[=======================================================================================================>]  41.62K  –.-KB/s    in 0.07s   

2019-08-22 20:15:52 (586 KB/s) – ‘Pomorie.png’ saved [42617/42617]


Note: The generated .png is again the ASCII art produced by a direct text fetch bug in pic format


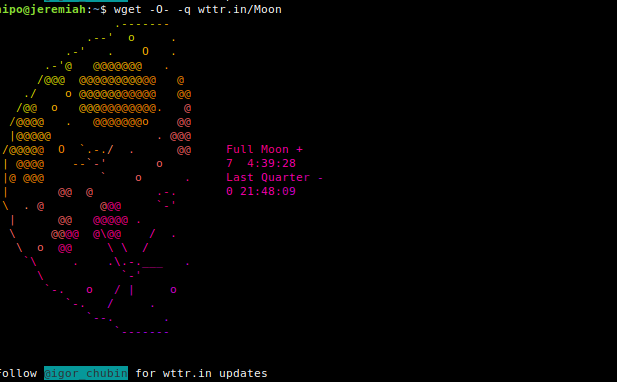
6. Displaying Current Moon Phase


If you want to enjoy a text based Moon phase picture through wttr.in 🙂

wget -O- -q wttr.in/Moon


Display-current-Phase-of-Moon-in-terminal-console-Linux-wttr.in-service

You can also get a Moon Phase prognosis for a current future date or get a previous date phase


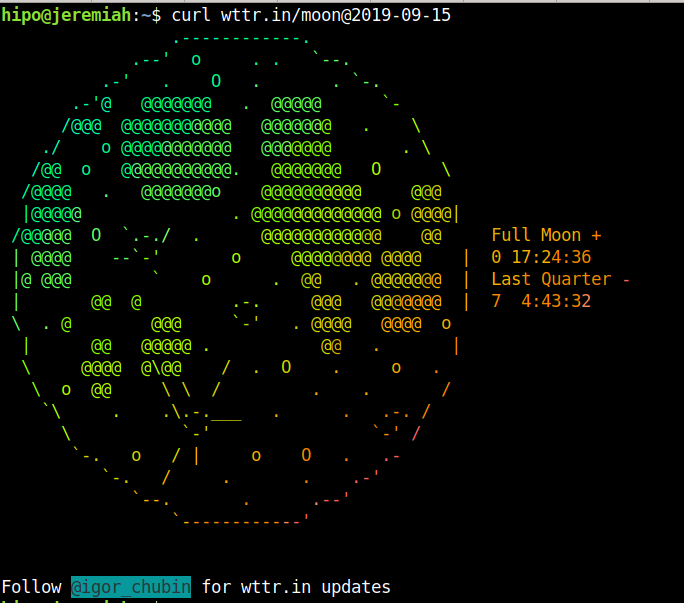
curl wttr.in/moon@2019-09-15

Full-Moon-Weather-forecast-text-console-reporting-via-wttr.in-on-Gnu_Linux


Full Moon Madness !! – Vampires are out beaware and Enjoy the ultra kewl ASCII Colorful Art 🙂
 

7. Getting help for wttr.in terminal Waether Forecast results


$ curl wttr.in/:help
Usage:


    $ curl wttr.in          # current location
    $ curl wttr.in/muc      # weather in the Munich airport

Supported location types:

    /paris                  # city name
    /~Eiffel+tower          # any location
    /Москва                 # Unicode name of any location in any language
    /muc                    # airport code (3 letters)
    /@stackoverflow.com     # domain name
    /94107                  # area codes
    /-78.46,106.79          # GPS coordinates

Special locations:

    /moon                   # Moon phase (add ,+US or ,+France for these cities)
    /moon@2016-10-25        # Moon phase for the date (@2016-10-25)

Units:

    m                       # metric (SI) (used by default everywhere except US)
    u                       # USCS (used by default in US)
    M                       # show wind speed in m/s

View options:

    0                       # only current weather
    1                       # current weather + 1 day
    2                       # current weather + 2 days
    A                       # ignore User-Agent and force ANSI output format (terminal)
    F                       # do not show the "Follow" line
    n                       # narrow version (only day and night)
    q                       # quiet version (no "Weather report" text)
    Q                       # superquiet version (no "Weather report", no city name)
    T                       # switch terminal sequences off (no colors)

PNG options:

    /paris.png              # generate a PNG file
    p                       # add frame around the output
    t                       # transparency 150
    transparency=…        # transparency from 0 to 255 (255 = not transparent)

Options can be combined:

    /Paris?0pq
    /Paris?0pq&lang=fr
    /Paris_0pq.png          # in PNG the file mode are specified after _
    /Rome_0pq_lang=it.png   # long options are separated with underscore

Localization:

    $ curl fr.wttr.in/Paris
    $ curl wttr.in/paris?lang=fr
    $ curl -H "Accept-Language: fr" wttr.in/paris

Supported languages:

    af da de el et fr fa hu id it nb nl pl pt-br ro ru tr uk vi (supported)
    az be bg bs ca cy cs eo es fi ga hi hr hy is ja jv ka kk ko ky lt lv mk ml nl fy nn pt pt-br sk sl sr sr-lat sv sw th te uz zh zu he (in progress)

Special URLs:

    /:help                  # show this page
    /:bash.function         # show recommended bash function wttr()
    /:translation           # show the information about the translators


8. Comparing two cities weather from command line


One useful use of wttr.in if you plan to travel from Location city A to Location city B is to compare the temperatures with a simple bash one liner script:


diff -Naur <(curl -s http://wttr.in/Sofia ) <(curl -s http://wttr.in/Beograd )


9. Using ansiweather command to get Weather Temperature / Wind / Humidity in one line beuatiful text


If you go and install answeather Linux package


apt-get install –yes ansiweather


You will get a shell script wrapper with ANSI colors and Unicode symbols support. Weather data comes from OpenWeatherMap, this is useful if wttr.in is not working due to some URL malfunction (due to service is DoS-ed) etc.


ansiweather -l Atina


ansiweather-Atina-weather-forecast-result-linux-text-console

Lets use ansiweather to print the weather prognosis for upcoming 5 days for near port of Burgas, BG
 

ansiweather -F -l Burgas

ansiweather-print-weather-forecast-prognosis-for-5-days-in-Linux-text-terminal


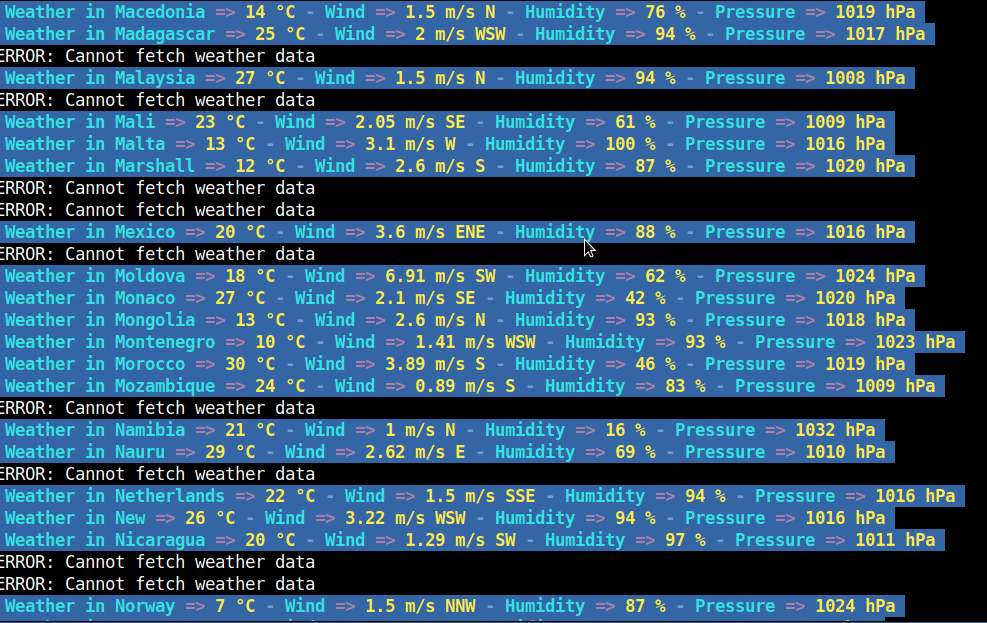
10. Get all Weather current forecast for each Capital in the world


You can download and use this simple plain text file list of All Country Capitals in the World (country-capitals-all-world.txt) with ansiweather and a bash loop to get displayed each and every current day Weather Forecast in the World, here is how:


while read line; do ansiweather -l $line; sleep 3; done < country-capitals-all-world.txt


ansiweather-all-countires-capitals-result

As you can see some of the very exotic third world capitals does not return data so 'ERROR: Cannot fetch weather data' is returned.


You can also substitute ansiweather with curl wttr.in/$line to do get the beautiful ASCII art 3 days weather forecast via wttr.in


while read line; do curl http://wttr.in/$line; sleep 3; done < country-capitals-all-world.txt


I'll be happy to know other nice ASCII Art supporting Web service to enjoy from text terminal on Linux (nomatter useful or) just funny joyful prank maniacal pranks such as Watching text ASCII version remake of Star Wars Classic Movie by simply telnetting to towel.blinkenlights.nl (if you haven't so just telnet and enjoy the streamed ASCIIs ! 🙂


telnet towel.blinkenlights.nl


watch-star-wars-ascii-art-version-remake-online-with-telnet-on-linux-console-terminal


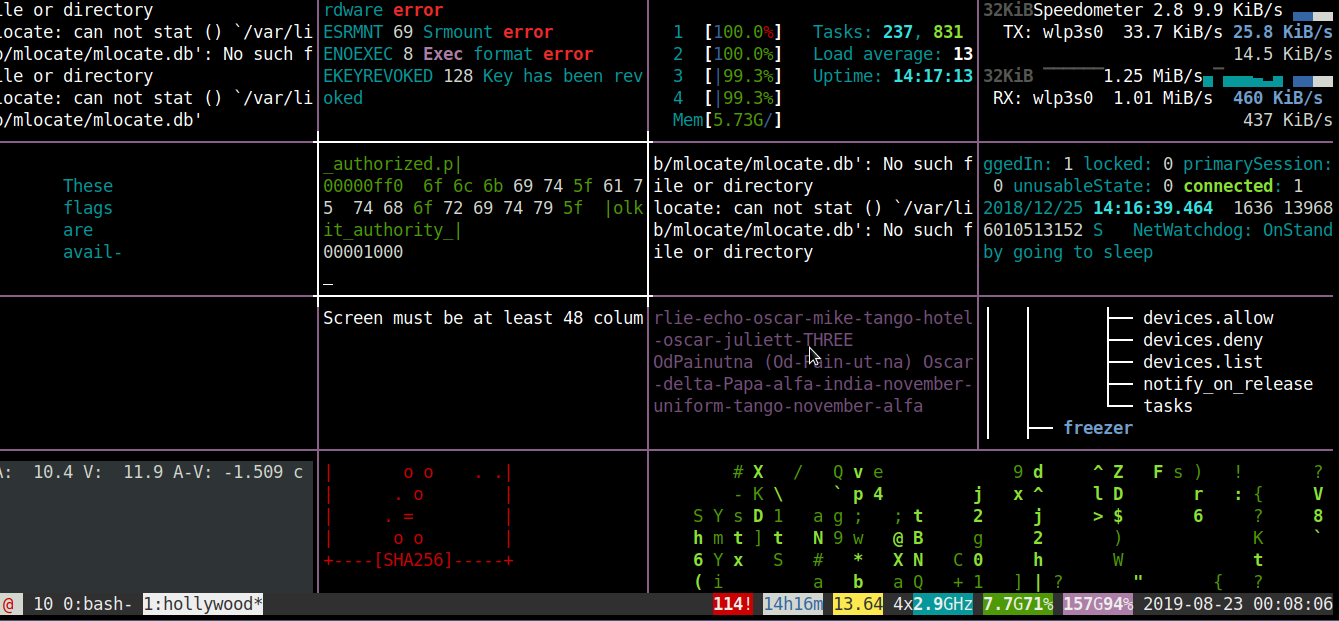
Talking about fun and ASCII, its worthy to mention hollywood Linux package

hipo@jeremiah:~/Desktop$ apt-cache show hollywood|grep -i desc -A 3
Description-en: fill your console with Hollywood melodrama technobabble
 This utility will split your console into a multiple panes of genuine
 technobabble, perfectly suitable for any Hollywood geek melodrama.
 It is particularly suitable on any number of computer consoles in the


Description-md5: 768f44c76220ea2b35f855ea34c8bc35
Homepage: http://launchpad.net/hollywood
Section: games
Priority: optional


Once installed on Debian with:

aptitude install -y hollywood

You can get in a rapid manner plenty of tmux (screen like – virtual console emulator) split screen statistics about your notebook / workstation / server CPU usage, mlocate.db status, info about plugged in machine voltage, Speedometer (statistics about Network bandwidth usage), System load avarage (CPU Count, Memory Utilization) and some other random info coming out of dmesg kernel log and more. The information displayed in splitted windows changes rapidly and (assuming you run it at home Desktop with a soundblaster) and not remotely, a james bond Agent 007 soundtrack is played on the back, that brings up one's adrenaline and makes it look even cooler.

hollywood-melodrama-technobubble-split-console-multiple-panes-for-genuine-technobubble

To give you an idea what to expect, here is shot of /usr/games/hollywood (the program start binary location) on Debian GNU / Linux running, Enjoy! 🙂
 

What is inode and how to find out which directory is eating up all your filesystem inodes on Linux, Increase inode count on a ext3 ext4 and ufs filesystems

Tuesday, August 20th, 2019

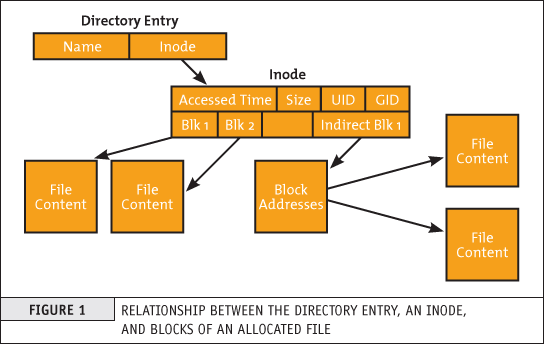
what-is-inode-find-out-which-filesystem-or-directory-eating-up-all-your-system-inodes-linux_inode_diagram

If you're a system administrator of multiple Linux servers used for Web serving delivery / Mail server sysadmin, Database admin or any High amount of Drives Data Storage used for backup servers infra, Data Repository administrator such as Linux hosted Samba / CIFS shares, etc. or using some Linux Hosting Provider to host your website or any other UNIX like Infrastructure servers that demands a storage of high number of files under a Directory  you might end up with the common filesystem inode depletion issues ( Maximum Inode number for a filesystem is predefined, limited and depending on the filesystem configured size).

In case a directory stored files end up exceding the amount of possible addressable inodes could prevent any data to be further assiged and stored on the Filesystem.

When a device runs out of inodes, new files cannot be created on the device, even though there may be plenty free space available and the first time it happened to me very long time ago I was completely puzzled how this is possible as I was not aware of Inodes existence  …

Reaching maximum inodes number (e.g. inode depletion), often happens on Busy Mail servers (receivng tons of SPAM email messages) or Content Delivery Network (CDN – Website Image caching servers) which contain many small files on EXT3 or EXT4 Journalled filesystems. File systems (such as Btrfs, JFS or XFS) escape this limitation with extents or dynamic inode allocation, which can 'grow' the file system or increase the number of inodes.


Hence ending being out of inodes could cause various oddities on how stored data behaves or communicated to other connected microservices and could lead to random application disruptions and odd results costing you many hours of various debugging to find the root cause of inodes (index nodes) being out of order.

In below article, I will try to give an overall explanation on what is an I-Node on a filesystem, how inodes of FS unit could be seen, how to diagnose a possible inode poblem – e.g.  see the maximum amount of inodes available per filesystem and how to prepare (format) a new filesystem with incrsed set of maximum inodes.


What are filesystem i-nodes?


This is a data structure in a Unix-style file system that describes a file-system object such as a file or a directory.
The data structure described in the inodes might vary slightly depending on the filesystem but usually on EXT3 / EXT4 Linux filesystems each inode stores the index to block that contains attributes and disk block location(s) of the object's data.
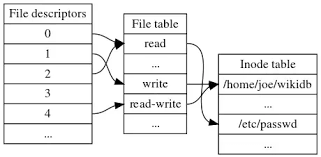
– Yes for those who are not aware on how a filesystem is structured on *nix it does allocate all stored data in logical separeted structures called data blocks. Each file stored on a local filesystem has a file descriptor, there are virtual unit structures file tables and each of the inodes that are a reference number has a own data structure (inode table).

Inodes / "Index" are slightly unusual on file system structure that stored the access information of files as a flat array on the disk, with all the hierarchical directory information living aside from this as explained by Unix creator and pioneer- Dennis Ritchie (passed away few years ago).

what-is-inode-very-simplified-explanation-diagram-data

Simplified explanation on file descriptors, file table and inode, table on a common Linux filesystem

Here is another description on what is I-node, given by Ken Thompson (another Unix pioneer and father of Unix) and Denis Ritchie, described in their paper published in 1978:

"    As mentioned in Section 3.2 above, a directory entry contains only a name for the associated file and a pointer to the file itself. This pointer is an integer called the i-number (for index number) of the file. When the file is accessed, its i-number is used as an index into a system table (the i-list) stored in a known part of the device on which the directory resides. The entry found thereby (the file's i-node) contains the description of the file:…
    — The UNIX Time-Sharing System, The Bell System Technical Journal, 1978  "


What is typical content of inode and how I-nodes play with rest of Filesystem units?


The inode is just a reference index to a data block (unit) that contains File-system object attributes. It may include metadata information such as (times of last change, access, modification), as well as owner and permission data.


On a Linux / Unix filesystem, directories are lists of names assigned to inodes. A directory contains an entry for itself, its parent, and each of its children.

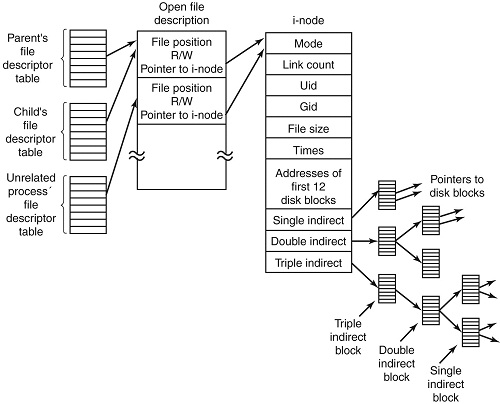
Structure-of-inode-table-on-Linux-Filesystem-diagram


Structure of inode table-on Linux Filesystem diagram (picture source GeeksForGeeks.org)

  • Information about files(data) are sometimes called metadata. So you can even say it in another way, "An inode is metadata of the data."
  •  Inode : Its a complex data-structure that contains all the necessary information to specify a file. It includes the memory layout of the file on disk, file permissions, access time, number of different links to the file etc.
  •  Global File table : It contains information that is global to the kernel e.g. the byte offset in the file where the user's next read/write will start and the access rights allowed to the opening process.
  • Process file descriptor table : maintained by the kernel, that in turn indexes into a system-wide table of files opened by all processes, called the file table .

The inode number indexes a table of inodes in a known location on the device. From the inode number, the kernel's file system driver can access the inode contents, including the location of the file – thus allowing access to the file.

  •     Inodes do not contain its hardlink names, only other file metadata.
  •     Unix directories are lists of association structures, each of which contains one filename and one inode number.
  •     The file system driver must search a directory looking for a particular filename and then convert the filename to the correct corresponding inode number.

The operating system kernel's in-memory representation of this data is called struct inode in Linux. Systems derived from BSD use the term vnode, with the v of vnode referring to the kernel's virtual file system layer.


But enough technical specifics, lets get into some practical experience on managing Filesystem inodes.
 

Listing inodes on a Fileystem


Lets say we wan to to list an inode number reference ID for the Linux kernel (files):


root@linux: # ls -i /boot/vmlinuz-*
 3055760 /boot/vmlinuz-3.2.0-4-amd64   26091901 /boot/vmlinuz-4.9.0-7-amd64
 3055719 /boot/vmlinuz-4.19.0-5-amd64  26095807 /boot/vmlinuz-4.9.0-8-amd64


To list an inode of all files in the kernel specific boot directory /boot:


root@linux: # ls -id /boot/
26091521 /boot/


Listing inodes for all files stored in a directory is also done by adding the -i ls command flag:

Note the the '-1' flag was added to to show files in 1 column without info for ownership permissions


root@linux:/# ls -1i /boot/
26091782 config-3.2.0-4-amd64
 3055716 config-4.19.0-5-amd64
26091900 config-4.9.0-7-amd64
26095806 config-4.9.0-8-amd64
26091525 grub/
 3055848 initrd.img-3.2.0-4-amd64
 3055644 initrd.img-4.19.0-5-amd64
26091902 initrd.img-4.9.0-7-amd64
 3055657 initrd.img-4.9.0-8-amd64
26091756 System.map-3.2.0-4-amd64
 3055703 System.map-4.19.0-5-amd64
26091899 System.map-4.9.0-7-amd64
26095805 System.map-4.9.0-8-amd64
 3055760 vmlinuz-3.2.0-4-amd64
 3055719 vmlinuz-4.19.0-5-amd64
26091901 vmlinuz-4.9.0-7-amd64
26095807 vmlinuz-4.9.0-8-amd64


To get more information about Linux directory, file, such as blocks used by file-unit, Last Access, Modify and Change times, current External Symbolic or Static links for filesystem object:
 

root@linux:/ # stat /etc/
  File: /etc/
  Size: 16384         Blocks: 32         IO Block: 4096   catalog
Device: 801h/2049d    Inode: 6365185     Links: 231
Access: (0755/drwxr-xr-x)  Uid: (    0/    root)   Gid: (    0/    root)
Access: 2019-08-20 06:29:39.946498435 +0300
Modify: 2019-08-14 13:53:51.382564330 +0300
Change: 2019-08-14 13:53:51.382564330 +0300
 Birth: –


Within a POSIX system (Linux-es) and *BSD are more or less such, a file has the following attributes[9] which may be retrieved by the stat system call:

   – Device ID (this identifies the device containing the file; that is, the scope of uniqueness of the serial number).
    File serial numbers.
    – The file mode which determines the file type and how the file's owner, its group, and others can access the file.
    – A link count telling how many hard links point to the inode.
    – The User ID of the file's owner.
    – The Group ID of the file.
    – The device ID of the file if it is a device file.
    – The size of the file in bytes.
    – Timestamps telling when the inode itself was last modified (ctime, inode change time), the file content last modified (mtime, modification time), and last accessed (atime, access time).
    – The preferred I/O block size.
    – The number of blocks allocated to this file.


Getting more extensive information on a mounted filesystem


Most Linuxes have the tune2fs installed by default (in debian Linux this is through e2fsprogs) package, with it one can get a very good indepth information on a mounted filesystem, lets say about the ( / ) root FS.
 

root@linux:~# tune2fs -l /dev/sda1
tune2fs 1.44.5 (15-Dec-2018)
Filesystem volume name:   <none>
Last mounted on:          /
Filesystem UUID:          abe6f5b9-42cb-48b6-ae0a-5dda350bc322
Filesystem magic number:  0xEF53
Filesystem revision #:    1 (dynamic)
Filesystem features:      has_journal ext_attr resize_inode dir_index filetype needs_recovery sparse_super large_file
Filesystem flags:         signed_directory_hash
Default mount options:    (none)
Filesystem state:         clean
Errors behavior:          Continue
Filesystem OS type:       Linux
Inode count:              30162944
Block count:              120648960
Reserved block count:     6032448
Free blocks:              13830683
Free inodes:              26575654
First block:              0
Block size:               4096
Fragment size:            4096
Reserved GDT blocks:      995
Blocks per group:         32768
Fragments per group:      32768
Inodes per group:         8192
Inode blocks per group:   512
Filesystem created:       Thu Sep  6 21:44:22 2012
Last mount time:          Sat Jul 20 11:33:38 2019
Last write time:          Sat Jul 20 11:33:28 2019
Mount count:              6
Maximum mount count:      22
Last checked:             Fri May 10 18:32:27 2019
Check interval:           15552000 (6 months)
Next check after:         Wed Nov  6 17:32:27 2019
Lifetime writes:          338 GB
Reserved blocks uid:      0 (user root)
Reserved blocks gid:      0 (group root)
First inode:              11
Inode size:              256
Required extra isize:     28
Desired extra isize:      28
Journal inode:            8
First orphan inode:       21554129
Default directory hash:   half_md4
Directory Hash Seed:      d54c5a90-bc2d-4e22-8889-568d3fd8d54f
Journal backup:           inode blocks


Important note to make here is file's inode number stays the same when it is moved to another directory on the same device, or when the disk is defragmented which may change its physical location. This also implies that completely conforming inode behavior is impossible to implement with many non-Unix file systems, such as FAT and its descendants, which don't have a way of storing this invariance when both a file's directory entry and its data are moved around. Also one inode could point to a file and a copy of the file or even a file and a symlink could point to the same inode, below is example:

$ ls -l -i /usr/bin/perl*
266327 -rwxr-xr-x 2 root root 10376 Mar 18  2013 /usr/bin/perl
266327 -rwxr-xr-x 2 root root 10376 Mar 18  2013 /usr/bin/perl5.14.2

A good to know is inodes are always unique values, so you can't have the same inode number duplicated. If a directory is damaged, only the names of the things are lost and the inodes become the so called “orphan”, e.g.  inodes without names but luckily this is recoverable. As the theory behind inodes is quite complicated and is complicated to explain here, I warmly recommend you read Ian Dallen's Unix / Linux / Filesystems – directories inodes hardlinks tutorial – which is among the best academic Tutorials explaining various specifics about inodes online.


How to Get inodes per mounted filesystem


root@linux:/home/hipo# df -i
Filesystem       Inodes  IUsed   IFree IUse% Mounted on


dev             2041439     481   2040958   1% /dev
tmpfs            2046359     976   2045383   1% /run
tmpfs            2046359       4   2046355   1% /dev/shm
tmpfs            2046359       6   2046353   1% /run/lock
tmpfs            2046359      17   2046342   1% /sys/fs/cgroup
/dev/sdb5        1221600    2562   1219038   1% /usr/var/lib/mysql
/dev/sdb6        6111232  747460   5363772  13% /var/www/htdocs
/dev/sdc1      122093568 3083005 119010563   3% /mnt/backups
tmpfs            2046359      13   2046346   1% /run/user/1000


As you see in above output Inodes reported for each of mounted filesystems has a specific number. In above output IFree on every mounted FS locally on Physical installed OS Linux is good.


Here is an example on how to recognize a depleted Inodes on a OpenXen Virtual Machine with attached Virtual Hard disks.

linux:~# df -i
Filesystem         Inodes     IUsed      IFree     IUse%   Mounted on
/dev/xvda         2080768    2080768     0      100%    /
tmpfs             92187      3          92184   1%     /lib/init/rw
varrun            92187      38          92149   1%    /var/run
varlock            92187      4          92183   1%    /var/lock
udev              92187     4404        87783   5%    /dev
tmpfs             92187       1         92186   1%    /dev/shm


Finding files with a certain inode


At some cases if you want to check all the copy files of a certain file that have the same i-node pointer it is useful to find them all by their shared inode this is possible with simple find (below example is for /usr/bin/perl binary sharing same inode as perl5.28.1:


ls -i /usr/bin/perl
23798851 /usr/bin/perl*


 find /usr/bin -inum 435308 -print
/usr/bin/perl5.28.1
/usr/bin/perl


Find directory that has a large number of files in it?

To get an overall number of inodes allocated by a certain directory, lets say /usr /var


root@linux:/var# du -s –inodes /usr /var
566931    /usr
56020    /var/

To get a list of directories use by inode for a directory with its main contained sub-directories sorted from 1 till highest number use:
 

du -s –inodes * 2>/dev/null |sort -g


Usually running out of inodes means there is a directory / fs mounts that has too many (small files) that are depleting the max count of possible inodes.

The most simple way to list directories and number of files in them on the server root directory is with a small bash shell loop like so:
 

for i in /*; do echo $i; find $i |wc -l; done


Another way to identify the exact directory that is most likely the bottleneck for the inode depletion in a sorted by file count, human readable form:
 

find / -xdev -printf '%h\n' | sort | uniq -c | sort -k 1 -n


This will dump a list of every directory on the root (/) filesystem prefixed with the number of files (and subdirectories) in that directory. Thus the directory with the largest number of files will be at the bottom.


The -xdev switch is used to instruct find to narrow it's search to only the device where you're initiating the search (any other sub-mounted NAS / NFS filesystems from a different device will be omited).


Print top 10 subdirectories with Highest Inode Usage


Once identifed the largest number of files directories that is perhaps the issue, to further get a list of Top subdirectories in it with highest amount of inodes used, use below cmd:


for i in `ls -1A`; do echo "`find $i | sort -u | wc -l` $i"; done | sort -rn | head -10


To list more than 10 of the top inodes used dirs change the head -10 to whatever num needed.

N.B. ! Be very cautious when running above 2 find commands on a very large filesystems as it will be I/O Excessive and in filesystems that has some failing blocks this could create further problems.

To omit putting a high I/O load on a production filesystem, it is possible to also use du + very complex regular expression:
 

cd /backup
du –inodes -S | sort -rh | sed -n         '1,50{/^.\{71\}/s/^\(.\{30\}\).*\(.\{37\}\)$/\1…\2/;p}'


Results returned are from top to bottom.


How to Increase the amount of Inodes count on a new created volume EXT4 filesystem

Some FS-es XFS, JFS do have an auto-increase inode feature in case if their is physical space, whether otheres such as reiserfs does not have inodes at all but still have a field reported when queried for errors. But the classical Linux ext3 / ext4 does not have a way to increase the inode number on a live filesystem. Instead the way to do it there is to prepare a brand new filesystem on a Disk / NAS / attached storage.

The number of inodes at format-time of the block storage can be as high as 4 billion inodes. Before you create the new FS, you have to partition the new the block storage as ext4 with lets say parted command (or nullify the content of an with dd to clean up any previous existing data on a volume if there was already existing data:
 

parted /dev/sda


dd if=/dev/zero of=/dev/path/to/volume


  then format it with this additional parameter:


mkfs.ext4 -N 3000000000 /dev/path/to/volume


Here in above example the newly created filesystem of EXT4 type will be created with 3 Billion inodes !, for setting a higher number on older ext3 filesystem max inode count mkfs.ext3 could be used instead.

Bear in mind that 3 Billion number is a too high number and if you plan to have some large number of files / directories / links structures just raise it up to your pre-planning requirements for FS. In most cases it will be rarely anyone that want to have this number higher than 1 or 2 billion of inodes.

On FreeBSD / NetBSD / OpenBSD setting inode maximum number for a UFS / UFS2 (which is current default FreeBSD FS), this could be done via newfs filesystem creation command after the disk has been labeled with disklabel:


freebsd# newfs -i 1024 /dev/ada0s1d


Increase the Max Count of Inodes for a /tmp filesystem


Sometimes on some machines it is necessery to have ability to store very high number of small files (e.g. have a very large number of inodes) on a temporary filesystem kept in memory. For example some web applications served by Web Server Apache + PHP, Nginx + Perl-FastCGI are written in a bad manner so they kept tons of temporary files in /tmp, leading to issues with exceeded amount of inodes.
If that's the case to temporary work around you can increase the count of Inodes for /tmp to a very high number like 2 billions using:


mount -o remount,nr_inodes=<bignum> /tmp

To make the change permanent on next boot if needed don't forget to put the nr_inodes=whatever_bignum as a mount option for the temporary fs to /etc/fstab

Eventually, if you face this issues it is best to immediately track which application produced the mess and ask the developer to fix his messed up programs architecture.


Conclusion


It was explained on the very common issue of having maximum amount of inodes on a filesystem depleted and the unpleasent consequences of inability to create new files on living FS.
Then a general overview was given on what is inode on a Linux / Unix filesystem, what is typical content of inode, how inode addressing is handled on a FS. Further was explained how to get basic information about available inodes on a filesystem, how to get a filename/s based on inode number (with find), the well known way to determine inode number of a directory or file (with ls) and get more extensive information on a FS on inodes with tune2fs.
Also was explained how to identify directories containing multitudes of files in order to determine a sub-directories that is consuming most of the inodes on a filesystem. Finally it was explained very raughly how to prepare an ext4 filesystem from scratch with predefined number to inodes to much higher than the usual defaults by mkfs.ext3 / mkfs.ext4 and *bsds newfs as well as how to raise the number of inodes of /tmp tmpfs temporary RAM filesystem.

Helpful Hints For Starting A Small WordPress Website or Ecomerce Business

Wednesday, August 14th, 2019

hints-for-starting-wordpress-site

Wordpress is the web application collection of PHP program behind thirty four percent (43%) of the internet’s websites, and fifteen percent (50%) of the top one hundred websites in the world, so if you’re considering it for your website then you’re perhaps thinking in the right direction. Small start-up projects a community website or even a small personal owned blog or mid to even large business presentation site  can benefit greatly from setting up their Web Platrform or Ecommerce shops on a WordPress website platform (that of itself depends just on a small number of technologies such as a Linux server with a Web Server installed on it to serve PHP as well as some kind of Linux host installed Database  backend engine such as MYSQL / PostgreSQL etc. …

But if you really want to create a successful ecommerce website on WordPress, that can seem a little intimidating at first as the general complexity to start up with WordPress looks very scary in the beginning. However in this article I’ll point to fewhelpful hints should get you off on the right foot, and make your entry into the world of Wodpress / WP Ecommerce a little easier and less scary.

This article is to be less technical than expected and in that will contrast slightly with many of the articles on this blog, the target audience is more of Web Marketing Manager or a Start-up Search Engine Optimization person at a small personal project or employed in the big bad corporate world.This is no something new that is going to be outlined in this article but a general rules that are known for the professional SEO Gurus but is most likely to be helpful for the starting persons.

If you happen to be one of these you should know you have to follow a set of well known rules on the website structure text, descriptions, text, orientation, ordering of menus and data etc. in order to have the WordPress based website running at full speed attracting more visitors to your site.
 

Photos


Importance of Photos on a Webiste
Although the text for your website is very important – more on that later – when a user first opens up your website in their browser, their eyes are going to be caught by the images that you have laid out on your website. Not using images is a big mistake, since it bores users’ eyes and makes your website seem amateur and basic, but using low quality images or irrelevant images can also harm your chances of appearing authentic to a user (yes here on this blog there are some of this low quality pictures but this is due to fact this website is more of information blog and not ecommerce. Thus at best case always make sure that you find the best, high-quality images for your website – make sure that you have the correct rights to use the images as well (as copyright infrignmenets) could cause you even a law suits ending in hundred or thousand dollar fines or even if this doesn't happen any publicity of such would reduce your website indexing rating. The images placed should always be relevant to your website. If you find a breath-taking sunset or tech-gadget picture, that’s great, but maybe not for your healthy food ecommerce store, but for your personal ranting or describing a personal experience.


Product Photos


Assuming that sooner or later even if you have a community website you will want to monerize it to bring back to yourself in material form at least part of the many years effort to bring the site to the web rank gained.
Leading on from that point, you’re going to be selling or advertise items – that’s the whole point of ecommerce. But users often find ads / online shopping frustrating due to not being able to properly see and understand what they’re buying before they make their purchase. This can lead to ‘buyer’s remorse’, and, consequently, refunds galore, which is not what you want. Make sure that images of your products are always available and of a high quality – investing in a fairly high quality camera might be a good idea – and consider many pictures for different angles or even rotating images so that the user can decide for themself which angle they want to look at.


Engaging Descriptions


“I can guarantee that you can’t remember the last five product descriptions you read – not even word-for-word, but the general ideas and vocabulary used will have been tossed into your short-term memory and forgotten in an instant. This is where your website can shine, and become better than ninety percent of those lingering on the internet,” Matthew Kelly, a project manager at WriteMyX and NextCoursework, suggests, “since putting effort into writing your product descriptions and making them lively and engaging will make your website memorable, and your subscribers will turn helpfully soon loyal customers will be more likely to come back time and time again and become repeat business, as well as mention you to their friends (social mounth to mouth marketing) and that way working as free advertising for you and making your website incredibly effective.”


Mobile-Friendly


Which device is most used to check email Laptop / PC or Mobile statistics as of year 2019

These days with the bloom of Mobile Devices that are currently overrunning the user of normal Desktop PCs, Laptops and Tablets and this trend is likely to stay and even increase, “If your website isn’t mobile-friendly in this day and age, then you won’t get anywhere with it.” Anne Baker, a marketer at BritStudent and Australia2Write, states. “Most people use their phones when they access websites, especially when they go shopping on the internet.

Statistics on user stay (secs / mins) stay on a website from Desktop PC and Mobile devices

On WordPress, this means finding a more recent theme – an older theme, maybe four-five years old, will probably not support mobile, and you just can’t afford to lose out on the mobile market.” In short, find yourself a mobile-friendly theme or install the right WordPress Pluguin that will enable you to have a Mobile Friendly theme in case if blog is accessed from a Mobile Dev or many of your customers will become frustrated with the badly formatted ‘mobile’ version of your website that they end up using, which might be for instance meant for a much larger screen. It can also ruin the atmosphere (experience) created at the accessed user site and have negative impact on your audience opion of your site or business. This is even more the case  if your website or webapp is targetting to be modern and keeping with the times – or especially if it deals with IT and electronics (where the competition is huge)!


Registration


Registration Ecommerce website

Registration form (Sign Up) on a website and the overall business cycle idea behind web product or business is of critical importance as this is the point that will guarantee intimidation with the customer, failing to have the person be engaged will quickly make your website rank lower and your producs less wanted. The general rule here is to make your registration be an easy (to orientate for the user) and be present on a very visible place on the site.

Registration steps should be as less as possible as this might piss off the user and repel him out of the site before the registration is completed. Showing oportunity to register with a Pop-Up window (while the user clicks on a place showing interest for the produce might be useful in some cases but generally might also push the user back so if you decide to implement it do it with a lot of care (beware of too much aggressive marketing on our site).

An example


The registration process should be as intimidating as possible to leave joy in the user that might later return and log in to your site or ecommerce platform, e.g. be interested to stay for a longer time. The marketing tactic aiming to make the user stay for a longer time on the website (dragging his attention / interest to stuff)  is nothing new by the way as it is well known marketing rule integrated in every supermarket you buy groceries, where all is made to keep you in the shop for as longer as possible. Research has shown that spending longer time within the supermarket makes the user buy more.


Returning customers can be intimidated with membership or a free gift (be it even virtual picture gift – free email whatever) or information store place could be given or if products are sold, registration will be obligatory to make them use their payment method or delivery address on next login to easify the buy out process. But if registration is convoluted and forced (e.g. user is somehow forced to become meber) then many customers will turn away and find another website for their shopping needs. Using a method like Quora’s ‘login to see more’ in that case might be a good idea even though for me this is also a very irritating and irritating – this method however should never be used if you run a ecommerce selling platform, on ecommerce site gatekeeping will only frustrate customers. Login is good to be implmeneted as a popup option (and not taking too much of the screen). Sign up and Login should be simplistic and self-explanatory – always not required but optioned and user should get the understanding of the advantage to be a member of the website if possible before the sign up procedure. Then, customers are more likely to sign up and won’t feel like they’ve been pushed into the decision – or pushed away, as the case may be.

Katrina Hatchett works as a lifestyle blogger at both Academic Brits and Assignment Help, due to a love of literature and writing, which she has had since youth. Throughout her career, she has become involved with many projects, such as writing for the PhD Kingdom blog.

Howto debug and remount NFS hangled filesystem on Linux

Monday, August 12th, 2019

nfsnetwork-file-system-architecture-diagram

If you're using actively NFS remote storage attached to your Linux server it is very useful to get the number of dropped NFS connections and in that way to assure you don't have a remote NFS server issues or Network connectivity drops out due to broken network switch a Cisco hub or other network hop device that is routing the traffic from Source Host (SRC) to Destination Host (DST) thus, at perfect case if NFS storage and mounted Linux Network filesystem should be at (0) zero dropped connectios or their number should be low. Firewall connectivity between Source NFS client host and Destination NFS Server and mount should be there (set up fine) as well as proper permissions assigned on the server, as well as the DST NFS should be not experiencing I/O overheads as well as no DNS issues should be present (if NFS is not accessed directly via IP address).
In below article which is mostly for NFS novice admins is described shortly few of the nuances of working with NFS.
 

1. Check nfsstat and portmap for issues

One indicator that everything is fine with a configured NFS mount is the number of dropped NFS connections
or with a very low count of dropped connections, to check them if you happen to administer NFS

nfsstat


linux:~# nfsstat -o net
Server packet stats:
packets    udp        tcp        tcpconn
0          0          0          0  


nfsstat is useful if you have to debug why occasionally NFS mounts are getting unresponsive.

As NFS is so dependent upon portmap service for mapping the ports, one other point to check in case of Hanged NFSes is the portmap service whether it did not crashed due to some reason.


linux:~# service portmap status
portmap (pid 7428) is running…   [portmap service is started.]


linux:~# ps axu|grep -i rpcbind
_rpc       421  0.0  0.0   6824  3568 ?        Ss   10:30   0:00 /sbin/rpcbind -f -w


A useful commands to debug further rcp caused issues are:

On client side:


rpcdebug -m nfs -c


On server side:


rpcdebug -m nfsd -c


It might be also useful to check whether remote NFS permissions did not changed with the good old showmount cmd

linux:~# showmount -e rem_nfs_server_host


Also it is useful to check whether /etc/exports file was not modified somehow and whether the NFS did not hanged due to attempt of NFS daemon to reload the new configuration from there, another file to check while debugging is /etc/nfs.conf – are there group / permissions issues as well as the usual /var/log/messages and the kernel log with dmesg command for weird produced NFS client / server or network messages.

nfs-utils disabled serving NFS over UDP in version 2.2.1. Arch core updated to 2.3.1 on 21 Dec 2017 (skipping over 2.2.1.) If UDP stopped working then, add udp=y under [nfsd] in /etc/nfs.conf. Then restart nfs-server.service.

If the remote NFS server is running also Linux it is useful to check its /etc/default/nfs-kernel-server configuration

At some stall cases it might be also useful to remount the NFS (but as there might be a process on the Linux server) trying to read / write data from the remote NFS mounted FS it is a good idea to check (whether a process / service) on the server is not doing I/O operations on the NFS and if such is existing to kill the process in question with fuser
 

linux:~# fuser -k [mounted-filesystem]


2. Diagnose the problem interactively with htop


    Htop should be your first port of call. The most obvious symptom will be a maxed-out CPU.
    Press F2, and under "Display options", enable "Detailed CPU time". Press F1 for an explanation of the colours used in the CPU bars. In particular, is the CPU spending most of its time responding to IRQs, or in Wait-IO (wio)?
 

3. Get more extensive Mount info with mountstats


nfs-utils package contains mountstats command which is very useful in debugging further the issues identified

$ mountstats
Stats for example:/tank mounted on /tank:
  NFS mount options: rw,sync,vers=4.2,rsize=524288,wsize=524288,namlen=255,acregmin=3,acregmax=60,acdirmin=30,acdirmax=60,soft,proto=tcp,port=0,timeo=15,retrans=2,sec=sys,clientaddr=xx.yy.zz.tt,local_lock=none
  NFS server capabilities: caps=0xfbffdf,wtmult=512,dtsize=32768,bsize=0,namlen=255
  NFSv4 capability flags: bm0=0xfdffbfff,bm1=0x40f9be3e,bm2=0x803,acl=0x3,sessions,pnfs=notconfigured
  NFS security flavor: 1  pseudoflavor: 0


NFS byte counts:
  applications read 248542089 bytes via read(2)
  applications wrote 0 bytes via write(2)
  applications read 0 bytes via O_DIRECT read(2)
  applications wrote 0 bytes via O_DIRECT write(2)
  client read 171375125 bytes via NFS READ
  client wrote 0 bytes via NFS WRITE

RPC statistics:
  699 RPC requests sent, 699 RPC replies received (0 XIDs not found)
  average backlog queue length: 0

READ:
    338 ops (48%)
    avg bytes sent per op: 216    avg bytes received per op: 507131
    backlog wait: 0.005917     RTT: 548.736686     total execute time: 548.775148 (milliseconds)
GETATTR:
    115 ops (16%)
    avg bytes sent per op: 199    avg bytes received per op: 240
    backlog wait: 0.008696     RTT: 15.756522     total execute time: 15.843478 (milliseconds)
ACCESS:
    93 ops (13%)
    avg bytes sent per op: 203    avg bytes received per op: 168
    backlog wait: 0.010753     RTT: 2.967742     total execute time: 3.032258 (milliseconds)
LOOKUP:
    32 ops (4%)
    avg bytes sent per op: 220    avg bytes received per op: 274
    backlog wait: 0.000000     RTT: 3.906250     total execute time: 3.968750 (milliseconds)
OPEN_NOATTR:
    25 ops (3%)
    avg bytes sent per op: 268    avg bytes received per op: 350
    backlog wait: 0.000000     RTT: 2.320000     total execute time: 2.360000 (milliseconds)
CLOSE:
    24 ops (3%)
    avg bytes sent per op: 224    avg bytes received per op: 176
    backlog wait: 0.000000     RTT: 30.250000     total execute time: 30.291667 (milliseconds)
DELEGRETURN:
    23 ops (3%)
    avg bytes sent per op: 220    avg bytes received per op: 160
    backlog wait: 0.000000     RTT: 6.782609     total execute time: 6.826087 (milliseconds)
READDIR:
    4 ops (0%)
    avg bytes sent per op: 224    avg bytes received per op: 14372
    backlog wait: 0.000000     RTT: 198.000000     total execute time: 198.250000 (milliseconds)
SERVER_CAPS:
    2 ops (0%)
    avg bytes sent per op: 172    avg bytes received per op: 164
    backlog wait: 0.000000     RTT: 1.500000     total execute time: 1.500000 (milliseconds)
FSINFO:
    1 ops (0%)
    avg bytes sent per op: 172    avg bytes received per op: 164
    backlog wait: 0.000000     RTT: 2.000000     total execute time: 2.000000 (milliseconds)
PATHCONF:
    1 ops (0%)
    avg bytes sent per op: 164    avg bytes received per op: 116
    backlog wait: 0.000000     RTT: 1.000000     total execute time: 1.000000 (milliseconds)


nfs-utils disabled serving NFS over UDP in version 2.2.1. Arch core updated to 2.3.1 on 21 Dec 2017 (skipping over 2.2.1.) If UDP stopped working then, add udp=y under [nfsd] in /etc/nfs.conf. Then restart nfs-server.service.
 

4. Check for firewall issues
 

If all fails make sure you don't have any kind of firewall issues. Sometimes firewall changes on remote server or somewhere in the routing servers might lead to stalled NFS mounts.


To use properly NFS as you should know as a minimum you need to have opened as ports is Port 111 (TCP and UDP) and 2049 (TCP and UDP) on the NFS server (side) as well as any traffic inspection routers on the road from SRC (Linux client host) and NFS Storage destination DST server.

There are also ports for Cluster and client status (Port 1110 TCP for the former, and 1110 UDP for the latter) as well as a port for the NFS lock manager (Port 4045 TCP and UDP) but having this opened or not depends on how the NFS is configured. You can further determine which ports you need to allow depending on which services are needed cross-gateway.
 

5. How to Remount a Stalled unresponsive NFS filesystem mount


At many cases situation with remounting stalled NFS filesystem is not so easy but if you're lucky a standard mount and remount should do the trick.

Most simple way to remout the NFS (once you're sure this might not disrupt any service) – don't blame me if you break something is with:
 

umount -l /mnt/NFS_mnt_point
mount /mnt/NFS_mnt_point


Note that the lazy mount (-l) umount opt is provided here as very often this is the only way to unmount a stalled NFS mount.

Sometimes if you have a lot of NFS mounts and all are inacessible it is useful to remount all NFS mounts, if the remote NFS is responsive this should be possible with a simple for bash loop:

for P in $(mount | awk '/type nfs / {print $3;}'); do echo $P; echo "sudo umount $P && sudo mount $P" && echo "ok :)"; done


If you cd /mnt/NFS_mnt_point and try ls and you get

$ ls
.: Stale File Handle


You will need to unmount the FS with forceful mount flag

umount -f /mnt/NFS_mnt_point
 

Sum it up


In this article, I've shown you a few simple ways to debug what is wrong with a Stalled / Hanged NFS filesystem present on a NFS server mounted on a Linux client server.
Above was explained the common issues caused by NFS portmap (rpcbind) dependency, how to its status is fine, some further diagnosis with htop and mountstat was pointed. I've pointed the minimum amount of TCP / UDP ports 2049 and 111 that needs to be opened for the NFS communication to work and finally explained on how to remount a stalled NFS single or all attached mount on a NFS client to restore to normal operations.
As NFS is a whole ocean of things and the number of ways it is used are too extensive this article is just a general info useful for the NFS dummy admin for more robust configs read some good book on NFS such as Managing NFS and NIS, 2nd Edition – O'Reilly Media and for Kernel related NFS debugging make sure you check as a minimum ArchLinux's NFS troubleshooting guide and sourceforge's NFS Troubleshoting and Optimizing NFS Performance guides.


Fix staled NFS on server with dmesg error log nfs: server nfs-server not responding, still trying

Saturday, March 16th, 2019

NFS_Filesystem-fix-staled-NFS-System-dmesg-error-nfs-server-not-responding-still-trying

On a server today I've found to have found a number of NFS mounts mounted through /etc/fstab file definitions that were hanging;
 

nfs-server:~# df -hT


 command kept hanging as well as any attempt to access the mounted NFS directory was not possible.
The server with the hanged Network File System is running SLES (SuSE Enterprise Linux 12 SP3) a short investigation in the kernel logs (dmesg) as well as /var/log/messages reveales following errors:


nfs-server:~# dmesg
[3117414.856995] nfs: server nfs-server OK
[3117595.104058] nfs: server nfs-server not responding, still trying
[3117625.032864] nfs: server nfs-server OK
[3117805.280036] nfs: server nfs-server not responding, still trying
[3117835.209110] nfs: server nfs-server OK
[3118015.456045] nfs: server nfs-server not responding, still trying
[3118045.384930] nfs: server nfs-server OK
[3118225.568029] nfs: server nfs-server not responding, still trying
[3118255.560536] nfs: server nfs-server OK
[3118435.808035] nfs: server nfs-server not responding, still trying
[3118465.736463] nfs: server nfs-server OK
[3118645.984057] nfs: server nfs-server not responding, still trying
[3118675.912595] nfs: server nfs-server OK
[3118886.098614] nfs: server nfs-server OK
[3119066.336035] nfs: server nfs-server not responding, still trying
[3119096.274493] nfs: server nfs-server OK
[3119276.512033] nfs: server nfs-server not responding, still trying
[3119306.440455] nfs: server nfs-server OK
[3119486.688029] nfs: server nfs-server not responding, still trying
[3119516.616622] nfs: server nfs-server OK
[3119696.864032] nfs: server nfs-server not responding, still trying
[3119726.792650] nfs: server nfs-server OK
[3119907.040037] nfs: server nfs-server not responding, still trying
[3119936.968691] nfs: server nfs-server OK
[3120117.216053] nfs: server nfs-server not responding, still trying
[3120147.144476] nfs: server nfs-server OK
[3120328.352037] nfs: server nfs-server not responding, still trying
[3120567.496808] nfs: server nfs-server OK
[3121370.592040] nfs: server nfs-server not responding, still trying
[3121400.520779] nfs: server nfs-server OK
[3121400.520866] nfs: server nfs-server OK


It took me a short while to investigate and check the NetApp remote NFS storage filesystem and investigate the Virtual Machine that is running on top of OpenXen Hypervisor system.
The NFS storage permissions of the exported file permissions were checked and they were in a good shape, also a reexport of the NFS mount share was re-exported and on the Linux
mount host the following commands ran to remount the hanged Filesystems:


nfs-server:~# umount -f /mnt/nfs_share
nfs-server:~# umount -l /mnt/nfs_share
nfs-server:~# umount -lf /mnt/nfs_share1
nfs-server:~# umount -lf /mnt/nfs_share2
nfs-server:~# mount -t nfs -o remount /mnt/nfs_share


that fixed one of the hanged mount, but as I didn't wanted to manually remount each of the NFS FS-es, I've remounted them all with:

nfs-server:~# mount -a -t nfs


This solved it but, the fix seemed unpermanent as in a time while the issue started reoccuring and I've spend some time
in further investigation on the weird NFS hanging problem has led me to the following blog post where the same problem was described and it was pointed the root cause of it lays
in parameter for MTU which seems to be quite high MTU 9000 and this over the years has prooven to cause problems with NFS especially due to network router (switches) configurations
which seem to have a filters for MTU and are passing only packets with low MTU levels and using rsize / wzise custom mount NFS values in /etc/fstab could lead to this strange NFS hangs.

Below is a list of Maximum Transmission  Unit (MTU) for Media Transport excerpt taken from wikipedia as of time of writting this article.

https://www.pc-freak.net/images/Maximum-Transmission-Unit-for-Media-Transport-diagram-3.png

In my further research on the issue I've come across this very interesting article which explains a lot on "Large Internet" and Internet Performance

I've used tracepath command which is doing basicly the same as traceroute but could be run without root user and discovers hops (network routers) and shows MTU between path -> destionation.

Below is a sample example

nfs-server:~# tracepath bergon.net
 1?: [LOCALHOST]                      pmtu 1500
 1:  192.168.6.1                                           0.909ms
 1:  192.168.6.1                                           0.966ms
 2:  192.168.222.1                                         0.859ms
 3:  6.192.104.109.bergon.net                              1.138ms reached
     Resume: pmtu 1500 hops 3 back 3


Optiomal pmtu for this connection is to be 1500 .traceroute in some cases might return hops with 'no reply' if there is a router UDP  packet filtering implemented on it.

The high MTU value for the Storage network connection interface on eth1 was evident with a simple:


 nfs-server:~# /sbin/ifconfig |grep -i eth -A 2
eth0      Link encap:Ethernet  HWaddr 00:16:3E:5C:65:74
          inet addr:100.127.108.56  Bcast:100.127.109.255  Mask:255.255.254.0
          UP BROADCAST RUNNING MULTICAST  MTU:1500  Metric:1

eth1      Link encap:Ethernet  HWaddr 00:16:3E:5C:65:76
          inet addr:100.96.80.94  Bcast:100.96.83.255  Mask:255.255.252.0
          UP BROADCAST RUNNING MULTICAST  MTU:9000  Metric:1


The fix was as simple to lower MTU value for eth1 Ethernet interface to 1500 which is the value which most network routers are configured too.

To apply the new MTU to the eth1 interface without restarting the SuSE SLES networking , I first used ifconfig one time with:


 nfs-server:~# /sbin/ifconfig eth1 mtu 1500
 nfs-server:~# ip addr show
 …


To make the setting permanent on next  SuSE boot:

I had to set the MTU=1500 value in


nfs-server:~#/etc/sysconfig/network/ifcfg-eth1
nfs-server:~#  ip address show eth1
3: eth1: <BROADCAST,MULTICAST,UP,LOWER_UP> mtu 1500 qdisc pfifo_fast state UP group default qlen 1000
    link/ether 8c:89:a5:f2:e8:d8 brd ff:ff:ff:ff:ff:ff
    inet 192.168.0.1/24 brd 192.168.0.255 scope global eth1
       valid_lft forever preferred_lft forever


Then to remount the NFS mounted hanged filesystems once again ran:
 

nfs-server:~# mount -a -t nfs


Many network routers keeps the MTU to low as 1500 also because a higher values causes IP packet fragmentation when using NFS over UDP where IP packet fragmentation and packet
reassembly requires significant amount of CPU at both ends of the network connection.
Packet fragmentation also exposes network traffic to greater unreliability, since a complete RPC request must be retransmitted if a UDP packet fragment is dropped for any reason.
Any increase of RPC retransmissions, along with the possibility of increased timeouts, are the single worst impediment to performance for NFS over UDP.
This and many more is very well explained in Optimizing NFS Performance page (which is a must reading) for any sys admin that plans to use NFS frequently.

Even though lowering MTU (Maximum Transmission Union) value does solved my problem at some cases especially in a modern local LANs with Jumbo Frames, allowing and increasing the MTU to 9000 bytes
might be a good idea as this will increase the amount of packet size.and will raise network performance, however as always on distant networks with many router hops keeping MTU value as low as 1492 / 5000 is always a good idea.


How to install KVM Kernel-based Virtual Machine Virtualization on Linux

Sunday, October 14th, 2018

install-KVM-Kernel-based-Virtual-Machine-virtualization-on-Linux

If you want to run multiple virtual machines on GNU / Linux server or your Linux powered Desktop you have the possibility to use a couple of Virtual Machines just to name a few VirtualBox and VMWare are the option the native way to do it is using the Linux kernel via a loadable kernel module called KVM (Kernel-based Virtual Machine).
Though Oracle's Virtualbox generally works and you could add new test beds virtual machines (install multiple Linux / *BSD OS) it is not fully Free Software and not even fully open source licensed, VMWare even though superior as a Virtualization product is proprietary and its application costs a lot of money which not each develpoper or small / mid-sized company could afford.

Once the kvm.ko module is loaded your Linux kernel turns into a full-featured Virtual Machine Hypervisor.
Starting with Linux kernel 2.6.X the KVM Hypervisor is available and easy to install virtually all modern Linux distributions Redhat / CentOS Debian / Ubuntu etc. support it and its up to running few commands to install and start using the Power of Kernel embedded Virtualization.

KVM could be used to run in parallel multiple Operating Systems such as Windows / Linux / FreeBSD and others of BSDs family,  each running under a separate virtual machine with its private dedicated (isolated), disc, graphic card, network card etc.

To start up I assume you have already installed some kind of Linux distribution either locally or on a remote dedicated server.
 

1. Installing KVM on Debian GNU / Linux / Ubuntu / Mint and other deb based distros


Using APT tool install below packages:


root@jeremiah:~# apt install –yes qemu-kvm libvirt-clients libvirt-daemon-system bridge-utils libguestfs-tools genisoimage virtinst libosinfo-bin


2. Installing virt-manager GUI to manage Virtual servers


root@jeremiah:~# apt-cache show virt-manager|grep -i desc -A 1
Description-en: desktop application for managing virtual machines
 It presents a summary view of running domains and their live performance &

Description-md5: 9f7f584744b77cdacc2291f2a8ac220e
Homepage: http://virt-manager.et.redhat.com/


root@jeremiah:~# apt install –yes virt-manager


virtual-manager-kvm-gnu-linux-virtual-machines-cpu-hdd-load-statistics-screenshot


virtual-manager-fedora-28-linux-virtual-machine-settings-screenshot


3. Configure bridged networking to allow access to newly configured VMs

Bridging has to be added via /etc/network/interfaces therefore it is a good idea to create a backup of it before modifying:


# cp -rpf /etc/network/interfaces /etc/network/interfaces.bakup-$(echo $(date '+%Y-%m-%d-%H'))


# vim /etc/network/interfaces

auto br0
 iface br0 inet static
         address 10.15.44.26
         netmask 255.255.255.192
         broadcast 10.15.44.63
         dns-nameservers 10.0.80.11 10.0.80.12
         # set static route for LAN
      post-up route add -net 10.0.0.0 netmask 255.0.0.0 gw 10.18.44.1
      post-up route add -net 161.26.0.0 netmask 255.255.0.0 gw 10.18.44.1
         bridge_ports eth0
         bridge_stp off
         bridge_fd 0
         bridge_maxwait 0
 
 # br1 setup with static wan IPv4 with ISP router as a default gateway
 auto br1
 iface br1 inet static
         address 192.168.222.51
         netmask 255.255.255.248
         broadcast 192.168.222.55
         gateway 192.168.222.49
         bridge_ports eth1
         bridge_stp off
         bridge_fd 0
         bridge_maxwait 0


Once file is saved in vim editor restart the networking.


# systemctl restart network.manager


To verify whether the bridge has been succesfully upped.


root@jeremiah:/home/hipo/kvm# brctl show
bridge name    bridge id        STP enabled    interfaces
virbr0        8000.525400cb1cd1    yes        virbr0-nic


4. List all installable Virtual OS images
 

root@jeremiah:/home/hipo/kvm# virt-builder -list
centos-6                 x86_64     CentOS 6.6
centos-7.0               x86_64     CentOS 7.0
centos-7.1               x86_64     CentOS 7.1
centos-7.2               aarch64    CentOS 7.2 (aarch64)
centos-7.2               x86_64     CentOS 7.2
centos-7.3               x86_64     CentOS 7.3
centos-7.4               x86_64     CentOS 7.4
centos-7.5               x86_64     CentOS 7.5
cirros-0.3.1             x86_64     CirrOS 0.3.1
cirros-0.3.5             x86_64     CirrOS 0.3.5
debian-6                 x86_64     Debian 6 (Squeeze)
debian-7                 sparc64    Debian 7 (Wheezy) (sparc64)
debian-7                 x86_64     Debian 7 (wheezy)
debian-8                 x86_64     Debian 8 (jessie)
debian-9                 x86_64     Debian 9 (stretch)
fedora-18                x86_64     Fedora® 18
fedora-19                x86_64     Fedora® 19
fedora-20                x86_64     Fedora® 20
fedora-21                aarch64    Fedora® 21 Server (aarch64)
fedora-21                armv7l     Fedora® 21 Server (armv7l)
fedora-21                ppc64      Fedora® 21 Server (ppc64)
fedora-21                ppc64le    Fedora® 21 Server (ppc64le)
fedora-21                x86_64     Fedora® 21 Server
fedora-22                aarch64    Fedora® 22 Server (aarch64)
fedora-22                armv7l     Fedora® 22 Server (armv7l)
fedora-22                i686       Fedora® 22 Server (i686)
fedora-22                x86_64     Fedora® 22 Server
fedora-23                aarch64    Fedora® 23 Server (aarch64)
fedora-23                armv7l     Fedora® 23 Server (armv7l)
fedora-23                i686       Fedora® 23 Server (i686)
fedora-23                ppc64      Fedora® 23 Server (ppc64)
fedora-23                ppc64le    Fedora® 23 Server (ppc64le)
fedora-23                x86_64     Fedora® 23 Server
fedora-24                aarch64    Fedora® 24 Server (aarch64)
fedora-24                armv7l     Fedora® 24 Server (armv7l)
fedora-24                i686       Fedora® 24 Server (i686)
fedora-24                x86_64     Fedora® 24 Server
fedora-25                aarch64    Fedora® 25 Server (aarch64)
fedora-25                armv7l     Fedora® 25 Server (armv7l)
fedora-25                i686       Fedora® 25 Server (i686)
fedora-25                ppc64      Fedora® 25 Server (ppc64)
fedora-25                ppc64le    Fedora® 25 Server (ppc64le)
fedora-25                x86_64     Fedora® 25 Server
fedora-26                aarch64    Fedora® 26 Server (aarch64)
fedora-26                armv7l     Fedora® 26 Server (armv7l)
fedora-26                i686       Fedora® 26 Server (i686)
fedora-26                ppc64      Fedora® 26 Server (ppc64)
fedora-26                ppc64le    Fedora® 26 Server (ppc64le)
fedora-26                x86_64     Fedora® 26 Server
fedora-27                aarch64    Fedora® 27 Server (aarch64)
fedora-27                armv7l     Fedora® 27 Server (armv7l)
fedora-27                i686       Fedora® 27 Server (i686)
fedora-27                ppc64      Fedora® 27 Server (ppc64)
fedora-27                ppc64le    Fedora® 27 Server (ppc64le)
fedora-27                x86_64     Fedora® 27 Server
fedora-28                i686       Fedora® 28 Server (i686)
fedora-28                x86_64     Fedora® 28 Server
freebsd-11.1             x86_64     FreeBSD 11.1
scientificlinux-6        x86_64     Scientific Linux 6.5
ubuntu-10.04             x86_64     Ubuntu 10.04 (Lucid)
ubuntu-12.04             x86_64     Ubuntu 12.04 (Precise)
ubuntu-14.04             x86_64     Ubuntu 14.04 (Trusty)
ubuntu-16.04             x86_64     Ubuntu 16.04 (Xenial)
ubuntu-18.04             x86_64     Ubuntu 18.04 (bionic)
opensuse-13.1            x86_64     openSUSE 13.1
opensuse-13.2            x86_64     openSUSE 13.2
opensuse-42.1            x86_64     openSUSE Leap 42.1
opensuse-tumbleweed      x86_64     openSUSE Tumbleweed


5. Create Virtual Machine OS-es from scratch with virt-builder

Below we'll create two images one for Fedora 28 and 1 for Debian 9 using the virt-builder (a tool to build virtual images quickly), the images that could be used are shown through below virt-builder –list command.
 

# iso='fedora-28';
# iso1='debian-9';


# sudo virt-builder $iso \
     –size=10G \
     –format qcow2 -o /var/lib/libvirt/images/$iso-vm1.qcow2 \
     –hostname $iso-vm1 \
     –network \
     –timezone Europe/Sofia


[   3.3] Downloading: http://libguestfs.org/download/builder/fedora-28.xz
[   5.2] Planning how to build this image
[   5.2] Uncompressing
[  20.8] Resizing (using virt-resize) to expand the disk to 10.0G
[  50.8] Opening the new disk
[  53.7] Setting a random seed
[  53.7] Setting the hostname: fedora-28-vm1
[  53.7] Setting the timezone: Europe/Sofia
[  53.7] Setting passwords
virt-builder: Setting random password of root to YMTkxaJIkEU24Ytf

[  54.7] Finishing off
                   Output file: /var/lib/libvirt/images/fedora-28-vm1.qcow2
                   Output size: 10.0G
                 Output format: qcow2
            Total usable space: 9.3G
                    Free space: 8.2G (87%)


# sudo virt-builder $iso1 \
     –size=10G \
     –format qcow2 -o /var/lib/libvirt/images/$iso-vm1.qcow2 \
     –hostname $iso1-vm1 \
     –network \
     –timezone Europe/Sofia


[   3.2] Downloading: http://libguestfs.org/download/builder/debian-9.xz
[   4.1] Planning how to build this image
[   4.1] Uncompressing
[  16.9] Resizing (using virt-resize) to expand the disk to 10.0G
[  40.1] Opening the new disk
[  42.9] Setting a random seed
virt-builder: warning: random seed could not be set for this type of guest
[  42.9] Setting the hostname: debian-9-vm1
[  43.6] Setting the timezone: Europe/Sofia
[  43.6] Setting passwords
virt-builder: Setting random password of root to JtzEYGff9KxL5jCR
[  44.3] Finishing off
                   Output file: /var/lib/libvirt/images/debian-9-vm1.qcow2
                   Output size: 10.0G
                 Output format: qcow2
            Total usable space: 9.8G
                    Free space: 9.0G (91%)


vim bridged.xml

<network>
  <name>br0</name>
  <forward mode="bridge"/>
  <bridge name="br0"/>
</network>


# sudo virsh net-define –file bridged.xml
# sudo virsh net-autostart br0
# sudo virsh net-start br0


Above two commands will download pre-packaged KVM isos and store them inside /var/lib/libvirt/images/ you see also the root (administrator) password for both ISOs printed out.


root@jeremiah:/home/hipo/kvm# ls -ld /var/lib/libvirt/images/*
-rw-r–r– 1 root         root         10739318784 Oct 12 23:45 /var/lib/libvirt/images/debian-9-vm1.qcow2
-rw-r–r– 1 root         root         10739318784 Oct 12 23:46 /var/lib/libvirt/images/fedora-28-vm1.qcow2


To access directly the new created VMs as we have specified the –vnc option it is possible to directly vnc to the new host with VNC client (in linux I use vncviewer), on Windows you can use something like TightVNC.
 

6. Use official Linux distributions ISO boot files to install into KVM VM


Those who would like to run inside KVM VM Linux could do it directly using installable ISO files and install the set of Linux with the required packages, just like installing a fresh new Linux on a bare-metal machine.
To do so download your ISO image from the net (either from official distro website or a mirror website, in case if you need to spin an older version) and use virt-install to run the installer inside KVM.


root@jeremiah:~# cd /var/lib/libvirt/boot/;
root@jeremiah:~# wget http://mirrors.netix.net/centos/7.5.1804/isos/x86_64/CentOS-7-x86_64-DVD-1804.iso


# sudo virt-install \
–virt-type=kvm \
–name centos7 \
–ram 2048 \
–vcpus=2 \
–os-variant=centos7.0 \
–virt-type=kvm \
–hvm \
–cdrom=/var/lib/libvirt/boot/CentOS-7-x86_64-DVD-1804.iso \
–network=bridge=br0,model=virtio \
–network=bridge=br1,model=virtio \
–graphics vnc \
–disk path=/var/lib/libvirt/images/centos7.qcow2,size=40,bus=virtio,format=qcow2


7. List newly created VMs with Virsh command


root@jeremiah:/home/hipo/kvm# virsh list –all
 Id    Name                           State
—————————————————-
 3     fedora-28                      running
 –     debian9                        shut off


The –all parameter lists all available VMs ready to spin, if you want to check what are the VMs that are only running use instead:


root@jeremiah:/home/hipo/kvm# virsh list
 Id    Name                           State
—————————————————-
 3     fedora-28                      running


8. Install Virtual Machine OS-es

Below lines will install 2 Virtual machines one Fedora 28 and Debian 9


 os='fedora-28';
virt-install –import –name $os \
    –ram 2048 \
    –vcpu 2 \
    –disk path=/var/lib/libvirt/images/$os-vm1.qcow2,format=qcow2 \
    –os-variant fedora-unknown \
    –network=bridge=br0,model=virtio \
    –noautoconsole \
  –hvm \
  –graphics vnc

os='debian9';
virt-install –import –name $os     \
–ram 2048     \
–vcpu 2     \
–disk path=/var/lib/libvirt/images/$os-vm1.qcow2,format=qcow2     \
–os-variant debian9     –network=bridge=br0,model=virtio     \
–noautoconsole \
–hvm \
–graphics vnc


To deploy more just change the virtual machine type in os variable and modify the –os-variant variable to match the distribution name, to get the correct –os-variant variables that can be passed use osinfo-query below is output of the cmd:


root@jeremiah:/home/hipo/kvm# osinfo-query os
 Short ID             | Name                                               | Version  | ID                                      
———————-+—————————————————-+———-+—————————————–
 altlinux1.0          | Mandrake RE Spring 2001                            | 1.0      | http://altlinux.org/altlinux/1.0        
 altlinux2.0          | ALT Linux 2.0                                      | 2.0      | http://altlinux.org/altlinux/2.0        
 altlinux2.2          | ALT Linux 2.2                                      | 2.2      | http://altlinux.org/altlinux/2.2        
 altlinux2.4          | ALT Linux 2.4                                      | 2.4      | http://altlinux.org/altlinux/2.4        
 altlinux3.0          | ALT Linux 3.0                                      | 3.0      | http://altlinux.org/altlinux/3.0        
 altlinux4.0          | ALT Linux 4.0                                      | 4.0      | http://altlinux.org/altlinux/4.0        
 altlinux4.1          | ALT Linux 4.1                                      | 4.1      | http://altlinux.org/altlinux/4.1        
 altlinux5.0          | ALT Linux 5.0                                      | 5.0      | http://altlinux.org/altlinux/5.0        
 altlinux6.0          | ALT Linux 6.0                                      | 6.0      | http://altlinux.org/altlinux/6.0        
 altlinux7.0          | ALT Linux 7.0                                      | 7.0      | http://altlinux.org/altlinux/7.0        
 centos6.0            | CentOS 6.0                                         | 6.0      | http://centos.org/centos/6.0            
 centos6.1            | CentOS 6.1                                         | 6.1      | http://centos.org/centos/6.1            
 centos6.2            | CentOS 6.2                                         | 6.2      | http://centos.org/centos/6.2            
 centos6.3            | CentOS 6.3                                         | 6.3      | http://centos.org/centos/6.3            
 centos6.4            | CentOS 6.4                                         | 6.4      | http://centos.org/centos/6.4            
 centos6.5            | CentOS 6.5                                         | 6.5      | http://centos.org/centos/6.5            
 centos6.6            | CentOS 6.6                                         | 6.6      | http://centos.org/centos/6.6            
 centos6.7            | CentOS 6.7                                         | 6.7      | http://centos.org/centos/6.7            
 centos6.8            | CentOS 6.8                                         | 6.8      | http://centos.org/centos/6.8            
 centos6.9            | CentOS 6.9                                         | 6.9      | http://centos.org/centos/6.9            
 centos7.0            | CentOS 7.0                                         | 7.0      | http://centos.org/centos/7.0            
 debian1.1            | Debian Buzz                                        | 1.1      | http://debian.org/debian/1.1            
 debian1.2            | Debian Rex                                         | 1.2      | http://debian.org/debian/1.2            
 debian1.3            | Debian Bo                                          | 1.3      | http://debian.org/debian/1.3            
 debian2.0            | Debian Hamm                                        | 2.0      | http://debian.org/debian/2.0            
 debian2.1            | Debian Slink                                       | 2.1      | http://debian.org/debian/2.1            
 debian2.2            | Debian Potato                                      | 2.2      | http://debian.org/debian/2.2            
 debian3              | Debian Woody                                       | 3        | http://debian.org/debian/3              
 debian3.1            | Debian Sarge                                       | 3.1      | http://debian.org/debian/3.1            
 debian4              | Debian Etch                                        | 4        | http://debian.org/debian/4              
 debian5              | Debian Lenny                                       | 5        | http://debian.org/debian/5              
 debian6              | Debian Squeeze                                     | 6        | http://debian.org/debian/6              
 debian7              | Debian Wheezy                                      | 7        | http://debian.org/debian/7              
 debian8              | Debian Jessie                                      | 8        | http://debian.org/debian/8              
 debian9              | Debian Stretch                                     | 9        | http://debian.org/debian/9              
 debiantesting        | Debian Testing                                     | testing  | http://debian.org/debian/testing        
 fedora-unknown       | Fedora                                             | unknown  | http://fedoraproject.org/fedora/unknown
 fedora1              | Fedora Core 1                                      | 1        | http://fedoraproject.org/fedora/1       
 fedora10             | Fedora 10                                          | 10       | http://fedoraproject.org/fedora/10      
 fedora11             | Fedora 11                                          | 11       | http://fedoraproject.org/fedora/11      
 fedora12             | Fedora 12                                          | 12       | http://fedoraproject.org/fedora/12      
 fedora13             | Fedora 13                                          | 13       | http://fedoraproject.org/fedora/13      
 fedora14             | Fedora 14                                          | 14       | http://fedoraproject.org/fedora/14      
 fedora15             | Fedora 15                                          | 15       | http://fedoraproject.org/fedora/15      
 fedora16             | Fedora 16                                          | 16       | http://fedoraproject.org/fedora/16      
 fedora17             | Fedora 17                                          | 17       | http://fedoraproject.org/fedora/17      
 fedora18             | Fedora 18                                          | 18       | http://fedoraproject.org/fedora/18      
 fedora19             | Fedora 19                                          | 19       | http://fedoraproject.org/fedora/19      
 fedora2              | Fedora Core 2                                      | 2        | http://fedoraproject.org/fedora/2       
 fedora20             | Fedora 20                                          | 20       | http://fedoraproject.org/fedora/20      
 fedora21             | Fedora 21                                          | 21       | http://fedoraproject.org/fedora/21      
 fedora22             | Fedora 22                                          | 22       | http://fedoraproject.org/fedora/22      
 fedora23             | Fedora 23                                          | 23       | http://fedoraproject.org/fedora/23      
 fedora24             | Fedora 24                                          | 24       | http://fedoraproject.org/fedora/24      
 fedora25             | Fedora 25                                          | 25       | http://fedoraproject.org/fedora/25      
 fedora26             | Fedora 26                                          | 26       | http://fedoraproject.org/fedora/26      
 fedora3              | Fedora Core 3                                      | 3        | http://fedoraproject.org/fedora/3       
 fedora4              | Fedora Core 4                                      | 4        | http://fedoraproject.org/fedora/4       
 fedora5              | Fedora Core 5                                      | 5        | http://fedoraproject.org/fedora/5       
 fedora6              | Fedora Core 6                                      | 6        | http://fedoraproject.org/fedora/6       
 fedora7              | Fedora 7                                           | 7        | http://fedoraproject.org/fedora/7       
 fedora8              | Fedora 8                                           | 8        | http://fedoraproject.org/fedora/8       
 fedora9              | Fedora 9                                           | 9        | http://fedoraproject.org/fedora/9       
 freebsd1.0           | FreeBSD 1.0                                        | 1.0      | http://freebsd.org/freebsd/1.0          
 freebsd10.0          | FreeBSD 10.0                                       | 10.0     | http://freebsd.org/freebsd/10.0         
 freebsd10.1          | FreeBSD 10.1                                       | 10.1     | http://freebsd.org/freebsd/10.1         
 freebsd10.2          | FreeBSD 10.2                                       | 10.2     | http://freebsd.org/freebsd/10.2         
 freebsd10.3          | FreeBSD 10.3                                       | 10.3     | http://freebsd.org/freebsd/10.3         
 freebsd10.4          | FreeBSD 10.4                                       | 10.4     | http://freebsd.org/freebsd/10.4         
 freebsd11.0          | FreeBSD 11.0                                       | 11.0     | http://freebsd.org/freebsd/11.0         
 freebsd11.1          | FreeBSD 11.1                                       | 11.1     | http://freebsd.org/freebsd/11.1         
 freebsd2.0           | FreeBSD 2.0                                        | 2.0      | http://freebsd.org/freebsd/2.0          
 freebsd2.0.5         | FreeBSD 2.0.5                                      | 2.0.5    | http://freebsd.org/freebsd/2.0.5        
 freebsd2.2.8         | FreeBSD 2.2.8                                      | 2.2.8    | http://freebsd.org/freebsd/2.2.8        
 freebsd2.2.9         | FreeBSD 2.2.9                                      | 2.2.9    | http://freebsd.org/freebsd/2.2.9        
 freebsd3.0           | FreeBSD 3.0                                        | 3.0      | http://freebsd.org/freebsd/3.0          
 freebsd3.2           | FreeBSD 3.2                                        | 3.2      | http://freebsd.org/freebsd/3.2          
 freebsd4.0           | FreeBSD 4.0                                        | 4.0      | http://freebsd.org/freebsd/4.0          
 freebsd4.1           | FreeBSD 4.1                                        | 4.1      | http://freebsd.org/freebsd/4.1          
 freebsd4.10          | FreeBSD 4.10                                       | 4.10     | http://freebsd.org/freebsd/4.10         
 freebsd4.11          | FreeBSD 4.11                                       | 4.11     | http://freebsd.org/freebsd/4.11         
 freebsd4.2           | FreeBSD 4.2                                        | 4.2      | http://freebsd.org/freebsd/4.2          
 freebsd4.3           | FreeBSD 4.3                                        | 4.3      | http://freebsd.org/freebsd/4.3          
 freebsd4.4           | FreeBSD 4.4                                        | 4.4      | http://freebsd.org/freebsd/4.4          
 freebsd4.5           | FreeBSD 4.5                                        | 4.5      | http://freebsd.org/freebsd/4.5          
 freebsd4.6           | FreeBSD 4.6                                        | 4.6      | http://freebsd.org/freebsd/4.6          
 freebsd4.7           | FreeBSD 4.7                                        | 4.7      | http://freebsd.org/freebsd/4.7          
 freebsd4.8           | FreeBSD 4.8                                        | 4.8      | http://freebsd.org/freebsd/4.8          
 freebsd4.9           | FreeBSD 4.9                                        | 4.9      | http://freebsd.org/freebsd/4.9          
 freebsd5.0           | FreeBSD 5.0                                        | 5.0      | http://freebsd.org/freebsd/5.0          
 freebsd5.1           | FreeBSD 5.1                                        | 5.1      | http://freebsd.org/freebsd/5.1          
 freebsd5.2           | FreeBSD 5.2                                        | 5.2      | http://freebsd.org/freebsd/5.2          
 freebsd5.2.1         | FreeBSD 5.2.1                                      | 5.2.1    | http://freebsd.org/freebsd/5.2.1        
 freebsd5.3           | FreeBSD 5.3                                        | 5.3      | http://freebsd.org/freebsd/5.3          
 freebsd5.4           | FreeBSD 5.4                                        | 5.4      | http://freebsd.org/freebsd/5.4          
 freebsd5.5           | FreeBSD 5.5                                        | 5.5      | http://freebsd.org/freebsd/5.5          
 freebsd6.0           | FreeBSD 6.0                                        | 6.0      | http://freebsd.org/freebsd/6.0          
 freebsd6.1           | FreeBSD 6.1                                        | 6.1      | http://freebsd.org/freebsd/6.1          
 freebsd6.2           | FreeBSD 6.2                                        | 6.2      | http://freebsd.org/freebsd/6.2          
 freebsd6.3           | FreeBSD 6.3                                        | 6.3      | http://freebsd.org/freebsd/6.3          
 freebsd6.4           | FreeBSD 6.4                                        | 6.4      | http://freebsd.org/freebsd/6.4          
 freebsd7.0           | FreeBSD 7.0                                        | 7.0      | http://freebsd.org/freebsd/7.0          
 freebsd7.1           | FreeBSD 7.1                                        | 7.1      | http://freebsd.org/freebsd/7.1          
 freebsd7.2           | FreeBSD 7.2                                        | 7.2      | http://freebsd.org/freebsd/7.2          
 freebsd7.3           | FreeBSD 7.3                                        | 7.3      | http://freebsd.org/freebsd/7.3          
 freebsd7.4           | FreeBSD 7.4                                        | 7.4      | http://freebsd.org/freebsd/7.4          
 freebsd8.0           | FreeBSD 8.0                                        | 8.0      | http://freebsd.org/freebsd/8.0          
 freebsd8.1           | FreeBSD 8.1                                        | 8.1      | http://freebsd.org/freebsd/8.1          
 freebsd8.2           | FreeBSD 8.2                                        | 8.2      | http://freebsd.org/freebsd/8.2          
 freebsd8.3           | FreeBSD 8.3                                        | 8.3      | http://freebsd.org/freebsd/8.3          
 freebsd8.4           | FreeBSD 8.4                                        | 8.4      | http://freebsd.org/freebsd/8.4          
 freebsd9.0           | FreeBSD 9.0                                        | 9.0      | http://freebsd.org/freebsd/9.0          
 freebsd9.1           | FreeBSD 9.1                                        | 9.1      | http://freebsd.org/freebsd/9.1          
 freebsd9.2           | FreeBSD 9.2                                        | 9.2      | http://freebsd.org/freebsd/9.2          
 freebsd9.3           | FreeBSD 9.3                                        | 9.3      | http://freebsd.org/freebsd/9.3          
 freedos1.2           | FreeDOS 1.2                                        | 1.2      | http://freedos.org/freedos/1.2          
 gnome-continuous-3.10 | GNOME 3.10                                         | 3.10     | http://gnome.org/gnome-continuous/3.10  
 gnome-continuous-3.12 | GNOME 3.12                                         | 3.12     | http://gnome.org/gnome-continuous/3.12  
 gnome-continuous-3.14 | GNOME 3.14                                         | 3.14     | http://gnome.org/gnome-continuous/3.14  
 gnome3.6             | GNOME 3.6                                          | 3.6      | http://gnome.org/gnome/3.6              
 gnome3.8             | GNOME 3.8                                          | 3.8      | http://gnome.org/gnome/3.8              
 macosx10.0           | MacOS X Cheetah                                    | 10.0     | http://apple.com/macosx/10.0            
 macosx10.1           | MacOS X Puma                                       | 10.1     | http://apple.com/macosx/10.1            
 macosx10.2           | MacOS X Jaguar                                     | 10.2     | http://apple.com/macosx/10.2            
 macosx10.3           | MacOS X Panther                                    | 10.3     | http://apple.com/macosx/10.3            
 macosx10.4           | MacOS X Tiger                                      | 10.4     | http://apple.com/macosx/10.4            
 macosx10.5           | MacOS X Leopard                                    | 10.5     | http://apple.com/macosx/10.5            
 macosx10.6           | MacOS X Snow Leopard                               | 10.6     | http://apple.com/macosx/10.6            
 macosx10.7           | MacOS X Lion                                       | 10.7     | http://apple.com/macosx/10.7            
 mageia1              | Mageia 1                                           | 1        | http://mageia.org/mageia/1              
 mageia2              | Mageia 2                                           | 2        | http://mageia.org/mageia/2              
 mageia3              | Mageia 3                                           | 3        | http://mageia.org/mageia/3              
 mageia4              | Mageia 4                                           | 4        | http://mageia.org/mageia/4              
 mageia5              | Mageia 5                                           | 5        | http://mageia.org/mageia/5              
 mageia6              | Mageia 6                                           | 6        | http://mageia.org/mageia/6              
 mandrake10.0         | Mandrake Linux 10.0                                | 10.0     | http://mandriva.com/mandrake/10.0       
 mandrake10.1         | Mandrake Linux 10.1                                | 10.1     | http://mandriva.com/mandrake/10.1       
 mandrake10.2         | Mandrake Linux 10.2                                | 10.2     | http://mandriva.com/mandrake/10.2       
 mandrake5.1          | Mandrake Linux 5.1                                 | 5.1      | http://mandriva.com/mandrake/5.1        
 mandrake5.2          | Mandrake Linux 5.2                                 | 5.2      | http://mandriva.com/mandrake/5.2        
 mandrake5.3          | Mandrake Linux 5.3                                 | 5.3      | http://mandriva.com/mandrake/5.3        
 mandrake6.0          | Mandrake Linux 6.0                                 | 6.0      | http://mandriva.com/mandrake/6.0        
 mandrake6.1          | Mandrake Linux 6.1                                 | 6.1      | http://mandriva.com/mandrake/6.1        
 mandrake7.0          | Mandrake Linux 7.0                                 | 7.0      | http://mandriva.com/mandrake/7.0        
 mandrake7.1          | Mandrake Linux 7.1                                 | 7.1      | http://mandriva.com/mandrake/7.1        
 mandrake7.2          | Mandrake Linux 7.2                                 | 7.2      | http://mandriva.com/mandrake/7.2        
 mandrake8.0          | Mandrake Linux 8.0                                 | 8.0      | http://mandriva.com/mandrake/8.0        
 mandrake8.1          | Mandrake Linux 8.1                                 | 8.1      | http://mandriva.com/mandrake/8.1        
 mandrake8.2          | Mandrake Linux 8.2                                 | 8.2      | http://mandriva.com/mandrake/8.2        
 mandrake9.0          | Mandrake Linux 9.0                                 | 9.0      | http://mandriva.com/mandrake/9.0        
 mandrake9.1          | Mandrake Linux 9.1                                 | 9.1      | http://mandriva.com/mandrake/9.1        
 mandrake9.2          | Mandrake Linux 9.2                                 | 9.2      | http://mandriva.com/mandrake/9.2        
 mandriva2006.0       | Mandriva Linux 2006.0                              | 2006.0   | http://mandriva.com/mandriva/2006.0     
 mandriva2007         | Mandriva Linux 2007                                | 2007     | http://mandriva.com/mandriva/2007       
 mandriva2007.1       | Mandriva Linux 2007 Spring                         | 2007.1   | http://mandriva.com/mandriva/2007.1     
 mandriva2008.0       | Mandriva Linux 2008                                | 2008.0   | http://mandriva.com/mandriva/2008.0     
 mandriva2008.1       | Mandriva Linux 2008 Spring                         | 2008.1   | http://mandriva.com/mandriva/2008.1     
 mandriva2009.0       | Mandriva Linux 2009                                | 2009.0   | http://mandriva.com/mandriva/2009.0     
 mandriva2009.1       | Mandriva Linux 2009 Spring                         | 2009.1   | http://mandriva.com/mandriva/2009.1     
 mandriva2010.0       | Mandriva Linux 2010                                | 2010.0   | http://mandriva.com/mandriva/2010.0     
 mandriva2010.1       | Mandriva Linux 2010 Spring                         | 2010.1   | http://mandriva.com/mandriva/2010.1     
 mandriva2010.2       | Mandriva Linux 2010.2                              | 2010.2   | http://mandriva.com/mandriva/2010.2     
 mandriva2011         | Mandriva Linux 2011                                | 2011     | http://mandriva.com/mandriva/2011       
 mbs1.0               | Mandriva Business Server 1.0                       | 1.0      | http://mandriva.com/mbs/1.0             
 mes5                 | Mandriva Enterprise Server 5.0                     | 5.0      | http://mandriva.com/mes/5.0             
 mes5.1               | Mandriva Enterprise Server 5.1                     | 5.1      | http://mandriva.com/mes/5.1             
 msdos6.22            | Microsoft MS-DOS 6.22                              | 6.22     | http://microsoft.com/msdos/6.22         
 netbsd0.8            | NetBSD 0.8                                         | 0.8      | http://netbsd.org/netbsd/0.8            
 netbsd0.9            | NetBSD 0.9                                         | 0.9      | http://netbsd.org/netbsd/0.9            
 netbsd1.0            | NetBSD 1.0                                         | 1.0      | http://netbsd.org/netbsd/1.0            
 netbsd1.1            | NetBSD 1.1                                         | 1.1      | http://netbsd.org/netbsd/1.1            
 netbsd1.2            | NetBSD 1.2                                         | 1.2      | http://netbsd.org/netbsd/1.2            
 netbsd1.3            | NetBSD 1.3                                         | 1.3      | http://netbsd.org/netbsd/1.3            
 netbsd1.4            | NetBSD 1.4                                         | 1.4      | http://netbsd.org/netbsd/1.4            
 netbsd1.5            | NetBSD 1.5                                         | 1.5      | http://netbsd.org/netbsd/1.5            
 netbsd1.6            | NetBSD 1.6                                         | 1.6      | http://netbsd.org/netbsd/1.6            
 netbsd2.0            | NetBSD 2.0                                         | 2.0      | http://netbsd.org/netbsd/2.0            
 netbsd3.0            | NetBSD 3.0                                         | 3.0      | http://netbsd.org/netbsd/3.0            
 netbsd4.0            | NetBSD 4.0                                         | 4.0      | http://netbsd.org/netbsd/4.0            
 netbsd5.0            | NetBSD 5.0                                         | 5.0      | http://netbsd.org/netbsd/5.0            
 netbsd5.1            | NetBSD 5.1                                         | 5.1      | http://netbsd.org/netbsd/5.1            
 netbsd6.0            | NetBSD 6.0                                         | 6.0      | http://netbsd.org/netbsd/6.0            
 netbsd6.1            | NetBSD 6.1                                         | 6.1      | http://netbsd.org/netbsd/6.1            
 netbsd7.0            | NetBSD 7.0                                         | 7.0      | http://netbsd.org/netbsd/7.0            
 netbsd7.1            | NetBSD 7.1                                         | 7.1      | http://netbsd.org/netbsd/7.1            
 netbsd7.1.1          | NetBSD 7.1.1                                       | 7.1.1    | http://netbsd.org/netbsd/7.1.1          
 netware4             | Novell Netware 4                                   | 4        | http://novell.com/netware/4             
 netware5             | Novell Netware 5                                   | 5        | http://novell.com/netware/5             
 netware6             | Novell Netware 6                                   | 6        | http://novell.com/netware/6             
 openbsd4.2           | OpenBSD 4.2                                        | 4.2      | http://openbsd.org/openbsd/4.2          
 openbsd4.3           | OpenBSD 4.3                                        | 4.3      | http://openbsd.org/openbsd/4.3          
 openbsd4.4           | OpenBSD 4.4                                        | 4.4      | http://openbsd.org/openbsd/4.4          
 openbsd4.5           | OpenBSD 4.5                                        | 4.5      | http://openbsd.org/openbsd/4.5          
 openbsd4.8           | OpenBSD 4.8                                        | 4.8      | http://openbsd.org/openbsd/4.8          
 openbsd4.9           | OpenBSD 4.9                                        | 4.9      | http://openbsd.org/openbsd/4.9          
 openbsd5.0           | OpenBSD 5.0                                        | 5.0      | http://openbsd.org/openbsd/5.0          
 openbsd5.1           | OpenBSD 5.1                                        | 5.1      | http://openbsd.org/openbsd/5.1          
 openbsd5.2           | OpenBSD 5.2                                        | 5.2      | http://openbsd.org/openbsd/5.2          
 openbsd5.3           | OpenBSD 5.3                                        | 5.3      | http://openbsd.org/openbsd/5.3          
 openbsd5.4           | OpenBSD 5.4                                        | 5.4      | http://openbsd.org/openbsd/5.4          
 openbsd5.5           | OpenBSD 5.5                                        | 5.5      | http://openbsd.org/openbsd/5.5          
 openbsd5.6           | OpenBSD 5.6                                        | 5.6      | http://openbsd.org/openbsd/5.6          
 openbsd5.7           | OpenBSD 5.7                                        | 5.7      | http://openbsd.org/openbsd/5.7          
 openbsd5.8           | OpenBSD 5.8                                        | 5.8      | http://openbsd.org/openbsd/5.8          
 openbsd5.9           | OpenBSD 5.9                                        | 5.9      | http://openbsd.org/openbsd/5.9          
 openbsd6.0           | OpenBSD 6.0                                        | 6.0      | http://openbsd.org/openbsd/6.0          
 openbsd6.1           | OpenBSD 6.1                                        | 6.1      | http://openbsd.org/openbsd/6.1          
 openbsd6.2           | OpenBSD 6.2                                        | 6.2      | http://openbsd.org/openbsd/6.2          
 opensolaris2009.06   | OpenSolaris 2009.06                                | 2009.06  | http://sun.com/opensolaris/2009.06      
 opensuse-factory     | openSUSE                                           | factory  | http://opensuse.org/opensuse/factory    
 opensuse-unknown     | openSUSE                                           | unknown  | http://opensuse.org/opensuse/unknown    
 opensuse10.2         | openSUSE 10.2                                      | 10.2     | http://opensuse.org/opensuse/10.2       
 opensuse10.3         | openSUSE 10.3                                      | 10.3     | http://opensuse.org/opensuse/10.3       
 opensuse11.0         | openSUSE 11.0                                      | 11.0     | http://opensuse.org/opensuse/11.0       
 opensuse11.1         | openSUSE 11.1                                      | 11.1     | http://opensuse.org/opensuse/11.1       
 opensuse11.2         | openSUSE 11.2                                      | 11.2     | http://opensuse.org/opensuse/11.2       
 opensuse11.3         | openSUSE 11.3                                      | 11.3     | http://opensuse.org/opensuse/11.3       
 opensuse11.4         | openSUSE 11.4                                      | 11.4     | http://opensuse.org/opensuse/11.4       
 opensuse12.1         | openSUSE 12.1                                      | 12.1     | http://opensuse.org/opensuse/12.1       
 opensuse12.2         | openSUSE 12.2                                      | 12.2     | http://opensuse.org/opensuse/12.2       
 opensuse12.3         | openSUSE 12.3                                      | 12.3     | http://opensuse.org/opensuse/12.3       
 opensuse13.1         | openSUSE 13.1                                      | 13.1     | http://opensuse.org/opensuse/13.1       
 opensuse13.2         | openSUSE 13.2                                      | 13.2     | http://opensuse.org/opensuse/13.2       
 opensuse42.1         | openSUSE Leap 42.1                                 | 42.1     | http://opensuse.org/opensuse/42.1       
 opensuse42.2         | openSUSE Leap 42.2                                 | 42.2     | http://opensuse.org/opensuse/42.2       
 opensuse42.3         | openSUSE Leap 42.3                                 | 42.3     | http://opensuse.org/opensuse/42.3       
 opensusetumbleweed   | openSUSE Tumbleweed                                | tumbleweed | http://opensuse.org/opensuse/tumbleweed
 rhel-atomic-7.0      | Red Hat Enterprise Linux Atomic Host 7.0           | 7.0      | http://redhat.com/rhel-atomic/7.0       
 rhel-atomic-7.1      | Red Hat Enterprise Linux Atomic Host 7.1           | 7.1      | http://redhat.com/rhel-atomic/7.1       
 rhel-atomic-7.2      | Red Hat Enterprise Linux Atomic Host 7.2           | 7.2      | http://redhat.com/rhel-atomic/7.2       
 rhel2.1              | Red Hat Enterprise Linux 2.1                       | 2.1      | http://redhat.com/rhel/2.1              
 rhel2.1.1            | Red Hat Enterprise Linux 2.1 Update 1  
/etc/bind/masters/elinvent.com            | 2.1.1    | http://redhat.com/rhel/2.1.1            
 rhel2.1.2            | Red Hat Enterprise Linux 2.1 Update 2              | 2.1.2    | http://redhat.com/rhel/2.1.2            
 rhel2.1.3            | Red Hat Enterprise Linux 2.1 Update 3              | 2.1.3    | http://redhat.com/rhel/2.1.3            
 rhel2.1.4            | Red Hat Enterprise Linux 2.1 Update 4              | 2.1.4    | http://redhat.com/rhel/2.1.4            
 rhel2.1.5            | Red Hat Enterprise Linux 2.1 Update 5              | 2.1.5    | http://redhat.com/rhel/2.1.5            
 rhel2.1.6            | Red Hat Enterprise Linux 2.1 Update 6              | 2.1.6    | http://redhat.com/rhel/2.1.6            
 rhel2.1.7            | Red Hat Enterprise Linux 2.1 Update 7              | 2.1.7    | http://redhat.com/rhel/2.1.7            
 rhel3                | Red Hat Enterprise Linux 3                         | 3        | http://redhat.com/rhel/3                
 rhel3.1              | Red Hat Enterprise Linux 3 Update 1                | 3.1      | http://redhat.com/rhel/3.1              
 rhel3.2              | Red Hat Enterprise Linux 3 Update 2                | 3.2      | http://redhat.com/rhel/3.2              
 rhel3.3              | Red Hat Enterprise Linux 3 Update 3                | 3.3      | http://redhat.com/rhel/3.3              
 rhel3.4              | Red Hat Enterprise Linux 3 Update 4                | 3.4      | http://redhat.com/rhel/3.4              
 rhel3.5              | Red Hat Enterprise Linux 3 Update 5                | 3.5      | http://redhat.com/rhel/3.5              
 rhel3.6              | Red Hat Enterprise Linux 3 Update 6                | 3.6      | http://redhat.com/rhel/3.6              
 rhel3.7              | Red Hat Enterprise Linux 3 Update 7                | 3.7      | http://redhat.com/rhel/3.7              
 rhel3.8              | Red Hat Enterprise Linux 3 Update 8                | 3.8      | http://redhat.com/rhel/3.8              
 rhel3.9              | Red Hat Enterprise Linux 3 Update 9                | 3.9      | http://redhat.com/rhel/3.9              
 rhel4.0              | Red Hat Enterprise Linux 4.0                       | 4.0      | http://redhat.com/rhel/4.0              
 rhel4.1              | Red Hat Enterprise Linux 4.1                       | 4.1      | http://redhat.com/rhel/4.1              
 rhel4.2              | Red Hat Enterprise Linux 4.2                       | 4.2      | http://redhat.com/rhel/4.2              
 rhel4.3              | Red Hat Enterprise Linux 4.3                       | 4.3      | http://redhat.com/rhel/4.3              
 rhel4.4              | Red Hat Enterprise Linux 4.4                       | 4.4      | http://redhat.com/rhel/4.4              
 rhel4.5              | Red Hat Enterprise Linux 4.5                       | 4.5      | http://redhat.com/rhel/4.5              
 rhel4.6              | Red Hat Enterprise Linux 4.6                       | 4.6      | http://redhat.com/rhel/4.6              
 rhel4.7              | Red Hat Enterprise Linux 4.7                       | 4.7      | http://redhat.com/rhel/4.7              
 rhel4.8              | Red Hat Enterprise Linux 4.8                       | 4.8      | http://redhat.com/rhel/4.8              
 rhel4.9              | Red Hat Enterprise Linux 4.9                       | 4.9      | http://redhat.com/rhel/4.9              
 rhel5.0              | Red Hat Enterprise Linux 5.0                       | 5.0      | http://redhat.com/rhel/5.0              
 rhel5.1              | Red Hat Enterprise Linux 5.1                       | 5.1      | http://redhat.com/rhel/5.1              
 rhel5.10             | Red Hat Enterprise Linux 5.10                      | 5.10     | http://redhat.com/rhel/5.10             
 rhel5.11             | Red Hat Enterprise Linux 5.11                      | 5.11     | http://redhat.com/rhel/5.11             
 rhel5.2              | Red Hat Enterprise Linux 5.2                       | 5.2      | http://redhat.com/rhel/5.2              
 rhel5.3              | Red Hat Enterprise Linux 5.3                       | 5.3      | http://redhat.com/rhel/5.3              
 rhel5.4              | Red Hat Enterprise Linux 5.4                       | 5.4      | http://redhat.com/rhel/5.4              
 rhel5.5              | Red Hat Enterprise Linux 5.5                       | 5.5      | http://redhat.com/rhel/5.5              
 rhel5.6              | Red Hat Enterprise Linux 5.6                       | 5.6      | http://redhat.com/rhel/5.6              
 rhel5.7              | Red Hat Enterprise Linux 5.7                       | 5.7      | http://redhat.com/rhel/5.7              
 rhel5.8              | Red Hat Enterprise Linux 5.8                       | 5.8      | http://redhat.com/rhel/5.8              
 rhel5.9              | Red Hat Enterprise Linux 5.9                       | 5.9      | http://redhat.com/rhel/5.9              
 rhel6.0              | Red Hat Enterprise Linux 6.0                       | 6.0      | http://redhat.com/rhel/6.0              
 rhel6.1              | Red Hat Enterprise Linux 6.1                       | 6.1      | http://redhat.com/rhel/6.1              
 rhel6.2              | Red Hat Enterprise Linux 6.2                       | 6.2      | http://redhat.com/rhel/6.2              
 rhel6.3              | Red Hat Enterprise Linux 6.3                       | 6.3      | http://redhat.com/rhel/6.3              
 rhel6.4              | Red Hat Enterprise Linux 6.4                       | 6.4      | http://redhat.com/rhel/6.4              
 rhel6.5              | Red Hat Enterprise Linux 6.5                       | 6.5      | http://redhat.com/rhel/6.5              
 rhel6.6              | Red Hat Enterprise Linux 6.6                       | 6.6      | http://redhat.com/rhel/6.6              
 rhel6.7              | Red Hat Enterprise Linux 6.7                       | 6.7      | http://redhat.com/rhel/6.7              
 rhel6.8              | Red Hat Enterprise Linux 6.8                       | 6.8      | http://redhat.com/rhel/6.8              
 rhel6.9              | Red Hat Enterprise Linux 6.9                       | 6.9      | http://redhat.com/rhel/6.9              
 rhel7.0              | Red Hat Enterprise Linux 7.0                       | 7.0      | http://redhat.com/rhel/7.0              
 rhel7.1              | Red Hat Enterprise Linux 7.1                       | 7.1      | http://redhat.com/rhel/7.1              
 rhel7.2              | Red Hat Enterprise Linux 7.2                       | 7.2      | http://redhat.com/rhel/7.2              
 rhel7.3              | Red Hat Enterprise Linux 7.3                       | 7.3      | http://redhat.com/rhel/7.3              
 rhel7.4              | Red Hat Enterprise Linux 7.4                       | 7.4      | http://redhat.com/rhel/7.4              
 rhl1.0               | Red Hat Linux 1.0                                  | 1.0      | http://redhat.com/rhl/1.0               
 rhl1.1               | Red Hat Linux 1.1                                  | 1.1      | http://redhat.com/rhl/1.1               
 rhl2.0               | Red Hat Linux 2.0                                  | 2.0      | http://redhat.com/rhl/2.0               
 rhl2.1               | Red Hat Linux 2.1                                  | 2.1      | http://redhat.com/rhl/2.1               
 rhl3.0.3             | Red Hat Linux 3.0.3                                | 3.0.3    | http://redhat.com/rhl/3.0.3             
 rhl4.0               | Red Hat Linux 4.0                                  | 4.0      | http://redhat.com/rhl/4.0               
 rhl4.1               | Red Hat Linux 4.1                                  | 4.1      | http://redhat.com/rhl/4.1               
 rhl4.2               | Red Hat Linux 4.2                                  | 4.2      | http://redhat.com/rhl/4.2               
 rhl5.0               | Red Hat Linux 5.0                                  | 5.0      | http://redhat.com/rhl/5.0               
 rhl5.1               | Red Hat Linux 5.1                                  | 5.1      | http://redhat.com/rhl/5.1               
 rhl5.2               | Red Hat Linux 5.2                                  | 5.2      | http://redhat.com/rhl/5.2               
 rhl6.0               | Red Hat Linux 6.0                                  | 6.0      | http://redhat.com/rhl/6.0               
 rhl6.1               | Red Hat Linux 6.1                                  | 6.1      | http://redhat.com/rhl/6.1               
 rhl6.2               | Red Hat Linux 6.2                                  | 6.2      | http://redhat.com/rhl/6.2               
 rhl7                 | Red Hat Linux 7                                    | 7        | http://redhat.com/rhl/7                 
 rhl7.1               | Red Hat Linux 7.1                                  | 7.1      | http://redhat.com/rhl/7.1               
 rhl7.2               | Red Hat Linux 7.2                                  | 7.2      | http://redhat.com/rhl/7.2               
 rhl7.3               | Red Hat Linux 7.3                                  | 7.3      | http://redhat.com/rhl/7.3               
 rhl8.0               | Red Hat Linux 8.0                                  | 8.0      | http://redhat.com/rhl/8.0               
 rhl9                 | Red Hat Linux 9                                    | 9        | http://redhat.com/rhl/9                 
 sled10               | SUSE Linux Enterprise Desktop 10                   | 10       | http://suse.com/sled/10                 
 sled10sp1            | SUSE Linux Enterprise Desktop 10 SP1               | 10.1     | http://suse.com/sled/10.1               
 sled10sp2            | SUSE Linux Enterprise Desktop 10 SP2               | 10.2     | http://suse.com/sled/10.2               
 sled10sp3            | SUSE Linux Enterprise Desktop 10 SP3               | 10.3     | http://suse.com/sled/10.3               
 sled10sp4            | SUSE Linux Enterprise Desktop 10 SP4               | 10.4     | http://suse.com/sled/10.4               
 sled11               | SUSE Linux Enterprise Desktop 11                   | 11       | http://suse.com/sled/11                 
 sled11sp1            | SUSE Linux Enterprise Desktop 11 SP1               | 11.1     | http://suse.com/sled/11.1               
 sled11sp2            | SUSE Linux Enterprise Desktop 11 SP2               | 11.2     | http://suse.com/sled/11.2               
 sled11sp3            | SUSE Linux Enterprise Desktop 11 SP3               | 11.3     | http://suse.com/sled/11.3               
 sled11sp4            | SUSE Linux Enterprise Desktop 11 SP4               | 11.4     | http://suse.com/sled/11.4               
 sled12               | SUSE Linux Enterprise Desktop 12                   | 12       | http://suse.com/sled/12                 
 sled12sp1            | SUSE Linux Enterprise Desktop 12 SP1               | 12.1     | http://suse.com/sled/12.1               
 sled12sp2            | SUSE Linux Enterprise Desktop 12 SP2               | 12.2     | http://suse.com/sled/12.2               
 sled9                | SUSE Linux Enterprise Desktop 9                    | 9        | http://suse.com/sled/9                  
 sles10               | SUSE Linux Enterprise Server 10            
/etc/bind/masters/elinvent.com        | 10       | http://suse.com/sles/10                 
 sles10sp1            | SUSE Linux Enterprise Server 10 SP1                | 10.1     | http://suse.com/sles/10.1               
 sles10sp2            | SUSE Linux Enterprise Server 10 SP2                | 10.2     | http://suse.com/sles/10.2               
 sles10sp3            | SUSE Linux Enterprise Server 10 SP3                | 10.3     | http://suse.com/sles/10.3               
 sles10sp4            | SUSE Linux Enterprise Server 10 SP4                | 10.4     | http://suse.com/sles/10.4               
 sles11               | SUSE Linux Enterprise Server 11                    | 11       | http://suse.com/sles/11                 
 sles11sp1            | SUSE Linux Enterprise Server 11 SP1                | 11.1     | http://suse.com/sles/11.1               
 sles11sp2            | SUSE Linux Enterprise Server 11 SP2                | 11.2     | http://suse.com/sles/11.2               
 sles11sp3            | SUSE Linux Enterprise Server 11 SP3                | 11.3     | http://suse.com/sles/11.3               
 sles11sp4            | SUSE Linux Enterprise Server 11 SP4                | 11.4     | http://suse.com/sles/11.4               
 sles12               | SUSE Linux Enterprise Server 12                    | 12       | http://suse.com/sles/12                 
 sles12sp1            | SUSE Linux Enterprise Server 12 SP1                | 12.1     | http://suse.com/sles/12.1               
 sles12sp2            | SUSE Linux Enterprise Server 12 SP2                | 12.2     | http://suse.com/sles/12.2               
 sles9                | SUSE Linux Enterprise Server 9                     | 9        | http://suse.com/sles/9                  
 solaris10            | Solaris 10                                         | 10       | http://sun.com/solaris/10               
 solaris11            | Oracle Solaris 11                                  | 11       | http://oracle.com/solaris/11            
 solaris9             | Solaris 9                                          | 9        | http://sun.com/solaris/9                
 ubuntu10.04          | Ubuntu 10.04 LTS                                   | 10.04    | http://ubuntu.com/ubuntu/10.04          
 ubuntu10.10          | Ubuntu 10.10                                       | 10.10    | http://ubuntu.com/ubuntu/10.10          
 ubuntu11.04          | Ubuntu 11.04                                       | 11.04    | http://ubuntu.com/ubuntu/11.04          
 ubuntu11.10          | Ubuntu 11.10                                       | 11.10    | http://ubuntu.com/ubuntu/11.10          
 ubuntu12.04          | Ubuntu 12.04 LTS                                   | 12.04    | http://ubuntu.com/ubuntu/12.04          
 ubuntu12.10          | Ubuntu 12.10                                       | 12.10    | http://ubuntu.com/ubuntu/12.10          
 ubuntu13.04          | Ubuntu 13.04                                       | 13.04    | http://ubuntu.com/ubuntu/13.04          
 ubuntu13.10          | Ubuntu 13.10                                       | 13.10    | http://ubuntu.com/ubuntu/13.10          
 ubuntu14.04          | Ubuntu 14.04 LTS                                   | 14.04    | http://ubuntu.com/ubuntu/14.04          
 ubuntu14.10          | Ubuntu 14.10                                       | 14.10    | http://ubuntu.com/ubuntu/14.10          
 ubuntu15.04          | Ubuntu 15.04                                       | 15.04    | http://ubuntu.com/ubuntu/15.04          
 ubuntu15.10          | Ubuntu 15.10                                       | 15.10    | http://ubuntu.com/ubuntu/15.10          
 ubuntu16.04          | Ubuntu 16.04                                       | 16.04    | http://ubuntu.com/ubuntu/16.04          
 ubuntu16.10          | Ubuntu 16.10                                       | 16.10    | http://ubuntu.com/ubuntu/16.10          
 ubuntu17.04          | Ubuntu 17.04                                       | 17.04    | http://ubuntu.com/ubuntu/17.04          
 ubuntu17.10          | Ubuntu 17.10                                       | 17.10    | http://ubuntu.com/ubuntu/17.10          
 ubuntu4.10           | Ubuntu 4.10                                        | 4.10     | http://ubuntu.com/ubuntu/4.10           
 ubuntu5.04           | Ubuntu 5.04                                        | 5.04     | http://ubuntu.com/ubuntu/5.04           
 ubuntu5.10           | Ubuntu 5.10                                        | 5.10     | http://ubuntu.com/ubuntu/5.10           
 ubuntu6.06           | Ubuntu 6.06 LTS                                    | 6.06     | http://ubuntu.com/ubuntu/6.06           
 ubuntu6.10           | Ubuntu 6.10                                        | 6.10     | http://ubuntu.com/ubuntu/6.10           
 ubuntu7.04           | Ubuntu 7.04                                        | 7.04     | http://ubuntu.com/ubuntu/7.04           
 ubuntu7.10           | Ubuntu 7.10                                        | 7.10     | http://ubuntu.com/ubuntu/7.10           
 ubuntu8.04           | Ubuntu 8.04 LTS                                    | 8.04     | http://ubuntu.com/ubuntu/8.04           
 ubuntu8.10           | Ubuntu 8.10                                        | 8.10     | http://ubuntu.com/ubuntu/8.10           
 ubuntu9.04           | Ubuntu 9.04                                        | 9.04     | http://ubuntu.com/ubuntu/9.04           
 ubuntu9.10           | Ubuntu 9.10                                        | 9.10     | http://ubuntu.com/ubuntu/9.10           
 win1.0               | Microsoft Windows 1.0                              | 1.0      | http://microsoft.com/win/1.0            
 win10                | Microsoft Windows 10                               | 10.0     | http://microsoft.com/win/10             
 win2.0               | Microsoft Windows 2.0                              | 2.0      | http://microsoft.com/win/2.0            
 win2.1               | Microsoft Windows 2.1                              | 2.1      | http://microsoft.com/win/2.1            
 win2k                | Microsoft Windows 2000                             | 5.0      | http://microsoft.com/win/2k             
 win2k12              | Microsoft Windows Server 2012                      | 6.3      | http://microsoft.com/win/2k12           
 win2k12r2            | Microsoft Windows Server 2012 R2                   | 6.3      | http://microsoft.com/win/2k12r2         
 win2k3               | Microsoft Windows Server 2003                      | 5.2      | http://microsoft.com/win/2k3            
 win2k3r2             | Microsoft Windows Server 2003 R2                   | 5.2      | http://microsoft.com/win/2k3r2          
 win2k8               | Microsoft Windows Server 2008                      | 6.0      | http://microsoft.com/win/2k8            
 win2k8r2             | Microsoft Windows Server 2008 R2                   | 6.1      | http://microsoft.com/win/2k8r2          
 win3.1               | Microsoft Windows 3.1                              | 3.1      | http://microsoft.com/win/3.1            
 win7                 | Microsoft Windows 7                                | 6.1      | http://microsoft.com/win/7              
 win8                 | Microsoft Windows 8                                | 6.2      | http://microsoft.com/win/8              
 win8.1               | Microsoft Windows 8.1                              | 6.3      | http://microsoft.com/win/8.1            
 win95                | Microsoft Windows 95                               | 4.0      | http://microsoft.com/win/95             
 win98                | Microsoft Windows 98                               | 4.1      | http://microsoft.com/win/98             
 winme                | Microsoft Windows Millennium Edition               | 4.9      | http://microsoft.com/win/me             
 winnt3.1             | Microsoft Windows NT Server 3.1                    | 3.1      | http://microsoft.com/winnt/3.1          
 winnt3.5             | Microsoft Windows NT Server 3.5                    | 3.5      | http://microsoft.com/winnt/3.5          
 winnt3.51            | Microsoft Windows NT Server 3.51                   | 3.51     | http://microsoft.com/winnt/3.51         
 winnt4.0             | Microsoft Windows NT Server 4.0                    | 4.0      | http://microsoft.com/winnt/4.0          
 winvista             | Microsoft Windows Vista                            | 6.0      | http://microsoft.com/win/vista          
 winxp                | Microsoft Windows XP                               | 5.1      | http://microsoft.com/win/xp  


9. Start / Stop listed KVM Virtual Machine


root@jeremiah:~# virsh list –all
 Id    Name                           State
—————————————————-
 3     fedora-28                      running
 –     debian9                        shut off


To start debian9 linux virtual machine that is currently off


root@jeremiah:~# virsh start fedora-28
Domain fedora-28 started


root@jeremiah:/home/hipo# virsh start debian9
error: Failed to start domain debian9
error: Requested operation is not valid: network 'default' is not active

root@jeremiah:/home/hipo# virsh net-list –all
Name                 State      Autostart     Persistent
———————————————————-
br0                  active     yes           yes
default              inactive   no            yes


root@jeremiah:/home/hipo# virsh net-start default
Network default started

root@jeremiah:/home/hipo# virsh start debian9
Domain debian9 started


10. Attach to running VM with virsh or virt-manager


root@jeremiah:~# virsh list
 Id    Name                           State
—————————————————-
 1     fedora-28                      running
 3     debian9                        running

root@jeremiah:~# virsh connect debian9


Note that to make the login prompt appear you have to press enter once after the ^] connection string appears


kvm-connect-to-virtual-machine-with-virsh-command-screenshot-howto

An alternative way is to use virt-manager GUI KVM desktop management interface and click over the Virtual Machine Guest name, in same fashion like in VirtualBox.

virtual-manager-virt-manager-screenshot-with-Virtual-Machines-inside-on-Debian-Linux

virt-manager-gui-interface-connect-to-fedora-28-virtual-machine

If you have KVM running on your Linux desktop PC / notebook you can also connect via VNC with virsh command.


root@jericho:~# virsh vncdisplay centos7


Another handy thing is to expose the Virtualized Guest OS with VNC in order to be able to connect and manage installation or further Linux configuration via VNC using an SSH Tunnel with port forwarding:


$ ssh hipo@www.pc-freak.net -L 5901:127.0.0.1:5901


11.  Start / Shutdown / Suspend / Reboot (safe reboot) a VM guest machine domain


root@jericho:~# virsh shutdown debian9
root@jericho:~# virsh start fedora-28
root@jericho:~# virsh suspend debian9
root@jericho:~# virsh reboot fedora-28


12. Remove / Delete KVM Virtual Machines domain


root@jeremiah:~# virsh undefine fedora-28
root@jeremiah:~# virsh destroy fedora-28


Closing words


Using KVM to experiment with different OS distributions is really fun just like you can easily run a number of the major most popular Linux Distributions and a set of different versions. It takes few minutes to have a fully functional Linux to play with and it saves a lot of hassles when dealing with GNU / Linux and FreeBSD, doing so in Virtualbox for me prooved to be much more complicated (not to mention that often Virtualbox had an ugly bugs so even Importing an Appliance as a Guest VM with an official distro OS-es failed with weird errors.
One other very practical use of Kerkel-based Virtualization is if you want to run your servers using own Micro-Services architecture (e.g. run multiple Linux OS-es each running a separate Apache / Nginx / MySQL / PostGreSQL / Backup / Storage) etc. all of it running on a single dedicated server or a self-hosted bare-metal
There are plenty of Web Interfaces for Management KVM (proprietary and free software) that could even futher simplify the use and deploy / destory of KVM VMs.
All that makes possible running your own Linux or Web hosting provider a relatively easy task and seriously could cut business expenses and operational (maintenance) costs.

If you plan to run youw own hosting company, I can help you establish your infrastructure and advise you on the right technologies to use.