Posts Tagged ‘need’

Windows add command to PATH variable – Adding (Putty, VIM) new binaries folder to windows %PATH%

Friday, June 27th, 2014

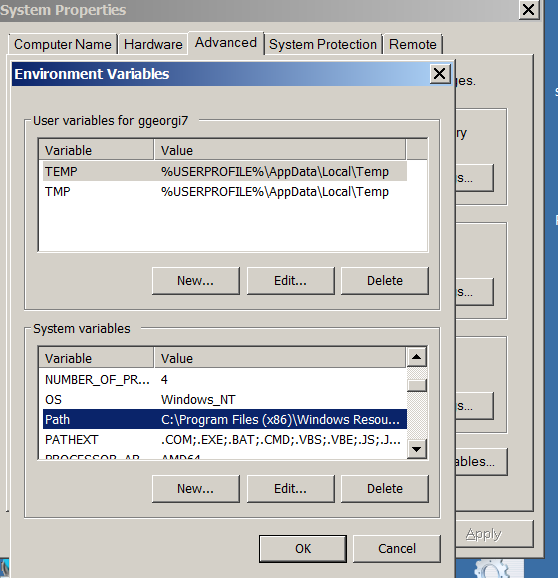
windows-add-to-path-location-of-new-binaries-putty-vim-etc-system-properties-environment-variable-screenshot
I want to use vim (text editor) on my Windows 7 work computer and hence installed VIM (VI Improved) port for Windows GVim.
VIM works perfect on Windows and for those coming from UNIX background having it installed is a must, however vim doesn't include a PATH location to its (vim) executable in Windows %PATH%.
PATH command line variable stores path locations to all binaries that could be executed directly from cmd line with no need to type full directory path to binary.

To illustrate what PATH is lets say you want to make Putty accessible straight from Windows command line (cmd.exe), you can add Putty's installation Path Folder to global Windows %PATH%. On my 64-bit Windows PC Putty binary is installed in C:Program Files (x86)PuTTY.

echo %PATH%
 

C:Perl64sitebin;C:Perl64bin;C:Program FilesRA2HP;C:Windowssystem32;C:
Windows;C:WindowsSystem32Wbem;C:WindowsSystem32WindowsPowerShellv1.0;C:
Program FilesWIDCOMMBluetooth Software;C:Program FilesWIDCOMMBluetooth Sof
twaresyswow64;C:Program Files (x86)Hewlett-PackardHP ProtectTools Security M
anagerBin;C:Program FilesActivIdentityActivClient;C:Program Files (x86)A
ctivIdentityActivClient;C:Program Files (x86)QuickTimeQTSystem


To make Putty accessible only by typing Putty instead of typing C:Program Files (x86)PuTTYPutty.exe, it has to be included in PATH, normally from Win command line (cmd.exe). This is done with:


set PATH=%PATH%;C:Program Files (x86)PuTTY


echo %PATH%


C:Usersggeorgi7Desktop>echo %PATH%
C:Perl64sitebin;C:Perl64bin;C:Program FilesRA2HP;C:Windowssystem32;C:
Windows;C:WindowsSystem32Wbem;C:WindowsSystem32WindowsPowerShellv1.0;C:
Program FilesWIDCOMMBluetooth Software;C:Program FilesWIDCOMMBluetooth Sof
twaresyswow64;C:Program Files (x86)Hewlett-PackardHP ProtectTools Security M
anagerBin;C:Program FilesActivIdentityActivClient;C:Program Files (x86)A
ctivIdentityActivClient;C:Program Files (x86)QuickTimeQTSystem;C:Program
Files (x86)PuTTY

To check all the exported variables, use SET command, here is my default SET variables:

C:> SET
 

ALLUSERSPROFILE=C:ProgramData
APPDATA=C:UsersgeorgiAppDataRoaming
CLASSPATH=.;C:Program Files (x86)Javajre6libextQTJava.zip
CommonProgramFiles=C:Program FilesCommon Files
CommonProgramFiles(x86)=C:Program Files (x86)Common Files
CommonProgramW6432=C:Program FilesCommon Files
COMPUTERNAME=GEORGI
ComSpec=C:Windowssystem32cmd.exe
DEFLOGDIR=C:ProgramDataMcAfeeDesktopProtection
FP_NO_HOST_CHECK=NO
HOMEDRIVE=C:
HOMEPATH=Usersggeorgi7
LOCALAPPDATA=C:Usersggeorgi7AppDataLocal
LOGONSERVER=G1W4730
NUMBER_OF_PROCESSORS=4
OS=Windows_NT

To make inclusion of VIM, Putty or other binary directory) into PATH variable permanent:


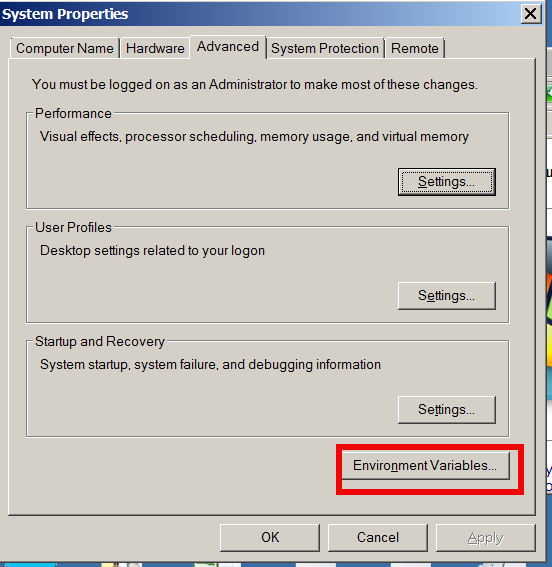
From Windows desktop, right-click My Computer and click Properties.
In the Advanced system settings click on Properties window, click on the Advanced tab.
In the Advanced System section, click the Environment Variables button.


windows-add-command-to-path-variable-adding-new-folder-to-windows-path-add-putty-vim-to-easy-execute
Finally, in the Environment Variables window, search for the Path variable in Systems Variable section and click the Edit button.
Add or modify the path lines including the paths to binaries you wish to be easy access.
Note that each different directory should be separated with a semicolon (;), e.g.
 

C:Program Files;C:Winnt;C:WinntSystem32; C:Perl64bin


Install TorrentFlux Bit Torrent Web management interface on Debian / Ubuntu Linux

Tuesday, July 15th, 2014

torrent flux logo
Torrentflux
is web based, feature-rich BitTorrent download manager.
Torrentflux is a must have installed server software for anyone who does regular torrent downloads and want to access the downloads from anywhere on the internet.

TorrentFlux is a PHP based BitTorrent controller that runs on a web
 server. It can manage all of your BitTorrent downloads from anywhere
 through a convenient and easy-to-use web interface.
 .
 TorrentFlux uses a MySQL database to manage the downloads.

 TorrentFlux enables you to run BitTorrent downloads unattended on a monitor-less or remote server 24 hours a day, while still maintaining complete control from any web browser. Now you can control your  downloading on your firewall, or keep up with downloads while on  vacation. It uses the BitTornado client to download files, and also  requires a web server with PHP.
 
 Some of the Torrentflux features:

   * Upload Torrents via URL or File Upload
   * Start, Stop, and Delete Torrents with ease
   * Advanced Torrent start options (ports, speeds, etc.)
   * Multi-user interface
   * RSS Feeds, download Torrents files with a click
   * Run several torrents at once
   * View Download Progress of all torrents at a glance
   * View drive space at a glance
   * View Torrent file meta information
   * Built-in User management and Security
   * Private Messaging
   * Themes (selectable per user)
   * Upload History


Before installing Bittorrent you will need to have a running version of Debian, Ubuntu or any other debian derivative (though it can easily be run on any Linux distro). To install AMP (Apache MySQL Server, PHP) you can follow first part of my previous article Installing Usual PHP Apache MySQL for new Debian GNU / Linux installs.

So what for is TorrentFlux Useful?
Torrenflux is precious and must have if you have to access filtered torrent from outside of your homecountry and you have a running server already in your home country in that I was using TorrentFlux to access Bulgarian Zamunda.Net Torrent Tracker from Holland and was downloading first movies from the Bulgarian Torrent Tracker to my Fluxbox installed on my Dobrich home router and then used FTP to transfer movies to the Netherlands. Talking about many people choose to also install VSFTP and use it together with Torrentflux …

1. Install TorrentFlux and its dependencies (BitTornado, Bittorrent, Zip, Unzip, Bzip etc.) the "Debian Way"


On my Debian 7 Wheezy home machine  I run

apt-get install –yes bzip2 php5-gd php5-cli unrar-free grep python net-tools mawk wget unzip cksfv vlc-nox uudeview python-crypto libxml-simple-perl libxml-dom-perl libdbd-mysql-perl bittorrent bittornado


a) Install TorrentFlux the Debian Way

apt-get install –yes torrentflux


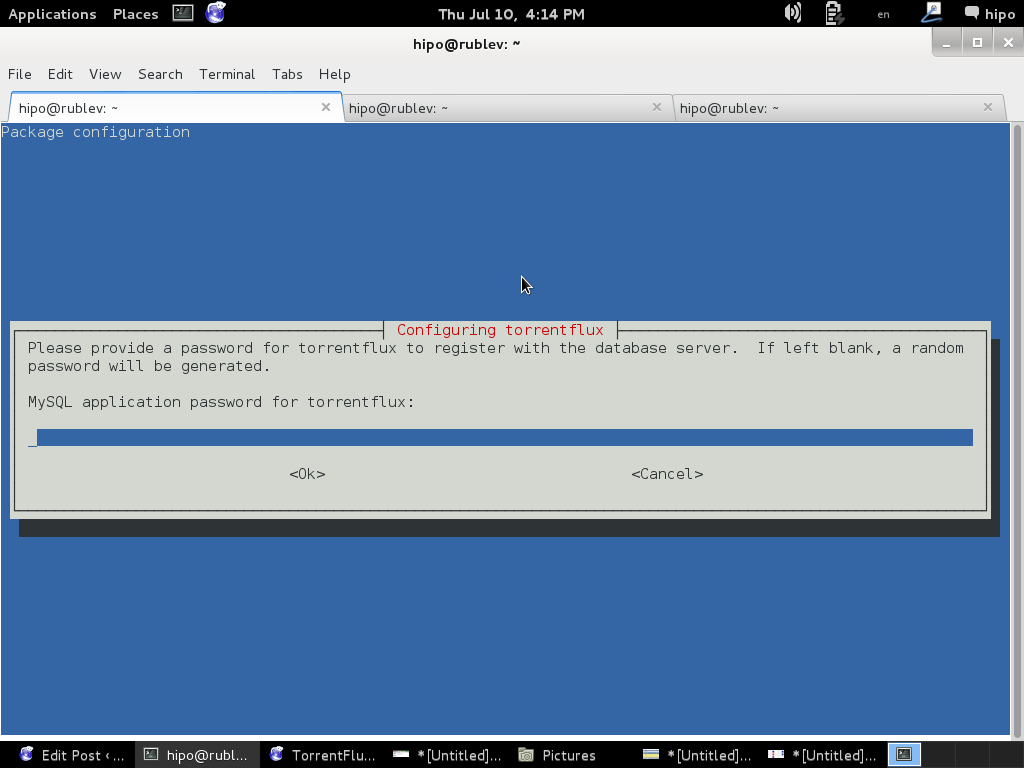
You will be prompted with a coule of screens, to set a new MySQL database user and password and SQL database, as well as offered to restart Apache to make Torrentflux accessible like as on below screenshots.
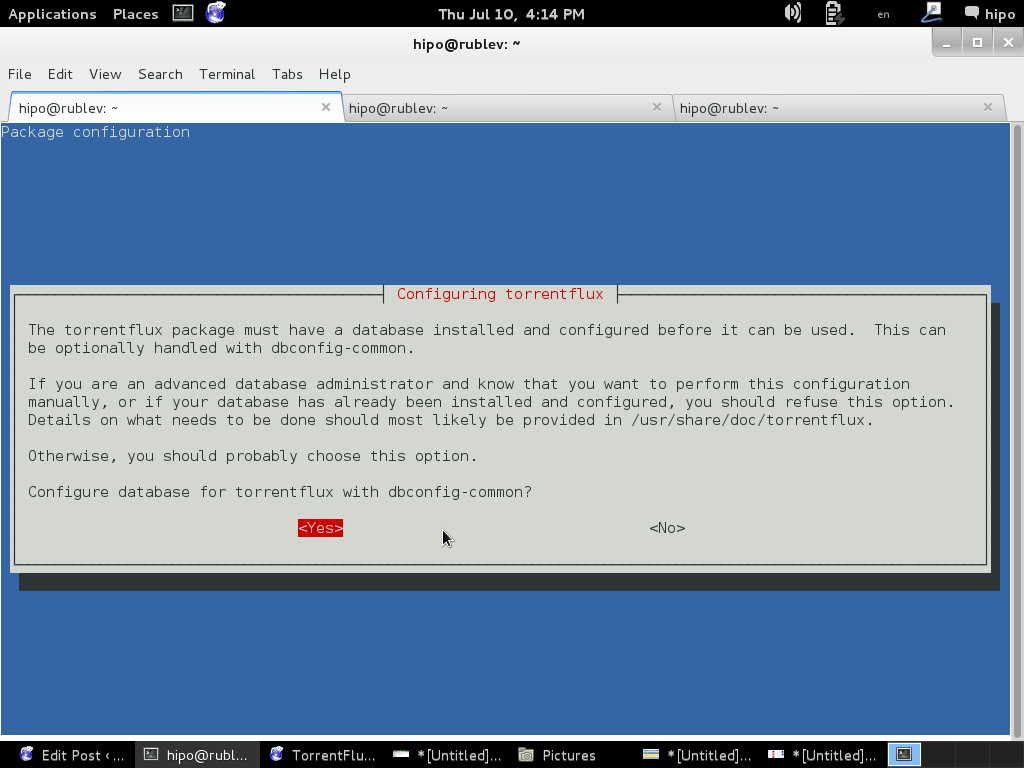
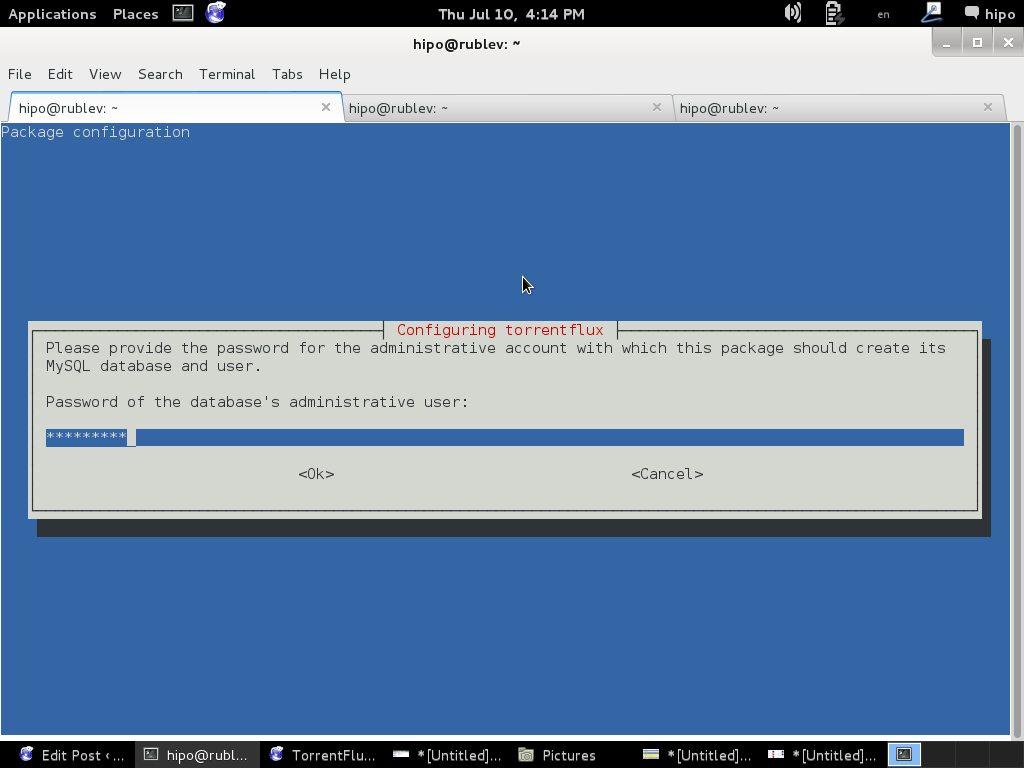
configuring-torrentflux-debian-linux-screenshot-2


configuring-torrentflux-debian-linux-screenshot 3

configuring-torrentflux-debian-linux-screenshot-4

To make new installed torrentflux accessible from web you will either have to configure it via some new Apache VirtualHost or make a symbolic link to /usr/share/torrentflux/www :
 

cd /var/www/
ln -sf /usr/share/torrentflux/www/ torrentflux


That's all you're all done to access torrentflux either access it via your default configured webserver domain name or via localhost if you're logged in to same pc where installing.

http://www.your-domain.com/torrentflux

or

http://127.0.0.1/torrentflux
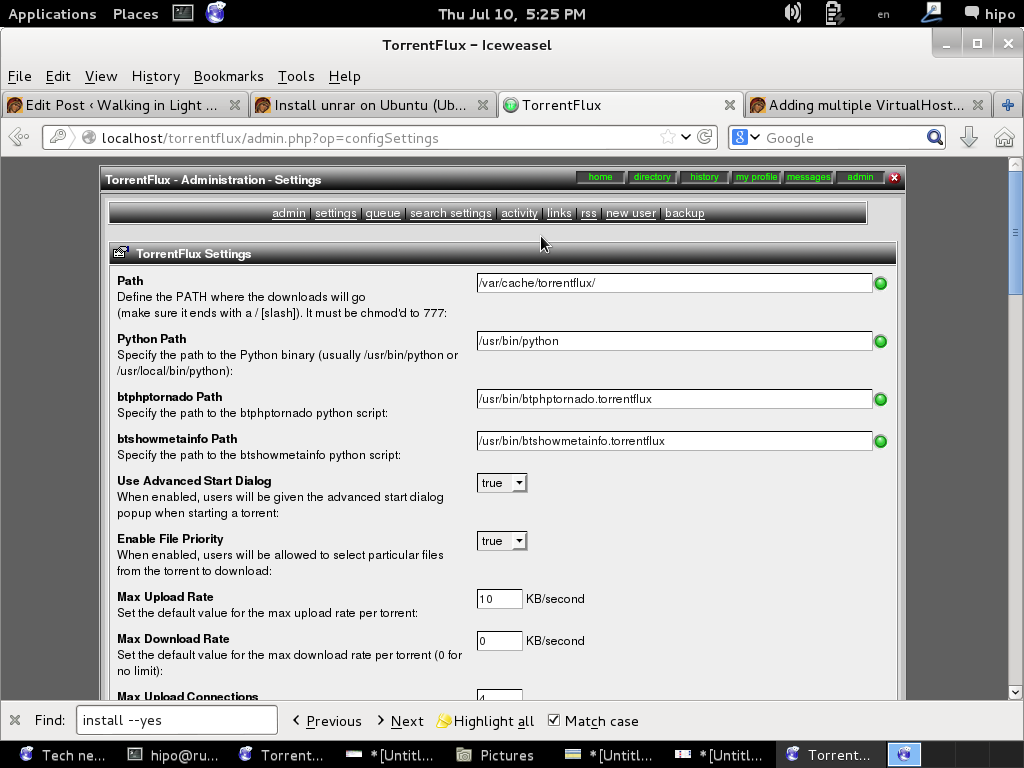
configuring-torrentflux-after-first-login-in-web-debian-linux

2. Install latest Torrentflux version from source

Alternatively if you want to have the latest version (because the Debian version is part of the stable distribution is a little bit outdated you will have to fetch Torrentflux-b4rt and unarchive it:

cd /tmp/
wget http://download.berlios.de/tf-b4rt/torrentflux-b4rt_1.0-beta2.tar.bz2

tar -xjf torrentflux-b4rt_1.0-beta2.tar.bz2

mv torrentflux-b4rt_1.0-beta2 /opt/torrentflux

Then to make torrentflux visible from web server I had to create a symbolic link to installation directory:
 

ln -sf /opt/torrentflux/html /var/www/torrentflux

For further initial configuration its necessery to make Torrentflux config writtable by www-data (the user with which Apache is running on Debian).


chown -R www-data:www-data /var/www/torrentflux/inc/config/


Next it its required to create somewhere download folder where TorrentFlux will keep downloaded Torrents

mkdir /var/lib/torrentflux


Apache HTTP server will have to have write ther:

chown -R www-data:www-data /var/lib/torrentflux


If you already haven't restarted Apache earlier in installing TorrentFlux pre-requirements, you will have to do it now:


/etc/init.d/apache2 restart


As TorrentFlux depends on its MySQL backend, we need to also create manually TorrentFlux database username and a password
 

export SQL_DB='torrentflux';
TFLUXSQL_USERNAME='torrentflux';
TFLUX_SQL_PWD='any-secret-password';

echo "CREATE DATABASE IF NOT EXISTS $SQL_DB DEFAULT CHARACTER SET utf8 DEFAULT COLLATE utf8_unicode_ci"
| mysql –user=root –password

echo "GRANT ALL PRIVILEGES ON $SQL_DB.*
TO $TFLUXSQL_USERNAME@localhost
IDENTIFIED BY $TFLUX_SQL_PWD;" | mysql –user=root –password


Substitute with your Database, Username and Password above shell variables – $SQL_DB, $TFLUX_USERNAME, $TFLUX_SQL_PWD

To configure TorrentFlux access it in browser:

http://your-domain.com/torrentflux
 

By accessing it for a first time, you will redirected to setup.php, in case something goes wrong and yuo're not redirected (probably some mod_rewrite issues add setup.php to url – e.g., acess –

http://your-domain.com/torrentflux/setup.php

I will not enter details, about Web config, because everything there is pretty clear.

Just in short – you will have to now choose:

Choose Database
Choose Database Information of database (put in the exact name of TorrentFlux databse previously created)
Uncheck the box for "Create new database"
Choose as a download location upper created directory – /var/lib/torrentflux

If you get an error on software dependencies screen for missing unrar – just install it
VLC may show an error as well, that's not a problem because VLC is probably not to be used.
Finally after completion of all, you will get an error that setup.php cannot be deleted.
 

To prevent, someone to re-configure it through http://your-domain/torrentflux/setup.php URL remove setup.php


rm /var/www/torrentflux/setup.php

To prevent someone rewrite anything in config file from web we have to revert back config/ folder not to be writable by Apache


chown -R root:root /var/www/torrentflux/inc/config/

Now in browser to access torrentflux type:


http://ipofyourbox/torrentflux

/torrentflux should redirect you to login.php if for some reason it doesn't type it manually in URL.

First account you will login is the super user account, you can allow multiple users to use it by adding multiple accounts.
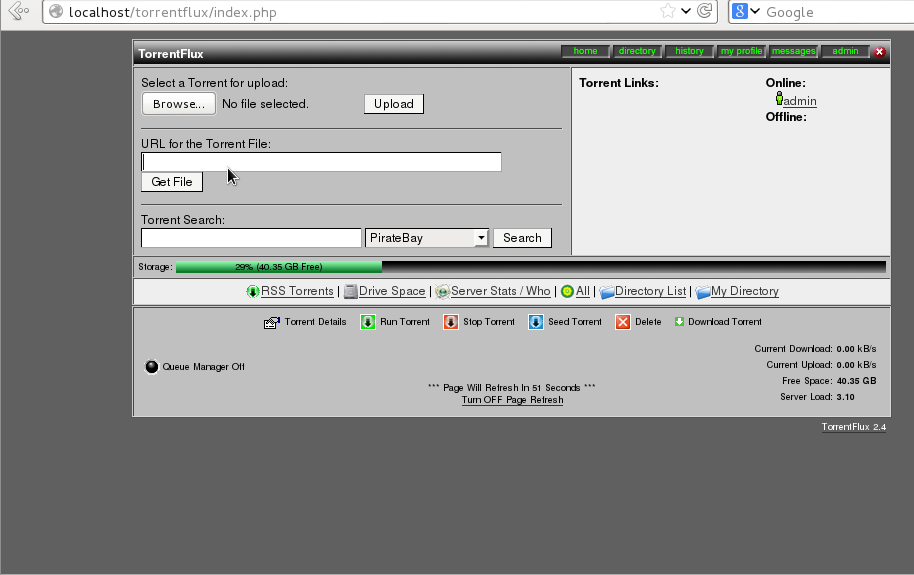
torrentflux-install-on-debian-ubuntu-gnu-linux-web-management-torrent-interface

As you will see there is plety of configuration options to play with.

You will definitely want to look in Server Page, some very important page to look is the Transfer Page – from there you can adjust the bandwidth of your connection on 100Mbit network this would be 12500 – to use the maximum possible connection provided by your ISP set the max bandwidth to 0. You have the option to also set a default bittorrent client, by default this will be bittornado.


If you have troubles downloading from TorrentTrackers make sure your router is configured to forward port 49160 to 49300

Now if you have a lot of storage create accounts also for your friends and enjoy torrentflux 🙂


How to install Java Virtual Machine on Debian 7 GNU / Linux

Wednesday, July 23rd, 2014

install-java-on-debian-gnu-linux-logo
Debian 7 stable as most stable Debian releases includes custom Open Source Oracle Java Virtual Machine version called IcedTea OpenJDK, just like with sun's proprietary java, open sourced icedtea fork is made of two components:
 

JREJava Runtime Environment

and


JDKJava Development Kit).


1. installing OpenJDK Open Source Java Virtual Machine on Debian GNU / Linux

openjdk_java_open_source_virtual_machine_linux-logo
The default meta-package for install java-jre is default-jre meta package which by default on Debian Wheezy points to openjdk:


apt-cache depends default-jdk
default-jdk
  Depends: default-jre
  Depends: openjdk-6-jdk

If you want to install default Open Source Java Debian package implementation run:
 

apt-get –yes install default-jre

apt-get –yes install default-jdk


2. Installing Oracle Java VM 7 on Debian / Ubuntu Linux and deb derivatives
/images/oracle_java_logo-linux-install-debian
Also it is possible to install Oracle Java 7 from binary via apt-get by adding a custom Ubuntu repository containing deb Oracle proprietary java install package called oracle-java7-installer:
 

echo "deb http://ppa.launchpad.net/webupd8team/java/ubuntu precise main" | tee -a /etc/apt/sources.list
echo "deb-src http://ppa.launchpad.net/webupd8team/java/ubuntu precise main" | tee -a /etc/apt/sources.list
apt-key adv –keyserver hkp://keyserver.ubuntu.com:80 –recv-keys EEA14886
apt-get update
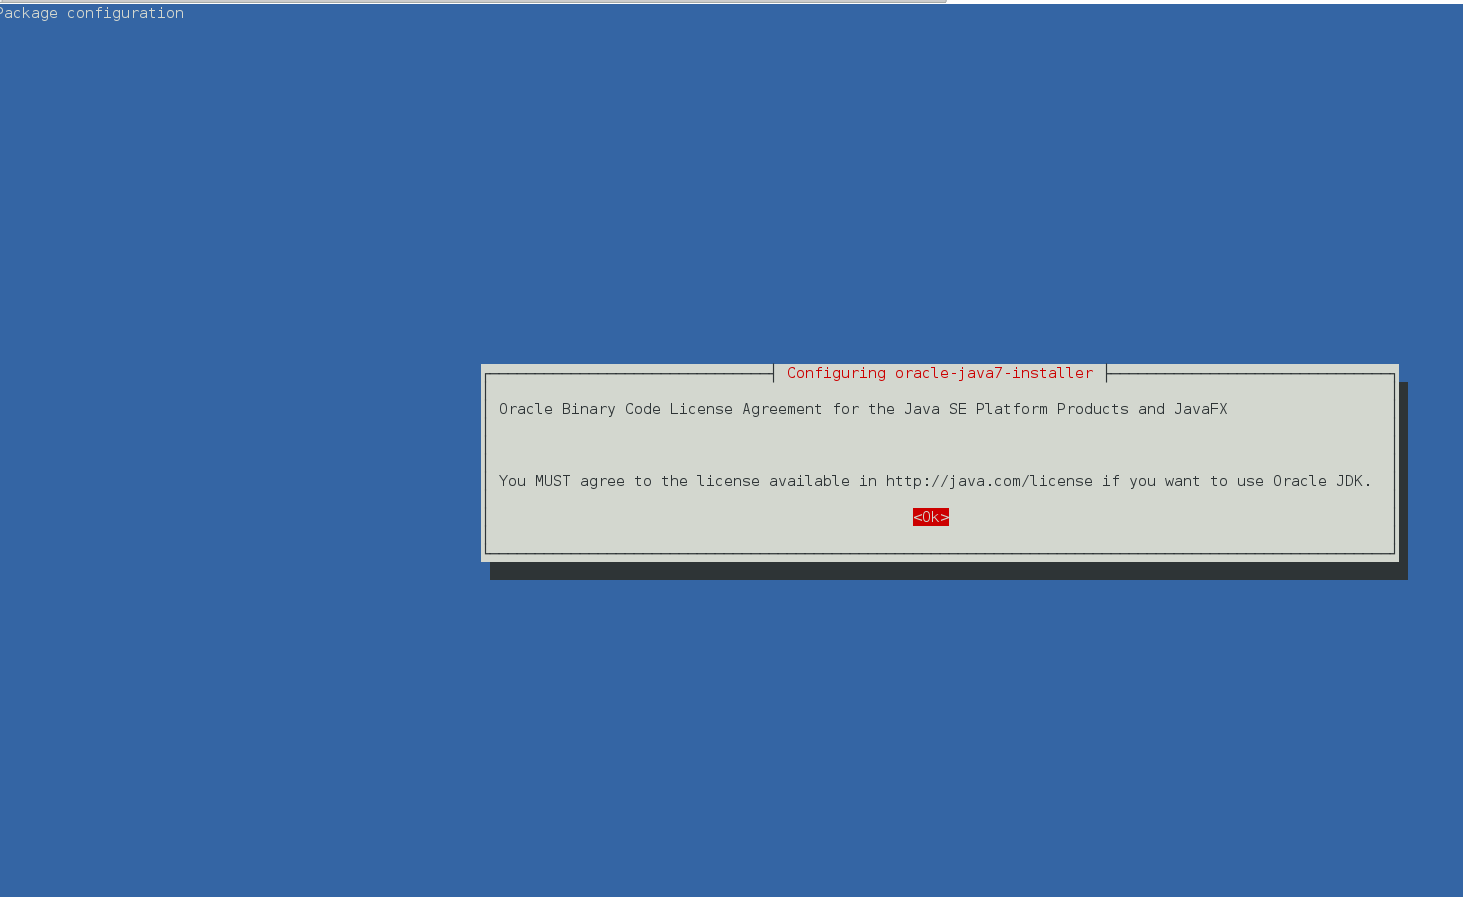
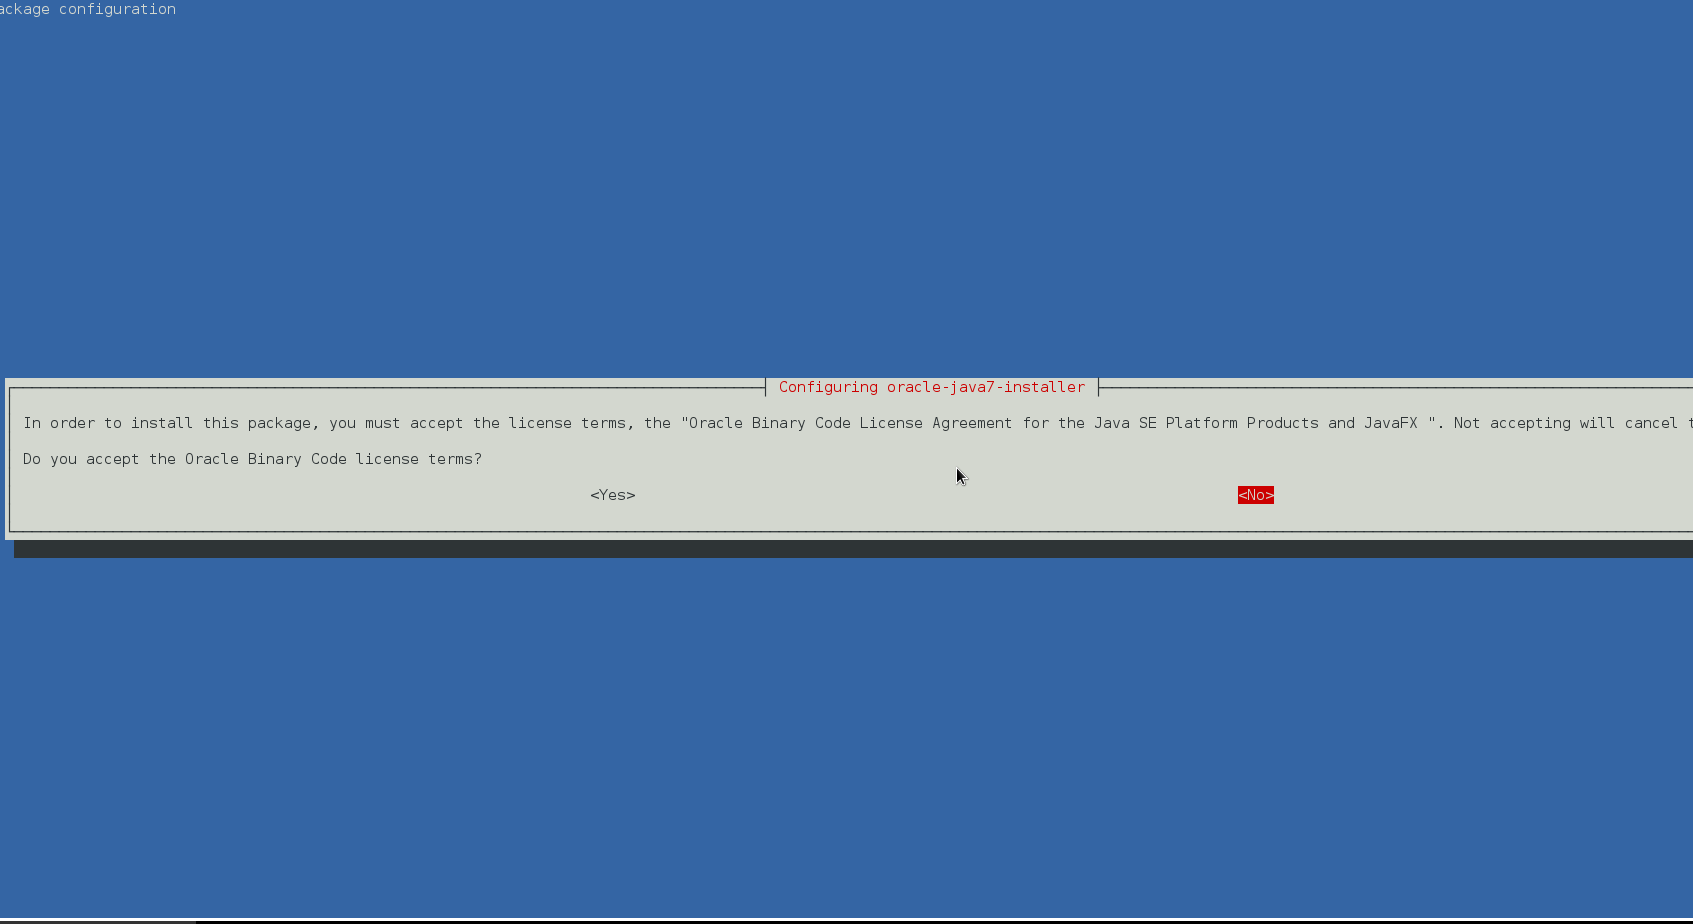
apt-get install –yes oracle-java7-installer


 Above apt-get command can be used also to install Oracle Sun Java on Ubuntu Linux and other Debian derivatives, for example you can install it like this on Linux Mint and rest of deb based Desktop oriented Linuces …

installing-java-debian-7-linux-install-oracle-java-7-screenshot-1

installing-java-debian-7-linux-install-oracle-java-7-screenshot-2

If you already have the openjdk installed together with oracle java jdk, to make oracle jdk the default Virtual Machine install also oracle-java7-set-default:

apt-get install oracle-java7-set-default


3. Installing Oracle Java 8 the debian way on Debian and Ubuntu Linux

echo "deb http://ppa.launchpad.net/webupd8team/java/ubuntu trusty main" | tee /etc/apt/sources.list.d/webupd8team-java.list
echo "deb-src http://ppa.launchpad.net/webupd8team/java/ubuntu trusty main" | tee -a /etc/apt/sources.list.d/webupd8team-java.list
apt-key adv –keyserver keyserver.ubuntu.com –recv-keys EEA14886
apt-get update
apt-get install oracle-java8-installer


4. Install Oracle Proprietary Java on Debian Linux using any version from Oracle website

As some written software requires custom ex-SUN Microsystems and currently owned by Oracle Java proprietary non-free binaries to install them on Debian Linux 7, there is a way to download any sun java jdk version, create .deb package and install the package with dpkg.

Here is how:

a.) Install java-package meta-package

apt-get –yes install java-package


Building dependency tree       
Reading state information… Done
The following extra packages will be installed:
  autopoint debhelper gettext git git-man html2text intltool-debian liberror-perl libgettextpo0 libmail-sendmail-perl libsys-hostname-long-perl po-debconf rsync
Suggested packages:
  dh-make gettext-doc git-daemon-run git-daemon-sysvinit git-doc git-el git-arch git-cvs git-svn git-email git-gui gitk gitweb libmail-box-perl
The following NEW packages will be installed:
  autopoint debhelper gettext git git-man html2text intltool-debian java-package liberror-perl libgettextpo0 libmail-sendmail-perl libsys-hostname-long-perl po-debconf rsync
0 upgraded, 14 newly installed, 0 to remove and 112 not upgraded.
Need to get 11.8 MB of archives.
After this operation, 24.7 MB of additional disk space will be used.

b.) Download your desiresd Oracle Java version


Then according to your Debian Linux platform install (32-bit x86 or 64-bit amd64) go in a browser to:

http://www.oracle.com/technetwork/java/javase/downloads/index.html

Accept the agreement and download latest Java release, if you need to install some specific Oracle Java version check out there Old Java download versions (archives) page

Note that in order to download, either you will need some text-browser like elinks or you will need to have a GUI environment with IceWeasel / Epiphany etc. If you're already using the Linux as a desktop environment with GNOME and you used IceWeasel to download java jdk it will be downloaded into /tmp

cd /tmp
make-jpkg <downloaded_jdk_file>

Install the binary package created:

dpkg -i oracle-j2sdk1.7_1.7.0+update44_amd64.deb

Enjoy 🙂
Run native Internet Explorer 6 on latest Debian / Ubuntu Linux with IEs4Linux

Thursday, July 24th, 2014

Install-internet-explorer-on-debian-linux-IEs4Linux_logo.svg
If you're a GNU / Linux Desktop user like me and you have to administrate hybrid server environments running mixture of MS Windows with Microsoft IIS webserver running active server pages (.ASP) developed application or UNIX / GNU Linux servers web applications using Mono as a server-side language, often you need to have browser which properly supports  Internet Explorer Trident web (layout) renderer (also famous as MSHTML).

Having Internet Explorer on your Linux is very useful for web developers who want to test how their website works under IE.

Of course you can always install Windows in Virtualbox VM and do your testing in the Virtual Machine but this takes time to install and also puts a useless load to a PC ….

IES4 Linux is a Linux free (open source) shell script that lets you run Internet Explorer on your Linux desktop.

ies4linux scripts collection uses emulation with WINE (Wine is Not Emulator) emulator to run the native  Windows Internet Explorer thus before use it you have to install Wine.

There are plenty of tutorials online about ies4Linux, problem is as it is not updated and developed most tutorials doesn't work on Debian Wheezy / Ubuntu and rest of deb based linux distros.
This is why I decided to write just another ies4linux tutorial that actually works!

On Debian / Ubuntu / Mint Linux install via apt-get:

apt-get –yes install wine

Then with a non-root user download ies4linux-latest.tar.gz. Just in case ies4linux-latest.tar.gz disappears in future I've created also a ies4linux-latest.tar.gz mirror for download here

and unarchive tar archive:

wget http://www.tatanka.com.br/ies4linux/downloads/ies4linux-latest.tar.gz
tar -zxvf ies4linux-latest.tar.gz
cd ies4linux-*
./ies4linux

You will get:
 

IEs4Linux 2 is developed to be used with recent Wine versions (0.9.x). It seems that you are using an old version. It's recommended that you update your wine to the latest version (Go to: winehq.com).

You need to install cabextract first!
Download it here: http://www.kyz.uklinux.net/cabextract.php

To fulfill this requirement you will need to also cabetract package which is luckily part of Debian:
 

apt-get install –yes cabextract

On wine version 1.0 and onwards winprefixcreate has been changed to winecfg binary.
To prevent missing wineprefixcreate, errors during ies4linux installer run  its necessery to symlink as a workaround:
 

ln -sv /usr/bin/winecfg /usr/bin/wineprefixcreate


To continue with Internet Explorer ies4Linux installater run again:

./ies4linux

images/internet-explorer-for-linux-debian-gnu-linux-screenshot

/images/internet-explorer-4-linux-installer-debian-gnu-linu-screenshot

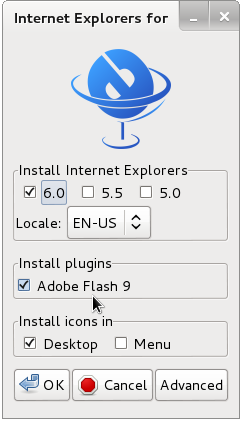
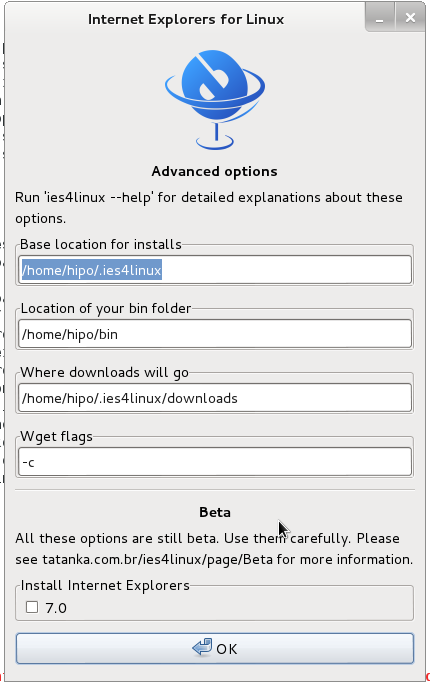
You will get the installer GUI window with selection option which Internet Explorer version you want. Choose between IE 5.0, IE 5.5 and IE 6. It is also possible to install IE 7 which is still considered beta version and is less tested and unstable, will probably lead to crashes. If you want to install also IE 7 check it as an option from Advanced menu.

/images/ies4linux-internet-explorer-installer-debian-gnu-linux-screenshot

If you get permission errors after running ies4Linux gui installer to solve that chown recursively directory to the user with which you will be running it:
 

chown -R hipo:hipo ies4linux-2.99.0.1


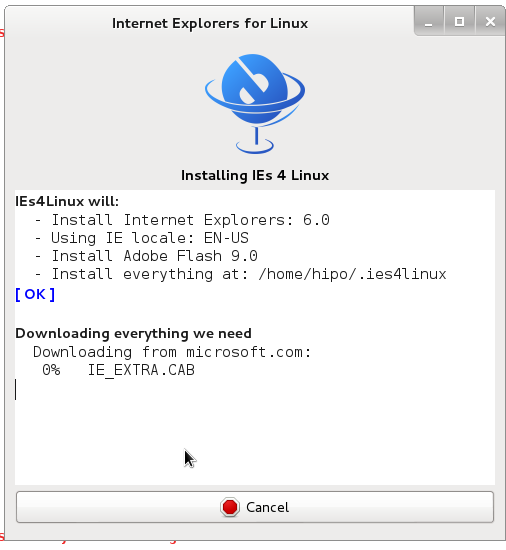
Internet Explorer for Linux downloader, will connect Microsoft.com website and download DCOM, MCF and various IE required .CAB files.

If you get some ies4linux GUI installer unexpected crashes you can try to download all required IE binaries, surrounding files and flash player using no-gui installer with cmd:
 

./ies4linux –no-gui –install-corefonts

IEs4Linux 2 is developed to be used with recent Wine versions (0.9.x). It seems that you are using an old version. It's recommended that you update your wine to the latest version (Go to: winehq.com).

IEs4Linux will:
  – Install Internet Explorers: 6.0
  – Using IE locale: EN-US
  – Install Adobe Flash 9.0
  – Install MS Core Fonts
  – Install everything at: /home/hipo/.ies4linux
[ OK ]

Downloading everything we need
  Downloading from microsoft.com:
   DCOM98.EXE
   mfc42.cab
   249973USA8.exe
   ADVAUTH.CAB
   CRLUPD.CAB
   HHUPD.CAB
   IEDOM.CAB
   IE_EXTRA.CAB
   IE_S1.CAB
   IE_S2.CAB
   IE_S5.CAB
   IE_S4.CAB
   IE_S3.CAB
   IE_S6.CAB
   SETUPW95.CAB
   FONTCORE.CAB
   FONTSUP.CAB
   VGX.CAB
   SCR56EN.CAB

  Downloading from macromedia.com:
   100% swflash.cab

  Downloading from sourceforge.net
   0%   webdin32.exe[ OK ]bdin32.exe

Installing IE 6
  Initializing
  Creating Wine Prefix
Your wine does not have wineprefixcreate installed. Maybe you are running an old Wine version. Try to update it to the latest version.

To fix the error:

Your wine does not have wineprefixcreate installed. Maybe you are running an old Wine version. Try to update it to the latest version.

vim lib/functiions.sh

Go to line 36 (Type :36 in vim)

Line:

wine –version 2>&1 | grep -q "0.9." || warning $MSG_WARNING_OLDWINE

Has to be changed to:

wine –version 2>&1 | egrep -q "0.9.|-1." || warning $MSG_WARNING_OLDWINE


Also you need to substitute wineprefixcreate to wineboot (if you haven't already symlinked wineprefixcreate to winecfg – as pointed earlier in article.

To do so make following substitution in lib/install.sh and in lib/functions.sh

cp -rpf lib/install.sh lib/install.sh.bak; cat lib/install.sh |sed -e 's#wineprefixcreate#wineboot#g' > lib/install_new.sh; mv lib/install_new.sh lib/install.sh

cp -rpf lib/install.sh lib/functions.sh.bak; cat lib/functions.sh |sed -e 's#wineprefixcreate#wineboot#g' > lib/functions_new.sh; mv lib/functions_new.sh lib/functions.sh


Also it is necessery to change default corefonts download url which points to sourceforge but is failing. I've made mirror of corefonts files here
 

cp -rpf lib/install.sh lib/install.sh.bak; cat lib/install.sh |sed -e 's#http://internap.dl.sourceforge.net/sourceforge/corefonts/#www.pc-freak.net/files/corefonts/#g' > lib/install_new.sh; mv lib/install_new.sh lib/install.sh

Re-run the ies4linux console installer:
 

 ./ies4linux –no-gui –install-corefonts

….
Es4Linux installations finished!

On installation success you should get output like this
Hopefully you will see no errors like in my case, if you get the corefonts download error again re-run the installer and it should succesully download the files.

To then run ies4linux:

~/bin/ie6


internet-explorer-ies4linx-running-on-debian-gnu-linux-screenshot
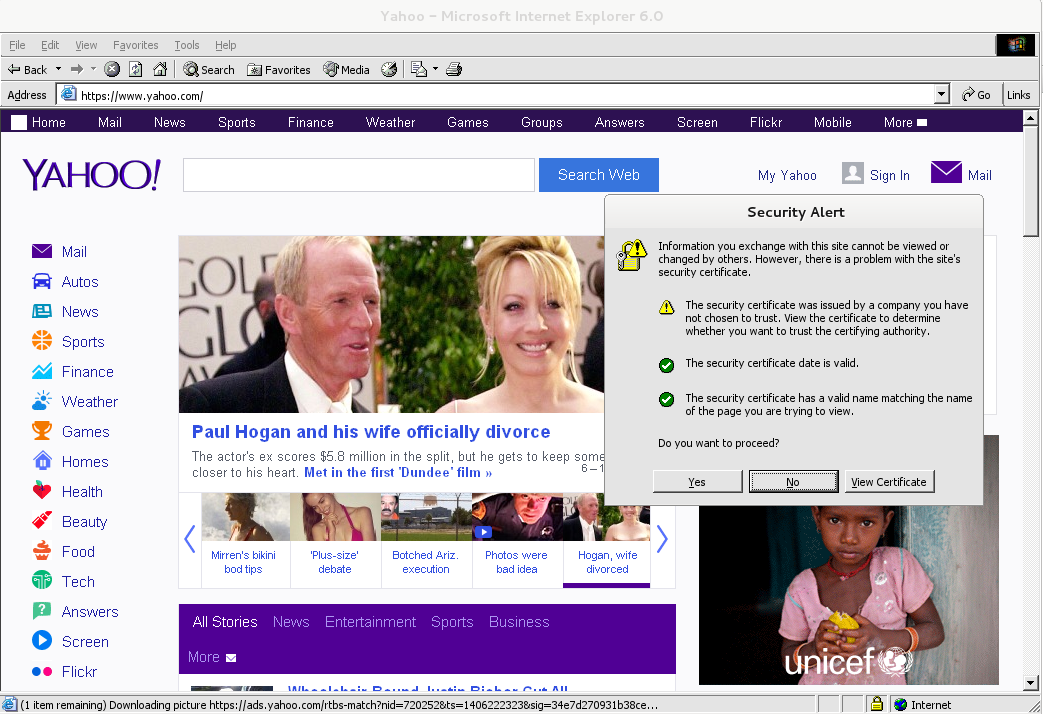
Though Ies 4 Linux is good for basic testing it is not psosible to use the browser for normal browsing because its a bit buggy and slow.

By default Internet Explorer 6 behavior is to prompt security alert on various actions, though this might be useful for debugging it is really annoying so I personally disabled those by decreasing from:

Tools -> Internet Options -> Security -> (Security Level)
I've decreased it from Medium to Medium-Low

ies4Linux was not developed since 2008 and as of time of writting ies4linux official project website seems abandoned.


Free Software Remote Desktop for Mac OS X – CoRD simple RDP remote desktop for Mac

Monday, August 4th, 2014

free-software-remote-desktop-client-to-connect-to-windows-rdp-for-MAC-OSX-CoRD-logo
If you're admin using Mac OS X Desktop or casually on a place where you have no access to a Windows / Linux PC (only have access to your girlfriend of wife MAC OS notebook) and you need to administrate Windows hosts remotely out of office hours (from home), you will need some remote desktop client for Mac OS X.

I was just recently in that situation as we were guests to a friend in Shabla village nearby Sea coast and the only near PC, I had was my wife's MacBook Air running Mac OS X.

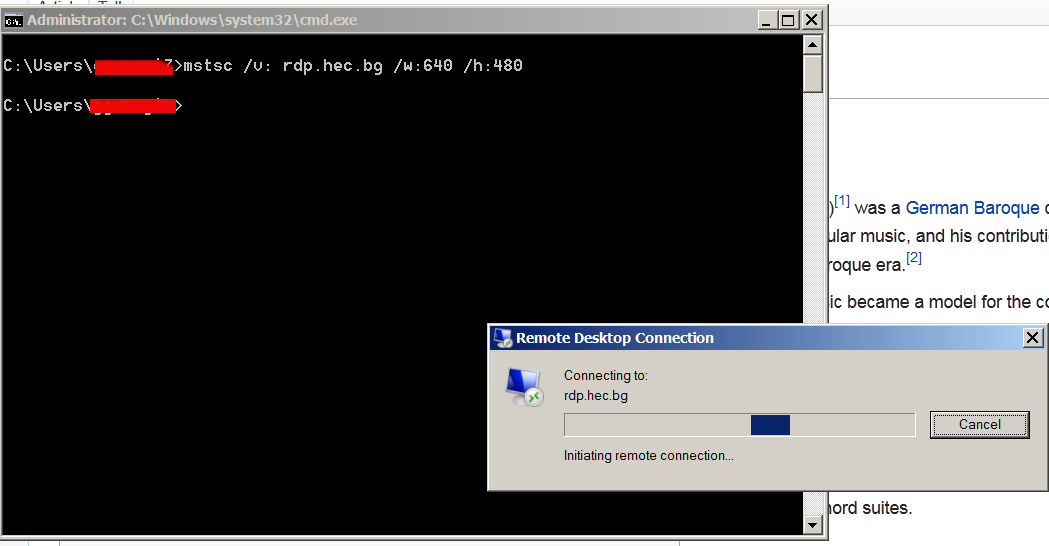
I looked in google to see if there is some default RDP (remote desktop protocol) client like MS Windows remote desktop command line client, i.e. (yes there is way to invoke remote desktop on Windows from command line 🙂 ):

mstsc [] [/v:] [/admin] [/f[ullscreen]] [/w:] [/h:] [/public] | [/span] [/edit “connection file”] [/migrate] [/?]

remote-desktop-run-from-windows-command-line-rdp-command-line-ms-windows-screenshot

I also looked if there is Mac OS X version ofLinux's rdesktop (command) or RDP Linux GUI remmina 
however  I didn't find direct port of em, neither there is default integrated RDP Client on Mac OS X, thus after researching a bit further I tried installing the first returned result in Google which was leading to Apple's AppStore – Apple – Remote Desktop.

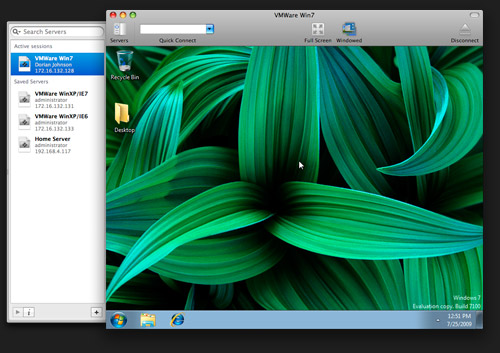
I tried installing the clicking it but it seemed my wife, didn't know her AppStore as it was her cousin which earlier configured her Mac OS PC on laptop initial install time. Contacting her cousin to ask for the password was a time eater as well as I was lazy to create new appstore account (plus I always prefer to use free software alternative when possible) …  did a quick search in Google whether there is some Open Source / Free Software Remote Desktop Client for Mac OS X and I found CoRD – Mac OS X remote desktop client for Microsoft Windows computers using the RDP protocol.
CoRD was originally ported from UNIX program rdesktop.
To have CoRD working you will need as a minimum requirement Mac OS X version 10.5 or later.

CoRD-Free-Software-Open_Source-remote-desktop-client-for-mac-osx
Here is CoRD's description quoted from its SourceForge website:

CoRD: Simple RDP Remote Desktop

Macs interact well with Windows, and with CoRD the experience is a bit smoother. Great for working on the office terminal server, administrating servers or any other time you'd like your PC to be a bit closer without leaving your Mac. CoRD allows you to view each session in its own window, or save space with all sessions in one window. Scale session windows to whatever size fits you—the screen is resized automatically. Enter full screen mode and feel like you're actually at the computer. The clipboard is automatically synchronized between CoRD and the server. For system administrators, CoRD creates a simpler workflow by allowing you to save server information, then quickly connect to that server by using HotKeys or the server drawer. This makes quickly connecting to a specific server easy, even when managing many servers.

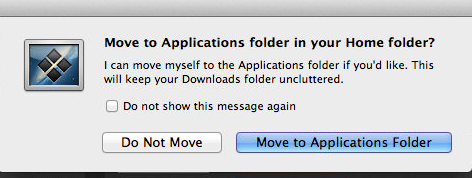
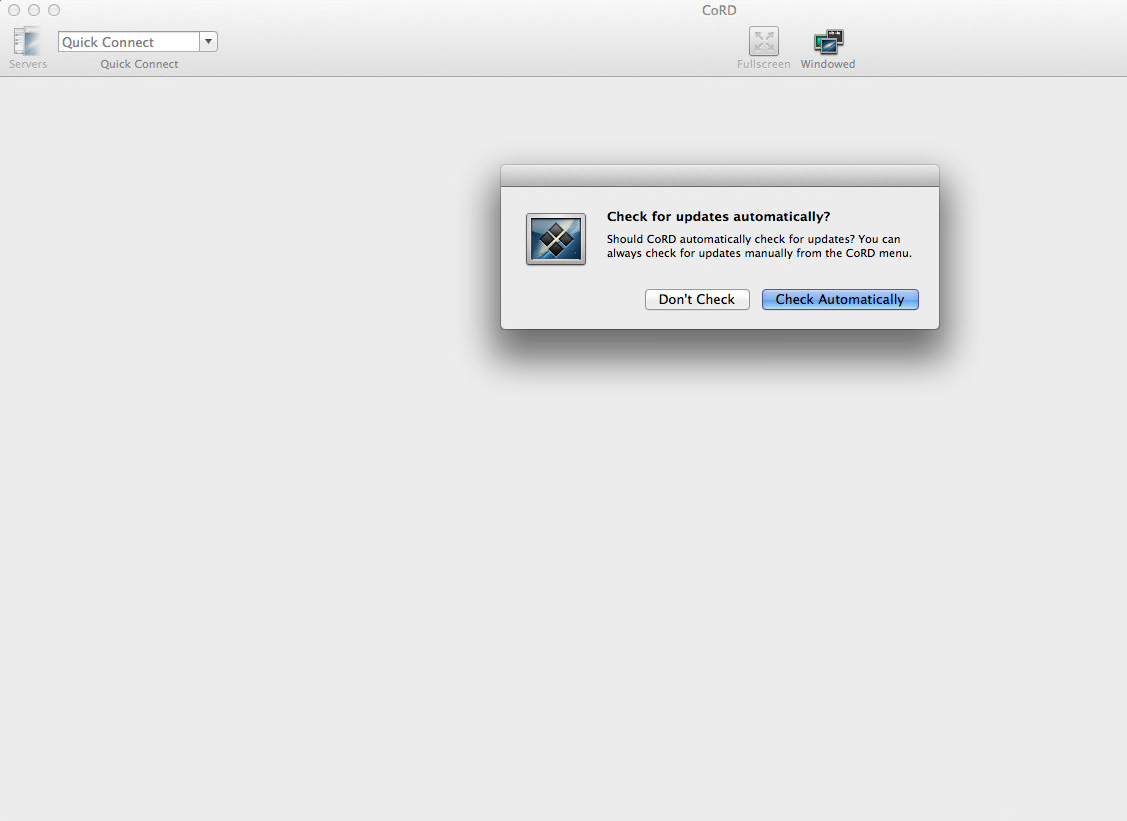
Installing CoRD is pretty, straight forward, just download unzip the archive and run it:

cord-remote-desktop-free-software-client-mac-osx-install-warning-screenshot

cord-remote-desktop-free-software-client-mac-osx-install-warning-screenshot.png

cord-open-source-rdp-client-mac-osx

To later run Cord either look it up in Finder or if you prefer like me to access it from command line, you will need to export CoRD PATH in Mac Terminal $PATH variable:

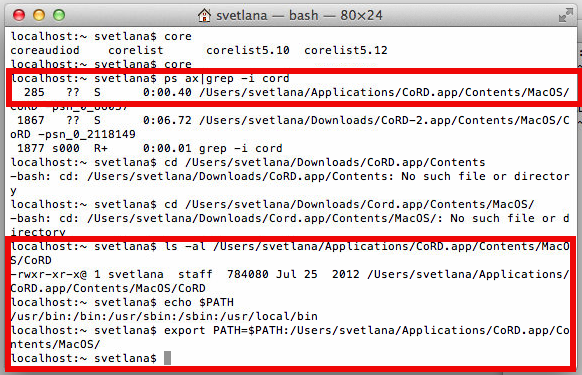
add-cord-remote-desktop-lcient-command-to-default-path-mac-osx

As you see in above screenshot to find out which directory is CoRD located, I've grepped through the processes with

ps ax | grep cord

and then added it to PATH with:

export PATH=$PATH:/Users/svetlana/Application/CoRD.app/Contents/MacOS/

Remembering CoRD to type it each time is annoying, thus to make CorD be accessed like on Linux with rdesktop (easy to remember command), I've used alias:

alias rdesktop='CoRD'

To make the new PATH and alias permanent for the user, I've added it to (/Users/svetlana) – ~/.profile

echo "export PATH=$PATH:/Users/svetlana/Application/CoRD.app/Contents/MacOS/" >> ~/.profile
echo "alias rdesktop='CoRD'" >> ~/.profile


Current CoRD MacOSX version is 0.5.7, for personal ease if I need to install it in future time, I've made my own mirror of cord here.

There is also Microsoft Remote Desktop client for Mac OS 2.1.1 however this version was released back in 2011 and is outdated (not supported for use with Mac OS X v10.7 (Lion) or later).

Extracting pages and page ranges, protect with password and remove password from PDF on GNU / Linux with QPDF – Linux Manipulating PDF files from command line

Friday, August 8th, 2014

qpdf-logo-extract-pages-page-ranges-protect-pdf-with-password-remove-password-from-pdf-linux-qpdf-manipulating-pdf-files-on-gnu-linux-and-bsd
If're a Linux user and you need to script certain page extraction from PDF files, crypt protect with password a PDF file or decrypt (remote password protection from PDF) or do some kind of structural transformation of existing PDF file you can use a QPDF command line utility. qpdf is in active development and very convenient tool for Website developers (PHP / Perl / Python), as often on websites its necessery to write code to cut / tailer / restructure PDFs.

1. Install QPDF from deb / rpm package

qpdf is instalalble by default in deb repositories on Debian / Ubuntu GNU / (deb derivative) Linux-es to install it apt-get it

apt-get install –yes qpdf

On RPM based distribution CentOS / SuSE / RHEL / Fedora Linux to install qpdf, fetch the respective distribution binary from rpmfind.net or to install latest version of qpdf build it from source code.

2. Install QPDF from source

To build latest qpdf from source

  • on RPM based distributions install with yum fullowing packages:

yum -y install zlib-devel pcre-devel gcc gcc-c++

  • on Deb based Linuces, you will need to install

apt-get install –yes build-essential gcc dpkg-dev g++ zlib1g-dev


Then to build gather latest qpdf source from here


cd /usr/local/src
wget -q https://www.pc-freak.net/files/qpdf-5.1.2.tar.gz
tar -zxvf qpdf-5.1.2.tar.gz
cd qpdf-5.1.2/
./configure
make
make install


Once it is installed, if you get error on qpdf runtime:
 

/usr/local/bin/qpdf: error while loading shared libraries: libqpdf.so.13: cannot open shared object file: No such file or directory

To solve the error find in your compile directory libqpdf.so.13 and copy it to /usr/lib or /usr/local/lib

 cp -rpf ./libqpdf/build/.libs/libqpdf.so.13 /usr/local/lib


3. Decrypt password encrypted (protected) PDF file

if you have time and you like reading be sure to check the extensive qpdf-manual.

To remove password from a PDF file protected with a password with qpdf

qpdf –password=SECRET-PASSWORD –decrypt input-file.pdf output-file.pdf

QPDF has a vast range of split and merge features. It can combine all the files in a folder (*.pdf), you can use it to try to recover damaged pdf files, extract individual pages from PDF, dump and reverse page range, make new created PDF with old PDF's reversed pages (pages 1,2,3,4 to become in order 4,3,2,1), apply some single pdf file metadata to multiple files.

4. Try to Recover damaged PDF file


To try to recover some damaged file with qpdf:
 

qpdf file-to-repair.pdf repaired-file.pdf

5. Extract certain pages or page range from PDF

It is recommended to use the version built from source to extract certain page range from PDF
 

/usr/local/bin/qpdf –empty –pages input-file.pdf 1-5 — outfile-file.pdf


If you wanted to take pages 1–5 from file1.pdf and pages 11–15 from file2.pdf in reverse, you would run
 

qpdf file1.pdf –pages file1.pdf 1-5 file2.pdf 15-11 — outfile.pdf


Disable annoying ads on Youtube in Firefox and Google Chrome – Adblock Plus

Monday, November 17th, 2014


adblock-plus-great-way-to-stop-annoying-website-advertisements
I'm not an Youtube addict but every now and then to kill some time I watch videos there usually this is 10 to 20 videos a day. Over the last few months, I've noticed Youtube video Adsense ads has increased dramatically and this is seriously breaking the overall user-experience one gets when watching videos.

Thus finally I decided to get rid of the ads and to prevent the annoyance, i've seen a hack on LifeHacker claiming to disable Youtube Ads with Javascript setting, I've tested this one but probably since 2013 when the hack was working Youtube updated, there player Ads inclusion algorithm and this Adus removal tip no longer works.

Adblock-Plus-remove-google-youtube-facebook-advertisements-and-browser-ads-firefox-chrome-plugin

Thanksfully there is an easy way to achieve that with no need for crytic commands in through developers by using the good old Adblock Plus Browser extension which besides of capable of removing standard Adsense Advertisements (showing up on almost every webpage on the internet) also removes Adsense Advertisements "embedded" into Youtube Videos is a generally one of the few recommended plugins to increase your browser security.

Installation of Adblockplus 2 is done directly from plugin website for both Firefox and Google Chrome, just click on Install button and you're done.
You don't need to do any post-configuration of Adblockplus even though for those who like to finely tune on any custom website White / Blacklisting.

Creating multi-part zip archives in Linux with 7zip command to transfer large zip files data in parts

Monday, December 1st, 2014

creating-multi-part-zip-archives-in-Linux-debian-ubuntu-fedora-centos-rhel-with-7z-command-to-transfer-large-files-data-in-parts
Recently, I've blogged on how to move large files from source to destination server in parts on a slow / restricted networks or whenever the media is limtied in size. This is not a common scenario but it happens so if you're admin sooner or later you will need that. I give example with UNIX's split and unrar. However strip's file naming can get you insane (in case if you don't want to use cstrip command – split a file into sections determined by context lines instead) plus normal split Linux / *nix command doesn't support compression and encryption. On the other side on many Company internal Networks with Windows server hosts running – Winblows (2003, 2008, 1012) for security purposes it might be that WinRar is not installed, thus you might need to transfer the file parted between the GNU / Linux server and Windows server in standard OS supported by Windows ZIP format. Assuming that you have root (admin) access to the Linux host you can then archive your file in parts using ZIP encryption algorithm with 7zip.

1. Installing 7zip on CentOS / Fedora / RHEL and other Redhat based Linuces

If the Linux server is running:
Fedora / CentOS  / RHEL and you don't have 7zip installed yet install it with:

yum -y install p7zip

According to distros version  it might be the name could be a bit different if p7zip is different to find the one you need search with:

yum search p7zip

and install whatever you need
 

2. Installing 7zip on Debian / Ubuntu and other Debian based servers

apt-get install –yes p7zip-full

Depending on Deb based distro just like with fedora if p7zip-full pack is not installable, check 7zip's package distro version:

apt-cache search p7zip


3. Archiving ZIP file in multiple (sized) parts on GNU / Linux

7z a -v512m Large-file-separated-in-multi-parts.zip Large-Many-Gigabytes-File.SQL

This would output multiple files:

Large-file-separated-in-multi-parts.zip.001, Large-file-separated-in-multi-parts.zip.002, Large-file-separated-in-multi-parts.zip.003, Large-file-separated-in-multi-parts.004 etc.

If you want to add security to the transferred file to protect newly created ZIP archive with password use following command:

7z a -v512m Large-file-separated-in-multi-parts.zip Large-Many-Gigabytes-File.SQL


7-Zip [64] 9.20  Copyright (c) 1999-2010 Igor Pavlov  2010-11-18
p7zip Version 9.20 (locale=bg_BG.UTF-8,Utf16=on,HugeFiles=on,2 CPUs)
Scanning

Creating archive Large-file-separated-in-multi-parts.zip


Enter password (will not be echoed) :

Once you have transferred all the many parts via (SSH/ FTPS or not preferrably HTTP / HTTPS / FTP) place them in the same folder and use Windows standard ZIP to unarchive.

If the archived 7zip files are to be unarchived on another Linux host (in case if multi part zip transfer is between Linux -> Linux hosts) to unarchive, parted files:

7z x Large-file-separated-in-multi-parts.zip.*

How to View Mail (Full Headers) in Outlook 97 / 98 / 2003 / 2007 / 2010 and Outlook 2013 Mail client on Windows and Mac OS

Tuesday, December 16th, 2014

View-Full-Mail-headers-in-Outlook-97-98-2003-2007-2010-2013-on-Windows-Mac-OSX

Being able to see the headers is very important if you have to administer Microsoft Exchange mail server / Windows Active directory in case whether mails have some issues not being received within a Corporate Outlook MS Clients because of being mistakenly flagged as spam, or just to track the route of the mail. By default Outlook displays only few fields of the headers: From, Sent (date and time), To, and CCs. This gives too little info and is often irritating, as you can't really see important info such as:

  • Mail Carriers (Mail SMTPs) through which Mail has been passed
  • Mail MIME Header / Type (specifics)
  • Any extra written by mail server Anvirus
  • Anti-Malware check headers etc
  • Pyzor / Razor / Blacklisting check pass / fail headers etc.


1. How to view Mail headers in Outlook 2010 / 2013
 

In Outlook 2010 / 2013  when you use the default settings, you need to OPEN the message (Double Click on some random Mail) and either go to the Tags section of the ribbon or go to File, Properties.

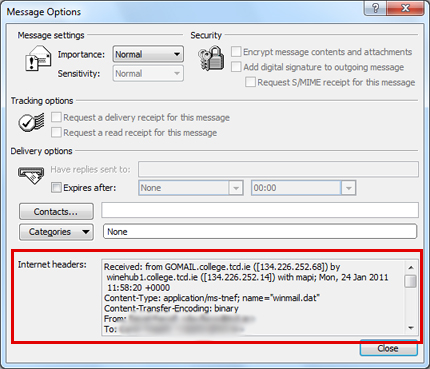
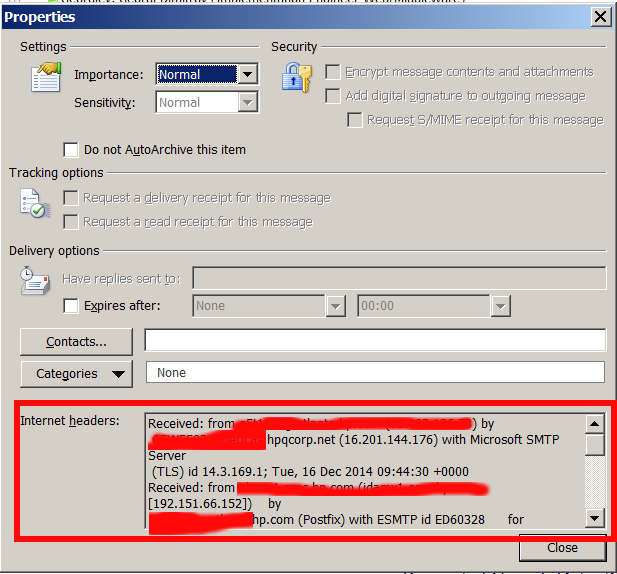
message-property-tag-microsoft-outlook-2010-2013-screenshot 

Click on the Expand button (highlighted in yellow) in the lower right corner to show the Message options dialog. Voila You will have the Properties dialog with the (Mail) Internet headers in the bottom (see screenshot)


One thing to mention is when you have a Mail Message Headers visible through the Properties dialog in Outlook, it is very unpleasent there is no way to search inside Visualized Mail headers ..
 

2. How to access Outlook Full Mail Headers using a shortcut

For those who had to regularly check Mail headers, it is very useful to make Outlook View Headers accessible through a key shortcut.

Here is how:

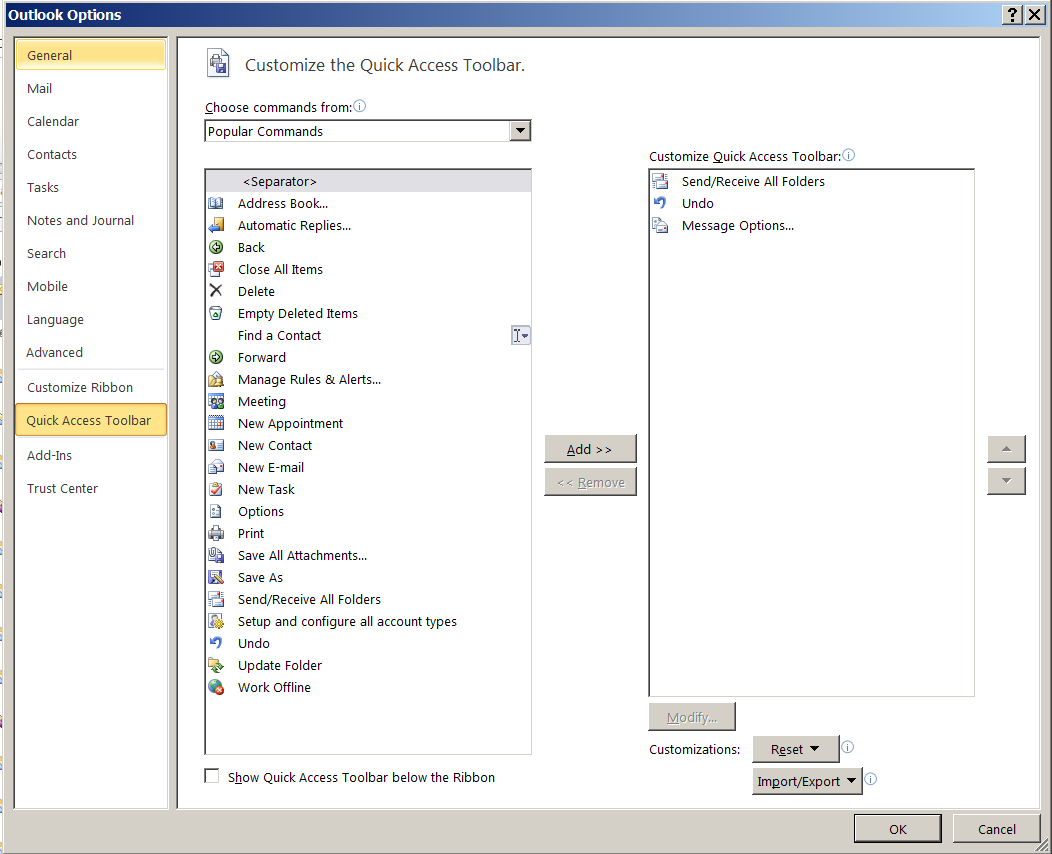
a) Go to File > Options > Quick Access Toolbar.
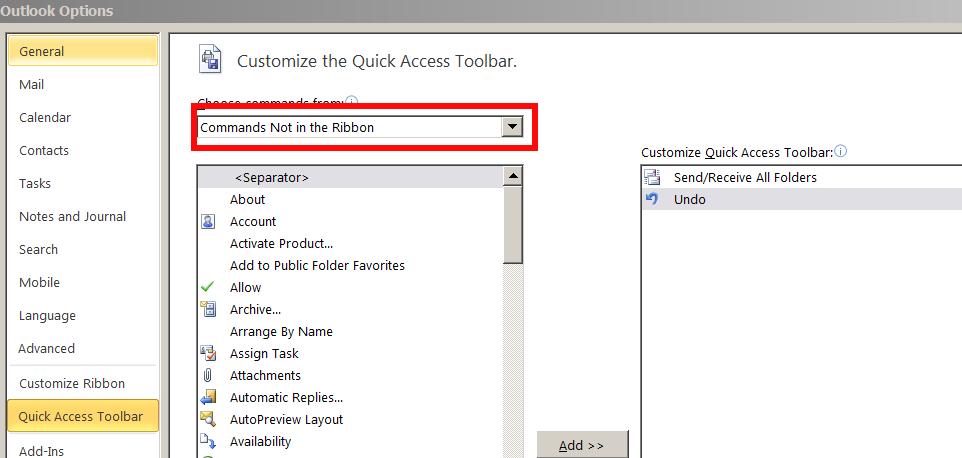
b) In Choose Commands From, select
Commands Not in the Ribbon

commands-not-in-the-ribbon-screenshot-ms-outlook-2010-2013

c) Click in the list of commands and press M on the keyboard

d) Scroll to find Message Options

e) Click Add > (button) to add it to the QAT.

Outlook-Options-Quick_Access_Toolbar_screenshot-ms-windows-add-QAT-shortcut-to-message-options
 

To Quickly Access New added "Message Options" / View headers QAT, the shortcut to use is something like ALT + 3, or ALT + number (depending on the number of QATs already existing in the mailbox, the position of the Message Options on the QAT bar determines the exact nr. to be used.)

On older versions of Microsoft Outlook Mail Clients 97 / 98 / 2003 / 2007 to View Mail Headers

Right-click on Mail message in the folder view, then choose Options.

Or

In an Opened Mail Message, choose View -> Options.
 

3. Viewing Mail Headers on MS Outlook running on Mac OS 

If you happen to need use MS Outlook on Mac OS X (hope you'll not 🙂 ) to View Complete Mail Headers

Select the message whose headers you want to view.
Right-click (or Control-click) on the message and choose View Source.
Message headers appear at the top of the text document that opens.

Windows XP / 7, Minimize any program to system tray free software – RBTray, Trayconizer and Windows HideIT

Monday, January 5th, 2015

rbtray-screenshot1-on-ms-windows-minimize-any-application-systray-winblows
As Linux admin, I'm already aware of AllTray *NIX application able to send any application to GNOME / KDE tray.
But what If you have a program on Windows XP / 7 / 8,  that doesn't have a minimize to tray functionality and you want to send it to tray?
I.e. what if you want to send programs like Notepad (that doesn't by default go to win systray) to Windows  tray in order to prevent them mess up with other Open Windows minimized windows?

After a quick research on the topic I found these 3 – RBtray, Trayconizer, HideIt, Below is a very quick review on each

.

1. Minimize any Windows program to tray with RBTray

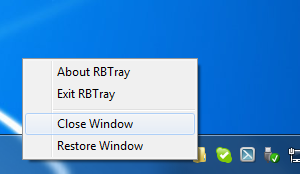
rbtray_windows-7-screenshot-minimize-any-application-to-tray-minimize-notepad
If you want to stick to open source (GPL) software a tiny free software proggie that does the trick is RBTray current latest RBtray is 4.3 release is download mirror is here.

To use RBTray you don't need to do anything, once program is unarchived from archive, once launched there will be no system application that it is running, but you can go to any minimized program (not in tray) and by clicking with right mouse button on minimize button you will the app minimize to tray.

Here is how RBTray works (taken from archive README file):

Installing:
Extract the 32-bit or 64-bit binaries (depending on your OS) to a
 folder, e.g.
C:Program FilesRBTray.  Double click RBTray.exe to start it.  If you want it
to automatically start after you reboot, create a shortcut to RBTray.exe in
your Start menu's Startup group.

Using:
Right click on any program's minimize button to minimize it to the tray.  To
restore, single-click the program's icon in the tray.

Exiting:
Right click on any tray icon created by RBTray and click Exit RBTray in the
popup menu.  Or run RBTray.exe with the –exit parameter.


2. Miminize any app to system tray with Trayconizer

trayconizer_screenshot-microsoft-windows-minimize-notepad
Trayconizer is the other tray minizer tool you might want to check out, Windows tray minize application a download mirror of Trayconizer is here. As of time of writing this post (current) latest Trayconizer version is 1.1.1.

Trayconizer allows you to minimize virtually any application to the system tray rather than having it take up valuable space in your taskbar. The screen shot to the left shows Trayconizer minimizing Notepad to the system tray. Trayconizer is definitely the tool of choice of system administrators who need to keep minimized windows program to system tray each time on boot as it can be easily run from command line.

Using Trayconizer is simple. To start Trayconizer on Notepad, you would execute: C:PathToTrayconizer.exe C:WindowsNotepad.exe.

You can create a shortcut in your Startup group to execute Trayconizer on a program that you use frequently but want to keep tucked out of the way in the system tray when you're not using it. There is even an option for starting the application initially in the minimized state.

Trayconizer will automatically shut itself down when you close the program you are Trayconizing. Additionally, multiple Trayconized programs are handled by a single instance of Trayconizer to avoid wasting system resources.

Trayconizer requires no DLL's beyond the base Win32 API libraries and will not store any entries in your registry.

3. Minimize any program to Windows systray with Windows HideIT

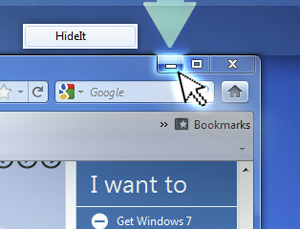
windows-hideit-minimize-to-tray-screenshot-send-any-running-windows-program-to-systray

Another good tool useful in hiding (minimizing) Windows programs which are lacking the minimize option embedded built-in is Windows HideIT.

Hideit official download website is here, note that with Hideit, Its pretty confusing to find where to download in (so to download look in the right upper corner for a download button) HideIT Download Mirror is here.

Hideit should be able to minimize any Application to sysytem tray, while Rbtray fails ith some. Both RBtray and Windows
HIdeIT will popup with a blue down-arrow on Tray icon once launched and you can show / hide minimized applications from there.

All RbTray, Trayconizer and HideIt tray minimizers should work on virtually all NT 4.0 Windows XP / 2000 / Vista / 7 / 8 though I haven't tested on all of 'em yet. If you happen to find it working on  Win NT 4.0 / 8 etc., please drop a comment.