Posts Tagged ‘password’
Tuesday, January 14th, 2014 
I'm following a training intensive 5 days course for Oracle WebLogic. Some of exercises included stopping / starting Weblogic App server for security reasons Weblogic is designed to always propmpt for password. I remember similar behavior in Apache configured to use SSL certificate.
Whether a new Weblogic server is configured and a frequent restart of server is needed having to write the password each and everyime is mostly annoying. Thanksfully there is a file called boot.properties in which username / password can be hardcoded and later red on Weblogic start. As boot.properties contains security credentials its very important to keep the file as secured as possible. boot.properties files can be set-up for each different configured separate Weblogic server instance.
For my training sessiion boot.properties is in locations:
/home/oracle/wls11g_advadm/work/domains/MedRecDomain/servers/MedRecAdmSvr/security/boot.properties
/home/oracle//wls11g_advadm/work/domains/MedRecDomain/servers/MedRecSvr2/security/boot.properties
 #  cat /home/oracle/wls11g_advadm/work/domains/MedRecDomain/servers/MedRecSvr2/security/boot.properties

username=weblogic

password=Welcome1
Depending on how Oracle Weblogic is configured its possible values in boot.properties (username / password) to be encrypted after first server boot-up.
Tags: boot, configured, home, How to, oracle, password, store, username, Weblogic App, Weblogic Application
Posted in System Administration, Web and CMS | No Comments »
Thursday, December 5th, 2013 
I work on ongoing project where Tomtat Application servers configured to run Clustered located behind Apache with mod_proxy configured to use ReverseProxy are used. One of customers which required a java application deployment experienced issues with application's capability to connect to SAP database.
After some investigation I figured out, the application is unable to connect to the SAP db server becuse remote host webserver running some SAP related stuff was not connecting due to expired certificate in Tomcat Keystore known also as JKS / Java Keystore– (.keystore) – which is a file containing multiple remote hosts imported certificates.
The best and shortest definition of keystore is:
Keystore entry = private + public key pair = identified by an alias
The keystore protects each private key with its individual password, and also protects the integrity of the entire keystore with a (possibly different) password.
Managing Java imported certificates later used by Tomcat is done with a command line tool part of JDK (Java Development Kit) called keystore. Keystore is usually located under /opt/java/jdk/bin/keytool. My Java VM is installed in /opt/ anyways usual location of keytool is $JAVA_HOME/bin/
Keytool has capabilities to create / modify / delete or import new SSL certificates and then Java applications can access remote applications which requires Secure Socket Layer handshake . Each certificate kept in .keystore file (usually located somewhere under Tomcat web app server directory tree), lets say – /opt/tomcat/current/conf/.keystore
1. List current existing imported SSL certificates into Java's Virtual Machine
 tomcat-server:~# /opt/java/jdk/bin/keytool -list -keystore /opt/tomcat/current/conf/.keystore

password:
Command returns output similar to;
Entry type: trustedCertEntry
Owner: CN=www.yourhost.com, OU=MEMBER OF E.ON GROUP, OU=DEVICES, O=E.GP AG, C=DE
Issuer: CN=E.ON Internal Devices Sub CA V2, OU=CA, O=EGP, C=DE
Serial number: 67460001001c6aa51fd25c0e8320
Valid from: Mon Dec 27 07:05:33 GMT 2010 until: Fri Dec 27 07:05:22 GMT 2013
Certificate fingerprints:
MD5: D1:AA:D5:A9:A3:D2:95:28:F1:79:57:25:D3:6A:16:5E
SHA1: 73:CE:ED:EC:CA:18:E4:E4:2E:AA:25:58:E0:2B:E4:D4:E7:6E:AD:BF
Signature algorithm name: SHA1withRSA
Version: 3
Extensions:
#1: ObjectId: 2.5.29.15 Criticality=true
KeyUsage [
DigitalSignature
Key_Encipherment
Key_Agreement
]
#2: ObjectId: 2.5.29.19 Criticality=true
BasicConstraints:[
CA:false
PathLen: undefined
]
#3: ObjectId: 1.3.6.1.5.5.7.1.1 Criticality=false
AuthorityInfoAccess [
[
accessMethod: 1.3.6.1.5.5.7.48.2
accessLocation: URIName: http://yourhost.com/cacerts/egp_internal_devices_sub_ca_v2.crt,
accessMethod: 1.3.6.1.5.5.7.48.2
accessLocation: URIName: http://www.yourhost1.com/certservices/cacerts/egp_internal_devices_sub_ca_v2.crt]
]
#4: ObjectId: 2.5.29.14 Criticality=false
SubjectKeyIdentifier [
KeyIdentifier [
0000: D3 52 C7 63 0F 98 BF 6E FE 00 56 5C DF 35 62 22 .R.c…n..V\.5b"
0010: F2 B9 5B 8F ..[.
]
…
Note that password that will be promtped has is by default changeit (in case if you don't have explicitly changed it from Tomcat's default config server.xml).
2. Delete Old expired SSL host Certificate from Java Keystore
It is good practice to always make backup of old .keystore before modifying, so I ran:
tomcat-server:~# cp -rpf /opt/tomcat/current/conf/.keystore /opt/tomcat/current/conf/.keystore-05-12-2013
In my case first I had to delete old expired SSL certificate with:
tomcat-server:~# /opt/java/jdk/bin/keytool -delete -alias "your-hostname" -v -keystore /opt/tomcat/current/conf/.keystore
Then to check certificate is no longer existent in keystore chain;
tomcat-server:~# /opt/java/jdk/bin/keytool -list -keystore /opt/tomcat/current/conf/.keystore
-keystore – option is obligitory it does specify where keystore file is located
-list – does list the certificate
-v – stands for verbose
3. Finally to import new SSL from already expored via a browser url in keystore
tomcat-server:~# /opt/java/jdk/bin/keytool -importcert -file /tmp/your-hostname.cer -alias your-hostname.com -keystore /opt/tomcat/current/conf/.keystore
More complete information on how to deal with keystore is available from Apache Tomcat's SSL Howto – a must read documentation for anyone managing Tomcat.
Tags: AA, alias, application, apps, BF, bin, CA, com, configured, Delete Old, Entry, file, file tmp, import, ip, Java Keystore, key, list, password, SAP, server, SSL, tmp, tomcat, Tomcat Keystore, Tomtat Application, url, yourhost
Posted in System Administration, Various, Web and CMS | 5 Comments »
Wednesday, November 13th, 2013 
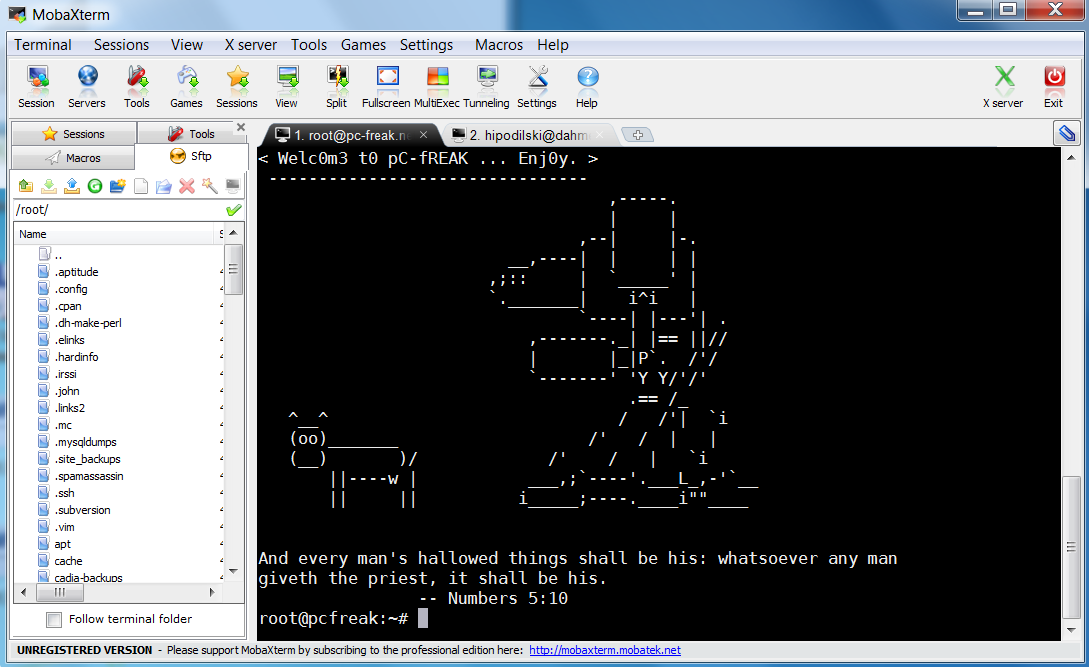
Last 10+ years I worked on GNU / Linux as Desktop. Last 7 years most of my SSH connections were managed from GNOME and I'm quite used to gnome-terminal ssh tabbing. In my new Employee Hewlett Packard. I'm forced to work on Microsoft Windows 7 and thus I used for a month or so Putty and Kitty fork from version 0.63 of PuTTY advertising itself as the best telnet / SSH client in the world. Both of the two lack tabbing and have interface which is pretty unfamiliar to me. As I'm so used to using native UNIX terminal. Fortunately a colleague of mine Ivelin was using an SSH client called MobaXTerm which very much did emulation similar to my favourite gnome-terminal. MobaXterm is not free software / open source app but this doesn't matter so much to me as anyways I'm running a non-free Win OS on my desktop. What makes MobaXterm so attractive is its rich functionality (cosmic years infront of Putty).
Here is website description of MobaXterm quoted from its website:
MobaXterm is an enhanced terminal for Windows with an X11 server, a tabbed SSH client and several other network tools for remote computing (VNC, RDP, telnet, rlogin). MobaXterm brings all the essential Unix commands to Windows desktop, in a single portable exe file which works out of the box.
Overall list of features MobaXterm offers are;
-
multitab terminal with embedded Unix commands (ls, cd, cat, sed, grep, awk, rsync, wget, …)
-
embedded X11 server for easily exporting your Unix/Linux display
-
a session manager with several network utilities: SSH, RDP, VNC, Telnet, Rlogin, FTP, SFTP and XDMCP
-
passwords management for SSH, RDP, VNC, SFTP (on demand password saving)
-
easy graphical file transfer using drag and drop during SSH sessions
-
advanced SSH tunnels creation tool (graphical port forwarding builder)
-
tasks automation using scripts or macros
Mobaxterm is portable just like Putty so its useful to use on HOP stations to servers like used in big companies like HP. Featured embedded Unix commands (e.g., ls, cd, cat, sed, grep, awk, rsync, wget) gives a feeling like you're working on pure Linux console making people addicted to Linux / BSD quite confortable. Some other very useful terminal emulator functions are support for anti-aliasing session manager (save / remember passwords for ssh sessions in Crypted format so much missing in Putty) and it even supports basic macros.
Basic UNIX commands embedded in MobaXterm are taken and ported from Cygwin project – Linux-like environment for Windows making it possible to port software running on POSIX systems (such as Linux, BSD, and Unix systems) to Windows. A very cool think is also MobaXterm gives you a Linux like feel of console navigation in between basic files installed from Cygwin. Some downside I found is program menus which look at first glimpse a bit confusing especially for people used to simplicity of gnome-terminal. Once logged in to remote host via ssh command the program offers you to log you in also via SFTP protocol listing in parallel small window with possibility to navigate / copy / move etc. between server files in SFTP session which at times is pretty useful as it saves you time to use some external SFTP connector tools like WinSCP.
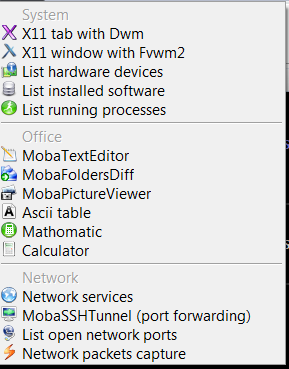
From Tools configuration menu, there are few precious tools as well;
– embedded text editor MobaTextEditor
– MobaFoldersDiff (Able to show diffeernces between directories)
– AsciiTable (Complete List of Ascii table with respective codes and characters)
– Embedded simple Calculator
– List open network ports – GUI Tool to list all open ports on Windows localhost
– Network packets capture – A Gui tool showing basic info like from UNIX's tcpdump!
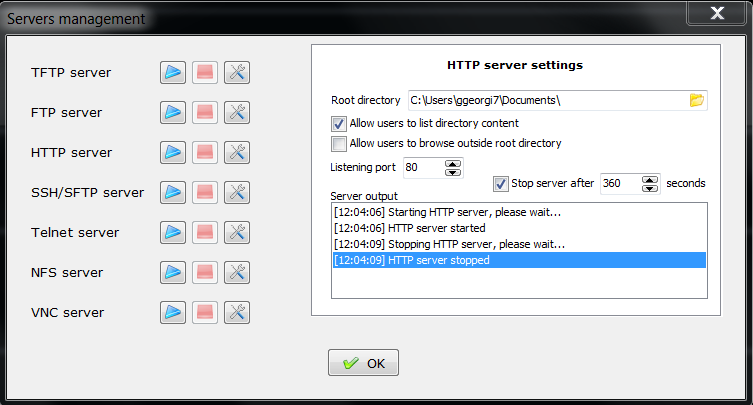
– Ability to start quickly on local machine (TFTP, FTP, SFTP / SSH server, Telnet server, NFS server, VNC Server and even simple implementation of HTTP server)
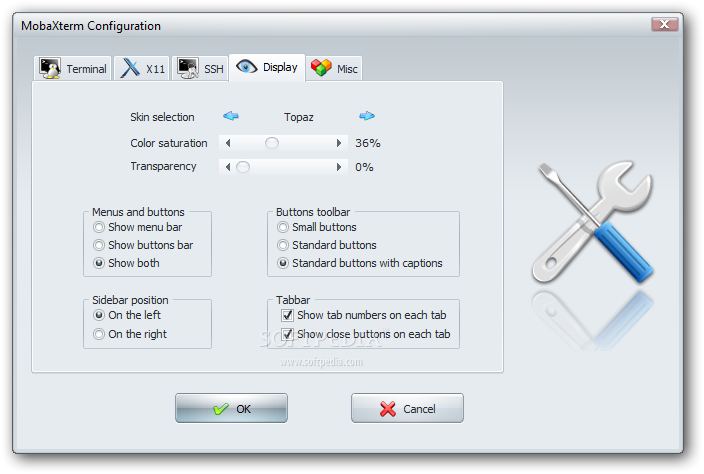
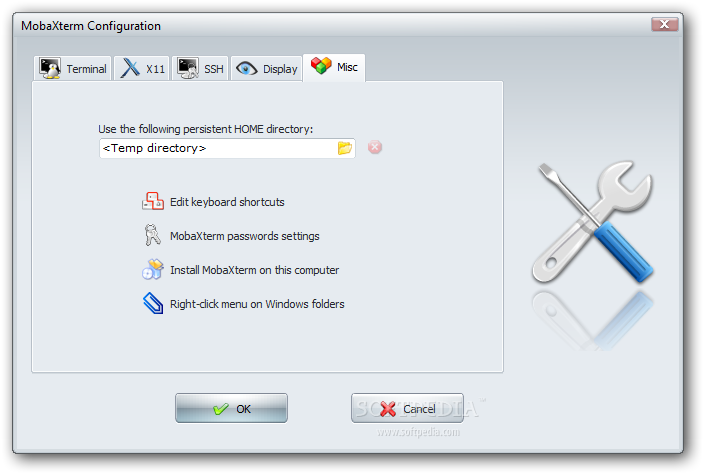
Below are few screenshots to get you also idea about what kind of configuration MobaXterm supports
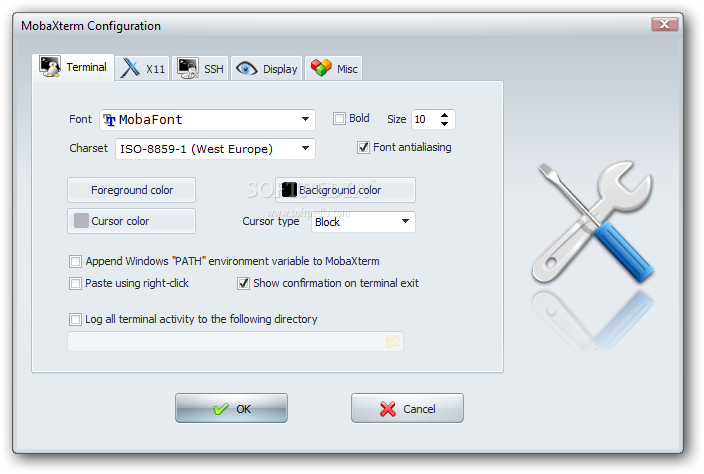
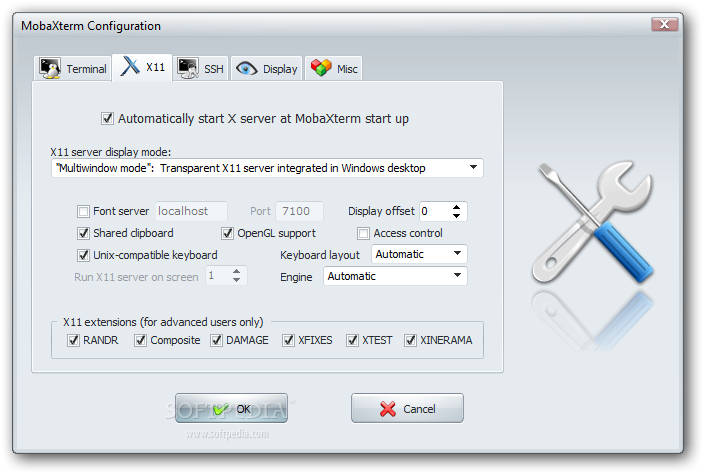

To configure and use Telnet, RSH, RDP, VNC, FTP etc. Sessions use the Sessions tab on top menu.
One very handy thing is MobaXterm supports export of remote UNIX display with no requirement to install special Xserver like already a bit obsolete Xming – X server for Windows.
The X Display Manager Control Protocol (XCMCP) is a key feature of the X11 architecture. Together with XDMCP, the X network protocol allows distributed operation of the X server and X display manager. The requesting X server runs on the client (usually as an X terminal), thus providing a login service, that why the X server ported to MobaXterm from Cygwin also supports XDMCP. If, for example, you want to start a VNC session with a remote VNC server, all you have to do is enter the remote VNC server’s IP address in the VNC area; the default VNC port is already registered.
Accessing the remote Windows server via RDP (Remote Desktop Protocol) is also a piece of cake. Once you establish a session to RDP or other Proto it is possible to save this session so later you just choose between session to access. The infamous (X11 Port Forwarding) or creation of SSH encrypted tunnels between hosts to transfer data securily or hide your hostname is also there.
MobaXterm is undoubtedly a very useful and versatile tool. Functionally, the software is well mannered, and Windows users who want to sniff a little Linux/Unix air can get a good idea of how Linux works. A closer look reveals that anything you can do with MobaXterm can be achieved directly with freely available tools (Cygwin) and Unix tools ported from Cygwin. However, although Cygwin provides a non-Posix environment for Windows, it doesn’t offer a decent terminal, which is one thing Moba-Xterm has going for it.
Admittedly, in pure vanilla Cygwin, you can start an X server automatically and then use xterm, but xterm lacks good-quality fonts, whereas MobaXterm conveniently lets you integrate a font server.
Tags: awk, cat, drag, drop, exe, file, Ftp, grep, infront, manager, microsoft windows, network, open source, password, Putty, RDP, session, session manager, sftp, software open source, ssh, Telnet, terminal, VNC, wget, Windows
Posted in System Administration, Various, Windows | 15 Comments »
Wednesday, June 29th, 2011 
I’m using access to the mysql servers via localhost with mysql cli on daily basis.
With time I’ve figured out that it’s pretty unahandy to always login with my root mysql password, I mean each time to enter it, e.g.:
root@mysql-server:~# mysql -u root

Enter password:

...
Thus to make my life a way easier I decided to store my mysql root password in order to allow my root admin user to be able to login to my mysql server without asking for password. This saves time and nerves, as I’m not supposed to look up for the password file I store my server mysql root pass.
To allow my mysql cli interface, to login passwordless to the SQL server I had to create the file /root/.my.cnf readable only for my root user and store my MySQL username and password there.
Here is a sample /root/.my.cnf file:
root@mysql-server:~# cat /root/.my.cnf

[client]

user="root"

pass="mysecretMySQLPasswordgoeshere"
Now next time I use the mysql console interface to access my mysql server I don’t have to supply the password, here is how easier is the mysql login afterwards:
root@mysql-server:~# mysql -u root

Welcome to the MySQL monitor. Commands end with ; or g.

Your MySQL connection id is 3520

Server version: 5.0.77 Source distribution
Type ‘help;’ or ‘h’ for help. Type ‘c’ to clear the buffer.
mysql>
The only downside of using .my.cnf to store permanently the mysql server root and password is from security standpoint.
If for instance somebody roots my servers, where I have stored my root user/pwds in .my.cnf , he will be able immediately to get access to the MySQL server.
Another possible security flaw with using the mysql passwordless login “trick” is if somebody forgets to set proper file permissions to, .my.cnf
Once again the file should possess the permissons of:
root@mysql-server:~# ls -al /root/.my.cnf

-rw------- 1 root root 90 Apr 2 00:05 /root/.my.cnf
Any other permissons might allow non-privileged users to read the file and gain unathorized admin access to the SQL server.
Tags: Auto, basis, buffer, cat, cli, client, cnf, connection id, daily basis, distribution type, downside, Draft, file, file permissions, help, life, localhost, mysql connection, mysql servers, order, password, password file, root, root admin, root password, root root, root user, security, security flaw, security standpoint, server mysql, server root, server version, source distribution, standpoint, time, type, username, version, way
Posted in FreeBSD, Linux, MySQL, System Administration | No Comments »
Monday, July 4th, 2011 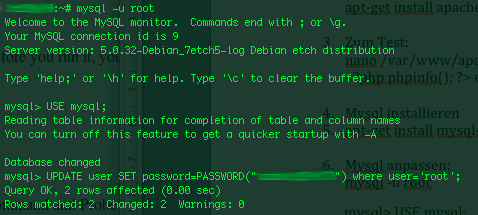
On a couple of occasions, I’ve had the issue of loosing / forgetting a MySQL password at other times I had to login to servers which contained MySQL servers with a password I don’t know.
In any of this occasions I was required to restore the ROOT access to the mysql server.
Sadly recoving a mysql lost root password is not really possible in a easy way, thus in most cases the only option one have is to stop the mysql server and run it again in a special skip-grant-tables mode, which runs the server in a sort of passwordless safe mode and makes it accessible without admin password through mysql cli .
To Omit the password check the skip-grant-table option instructs the MySQL server not to check in mysql.user while any request to connect with mysql client to the server is made.
Therefore one can login to the mysql server passwordless and reset the current (lost) password to another one.
Thease can be achived in the following four easy steps:
1. Stop the MySQL server
mysql:~# /etc/init.d/mysqld stop
2. Run the mysql server with the –skip-grant-tables option
mysql:~# mysqld_safe --skip-grant-tables &
3. Login to the mysql and change current mysql root password
mysql:~# mysq -u root

mysql> UPDATE user SET password=PASSWORD('yournewpassword')

WHERE user='root';

mysql> FLUSH privileges;
4. Stop and Start the Mysql server again
mysql:~# killall -9 mysqld_safe

mysql:~# /etc/init.d/mysqld start

..
Now the new mysql password will be identical to the yournewpassword . Cheers 😉
Tags: amp, Cheers, cli, client, couple, FLUSH, issue, killall, login, Mode, mysq, mysql password, mysql servers, mysqld, occasions, password, password check, Privileges, request, root, root password, safe mode, safemysql, server root, servermysql, Set, sort, Stop, thease, update, way, WHERE
Posted in Linux, MySQL, System Administration | No Comments »
Sunday, July 24th, 2011 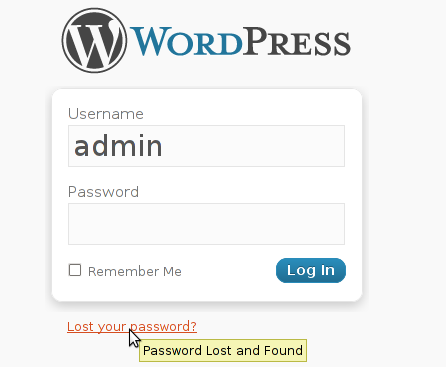 My sister has forgotten the administrator account for her wordpress blog as she did not blogged for a while.
I decided to help her and reset the WORDPRESS blog password to another one.
The easiest way of course in normal circumstances is to use wordpress's Lost your password password reset via email.
However with this blog it seems I used an email address which I forgot so I couldn't really use this as a mean to reset the blog password.
Therefore as I'm addicted to command line 😉 I decided to do it straight via connecting to mysql server with mysql cli and change the encrypted password value directly there. Here is how I did it:
1. First I logged in to the mysql server with my root user/pass
pcfreak# mysql -u root -p

Enter password: Welcome to the MySQL monitor. Commands end with ; or \g.

Your MySQL connection id is 39263

Server version: 5.0.83-log FreeBSD port: mysql-server-5.0.83
Type 'help;' or '\h' for help. Type '\c' to clear the current input statement.
2. Then I checked current set user and password for the wp-admin admin user
mysql> use wordpress1;

mysql> select * from wp_users where user_login like '%admin%';

+----+------------+--------------+---------------------+-------------+--------------+

| ID | user_login | user_pass | user_nicename | user_email | user_url | user_registered | user_activation_key | user_status | display_name |

+----+------------+------------------------------------+---------------+----------------+----------+---------------------+----

| 1 | admin | $P$BG9eMoysG8ztywLp25AOpJSkWlRZMu. | admin | invoke@emailaddress.com | | 2011-03-10 13:44:26 |

| 0 | admin | +----+------------+------------------------------------+---------------+----------------+----------+---------------------+---

1 row in set (0.25 sec)
3. Used a query to reset the current encrypted password you see below shown under the user_pass column
mysql> UPDATE wp_users SET user_pass= MD5('my_new_wordpress_password_to_reset') where ID = '1';
4. I've changed the email set for user_email to which mail is sent, in case of forgotten password again
I've done this to prevent my sister to bother me again, if she forgets her password once again 😉
mysql> UPDATE wp_users SET user_email='invoke_@abv.bg' where ID = '1';
One important note here is that in step 3
I've used the MD5(); mysql embedded function to generate the MD5 crypted password which is inserted in above's sql query, however the MD5 function is only available in MySQL servers version 5.x, therefore in older releases of MySQL e.g. ver 4.x, one will have to first generate the md5 password with let's say md5sum linux command or bsd's md5 cmd like so:
a. On Linux
hipo@noah:~$ echo 'my_new_wordpress_password_to_reset' | md5sum

f0ed1489e6d9e7eae8b363b1b5e4a864 -
b. On FreeBSD
pcfreak# echo 'my_new_wordpress_password_to_reset' | md5

f0ed1489e6d9e7eae8b363b1b5e4a864
Afterwards the SQL query that can be used with the above generated string to issue on the MySQL 4.x server or earlier versions would be:
mysql> UPDATE wp_users SET user_pass='f0ed1489e6d9e7eae8b363b1b5e4a864' where ID = '1';
That's all now the password is set to the newly generated my_new_wordpress_password_to_reset pass string.
Cheers 😉
Tags: administrator account, circumstances, cli, com, Commands, connection, connection id, course, Display, eae, email address, encrypted password, function, help, input statement, login, monitor, mysql connection, password, pcfreak, reset, root, root user, row, server version, status, update, url, value, wordpress blog, wp, ztywLp
Posted in FreeBSD, Linux, MySQL, System Administration, Wordpress | 7 Comments »
Friday, July 29th, 2011 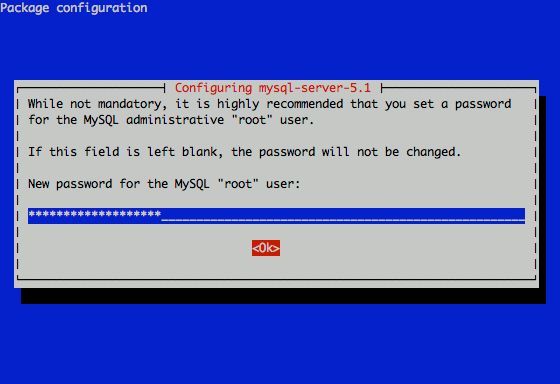
I had to change my mysql root password for one of the servers since during the install I mispasted the password in the MySQL password prompt I needed the pwd to be changed.
Here is how I changed it to my desired one:
linux:~# /usr/bin/mysqladmin -u root -p'OLD_PASSWORD_STRING' password NEW_PASSWORD_STRING

linux:~#
The password gets changed immediately 😉
If a new password has to be set to a passwordless mysql server, the command to be issued is:
linux:~# /usr/bin/mysqladmin -u root password PASSWORD_STRING
Changing the MySQL password is also possible with mysql cli, after connecting to the sql server, though this method is a bit more time consuming. Here is how to do it from mysql console:
linux:~# mysql -u root -p

Server version: 5.1.49-3 (Debian)
Copyright (c) 2000, 2010, Oracle and/or its affiliates. All rights reserved.
This software comes with ABSOLUTELY NO WARRANTY. This is free software,
and you are welcome to modify and redistribute it under the GPL v2 license
Type ‘help;’ or ‘h’ for help. Type ‘c’ to clear the current input statement.
mysql> use mysql;
mysql> update user set password=PASSWORD(“NEW_PASSWORD”) where User=’root’;mysql> flush privileges;
Of course it’s possible to do change the root pass via phpmyadmin
Cheers 😉
Tags: Cheers, cli, command, consuming, Copyright, course, free software, gpl v2, help, input statement, licenseType, Linux, mysqladmin, Old, oracle, password, password string, phpmyadmin, Privileges, pwd, root, root password, server root, servers, software, sql server, string password, time, time consuming, type, use, usr, usr bin, version, warranty
Posted in Linux, MySQL, System Administration | No Comments »
Saturday, May 12th, 2012 After migrating databases data from FreeBSD MySQL 5.0.83 server to a Debian Squeeze Linux MySQL version 5.1.61, below is a mysql –version issued on both the FreeBSD and the Debian servers
freebsd# mysql --version

mysql Ver 14.12 Distrib 5.0.83, for portbld-freebsd7.2 (i386) using 5.2
debian:~# mysql --version

mysql Ver 14.14 Distrib 5.1.61, for debian-linux-gnu (i486) using readline 6.1
The data SQL dump from the FreeBSD server was dumped with following command arguments:
freebsd# mysqldump --opt --allow-keywords --add-drop-table --all-databases -u root -p > complete_db_dump.sql
Then I used sftp to transfer complete_db_dump.sql dump to the a brand new installed latest Debian Squeeze 6.0.2. The Debian server was installed using a "clean Debian install" without graphical environment with CD downloaded from debian.org's site.
On the Debian machine I imported the dump with command:
debian:~# mysq -u root -p < complete_db_dump.sql
Right After the dump was imported I re-started SQL server which was previously installed with:
debian:~# apt-get install mysql-server
The error I got after restarting the mysql server:
debian:~# #/etc/init.d/mysql restart
was:
 ERROR 1577 (HY000) at line 1: Cannot proceed because system tables used by Event Scheduler were found damaged at server start

ERROR 1547 (HY000) at line 1: Column count of mysql.proc is wrong. Expected 20, found 16. The table is probably corrupted
This error cost me a lot of nerves and searching in google to solve. It took me like half an hour of serious googling ,until I finally found the FIX!!!:
 debian:~# mysql_upgrade -u root -h localhost -p --verbose --force

Enter password:

Looking for 'mysql' as: mysql

Looking for 'mysqlcheck' as: mysqlcheck

Running 'mysqlcheck' with connection arguments: '--port=3306' '--socket=/var/run/mysqld/mysqld.sock' '--host=localhost'

Running 'mysqlcheck' with connection arguments: '--port=3306' '--socket=/var/run/mysqld/mysqld.sock' '--host=localhost'

bible.holy_bible OK

bible.holybible OK

bible.quotes_meta OK
Afterwards finally I had to restart the mysql server once again in order to finally get rid of the shitty:
ERROR 1547 (HY000) at line 1: Column count of mysql.proc is wrong. Expected 20, found 16. The table is probably corrupted error!
 debian:~# /etc/init.d/mysql restart

Stopping MySQL database server: mysqld.

Starting MySQL database server: mysqld.

Checking for corrupt, not cleanly closed and upgrade needing tables..
This solved the insane Column count of mysql.proc is wrong. Expected 20, found 16 once and for all!
Before I came with this fix I tried all kind of forum suggested fixes like:
 debian:~# mysql_upgrade -u root -p

Looking for 'mysql' as: mysql

Looking for 'mysqlcheck' as: mysqlcheck

This installation of MySQL is already upgraded to 5.1.61, use --force if you still need to run mysql_upgrade
 debian:~# mysql_upgrade -p

Looking for 'mysql' as: mysql

Looking for 'mysqlcheck' as: mysqlcheck

This installation of MySQL is already upgraded to 5.1.61, use --force if you still need to run mysql_upgrade
And few more, none of them worked the only one that worked was:
debian:~# #mysql_upgrade -u root -h localhost -p --verbose --force
I have to say big thanks to Mats Lindth wonderful blog post which provided me with the solution.
It seems, since Oracle bought the Community edition of MySQL thinks with this database server are getting more and more messy and backwards incompatible day by day.
Lately, I'm experiencing too much hassles with MySQL version incompitabilities. Maybe I should think for migrating permanently to Postgre …
By the way the ERROR 1547 (HY000) at line 1: Column count of mysql.proc is wrong. is most probably caused of some kind of password hashing incompitability between the password hashing between the BSD and Debian SQL versions, as mysql -u root -p < dump.sql, does override default stored user passwords in the mysql database tables… Such password, hashing issues were common in prior MySQL 4 to MySQL 5 migrations I've done, however since MySQL 5+ is already storing its password strings encrypted with md5 encryption I wonder why on earth this mess happens ….
Tags: Auto, COLUMN, column count, command arguments, connection, cost, count, debian linux, debian server, Draft, event, event scheduler, fix, freebsd server, google, googling, graphical environment, half an hour, host, host localhost, init, installation, line 1, linux gnu, localhost, machine, mysq, mysql server, mysqlcheck, mysqld, nerves, password, port 3306, quot, root, server start, sftp, Socket, SQL, squeeze, system tables, TABLE, verbose
Posted in Everyday Life, MySQL, System Administration, Web and CMS | 2 Comments »
Wednesday, April 4th, 2012 
Some long time ago, I've created one user called newuser, on my home FreeBSD router and added him to be a member of wheel group.I've completely forgot about the users existing, just until yesterday when I saw the user still hanging around in my wheel group.For those unfamiliar with the wheel group on FreeBSD, wheel is the same like root group on Linux and some other *nices.
Before proceed with the reason fot this post to show the proper way of adding and removing user to a group on BSD, I will first explain a bit few things concerning BSD password files, where they are and why are they so many 🙂
On the first glimpse, people unfamiliar with BSD will be shocked / (confused) to find out there are 5 files, which has something to do to password authentication.
1. Some short explanation on /etc/passwd /etc/master.passwd, /etc/pwd.db, /etc/spwd.db, /etc/group and login.conf.db BSD auth and login filesFreeBSD and rest of the BSD family has 5 files which deal with username and password authentication, group ids, default shell configs etc.:
The 5 ones are:
- /etc/passwd
- /etc/master.passwd
- /etc/group
- /etc/pwd.db
- /etc/spwd.db
/etc/passwd is readable by all the users on the system whether /etc/master.passwd is only readable by root and toor administrative users. In that numbers members to wheel group have access for reading to all of the five.
Just like on Linux /etc/passwd contains all kind of system existing users … everything except the stored user passwords strings.
/etc/master.passwd is actually the BSD equivalent of Linux's /etc/shadow file. It stores md5 encrypted user passwords (by default) in a form of encrypted hashes. For tightened security one can, however choose to use a blowfish password hash encryption instead.
Since my newuser was a member to group, the user had read access to my /etc/master.passwd and hence this was a potential potential security hole on my system.
To close the whole I decided to remove newuser's membership to wheel group.
Before I say how I actually did it. I will sawy few more words on BSD systems authentication files structure.
The file /etc/master.passwd is actually the BSD equivalent of Linux's /etc/shadow.
Besides /etc/password and /etc/master.passwd, on BSD there are also two other separate binary database files storing authentication user credentials:
freebsd# ls -l /etc/pwd.db /etc/spwd.db

-rw-r--r-- 1 root wheel 90112 Mar 13 23:56 /etc/pwd.db

-rw------- 1 root wheel 90112 Mar 13 23:56 /etc/spwd.db
In case if you're wondering what are this two *pwd.db files for:
/etc/pwd.db contains in database format /etc/passwd content
/etc/spwd.db contains in database format /etc/master.password
, spwd.db stands for (shadow) pwd.db.
Near the end of the man page for pwd_mkdb, pwd.db is described as "insecure password database file and spwd.db as secure password database file.
The exact database type can be displayed with file command which is alawys helpful in (determining a file types).
I use file almost daily to check the (MIME) type of most of the "weird" file type extensions I have on my system. If not yet familiar with file cmd, be sure to try it on few various file extensions and see how it works.
freebsd# file /etc/pwd.db

/etc/pwd.db: Berkeley DB 1.85 (Hash, version 2, native byte-order)

freebsd# file /etc/spwd.db

/etc/spwd.db: Berkeley DB 1.85 (Hash, version 2, native byte-order)
You see, files are stored in format of Berkley DB Hash version 2.
The two files got updated every time with command pwd_mkdb whether a change in /etc/master.passwd occurs through use of lets say pw or vipw.
Btw, one common way to initiate changes to /etc/master.passwd (lets say modify a user shell) is possible through vipw command.
vipw is a wrapper command that launch instance of vi editor over /etc/master.passwd, once changes are saved in the file, pwd_mkdb is run to regenerate the /etc/pwd.db and /etc/spwd.db. With this in mind vipw on BSD is the equivalent of manually editting /etc/shadow with vi /etc/shadow on G / Linux.
Whether talking about user credentials and /etc/pwd.db and /etc/spwd.db, its worthy to mention there is one more db file – /etc/login.conf.db. /etc/login.conf.db is red everytime a user logs in the system. It is is generated from the plain text /etc/login.conf. Just in case if wondering why this .db files are used on FreeBSD at all, the reason is efficiency.
Reading binary database (structured data) as we all know is way faster than plain text file look ups
The performance advantage of the BSD's use of .db stored credentials is not so-"visible" in normal BSD systems with less than lets say 100 users.
Anyways on systems with few thousands of users that login and logout frequently the speed difference will surely be clear.
Manual generation of /etc/pwd.db and /etc/spwd.db or /etc/login.conf.db is possible via pwd_mkdb and cap_mkdb commands.
After explaining shortly the basic auth files, I'll proceed with my specific case and will explain how I removed my newuser from membership in wheel group.
2. "BSD way" to remove or add existing user to member a group
The record for my user newuser in /etc/group, looked like so:
freebsd# grep -i newuser /etc/groupwheel:*:0:root,hipo,newuser
I was curious if /etc/group was possible to manually edit like on Linux with vi or mcedit.I thought this might be a problem since I thought the /etc/group info might be stored somewhere along in /etc/pwd.db or /etc/spwd.db. My hypothesis, however was wrong.
Straight use of vim /etc/group and deletion of the newuser record was enough to remove the user from wheel.
Anyways this is not a standard way and especially if it has to be scripted it is unnecessery hassel, hence below is the 'BSD way' via pw:
freebsd# pw groupmod wheel -d newuser
There is no output returned, therefore the command executed succesfully.
pw can be used for plenty of user management operations. Lets say I want to add back the newuser to be a member of wheel some time in the future, I could use:
freebsd# pw groupmod wheel -m newuser
To later check if newuser is succesfully removed from /etc/group:
freebsd# grep -i wheel /etc/group

wheel:*:0:root,hipo
Generally it is better, to stick to one way to do everything related to user and group management with pw and use it to show group permissions for wheel instead:
freebsd# pw group show wheel

wheel:*:0:root,hipo
Tags: administrative users, authentication, Auto, blowfish, bsd family, default shell, Draft, everything, existing users, family, file, first glimpse, form, fot, group ids, hash, hashes, Linux, login, long time, Mar, newuser, nices, password, password files, passwords, reading, reason, root, root group, router, security hole, shadow, Shell, something, text, time, toor, type, username, wheel, wheel group
Posted in Computer Security, FreeBSD, System Administration | No Comments »
Monday, April 2nd, 2012 I've hit an interesting article explaining how to check unread gmail email messages in Linux terminal. The original article is here
Being able to read your latest gmail emails in terminal/console is great thing, especially for console geeks like me.
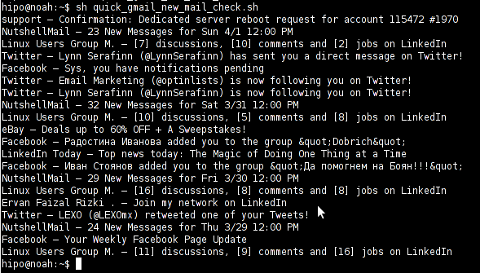
Here is the one liner script:
curl -u GMAIL-USERNAME@gmail.com:SECRET-PASSWORD \

--silent "https://mail.google.com/mail/feed/atom" | tr -d '\n' \

| awk -F '' '{for (i=2; i<=NF; i++) {print $i}}' \

| sed -n "s/
Linux Users Group M. – [7] discussions, [10] comments and [2] jobs on LinkedIn

Twitter – Lynn Serafinn (@LynnSerafinn) has sent you a direct message on Twitter!

Facebook – Sys, you have notifications pending

Twitter – Email Marketing (@optinlists) is now following you on Twitter!

Twitter – Lynn Serafinn (@LynnSerafinn) is now following you on Twitter!

NutshellMail – 32 New Messages for Sat 3/31 12:00 PM

Linux Users Group M. – [10] discussions, [5] comments and [8] jobs on LinkedIn

eBay – Deals up to 60% OFF + A Sweepstakes!

LinkedIn Today – Top news today: The Magic of Doing One Thing at a Time

NutshellMail – 29 New Messages for Fri 3/30 12:00 PM

Linux Users Group M. – [16] discussions, [8] comments and [8] jobs on LinkedIn

Ervan Faizal Rizki . – Join my network on LinkedIn

Twitter – LEXO (@LEXOmx) retweeted one of your Tweets!

NutshellMail – 24 New Messages for Thu 3/29 12:00 PM

Facebook – Your Weekly Facebook Page Update

Linux Users Group M. – [11] discussions, [9] comments and [16] jobs on LinkedIn
As you see this one liner uses curl to fetch the information from mail.google.com's atom feed and then uses awk and sed to parse the returned content and make it suitable for display.
If you want to use the script every now and then on a Linux server or your Linux desktop you can download the above code in a script file -quick_gmail_new_mail_check.sh here
Here is a screenshot of script's returned output:
A good use of a modified version of the script is in conjunction with a 15 minutes cron job to launch for new gmail mails and launch your favourite desktop mail client.
This method is useful if you don't want a constant hanging Thunderbird or Evolution, pop3 / imap client on your system to just take up memory or dangle down the window list.
I've done a little modification to the script to simply, launch a predefined email reader program, if gmail atom feed returns new unread mails are available, check or download my check_gmail_unread_mail.sh here
Bear in mind, on occasions of errors with incorrect username or password, the script will not return any errors. The script is missing a properer error handling.Therefore, before you use the script make sure:
gmail_username='YOUR-USERNAME';

gmail_password='YOUR-PASSWORD';
are 100% correct.
To launch the script on 15 minutes cronjob, put it somewhere and place a cron in (non-root) user:
# crontab -u root -e

...

*/15 * * * * /path/to/check_gmail_unread_mail.sh
Once you read your new emails in lets say Thunderbird, close it and on the next delivered unread gmail mails, your mail client will pop up by itself again. Once the mail client is closed the script execution will be terminated.
Consised that if you get too frequently gmail emails, using the script might be annoying as every 15 minutes your mail client will be re-opened.
If you use any of the shell scripts, make sure there are well secured (make it owned only by you). The gmail username and pass are in plain text, so someone can steal your password, very easily. For a one user Linux desktops systems as my case, security is not such a big concern, putting my user only readable script permissions (e.g. chmod 0700)is enough.
Tags: article, atom, Auto, awk, client, com, cron, Desktop, download, Draft, ebay, email, email marketing, email messages, facebook, Fri, geeks, Gmail, GMAIL-USERNAME, GNU, gnu linux, google, Group, https mail, liner, LinkedIn, Linux, linux server, linux users group, mail, marketing, news today, OFF, original article, password, quot, rizki, sat 3, script, SECRET-PASSWORD, terminal, thing, top news, twitter, username, Users, Weekly
Posted in Linux, System Administration, Various | 2 Comments »


